


Latest & Greatest
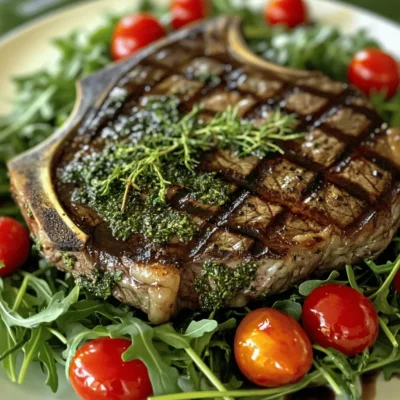
Tuscan Grilled Rib Eye Steak Savory Delightful Meal
Are you ready to treat yourself to a Tuscan Grilled Rib Eye Steak? This flavorful dish combines juicy rib eye
Read more…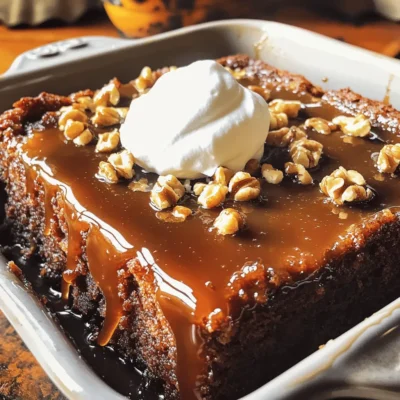
Sticky Toffee Pudding Decadent and Easy Dessert Delight
Sticky toffee pudding is the ultimate sweet treat that brings joy to any meal. It’s rich, moist, and incredibly simple
Read more…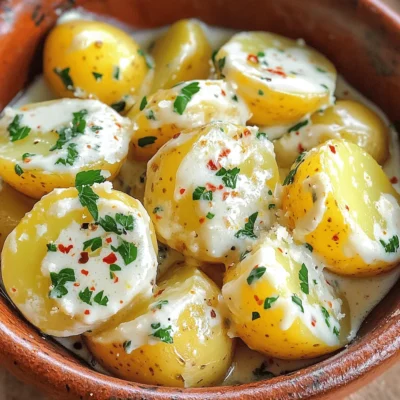
Creamy Garlic Sauce Potatoes Easy and Flavorful Dish
Are you ready to take your potato game to the next level? My creamy garlic sauce potatoes are an easy
Read more…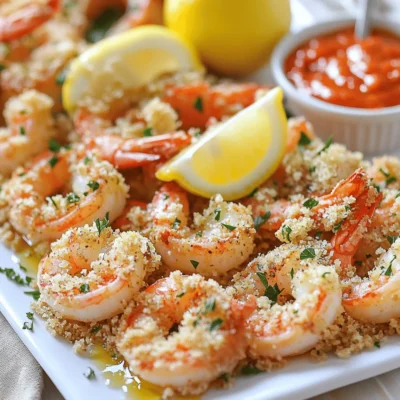
Oven Baked Crispy Garlic Shrimp Simple and Tasty Meal
Looking for a quick and tasty meal? Oven Baked Crispy Garlic Shrimp is your answer! This dish is simple to
Read more…
Slow Cooker Birria Tacos Flavorful and Simple Recipe
If you crave rich, savory flavors in your meals, then Slow Cooker Birria Tacos are a must-try. This dish packs
Read more…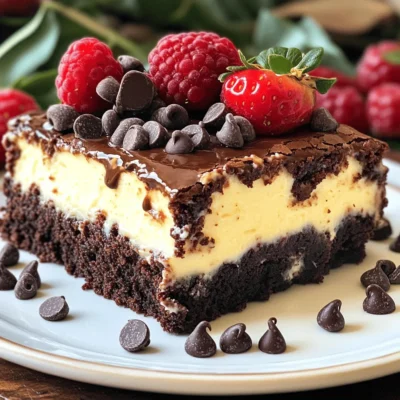
Brownie Cheesecake Delight Easy and Tasty Treat
Chocolate lovers, get ready for a treat! Today, I’m sharing my easy and tasty Brownie Cheesecake recipe that combines rich,
Read more…
Garlic Parmesan Cheeseburger Bombs Flavorful Delight
Love burgers but want something fun? Try my Garlic Parmesan Cheeseburger Bombs! These tasty treats pack all the flavor of
Read more…
Savory Steak-Stuffed French Bread Delight Recipe
If you love steak and bread, you’re in for a treat. This Savory Steak-Stuffed French Bread Delight recipe will wow
Read more…browse recipes


Cheesy Garlic Bread Irresistible and Simple Delight
If you’re craving a warm, cheesy treat, look no further! My Cheesy Garlic Bread recipe is not just easy to make; it’s a crowd-pleaser…
My Latest Desserts

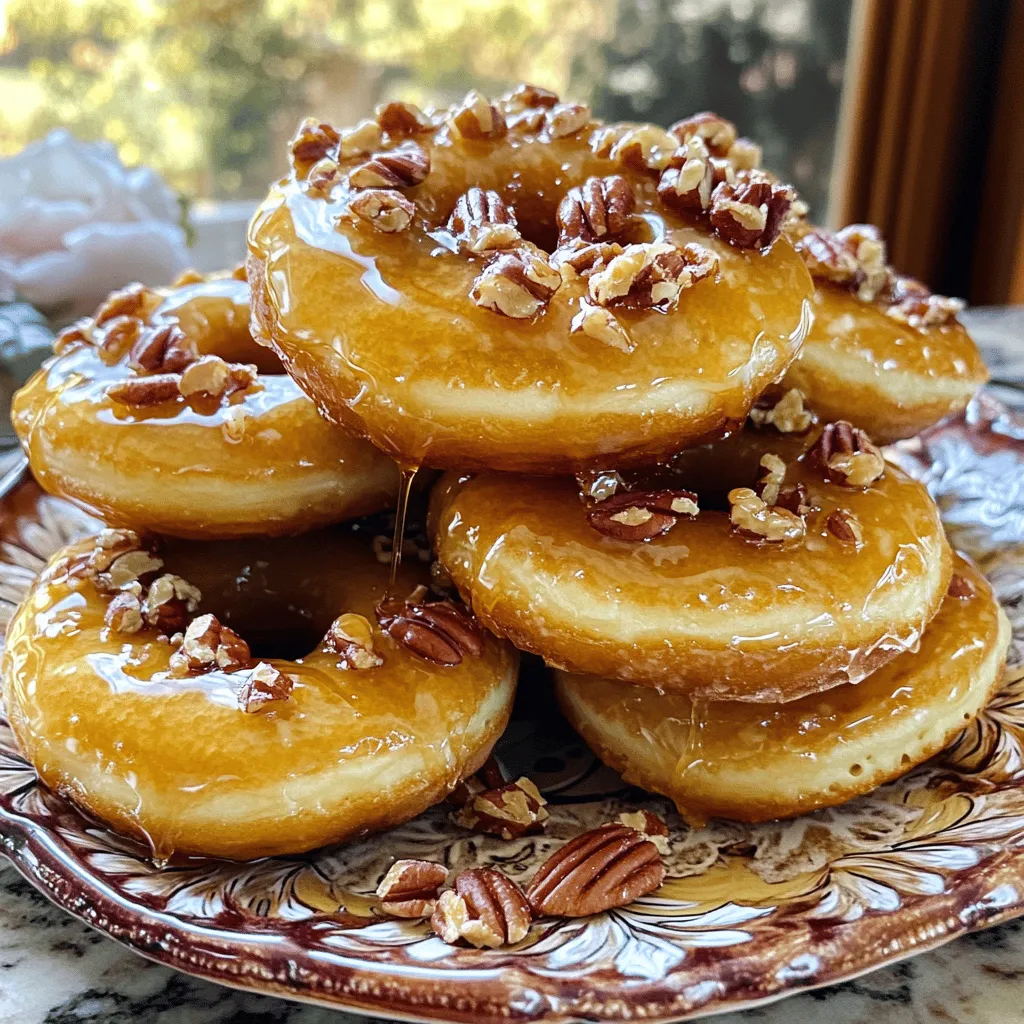
Pancake Donuts with Maple Glaze Simple and Delicious
Do you love pancakes and donuts? With my pancake donuts topped with maple glaze, you can enjoy both! This simple Read Full Recipe-
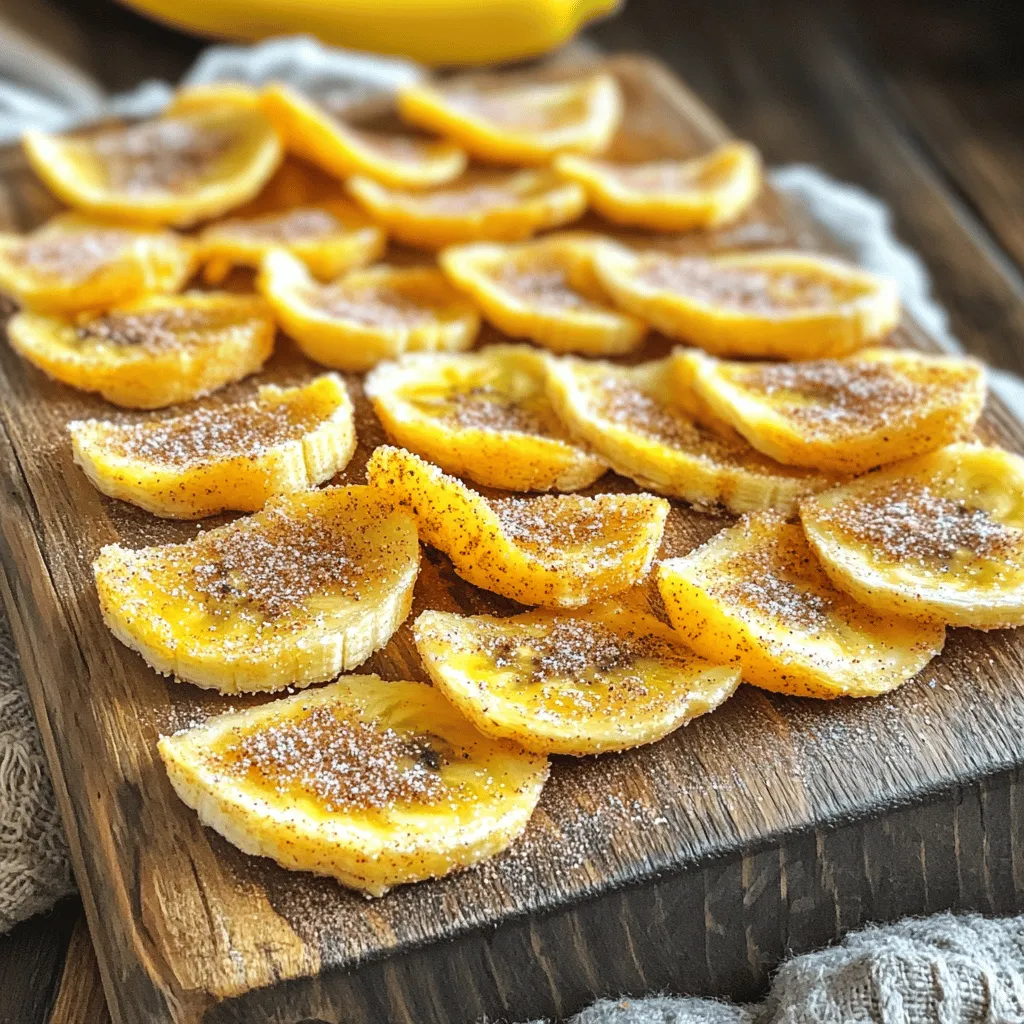
Crispy Cinnamon Sugar Air Fryer Banana Chips Delight
Are you ready for a snack that’s both crunchy and sweet? I’m excited to share my Crispy Cinnamon Sugar Air Read Full Recipe -
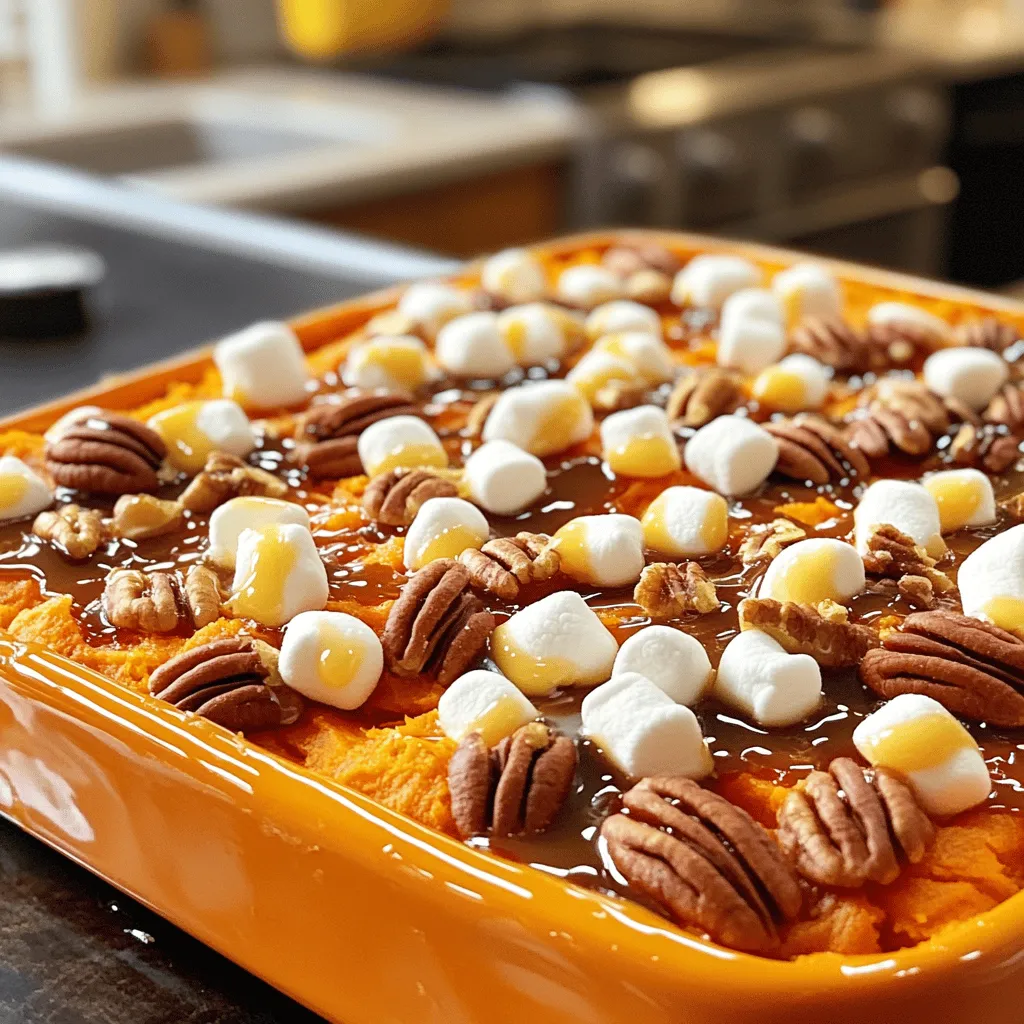
Easy Sweet Potato Casserole Simple and Tasty Recipe
Looking for a sweet, easy dish that steals the show? My Easy Sweet Potato Casserole is just what you need! Read Full Recipe -
Peppermint Chocolate Chip Cookies Festive and Delightful
Get ready to celebrate the season with my Peppermint Chocolate Chip Cookies! These festive treats combine the rich taste of Read Full Recipe -
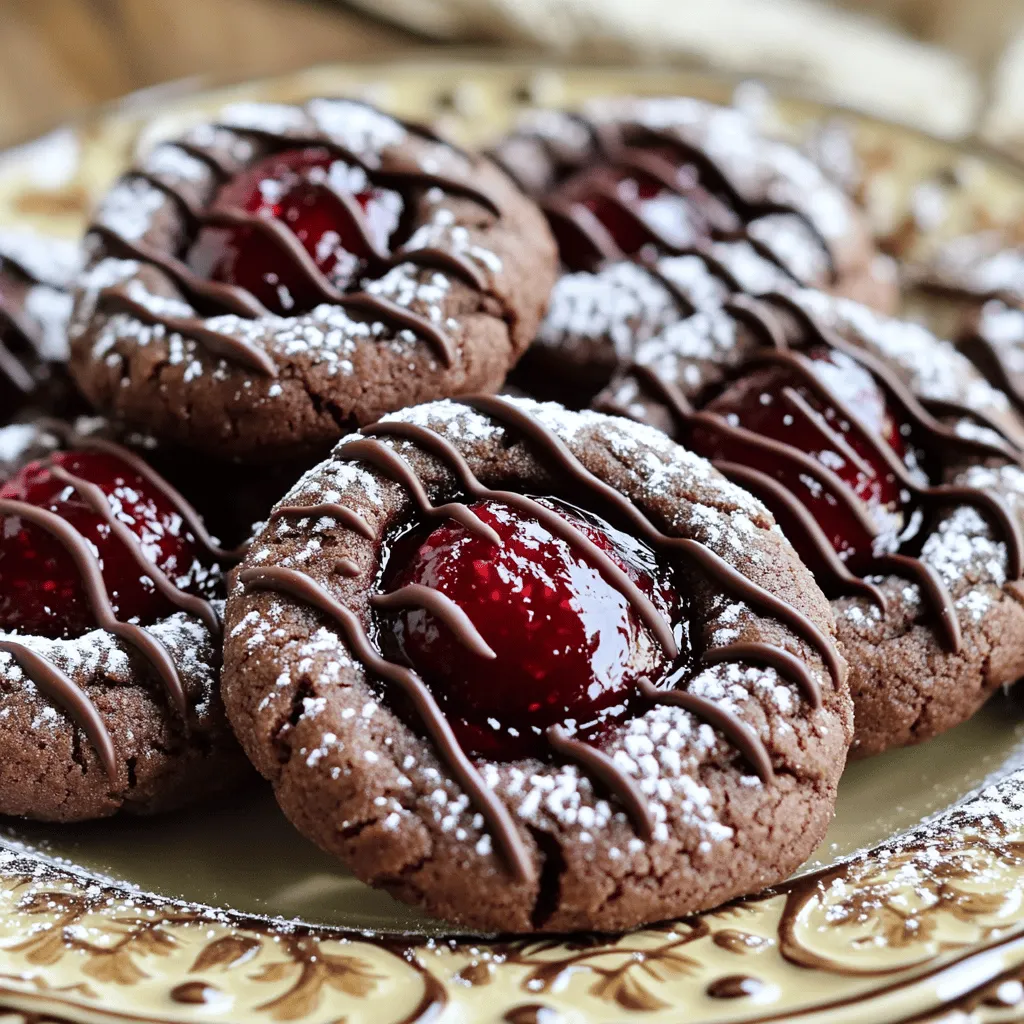
Chocolate Thumbprint Cookies Irresistible Treat Recipe
If you’re craving a sweet treat, you’ll love chocolate thumbprint cookies! These soft, chewy cookies are easy to make and Read Full Recipe -
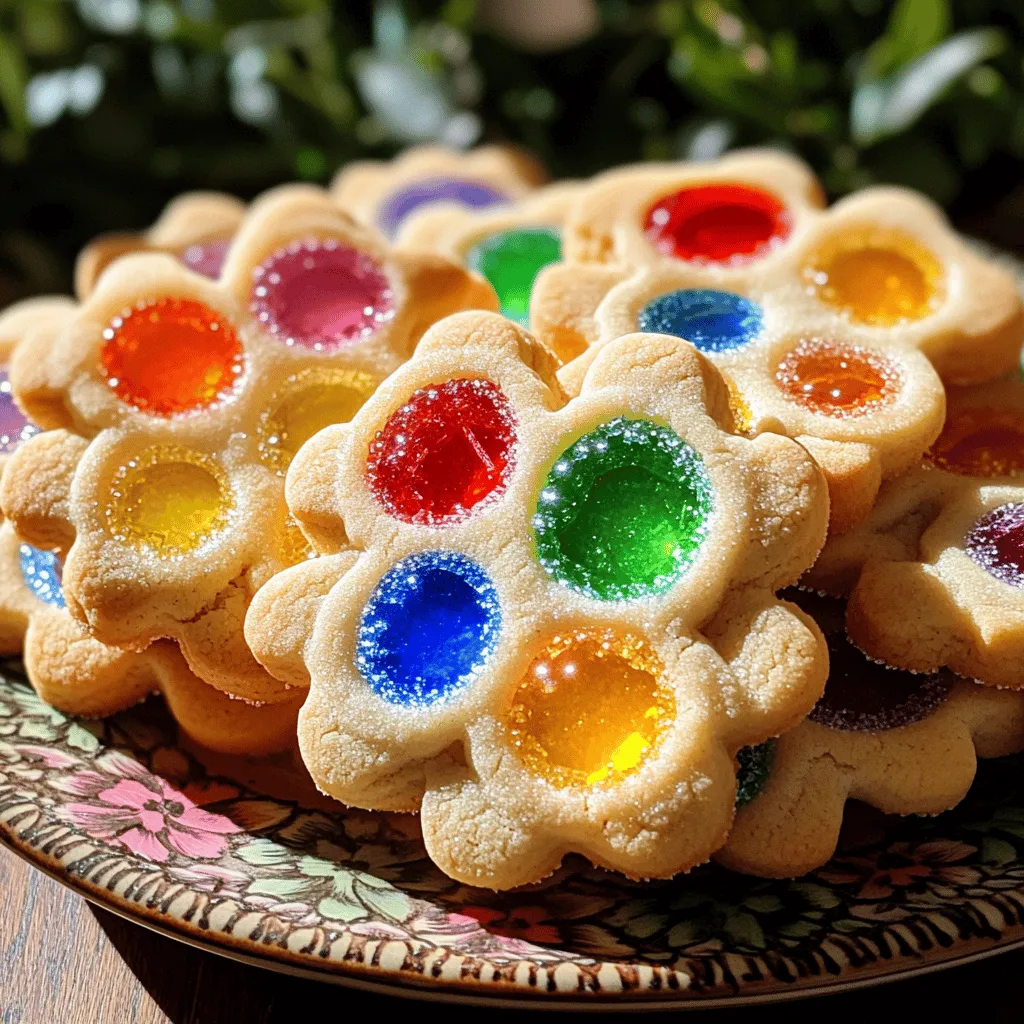
Easy Stained Glass Cookies Simple and Fun Recipe
Get ready to create some beautiful treats with my Easy Stained Glass Cookies! This simple recipe is perfect for kids Read Full Recipe -
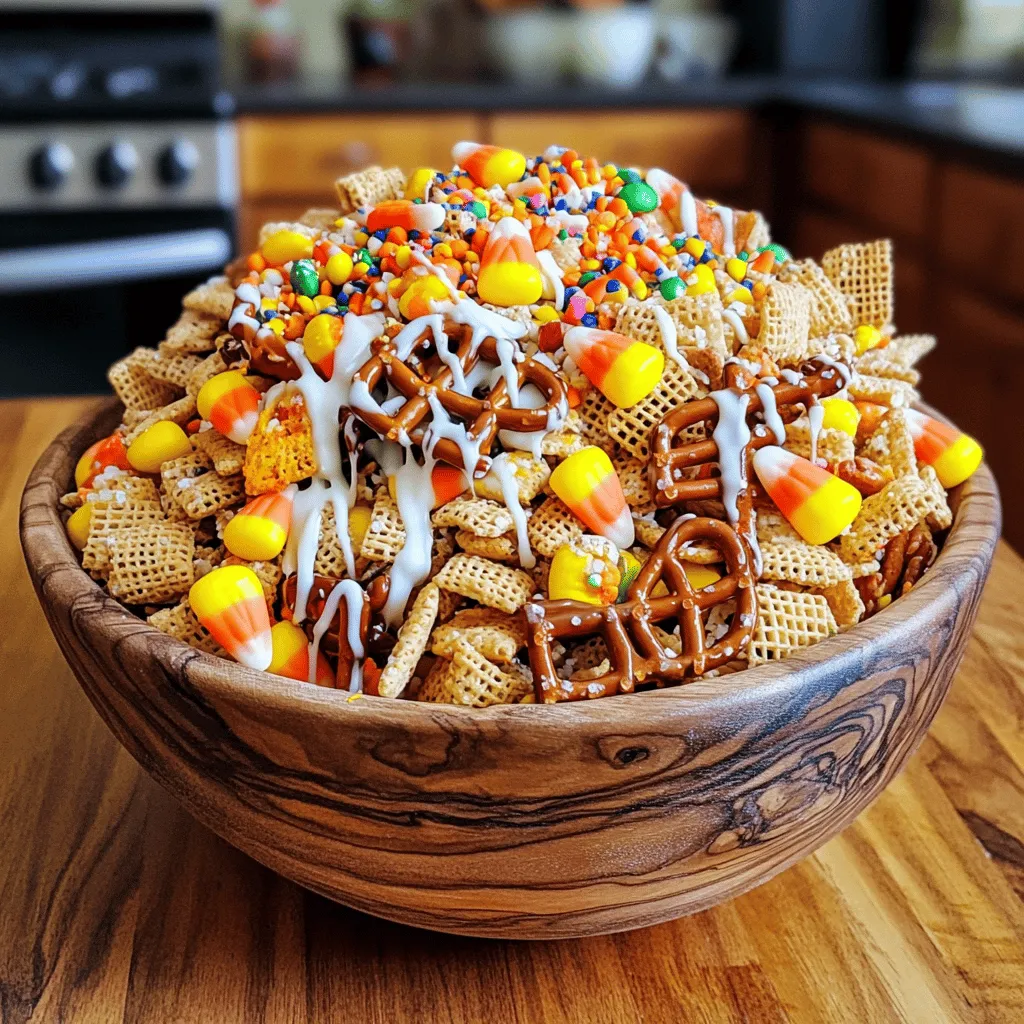
Halloween Chex Mix Fun and Festive Snack Idea
Get ready for a sweet and spooky delight with my Halloween Chex Mix! This fun snack combines crispy Chex cereal, Read Full Recipe -
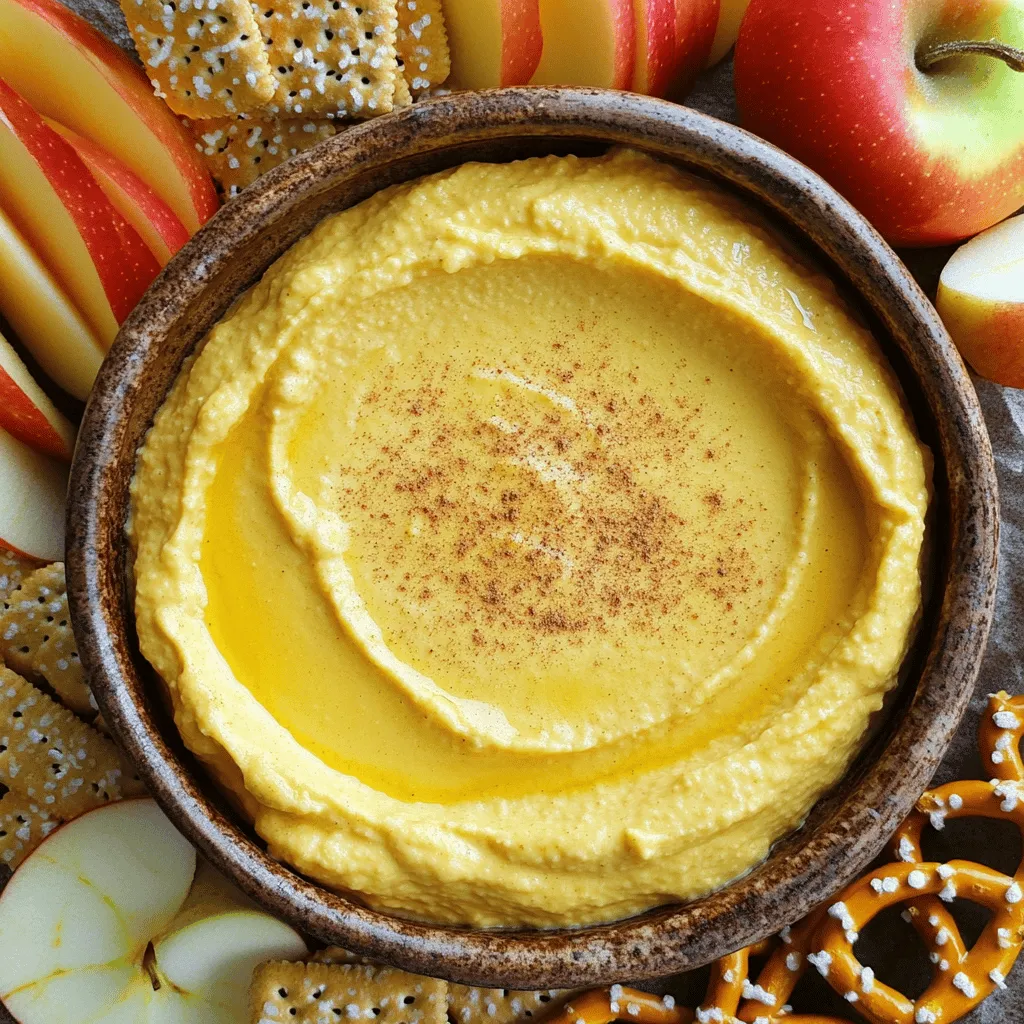
Pumpkin Cheesecake Dip Delightful and Easy Recipe
Fall is here, and nothing screams comfort like my Pumpkin Cheesecake Dip! This delightful treat is easy to make, packed Read Full Recipe -
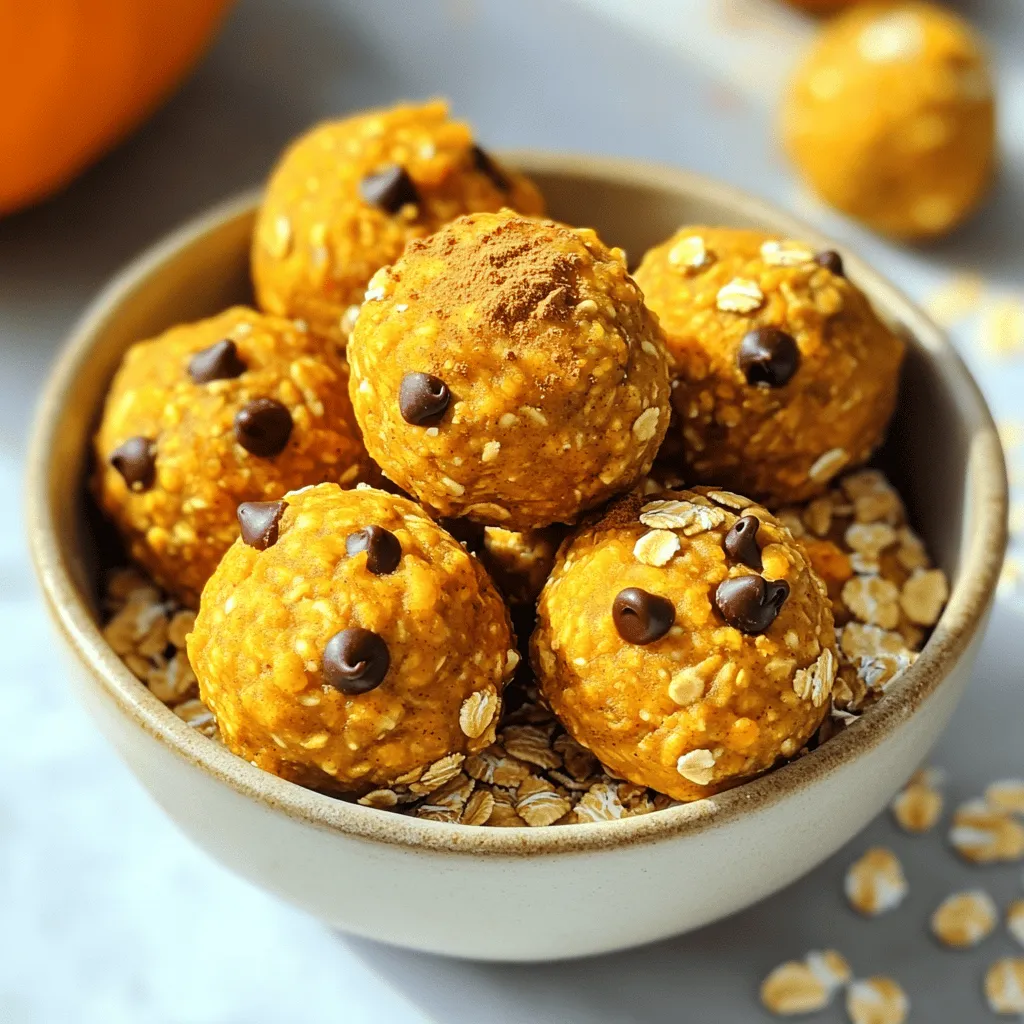
Pumpkin Spice Energy Bites Healthy Power Snack
Looking for a delicious and healthy snack? Pumpkin Spice Energy Bites are the answer! These tasty treats blend fiber-rich oats, Read Full Recipe -
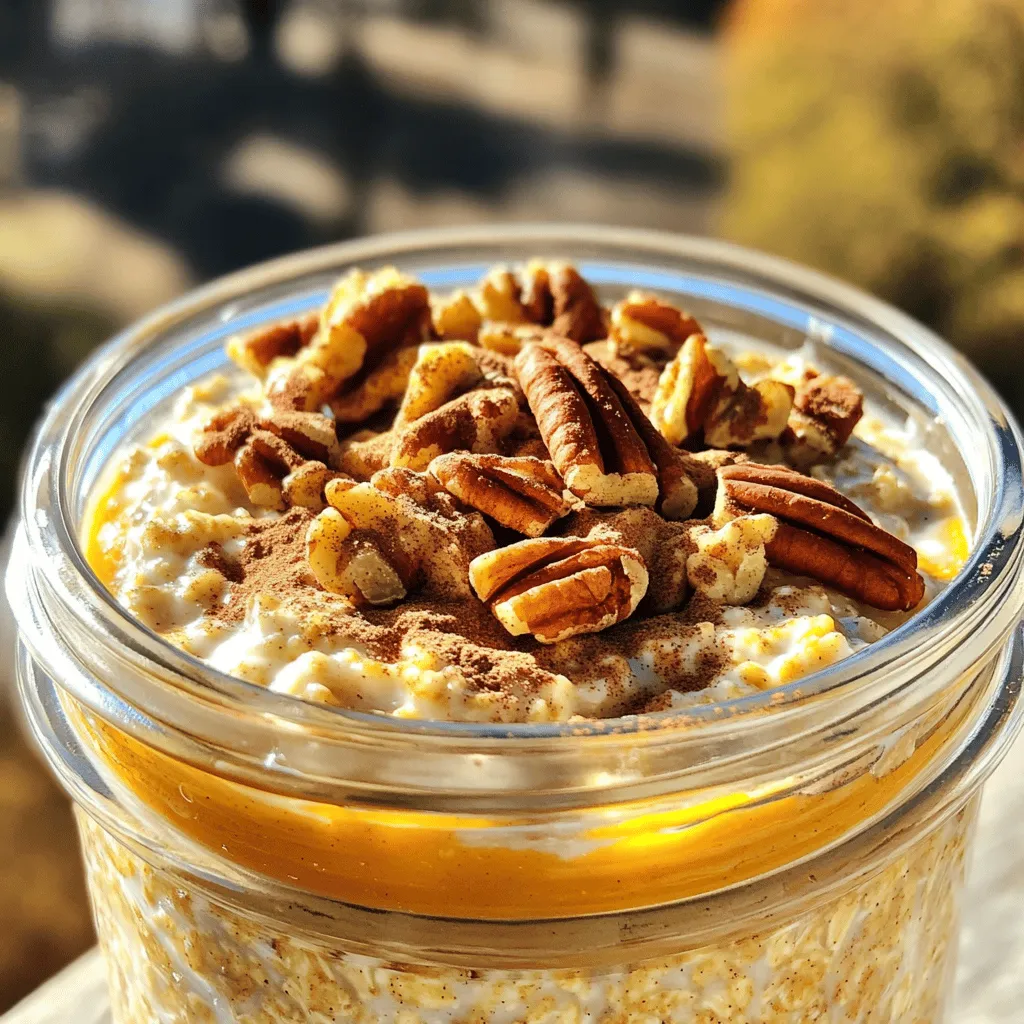
Pumpkin Pie Overnight Oats Flavorful and Nutritious Meal
Looking for a healthy yet tasty breakfast? Pumpkin Pie Overnight Oats combine rich pumpkin flavor with creamy oats. Packed with Read Full Recipe

My Latest Recipes

hey,
i’m !
I’m so happy you’re here!
Food is my passion, and perfecting each dish is my craft. I can’t wait for you to try them let’s dive into this delicious journey side by side.

Blueberry Lemon Cheesecake Smoothie Creamy Delight
Get ready to treat yourself with a delicious Blueberry Lemon Cheesecake Smoothie! This creamy delight is packed with flavor and good-for-you ingredients. You’ll love…
![To make a delicious Blueberry Lemon Cheesecake Smoothie, gather these ingredients: - 1 cup fresh or frozen blueberries - 1 banana, frozen - 1 cup Greek yogurt - 1/2 cup cream cheese, softened - 1 cup almond milk (or any milk of your choice) - 2 tablespoons honey or maple syrup (optional) - Zest of 1 lemon - Juice of 1/2 lemon - 1/4 teaspoon vanilla extract - A pinch of salt Each ingredient plays a key role in creating that creamy delight. The blueberries give a sweet and tangy flavor, while the banana adds natural sweetness and creaminess. Greek yogurt and cream cheese help achieve that cheesecake-like texture, making this smoothie rich and satisfying. Almond milk keeps it light but creamy, and the lemon zest and juice add brightness that balances the flavors perfectly. You can easily customize this smoothie to fit your needs: - Alternative fruits to use: Try strawberries or raspberries for a different taste. Mango can add a tropical twist, too. - Dairy-free options: Use coconut yogurt and plant-based cream cheese for a dairy-free version. Oat or soy milk can replace almond milk. - Sweetener alternatives: Agave syrup or stevia can replace honey or maple syrup. Adjust to your taste, especially if you want it less sweet. By mixing and matching these ingredients, you can create your own version of this tasty smoothie. Don't forget to check out the Full Recipe for all the details! - Step 1: Combine ingredients in the blender Start by adding the blueberries, frozen banana, Greek yogurt, and cream cheese to your blender. This mix gives our smoothie a creamy texture and a rich flavor. - Step 2: Adjust sweetness and flavor Pour in the almond milk. If you like sweeter smoothies, add honey or maple syrup now. Next, add the lemon zest, lemon juice, vanilla extract, and a pinch of salt. These ingredients brighten the taste. - Step 3: Blend until smooth Blend on high speed until the mixture is smooth and creamy. You may need to stop and scrape down the sides of the blender for an even mix. Taste the smoothie. If you want it sweeter or more lemony, add more honey or lemon juice. - How to serve the smoothie Once blended, pour the smoothie into your favorite glasses. You can top each glass with extra blueberries or a sprinkle of lemon zest for a nice touch. This not only makes it look pretty but adds extra flavor too. - Best glasses to use I recommend using tall glasses or mason jars. These styles show off the lovely color of the smoothie and hold a good amount. Plus, they are fun to drink from! Check out the Full Recipe for more details and tips! To get a smooth texture, use a strong blender. This helps blend all the ingredients well. Start blending on low, then move to high speed. Stop to scrape the sides if needed. This ensures everything mixes evenly. If your smoothie is too thick, add more almond milk. Just pour in a little at a time. Blend again until you reach the right thickness. If it’s too thin, add more frozen banana or blueberries. They will help thicken it up without changing the flavor too much. You can add more fun flavors to your smoothie. Try mixing in some spinach for a green boost. It adds nutrients without changing the taste much. You could also use raspberries or strawberries instead of blueberries. Each fruit brings its own twist. When it comes to toppings, I love using a sprinkle of lemon zest. It adds a nice pop of flavor. Fresh blueberries on top look great and taste even better. You could also add a dollop of whipped cream for a creamy finish. For a crunch, consider crushed graham crackers. They give you that cheesecake feel. Try these tips to make your Blueberry Lemon Cheesecake Smoothie even more delightful! For the complete recipe, check out the [Full Recipe]. {{image_2}} You can make your Blueberry Lemon Cheesecake Smoothie even more fun! One great way is to add spinach. This gives your smoothie a bright green color and boosts the nutrients. Don't worry; the taste stays yummy because blueberries mask the spinach flavor well. You can also swap out blueberries for other berries. Raspberries, strawberries, or blackberries all work great. Each berry brings its unique flavor. Mix and match for a fun berry medley. If you want to make your smoothie lower in calories, you can change a few ingredients. Use low-fat cream cheese instead of regular. You can also use a sugar-free sweetener instead of honey or maple syrup. This way, you still get a tasty treat without the extra calories. For a high-protein version, try adding a scoop of protein powder to the mix. You can also use Greek yogurt with added protein. This change makes the smoothie great for breakfast or a post-workout snack. For the full recipe, check the earlier section. To keep your Blueberry Lemon Cheesecake Smoothie fresh, store any leftovers in an airtight container. This helps prevent oxidation and keeps the flavor intact. Place the container in the fridge and use it within two days for the best taste. If you want to prepare ahead, consider freezing the smoothie. Pour it into freezer-safe bags or containers. Leave some space at the top for expansion. When you're ready to enjoy it, let it thaw in the fridge overnight. You can also blend it again for a smooth texture. In the fridge, this smoothie lasts about 2 days. After that, the flavor and texture may change. If you freeze it, you can keep it for up to 3 months. Just remember to check for any off smells when you thaw it. Always trust your senses! Can I use frozen blueberries instead of fresh? Yes, you can use frozen blueberries. They work well and make the smoothie cold. Frozen fruit often blends better and gives a thicker texture. If you use frozen blueberries, there is no need for ice. Is this smoothie suitable for meal replacement? Yes, this smoothie can serve as a meal replacement. It has protein from Greek yogurt and cream cheese. Plus, the fruit provides vitamins and fiber. Just add a bit more protein or healthy fat if you want it to be more filling. Can I make it vegan? Yes, you can make this smoothie vegan. Use plant-based yogurt and cream cheese instead of dairy. Almond milk or coconut milk works great as milk options. Replace honey with maple syrup or agave for sweetening. What to do if it's too thick or too thin? If your smoothie is too thick, add more almond milk. Blend again until you reach the right consistency. If it’s too thin, add more frozen fruit or a bit of yogurt. This helps thicken it up. How to boost nutrition in a smoothie? You can boost nutrition easily. Add a handful of spinach for extra vitamins. Chia seeds or flaxseeds add fiber and omega-3s. You can also mix in protein powder for a protein boost. These additions keep your smoothie tasty and healthy. You can find the full recipe [here](#). This blog post covered a tasty smoothie recipe and tips for making it perfect. We discussed ingredients, substitutes, and step-by-step instructions for blending. You learned how to adjust flavors and consistency. We also explored storage tips and answered common questions. Smoothies are simple, healthy, and customizable. You can mix and match to fit your taste. Try new ingredients to keep things exciting. Enjoy your smoothie journey and make it your own!](https://mysavedrecipe.com/wp-content/uploads/2025/06/13418d7e-7ad5-46a5-8f6f-9341929ea62b.webp)
