


Latest & Greatest
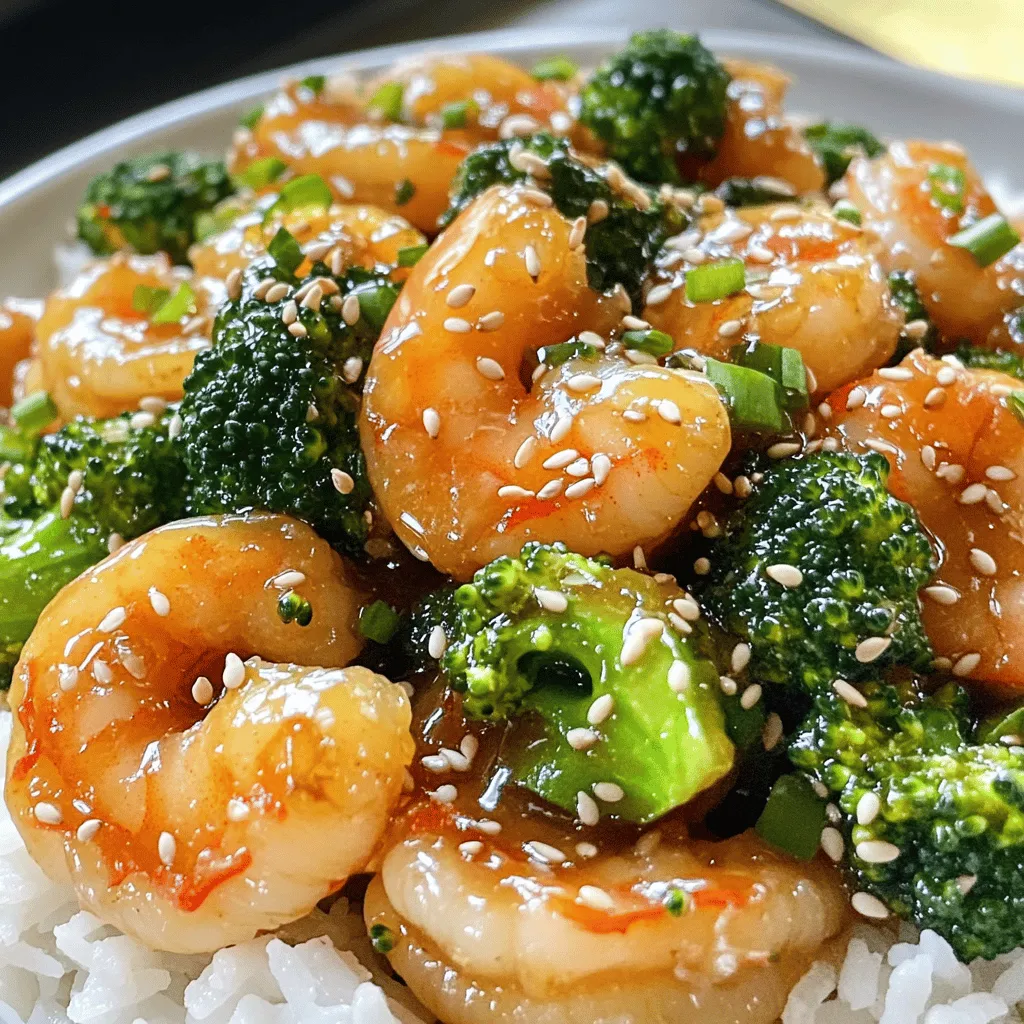
Honey Garlic Shrimp and Broccoli Quick Flavor Explosion
If you’re craving a quick meal that bursts with flavor, look no further than Honey Garlic Shrimp and Broccoli. This
Read more…
No-Bake Chocolate Eclair Cake Delicious and Easy Dessert
Craving a sweet treat that’s both easy and delicious? Look no further than this No-Bake Chocolate Eclair Cake! With layers
Read more…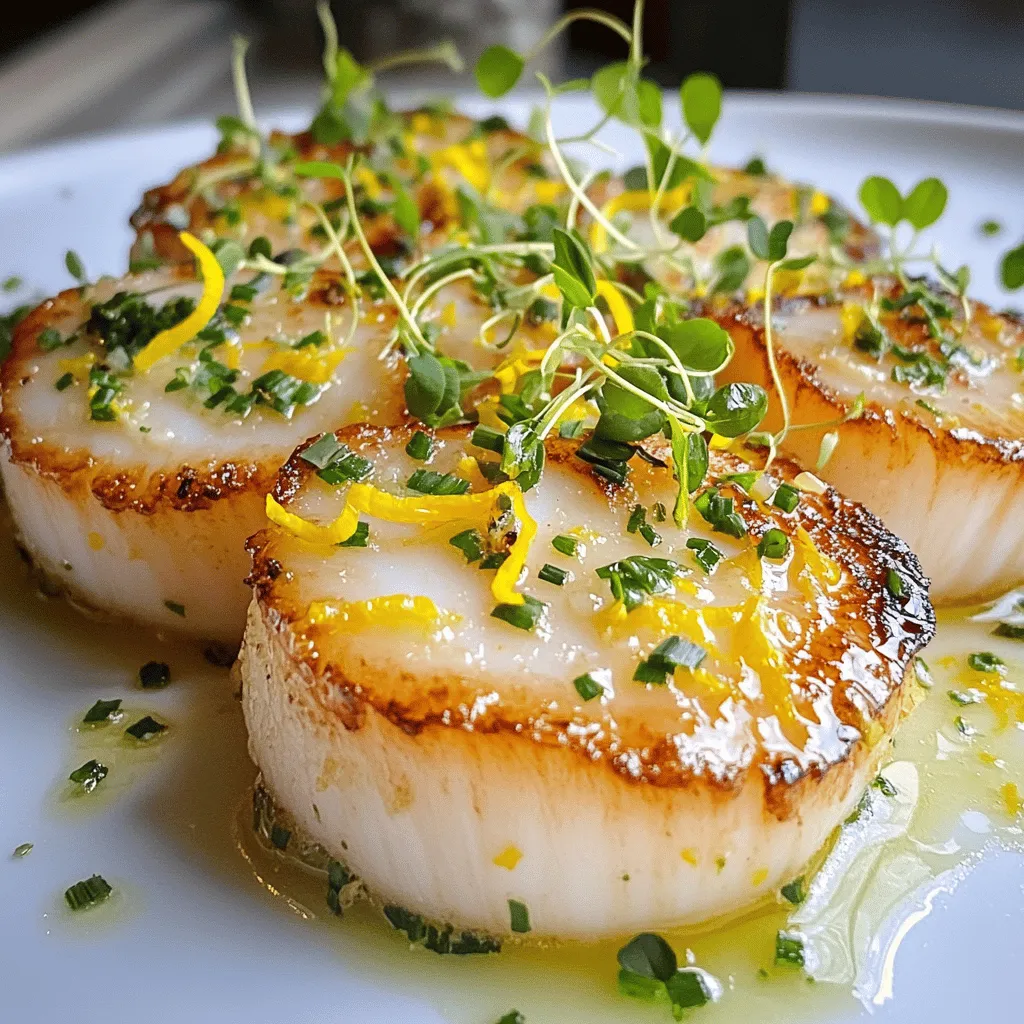
Gordon Ramsay’s Pan-Seared Scallops Delicious Recipe
Ready to impress your friends with a stunning dish? Gordon Ramsay’s Pan-Seared Scallops are simple yet elegant. They combine fresh
Read more…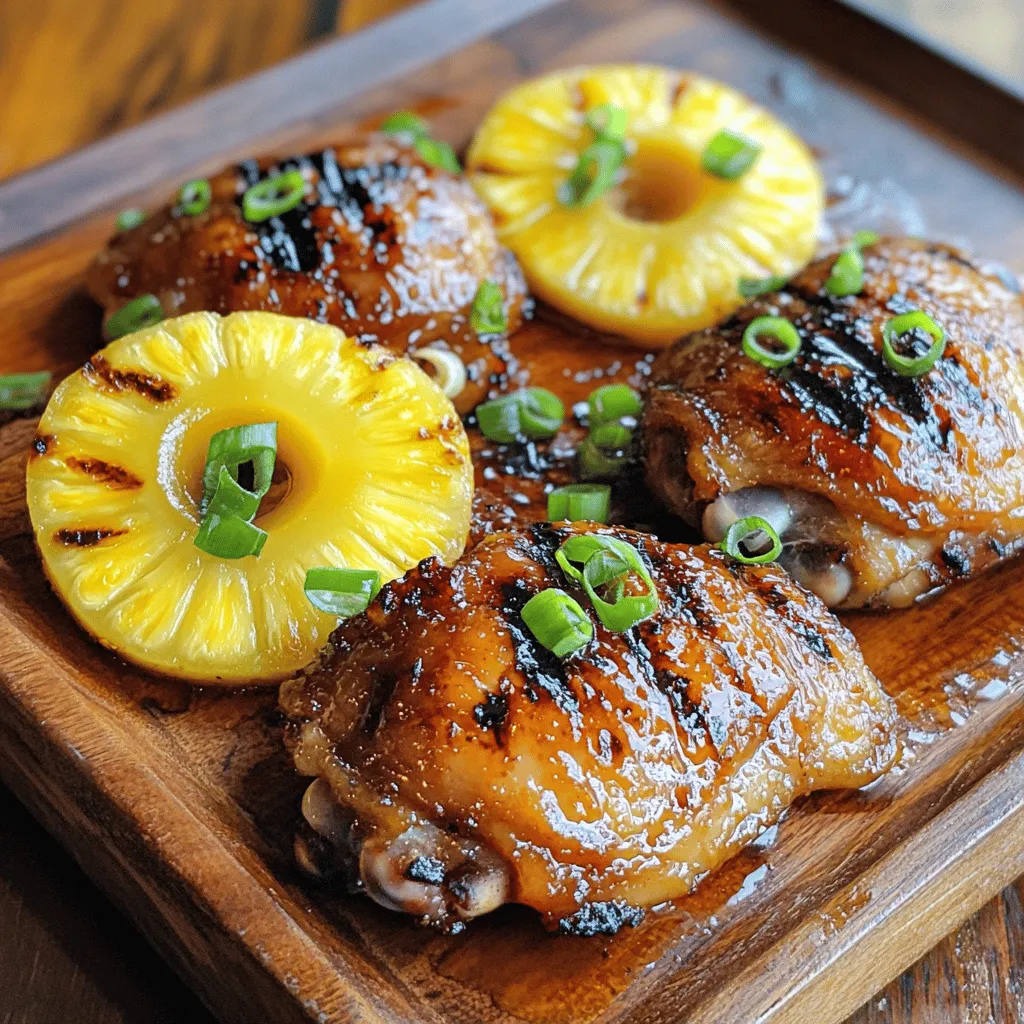
Huli Huli Chicken Delight Fresh and Flavorful Recipe
Ready to take your taste buds on a tropical trip? Huli Huli Chicken, a true Hawaiian delight, is bursting with
Read more…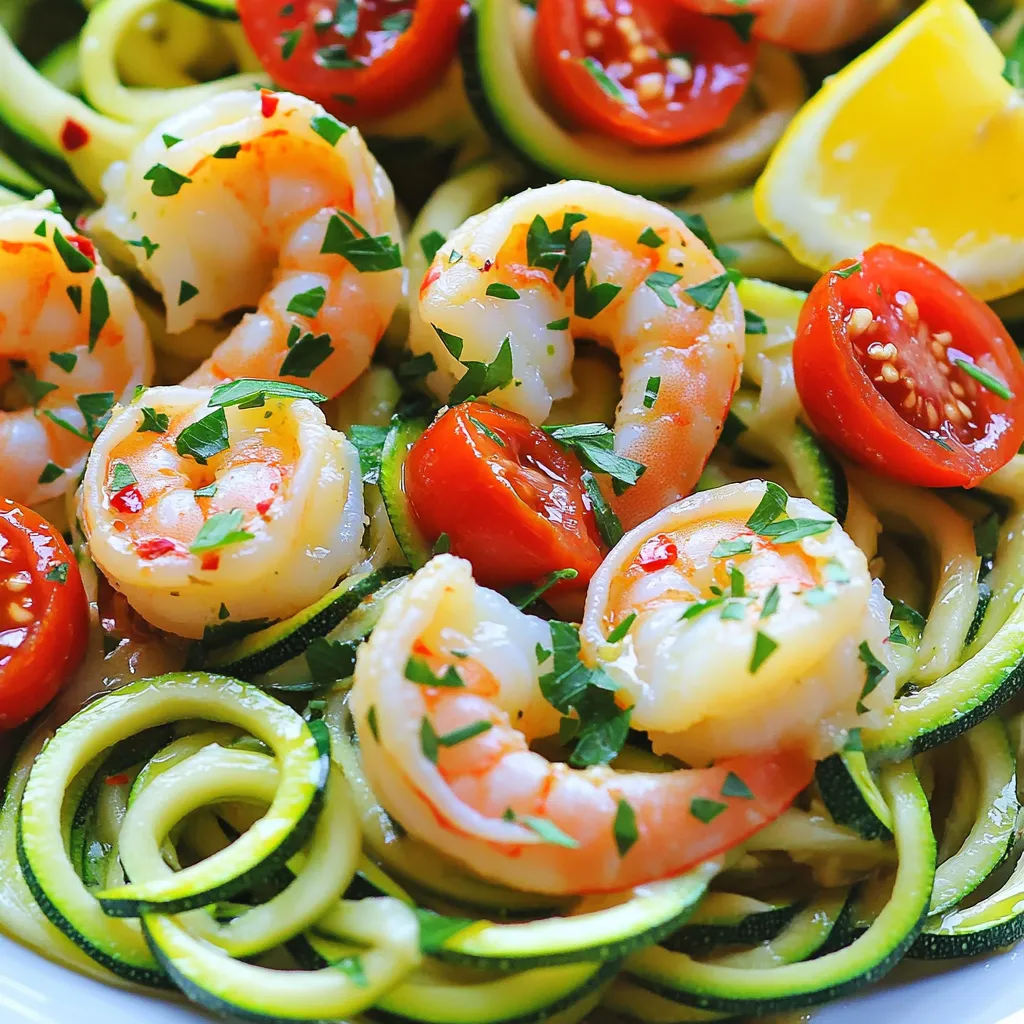
Skinny Shrimp Scampi with Zucchini Noodles Delight
Looking to enjoy a light yet flavorful meal? My Skinny Shrimp Scampi with Zucchini Noodles is the perfect dish for
Read more…
Grilled Chicken Bites with Garlic Sauce Delightful Recipe
Get ready to impress your taste buds with my Grilled Chicken Bites with Garlic Sauce! This mouthwatering recipe packs big
Read more…
Sticky Honey Chicken Flavorful Quick Recipe for Dinner
Are you in need of a quick and tasty dinner idea? Look no further than my Sticky Honey Chicken! This
Read more…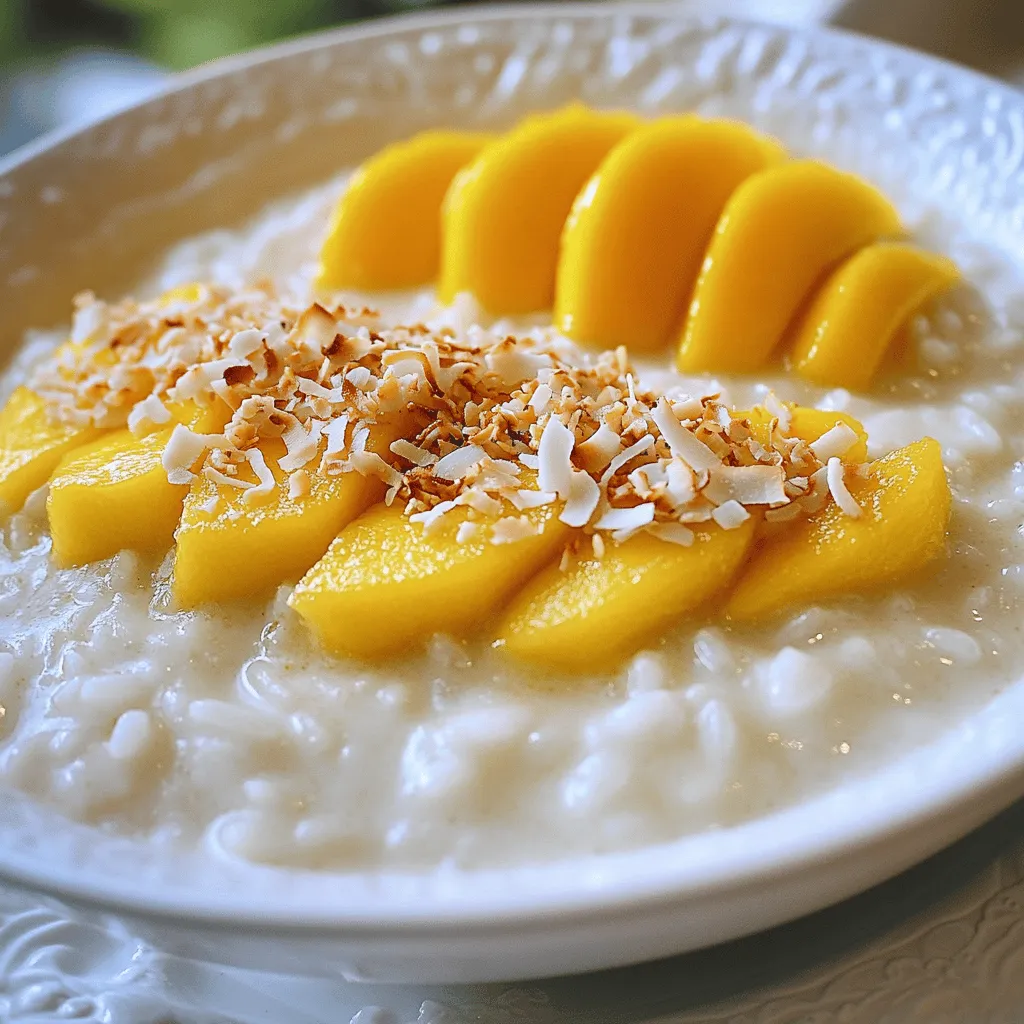
Coconut Rice Pudding Disney Copycat Delightful Recipe
Craving a taste of Disney magic without leaving home? Look no further! My Coconut Rice Pudding Disney Copycat recipe brings
Read more…browse recipes


Savory Oatmeal with Fried Egg Flavorful Breakfast Idea
Start your day right with a savory twist on oatmeal! This recipe combines rolled oats, fresh greens, and a perfectly fried egg to create…
My Latest Desserts

Chocolate Chip Pumpkin Cream Cheese Muffins Delight
If you love the cozy flavors of fall, you’re in for a real treat! Chocolate Chip Pumpkin Cream Cheese Muffins Read Full Recipe-
Streusel Pumpkin Cream Cheese Muffins Delightful Treat
If you love pumpkin flavors, you will adore these Streusel Pumpkin Cream Cheese Muffins. They mix rich pumpkin with creamy Read Full Recipe -
Easy Pumpkin Cream Cheese Muffins Tasty Fall Treat
Fall is here, and that means it’s time for warm, cozy treats! You’ll love these Easy Pumpkin Cream Cheese Muffins. Read Full Recipe -
Pumpkin Cream Cheese Muffins Delightful and Simple Recipe
Get ready to enjoy a treat that combines the warmth of pumpkin with creamy cheese! This simple recipe for pumpkin Read Full Recipe -
Pumpkin Pie Crinkle Cookies Charming Autumn Treat
Get ready to embrace autumn with a delightful twist on a classic favorite! Pumpkin Pie Crinkle Cookies combine the warm Read Full Recipe -
Pumpkin Cheesecake Cookies Irresistible Fall Treat
Welcome to the season of cozy flavors and pumpkin delights! If you crave a treat that combines the rich taste Read Full Recipe -
Chocolate Chip Pumpkin Cookies Flavorful Fall Treat
Are you ready to bake something special this fall? Chocolate chip pumpkin cookies blend sweet chocolate with warm pumpkin spice Read Full Recipe -
Pumpkin Butter Snickerdoodles Irresistible Cookie Treat
Looking for a new fall favorite? These Pumpkin Butter Snickerdoodles are the perfect cookie treat! With soft centers and a Read Full Recipe -
Pumpkin & Oatmeal Cookies with Icing Delight
If you’re looking for a delightful treat that combines the warm flavors of fall, you’re in the right place! In Read Full Recipe -
Pumpkin Churro Bites Tasty and Easy Dessert Treat
Are you ready to take your dessert game to the next level? These Pumpkin Churro Bites are here to impress! Read Full Recipe


My Latest Recipes

hey,
i’m !
I’m so happy you’re here!
Food is my passion, and perfecting each dish is my craft. I can’t wait for you to try them let’s dive into this delicious journey side by side.


![- 2 boneless, skinless chicken breasts, sliced into thin strips - 1 cup teriyaki sauce (store-bought or homemade) - 1 tablespoon sesame oil - 2 cups cooked jasmine rice - 1 cup broccoli florets - 1 red bell pepper, sliced - 1 cup shredded carrots - 2 green onions, chopped - 1 tablespoon sesame seeds - Salt and pepper to taste For the teriyaki chicken bowls, you need fresh chicken breasts. They give the dish a great flavor. Teriyaki sauce is key too. You can buy it or make your own. Fresh vegetables like broccoli, red bell pepper, and carrots add crunch. - Skillet or wok - Mixing bowls - Serving bowls You’ll want a good skillet or wok for cooking. A mixing bowl helps you marinate your chicken. Lastly, serving bowls are perfect for presenting your beautiful meal. - Calories: Approx. 480 - Macronutrients breakdown: - Proteins: 36g - Fats: 12g - Carbs: 58g Each serving packs a punch with solid protein from the chicken. The rice provides carbs for energy. This meal keeps you full and satisfied while tasting amazing. Don't forget to check the [Full Recipe] for more details! To marinate the chicken, start by slicing your chicken breasts into thin strips. Place them in a bowl and add half of the teriyaki sauce. This step is crucial. It lets the chicken soak up all the tasty flavors. I recommend marinating for at least 20 minutes. If you have more time, you can marinate it longer for even better flavor. Next, heat your skillet or wok on medium-high heat. Add one tablespoon of sesame oil. It gives the chicken a nice flavor. Once the oil is hot, add the marinated chicken. Cook it for about 5 to 7 minutes. The chicken should turn golden brown and caramelized. To check if it is done, make sure it is no longer pink in the center. You can use a meat thermometer; the chicken should reach 165°F. Now, it's time to stir-fry the veggies. In the same skillet, add broccoli florets, sliced red bell pepper, and shredded carrots. Stir-fry them for about 3 to 5 minutes. This keeps the veggies tender-crisp. Stir them often to ensure they cook evenly. You want them to keep their bright colors and crunch. After cooking the chicken and veggies, it’s time to combine everything. Pour the remaining teriyaki sauce over the chicken and vegetables. Stir well to coat all the ingredients evenly. Cook for an additional 1 to 2 minutes. This final stir is key. It helps blend all the flavors together. Now, you are ready to serve your mouthwatering teriyaki chicken bowls. For the full recipe, check out the complete instructions above. To get juicy chicken, start with marinating. Use half of your teriyaki sauce to coat the chicken. A marinating time of at least 20 minutes works best. The flavors really soak in during this time. Avoid cooking chicken straight from the fridge; let it warm up for 10 minutes. This helps it cook evenly. Cook the chicken on medium-high heat for about 5-7 minutes. Look for no pink in the center. It should be golden brown. Stir occasionally to avoid burning and ensure even cooking. You can switch up the teriyaki sauce for a fun twist. Try using a hoisin sauce or a sweet chili sauce. These add new layers of flavor. If you want a kick, add crushed red pepper or a dash of ginger. For toppings, consider adding crushed peanuts or diced avocado. These add texture and flavor to your bowl. A beautiful presentation makes your dish shine. Use colorful veggies to create a vibrant look. Arrange the chicken and vegetables neatly on top of the rice. For gatherings, serve in large bowls. Let guests build their own bowls. Offer extra toppings on the side. This adds fun and choice to the meal. For a lovely finish, drizzle some teriyaki sauce over the top and sprinkle sesame seeds. This makes each bowl look like a work of art! {{image_2}} You can easily swap chicken for shrimp, tofu, or beef. Each protein brings its own flavor and texture. Shrimp cooks quickly, so add it to the skillet for just 3-4 minutes. Tofu takes a bit longer to crisp up, around 5-6 minutes. Beef should be sliced thin and cooked for about 6-8 minutes. Adjust your cooking times based on the protein you choose. If you want a vegetarian or vegan dish, use tofu or tempeh as a chicken substitute. Both options soak up flavors well. You can also add a mix of vegetables like bell peppers, carrots, and snap peas. These will not only add color but also crunch to your bowl. While jasmine rice is a classic base, consider other grains like brown rice or quinoa. Brown rice offers more fiber and a nutty flavor. Quinoa is higher in protein and cooks faster than brown rice. Each grain choice adds its unique taste and nutrition to your teriyaki bowls. You can even use cauliflower rice for a low-carb option. To keep your teriyaki chicken bowls fresh, store them in airtight containers. This prevents air from spoiling your food. Place the leftover chicken and veggies in one container and the rice in another. This way, the rice stays fluffy. Make sure to refrigerate them within two hours after cooking. This will help prevent bacteria growth. When it's time to eat again, reheating is easy. You can use the microwave or a skillet. If using a microwave, heat on medium for about 2-3 minutes. Stir halfway through to heat evenly. For a skillet, warm on low heat for about 5 minutes. Add a splash of water or teriyaki sauce to keep it moist. If you want to save some for later, freezing works well. Let the chicken and veggies cool before packing them in freezer-safe bags. Remove as much air as possible. Rice can also be frozen but should be cooled first. When ready to eat, thaw the meals overnight in the fridge. Heat them thoroughly before serving. To make homemade teriyaki sauce, you need a few basic ingredients: - 1/4 cup soy sauce - 1/4 cup mirin - 2 tablespoons sugar - 1 tablespoon rice vinegar - 1 teaspoon cornstarch mixed with 1 tablespoon water (for thickening) Start by mixing the soy sauce, mirin, sugar, and rice vinegar in a small pot. Heat it over medium heat. Stir until the sugar dissolves. Once it simmers, add the cornstarch mix. Stir until the sauce thickens. This sauce is sweet and savory. For flavor adjustments, try adding garlic or ginger. You can also use honey instead of sugar for a different taste. Yes, you can use frozen vegetables. They are quick and easy to use. Frozen veggies may change the taste a bit. They can also release extra water while cooking. This may affect the sauce's thickness. For best results, use blends like stir-fry mixes. Look for broccoli, bell peppers, and snap peas. These maintain flavor and texture well. For side dishes, I recommend: - Steamed edamame - Cucumber salad - Miso soup These sides add freshness and balance to your meal. For beverage pairings, green tea works great. It complements the flavors without overpowering them. If you prefer something sweeter, try a light lemonade. For the full recipe of Teriyaki Chicken Bowls, check out the Full Recipe link! In this post, we explored how to make teriyaki chicken bowls from scratch. We covered key ingredients, tools, and nutrition. I provided step-by-step instructions to marinate and cook chicken perfectly. You also learned how to stir-fry vegetables and present the dish nicely. Remember, you can customize with different proteins and grains. Store and reheat leftovers correctly to enjoy this meal later. With these tips, you can create a delicious and satisfying dish for any occasion.](https://mysavedrecipe.com/wp-content/uploads/2025/05/6fa04181-7ee3-4614-ab9c-ad5c3b3194f1-300x300.webp)
Savory Honey Mustard Chicken Thighs Easy Recipe
Are you ready to delight your taste buds with a sweet and tangy twist? This easy Honey Mustard Chicken Thighs recipe will become a…
![To make this recipe, gather these items: - 4 bone-in, skin-on chicken thighs - 1/4 cup honey - 1/4 cup Dijon mustard - 2 tablespoons soy sauce (or tamari for gluten-free) - 1 tablespoon apple cider vinegar - 2 cloves garlic, minced - 1 teaspoon fresh thyme leaves (or 1/2 teaspoon dried) - 1 teaspoon paprika - Salt and pepper to taste - 1 tablespoon olive oil - Fresh parsley, chopped (for garnish) If you need to swap ingredients, here are some ideas: - Use maple syrup instead of honey for a different sweetness. - Switch Dijon mustard with yellow mustard for a milder taste. - If you don't have apple cider vinegar, try white wine vinegar or lemon juice. - Fresh thyme can be replaced with rosemary or oregano. - Use chicken breasts if you prefer less fat. To enhance the flavor of your chicken thighs, consider these seasonings: - Add a pinch of cayenne pepper for heat. - Try using smoked paprika for a smoky flavor. - Include some fresh lemon zest for brightness. - Garlic powder can boost the garlic flavor if you love it. This recipe is flexible, so feel free to mix and match based on what you have at home. For a full, detailed recipe, check out the Full Recipe to enjoy these savory honey mustard chicken thighs. To start, gather your chicken thighs. I prefer bone-in, skin-on thighs for the best flavor. Rinse them under cold water and pat them dry with paper towels. Drying helps the skin crisp up nicely. You want to make sure there’s no excess water. This step is key for great texture later. Next, we prepare the marinade. In a bowl, combine honey, Dijon mustard, soy sauce, apple cider vinegar, minced garlic, thyme, paprika, salt, and pepper. Whisk them until they blend well. This mixture is both sweet and tangy, giving the chicken great depth. Place the chicken in a large zip-top bag or a shallow dish. Pour the marinade over the chicken, ensuring every piece gets coated. Seal the bag or cover the dish. Let it sit in the fridge for at least 30 minutes. If you have time, marinate it for up to 2 hours. This extra time allows the flavors to infuse deeply. After marinating, it’s time to cook. Preheat your oven to 400°F (200°C). In an oven-safe skillet, heat olive oil over medium-high heat. Take the chicken out of the marinade, letting the extra drip off. Place the thighs skin-side down in the skillet. Sear them for about 5-7 minutes until the skin is golden brown and crispy. This step adds flavor and texture. Once done, flip the thighs over. Pour the leftover marinade over the chicken and place the skillet in the oven. Bake for 25-30 minutes or until the internal temperature reaches 165°F (74°C). The chicken should be juicy, and the skin should remain crispy. Once finished, let the chicken rest for about 5 minutes before serving. Garnish with fresh parsley. For the full recipe, check out the details above. To get that perfect crispy skin, you need to start with dry chicken. Pat the thighs dry with paper towels. This helps the skin crisp up nicely. When cooking, always sear the chicken skin-side down first. Use a hot skillet with olive oil. Let it cook for about 5-7 minutes without moving it. This will create a beautiful golden crust. You can also use a high oven temperature for roasting. This keeps the skin crispy while cooking through. Marinating adds flavor and moisture to your chicken. Use a mix of honey, Dijon mustard, and soy sauce to create a balanced taste. Make sure to marinate for at least 30 minutes. For more flavor, let it sit for up to 2 hours. You can use a zip-top bag for easy marinating. Just seal it tight and give it a good shake. Make sure every piece of chicken gets coated in the marinade. To ensure your chicken cooks evenly, use a meat thermometer. The internal temperature should reach 165°F (74°C). This guarantees it's safe to eat. When baking, let the chicken rest for about 5 minutes before serving. This helps the juices settle back into the meat. If you follow these tips, your chicken thighs will turn out juicy and flavorful every time. For a detailed recipe, check out the Full Recipe. {{image_2}} You can add fresh herbs to boost the flavor. Try rosemary, sage, or oregano. Simply chop the herbs and mix them into the marinade. The herbs add a nice touch and make the chicken extra tasty. I love using fresh thyme, as it pairs well with honey mustard. You can also use dried herbs if that’s what you have on hand. For a kick, add some heat to your honey mustard chicken. You can stir in red pepper flakes or cayenne pepper. Just a pinch will do! This adds a warm spice that balances the sweetness of honey. If you want more heat, add a dash of hot sauce to the marinade. This variation is perfect for those who enjoy bold flavors! You don’t have to stick with thighs. You can use drumsticks or chicken breasts instead. Drumsticks will have a great flavor, and they stay juicy. If you prefer chicken breasts, just make sure not to overcook them. They can dry out quickly. No matter the cut, the honey mustard marinade works well, so feel free to mix it up! For a complete recipe, check out the [Full Recipe]. To keep your honey mustard chicken thighs fresh, let them cool first. Place the chicken in an airtight container. You can store it in the fridge for up to three days. If you want to keep it longer, consider freezing. When it's time to enjoy your leftovers, reheat them properly. You can use the oven or the microwave. For the oven, set it to 350°F (175°C). Place the chicken in a dish and cover it with foil. Heat for about 15-20 minutes. In the microwave, place the chicken on a plate, cover it, and heat for 2-3 minutes. Check that it’s hot all the way through. Freezing is a great way to save your honey mustard chicken thighs. Wrap each thigh in plastic wrap, then place them in a freezer bag. Make sure to squeeze out as much air as possible. You can freeze them for up to three months. To thaw, place the chicken in the fridge overnight. This keeps the flavor and texture intact. For the full recipe, check out the earlier section. Enjoy your cooking! Yes, you can use boneless chicken thighs. They cook faster than bone-in thighs. Adjust the cooking time to about 20-25 minutes. Make sure to check the internal temperature reaches 165°F (74°C). This will ensure the chicken is fully cooked and safe to eat. I love serving these chicken thighs with roasted vegetables. You can use carrots, broccoli, or Brussels sprouts. A side of fluffy rice or quinoa pairs well. You can also serve a fresh salad with a light vinaigrette. These sides balance the sweet and tangy flavors of the chicken. You can store leftovers in the fridge for up to 3 days. Keep the chicken in an airtight container. Make sure it cools to room temperature before sealing. This way, the chicken stays moist and tasty for your next meal. You can also reheat it in the oven or microwave. Remember to check the temperature before eating. For the full recipe, check out the details above! In this post, we covered how to make honey mustard chicken thighs. We listed the ingredients, shared substitution tips, and suggested seasonings. You learned how to prepare, marinate, and cook the chicken perfectly. We shared tricks for crispy skin and storage tips for leftovers. Now you can enjoy delicious variations, like adding herbs or spice. Use these steps to impress at your next meal. Follow this guide for tasty results every time. Enjoy cooking!](https://mysavedrecipe.com/wp-content/uploads/2025/04/f6801e4c-abe1-413e-96fb-9cd9455b7c97.webp)
