Latest & Greatest
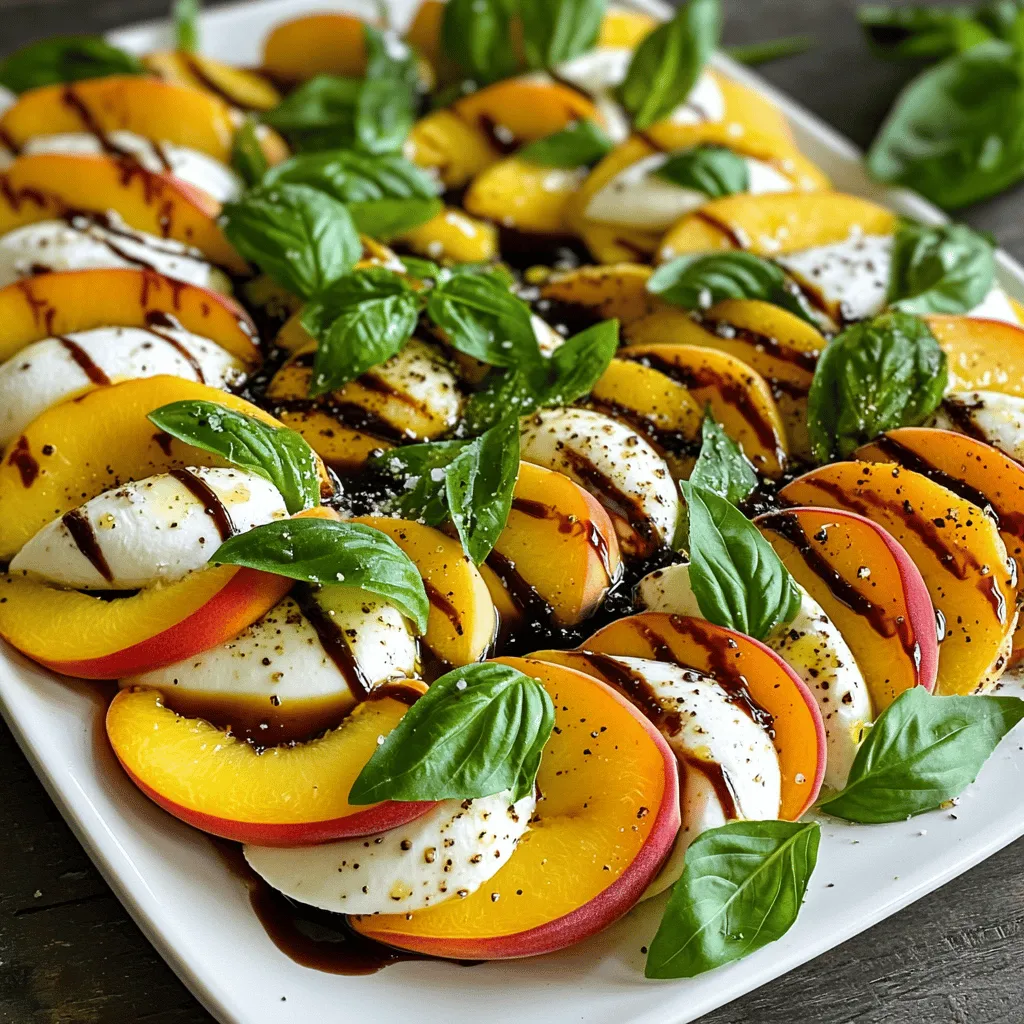
Peach Caprese Salad Fresh and Flavorful Delight
Are you ready to brighten up your plate? A Peach Caprese Salad is fresh, flavorful, and perfect for any meal.
Read more…
Garlic Butter Shrimp and Asparagus Tasty Quick Dish
If you’re looking for a quick and tasty meal, this Garlic Butter Shrimp and Asparagus dish is for you. In
Read more…
Lemon Herb Grilled Salmon Flavorful and Simple Meal
Are you ready to impress your family with a dish that’s full of flavor and easy to make? Lemon Herb
Read more…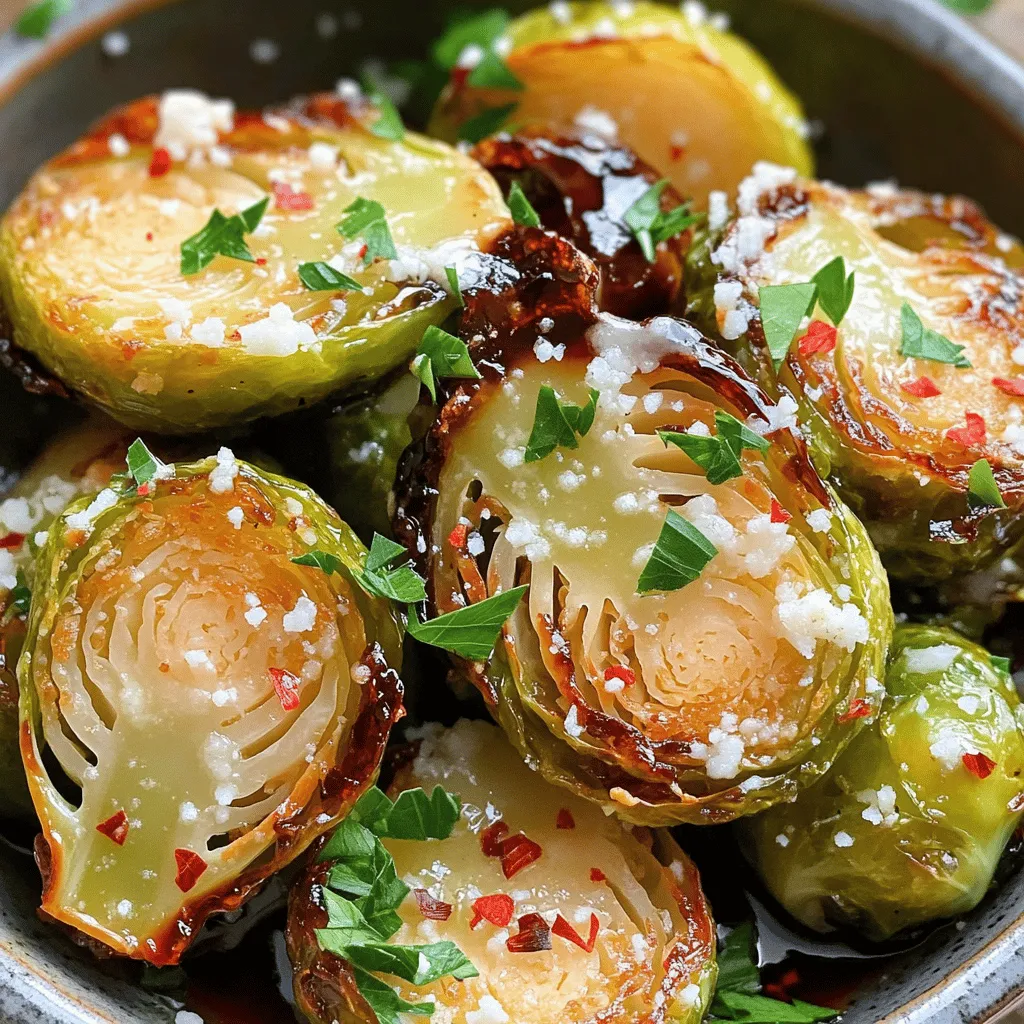
Balsamic Glazed Brussels Sprouts Flavorful Side Dish
Looking for a delicious side dish that pairs perfectly with any meal? Balsamic Glazed Brussels Sprouts are here to impress!
Read more…
Stuffed Bell Peppers with Quinoa Flavorful Meal Idea
Looking for a tasty and healthy meal idea? Stuffed bell peppers with quinoa are a crowd-pleaser! They are colorful, filling,
Read more…
Honey Mustard Chicken Skewers Flavorful and Easy Meal
Looking for a tasty and easy meal? You’re in the right place! Honey Mustard Chicken Skewers are not only simple
Read more…
Banana Bread Overnight Oats Simple and Nourishing Recipe
Are you looking for a quick and tasty breakfast? Try my Banana Bread Overnight Oats! This simple recipe combines rolled
Read more…
Cheesy Spinach Artichoke Dip Irresistible Flavor Guide
Craving something cheesy and delicious? Look no further! My Cheesy Spinach Artichoke Dip is the ultimate blend of savory goodness.
Read more…browse recipes


Coconut Curry Lentil Soup Rich and Flavorful Meal
Are you ready to enjoy a warm bowl of Coconut Curry Lentil Soup? This rich and flavorful meal combines creamy coconut milk with hearty…
My Latest Desserts

Apple Cider Donut Ice Cream Sandwiches Tasty Delight
Get ready for a sweet treat that combines two favorites: donuts and ice cream! Apple Cider Donut Ice Cream Sandwiches Read Full Recipe-
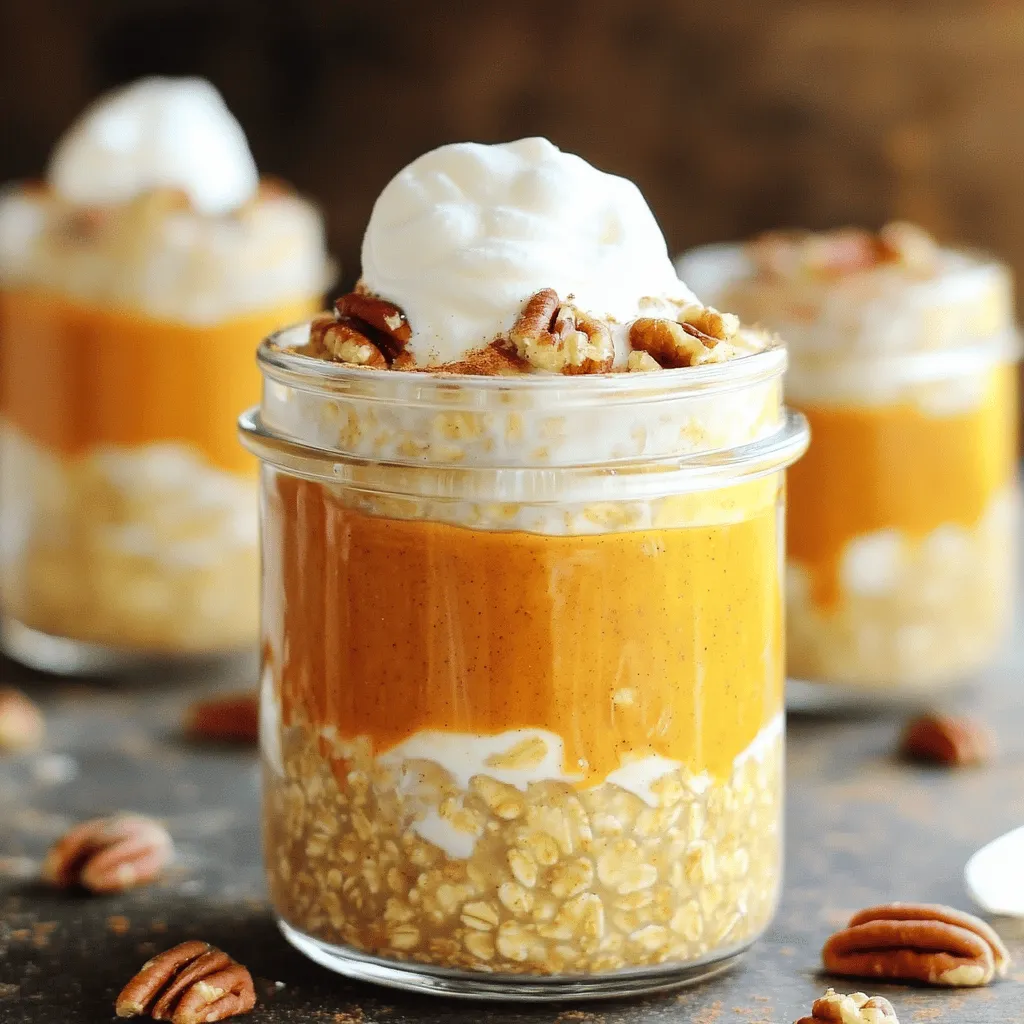
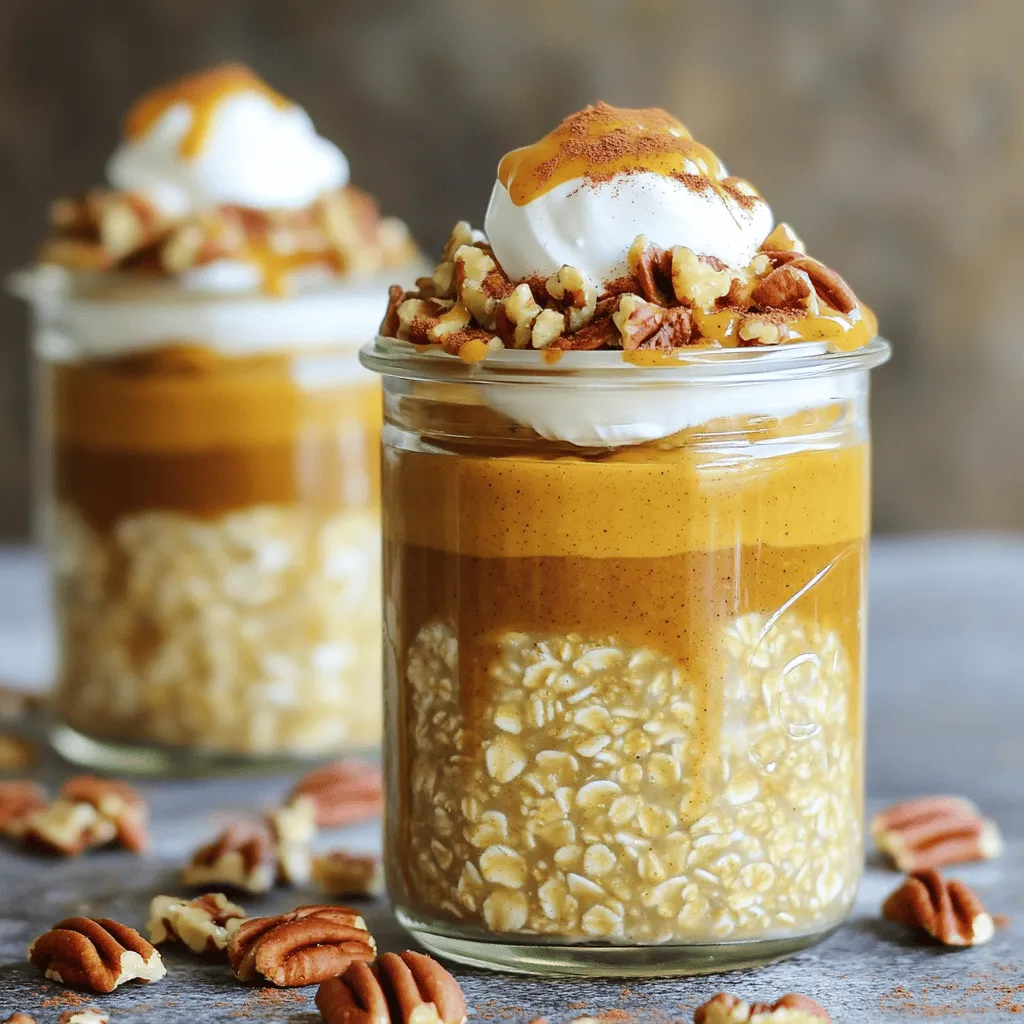
Brown Sugar Pumpkin Pie Overnight Oats Delight
Start your day with a warm slice of fall in a jar: Brown Sugar Pumpkin Pie Overnight Oats! This easy Read Full Recipe -
Apple Cider Donut Ice Cream Sandwiches Delightful Treat
Get ready to treat your taste buds! Apple Cider Donut Ice Cream Sandwiches blend fall flavors and sweet creaminess. These Read Full Recipe -
Brown Sugar Pumpkin Pie Overnight Oats Delight
Looking for a tasty breakfast that’s easy and fun? You’ll love my Brown Sugar Pumpkin Pie Overnight Oats Delight! This Read Full Recipe -
Cream Soda Donut Holes Delightful Dessert Recipe
Are you ready to enjoy a fun twist on a classic treat? Cream Soda Donut Holes are sweet, fluffy, and Read Full Recipe -
Cookie Dough Bars Delightful Recipe for a Sweet Treat
If you’ve ever craved the rich, sweet goodness of cookie dough, then you’re in for a treat! My recipe for Read Full Recipe -
Chocolate Covered Cherries with Pistachio Dust Delight
Get ready to treat your taste buds with my “Chocolate Covered Cherries with Pistachio Dust Delight.” This sweet snack combines Read Full Recipe -
Peach Plum Crumble Bars Irresistible Sweet Treat
Are you ready for a dessert that combines the sweetness of peaches and plums? My Peach Plum Crumble Bars are Read Full Recipe -
Watercolor Buttercream Cupcakes Delightful Recipe Guide
Are you ready to bring some color to your baking? In this guide, I’ll show you how to make stunning Read Full Recipe -
No-Bake Peach Icebox Cake Simple and Refreshing Treat
If you’re seeking a sweet, cool treat that’s simple to make, it’s time to try my No-Bake Peach Icebox Cake. Read Full Recipe


My Latest Recipes

hey,
i’m !
I’m so happy you’re here!
Food is my passion, and perfecting each dish is my craft. I can’t wait for you to try them let’s dive into this delicious journey side by side.
![To make a tasty sweet potato hash, you need key items. Here’s what to gather: - 2 medium sweet potatoes, peeled and diced - 1 red bell pepper, chopped - 1 yellow bell pepper, chopped - 1 small red onion, diced - 2 cloves garlic, minced - 1 teaspoon smoked paprika - 1 teaspoon ground cumin - ½ teaspoon cayenne pepper (optional, for heat) - 3 tablespoons olive oil - Salt and black pepper to taste - 1 cup kale, chopped (or spinach) - 4 large eggs (optional) - Fresh cilantro or parsley for garnish These ingredients blend well together to create a hearty meal. Sweet potatoes give a sweet taste. Bell peppers add crunch and color. Onions and garlic bring strong flavors. You can add more items for extra flavor and nutrition. Consider these options: - Chopped mushrooms for earthiness - Spinach instead of kale for a milder taste - Diced tomatoes for juiciness - Black beans for protein - Avocado slices for creaminess These extras make your hash even better. You can mix and match based on what you have. Sweet potato hash is not just tasty; it’s also good for you. Here’s a quick look at the nutrition: - High in fiber, which helps digestion - Packed with vitamins A and C from sweet potatoes and peppers - Contains healthy fats from olive oil - Provides protein from eggs, if added This dish can fit well into a balanced diet. Enjoy it as breakfast, lunch, or dinner. You can find the full recipe [here]. To start, gather all your ingredients. You need: - 2 medium sweet potatoes, peeled and diced - 1 red bell pepper, chopped - 1 yellow bell pepper, chopped - 1 small red onion, diced - 2 cloves garlic, minced - 1 teaspoon smoked paprika - 1 teaspoon ground cumin - ½ teaspoon cayenne pepper (optional, for heat) - 3 tablespoons olive oil - Salt and black pepper to taste - 1 cup kale, chopped (or spinach) - 4 large eggs (optional) - Fresh cilantro or parsley for garnish Make sure your sweet potatoes are cut into even pieces. This helps them cook at the same rate. Dice the onions and peppers small so they blend well in the hash. 1. Heat olive oil in a large skillet over medium heat. 2. Add the sweet potatoes and season them with salt and black pepper. Cook for about 10-12 minutes. Stir occasionally until they soften and turn golden. 3. Next, add the onions and garlic. Sauté for 3-4 minutes until the onion is clear. 4. Now, stir in the bell peppers, smoked paprika, ground cumin, and cayenne pepper if you like heat. Cook for another 5-7 minutes until the peppers are soft. 5. Add the kale and mix it in. It will wilt quickly, about 2 minutes. Taste and adjust seasoning as needed. 6. If you want eggs, make four wells in the hash. Crack an egg into each well. Cover the skillet and let them cook. Aim for about 5-6 minutes for runny yolks. 7. Once cooked, gently stir the hash. Be careful not to break the yolks if you cooked eggs. 8. Serve hot and garnish with chopped cilantro or parsley. Sweet potato hash is great for breakfast or brunch. You can serve it with toast or a side of fruit. For a heartier meal, add avocado slices on top. This dish is easy to share and looks colorful on your plate. For the full recipe, check out the main section. Enjoy every bite! To cook sweet potatoes just right, start by peeling and dicing them. Aim for small cubes, about half an inch. This size helps them cook evenly. Heat your skillet and add olive oil. When the oil is hot, toss in the sweet potatoes. Season them with salt and black pepper. Cook for 10 to 12 minutes, stirring often. Look for a golden color and softness. This method gives you that lovely texture and flavor. Seasoning can bring your sweet potato hash to life. Start with salt and black pepper to enhance the natural sweetness. Adding smoked paprika gives a nice smoky flavor. Ground cumin adds warmth and earthiness. If you like heat, sprinkle in some cayenne pepper. For a fresh touch, mix in chopped cilantro or parsley just before serving. Taste as you go, and adjust the spices to fit your palate. If you want eggs in your hash, it’s easy to cook them just how you like. After the sweet potatoes and veggies are ready, make little wells in the hash. Crack an egg into each well. Cover the skillet to keep the heat in. For runny yolks, cook for about 5 to 6 minutes. If you prefer firm yolks, let them cook a bit longer. This method makes the eggs part of the dish, adding creaminess and richness. Check the [Full Recipe] for more details and enjoy your cooking! {{image_2}} Sweet potato hash is great for vegetarians. You can make it meat-free by using more veggies. Try adding mushrooms, zucchini, or even some fresh corn for a nice crunch. Spinach is a fantastic green to mix in. It wilts quickly and adds flavor. For a cheesy touch, sprinkle some feta or goat cheese on top before serving. It melts just right. Want to add protein? Sausage and bacon both work well. They bring a savory taste. Cook them until crispy, then add them to the hash. If you prefer a plant-based option, use firm tofu. Dice it, season it, and pan-fry until golden. This adds a nice texture. You could also try tempeh for a nutty flavor. Any of these options make your meal heartier. Feel free to mix up the veggies! Broccoli, carrots, or even Brussels sprouts can add new flavors. Roasted vegetables can also add depth. If you have leftovers, chop those up. They make a great addition to your hash. You can even toss in some seasonal veggies like asparagus or butternut squash. The key is to experiment and find what you love best. Check the full recipe to see how to create your own unique twist! To store leftover sweet potato hash, let it cool first. Place it in an airtight container. It will stay fresh in the fridge for up to four days. Label the container with the date. This way, you won't forget when you made it. For the best taste, reheat your sweet potato hash on the stove. Heat a skillet over medium heat. Add a splash of olive oil to keep it moist. Stir the hash occasionally until it's hot. You can also use a microwave. Place the hash in a bowl, cover it, and heat it for 1-2 minutes. Yes, you can freeze sweet potato hash! It’s great for meal prep. Let it cool completely before freezing. Use a freezer-safe container or bag. It can last up to three months. To use, thaw it in the fridge overnight. Reheat it as mentioned above for the best flavor. For a full recipe, check out the hearty sweet potato hash. If you don't have sweet potatoes, try regular potatoes. Yukon gold or red potatoes work well. You can also use butternut squash for a sweet flavor. Other root veggies like carrots or parsnips are great too. Each choice brings its own taste and texture to your hash. Yes, you can make sweet potato hash ahead of time. Cook it fully, then cool it down. Store it in an airtight container in the fridge for up to three days. When you are ready, just reheat it on the stove. Add a splash of olive oil to revive the flavors. Sweet potato hash is healthy. Sweet potatoes are packed with vitamins A and C. They also have fiber for good digestion. Adding veggies like bell peppers and kale boosts nutrients even more. If you choose to add eggs, you get protein, too. This dish is colorful and good for your body. You can top your sweet potato hash in many ways. Avocado slices add creaminess and healthy fats. A dollop of sour cream or Greek yogurt gives tang. Crumbled feta cheese adds a nice salty touch. Fresh herbs like cilantro or parsley brighten the dish. You can even sprinkle hot sauce for a kick. For a full experience, check the Full Recipe. Sweet potato hash combines key ingredients, cooking tips, and variations. You can customize it to fit your taste. Remember, the right seasoning and cooking techniques can make a big difference. Store it properly for quick meals later. This dish is healthy and versatile, perfect for breakfast or dinner. Try different toppings to keep things exciting. With these steps, you can create a delicious hash every time. Enjoy exploring flavors and making this dish your own!](https://mysavedrecipe.com/wp-content/uploads/2025/05/776a96c5-351e-41c5-9219-adb8a2843724-300x300.webp)
![To make a delicious spinach artichoke dip, you need a few key ingredients. Here’s what you will need: - 1 cup frozen spinach, thawed and drained - 1 cup canned artichoke hearts, chopped - 1 cup cream cheese, softened - 1/2 cup sour cream - 1/2 cup mayonnaise - 1 cup shredded mozzarella cheese - 1/2 cup grated Parmesan cheese - 2 cloves garlic, minced - 1 teaspoon onion powder - 1/2 teaspoon crushed red pepper flakes (optional) - Salt and pepper to taste Using these ingredients, you will create a dip that is creamy and packed with flavor. The spinach offers a nice green color. The artichokes add a unique taste. Cream cheese, sour cream, and mayonnaise make it rich and smooth. Garlic and onion powder bring depth to every bite. You can adjust the crushed red pepper flakes if you want some heat. This dip is perfect for parties or just a cozy night in. You can find the full recipe above to guide you through the steps. Enjoy making this tasty treat! 1. Preheating the oven: Start by preheating your oven to 350°F (175°C). This helps the dip bake evenly and get nice and bubbly. 2. Combining cream cheese, sour cream, and mayonnaise: In a large bowl, combine 1 cup of softened cream cheese, 1/2 cup of sour cream, and 1/2 cup of mayonnaise. Mix these together until the mixture is smooth and creamy. 3. Mixing in seasonings and ingredients: Add 2 minced garlic cloves, 1 teaspoon of onion powder, and salt and pepper to taste. If you like a bit of heat, toss in 1/2 teaspoon of crushed red pepper flakes. Mix everything well. Then, gently fold in 1 cup of drained, chopped artichoke hearts and 1 cup of thawed, drained frozen spinach. Finally, incorporate 1 cup of shredded mozzarella and 1/2 cup of grated Parmesan cheese, saving a little mozzarella for the topping. 1. Transferring to a baking dish: Once mixed, transfer the creamy mixture into a baking dish. Spread it out evenly so it bakes nicely. 2. Adding cheese on top: Sprinkle the reserved mozzarella cheese over the top of the dip. This will create a lovely, cheesy crust as it bakes. 3. Baking time and expected results: Place the dish in the oven and bake for 25 to 30 minutes. You’ll know it’s done when the dip is bubbly and golden on top. Let it cool for a few minutes before serving. For the full recipe with detailed instructions, check the [Full Recipe]. To achieve the creamiest texture, start with softened cream cheese. Soft cheese mixes better with other ingredients. I recommend mixing the cream cheese, sour cream, and mayonnaise until you see no lumps. This smooth base makes your dip rich and tasty. Using high-quality ingredients enhances the flavor. Choose fresh artichoke hearts if you can find them. Frozen spinach is fine, but make sure to drain it well. Too much water will make the dip runny. Always use freshly grated cheese for the best melt and taste. Balancing flavors is key. Add garlic for a nice kick. Red pepper flakes give it warmth, but you can skip them if you prefer less heat. Taste your mixture before baking and adjust salt or pepper to your liking. For dippers, I love using toasted baguette slices, tortilla chips, or fresh veggie sticks. These options add crunch and contrast to the creamy dip. You can also try pita chips for a fun twist. To make your dip look great, garnish with fresh parsley or a sprinkle of paprika. This adds color and a hint of flavor. Serve the dip warm right from the oven. It creates a cozy and inviting feel for your guests. If you want the full recipe, you can find it [here](#). {{image_2}} You can easily switch ingredients in your spinach artichoke dip for fun. Here are some ideas: - Fresh Spinach: Instead of frozen spinach, use fresh. Just wash and chop about 2 cups. Cook it a bit to wilt it down. It gives a brighter flavor and texture. - Greek Yogurt: Swap sour cream for Greek yogurt. This change makes the dip a bit tangier and adds protein. It keeps the dip creamy too. - Cheese Choices: Try different cheeses for unique tastes. Cream cheese is a must, but you can add gouda or pepper jack. They give extra depth and spice. You can also adapt the dip for dietary needs: - Gluten-Free: This dip is already gluten-free if you avoid bread. Use gluten-free chips or veggies for dipping. - Dairy-Free: If you need a dairy-free option, use cashew cream instead of cream cheese. Nutritional yeast can add a cheesy flavor. There are also dairy-free cheese options that melt well. These changes can help everyone enjoy the dip without worry. To keep your spinach artichoke dip fresh, store it in an airtight container. Let it cool to room temperature before sealing. Place it in the fridge. Your dip can last about 3 to 5 days in the refrigerator. Always check for any changes in color or smell before serving. When you're ready to enjoy leftovers, you have a few options. The best method is to reheat in the oven. Preheat the oven to 350°F (175°C). Place the dip in an oven-safe dish and cover it with foil. Heat for about 15 to 20 minutes. This keeps the dip creamy and warm. If you're in a hurry, you can also use the microwave. Heat it in short bursts of 30 seconds. Stir in between to keep it even. To refresh your leftovers, consider adding a sprinkle of cheese on top. This helps regain that fresh, gooey texture. Enjoy your delicious dip again! For the full recipe, check out the complete guide. Can I make this recipe ahead of time? Yes, you can prepare this dip a day early. Mix all the ingredients and store it in the fridge. When you’re ready to serve, just bake it. This makes it easy for parties. What can I serve with spinach artichoke dip? You have many choices! Serve it with toasted baguette slices, tortilla chips, or fresh veggies like carrots and celery. Each adds a nice crunch and contrast to the creamy dip. Is spinach artichoke dip healthy? It can be a bit rich due to cream cheese and mayo. However, it does have spinach and artichokes, which are good for you. Enjoy it in moderation for a tasty treat. You can find the full recipe for this creamy delight online. It has detailed steps and reviews from others who tried it. Many users rave about how easy it is to make and how great it tastes. In this post, we covered how to make a tasty spinach artichoke dip. We discussed the main ingredients, step-by-step instructions, and helpful tips. You learned how to achieve a creamy texture and flavorful balance. We also shared storage tips and fun variations to try. Remember, using quality ingredients can make a big difference. This dip is perfect for gatherings or as a snack. Enjoy making it and impressing your friends with your skills.](https://mysavedrecipe.com/wp-content/uploads/2025/06/4c6aa510-2d74-4bd4-a502-ec5b8a6264b7-300x300.webp)


Pomegranate Rosemary Cooler Refreshing Drink Recipe
Looking for a drink that’s both refreshing and unique? The Pomegranate Rosemary Cooler is just what you need! With its vibrant flavors and easy…