Latest & Greatest

Raspberry Lemon Bars Fresh and Tangy Dessert Treat
Are you ready for a dessert that bursts with bright flavors? My Raspberry Lemon Bars are the perfect mix of
Read more…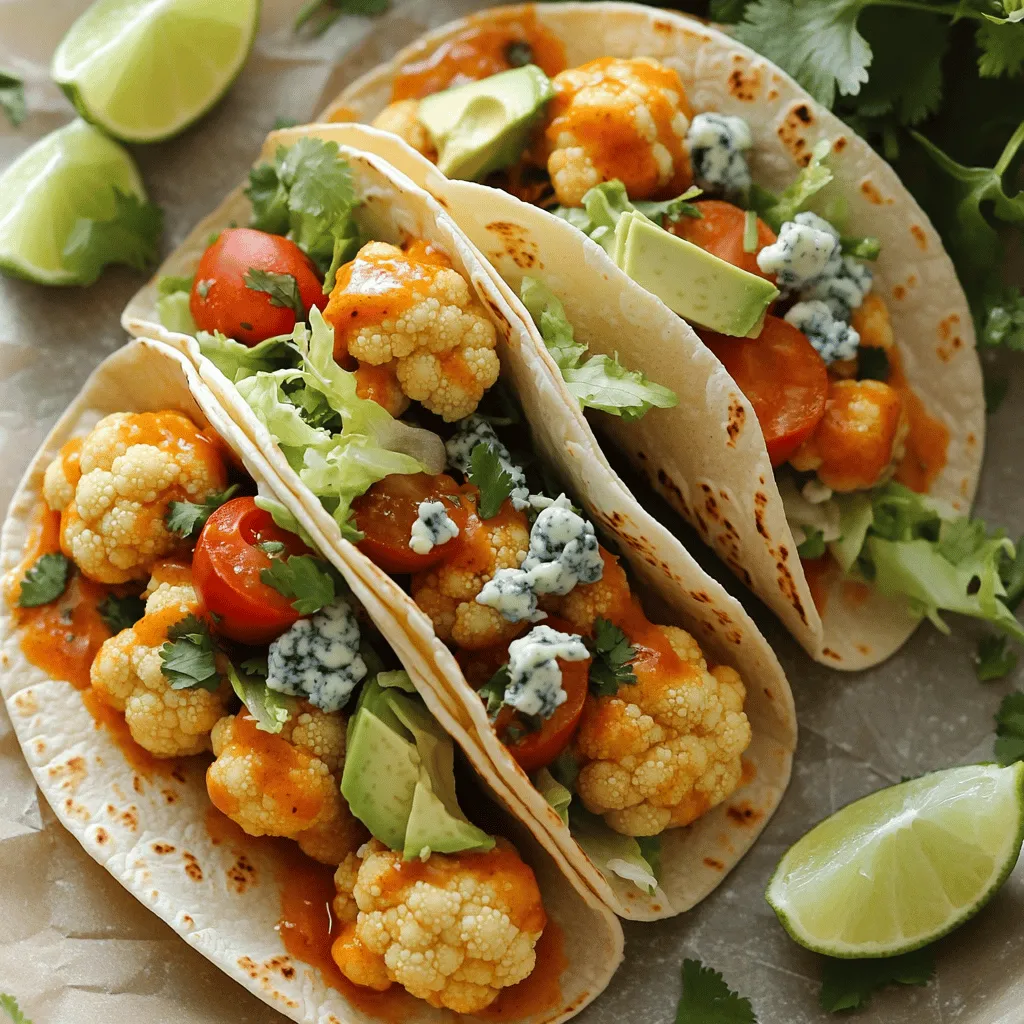
Buffalo Cauliflower Tacos Flavorful and Easy Meal
Looking for a flavorful and easy meal? Buffalo cauliflower tacos are the answer! Packed with spices and crunch, they are
Read more…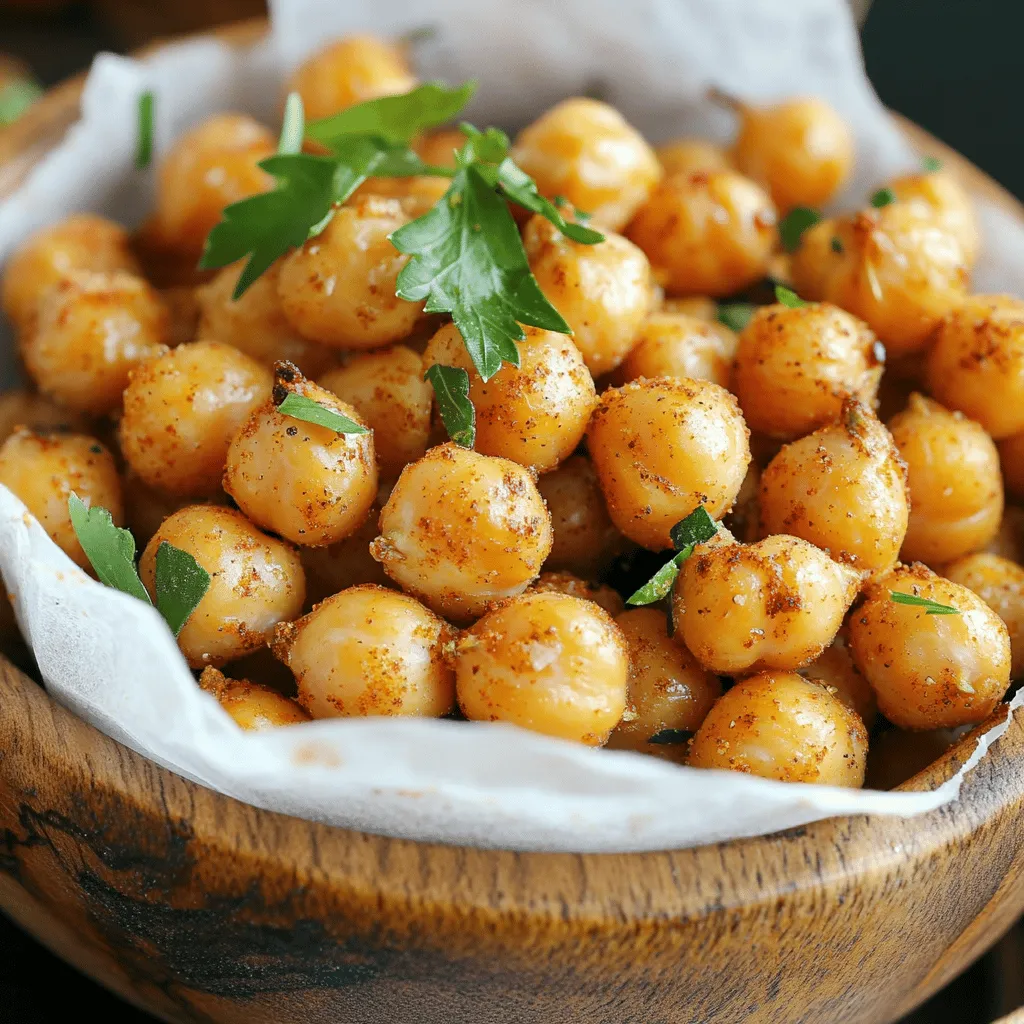
Crispy Baked Chickpeas Flavorful and Healthy Snack
Looking for a tasty snack that’s both crunchy and healthy? I’ve got just the thing: Crispy Baked Chickpeas! These little
Read more…
Cheesy Taco Pasta Bake Simple and Satisfying Meal
Welcome to your new favorite dish: the Cheesy Taco Pasta Bake! This simple and satisfying meal combines the fun of
Read more…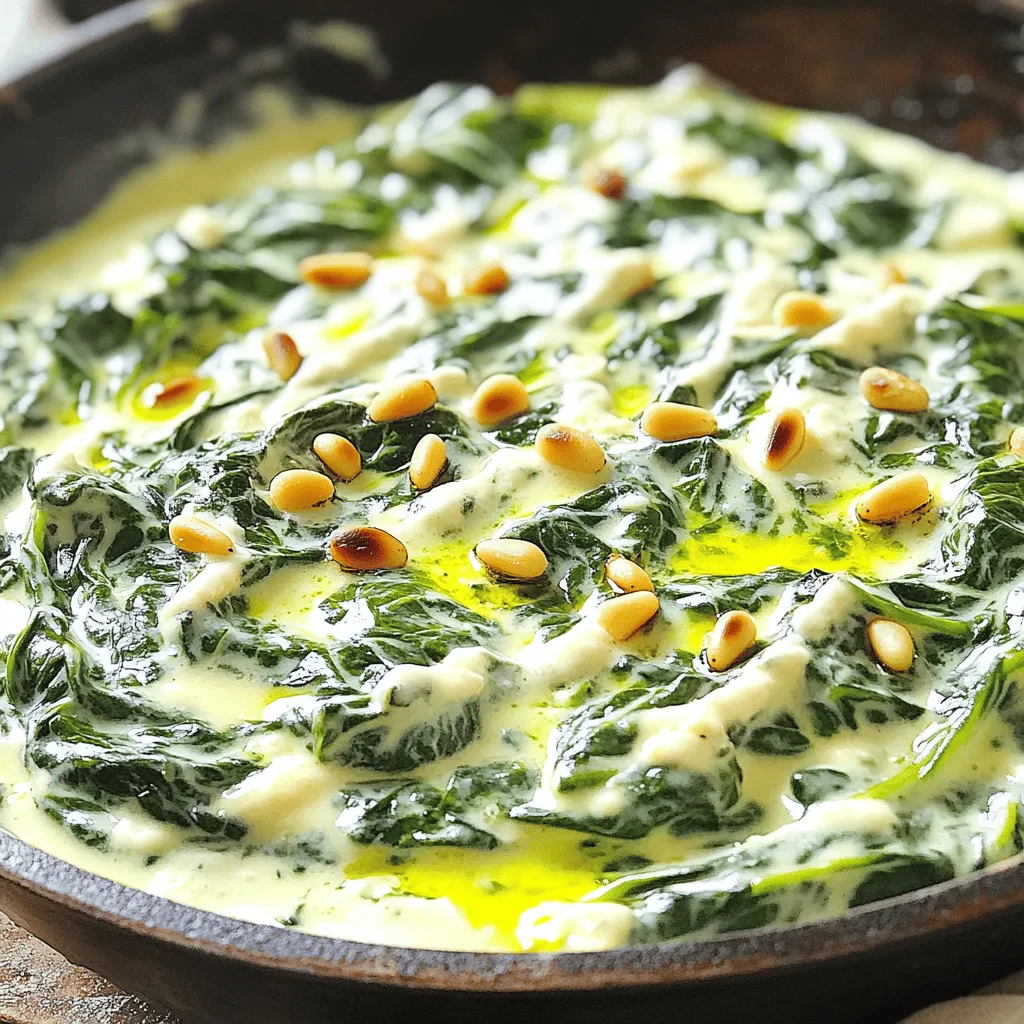
Skillet Creamed Spinach Rich and Creamy Delight
If you’re looking for a quick, creamy, and rich dish, you’ve found it! Skillet Creamed Spinach is not only easy
Read more…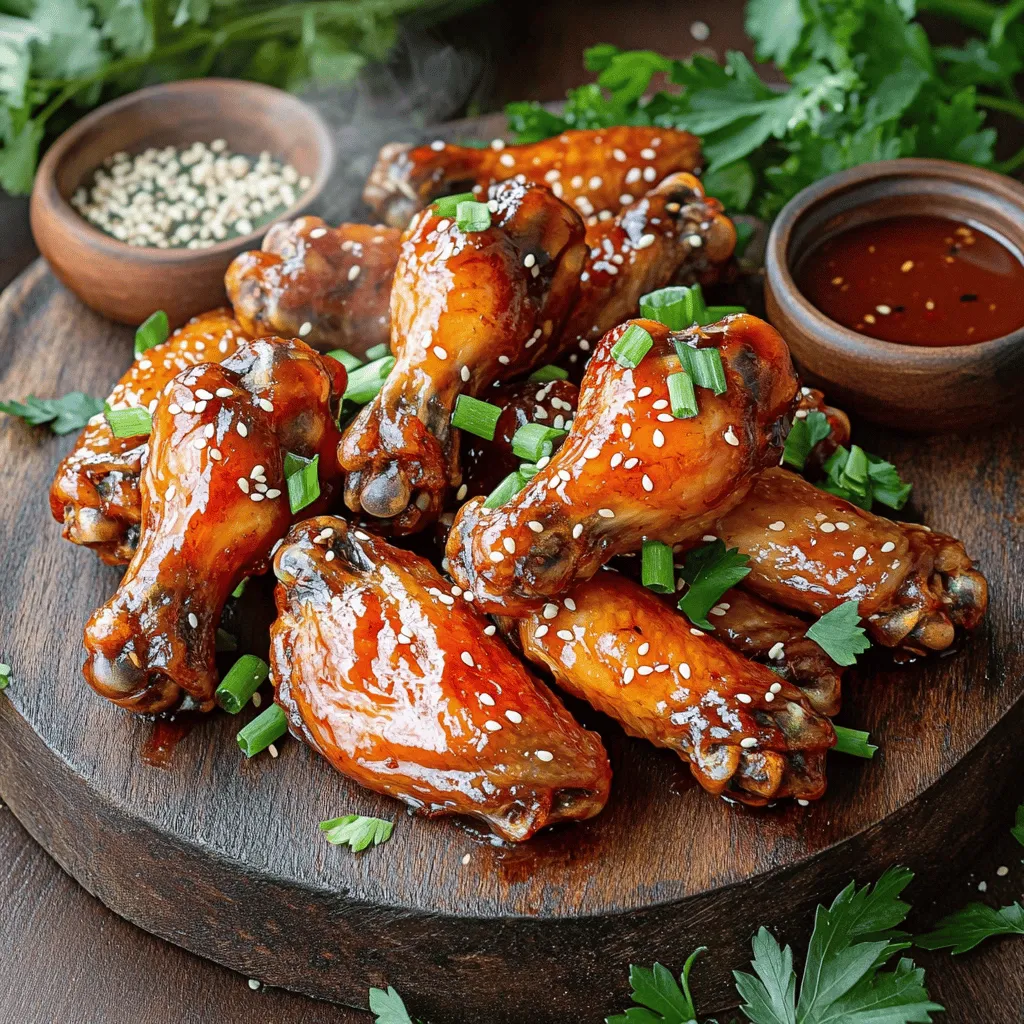
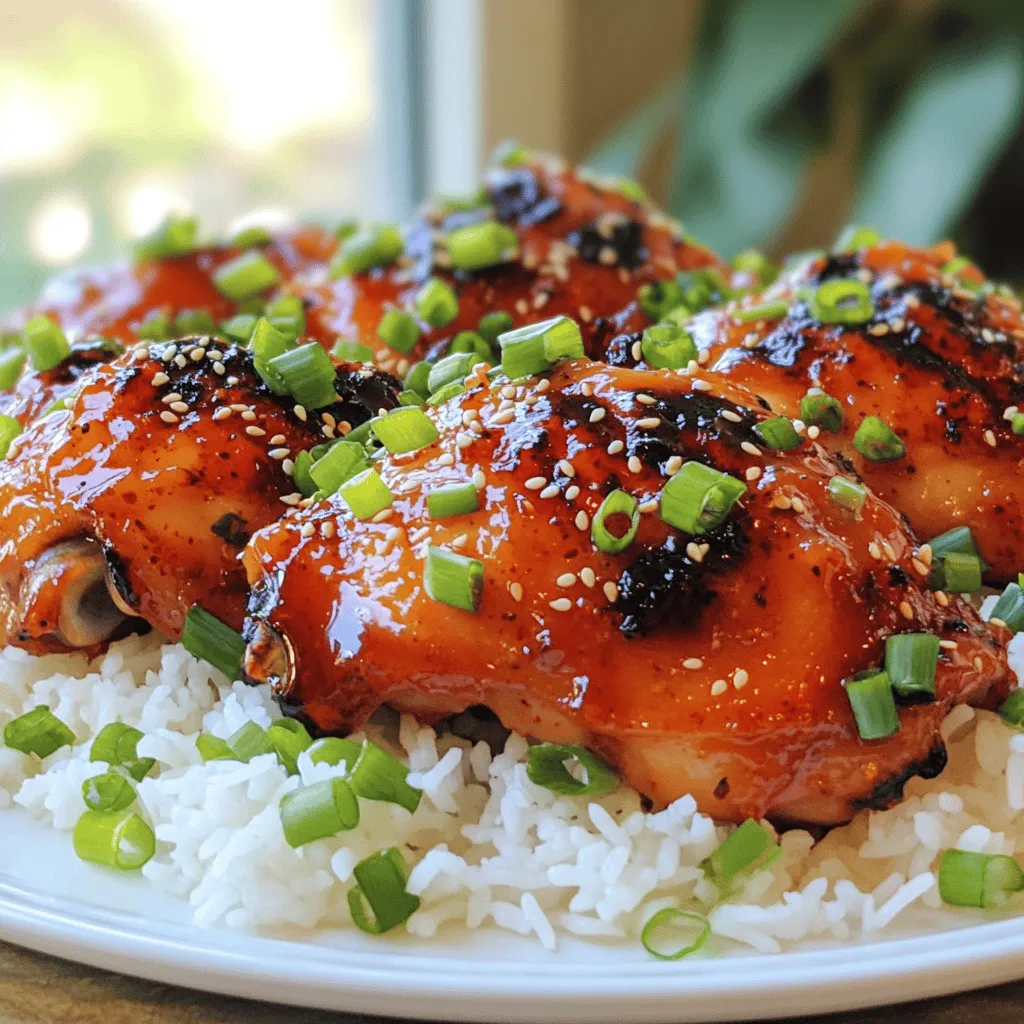
Sweet and Spicy Chicken Wings Flavorful and Easy Recipe
If you’re craving chicken wings packed with flavor, you’ve found the right recipe! This Sweet and Spicy Chicken Wings dish
Read more…
Chocolate Peanut Butter Energy Bites Easy Snack Idea
Looking for a quick and tasty snack? Try my Chocolate Peanut Butter Energy Bites! These bites are easy to make
Read more…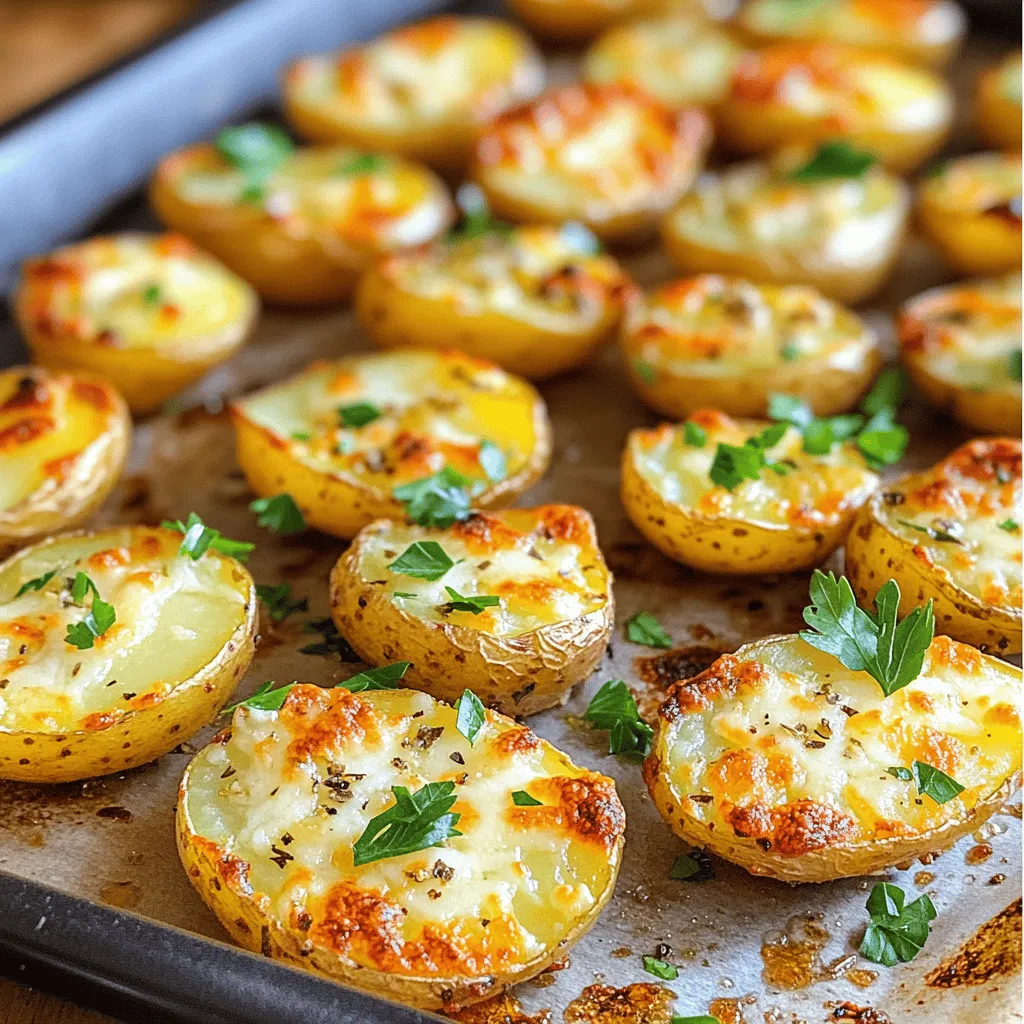
Garlic Parmesan Roasted Potatoes Irresistible Flavor
Are you ready to transform your dinner table with an easy, mouthwatering side dish? Garlic Parmesan Roasted Potatoes deliver that
Read more…browse recipes


Gluten-Free Blueberry Muffins Simple and Tasty Snack
Are you craving a tasty snack that’s also gluten-free? These Gluten-Free Blueberry Muffins are simple to make and loaded with flavor. I’ll guide you…
My Latest Desserts

Cream Soda Donut Holes Delightful Dessert Recipe
Are you ready to enjoy a fun twist on a classic treat? Cream Soda Donut Holes are sweet, fluffy, and Read Full Recipe-
Cookie Dough Bars Delightful Recipe for a Sweet Treat
If you’ve ever craved the rich, sweet goodness of cookie dough, then you’re in for a treat! My recipe for Read Full Recipe -
Chocolate Covered Cherries with Pistachio Dust Delight
Get ready to treat your taste buds with my “Chocolate Covered Cherries with Pistachio Dust Delight.” This sweet snack combines Read Full Recipe -
Peach Plum Crumble Bars Irresistible Sweet Treat
Are you ready for a dessert that combines the sweetness of peaches and plums? My Peach Plum Crumble Bars are Read Full Recipe -
Watercolor Buttercream Cupcakes Delightful Recipe Guide
Are you ready to bring some color to your baking? In this guide, I’ll show you how to make stunning Read Full Recipe -
No-Bake Peach Icebox Cake Simple and Refreshing Treat
If you’re seeking a sweet, cool treat that’s simple to make, it’s time to try my No-Bake Peach Icebox Cake. Read Full Recipe -
The Best Zucchini Bread Irresistible and Easy Recipe
Are you ready to bake the best zucchini bread that’s both irresistible and easy? This simple recipe combines fresh, grated Read Full Recipe -
Peach Cobbler Pancakes Delicious and Simple Recipe
Are you ready to bring a burst of flavor to your breakfast table? Peach Cobbler Pancakes are the perfect blend Read Full Recipe -
Olive Oil Zucchini Bread Moist and Flavorful Recipe
Welcome to your new favorite treat: Olive Oil Zucchini Bread! This recipe gives you a moist, flavorful loaf that’s perfect Read Full Recipe -
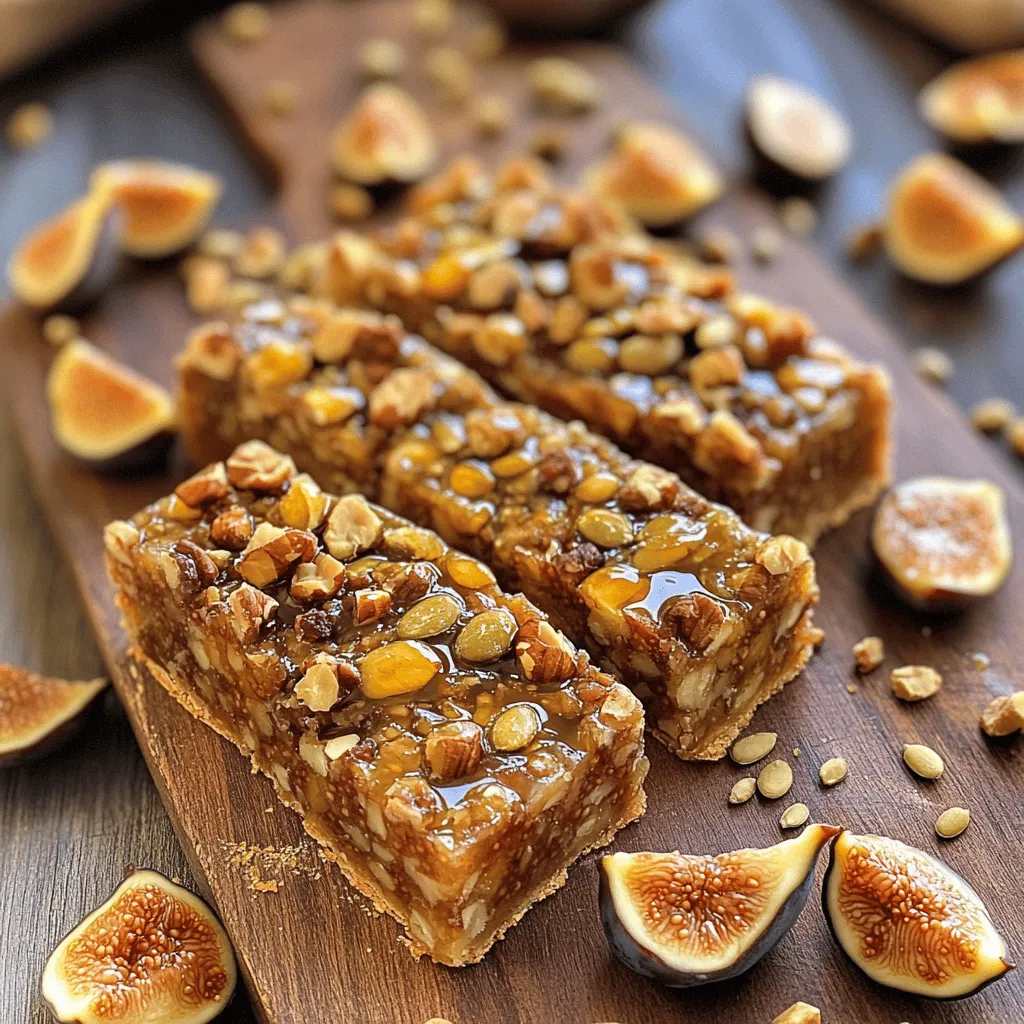
Fig and Walnut Bars Healthy and Flavorful Snack
If you’re searching for a tasty yet healthy snack, Fig and Walnut Bars are a perfect choice! Packed with nutritious Read Full Recipe


My Latest Recipes

hey,
i’m !
I’m so happy you’re here!
Food is my passion, and perfecting each dish is my craft. I can’t wait for you to try them let’s dive into this delicious journey side by side.
![- 1 lb (450g) chicken breast, cut into 1-inch pieces - 1/4 cup soy sauce (low sodium) - 2 tablespoons honey - 1 tablespoon rice vinegar - 2 cloves garlic, minced - 1 tablespoon ginger, grated - 1 teaspoon sesame oil - Wooden skewers, soaked in water for 30 minutes The main ingredient for these skewers is chicken breast. It’s lean and juicy. You will also need soy sauce for that deep umami flavor. Honey adds a sweet touch. Rice vinegar brightens the taste. Garlic and ginger give it that warm, aromatic kick. Lastly, sesame oil offers a nutty finish. - 1/4 cup soy sauce (low sodium) - 2 tablespoons honey - 2 cloves garlic, minced - 1 tablespoon ginger, grated For the marinade, mix soy sauce and honey in a bowl. Garlic adds depth, while ginger provides a fresh zing. This blend makes the chicken flavorful. Let it sit to soak up all the goodness. - 1/4 cup green onions, chopped (for garnish) - 1 tablespoon sesame seeds (for garnish) Once grilled, add a pop of color. Chopped green onions give a fresh taste. Sprinkle sesame seeds for crunch. These simple garnishes make your dish look and taste great. For the full recipe, check out the complete instructions on how to create these tasty teriyaki chicken skewers! How to Prepare the Marinade To make the marinade, grab a mixing bowl. Add 1/4 cup of soy sauce, 2 tablespoons of honey, and 1 tablespoon of rice vinegar. Then, add 2 minced garlic cloves and 1 tablespoon of grated ginger. Lastly, stir in 1 teaspoon of sesame oil. Whisk everything until the honey dissolves. This mix gives the chicken a sweet and salty flavor. Marinating the Chicken Cut 1 pound of chicken breast into 1-inch pieces. Place the chicken in a resealable bag or shallow dish. Pour the marinade over the chicken. Make sure every piece gets coated. Seal the bag or cover the dish, then refrigerate for at least 30 minutes. You can marinate it for up to 2 hours. This step is key for flavor. Preheating the Grill Before grilling, preheat your grill to medium-high heat. Aim for around 375°F (190°C). Proper heat helps achieve those tasty grill marks and ensures even cooking. Assembling the Skewers Pull the marinated chicken from the fridge. Thread the chicken pieces onto soaked wooden skewers, leaving a little space between each piece. This space helps the heat reach all sides of the chicken. Grilling Techniques Place the skewers on the preheated grill. Cook them for about 10 to 12 minutes. Turn the skewers occasionally for even cooking. Brush some reserved marinade on the skewers during the last few minutes for extra glaze and flavor. Ensuring Proper Cooking Temperature To check if the chicken is done, use a meat thermometer. The internal temperature should reach 165°F (75°C). This ensures the chicken is safe to eat and juicy. When done, remove the skewers from the grill. Let them rest for a few minutes before serving. For the full recipe, check out the detailed instructions. - Avoiding Dry Chicken: To keep your chicken juicy, use fresh chicken breast. Marinate the chicken for at least 30 minutes. This adds moisture and flavor. Grill on medium heat. Too high heat can dry it out. - Flavor Enhancements: Add some crushed red pepper for heat. You can also mix in orange juice for a citrus twist. Try adding a splash of pineapple juice for extra sweetness. - Serving Suggestions: Serve the skewers on a wooden board. This gives a rustic look. Place sliced cucumbers or bell peppers alongside for color. Drizzle extra teriyaki sauce over the skewers for a glossy finish. - Garnishing Ideas: Use chopped green onions and sesame seeds to garnish. They add crunch and a pop of color. You can also add a sprig of cilantro for a fresh touch. - Essential Kitchen Equipment: A good grill is key for these skewers. You’ll also need a mixing bowl for the marinade. Use a whisk to mix well. A meat thermometer ensures the chicken is cooked through. - Recommended Skewers: Use wooden skewers that have been soaked in water for 30 minutes. This helps prevent burning. Metal skewers are also great, as they can be reused. Want to know the full recipe? Check out the [Full Recipe] for all the details! {{image_2}} Chicken Alternatives You can swap chicken breast for other meats. Try using: - Chicken thighs for juicier flavor. - Pork tenderloin for a different taste. - Shrimp for a lighter option. - Firm tofu for a vegetarian twist. Vegan Options For a vegan version, use: - Marinated tempeh for protein. - Seitan for a meat-like texture. - Grilled vegetables like bell peppers or zucchinis. Different Marinades You can change the flavor by using different marinades. Here are some ideas: - Teriyaki with orange juice for a citrus kick. - Honey and sriracha for a sweet-spicy blend. - Miso paste for a deeper umami flavor. Spice Level Adjustments If you want heat, add some spice! Consider: - Red pepper flakes for mild warmth. - Fresh chili slices for a bold kick. - Sriracha mixed into the marinade for heat. Oven-Baking If you can’t grill, try baking the skewers. Here’s how: 1. Preheat the oven to 400°F (200°C). 2. Place the skewers on a baking sheet lined with foil. 3. Bake for about 15-20 minutes, flipping halfway through. Skillet Cooking You can also cook skewers in a skillet. Follow these steps: 1. Heat a little oil in a pan over medium heat. 2. Add the skewers and cook for 8-10 minutes. 3. Turn occasionally for even cooking. For a full recipe, refer to the [Full Recipe]. After you enjoy your teriyaki chicken skewers, store any leftovers carefully. Place them in an airtight container. This keeps moisture in and prevents odors. You should refrigerate them within two hours of cooking. For longer storage, freezing is an option. First, let the skewers cool completely. Then, wrap them tightly in plastic wrap and place them in a freezer-safe bag. They can last up to three months in the freezer. When it's time to enjoy your leftovers, reheating is key. You can use an oven or a microwave. For the oven, preheat it to 350°F (175°C). Place the skewers on a baking sheet and cover them with foil. Heat for about 10-15 minutes until warm. If you prefer the microwave, place the skewers on a microwave-safe plate. Heat for 1-2 minutes. This method is quick but can make the chicken a bit rubbery. To keep the texture and flavor, brush with a little teriyaki sauce before reheating. Wondering how long your teriyaki chicken skewers last? In the fridge, they stay good for about 3-4 days. Always check for signs of spoilage. Signs include an off smell or a change in color or texture. If you see any of these, it's best to throw them out. Keeping your food safe is important for health. Enjoy your teriyaki chicken skewers fresh and flavorful! For the full recipe, check out the section above. What can I use instead of chicken? You can use tofu, shrimp, or beef. Tofu works well as a meat substitute. Just cut it into cubes and marinate it like chicken. Shrimp grills quickly, so adjust cooking time. Beef can also be cut into strips and cooked the same way. How do I know when the chicken is done? Check the chicken's internal temperature. It should reach 165°F (75°C). You can also look for clear juices. If the juices run clear, the chicken is likely done. Make sure it has nice grill marks too! Is it gluten-free? Teriyaki chicken skewers can be gluten-free. Use gluten-free soy sauce or tamari in your marinade. Always check labels to be sure. This helps avoid gluten for those with sensitivities. Can I make it low-carb? Yes, you can make it low-carb. Skip the honey or use a low-carb sweetener. Serve the skewers with low-carb veggies. Zucchini or bell peppers are great options. They add color and flavor without extra carbs. What to serve with teriyaki chicken skewers? Serve with rice or noodles for a full meal. You can also pair it with a fresh salad. A cucumber or carrot salad adds crunch and balances the flavors. Any side dish recommendations? Consider grilled vegetables or a simple stir-fry. You can also serve it with steamed broccoli or snap peas. These sides add color and nutrition to your meal. For an extra touch, drizzle some teriyaki sauce over everything for a tasty finish. For the complete method to make these delightful skewers, check the Full Recipe. In this article, we explored how to make delicious teriyaki chicken skewers. We covered key ingredients, from chicken and teriyaki sauce to garnishes. I shared step-by-step instructions for marination, grilling, and cooking. You learned tips to keep your chicken moist and tasty. We also discussed variations and how to store leftovers. Finally, I answered common questions to help you succeed. With these insights, you can easily create a tasty meal that impresses everyone. Enjoy your cooking journey!](https://mysavedrecipe.com/wp-content/uploads/2025/04/883cdec6-da6f-49f7-a2b3-676d19808b7c-300x300.webp)
. To make sure your chicken stays juicy, marinate it well. The marinade has honey and soy sauce, which help keep the chicken moist. Let it sit for at least 30 minutes. If you have time, let it marinate for up to two hours for even better flavor. When cooking, don't rush. Cook the chicken over medium-high heat for 6-7 minutes on each side. Let it rest for 5 minutes after cooking to keep the juices inside. To boost the BBQ taste, use a good quality sauce. Choose a sauce that matches your taste—sweet, smoky, or spicy. You can also add extra seasonings to your marinade. Try adding a splash of apple cider vinegar for tang or a bit of hot sauce for heat. Brush the reserved marinade on the chicken in the last few minutes of cooking. This gives it a nice glaze and intensifies the BBQ flavor. I recommend using jasmine rice for this dish. Its light, fluffy texture pairs well with the chicken and sauce. If you want a different flavor, try basmati rice. It has a nutty taste that also works nicely. Cook the rice according to the package directions. Once cooked, mix it with the remaining honey BBQ marinade. This adds an extra layer of flavor to the rice, making it even more delicious. You can find the Full Recipe for detailed steps. {{image_2}} If you like heat, try adding chili flakes or hot sauce to the marinade. This will give your dish a nice kick. Use about one teaspoon of chili flakes for a mild heat or more for extra spice. You can also switch out the barbecue sauce for a spicy version. This adds a new layer of flavor to the honey BBQ chicken rice. You can make a great vegetarian version of this dish. Instead of chicken, use firm tofu or seitan. For tofu, press it first to remove extra water. Cut it into cubes and marinate just like the chicken. For seitan, cut it into strips and use the same marinade. Both options absorb flavors well, making them tasty alternatives. For serving, I love to add some fresh veggies. Try steamed broccoli or a mixed green salad. They add color and crunch to your meal. You can also serve it with a side of grilled corn or avocado slices. This makes for a well-rounded meal. For drinks, sweet tea or lemonade pairs nicely with this dish. Don’t forget to check out the Full Recipe for all the details! After you enjoy your Honey BBQ Chicken Rice, store leftovers in an airtight container. This keeps them fresh and tasty. Make sure the rice and chicken cool down first before sealing the container. You can keep it in the fridge for up to four days. If you want to keep it longer, consider freezing. To reheat your dish, you can use the microwave or the stove. For the microwave, place your food in a bowl and cover it with a damp paper towel. Heat in short bursts, stirring in between. This helps keep the chicken moist. If you use the stove, add a splash of water to the pan. Heat on low, stirring often to prevent sticking. This way, the meal stays juicy and flavorful. If you want to save your Honey BBQ Chicken Rice for later, freezing is a great option. Divide the meal into single servings and place them in freezer-safe bags. Make sure to remove as much air as possible. Label the bags with the date. You can freeze it for up to three months. When you're ready to eat, thaw in the fridge overnight before reheating. Enjoy your delicious meal again! If your chicken turns out dry, don't worry. You can fix it! First, try to add a bit of moisture. Drizzle some chicken broth or extra barbecue sauce over the chicken. This will help bring back some juiciness. For next time, marinate your chicken longer. A good soak helps keep it moist. Also, make sure you cook it just right. Use a meat thermometer to check for 165°F (75°C). This way, your chicken will be juicy every time. Yes, you can use different rice! Jasmine rice is great, but feel free to swap. Brown rice adds a nutty taste and is healthier. You can even use white rice or basmati rice. Just make sure to cook it according to the package instructions. Whichever rice you choose, it will soak up the honey BBQ flavor well. You can store Honey BBQ Chicken Rice for up to four days. Keep it in an airtight container in the fridge. This way, it stays fresh and tasty. If you want to keep it longer, freeze it. It can last up to three months in the freezer. Just remember to thaw it in the fridge before reheating. Enjoy the flavors again later! For the full recipe, check out the provided link. This guide covered how to make Honey BBQ Chicken Rice. We explored key ingredients, cooking steps, and tips for juicy chicken. You also learned fun variations and storage methods. In conclusion, this dish is easy to adjust for your taste. Whether you want spice or a vegetarian option, you can make it yours. Enjoy your cooking, and don't forget to share with friends!](https://mysavedrecipe.com/wp-content/uploads/2025/06/ba69abde-fc7d-4e4b-a024-7380d24b21ec-300x300.webp)
![Shrimp and Zucchini Noodles Basics For this dish, I use: - 1 pound large shrimp, peeled and deveined - 4 medium zucchinis, spiralized into noodles Zucchini noodles, or zoodles, make a great low-carb base. They soak up flavors and add a fresh crunch. The shrimp gives the dish its protein and a sweet, salty taste. Flavor Enhancers: Garlic, Lemon, and More To boost the taste, I add: - 4 cloves garlic, minced - 2 tablespoons olive oil - 1 tablespoon unsalted butter - 1 cup cherry tomatoes, halved - 1 tablespoon lemon juice - 1 teaspoon red pepper flakes (adjust to taste) Garlic and lemon create a bright, zesty flavor. The tomatoes add a juicy pop. Olive oil and butter make the dish rich and smooth. Red pepper flakes give it a nice kick. Garnishes and Seasonings To finish, I use: - Salt and pepper to taste - Fresh parsley, chopped (for garnish) - Zest of 1 lemon (for added flavor) Fresh parsley adds color and freshness. The lemon zest enhances the citrus notes. These garnishes make the dish look and taste gourmet. For the full recipe, check our detailed guide on how to prepare this delightful dish! Spiralizing Techniques To create zucchini noodles, start with fresh zucchinis. A spiralizer is the best tool for this task. It makes long, thin noodles that mimic pasta. Simply wash the zucchini, trim the ends, and twist it through the spiralizer. If you don’t have one, don’t worry! You can use a vegetable peeler to make thin strips. Just slice the zucchini lengthwise into long ribbons. Alternative Methods for Zucchini Noodles Other tools like a julienne peeler or a box grater work well too. If you want to save time, pre-spiralized zucchini is available at many stores. Keep in mind, the thinner the noodle, the quicker they cook. Tips for Perfectly Cooked Shrimp Start by heating olive oil and butter in a large skillet. Use medium heat to avoid burning. When the butter melts, add minced garlic. Sauté for just about 30 seconds. This brings out the flavor without burning it. Next, toss in the shrimp. Cook them for about 2-3 minutes. They should turn pink and opaque. This shows they are perfectly cooked. Avoiding Common Mistakes Don’t overcrowd the pan. If the shrimp are too close, they will steam instead of sear. This can make them rubbery. Also, avoid cooking shrimp for too long. Overcooked shrimp can become tough. Timing for Adding Each Ingredient After cooking the shrimp, add halved cherry tomatoes. Cook for about 2 minutes until they soften. Next, stir in the zucchini noodles. Toss them gently to combine everything. Cook for just 2-3 minutes. The noodles should be heated but still crunchy. Heat Levels Explained It's important to keep the heat at medium throughout cooking. This helps all the ingredients cook evenly without burning. If you find it's too hot, lower the heat slightly. You want a gentle simmer, not a vigorous boil. For the full recipe, check out the [Full Recipe]. - Using Less Oil or Butter To cut calories, use less oil and butter. You can swap half the butter with vegetable broth. This keeps the dish moist but cuts down on fat. - Recommended Cooking Methods Sautéing shrimp in a non-stick pan helps reduce oil use. Steaming zucchini noodles instead of sautéing can also lower calories. This keeps the noodles crunchy and fresh. - Additional Herbs and Spices You can add fresh basil or thyme to boost flavor. A pinch of smoked paprika can give a nice twist. Always taste as you go to find the right balance. - Combining with Other Vegetables Mix in bell peppers or spinach for color and taste. These veggies add nutrients and make your dish more vibrant. You can also add a handful of arugula for a peppery kick. - Pairing with Other Healthy Dishes Serve your shrimp scampi with a side salad or whole-grain bread. You could also pair it with quinoa for a complete meal. This adds fiber and keeps you feeling full. - Presentation Ideas Use a large, shallow bowl for serving. Twirl the zucchini noodles for a fun look. Top with extra parsley and lemon zest for color and freshness. This makes the dish inviting and appetizing. For the full recipe, check out the details above and enjoy making this delightful dish! {{image_2}} Gluten-Free Options This recipe is naturally gluten-free. You can enjoy it without worry. Just make sure all ingredients are gluten-free. For example, check the labels on your shrimp and any seasonings you use. Low-Carb Adjustments Zucchini noodles are a great low-carb choice. If you want fewer carbs, skip the cherry tomatoes. They add some sugar. You can also use less lemon juice to cut carbs even more. Seafood Alternatives If you don’t like shrimp, try scallops or chicken. Both cook well in this dish. Just adjust the cooking time. Scallops need about 3-4 minutes, while chicken takes a bit longer. Vegetable Variations You can swap zucchini for other veggies. Consider using spaghetti squash or yellow squash. Each offers unique flavors while still keeping it healthy. Spicy vs. Mild I love a bit of heat in my dishes. If you do too, add more red pepper flakes. For a milder version, cut back on them or leave them out. Taste it as you go to find your perfect level. Adding Unique Ingredients Get creative! Try adding capers or olives for a briny twist. You can also mix in spinach for added greens. Just remember to cook it down with the shrimp. Each new ingredient can change the whole dish. For more ideas, check the Full Recipe for Skinny Shrimp Scampi with Zucchini Noodles. For storing your Skinny Shrimp Scampi with Zucchini Noodles, follow these tips: - Refrigeration Guidelines: Store leftovers in an airtight container. They keep well in the fridge for up to three days. Make sure to cool the dish before sealing it. This helps prevent condensation and sogginess. - Freezing Recommendations: You can freeze this dish, but I recommend freezing the shrimp and zucchini noodles separately. This way, they maintain better texture. Use freezer-safe bags or containers, and they can last up to three months. Reheating is easy if you follow a few steps: - Best Methods for Reheating: The best way to reheat is in a skillet over low heat. This keeps the shrimp tender and the zucchini noodles crunchy. You can also use a microwave, but do it in short bursts to avoid overcooking. - Preserving Flavor and Texture: Add a splash of olive oil or a bit of broth when reheating. This helps keep the dish moist and flavorful. Stir gently to avoid breaking the noodles. Knowing when to enjoy your dish is key: - Duration for Safe Consumption: If stored correctly, eat the dish within three days when refrigerated. For frozen portions, consume within three months for best quality. - Signs of Spoilage: Look for changes in smell, color, or texture. If the shrimp smells off or the noodles feel mushy, it's best to toss it. Always trust your senses; they guide you well! Can I use frozen shrimp? Yes, you can use frozen shrimp. Just thaw them before cooking. Place the shrimp in cold water for about 15 minutes. This will help them thaw quickly. Make sure they are peeled and deveined for the best results. What can I substitute for zucchini noodles? If you don't have zucchini, try using spaghetti squash or carrots. You can also use whole wheat pasta for a more traditional dish. Each option adds its own flavor and texture. Calorie count per serving Each serving of Skinny Shrimp Scampi with Zucchini Noodles has about 300 calories. This makes it a light yet filling meal option. Protein and nutrient breakdown This dish provides around 25 grams of protein per serving. It also has healthy fats from olive oil and butter. The zucchini adds fiber and vitamins, making it nutritious. What is the best way to avoid overcooking shrimp? Cook shrimp for only 2-3 minutes per side. They should turn pink and opaque. Remove them from heat as soon as they change color. This keeps them tender and juicy. How can I make this dish more flavorful? Add more garlic or lemon zest for extra taste. Fresh herbs like basil or thyme also enhance flavor. You can adjust red pepper flakes for spice. These tips help create a rich, delicious meal. This blog post detailed how to make a healthy shrimp and zucchini noodle dish. We covered ingredients, cooking steps, and storage tips. Remember, using fresh flavors like garlic and lemon makes a difference. Avoid overcooking shrimp for the best taste. You can also adjust the recipe to fit different diets. I hope these ideas inspire you to enjoy a tasty, healthy meal with ease. Try experimenting and have fun with your cooking!](https://mysavedrecipe.com/wp-content/uploads/2025/05/7b4b3630-b8d0-4f6c-ab6e-4fd87f177afa-300x300.webp)
Spicy Korean Chicken Flavorful and Easy Recipe
If you crave bold flavors and easy cooking, you’re in the right place! This Spicy Korean Chicken recipe packs a punch with simple ingredients…