Latest & Greatest
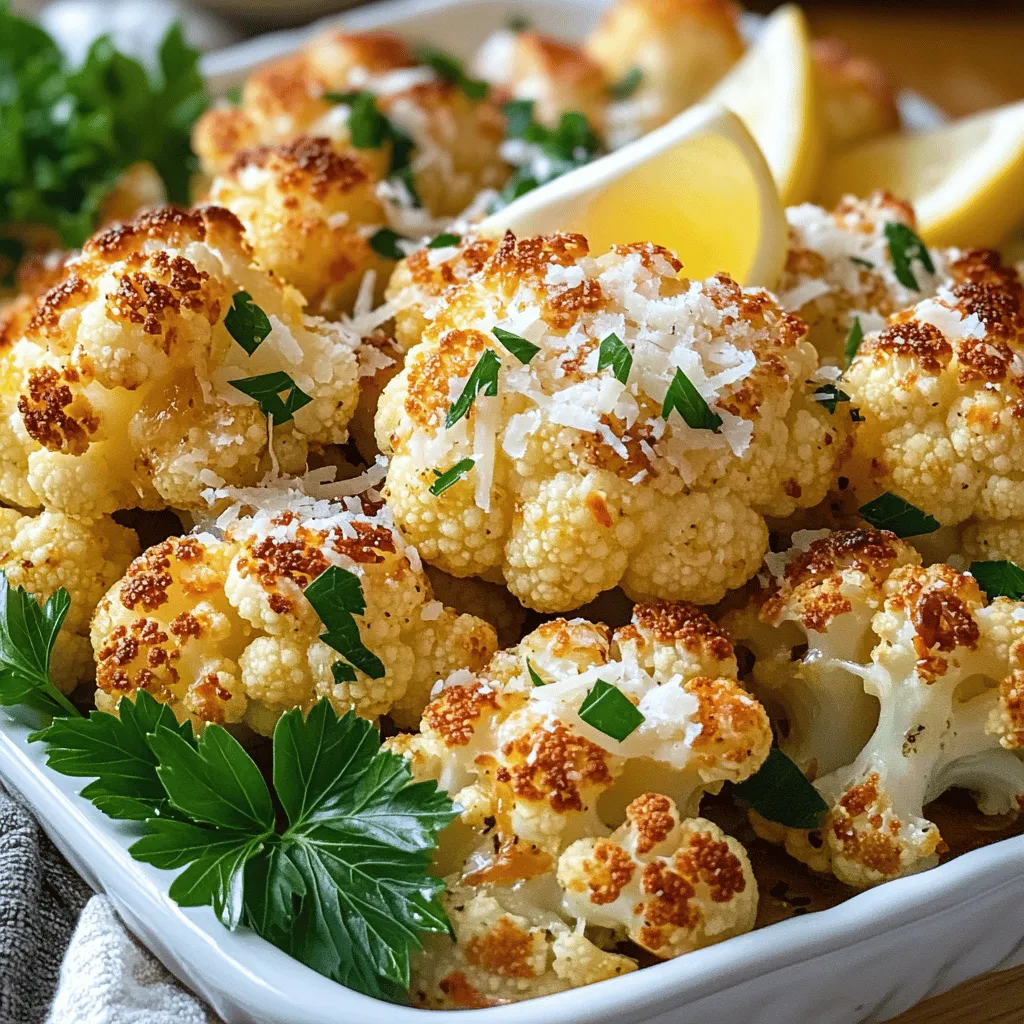
Garlic Parmesan Roasted Cauliflower Easy Flavorful Side
If you want a side dish that’s both easy and packed with flavor, I have just the recipe for you!
Read more…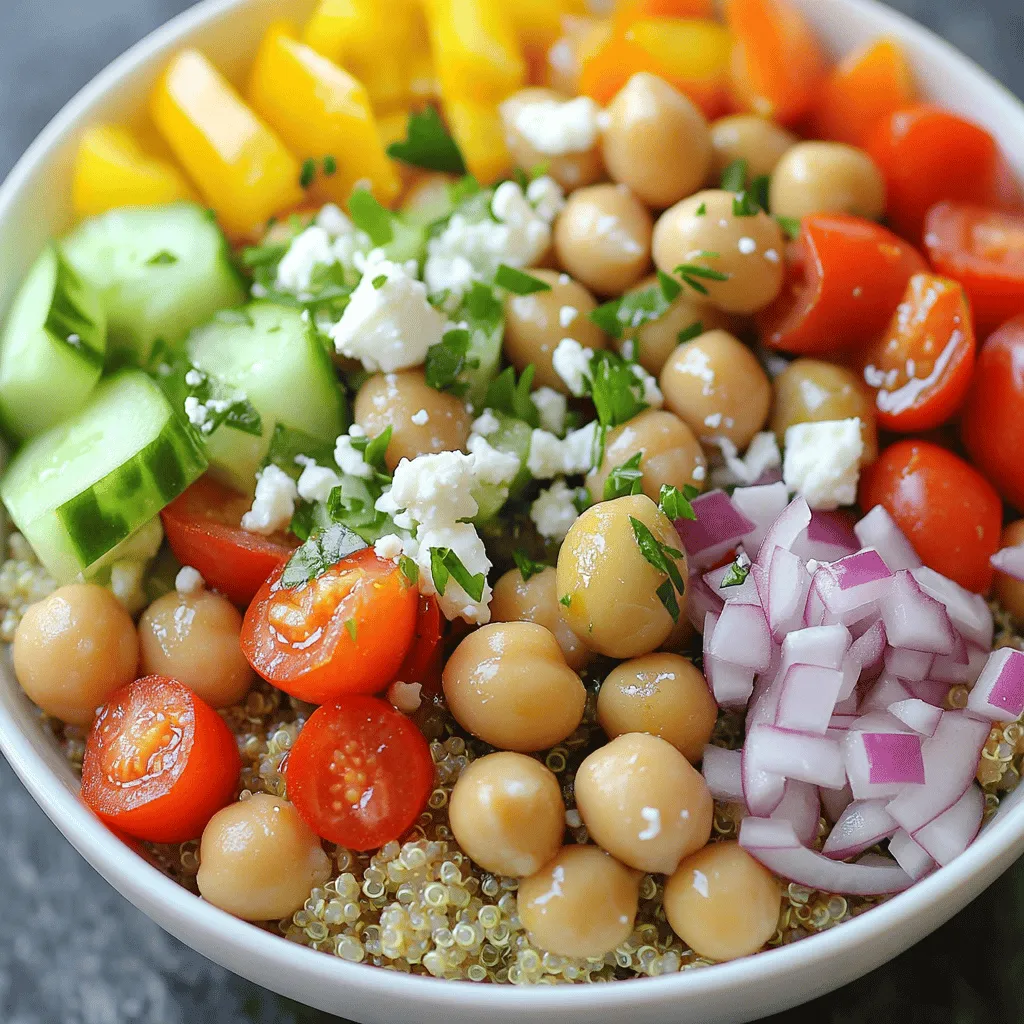
Mediterranean Quinoa Bowls Flavorful and Healthy Meal
Are you ready to elevate your meal game? Mediterranean Quinoa Bowls are your answer! Packed with wholesome ingredients and bursting
Read more…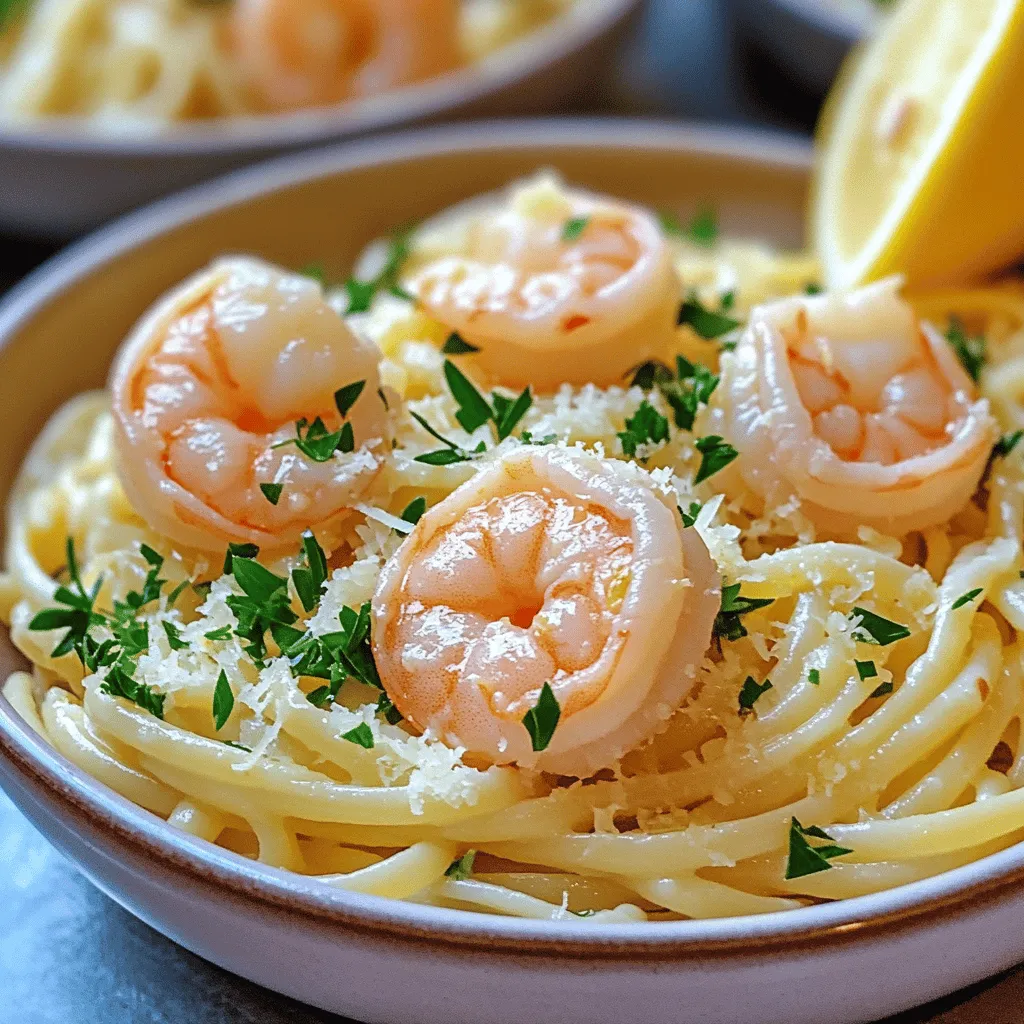
Zesty Lemon Garlic Shrimp Pasta Flavorful Dinner Delight
If you crave a quick, tasty dinner, you’re in the right place! Zesty Lemon Garlic Shrimp Pasta bursts with fresh
Read more…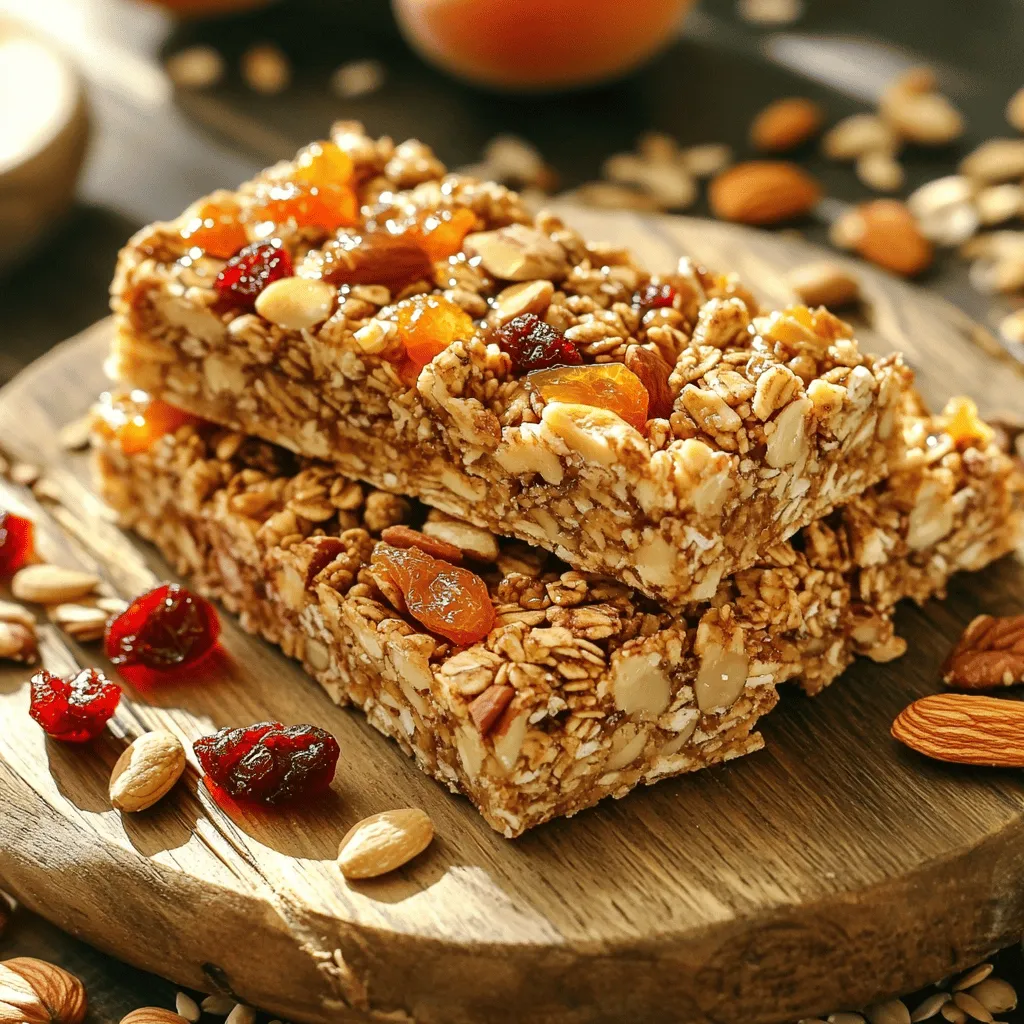
Homemade Granola Bars Simple and Healthy Snack
Looking for a quick, tasty snack that’s also healthy? You’ve come to the right place! Homemade granola bars are simple
Read more…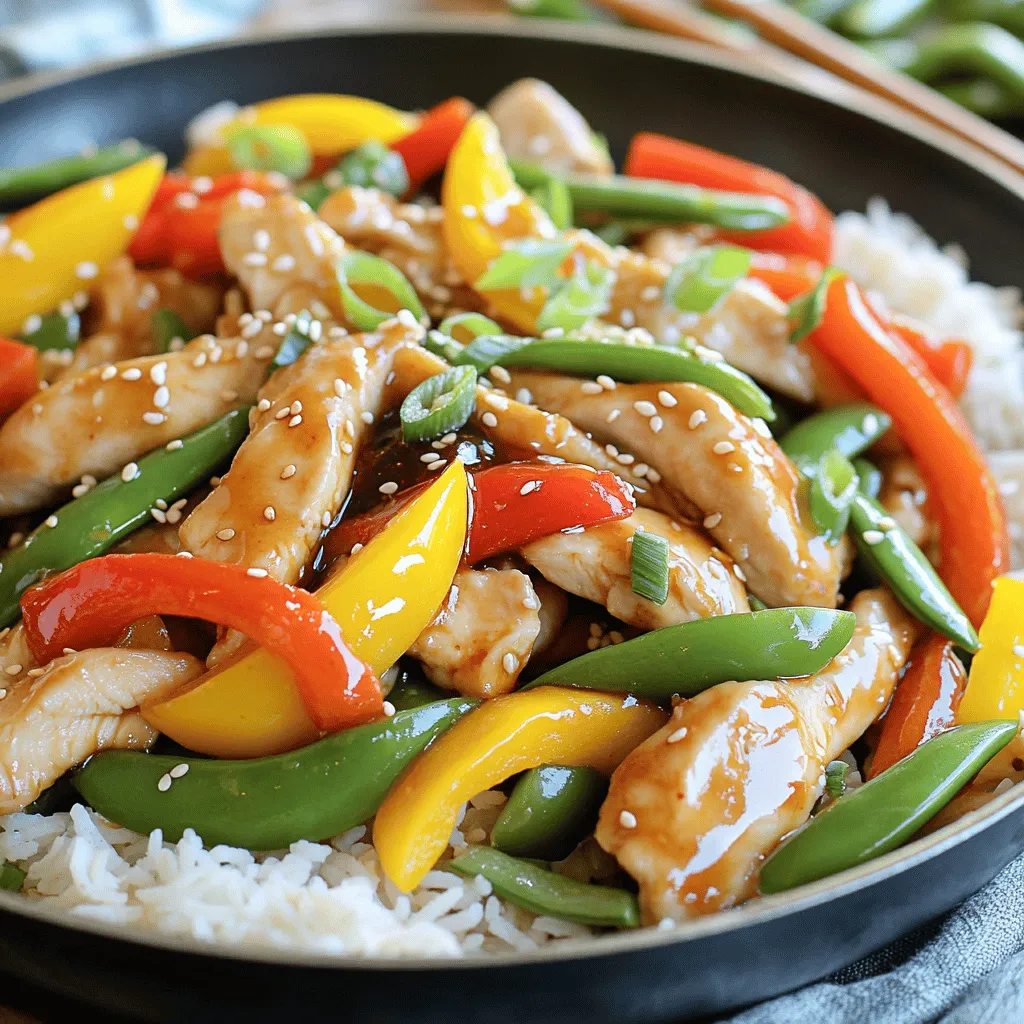
Sweet and Spicy Chicken Stir-Fry Quick Flavorful Meal
Looking for a quick and tasty meal? My Sweet and Spicy Chicken Stir-Fry is perfect for you! In just 20
Read more…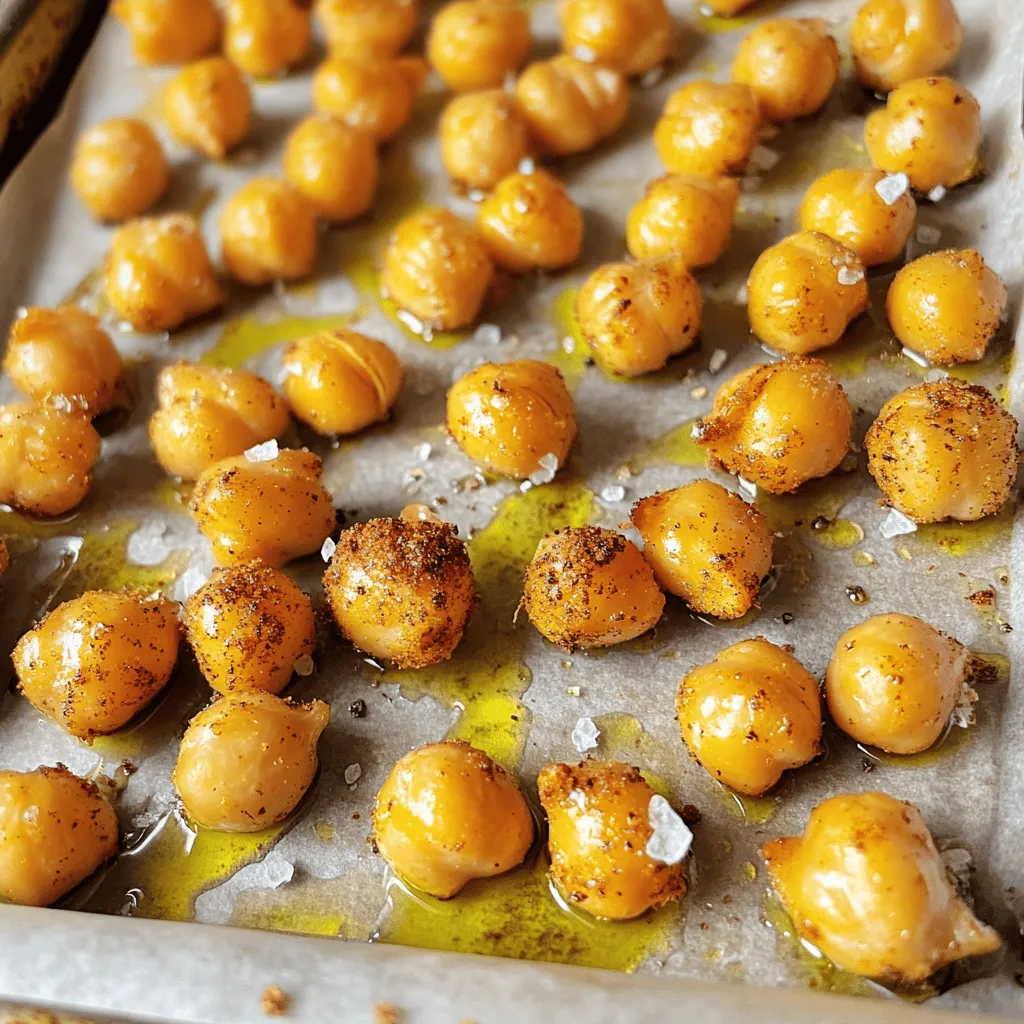
Crispy Roasted Chickpeas Flavorful and Healthy Snack
Looking for a tasty, healthy snack that’s easy to make? These crispy roasted chickpeas are your new go-to treat! With
Read more…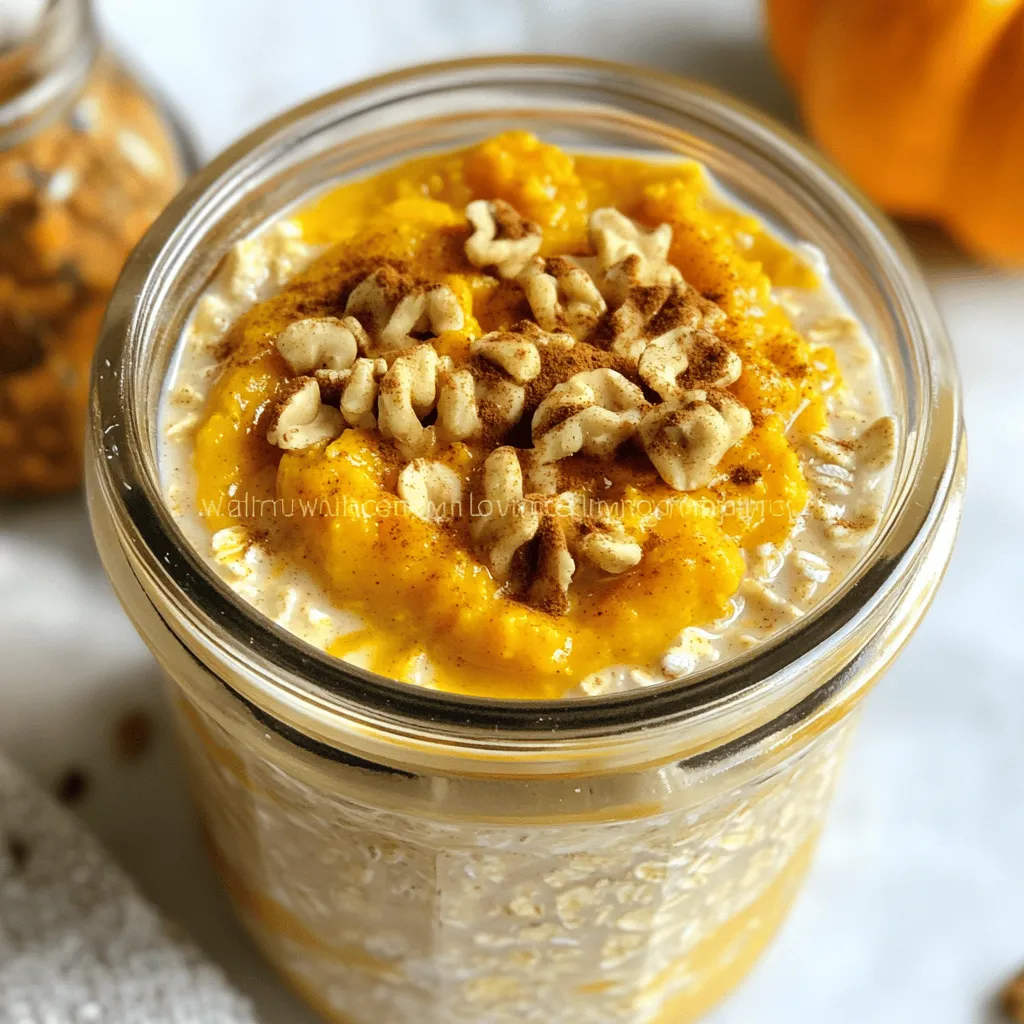
Pumpkin Spice Overnight Oats Simple Fall Breakfast
If you crave a cozy fall breakfast, let’s dive into Pumpkin Spice Overnight Oats! This easy recipe combines warm, comforting
Read more…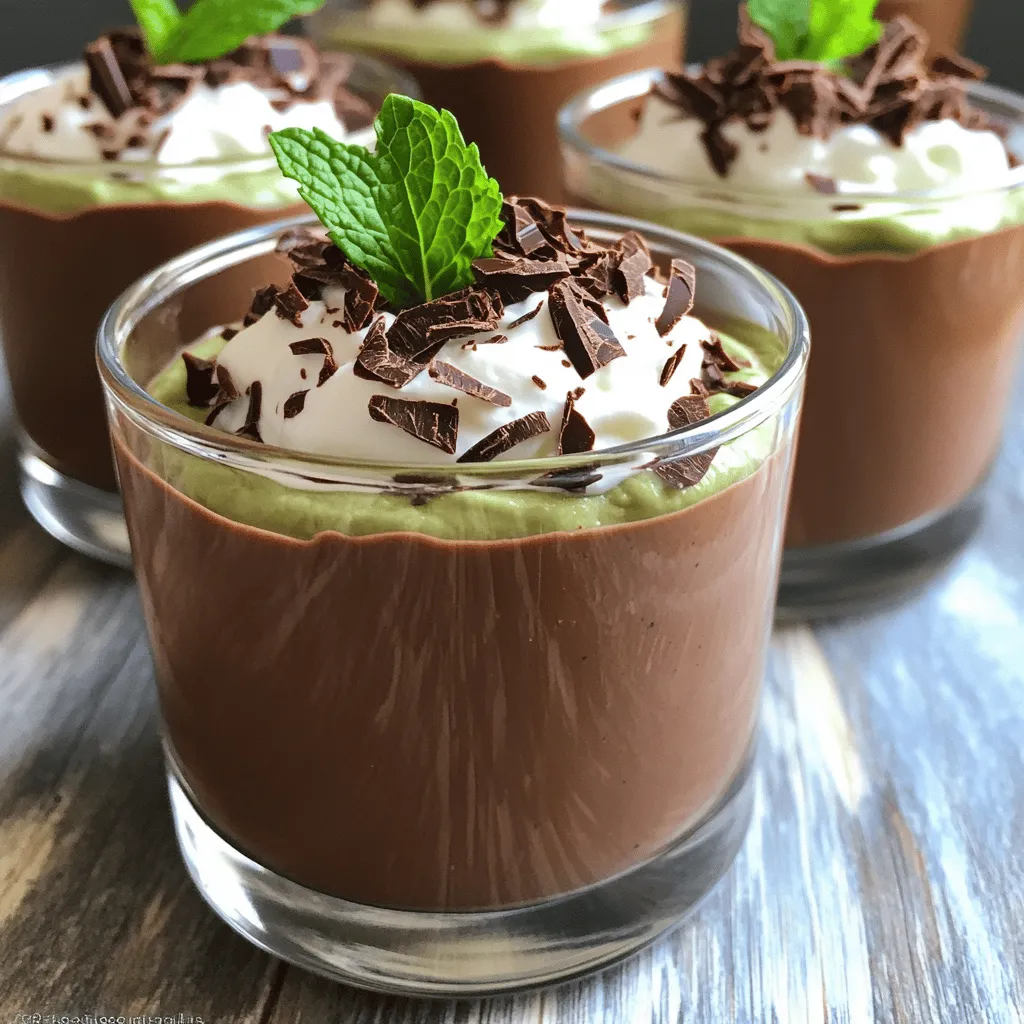
Chocolate Avocado Mousse Rich and Creamy Delight
Are you ready to indulge in a guilt-free dessert? This Chocolate Avocado Mousse is rich, creamy, and packed with healthy
Read more…browse recipes

![To make this refreshing Mango Salsa with Avocado, you need fresh, simple ingredients. Each one plays a role in creating the perfect balance of flavor. Here’s what you’ll need: - Ripe mango - Ripe avocado - Red onion - Red bell pepper - Jalapeño pepper - Fresh cilantro - Lime juice - Olive oil - Salt and pepper Using ripe mango and avocado is key. Their sweetness and creaminess make the salsa shine. The red onion and red bell pepper add crunch and color. The jalapeño gives a nice kick, but you can adjust it to your taste. Fresh cilantro brings brightness, while lime juice and olive oil add zest and richness. Finally, salt and pepper enhance all the flavors. For the full recipe, click [Full Recipe]. Now, let’s gather these ingredients and get ready to make a fresh, vibrant salsa! To make delicious mango salsa with avocado, follow these simple steps. - Dice mango and avocado: Start by peeling the mango. Cut it into small pieces. Then, take the avocado and cut it the same way. This gives nice bites in the salsa. - Chop red onion and red bell pepper: Next, take a small red onion. Chop it finely. Then, dice the red bell pepper. Make sure to keep the pieces small for even flavor. - Mince jalapeño pepper: If you like some heat, grab a jalapeño. Remove the seeds and chop it very finely. This will add a nice kick to your salsa. - Combine ingredients in a bowl: Now, take a medium bowl. Add the diced mango, avocado, chopped onion, diced bell pepper, and minced jalapeño. Gently mix them together. Be careful not to mash the avocado. - Mix lime juice and olive oil: In a small bowl, squeeze the juice from two limes. Add one tablespoon of olive oil. Whisk them together until well blended. Once you finish these steps, pour the lime and oil mix over the salsa. Add salt and pepper to taste. Toss it all gently for the best flavor. Let it sit for 15 minutes before serving. This is important because it lets the flavors come together beautifully. For the full recipe, check out the details above. Choosing ripe mango and avocado is key for great flavor. A ripe mango should feel slightly soft when you gently press it. Look for a bright color, too. For avocados, check for a dark skin. It should yield a bit when pressed. If they're hard, give them a few days to ripen. Chopping is an art. Use a sharp knife for smooth cuts. Start by slicing the mango and avocado in half. Remove the pit safely. Then, dice them into small cubes. For onion and bell pepper, chop them finely. This helps blend the flavors nicely. Allowing flavors to meld makes a big difference. After mixing all your ingredients, let your salsa sit for at least 15 minutes. This resting time allows the lime juice to soak in. The taste will be more vibrant and refreshing! For the full recipe, check out the details above. Enjoy your fresh and flavorful salsa! {{image_2}} Mango salsa with avocado is already a hit, but you can make it even better! Here are some fun ideas to mix things up. - Adding pineapple for sweetness: Pineapple adds a nice touch. It makes the salsa sweeter and more tropical. Just chop some ripe pineapple and mix it in. The sweetness of pineapple balances the heat from the jalapeño. - Incorporating black beans for protein: Want to make your salsa heartier? Add black beans! They bring protein and fiber. Rinse a can of black beans and stir them in. This twist makes the salsa filling and great for a meal. - Using different herbs like mint or basil: Want a fresh taste? Try using mint or basil instead of cilantro. Both herbs add unique flavors. Mint gives a cool touch, while basil adds a sweet note. Just chop your chosen herb and mix it in for a new twist. Feel free to try these variations and find your favorite! For the full recipe, check out the delicious Mango & Avocado Fiesta Salsa. To keep your salsa fresh, store it in a tight container. It’s best to refrigerate it right after making it. This keeps all the flavors bright and tasty. - Best practices for refrigerating: Place your mango salsa in an airtight container. This helps prevent air from getting in. The salsa will stay fresh for about 3 days in the fridge. After that, the ingredients may lose their crunch. - Freezing mango salsa: You can freeze your salsa if you want to keep it longer. Use a freezer-safe container and leave some space at the top. Salsa expands when it freezes. It stays good for up to 3 months. When you're ready to eat it, let it thaw in the fridge overnight. - Shelf life of ingredients: Each ingredient has a different shelf life. Fresh mango and avocado are best eaten quickly. They can spoil fast. Red onion and bell pepper last longer. They can stay fresh for about a week in the fridge. Keep an eye on them to enjoy the best taste. For a full recipe, check out the [Full Recipe]. Mango Salsa with Avocado can be mild or spicy. The heat comes from the jalapeño pepper. If you want less heat, remove the seeds and ribs from the jalapeño. For more spice, add more jalapeño or use a hotter pepper. This salsa is fresh and bright, not overpowering. Yes, you can make this salsa ahead of time. However, I recommend making it no more than a few hours before serving. The avocado can brown if left too long. To slow browning, squeeze extra lime juice over the avocado. This helps keep the color bright and fresh. Mango Salsa pairs well with many foods. Serve it with tortilla chips for a tasty snack. It also goes great on fish or chicken for a flavorful meal. Try it on tacos or salads for extra zing. You can even add it to sandwiches for a fresh twist. For the full recipe, check out the details above! In this blog post, we explored how to make delicious mango salsa with avocado. We went over the key ingredients, preparation steps, and helpful tips. You can add creative twists, like pineapple or black beans, to make it your own. Storing your salsa properly keeps it fresh longer. Remember, this tasty dish is easy to prepare and perfect for any occasion. Try it out and enjoy the bright flavors! You won’t be disappointed.](https://mysavedrecipe.com/wp-content/uploads/2025/05/6d9221c3-7ebd-48b1-9e19-afc94c25e611.webp)
Mango Salsa with Avocado Fresh and Flavorful Recipe
Looking to add a burst of flavor to your meals? My fresh and easy Mango Salsa with Avocado recipe brings together ripe mango, creamy…
My Latest Desserts

Cream Soda Donut Holes Delightful Dessert Recipe
Are you ready to enjoy a fun twist on a classic treat? Cream Soda Donut Holes are sweet, fluffy, and Read Full Recipe-
Cookie Dough Bars Delightful Recipe for a Sweet Treat
If you’ve ever craved the rich, sweet goodness of cookie dough, then you’re in for a treat! My recipe for Read Full Recipe -
Chocolate Covered Cherries with Pistachio Dust Delight
Get ready to treat your taste buds with my “Chocolate Covered Cherries with Pistachio Dust Delight.” This sweet snack combines Read Full Recipe -
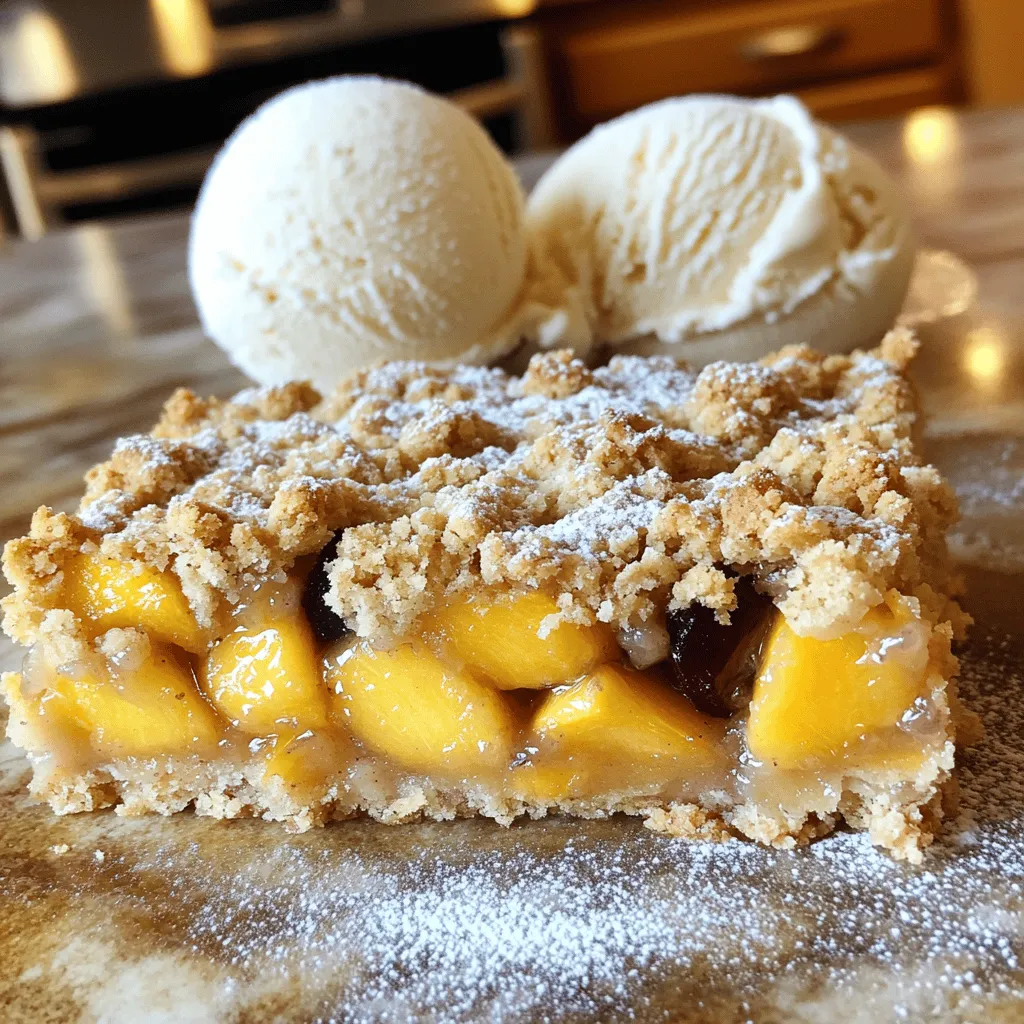
Peach Plum Crumble Bars Irresistible Sweet Treat
Are you ready for a dessert that combines the sweetness of peaches and plums? My Peach Plum Crumble Bars are Read Full Recipe -
Watercolor Buttercream Cupcakes Delightful Recipe Guide
Are you ready to bring some color to your baking? In this guide, I’ll show you how to make stunning Read Full Recipe -
No-Bake Peach Icebox Cake Simple and Refreshing Treat
If you’re seeking a sweet, cool treat that’s simple to make, it’s time to try my No-Bake Peach Icebox Cake. Read Full Recipe -
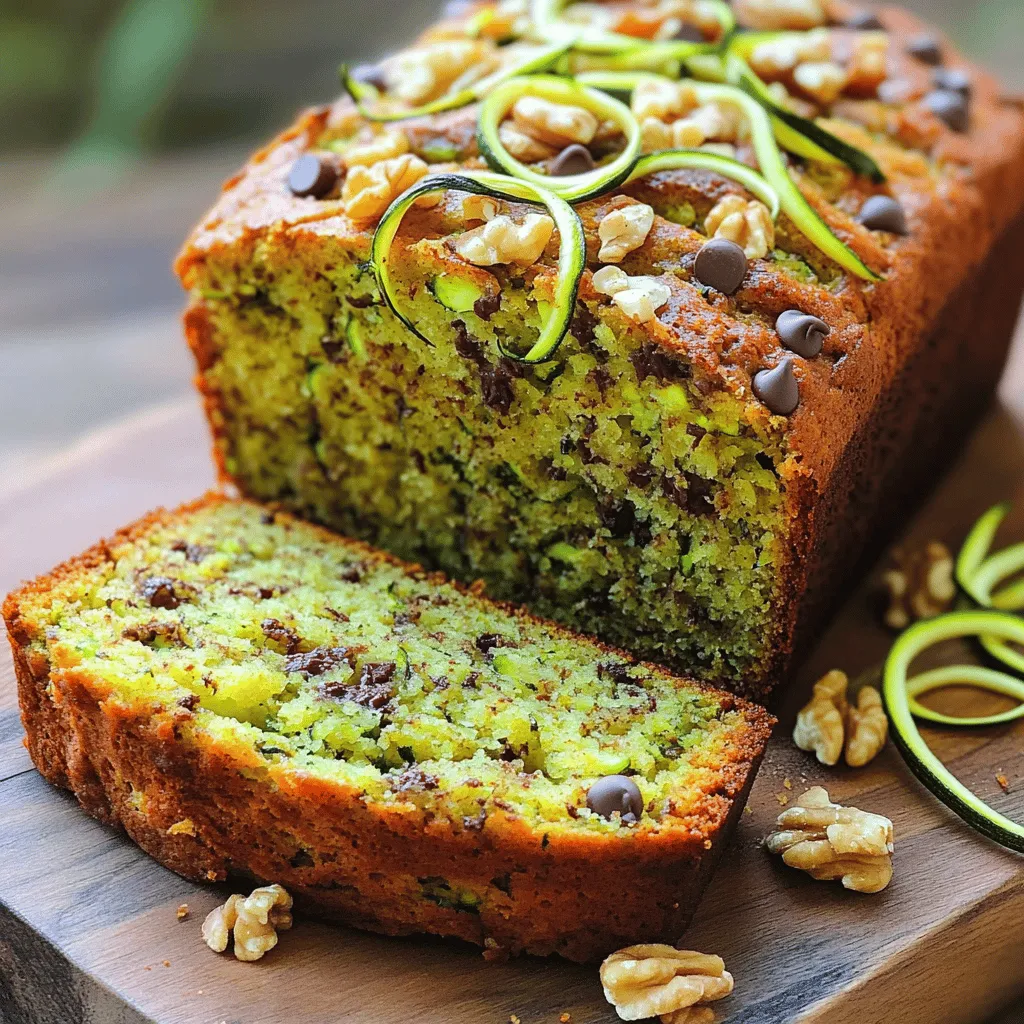
The Best Zucchini Bread Irresistible and Easy Recipe
Are you ready to bake the best zucchini bread that’s both irresistible and easy? This simple recipe combines fresh, grated Read Full Recipe -
Peach Cobbler Pancakes Delicious and Simple Recipe
Are you ready to bring a burst of flavor to your breakfast table? Peach Cobbler Pancakes are the perfect blend Read Full Recipe -
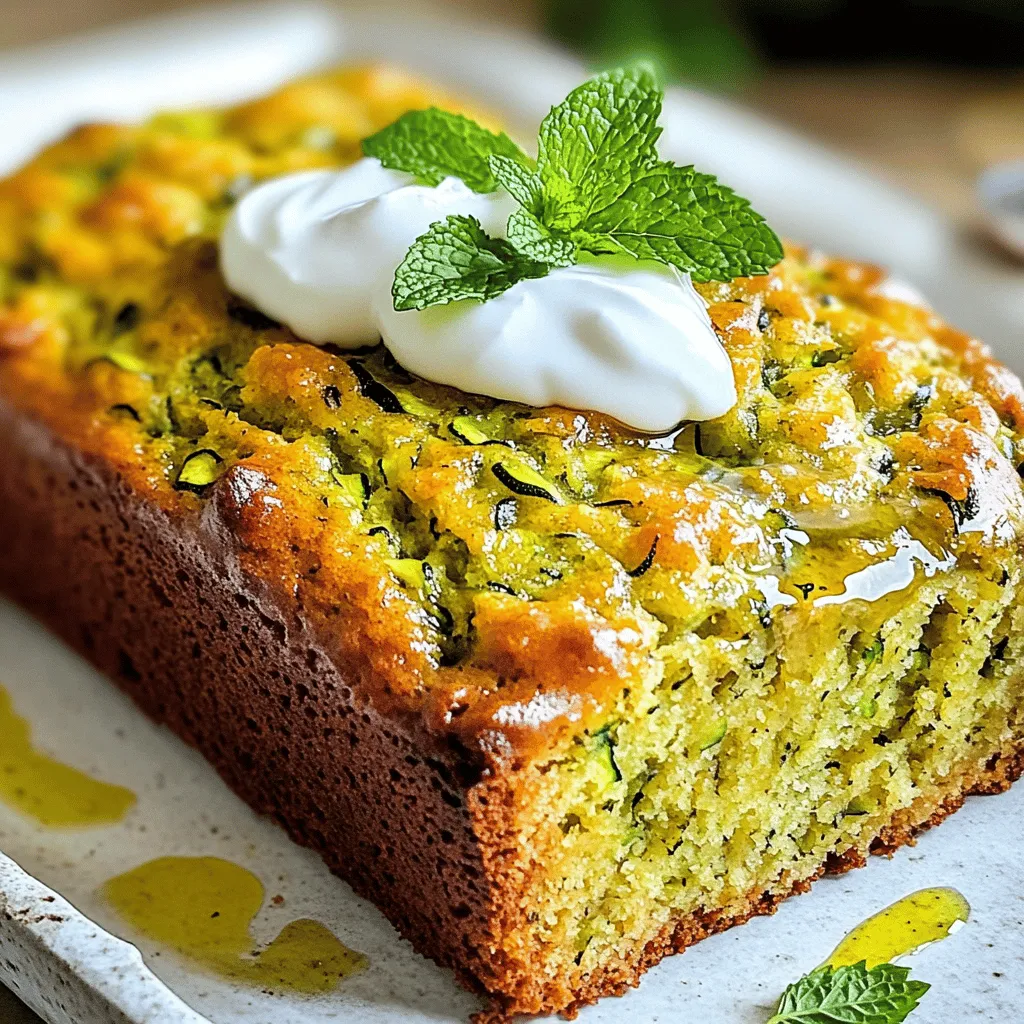
Olive Oil Zucchini Bread Moist and Flavorful Recipe
Welcome to your new favorite treat: Olive Oil Zucchini Bread! This recipe gives you a moist, flavorful loaf that’s perfect Read Full Recipe -
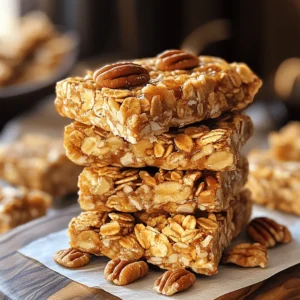
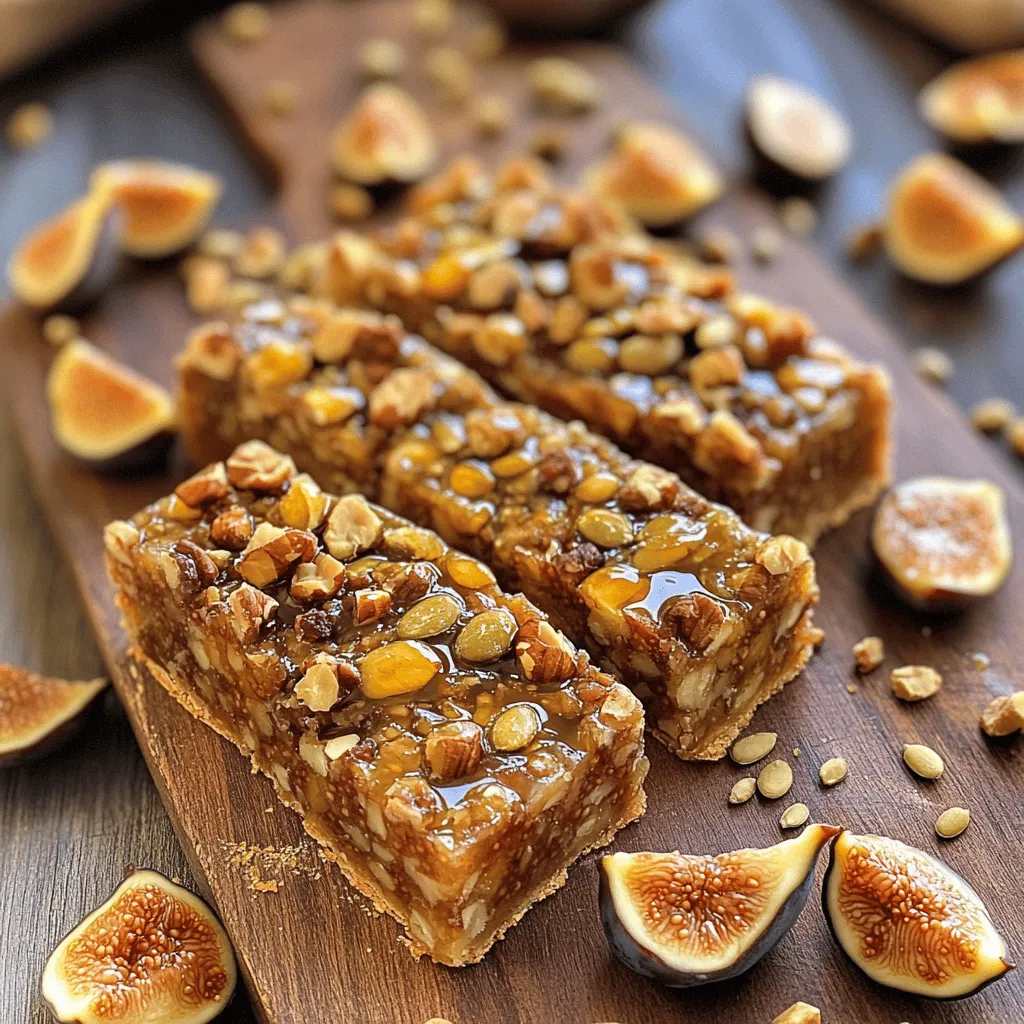
Fig and Walnut Bars Healthy and Flavorful Snack
If you’re searching for a tasty yet healthy snack, Fig and Walnut Bars are a perfect choice! Packed with nutritious Read Full Recipe


My Latest Recipes

hey,
i’m !
I’m so happy you’re here!
Food is my passion, and perfecting each dish is my craft. I can’t wait for you to try them let’s dive into this delicious journey side by side.

![To make a great Mediterranean chicken pasta salad, gather these fresh ingredients: - 2 cups of cooked penne pasta - 1 cup cooked, shredded chicken breast - 1/2 cup cherry tomatoes, halved - 1/2 cup cucumber, diced - 1/4 cup red onion, finely chopped - 1/3 cup Kalamata olives, pitted and sliced - 1/4 cup feta cheese, crumbled - 1/4 cup olive oil - 2 tablespoons red wine vinegar (optional) - 1 teaspoon dried oregano - Salt and pepper to taste - Fresh parsley for garnish These ingredients work together to create a colorful and tasty dish. The penne pasta serves as a hearty base. Shredded chicken adds protein, making it filling. Fresh veggies, like cucumbers and cherry tomatoes, give crunch and flavor. Kalamata olives add a briny touch, while feta cheese brings creaminess. I love using olive oil and red wine vinegar for the dressing. They bring a rich, tangy flavor to the salad. Dried oregano adds an herbal note that ties everything together. Make sure to use fresh parsley for garnish. It brightens the dish and adds a pop of color. Together, these ingredients create a vibrant Mediterranean chicken pasta salad that bursts with flavor. For the detailed preparation steps, check out the Full Recipe. To make this Mediterranean Chicken Pasta Salad, follow these easy steps. You will love how simple and tasty it is! - Combine pasta and chicken: In a large bowl, mix the cooked penne pasta and shredded chicken. This is the base of your salad. - Add vegetables and olives: Next, toss in the halved cherry tomatoes, diced cucumber, finely chopped red onion, and sliced Kalamata olives. These ingredients add color and crunch. - Whisk dressing ingredients: In a small bowl, whisk together the olive oil, red wine vinegar (if using), dried oregano, salt, and pepper. This dressing brings all the flavors together. - Toss pasta salad: Pour the dressing over the pasta mixture. Toss gently to coat each part well. This step ensures every bite is full of flavor. - Add feta cheese: Sprinkle crumbled feta cheese on top. Gently stir it in. The feta adds a creamy, salty touch to the dish. - Adjust seasoning: Taste the salad and add more salt and pepper if needed. This will help balance the flavors. - Let it sit: Cover the bowl and let the salad sit for about 20 minutes. This resting time allows the flavors to meld beautifully. - Serve with garnish: Before serving, sprinkle fresh parsley on top. It looks nice and adds a fresh taste. For the complete recipe, check out the [Full Recipe]. Enjoy your Mediterranean Chicken Pasta Salad! To make your Mediterranean Chicken Pasta Salad even better, start with the dressing. You can mix olive oil with lemon juice or yogurt. This adds a fresh twist. Marinating your chicken for at least one hour helps it taste amazing. Use herbs like oregano and thyme for a punch of flavor. Also, balance textures by adding crunchy cucumbers and soft feta cheese. This makes each bite exciting. Cooking pasta perfectly is key. Boil water and add salt for flavor. Cook until al dente, then drain and rinse in cold water. This keeps the pasta firm. For shredding chicken, use two forks to pull it apart easily. It’s quick and effective. Prepping your ingredients in advance saves time. Chop veggies and shred chicken the day before. This way, you’ll have everything ready when it’s time to mix the salad. For the full recipe, check the complete instructions above. {{image_2}} You can switch up the pasta in this dish. Try whole wheat, gluten-free, or even spiralized veggies. Each option adds a fun twist. For proteins, consider using tofu or shrimp instead of chicken. Tofu absorbs flavors well, making it a great choice. Shrimp cooks fast and gives a nice texture. If you want to skip dairy, use non-dairy cheese options like almond or cashew cheese. These give a creamy taste without the milk. To add more crunch, mix in nuts or seeds like pine nuts or sunflower seeds. They add a nice bite and extra nutrients. You can also use fresh herbs like basil or mint for a burst of flavor. These herbs brighten the dish and add freshness. Try different vinaigrette styles too! A lemon garlic dressing or a balsamic glaze can change the whole taste. Experiment to find your favorite combination. For the full recipe, check out the Mediterranean Chicken Pasta Salad section above. To keep your Mediterranean chicken pasta salad fresh, store it in an airtight container. Make sure it cools down to room temperature before sealing it. This step helps prevent moisture buildup. You can also separate the dressing from the salad if you want extra freshness. Just add it when you're ready to eat. If you have leftover ingredients, like chicken or olives, you can freeze them. Cooked chicken freezes well for about 2-3 months. Just chop it up and place it in a freezer bag. Olives can also freeze, but their texture may change slightly. In the fridge, your salad can last about 3-5 days. Always check for signs of spoilage. If you see any mold or smell something off, it’s best to toss it. Additionally, if the vegetables look mushy or slimy, that’s another sign it’s time to say goodbye. For the freshest taste, enjoy your Mediterranean chicken pasta salad within a couple of days. For the full recipe, check out the complete guide! Can I make this salad in advance? Yes, you can make this salad in advance. It tastes better after chilling. I suggest letting it sit for at least 20 minutes. This helps the flavors mix well. You can store it in the fridge for up to three days. Just remember to add fresh parsley before serving. What can I serve with Mediterranean Chicken Pasta Salad? This salad pairs well with grilled vegetables or a slice of crusty bread. You can also serve it with a light soup. A side of hummus and pita chips adds a nice touch. These options complete your meal and enhance the Mediterranean vibe. Is it gluten-free? No, this salad is not gluten-free. The penne pasta contains gluten. However, you can use gluten-free pasta instead. This swap keeps the dish tasty and safe for those with gluten allergies. How do I make it vegetarian? To make this salad vegetarian, remove the chicken. You can add chickpeas for protein. They provide a great texture and flavor. You can also add more veggies, like bell peppers or artichokes, to keep it hearty. Caloric content per serving One serving of Mediterranean Chicken Pasta Salad has about 350 calories. This value may change based on portion size and added ingredients. Key health benefits of ingredients - Chicken: High in protein, helps build and repair muscles. - Olive oil: Contains healthy fats, good for heart health. - Cherry tomatoes: Packed with vitamins A and C, great for skin health. - Cucumber: Hydrating and low in calories, perfect for weight management. - Feta cheese: Offers calcium and protein, supporting bone health. This salad is not just tasty; it also fuels your body well! For the full recipe, check out the Mediterranean Chicken Pasta Salad. This Mediterranean Chicken Pasta Salad is simple and tasty. You learned about the key ingredients and how to prep them. You can customize flavors and textures to suit your taste. Remember, storing leftovers properly keeps them fresh longer. With these tips, you can enjoy this dish multiple times. Explore varieties to find your favorite version. This salad is not just a meal; it’s a way to create joy in cooking and eating. Enjoy making it again and again!](https://mysavedrecipe.com/wp-content/uploads/2025/06/7e97549f-cad5-47f7-9a02-6057437abde8-300x300.webp)
![- 1 cup Arborio rice - 4 cups vegetable broth - 2 cups mushrooms (cremini or button), sliced - 1 small onion, finely chopped - 2 cloves garlic, minced - 1 cup fresh spinach, roughly chopped - 1 cup grated Parmesan cheese (or nutritional yeast for a vegan option) - 2 tablespoons olive oil - 2 tablespoons butter (or vegan butter) - Salt and pepper to taste - Fresh parsley, chopped (for garnish) When making creamy mushroom risotto, the choice of Arborio rice is key. This rice has a high starch content. It helps create that creamy texture we all love. Vegetable broth adds depth and flavor. I recommend using low-sodium broth. This way, you can control the saltiness of your dish. Mushrooms are the star here. You can use cremini or button mushrooms. Both offer rich flavors. Onion and garlic bring a savory base. They add aroma and taste to the dish. Fresh spinach adds color and nutrients. It wilts nicely into the risotto. For a cheesy finish, use Parmesan cheese. If you prefer a vegan option, nutritional yeast works well. It adds a cheesy flavor without dairy. Olive oil and butter create a rich flavor. They help sauté the onions and mushrooms. Lastly, don’t forget seasonings like salt and pepper. They enhance the overall taste of the risotto. - For a vegan option, use vegan butter alternatives like coconut oil or avocado oil. - If you're gluten-free, check for gluten-free options for broth or cheese. Some brands offer gluten-free cheese. - I recommend recommended mushroom types like shiitake or portobello for more flavor. Each serving of creamy mushroom risotto has about 300 calories. The macronutrient breakdown is roughly: - Carbohydrates: 50g - Protein: 9g - Fats: 10g For dietary considerations, this recipe can be vegan and gluten-free with simple swaps. This makes it suitable for many diets. If you have any specific dietary needs, adjust the ingredients to fit your lifestyle. For the complete recipe, check out the [Full Recipe]. 1. Preparing the broth: Start by heating 4 cups of vegetable broth in a medium saucepan over low heat. This keeps it warm for cooking. 2. Chopping vegetables: Finely chop 1 small onion and 2 cloves of garlic. Slice 2 cups of mushrooms. You can use cremini or button mushrooms. Set aside the chopped ingredients for later. 1. Sautéing onions and mushrooms: In a large skillet, heat 2 tablespoons of olive oil and 1 tablespoon of butter over medium heat. Add the chopped onion and sauté for 3-4 minutes until it turns soft. Then, add the garlic and mushrooms. Cook for about 5-7 minutes. The mushrooms should be tender and have released their moisture. 2. Toasting Arborio rice: Stir in 1 cup of Arborio rice with the onion and mushroom mix. Cook for 1-2 minutes, stirring often. This helps the rice toast lightly, giving it great flavor. 3. Gradually adding broth: Begin adding the warm vegetable broth one ladle at a time. Stir often and wait until the rice absorbs most of the liquid before adding more. Keep this going for about 18-20 minutes. The rice will become creamy and al dente. 1. Incorporating spinach and cheese: In the last 5 minutes of cooking, stir in 1 cup of roughly chopped fresh spinach. Add the remaining tablespoon of butter. This makes the spinach wilt and blend well. 2. Adjusting seasoning: Once the rice is done, mix in 1 cup of grated Parmesan cheese. If you prefer, you can use nutritional yeast for a vegan option. Season with salt and pepper to taste. Garnish with fresh chopped parsley before serving. You can find the full recipe [Full Recipe]. To make creamy mushroom risotto, stirring is key. You need to stir often. This helps the rice release starch. The starch creates that creamy texture. Recognizing doneness is simple. The rice should be tender but still firm. It should have a slight bite, called al dente. When it reaches this point, it’s ready for the next step. Adding herbs and spices boosts flavor. Fresh thyme or rosemary works well. You can also use a pinch of nutmeg for warmth. Experiment with your favorites to find what you love. Different cheeses can add depth. Parmesan is classic, but try goat cheese for tang. For a vegan option, nutritional yeast gives a cheesy flavor. One common mistake is overcooking the rice. If you cook it too long, it turns mushy. Keep an eye on the rice and taste as you go. Another mistake is skipping the broth warming step. Warm broth helps the rice cook evenly. Cold broth can shock the rice and affect texture. Always keep it warm while you cook. For the full recipe, click here: [Full Recipe]. {{image_2}} You can easily make this dish dairy-free. Simply swap out the butter and cheese. Use vegan butter instead of regular butter. For cheese, nutritional yeast works great. It adds a cheesy flavor without dairy. You can also try cashew cream for extra creaminess. Blend soaked cashews with water until smooth. This gives a rich texture that is hard to beat. One-pan mushroom risotto is a game changer. It simplifies the cooking process and saves time. You can cook everything in one pot, from the onions to the rice. This method cuts down on cleanup, making it easy. Start by sautéing the onion in olive oil. Then add mushrooms, rice, and broth all in the same pan. Stir as you go, and you’ll get creamy risotto with less mess. Seasonal vegetables can change the flavor of your risotto. In spring, add asparagus or peas for a fresh taste. In fall, use pumpkin or butternut squash for warmth. This recipe adapts well to different flavors. You can mix in spinach, kale, or even roasted carrots. Each season brings new veggies, making this dish fun and versatile. Enjoy experimenting with what’s fresh and local! For the full recipe, check out the main article. To keep your creamy mushroom risotto fresh, use an airtight container. Glass or plastic containers work well. If you have a lot of risotto, divide it into smaller portions. This makes it easier to reheat later. You can refrigerate or freeze your risotto. Refrigerating is great for short-term storage. It stays fresh for about 3 days. If you want to save it longer, freezing is best. Just remember to leave some space in the container, as the risotto may expand. When reheating your risotto, the best method is to use the stovetop. Add a splash of vegetable broth or water to help bring back the creaminess. Heat it over low to medium heat, stirring often. You can also use a microwave, but it might not keep the same texture. If you choose this method, add a bit of liquid and cover the bowl. Stir halfway through to help it heat evenly. In the fridge, creamy mushroom risotto lasts for about 3 days. If you freeze it, it can last up to 2 months. Always check for signs of spoilage before eating. Signs of spoilage include a sour smell, changes in color, or an off texture. If you notice any of these, it’s best to throw the risotto away. Enjoy your creamy mushroom risotto safely! Creamy mushroom risotto takes about 30 minutes to cook. Here’s the breakdown: - Prep time: 10 minutes - Cooking time: 20 minutes You start by heating the broth. This keeps it warm for cooking. Then, you sauté the onions and mushrooms. After that, you toast the rice and gradually add the broth. Stir often until the rice is creamy and tender. Yes, you can make risotto in advance. To store it properly, let it cool first. Then, place it in an airtight container. You can keep it in the fridge for up to three days. When you are ready to eat, reheat it on the stove. Add a splash of broth or water to keep it creamy. Stir well as it heats. The best rice for risotto is Arborio rice. This rice has a high starch content. It gives risotto its creamy texture. You can also use Carnaroli or Vialone Nano rice. These types have similar qualities. Yes, mushroom risotto can be gluten-free. Make sure to use gluten-free vegetable broth. Also, check your cheese for any gluten. The main ingredients are rice and mushrooms, which are naturally gluten-free. You can add proteins to your risotto. Grilled chicken or shrimp work well. For a plant-based option, try chickpeas or tofu. These options add flavor and make the dish more filling. You can mix them in during the last few minutes of cooking. For the full recipe, visit [Full Recipe]. This risotto provides comfort and flavor with simple ingredients and easy steps. You learned about key components like Arborio rice, mushrooms, and seasonings. Using substitutes for dietary needs can make it fit for everyone. Following the tips and avoiding common mistakes will help you nail the texture and taste. Enjoy experimenting with variations, like the vegan or one-pan options. Remember to store leftovers properly for future meals. With this guide, you have all you need to make a delicious mushroom risotto that delights every time.](https://mysavedrecipe.com/wp-content/uploads/2025/05/811f7301-5f08-427b-a87f-c3b8b667010d-300x300.webp)
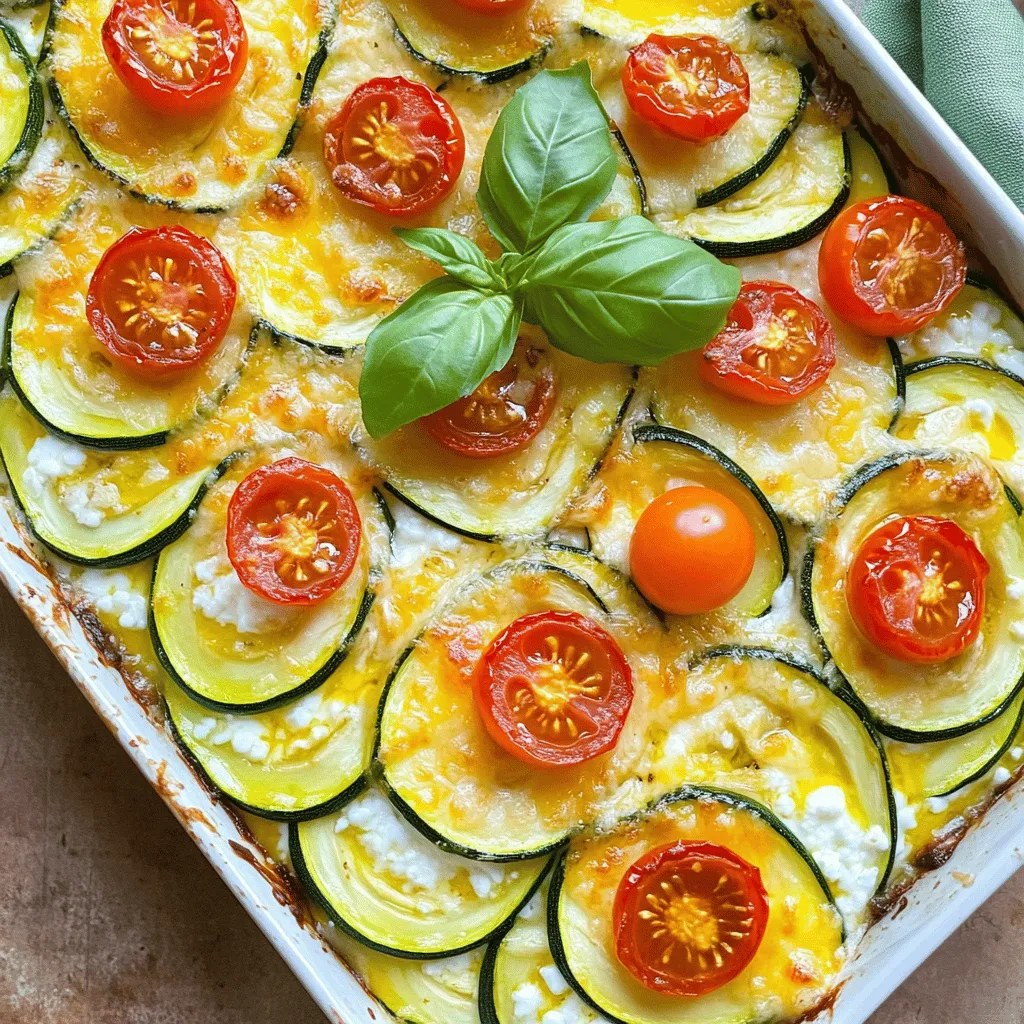
Easy Cheesy Zucchini Bake Simple and Delicious Dish
Looking for a tasty way to enjoy summer’s bounty? My Easy Cheesy Zucchini Bake is here to help! This simple and delicious dish is…