Latest & Greatest
Lemon Garlic Roasted Brussels Sprouts Simple Delight
Are you ready to transform Brussels sprouts into a tasty treat? In this post, I will guide you through my
Read more…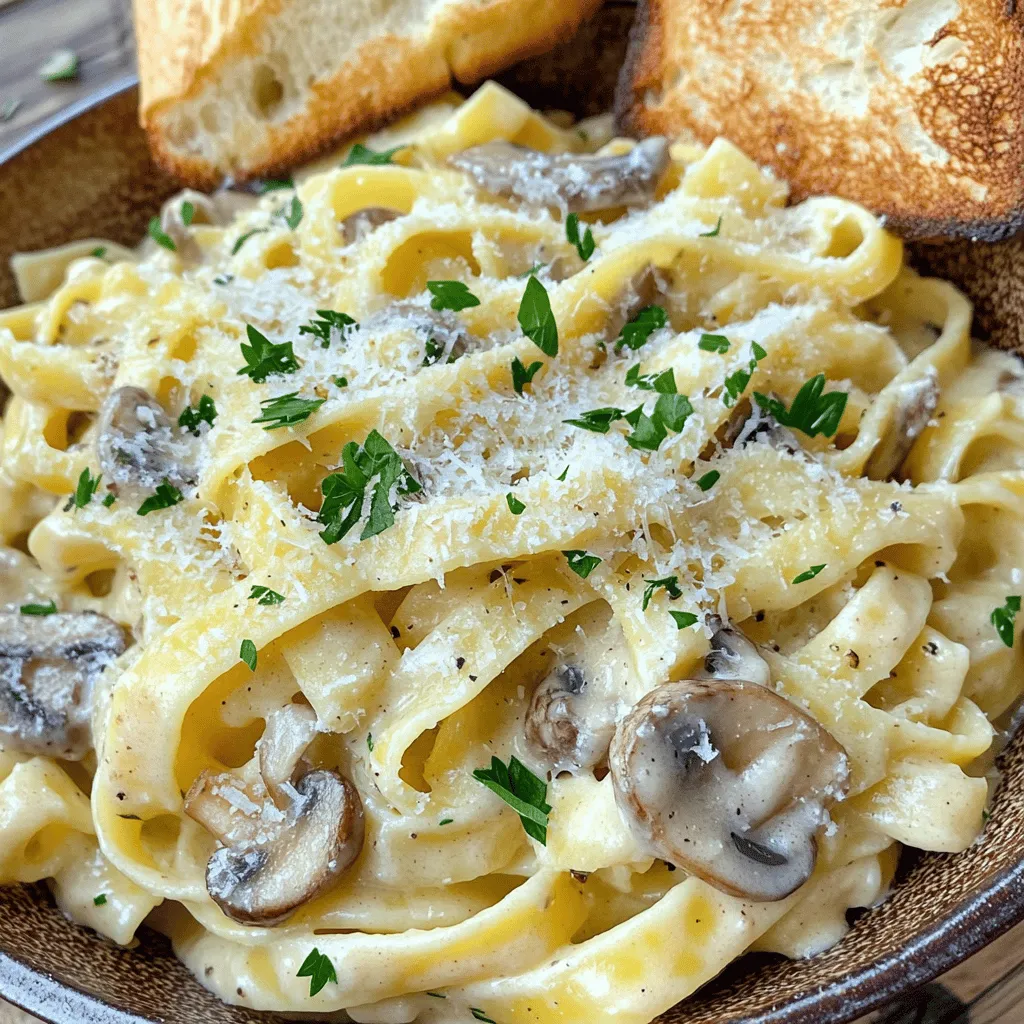
Creamy Garlic Mushroom Pasta Rich and Flavorful Meal
If you’re craving a rich and flavorful meal, look no further! Creamy Garlic Mushroom Pasta combines fettuccine, savory mushrooms, and
Read more…
Peanut Butter Banana Overnight Oats Delightful Recipe
Looking for a quick and tasty breakfast? Peanut Butter Banana Overnight Oats are the perfect solution! With just a few
Read more…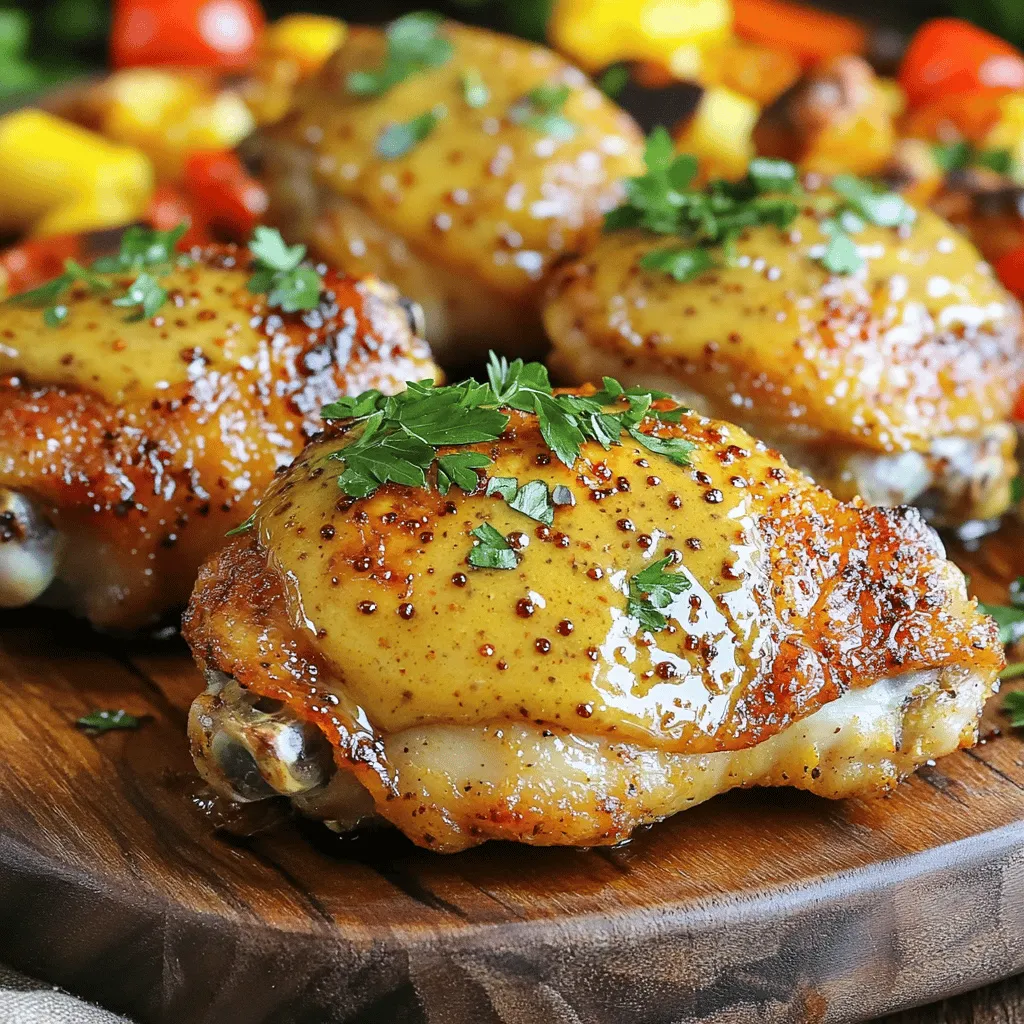
Honey Mustard Chicken Thighs Easy Dinner Delight
Craving a quick, tasty dinner? Honey Mustard Chicken Thighs are your answer! This easy recipe packs bold flavors and uses
Read more…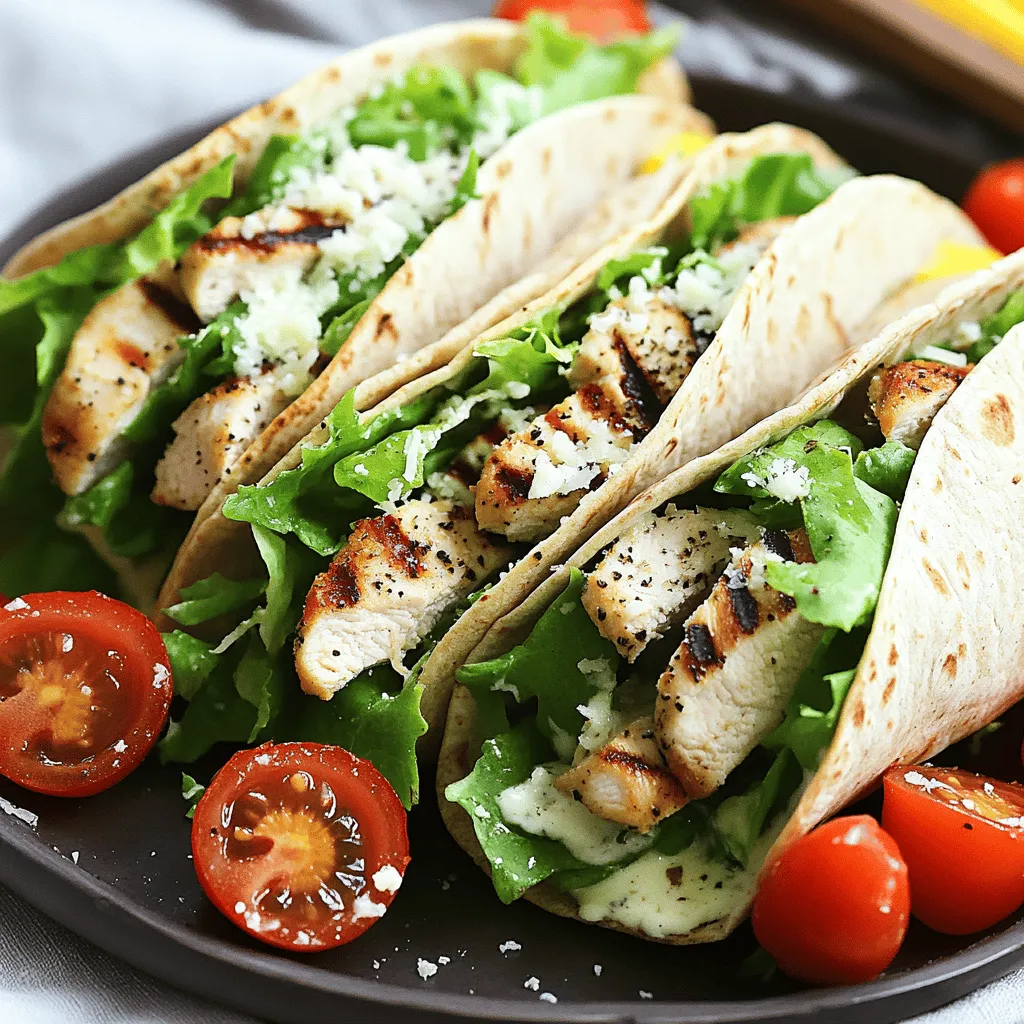
Grilled Chicken Caesar Wraps Simple and Tasty Meal
Looking for a quick and tasty meal idea? Grilled Chicken Caesar Wraps are easy to make and delicious! You can
Read more…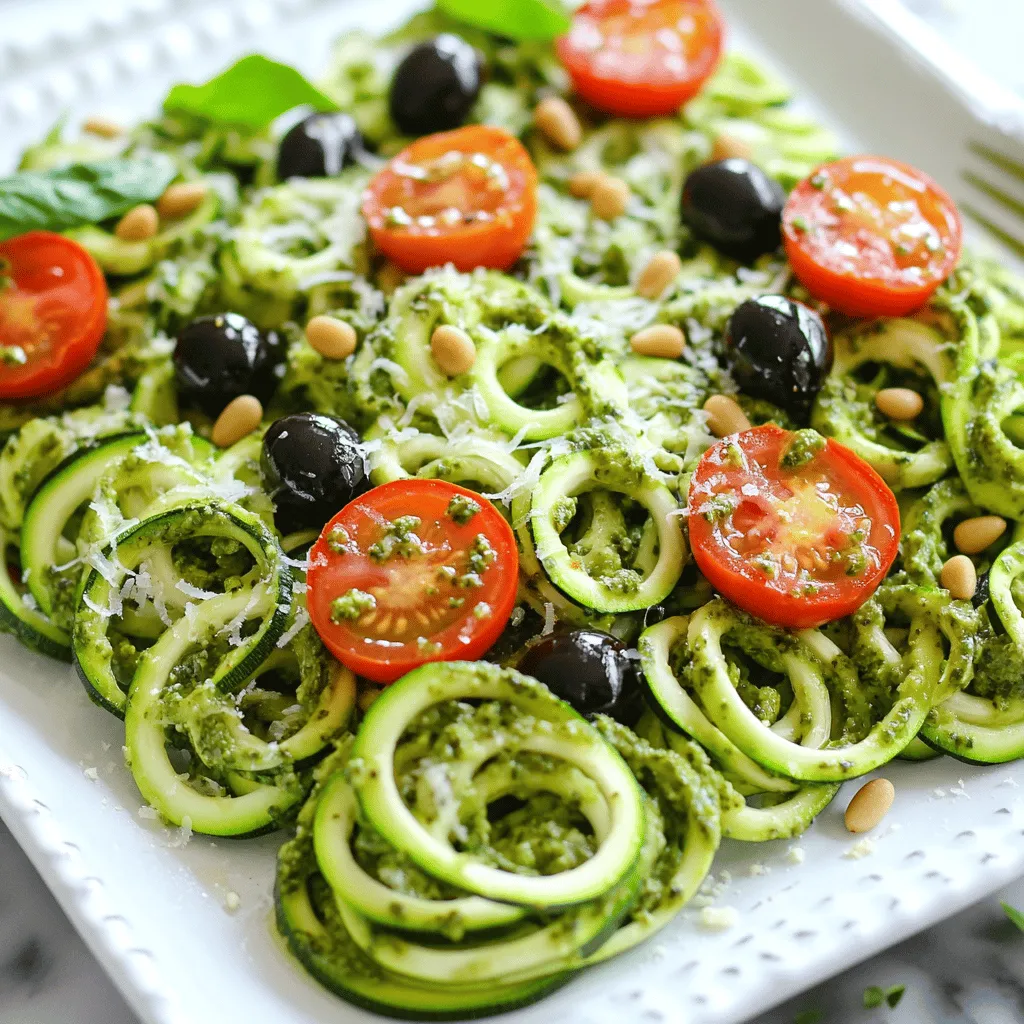
Zucchini Noodles with Pesto Fresh and Simple Recipe
Zucchini noodles with pesto are a fresh, tasty option for a quick meal. This easy recipe brings vibrant flavors without
Read more…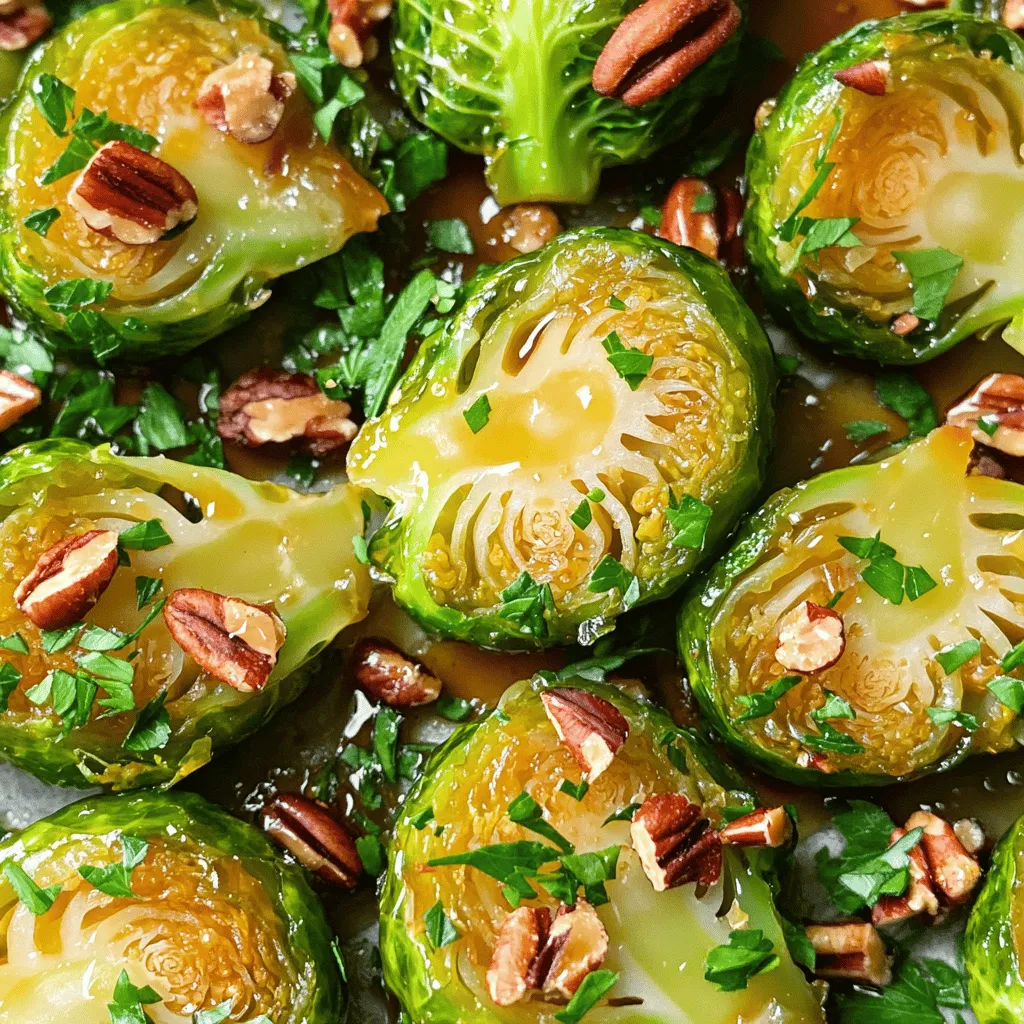
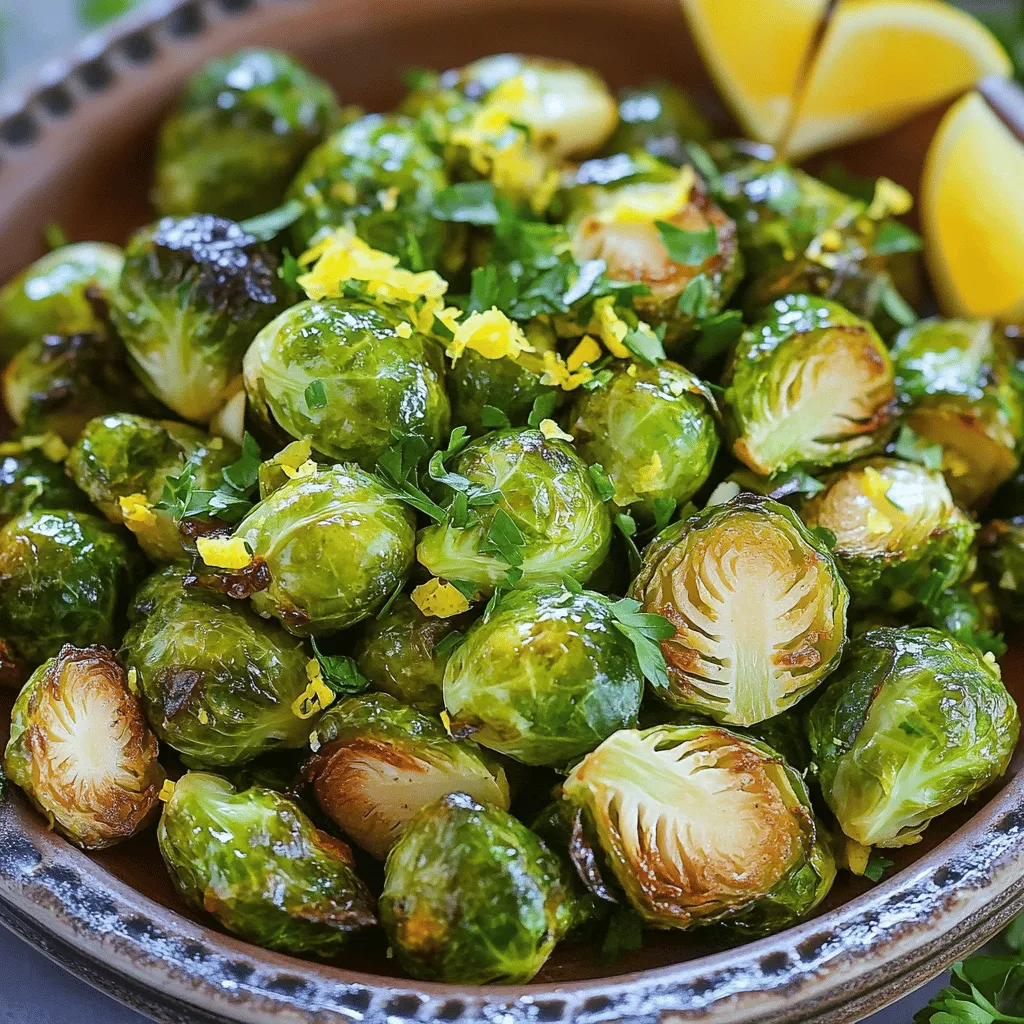
Maple Glazed Brussels Sprouts Tasty Side Dish Recipe
Are you ready to transform Brussels sprouts into a tasty side dish? My Maple Glazed Brussels Sprouts recipe combines sweet
Read more…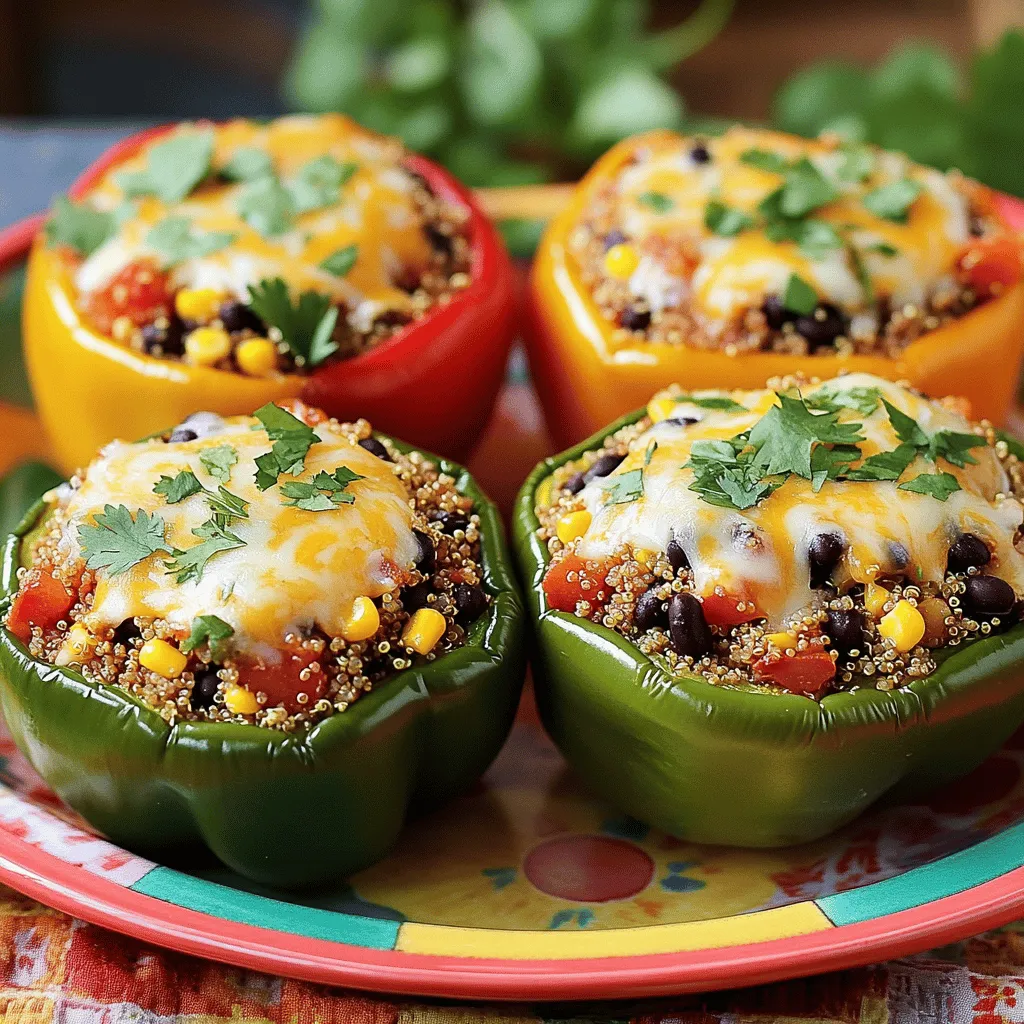
Stuffed Bell Peppers with Quinoa Flavor-packed Dish
Are you ready to delight your taste buds? Stuffed bell peppers with quinoa are a flavor-packed dish that everyone loves.
Read more…browse recipes
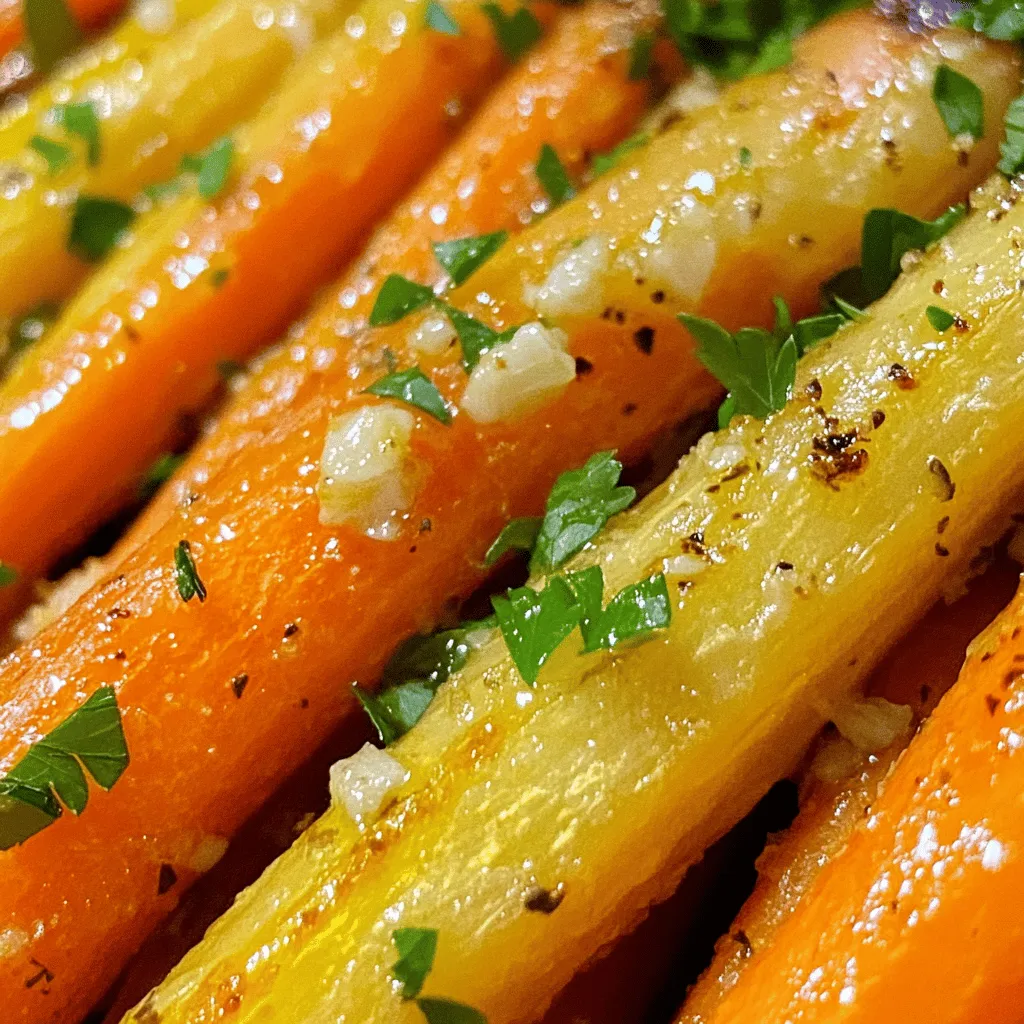
Garlic Herb Roasted Carrots Flavorful and Simple Dish
Looking for a simple yet tasty side dish? Garlic herb roasted carrots will steal the show! This dish combines sweet, tender carrots with bold…
My Latest Desserts

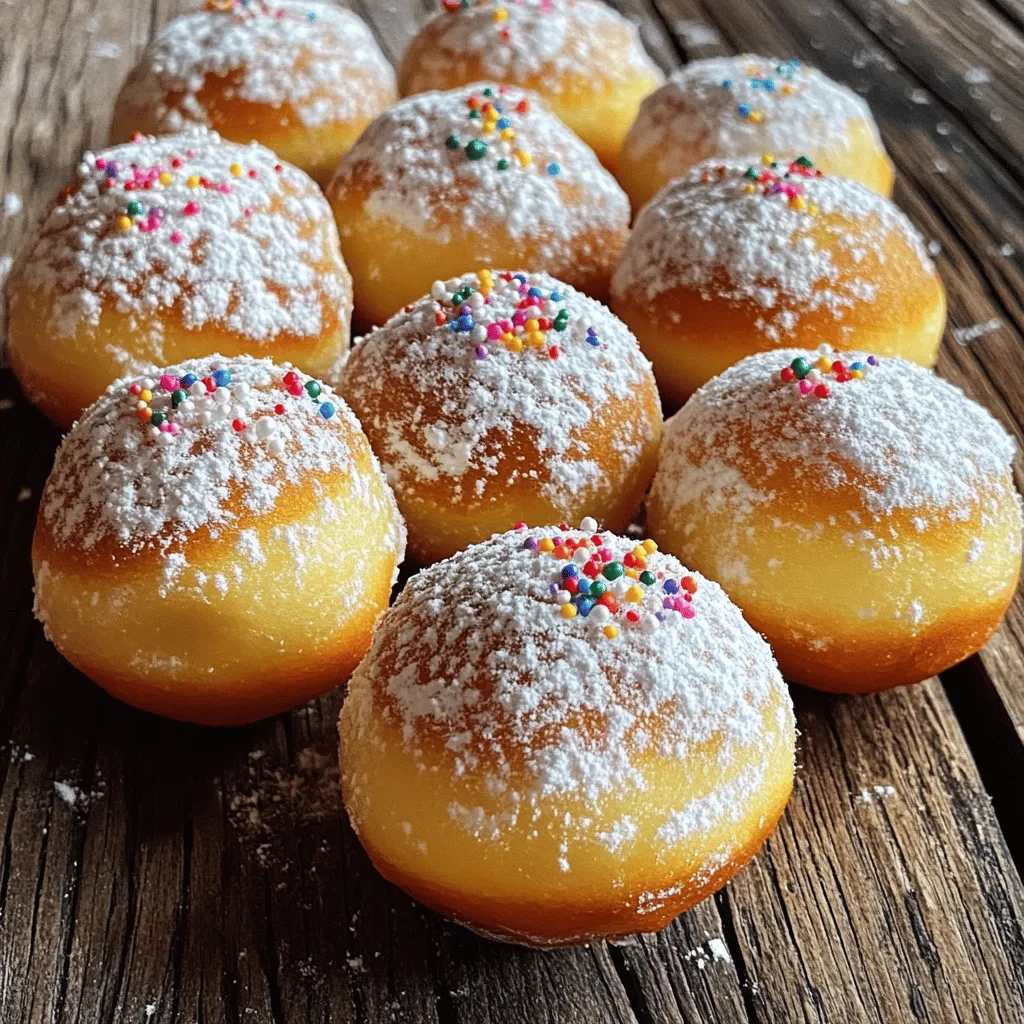
Cream Soda Donut Holes Delightful Dessert Recipe
Are you ready to enjoy a fun twist on a classic treat? Cream Soda Donut Holes are sweet, fluffy, and Read Full Recipe-
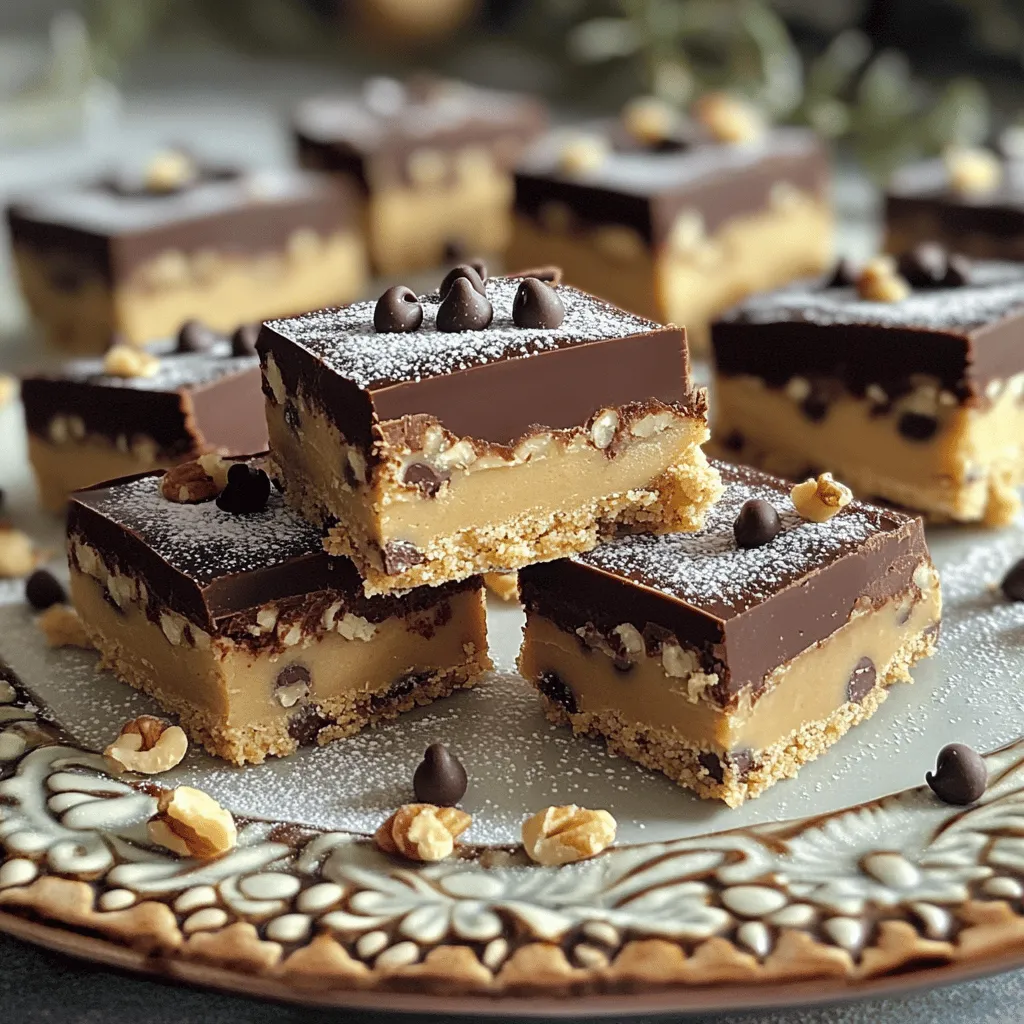
Cookie Dough Bars Delightful Recipe for a Sweet Treat
If you’ve ever craved the rich, sweet goodness of cookie dough, then you’re in for a treat! My recipe for Read Full Recipe -
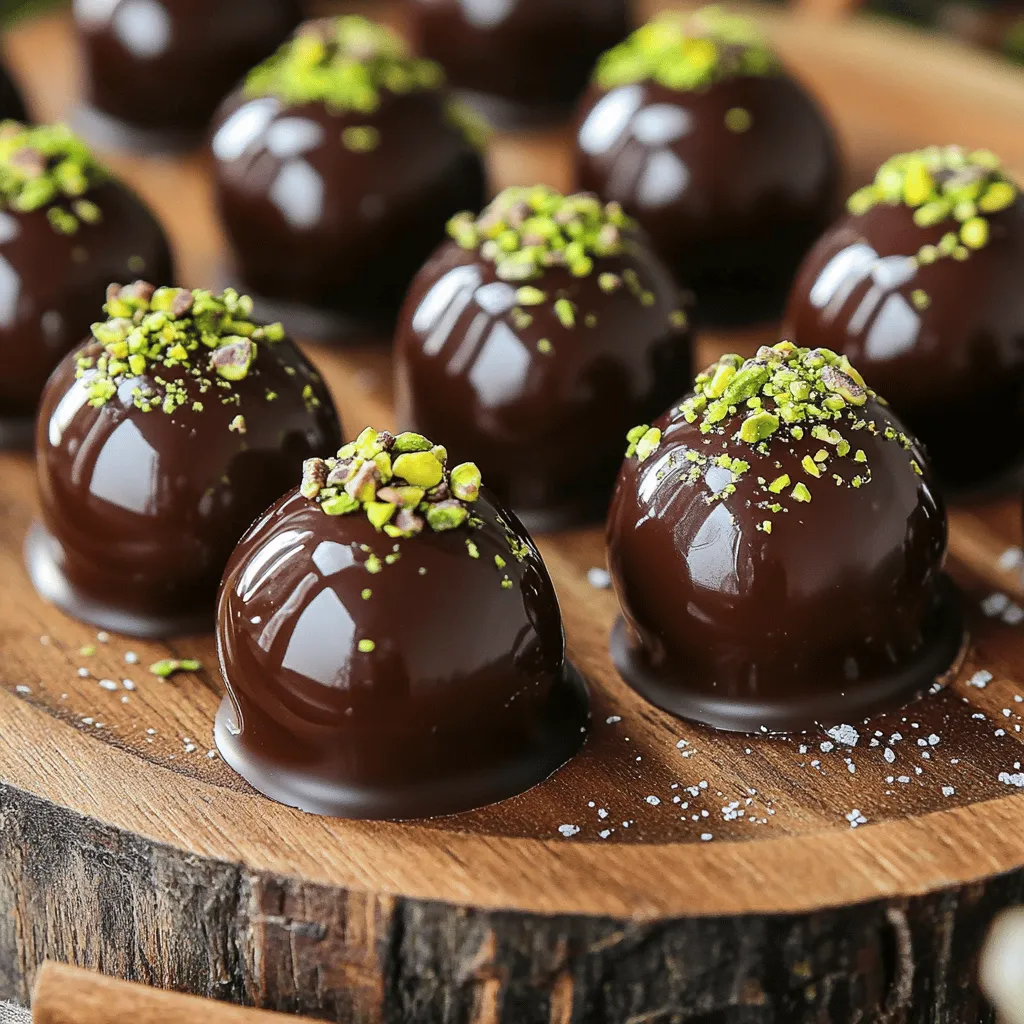
Chocolate Covered Cherries with Pistachio Dust Delight
Get ready to treat your taste buds with my “Chocolate Covered Cherries with Pistachio Dust Delight.” This sweet snack combines Read Full Recipe -
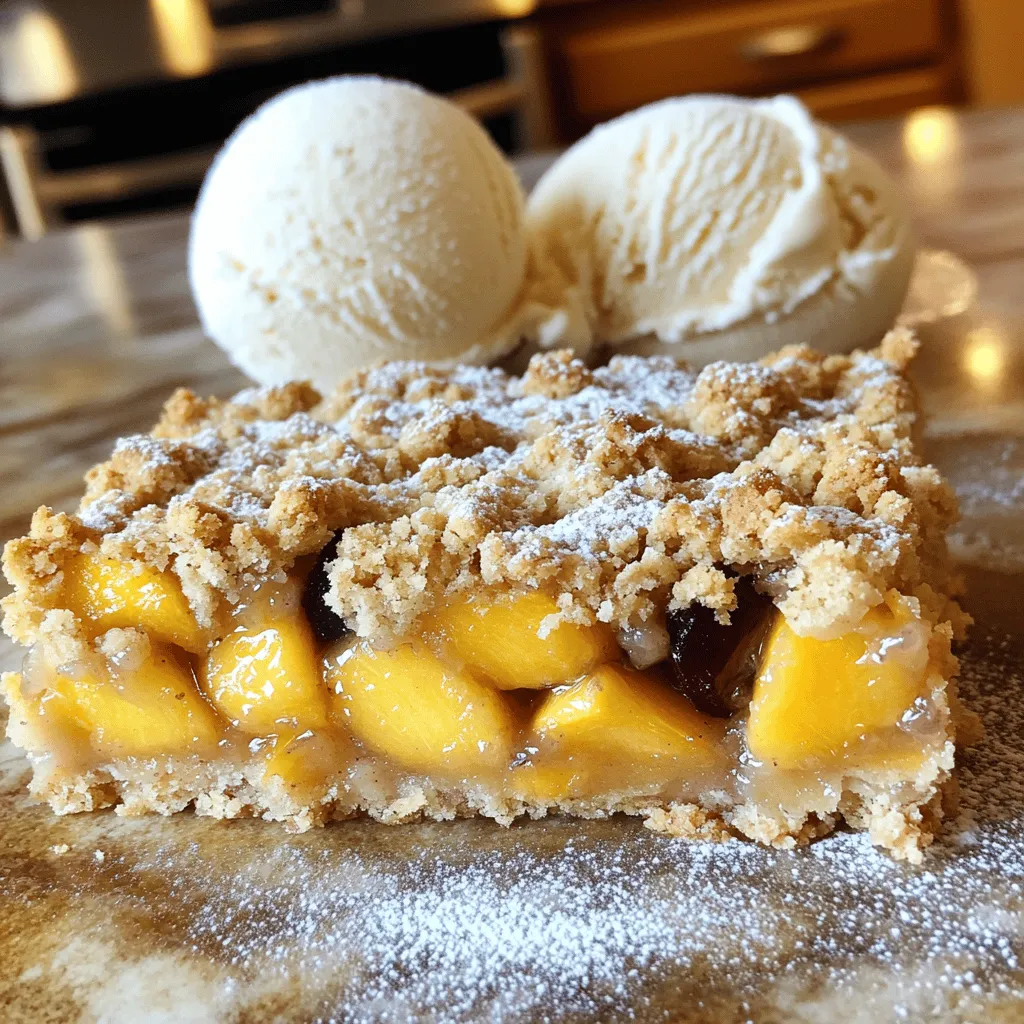
Peach Plum Crumble Bars Irresistible Sweet Treat
Are you ready for a dessert that combines the sweetness of peaches and plums? My Peach Plum Crumble Bars are Read Full Recipe -
Watercolor Buttercream Cupcakes Delightful Recipe Guide
Are you ready to bring some color to your baking? In this guide, I’ll show you how to make stunning Read Full Recipe -
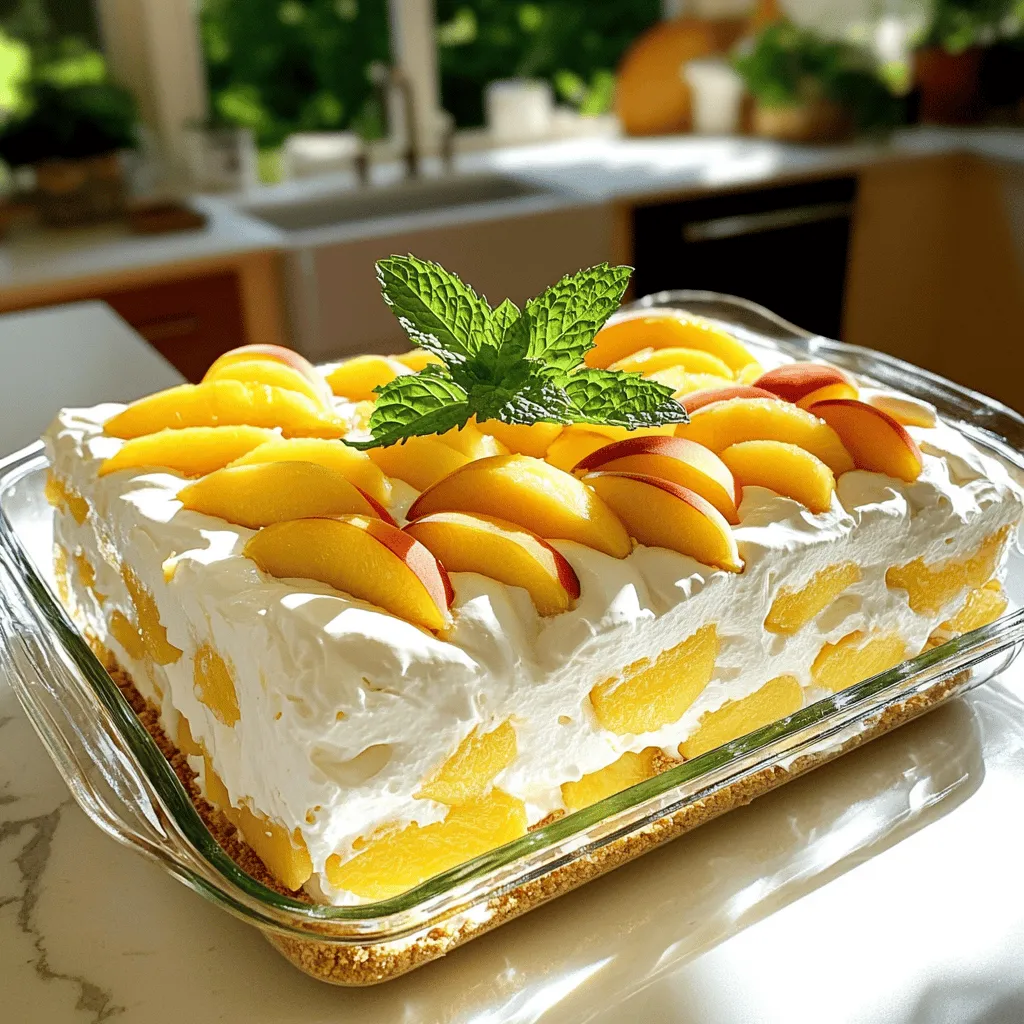
No-Bake Peach Icebox Cake Simple and Refreshing Treat
If you’re seeking a sweet, cool treat that’s simple to make, it’s time to try my No-Bake Peach Icebox Cake. Read Full Recipe -
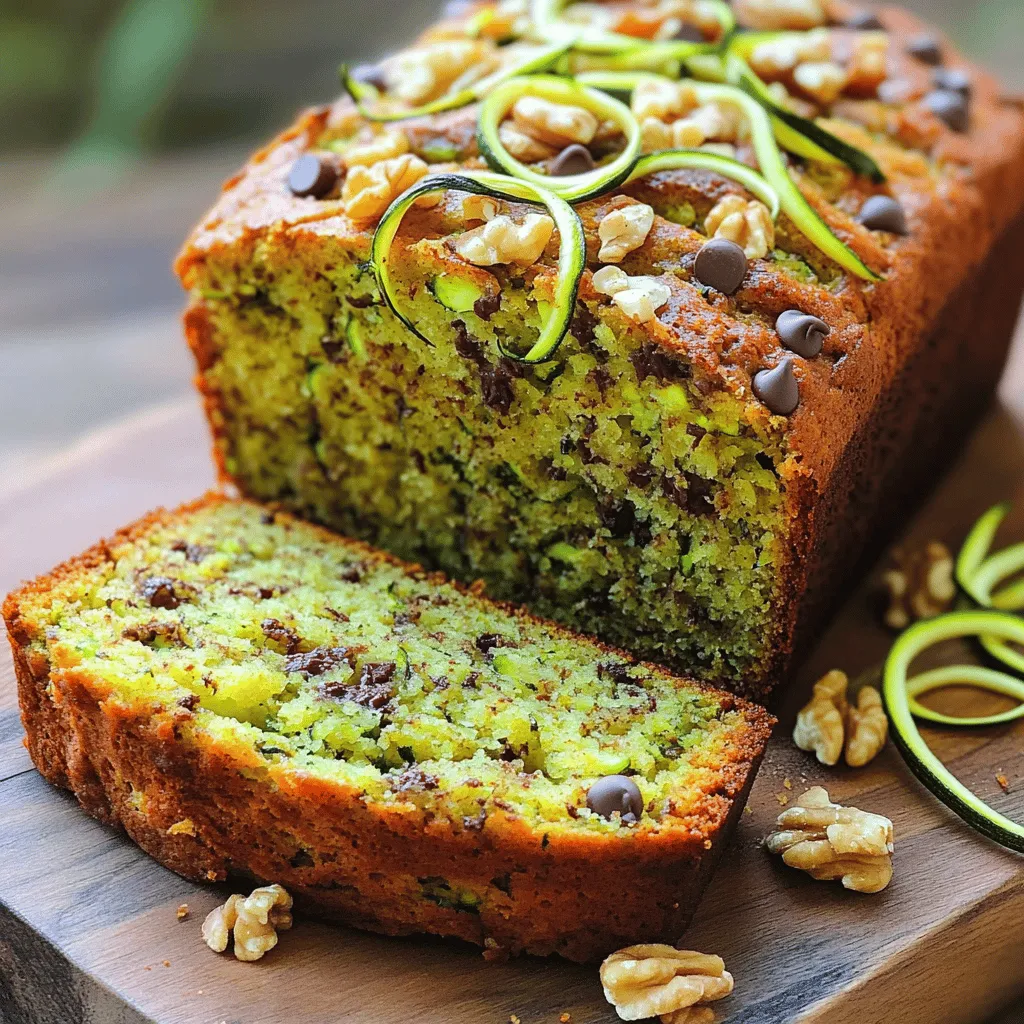
The Best Zucchini Bread Irresistible and Easy Recipe
Are you ready to bake the best zucchini bread that’s both irresistible and easy? This simple recipe combines fresh, grated Read Full Recipe -
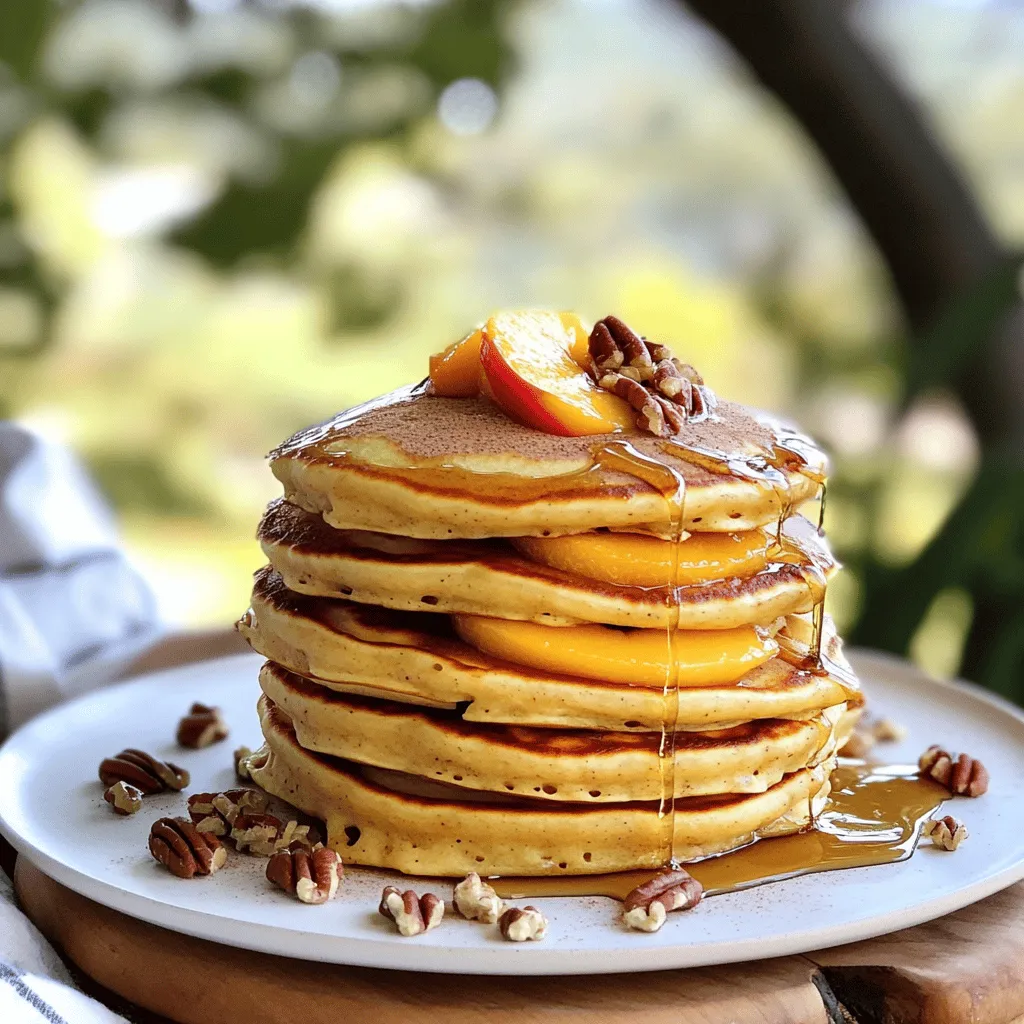
Peach Cobbler Pancakes Delicious and Simple Recipe
Are you ready to bring a burst of flavor to your breakfast table? Peach Cobbler Pancakes are the perfect blend Read Full Recipe -
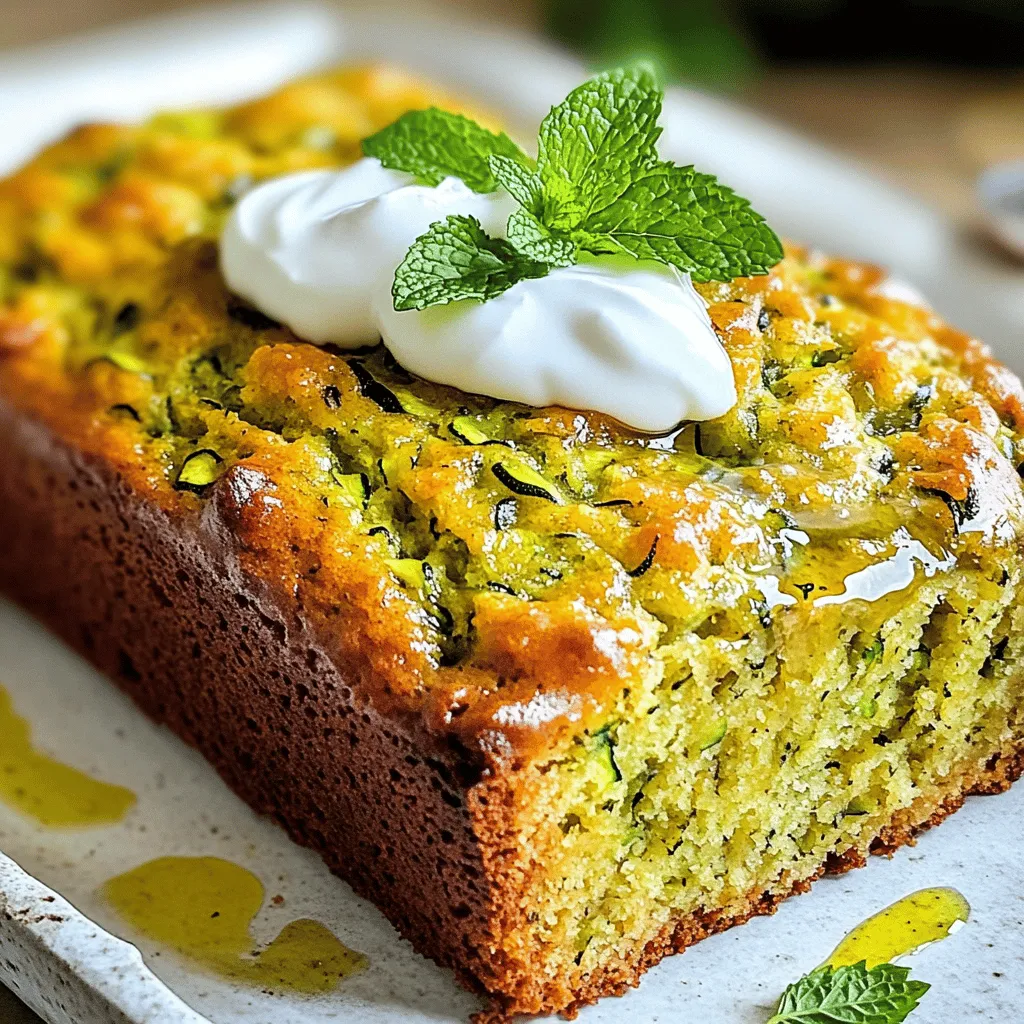
Olive Oil Zucchini Bread Moist and Flavorful Recipe
Welcome to your new favorite treat: Olive Oil Zucchini Bread! This recipe gives you a moist, flavorful loaf that’s perfect Read Full Recipe -
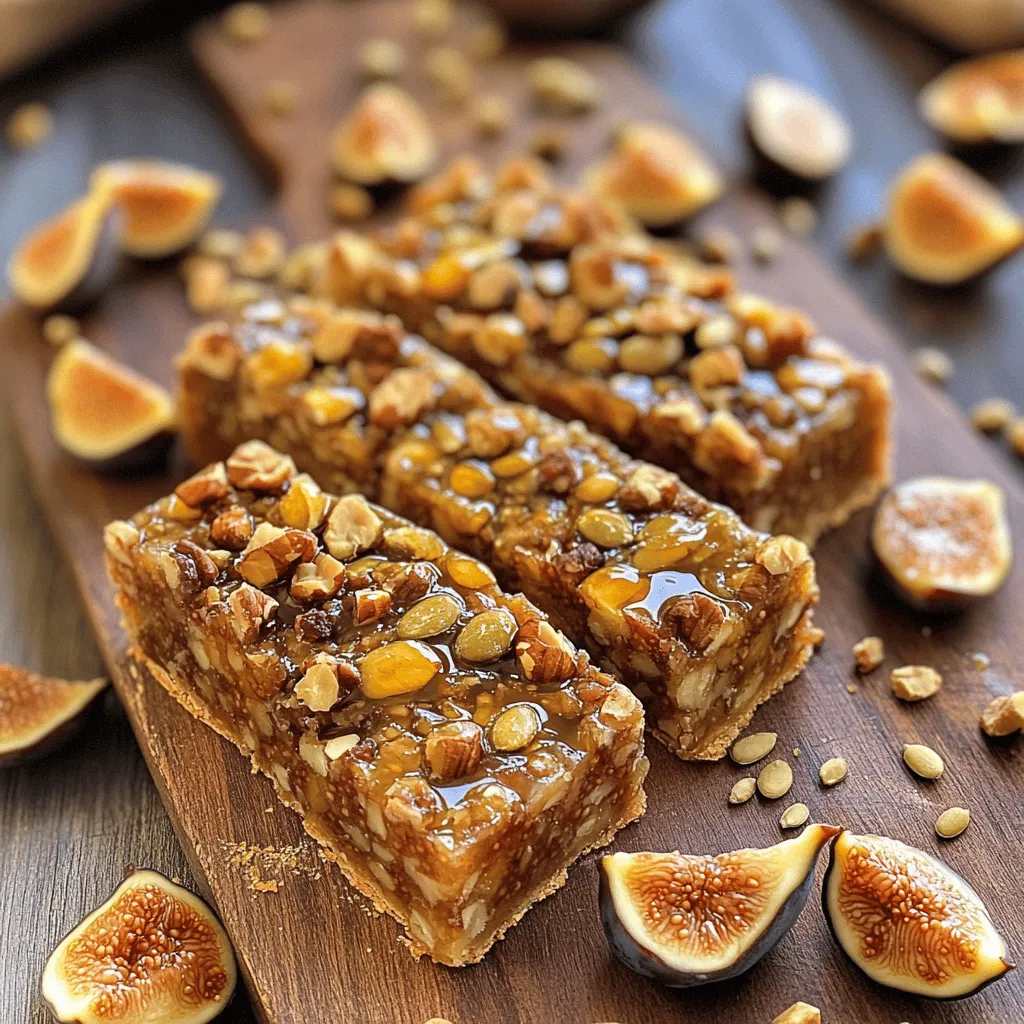
Fig and Walnut Bars Healthy and Flavorful Snack
If you’re searching for a tasty yet healthy snack, Fig and Walnut Bars are a perfect choice! Packed with nutritious Read Full Recipe

My Latest Recipes

hey,
i’m !
I’m so happy you’re here!
Food is my passion, and perfecting each dish is my craft. I can’t wait for you to try them let’s dive into this delicious journey side by side.
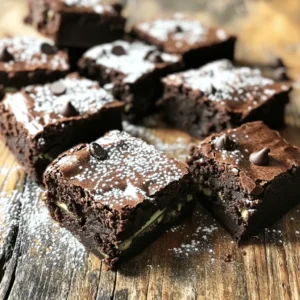
![For the ultimate chocolate fudge brownies, you need some core ingredients. These ingredients create a rich and delicious treat. - 1 cup unsalted butter (2 sticks) - 2 cups granulated sugar - 1 cup packed light brown sugar - 4 large eggs - 1 tablespoon vanilla extract - 1 cup all-purpose flour - 1 cup unsweetened cocoa powder - 1 teaspoon baking powder - 1/2 teaspoon salt - 2 cups semi-sweet chocolate chips Butter gives the brownies their rich flavor and fudgy texture. Sugar adds sweetness and helps create a shiny crust. Eggs bind all the ingredients together, making the brownies moist. Vanilla extract adds depth to the flavor. Flour gives structure, while cocoa powder provides that intense chocolate taste. Baking powder helps the brownies rise slightly, but we want them dense. Lastly, chocolate chips add extra chocolate goodness. You can enhance your brownies with some optional add-ins. Here are a few ideas to make them even better: - 1/2 cup chopped walnuts (optional) Adding nuts gives a nice crunch and flavor contrast. You can also consider these options: - Sea salt on top for a sweet-salty kick - Caramel swirls for a gooey texture - Peanut butter swirls for a nutty flavor These additions can take your brownies from great to spectacular. Feel free to mix and match based on what you enjoy! For the complete recipe, check out the [Full Recipe]. 1. Preheat your oven to 350°F (175°C). This step is key for even baking. 2. Prepare your baking pan. Grease a 9x13 inch pan or line it with parchment paper. This helps with easy removal of brownies later. 3. Melt the butter. Use a medium saucepan over low heat to melt 1 cup of unsalted butter completely. This gives the brownies a rich texture. 4. Combine wet ingredients. Remove the butter from heat and let it cool slightly. In a large bowl, mix the melted butter, 2 cups of granulated sugar, and 1 cup of packed light brown sugar. Stir until well mixed. 5. Add eggs and vanilla. Crack 4 large eggs into the bowl one at a time. Make sure to whisk well after each egg. Finally, stir in 1 tablespoon of vanilla extract. 1. Sift dry ingredients. In a separate bowl, sift together 1 cup of all-purpose flour, 1 cup of unsweetened cocoa powder, 1 teaspoon of baking powder, and 1/2 teaspoon of salt. This helps avoid lumps. 2. Incorporate dry ingredients into wet. Gradually add the dry mixture to your wet ingredients. Stir until just combined. Be careful not to overmix. This keeps the brownies fudgy and soft. 3. Fold in extras. If you want extra flavor, fold in 2 cups of semi-sweet chocolate chips and 1/2 cup of chopped walnuts, if desired. This adds crunch and richness. 1. Pour and spread. Pour the brownie batter into your prepared baking pan and spread it evenly. 2. Bake. Place the pan in your preheated oven. Bake for 25-30 minutes. To check for doneness, insert a toothpick in the center. It should come out with a few moist crumbs, not wet batter. 3. Cool properly. After baking, remove the brownies from the oven. Let them cool in the pan for 15 minutes. Then, transfer them to a wire rack to cool completely before slicing. This cooling step is important for the best texture. You can find the full recipe for Ultimate Chocolate Fudge Brownies to ensure you get every detail right! To get the perfect brownie texture, you need to choose between fudgy and cakey. For fudgy brownies, use more fat and less flour. This gives you a chewy, dense treat. For cakey brownies, use more flour and add baking powder. This makes them light and airy. Make sure your ingredients are at room temperature. Cold eggs or butter can affect how they mix. If you melt your butter, let it cool slightly before adding it to the mix. This helps keep your brownies rich and moist. Using the right tools is key for great brownies. I recommend using a metal or glass 9x13 inch baking pan. Metal pans heat evenly, while glass lets you see the bottom. Always grease your pan or line it with parchment paper. This makes it easy to lift out the brownies. To check if your brownies are done, use a toothpick. Insert it into the center of the brownies. If it comes out with a few moist crumbs, they are ready. If it comes out wet, they need more time. For a beautiful presentation, cut your brownies into squares and arrange them on a platter. You can dust them with powdered sugar for a nice touch. Drizzle some chocolate sauce on top for extra flair. Brownies pair wonderfully with ice cream or coffee. A scoop of vanilla ice cream on top makes them even more decadent. You could also enjoy them with a cup of strong coffee to balance the sweetness. For the ultimate treat, try both! For the full recipe, check out the Ultimate Chocolate Fudge Brownies! {{image_2}} You can change the taste of your Ultimate Chocolate Fudge Brownies in fun ways. One idea is to add mint extract. This gives a fresh, cool flavor that pairs well with chocolate. You can also swirl in peanut butter for a rich, nutty taste. Just drop spoonfuls of peanut butter into the batter and swirl with a knife before baking. Switch up the chocolate you use, too. Try dark chocolate for a deeper flavor. White chocolate chips can add a sweet touch to your brownies. Mixing different types of chocolate creates a rich, layered taste that excites your palate. If you need gluten-free brownies, you can use almond flour or coconut flour instead of all-purpose flour. These flours give a nice texture without gluten. Just make sure to adjust the amount since these flours absorb more liquid. For vegan brownies, swap the eggs with flaxseed meal. Mix one tablespoon of flaxseed with three tablespoons of water. Let it sit for a few minutes until it thickens. You can replace the butter with coconut oil or vegan butter. This keeps your brownies rich and moist without any animal products. These variations allow you to enjoy brownies that suit your taste and dietary needs. Check the Full Recipe for more details! To keep your brownies fresh, store them properly. Place them in an airtight container. This helps to lock in moisture. You can also wrap them tightly in plastic wrap. Avoid letting them sit out too long, as they can dry out. For best results, store brownies at room temperature for up to four days. If you want to keep them longer, refrigeration is an option, but it may change the texture slightly. Freezing brownies is a great way to save some for later. First, let the brownies cool completely. Then, cut them into squares. Wrap each piece in plastic wrap. This helps keep the flavor and texture. Next, place the wrapped brownies in a freezer-safe bag or container. They can last up to three months in the freezer. When you are ready to enjoy them, simply take them out and thaw them at room temperature. For a warm treat, you can microwave them for a few seconds. This will bring back some of that fudgy goodness. You can use many things in place of eggs. Common substitutes include: - Applesauce: Use 1/4 cup for each egg. It adds moisture and sweetness. - Mashed banana: A ripe banana works well. Use 1/2 banana per egg. - Yogurt: Use 1/4 cup of plain yogurt for each egg. It keeps brownies soft. - Flaxseed meal: Mix 1 tablespoon of flaxseed with 2.5 tablespoons of water. Let it sit until it thickens. These substitutes change the texture. Applesauce and banana add moisture. Flaxseed gives a slight nuttiness. Choose based on your taste and what you have at home. Watch for these signs when baking brownies: - Edges pull away: The edges will look firm and pull from the pan. - Shiny top: The surface will have a glossy sheen. - Toothpick test: Insert a toothpick into the center. It should come out with a few moist crumbs, not wet batter. These signs help you catch the perfect bake. Overbaking will make them dry. Keep an eye on your brownies during the last few minutes. Yes, you can use cocoa powder as the main chocolate source. Cocoa gives a rich chocolate flavor, but balance is key. - Dry to wet ratio: Cocoa is dry, so you need enough wet ingredients. - Add extra fat: Consider using more butter or oil for moisture. This method can make a delicious brownie, but adjust your other ingredients. Too much cocoa can lead to a dry brownie. Aim for that perfect balance! For the full recipe, check out the Ultimate Chocolate Fudge Brownies. In this post, we covered all you need to make Ultimate Chocolate Fudge Brownies. You learned about essential ingredients, the mixing process, and baking tips. We explored variations and how to store your brownies for later. Remember, choose your flavors and store them well for the best taste. Enjoying brownies can bring joy, whether alone or with friends. Get baking today and share your delicious results! Your taste buds will thank you.](https://mysavedrecipe.com/wp-content/uploads/2025/06/ecf212a4-d0fa-4c74-8ed0-c26c3d044df8-300x300.webp)
 for more ideas! After enjoying your honey garlic skillet chicken thighs, store leftovers in the refrigerator. Place them in an airtight container. This keeps the chicken moist and tasty. You can store them for up to four days. For longer storage, consider freezing. Wrap the chicken tightly in plastic wrap, then place it in a freezer bag. This helps prevent freezer burn. You can freeze it for up to three months. To reheat the chicken, the best method is to use the oven. Preheat your oven to 350°F (175°C). Place the chicken on a baking sheet. Heat for about 20 minutes or until warm. You can also use a microwave. Place the chicken on a microwave-safe plate. Cover it with a damp paper towel. Heat in short bursts of 30 seconds, checking often. This method can dry out the chicken, so watch closely. In the refrigerator, honey garlic chicken lasts about four days. Always check for signs of spoilage before eating. If the chicken smells off or looks discolored, it's best to discard it. When freezing, remember to label the bag with the date. This helps you track how long it has been in the freezer. To be safe, if you're unsure about the chicken's freshness, throw it away. For more delicious recipes like this one, check out the Full Recipe! Using a meat thermometer is the best way to check chicken. Insert it into the thickest part of the thigh. The chicken is safe to eat when it reaches 165°F (75°C). Look for clear juices running from the chicken. If the juices are pink, it’s not done. The meat should no longer be pink, and the skin should look golden brown. Yes, you can use boneless chicken thighs. They will cook faster than bone-in thighs. You should reduce the cooking time by about 5–10 minutes. Boneless thighs may be juicier, but they can lack some flavor from the bone. Adjust your cooking time to avoid dryness. If you need a substitute for honey, try maple syrup or agave nectar. They both add sweetness but may change the flavor slightly. You can also use brown sugar mixed with water for a similar texture. This swap may impact the overall taste and consistency of your dish. You can definitely make this dish ahead of time. Cook the chicken and let it cool before storing. Use an airtight container to keep the chicken fresh in the fridge. When reheating, use low heat to avoid drying out the meat. This blog post covered essential ingredients and step-by-step cooking instructions for a delicious chicken dish. You learned about perfecting the sear, enhancing flavors with spices, and even possible variations. Remember to store leftovers properly to keep them fresh. Try different proteins or add vegetables for a unique twist. Cooking can be fun and easy with the right tips. Enjoy the process and keep experimenting with your meals!](https://mysavedrecipe.com/wp-content/uploads/2025/05/20028b12-c9fb-4533-904e-ae34e976d113-300x300.webp)

![To make a tasty Chicken Fajita Casserole, gather the following: - 2 cups cooked chicken, shredded - 1 cup bell peppers (red, yellow, green), sliced - 1 small red onion, sliced - 1 can (15 oz) black beans, rinsed and drained - 1 cup corn (fresh, frozen, or canned) - 2 cups cooked rice (white or brown) - 1 cup salsa (mild or spicy, your choice) - 2 cups shredded cheese (cheddar or Mexican blend) - 2 teaspoons fajita seasoning - 1 tablespoon olive oil - Salt and pepper to taste - Fresh cilantro for garnish (optional) You can swap out some ingredients to suit your taste. Here are a few ideas: - Use leftover turkey instead of chicken. - Try different beans like pinto or kidney beans. - Swap out the rice for quinoa for a healthier grain. - Instead of salsa, use diced tomatoes mixed with spices. - Use dairy-free cheese for a vegan option. Fresh produce makes your casserole shine. Here are some tips: - Look for bell peppers that feel firm and have shiny skin. - Choose onions that are dry and have no soft spots. - When selecting corn, pick ears with bright green husks. - For cilantro, look for bright green leaves and a fresh scent. - Avoid any produce with bruises or dark spots, as they may spoil quickly. These tips ensure your Chicken Fajita Casserole is full of flavor and nutrition. For the full recipe, check the details above. To make Chicken Fajita Casserole, start by preheating your oven to 375°F (190°C). Heat a large skillet over medium heat. Add one tablespoon of olive oil to the skillet. Once it's hot, add the sliced bell peppers and onion. Sauté them for about 5 to 7 minutes until they soften. Next, stir in 2 cups of shredded chicken, one can of black beans, and one cup of corn. Now, add 2 teaspoons of fajita seasoning and one cup of salsa. Mix well and cook for 3 to 4 more minutes until everything is heated through. Don’t forget to add salt and pepper to taste. In a large bowl, combine 2 cups of cooked rice with half of the shredded cheese. Mix it to blend well. Grease a 9x13 inch casserole dish. Layer half of the rice on the bottom. Then, add the chicken and veggie mixture on top. Next, spread the remaining rice mixture over that. Finally, sprinkle the rest of the shredded cheese on the very top. Cover the dish with aluminum foil. Bake for 25 minutes. After that, remove the foil and bake for another 10 minutes until the cheese is melted and bubbly. Let it sit for about 5 minutes before you serve. Sautéing is a key technique here. It brings out the flavors in the peppers and onion. This step adds a nice depth to your casserole. Mixing the cheese with the rice helps to keep it creamy. Layering the casserole ensures even cooking. Covering it with foil at first helps cook the dish evenly without drying it out. Uncovering it for the last 10 minutes allows the cheese to get bubbly and golden. Timing is crucial for this dish. Preheating your oven ensures even cooking. The total time for this recipe is about 55 minutes. This includes 15 minutes for prep and 40 minutes of baking. Always check the internal temperature; it should reach at least 165°F (74°C). This ensures your casserole is safe and delicious. Also, letting it sit for 5 minutes after baking allows the flavors to settle. This dish is perfect for busy nights or gatherings. For the best results, follow the timings closely. You can find the Full Recipe at the start. To boost the flavors in your Chicken Fajita Casserole, consider these tips: - Use fresh herbs: Cilantro adds a fresh taste. - Add lime juice: A squeeze brightens the dish. - Experiment with spices: Try cumin or smoked paprika for depth. - Mix in jalapeños: For a spicy kick, add sliced jalapeños. These small tweaks can make your casserole burst with flavor. Avoid these easy mistakes to ensure your casserole shines: - Overcooking the vegetables: Sauté them just until soft. - Skipping the seasoning: Always season your chicken and veggies well. - Not layering properly: Layer rice, chicken, and cheese for even cooking. - Using cold ingredients: Bring everything to room temp for better blending. These tips will help you create a perfect, tasty dish. Serve your Chicken Fajita Casserole with these ideas: - Tortilla chips: They add crunch and texture. - A side salad: Fresh greens balance the meal. - Sour cream or guacamole: These toppings add creaminess. - Extra salsa: Serve on the side for those who love it. These pairings will make your meal even more delightful. For the full recipe, check out the [Full Recipe]. {{image_2}} You can swap the chicken for mushrooms or zucchini. This keeps the dish filling. Use the same spices for great flavor. Add extra beans or corn for more texture. A mix of cheeses makes it creamy and rich. This option is perfect for meat-free nights. For a low-carb meal, skip the rice. Instead, use cauliflower rice or shredded cabbage. This keeps the taste while cutting carbs. You can still enjoy all the spices and veggies. Top with cheese for that gooey finish. It’s a smart choice for anyone watching carbs. Want more heat? Add jalapeños or chili powder to the mix. You can also use spicy salsa. This gives your casserole a warm kick. If you love heat, experiment with different peppers. The spice level can be just right for your taste. Enjoy it with a side of cooling sour cream. After enjoying your Chicken Fajita Casserole, store leftovers in an airtight container. This keeps the dish fresh. Let it cool to room temperature before sealing. Enjoy the flavors for up to three days in the fridge. If you want to keep it longer, consider freezing. To reheat, take the casserole out of the fridge. Place it in a preheated oven at 350°F (175°C). Cover it with foil to keep it moist. Heat for about 20-25 minutes. If it's frozen, let it thaw overnight in the fridge first. Then, reheat as mentioned above. You can also use a microwave. Place a portion in a microwave-safe dish and heat for 2-3 minutes. Stir halfway for even heating. You can freeze Chicken Fajita Casserole for up to three months. It’s best to freeze it before baking. Assemble the dish, cover it tightly with foil, and place it in the freezer. When ready to eat, thaw it in the fridge overnight. Bake it as per the full recipe instructions. This way, you enjoy fresh and tasty flavors any day! Yes, you can make Chicken Fajita Casserole ahead of time. Prepare the casserole up to the point of baking. Cover it and place it in the fridge for up to 24 hours. When you're ready, just bake it straight from the fridge. You may need to add a few extra minutes of baking time. This makes it great for busy days or gatherings. You can serve many sides with Chicken Fajita Casserole. Some tasty options include: - Tortilla chips - Fresh guacamole - A simple side salad - Sliced avocados - Sour cream or Greek yogurt These sides add flavor and texture, making your meal even better. You can tell when the casserole is done by looking for a few signs. The cheese should be melted and bubbly. The edges may also be slightly browned. If you insert a fork in the center, it should be hot throughout. If unsure, use a food thermometer; the inside should reach 165°F (74°C). Enjoy your delicious Chicken Fajita Casserole! For the complete recipe, check out the Full Recipe. In this blog post, we covered the ingredients for Chicken Fajita Casserole, including substitutes and tips for choosing fresh produce. I shared step-by-step cooking instructions, important techniques, and timing tips. We also looked at ways to enhance flavors, avoid common mistakes, and some serving ideas. Variations such as vegetarian and spicy options provide more choices. Lastly, proper storage and reheating tips ensure you enjoy your leftovers. Knowing these details helps you create a delicious meal every time. Enjoy cooking!](https://mysavedrecipe.com/wp-content/uploads/2025/06/1a9b9afa-2cd5-47dd-be00-b94cadab55f0-300x300.webp)
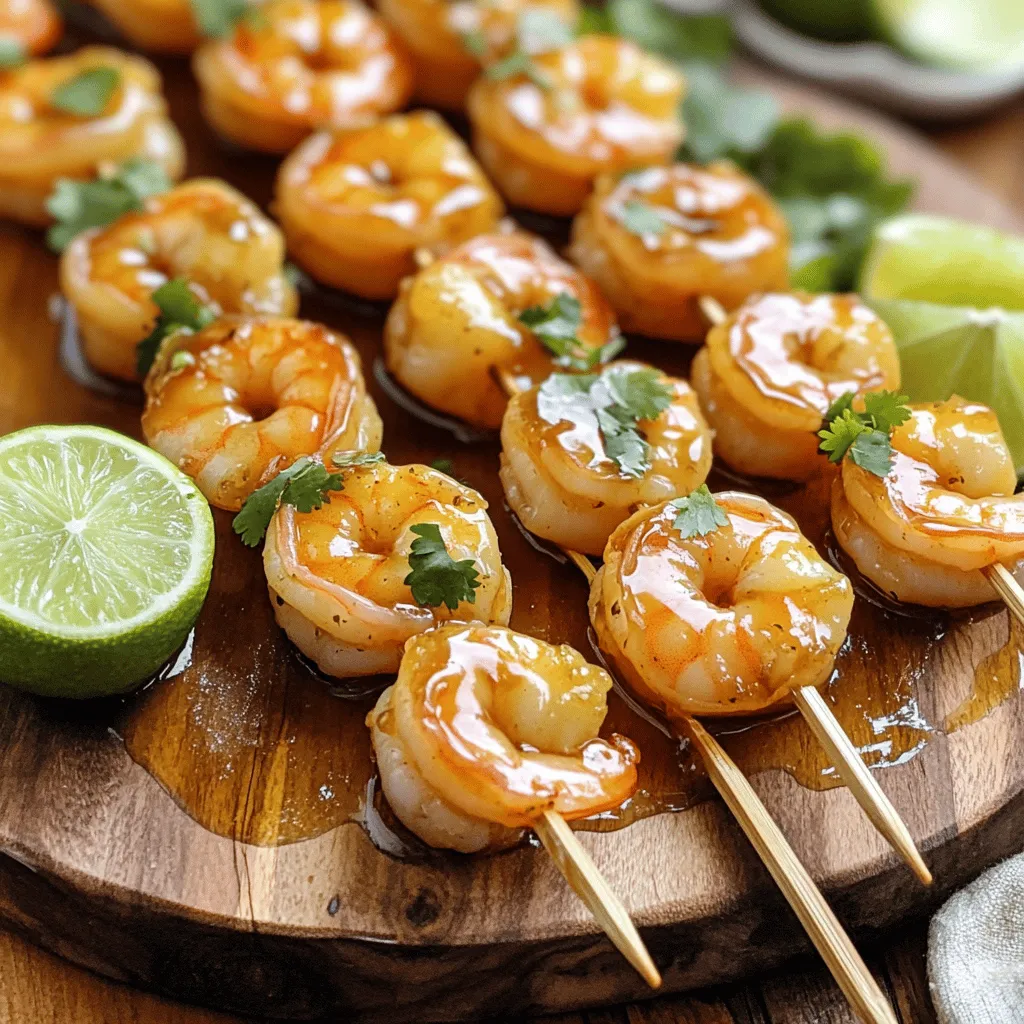
Honey Garlic Shrimp Skewers Quick and Tasty Recipe
Are you ready to impress your friends with a quick and tasty dish? Honey garlic shrimp skewers are easy to make and packed with…