
If you love a savory snack that's both simple and tasty, you're in the right place! These Savory Garlic Parmesan Scones are a delightful treat perfect for any meal. With just a few easy ingredients, you can whip up a batch that pairs beautifully with soups or stands alone as a delicious snack. Ready to impress your taste buds? Let’s dive into this recipe that will have everyone asking for more!
Why I Love This Recipe
- Delicious Flavor Combination: The blend of garlic and Parmesan creates a savory scone that is perfect for any meal or snack.
- Easy to Prepare: This recipe requires simple ingredients and straightforward steps, making it accessible for bakers of all levels.
- Versatile Serving Options: These scones can be served warm as a side dish, or enjoyed on their own with a bit of butter.
- Perfect for Any Occasion: Whether it's a brunch, a tea party, or just a cozy night in, these scones are a hit!
Ingredients
Dry Ingredients
To make these savory garlic Parmesan scones, you need:
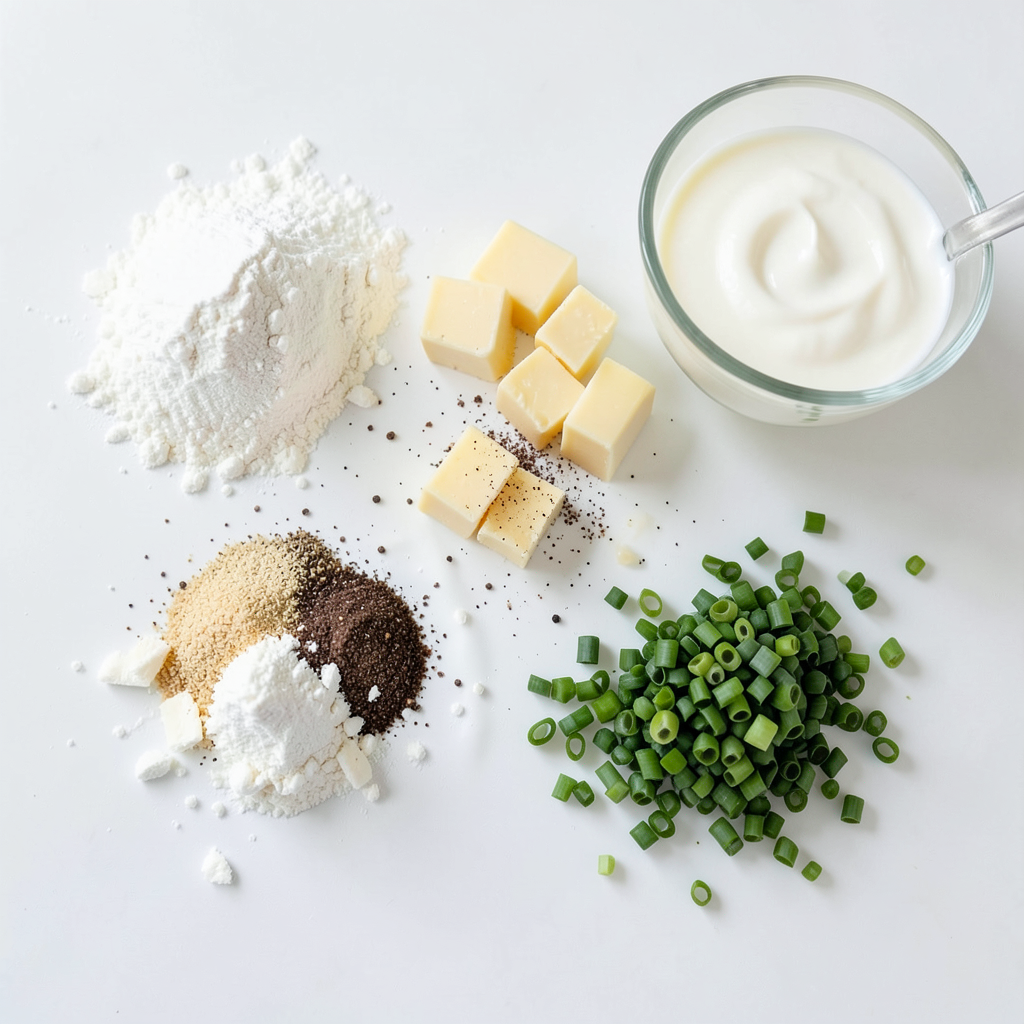
- 2 cups all-purpose flour
- 1 tablespoon baking powder
- 1 teaspoon salt
- 1/2 teaspoon black pepper
These dry ingredients set the base for your scones. The flour gives structure, while the baking powder helps them rise. The salt and black pepper add flavor, making each bite tasty.
Wet Ingredients
Next, gather your wet ingredients. You will need:
- 1/2 cup unsalted butter, chilled and cubed
- 1/2 cup sour cream
- 1/4 cup milk
The butter keeps the scones flaky. The sour cream adds moisture and a slight tang, while the milk helps to bind everything together smoothly.
Flavor Enhancers
Now comes the fun part! For flavor, you will want:
- 1 cup grated Parmesan cheese
- 4 cloves garlic, minced
- Fresh chives or parsley, chopped (for garnish)
The Parmesan cheese brings a rich, savory taste. The minced garlic adds a punch of flavor, while fresh herbs like chives or parsley brighten up the dish. These ingredients make your scones special and memorable.
Step-by-Step Instructions
Prepping Your Oven and Pan
First, you need to preheat your oven to 400°F (200°C). This high heat helps the scones rise nicely. While the oven heats, line a baking sheet with parchment paper. This makes cleanup easy and keeps the scones from sticking.
Mixing Dry Ingredients
In a large mixing bowl, whisk together the following dry ingredients:
- 2 cups all-purpose flour
- 1 tablespoon baking powder
- 1 teaspoon salt
- 1/2 teaspoon black pepper
Whisking helps to combine everything. It also adds air to the mix, making your scones light.
Incorporating Butter and Cheese
Now, add 1/2 cup of chilled, cubed unsalted butter to your bowl. Using your fingers or a pastry cutter, work the butter into the flour mix. You want it to look like coarse crumbs. Next, stir in 1 cup of grated Parmesan cheese and 4 minced garlic cloves. Mix well so the cheese and garlic spread evenly.
Combining Wet Ingredients
In a separate bowl, mix 1/2 cup of sour cream and 1/4 cup of milk until smooth. Slowly add this mix to your dry ingredients. Stir gently until just combined. Be careful not to overmix, or the scones may become tough.
Forming the Dough
Turn the dough out onto a floured surface. Knead it gently a few times until it holds together. Shape it into a circle about 1 inch thick. Then, cut the circle into 8 wedges. Place these on your lined baking sheet, leaving some space between them.
Baking the Scones
Bake in your preheated oven for 20 to 25 minutes. Keep an eye on them. They should turn a nice golden brown color. When they are done, take them out and let them cool slightly on the baking sheet. Garnish with chopped chives or parsley for a fresh touch.
Tips & Tricks
Achieving the Perfect Texture
To know when the butter is properly mixed, look for a crumbly texture. You want it to look like coarse sand. Use your fingers or a pastry cutter to blend it well. Don't rush this step. The small chunks of butter help make the scones flaky. If you see large pieces, keep mixing.
Storage Tips
To store leftover scones, let them cool completely. Place them in an airtight container. They will stay fresh for about two days at room temperature. If you need to keep them longer, freeze them. Wrap each scone in plastic wrap and place them in a freezer bag. They can last up to three months in the freezer.
Serving Suggestions
These scones pair well with soups or salads. They make a tasty snack too. Try them with a warm bowl of tomato soup or a fresh garden salad. You can even enjoy them plain or with some butter. Each bite will be flavorful and satisfying.
Pro Tips
- Use Cold Ingredients: Ensure your butter and sour cream are well-chilled before mixing. This helps create a flaky texture in the scones.
- Don’t Overmix: Mix the dough just until combined to keep the scones tender. Overworking the dough can lead to tough scones.
- Adjust Cheese to Taste: Feel free to experiment with different types of cheese, such as cheddar or feta, for unique flavor variations.
- Perfect Baking Time: Keep an eye on the scones as they bake; oven temperatures can vary. Bake until golden brown for the best results.
Variations
Adding Herbs
You can easily tweak this recipe by adding herbs. Fresh herbs can boost the taste. I love using fresh chives or parsley for a bright flavor. Other great options include rosemary or thyme. Just chop them fine and mix them in with the dry ingredients. This will add a fresh twist to your scones.
Cheese Alternatives
While Parmesan brings a rich taste, you can switch cheeses for variety. Cheddar offers a sharp, bold flavor. Feta adds a tangy touch. If you want a milder taste, try mozzarella. Each cheese will give your scones a unique flavor. Feel free to mix different cheeses for a fun twist!
Gluten-Free Options
If you need a gluten-free version, you can use gluten-free flour. Look for a blend that works well for baking. Replace the all-purpose flour with this blend in the same amount. To help with texture, add a bit more baking powder. This will ensure your scones rise nicely and remain light.
Storage Info
Short-Term Storage
To keep your savory garlic Parmesan scones fresh, store them at room temperature. Use an airtight container. This will help keep them moist. Avoid placing them in the fridge, as that can dry them out. They stay good for about two days on the counter. If you want to keep them longer, consider freezing them instead.
Long-Term Storage
Freezing scones is a great way to have them on hand later. Allow the scones to cool completely after baking. Wrap each scone tightly in plastic wrap or aluminum foil. Place wrapped scones in a freezer bag or container. Label the bag with the date. These scones can last up to three months in the freezer. When you're ready to enjoy them, just take out the number you want.
Reheating Instructions
To reheat your scones, preheat the oven to 350°F (175°C). Unwrap the scones and place them on a baking sheet. Bake for about 10-15 minutes. This will help them regain their texture. If you're in a hurry, you can also use a microwave. Heat for about 15-20 seconds. However, the oven gives a better result. Enjoy your warm scones right after reheating!
FAQs
Can I make the scone dough ahead of time?
Yes, you can make the scone dough ahead of time. I recommend wrapping it tightly in plastic wrap. Store it in the fridge for up to 24 hours. When you are ready, just roll it out and bake. This saves time and makes the process easy.
What can I substitute for sour cream?
If you don't have sour cream, you can use plain yogurt. Greek yogurt works well too. It gives a similar creaminess and tang. You can also try buttermilk or a mix of cream cheese and milk. These options keep the scones moist and tasty.
How do I know when scones are fully baked?
You can tell the scones are ready when they turn golden brown. The edges should also be firm to the touch. You can insert a toothpick into the center. If it comes out clean, the scones are done. This means the dough has cooked through.
Can these scones be made without cheese?
Yes, you can make these scones without cheese. You might want to add extra herbs or spices for flavor. Consider adding some sun-dried tomatoes or olives. These will keep your scones tasty and interesting without the cheese.
You learned how to make tasty scones with easy steps. We covered the key ingredients, like flour, butter, and cheese. You now know how to mix them and bake to perfection. Remember the tips for texture and storage to keep them fresh. Feel free to experiment with herbs or cheese types for fun flavors. Making your own scones brings joy and tasty results. You're ready to enjoy your fresh scones with soup or salad. Get baking and have fun in the kitchen!