- Savory Chicken Avocado Melt Easy Recipe to Enjoy
- Quick Homemade Butter Chicken Flavorful and Simple Meal
- The Best White Chicken Chili Flavorful and Easy Recipe
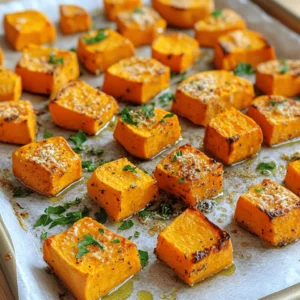
- Parmesan Garlic Roasted Sweet Potatoes Delightful Dish
- Classic Bread Stuffing Flavorful and Simple Recipe
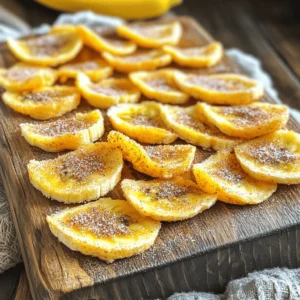
- Crispy Cinnamon Sugar Air Fryer Banana Chips Delight
- Smothered Chicken and Rice Skillet Comforting Meal
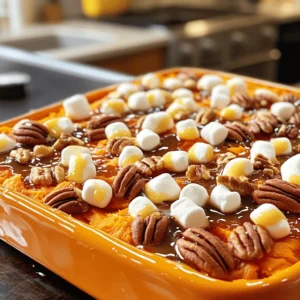
- Easy Sweet Potato Casserole Simple and Tasty Recipe
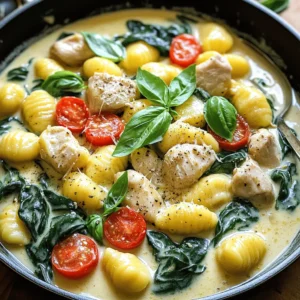
- Garlic Chicken Gnocchi Skillet Quick and Tasty Meal
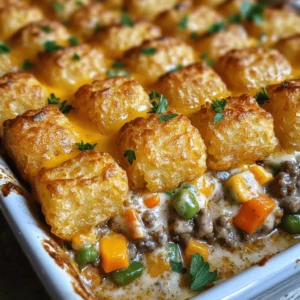
- Tater Tot Casserole Scrumptious Family Favorite Dish
- Easy Green Bean Casserole Simple and Comforting Dish
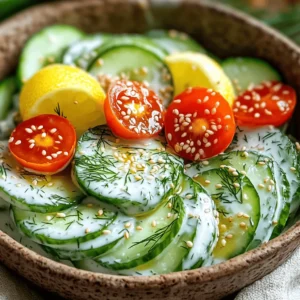
- Creamy Cucumber Salad Fresh and Simple Delight
- Peppermint Chocolate Chip Cookies Festive and Delightful
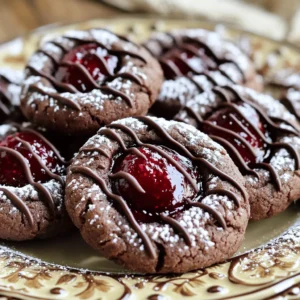
- Chocolate Thumbprint Cookies Irresistible Treat Recipe
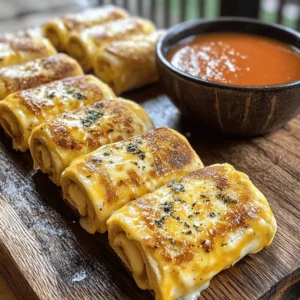
- Grilled Cheese Roll Ups Delightful Snack Idea
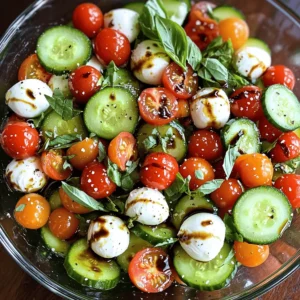
- Easy Cucumber Caprese Salad Fresh and Vibrant Dish
- Slow Cooker Honey Garlic Chicken and Veggies Delight
- Baked Mac and Cheese Creamy Comfort Food Delight
- White Chicken Chili Flavor-Packed Comfort Bowl
- Easy Stained Glass Cookies Simple and Fun Recipe
- Grilled Ranch Garlic Parmesan Chicken Skewers Delight
- Cheesy Garlic Bread Irresistible and Simple Delight
- Spooky Halloween Snack Mix Fun and Festive Recipe
- Halloween Chex Mix Fun and Festive Snack Idea
- Harvest Pumpkin Snack Mix Tasty and Crunchy Treat
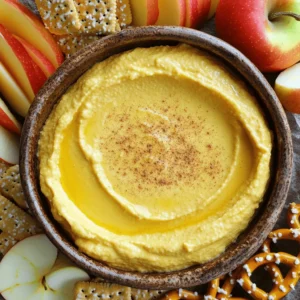
- Pumpkin Cheesecake Dip Delightful and Easy Recipe
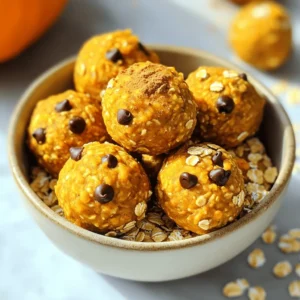
- Pumpkin Spice Energy Bites Healthy Power Snack
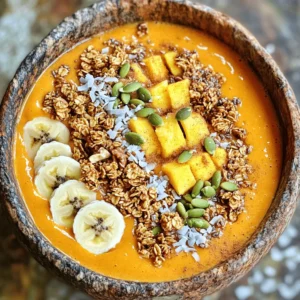
- Pumpkin Pie Smoothie Bowl Delicious Fall Delight
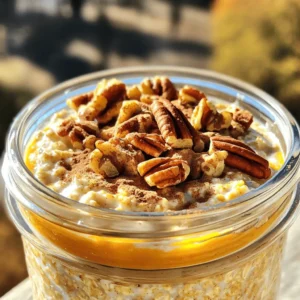
- Pumpkin Pie Overnight Oats Flavorful and Nutritious Meal
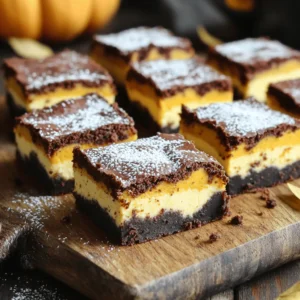
- Pumpkin Cheesecake Brownies Delightful Dessert Recipe
- Pillowy Pumpkin Dinner Rolls Simple and Delicious Recipe
- Chocolate Chip Pumpkin Cream Cheese Muffins Delight
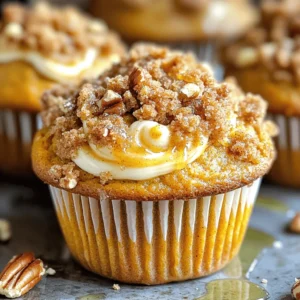
- Streusel Pumpkin Cream Cheese Muffins Delightful Treat
- Easy Pumpkin Cream Cheese Muffins Tasty Fall Treat
- Pumpkin Pie Crinkle Cookies Charming Autumn Treat
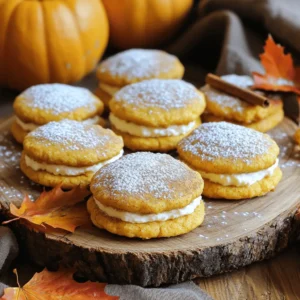
- Pumpkin Cheesecake Cookies Irresistible Fall Treat
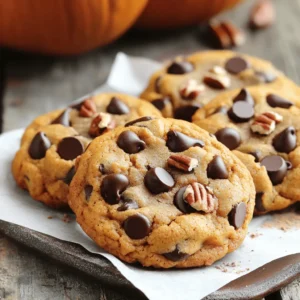
- Chocolate Chip Pumpkin Cookies Flavorful Fall Treat
- Pumpkin Butter Snickerdoodles Irresistible Cookie Treat
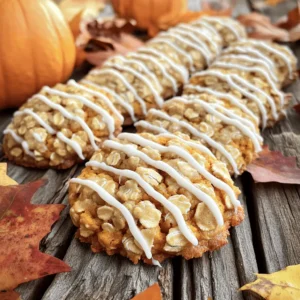
- Pumpkin & Oatmeal Cookies with Icing Delight
- Pumpkin Churro Bites Tasty and Easy Dessert Treat
- Maple Glazed Pumpkin Donuts Tasty Homemade Treat
- Iced Pumpkin Spice Latte Simple and Tasty Recipe

![- Boneless chicken thighs - Plain yogurt - Spices: garam masala, cumin, turmeric, chili powder - Fresh aromatics: onion, garlic, ginger - Heavy cream and diced tomatoes - Fresh cilantro - Additional cream for drizzling The main ingredients for quick homemade butter chicken bring flavor and warmth to your meal. Start with boneless chicken thighs. They are juicy and tender. I love using plain yogurt for marinating. It makes the chicken soft and adds a nice tang. Next, spices are key. I always use garam masala, cumin, turmeric, and chili powder. These spices give the dish its rich flavor. Fresh aromatics like onion, garlic, and ginger add depth. They make the dish smell amazing while cooking. Heavy cream and diced tomatoes create a creamy sauce. The cream balances the spices well. You can use canned diced tomatoes or fresh ones. Both work great in this dish. For optional garnishes, fresh cilantro adds a pop of color. It also gives a fresh taste. A drizzle of additional cream makes the dish look fancy. These simple touches elevate your butter chicken. This recipe is straightforward. You can find the full recipe for quick homemade butter chicken to guide you through every step. Enjoy making this delicious meal! To start, you need to create a tasty marinade for the chicken. In a bowl, combine: - 1 cup plain yogurt - 2 tablespoons lemon juice - 1 tablespoon garam masala - 2 teaspoons cumin powder - 1 teaspoon turmeric powder - 1 teaspoon chili powder Mix all the ingredients well. Then, add the chicken pieces and coat them evenly. Let the chicken marinate for at least 30 minutes. For even more flavor, you can marinate it overnight. Next, heat a large skillet over medium heat. Melt 2 tablespoons of butter in the skillet. Once the butter melts, add the marinated chicken. Discard any leftover marinade. Cook the chicken for about 8-10 minutes. You want it to be golden brown and cooked through. The chicken should no longer be pink in the center. After the chicken is done, it’s time to make the sauce. In the same skillet, add 2 more tablespoons of butter. Once melted, add the chopped onion. Sauté until the onion is golden brown, which takes about 5 minutes. Then, add 3 cloves of minced garlic and 1 tablespoon of minced ginger. Cook for another 1-2 minutes until you smell that great aroma. Now, add a can of diced tomatoes and let it cook on medium heat. You want the sauce to thicken a bit, which should take about 5-7 minutes. Finally, stir in 1 cup of heavy cream, and bring the sauce to a gentle simmer. Now, gently fold the cooked chicken back into the sauce. Let everything simmer together for about 5 more minutes. This step allows the flavors to blend nicely. Add salt to taste. If you want, you can serve it with fresh cilantro for a pop of color. For the full recipe, check out the details above. Enjoy your butter chicken! To make your butter chicken truly flavorful, marinate your chicken for at least 30 minutes. For the best taste, let it sit overnight. This will allow the spices to soak in well. Fresh spices are key. They give the dish an amazing aroma and depth of flavor. Always use whole spices when you can, and grind them just before use. Your taste buds will thank you! When cooking, set your heat to medium. This helps the chicken cook evenly without burning. If your pan gets too hot, the chicken can burn quickly. Stir often and keep an eye on it. If you notice it starting to brown too fast, lower the heat a bit. This way, you keep your chicken tender and juicy. For a perfect meal, serve your butter chicken with fluffy basmati rice or warm naan. These pair well and soak up the tasty sauce. When serving, use a wide, shallow bowl. Drizzle a bit of extra cream on top for a rich look. A sprinkle of fresh cilantro adds color and freshness to your dish. It makes everything pop! {{image_2}} You can easily make this dish vegetarian. Just swap out the chicken for paneer or tofu. Both options soak up all the rich flavors. Paneer adds a creamy texture, while tofu makes it lighter. Cut them into bite-sized pieces just like the chicken. Marinate them the same way to keep the taste strong. If you want a dairy-free version, use coconut milk instead of heavy cream. Coconut milk gives a nice, creamy feel without the dairy. It also adds a subtle sweetness that works well in the dish. Just replace the heavy cream with one cup of coconut milk. The taste stays rich and delicious. You can adjust the heat level to suit your taste. If you like it spicy, add more chili powder. For a milder dish, reduce the chili powder. You can also add some fresh green chilies for extra flavor. Taste the sauce as you go to get it just right. After enjoying your butter chicken, cool it down to room temperature. Store it in the fridge within two hours. Use an airtight container for best results. This keeps the flavors fresh and safe to eat. Your butter chicken will stay good for about 3 to 4 days in the refrigerator. If you want to keep it longer, you can freeze butter chicken. First, let it cool completely. Pour it into a freezer-safe container or a heavy-duty freezer bag. Make sure to remove as much air as possible. Label the container with the date. Your butter chicken can last up to three months in the freezer. When it's time to enjoy your frozen meal, take it out of the freezer. Thaw it in the fridge overnight for best results. If you're in a hurry, you can use the microwave to thaw it. Once thawed, reheat it on the stove. Stir occasionally to ensure even heating. You want it hot all the way through. Add a splash of cream if it looks too thick. Enjoy your meal! [Full Recipe] You can use coconut milk or cashew cream. Coconut milk adds a nice flavor and a creamy texture. It works well for a lighter dish. Cashew cream is rich and smooth. To make cashew cream, blend soaked cashews with water until smooth. Both options keep the dish creamy and delicious. Yes, you can use frozen chicken. Just make sure to thaw it first. Thawing helps cook the chicken evenly. You can place frozen chicken in the fridge overnight or run it under cold water until thawed. This way, the chicken absorbs the marinade better and cooks thoroughly. Homemade Butter Chicken lasts about 3 to 4 days in the fridge. Store it in an airtight container to keep it fresh. If you want to keep it longer, you can freeze it. Frozen Butter Chicken lasts up to 2 months. Just thaw in the fridge before reheating. Yes, you can make Butter Chicken ahead of time. Cook it fully, then let it cool. Store in the fridge for up to 3 days. You can also freeze it for later. To reheat, warm it on the stove over low heat. Stir often to avoid sticking. This makes weeknight meals super easy! For the full recipe, check the recipe section above. In this post, we explored making quick homemade butter chicken. We covered key ingredients, easy steps, and tips for great flavor. You can customize the dish to fit your needs, whether using chicken, paneer, or tofu. Proper storage and reheating ensure your buttery meal stays tasty. With the right spices and techniques, you’ll impress anyone at your table. Enjoy creating this comforting dish, and share it with friends and family!](https://mysavedrecipe.com/wp-content/uploads/2025/07/cfd4d909-9995-4cc2-90ab-6eb79e0d6acc-300x300.webp)

![The main ingredients create a hearty base for the stuffing. Here’s what you need: - 1 loaf of rustic bread (about 1 pound), cubed - 1 cup celery, diced - 1 cup onion, finely chopped - 1 cup mushrooms, diced (optional) - 1/2 cup dried cranberries (optional for sweetness) Rustic bread gives the best texture. It absorbs flavors well and holds up during baking. Celery and onion add crunch and a sweet taste. If you like, you can include mushrooms for an earthy note. Dried cranberries add a hint of sweetness. Seasoning brings the dish to life. Use these ingredients for great flavor: - 1 tablespoon fresh sage, chopped (or 1 teaspoon dried sage) - 1 tablespoon fresh thyme, chopped (or 1 teaspoon dried thyme) - 1 tablespoon fresh parsley, chopped - 2 cups vegetable broth (or chicken broth) - 1 teaspoon poultry seasoning (optional) - 1/2 cup chopped nuts (optional for crunch) Fresh herbs add brightness. Sage, thyme, and parsley each bring unique tastes. The broth keeps the stuffing moist. You can add poultry seasoning for a deeper flavor. Nuts can give you a nice crunch. Extra ingredients boost the flavor even more. Here’s what I recommend: - 4 cloves garlic, minced - Salt and pepper to taste - 1/2 cup unsalted butter Garlic adds warmth and richness. You can adjust salt and pepper based on your taste. Butter is key for a rich and savory stuffing. It helps everything blend together beautifully. For the full recipe, check out the [Full Recipe]. 1. Preheat your oven to 350°F (175°C). This heat helps the stuffing cook evenly. 2. Spread the cubed bread on a baking sheet. Toast it in the oven for about 10-15 minutes. This step makes the bread dry and crunchy. It adds great texture to your stuffing. Remove the bread from the oven and set it aside. 1. In a large skillet, melt the butter over medium heat. This gives the stuffing a rich taste. 2. Add the diced celery, onion, and mushrooms if you choose to use them. Cook for about 5-7 minutes. The veggies should get soft and the onions clear. 3. Stir in the minced garlic. Cook for another minute. Garlic adds a nice punch of flavor. 1. In a large mixing bowl, combine the toasted bread cubes, sautéed veggies, and fresh herbs. Add salt, pepper, and optional poultry seasoning if you wish. 2. If you're using cranberries or nuts, mix them in now. These add extra flavor and crunch. 3. Gradually pour in the vegetable or chicken broth. Stir gently until the bread is moist but not soggy. Adjust seasoning as needed. 1. Transfer the stuffing mixture into a greased baking dish. Cover it with aluminum foil. 2. Bake for 30 minutes. This helps the flavors meld together. 3. Remove the foil and bake for an additional 10-15 minutes. You want the top to turn golden brown and crispy. For the full recipe, check the details above! To boost flavor, try using different herbs. Rosemary and oregano can add a nice twist. Adjusting your seasoning is key. Always taste your stuffing before you bake it. You may need more salt or herbs. This small step makes a big difference. The right amount of broth is crucial. Start with two cups, then add more if needed. The goal is moist bread, not soggy stuffing. To avoid a wet texture, add broth slowly. Stir gently and check the consistency. If it feels too wet, add more bread. Serve your stuffing in the baking dish for a cozy look. Garnish with fresh herbs or nuts on top for color. For a fun twist, stuff vegetables like bell peppers or squash. This makes a beautiful plate and adds flavor. You can also use small ramekins for individual servings. {{image_2}} You can easily make stuffing vegan. Start by using non-dairy butter and vegetable broth. This makes your dish plant-based. You can also add more vegetables. Consider carrots, bell peppers, or zucchini. These veggies add flavor and color, making your stuffing more appealing. If you want to add protein, sausage or bacon works great. Cook the sausage in the skillet first. Crumble it before adding it to the bread mixture. If using bacon, chop it up and cook until crispy. Then mix it in. When adding meat, adjust your cooking time. You may need a few extra minutes in the oven to ensure everything cooks well. To make gluten-free stuffing, use gluten-free bread. Many stores offer good options now. Just make sure to check the ingredients. You might need to adjust the cooking method slightly. Gluten-free bread can absorb broth differently. So, start with a little less broth. You can always add more if needed. This helps keep the stuffing from getting too soggy. To store leftover stuffing, place it in an airtight container. This helps keep it fresh. You can also cover it tightly with plastic wrap. It stays good in the fridge for about three to four days. When reheating, use an oven for the best results. Preheat it to 350°F (175°C). Spread the stuffing in a baking dish. Add a little broth to moisten it. Cover with foil to keep it from drying out. Heat for about 20 minutes. To freeze bread stuffing, let it cool completely first. Then, pack it in freezer bags or containers. Be sure to remove as much air as you can. This helps avoid freezer burn. Stuffing can last up to three months in the freezer. When you want to eat it, thaw the stuffing in the fridge overnight. After it's thawed, reheat it in the oven. You can add broth to keep it moist. In the fridge, bread stuffing lasts three to four days. In the freezer, it can last up to three months. Watch for signs of spoilage. If you see mold or feel it has an off smell, it's best to toss it. Always trust your senses when it comes to food safety. You can prepare stuffing a day in advance. First, make the stuffing as directed. Once it cools, cover it and store it in the fridge. On the day you plan to serve it, take it out and let it sit at room temperature for 30 minutes. Then, bake it as you normally would. This helps the flavors meld together nicely. I recommend using rustic bread for the best flavor and texture. Sourdough or French bread also works well. These types of bread hold up to moisture without turning mushy. Whole grain bread adds a nice touch too. The key is to avoid soft white bread, as it can get too soggy. Yes, you can use frozen vegetables. They save time and are often just as tasty. However, fresh vegetables have a better crunch and flavor. If using frozen, thaw and drain them first. This helps prevent excess water from making the stuffing soggy. Classic bread stuffing pairs well with many dishes. Try serving it with roasted turkey or chicken. It also complements gravy and cranberry sauce nicely. For a fun twist, serve it with roasted veggies. They add color and nutrients to your meal. If your stuffing is dry, add more broth. Pour it in slowly, mixing gently. You want the bread to be moist, not soggy. If it’s still too dry after baking, cover it with foil. This traps steam and helps it stay moist while cooking. This blog post shared the key ingredients, steps, and tips for making great stuffing. We explored how to mix bread, veggies, and herbs for flavor. I provided ideas for variations to suit different diets and how to store leftovers. In closing, you can create a delicious stuffing that fits your needs. Use these tips to impress at your next meal. Enjoy experimenting and make it your own!](https://mysavedrecipe.com/wp-content/uploads/2025/07/771c68d0-f6af-4a42-8232-a81c9efc6b56-300x300.webp)


![- 8 ounces elbow macaroni - 2 tablespoons unsalted butter - 2 tablespoons all-purpose flour - 2 cups whole milk - 1 cup shredded sharp cheddar cheese - 1 cup shredded Gruyère cheese - 1/2 cup grated Parmesan cheese - 2 tablespoons truffle oil (or to taste) - Salt and pepper to taste - 1/2 cup panko breadcrumbs - 2 tablespoons chopped fresh parsley (for garnish) For this baked mac and cheese, I use simple, quality ingredients. First, I choose elbow macaroni. It holds the cheese sauce well. The butter and flour create a smooth base for my cheese sauce. Whole milk makes it rich and creamy. I love using a mix of cheeses. Sharp cheddar adds sharp flavor. Gruyère gives a nutty taste. Parmesan adds depth and saltiness. Truffle oil brings a unique touch that elevates the dish. I season with salt and pepper to balance the flavors. For the topping, I sprinkle panko breadcrumbs mixed with Parmesan. This gives a crunchy texture. Fresh parsley adds a pop of color and freshness. You can find the full recipe for this creamy delight above. - Preheat the oven to 350°F (175°C). - In a large pot, bring salted water to a boil. Add 8 ounces of elbow macaroni and cook for 6-8 minutes until al dente. Drain and set aside. - In the same pot, melt 2 tablespoons of unsalted butter over medium heat. - Add 2 tablespoons of all-purpose flour and whisk continuously for 1-2 minutes to form a roux. - Gradually whisk in 2 cups of whole milk until smooth. Cook while stirring until the mixture thickens, about 5-7 minutes. - Lower the heat and mix in 1 cup of shredded sharp cheddar cheese, 1 cup of shredded Gruyère cheese, and 1/2 cup of grated Parmesan cheese until fully melted and creamy. - Stir in 2 tablespoons of truffle oil, then season with salt and pepper to taste. - Add the cooked macaroni to the cheese sauce and stir until the pasta is well coated. - Pour the macaroni and cheese into a greased 9x13 inch baking dish. - In a small bowl, combine 1/2 cup of panko breadcrumbs with the remaining Parmesan cheese. Sprinkle this mixture evenly over the macaroni and cheese. - Bake in the preheated oven for 25-30 minutes, or until the top is golden brown and crispy. For the complete recipe, check out the Full Recipe section. To get that creamy texture, I recommend using whole milk. Whole milk adds richness. A mix of cheeses also helps. Sharp cheddar brings flavor, while Gruyère adds smoothness. Always remember to not overcook the pasta before baking. Cook it just until al dente. This keeps it from getting mushy in the oven. For a crunchy topping, I suggest using panko breadcrumbs. Panko gives a light, crispy finish that regular breadcrumbs can’t match. To take it up a notch, broil briefly after baking. This will add extra crispiness to the top. Just watch it closely to avoid burning. Baked mac and cheese pairs well with a side salad or garlic bread. A fresh side balances the richness of the dish. You can also offer fun toppings like crispy bacon or fresh herbs. This adds flavor and makes your meal feel special. For a complete meal, serve it with a simple green salad. Don't forget to try the [Full Recipe] for detailed steps and proportions! {{image_2}} You can mix up your cheese choices. Try adding mozzarella for creaminess. Fontina also melts well and adds a nice flavor. You can even use flavored cheeses like smoked cheddar or pepper jack. These choices boost the taste and make your dish unique. Adding cooked vegetables can enhance your baked mac and cheese. Spinach and broccoli work great. They add color and nutrients. You can also mix in proteins like cooked chicken or crispy bacon. This makes your meal heartier and keeps everyone happy. If you need gluten-free options, use gluten-free pasta. Many great brands offer tasty choices. For a vegan version, swap regular cheese for vegan substitutes. There are many types available now, so you can still enjoy creamy comfort food. Check out the Full Recipe to see how to create this creamy delight! After enjoying your baked mac and cheese, let it cool completely before refrigerating. This step helps keep it fresh and safe. Once cooled, transfer it to an airtight container. This keeps the flavors in and prevents any fridge smells from getting in. You can freeze baked mac and cheese for later. If you freeze it before baking, cover it well with foil. If you freeze it after baking, let it cool fully first. To reheat, thaw it overnight in the fridge. Then, bake it in the oven at 350°F (175°C) until hot. This way, you keep that creamy texture we all love. In the fridge, baked mac and cheese lasts about 3 to 5 days. For the best taste, enjoy it within this time. When reheating, make sure it’s heated all the way through. This keeps it safe and tasty. Store it properly, and you can enjoy delicious leftovers for days! Yes, you can prepare baked mac and cheese ahead of time. This dish is great for meal prep! Start by cooking the pasta and making the cheese sauce. After mixing them, pour everything into a baking dish. Cover it tightly with foil and place it in the fridge. You can keep it there for up to two days. When you're ready to bake, simply remove the foil and bake it straight from the fridge. This saves time and effort when you want to enjoy creamy comfort food. Adding spice is easy! You can mix in diced jalapeños or red pepper flakes. For a smoky flavor, try adding some smoked paprika. Another great option is to use pepper jack cheese instead of regular cheese. This will give your dish a nice kick. Adjust the spice level to your taste, and enjoy the heat! To reheat baked mac and cheese, use the oven for best results. Preheat your oven to 350°F (175°C). Place the mac and cheese in an oven-safe dish. Add a splash of milk to keep it creamy. Cover the dish with foil to prevent it from drying out. Heat for about 20 minutes or until warm throughout. If you want it crispy again, remove the foil for the last few minutes. Enjoy your creamy delight from the fridge! This post covered the key ingredients and steps for baked mac and cheese. You learned how to create a creamy sauce, combine flavors, and bake to perfection. Remember to try different cheeses or add fun mix-ins to make it your own. Also, proper storage and reheating keep it tasting fresh. Enjoy crafting this comfort food and impress your friends and family with each bite. Happy cooking!](https://mysavedrecipe.com/wp-content/uploads/2025/07/36dff1e5-c775-4cfa-992f-87a173508f3f-300x300.webp)

![- 2 ¾ cups all-purpose flour - ½ teaspoon baking powder - ¼ teaspoon salt - 1 cup unsalted butter, softened - 1 cup granulated sugar - 1 large egg - 1 teaspoon vanilla extract - 1 cup crushed hard candy (various colors) - Colored sugar (for decoration, optional) To make easy stained glass cookies, start with simple ingredients. Each one plays a key role in the taste and look of the cookies. The all-purpose flour gives the cookies structure. Baking powder helps them rise, while salt enhances flavor. Butter adds richness, and sugar sweetens the dough. You need a large egg for binding. Vanilla extract brings a warm flavor that everyone loves. The crushed hard candy is the star for the stained glass effect. It melts to create that beautiful look. You can add colored sugar for extra sparkle if you like. You can find these ingredients in most local stores. Make sure to get the hard candy in different colors for a fun presentation. Using high-quality ingredients helps to create the best cookies. For the full recipe, check the [Full Recipe]. 1. Start by whisking together the dry ingredients. In a medium bowl, mix 2 ¾ cups all-purpose flour, ½ teaspoon baking powder, and ¼ teaspoon salt. This mix gives your cookies structure. 2. Next, cream the butter and sugar. In a large bowl, beat 1 cup of softened unsalted butter and 1 cup of granulated sugar. Use an electric mixer for about 2-3 minutes until it becomes light and fluffy. 3. Now, combine the wet and dry ingredients. Add 1 large egg and 1 teaspoon of vanilla extract to the butter mix. Mix until everything blends well. Gradually add the flour mixture, mixing until just combined. The dough may feel crumbly, and that's okay! 1. Chill the dough to make it easier to work with. Divide the dough into two parts and shape each into a disc. Wrap them in plastic wrap and refrigerate for at least 1 hour. This step helps the flavors develop. 2. Roll and cut out cookie shapes. Preheat your oven to 350°F (175°C) and line a baking sheet with parchment paper. On a floured surface, roll out one disc to about ¼-inch thickness. Use cookie cutters to cut out shapes. Make sure to press a small cutter in the center to create an opening for the stained glass effect. 3. Fill the cut-outs with crushed candy. Remove the center cut-out and fill it with 1 cup of crushed hard candy. Repeat this for all cookies. 1. Set the oven temperature. Make sure your oven is preheated to 350°F (175°C) before baking. 2. Bake the cookies. Place the cookies in the oven and bake for 8-10 minutes. Look for lightly golden edges and melted candy in the centers. 3. Cool the cookies after baking. Once out of the oven, let the cookies cool on the baking sheet for a few minutes. Then, transfer them to a wire rack to cool completely. This step keeps them from getting soggy. Enjoy making these colorful treats! You can find the full recipe [here]. To make stained glass cookies shine, choose the right hard candies. I like using clear candies like Jolly Ranchers or Life Savers. They melt beautifully and give a bright color. Avoid candies with too much color or flour coating. These can create a cloudy look. When filling the cut-outs, crush the candies into small pieces. This helps them melt evenly. Use a rolling pin or a heavy jar to crush them. Fill the center cut-out carefully, but don’t overfill. Leave a little space for the candy to expand. To keep your cookies soft, avoid overworking the dough. Mix just until the ingredients combine. If the dough feels crumbly, that’s okay! It will come together when you chill it. For a soft cookie center, keep an eye on baking time. Bake until the edges turn light golden, about 8-10 minutes. The center may look soft, but it will firm up as the cookies cool. Using colored sugar can add fun to your cookies. Sprinkle it on while they’re warm for a sparkly look. Choose colors that match your theme or occasion for added flair. To present your cookies as gifts, arrange them on a nice plate. You might wrap them in clear bags and tie with colorful ribbons. This not only looks great but also keeps them fresh! For the full recipe, check the link above. {{image_2}} You can change the flavor of your stained glass cookies easily. Adding extracts really makes a difference. Try using almond or lemon extract. Just one teaspoon will add great taste. You can also mix in spices like cinnamon or nutmeg. A dash of these spices will give your cookies a warm, cozy feel. While crushed hard candy shines in these cookies, you can use other fillings too. Chocolate chips add a rich twist. Mini marshmallows can bring a fun, chewy texture. You can even try different types of candies. Think about gummy bears or sour candies. Each one will give a unique look and taste. Cookie shapes can set the mood for any occasion. For holidays, use seasonal shapes like stars or hearts. For birthdays, try making custom cookie shapes like balloons or gifts. You can use any cookie cutter that fits your theme. The right shape can make your cookies even more special. For the full recipe, check out the [Full Recipe]. To keep your stained glass cookies fresh, use an airtight container. This will help keep moisture out and flavors in. Layer the cookies with parchment paper to avoid sticking. Store them at room temperature away from direct sunlight. This will help maintain their texture and color. You can freeze stained glass cookies for later. First, let them cool completely. Then, wrap each cookie in plastic wrap. Place the wrapped cookies in a freezer-safe bag. Squeeze out as much air as you can before sealing. To thaw, take the cookies out and let them sit at room temperature for about 30 minutes. This way, they will taste fresh and yummy. These cookies stay fresh for about one week at room temperature. After that, they may start to lose their charm. Watch for signs like a stale smell or a hard texture. If they feel soft or chewy, they are still good. Use your senses to decide if they are tasty or not. You can use margarine or coconut oil as a butter substitute in stained glass cookies. Both options will change the flavor slightly. Margarine gives a similar taste to butter. Coconut oil adds a hint of coconut flavor, which can be nice. If you use coconut oil, make sure it’s solid when you mix it. This helps your cookies hold their shape. Yes, you can prepare stained glass cookies ahead of time. Make the dough and chill it in the fridge for up to three days. When you’re ready, roll it out and cut your shapes. You can also bake the cookies and store them in an airtight container. They stay fresh for about a week. For longer storage, freeze the baked cookies. Just make sure to wrap them well to keep them from getting dry. For stained glass cookies, clear or light-colored hard candies work best. Brands like Jolly Rancher, Life Savers, and Werther's Originals are great choices. Their bright colors melt nicely and look beautiful. Crush the candies into small pieces. This helps them fill the center cut-outs well. Avoid using chocolate candies, as they do not melt clear. In this post, we explored how to make stained glass cookies. We discussed the ingredients needed, step-by-step instructions, and tips for great results. I shared variations to keep things fun and storage tips to keep cookies fresh. Remember, creativity makes cooking enjoyable. Don’t hesitate to try new flavors or shapes. You can create unique gifts for friends and family. Happy baking! Enjoy your delicious cookies!](https://mysavedrecipe.com/wp-content/uploads/2025/07/13ab6d2e-bf34-4e22-80f8-5c6f83ce5110-300x300.webp)


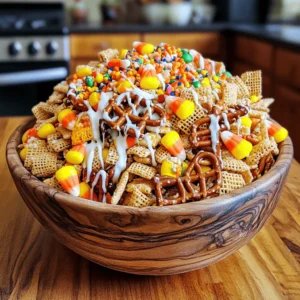
![- 2 cups mixed nuts (almonds, pecans, walnuts) - 1 cup pumpkin seeds (pepitas) - 1 cup dried cranberries - 1 cup mini pretzels The main ingredients create a fun mix. The nuts add crunch. Pumpkin seeds give it a tasty twist. Dried cranberries bring sweetness. Mini pretzels add a salty bite. This mix is perfect for fall! - 1 cup chocolate chips (milk or dark) - 2 tablespoons pumpkin spice - 2 tablespoons maple syrup - 1 tablespoon vegetable oil - 1/2 teaspoon salt Adding flavor is key to this recipe. Chocolate chips make it sweet and rich. Pumpkin spice gives a warm, cozy taste. Maple syrup adds a touch of sweetness. Vegetable oil helps the mix stick together. A pinch of salt balances the flavors. - Other nuts or seeds - Additional dried fruits - Seasonal toppings You can customize your mix with optional add-ins. Try different nuts or seeds to change the crunch. Add dried fruits like raisins or apricots for more flavor. Seasonal toppings like candy corn can make it festive. Get creative and make it your own! For the full recipe, check out the detailed instructions. 1. Preheat your oven to 325°F (165°C). This helps the snack mix cook evenly. 2. Grab a large mixing bowl. Combine the mixed nuts, pumpkin seeds, dried cranberries, mini pretzels, and chocolate chips. Mix them well. This blend gives great taste and crunch. 1. In a small bowl, whisk together the pumpkin spice, maple syrup, vegetable oil, and salt until smooth. This mixture adds flavor and sweetness. 2. Pour the pumpkin spice mixture over your dry ingredients. Toss everything together until all pieces are coated. This ensures every bite is tasty. 1. Spread the mixture evenly on a large baking sheet lined with parchment paper. This helps with easy cleanup. 2. Bake in the preheated oven for 15-20 minutes. Stir halfway through to ensure even cooking. You want the nuts to be golden and fragrant. Enjoy this Harvest Pumpkin Snack Mix as a fun treat! For the complete recipe, check out the [Full Recipe]. To enhance the flavor of your Harvest Pumpkin Snack Mix, focus on baking. Roasting the nuts brings out their rich taste. Bake at 325°F for 15-20 minutes. Stir halfway through to ensure even cooking. This step makes the mix extra crunchy. Adjust spice levels to your taste. Start with the recipe's suggested pumpkin spice. If you like it spicier, add more. You can also mix in cinnamon or nutmeg for a twist. Taste test as you go. This ensures your mix is just right. Serve your snack mix in rustic bowls. You can also use themed containers for a festive touch. Individual cupcake liners work great for parties. This makes it easy for guests to grab a portion. For added flair, sprinkle a little extra pumpkin spice on top. You could also add a few fresh cranberries or a sprig of rosemary. These garnishes make your snack mix look even more delicious. Consider pairing your snack mix with drinks during gatherings. It goes well with apple cider or pumpkin ale. These choices enhance the fall flavor theme. Portion control is key for snack-sized servings. Use small bowls or cups for easy sharing. This way, everyone can enjoy without overindulging. Aim for about 1/4 cup portions. This keeps it fun and light for all guests. {{image_2}} You can easily change the flavor of your Harvest Pumpkin Snack Mix. Sweet versions are a fun way to use extra fruits. Think about adding dried apples or banana chips. These fruits will give a chewy texture and a nice sweetness. For a savory twist, try spices like paprika or cayenne. These spices will add warmth and depth to your mix. A bit of cheese powder can also bring a new flavor that pairs well with the nuts. If you need nut-free options, you can use seeds instead. Sunflower seeds or pumpkin seeds work great as a substitute. This keeps the crunch while avoiding nuts. For gluten-free choices, swap mini pretzels for gluten-free versions. There are many brands that make tasty gluten-free pretzels. You can also use rice cakes, broken into pieces, for a light crunch. Seasonal changes can make your snack mix even more fun. In fall, add candy corn for a sweet treat. It will bring a pop of color and a sweet bite. For Halloween, consider adding themed toppings. You can sprinkle black or orange sprinkles on top. This adds flair and makes the mix festive. You can even use candy eyeballs to make it spooky! Each variation can make your snack mix unique and exciting. After baking, let the Harvest Pumpkin Snack Mix cool completely. This step is key. If you store it warm, it will get soggy. Once cool, use an airtight container. Glass jars or plastic containers work well. Keep it in a cool, dry place away from sunlight. This helps maintain its crunch. When stored properly, this snack mix can last up to two weeks. Keep an eye on it. If you see any signs of spoilage, toss it out. Watch for a stale smell or soft texture. These signs mean it’s time to say goodbye to your snack mix. You can freeze the Harvest Pumpkin Snack Mix, but do it right. First, place it in a freezer-safe bag. Remove as much air as possible. This keeps it fresh longer. To enjoy it again, thaw it in the fridge overnight. Reheat in the oven for a few minutes to bring back the crunch. Proper storage can extend its life for up to three months. If you have nut allergies, you can use seeds instead. Try sunflower seeds or pumpkin seeds. These add crunch and flavor, just like nuts. You can also use roasted chickpeas for a different texture. They are tasty and nutritious. Yes, you can prepare this snack mix ahead of time. After baking, let it cool completely. Store it in an airtight container. It stays fresh for up to two weeks. This makes it easy to grab when you want a quick snack. To boost the pumpkin flavor, add pumpkin puree. Mix a couple of tablespoons into your coating. You can also try adding more pumpkin spice. A dash of cinnamon or nutmeg can deepen the taste. These tips will make your snack mix even more delicious! This blog post covered how to make a tasty Harvest Pumpkin Snack Mix. We explored the key ingredients, flavor enhancers, and optional add-ins. I shared easy step-by-step instructions and tips to perfect your mix. We also discussed fun variations and proper storage methods. Creating this mix allows for so much creativity, so have fun with it. Enjoy sharing your unique snack with friends and family all season long. Happy snacking!](https://mysavedrecipe.com/wp-content/uploads/2025/07/7af74995-79db-4d82-873c-15a87f667b0f-300x300.webp)
![- 2 cups all-purpose flour, plus more for dusting - 1 cup pumpkin puree (canned or homemade) - 1/4 cup warm milk (about 110°F) - 1/4 cup unsweetened applesauce - 2 tablespoons sugar - 1 tablespoon active dry yeast - 1/2 teaspoon salt - 1/2 teaspoon ground cinnamon - 1/4 teaspoon nutmeg - 1/4 teaspoon ginger powder - 1/4 cup unsalted butter, melted - 1 egg (for egg wash) Using fresh pumpkin puree makes these rolls taste bright and fresh. Canned pumpkin is fine, too. Just pick a brand with no added sugar. If you want gluten-free rolls, you can use a gluten-free flour mix. Look for one that has a good structure. If you want to cut down on sugar, you can use honey or maple syrup instead. For a dairy-free option, swap the milk with almond milk or oat milk. You can also use coconut oil in place of butter to keep it dairy-free. First, we need to wake up the yeast. In a small bowl, mix warm milk and sugar. Sprinkle the active dry yeast on top. Let it sit for about 5 to 10 minutes. You want it to get frothy. This shows the yeast is alive and ready to help the rolls rise. Next, grab a large bowl. Combine the pumpkin puree, unsweetened applesauce, and melted butter. Then, add your frothy yeast mixture. Whisk it all together until it's smooth. In another bowl, mix the flour, salt, and spices. Slowly add this dry mix to the wet ingredients. Stir until it all comes together. Now it’s time to knead the dough. Dust your surface with flour. Turn the dough out onto this floured surface. Knead it for about 5 to 7 minutes. You want the dough to be smooth and elastic. If it feels too sticky, add a little more flour. This step is key for soft rolls. After kneading, place the dough in a greased bowl. Cover it with a clean towel. Let it rise in a warm spot for about one hour. The dough should double in size. This is when the yeast does its magic. Once the dough has risen, punch it down gently. Turn it out onto a floured surface again. Divide the dough into 12 equal pieces. Shape each piece into a ball. Make sure they are even in size. This helps them bake evenly. Preheat your oven to 350°F (175°C). Place the dough balls on a greased baking sheet, spaced apart. Cover them with a towel again and let them rise for another 30 minutes. Once ready, beat the egg and brush it over the tops of the rolls. This gives them a nice shine. Bake for 15 to 20 minutes, until they are golden brown. Enjoy your warm Pillowy Pumpkin Dinner Rolls! For more details, check the Full Recipe. To make your rolls fluffy, use warm milk to activate the yeast. The warmth wakes up the yeast, making it work better. Let the dough rise in a warm spot. A cozy kitchen will help it double in size. When you knead, stop when the dough feels smooth and elastic. This is key for that pillowy texture. If your dough is sticky while kneading, add a little flour. Dust your surface lightly so the dough does not stick. Knead gently, but don’t overdo it. You want the dough to be soft but not too wet. This balance will help you shape perfect rolls. Serve these rolls warm. A pat of butter on top makes them even better. Sprinkle some cinnamon for a sweet touch. You can pair these rolls with soup or salad. They also go great with holiday meals. For a nice display, arrange them on a platter. Watch how they vanish from the table! For the full recipe, check out the complete guide. {{image_2}} You can easily add herbs or nuts to your pumpkin dinner rolls. Try adding rosemary or thyme for a fresh taste. Chopped walnuts or pecans can give a nice crunch. These add-ins enhance the flavor and texture, making each bite exciting. Change the shape of your rolls for fun meals. You can make small sliders, perfect for burgers or sandwiches. For a pull-apart style, shape the dough into larger balls and place them close together. This way, everyone can tear off a roll easily. Mix in seasonal spices to change things up. In fall, you can add allspice or cloves for warmth. In spring, try lemon zest or fresh herbs for a bright touch. You can also fill the rolls with sweet fillings like apple butter or savory ones like cheese. These twists keep the rolls exciting all year long. Explore the full recipe to see how these variations can elevate your dish! To keep your pumpkin dinner rolls fresh, follow these steps: - Refrigeration: Place rolls in an airtight container. This helps prevent them from drying out. - Freezing: Wrap them tightly in plastic wrap, then place in a freezer bag. This keeps them tasty for longer. To enjoy these rolls warm and soft, try these methods: - Oven: Preheat to 350°F (175°C). Wrap rolls in foil and heat for about 10-15 minutes. - Microwave: Place rolls on a plate, cover with a damp paper towel, and heat for 15-20 seconds. The shelf life of your rolls varies by storage: - Room Temperature: These rolls last about 2-3 days when stored in a cool, dry place. - Refrigerated: They stay fresh for about a week in the fridge. - Frozen: Enjoy them for up to 3 months in the freezer. Just make sure to thaw completely before reheating. By following these tips, you can savor your pillowy pumpkin dinner rolls longer! For the complete recipe, check out the Full Recipe. To check if your pumpkin dinner rolls are done, look for a few key signs: - Color: They should be golden brown on top. - Sound: Tap the bottom of a roll; it should sound hollow. - Texture: The rolls should feel soft but firm, not doughy. If you see these signs, your rolls are ready to enjoy! Yes, you can prep these rolls ahead of time. Here are some tips: - Dough: You can make the dough a day early. Cover it tightly and store it in the fridge. - Shaping: Shape the rolls and place them on a baking sheet. Cover and chill overnight. - Baking: Let the rolls come to room temperature before baking. This helps them rise better. These rolls pair well with many dishes. Here are some great ideas: - Soups: Serve them with creamy pumpkin or tomato soup. - Salads: They go great with a fresh mixed green salad. - Main Courses: Pair them with roasted turkey or glazed ham for a festive meal. For the full recipe, check out the [Full Recipe] link. These pumpkin dinner rolls are simple and tasty. You’ve learned about the key ingredients and their qualities, from pumpkin puree to spices. The step-by-step guide makes baking easy, while tips help you master the perfect texture. Finally, variations and storage tips give you options for every season. Baking these rolls is fun and rewarding. Enjoy your pumpkin dinner rolls fresh, or save some for later. You have all the tools to make this recipe a success!](https://mysavedrecipe.com/wp-content/uploads/2025/07/4e1caa9b-ab53-4ff5-8e03-cb3f0b45ee66-300x300.webp)
![- 1 cup pumpkin puree - 1/2 cup cream cheese, softened - 1/2 cup granulated sugar - 1/2 cup brown sugar, packed - 2 large eggs - 1 teaspoon vanilla extract - 1/2 cup vegetable oil - 1 1/2 cups all-purpose flour - 1 teaspoon baking powder - 1 teaspoon baking soda - 1 teaspoon ground cinnamon - 1/2 teaspoon nutmeg - 1/2 teaspoon salt - 1 cup semi-sweet chocolate chips - Optional: Pumpkin seeds for topping These ingredients blend to create a tasty muffin. Pumpkin puree gives moisture and flavor. Cream cheese adds a rich, smooth texture. The sugars sweeten the mix and help it rise. Eggs bind everything together while adding fluffiness. Vegetable oil keeps the muffins moist. Flour forms the base and gives structure. Baking powder and baking soda help them rise. Cinnamon and nutmeg bring warmth and spice. Salt enhances all the flavors. Finally, chocolate chips provide a sweet surprise in every bite. You can even sprinkle pumpkin seeds on top for added crunch. For the full recipe, check out [Full Recipe]. - Muffin tin - Mixing bowls - Whisk and spatula - Measuring cups and spoons Having the right tools makes baking easier. A muffin tin shapes the muffins perfectly. Mixing bowls help you blend wet and dry ingredients separately. A whisk and spatula are essential for a smooth batter. Measuring cups and spoons ensure you use the right amounts. With these ingredients and tools, you’re ready to create delicious chocolate chip pumpkin cream cheese muffins. - Preheat oven to 350°F (175°C). - Prepare your muffin tin with liners. - In a large bowl, combine the wet ingredients: - 1 cup pumpkin puree - 1/2 cup cream cheese, softened - 1/2 cup granulated sugar - 1/2 cup brown sugar, packed - 2 large eggs - 1 teaspoon vanilla extract - 1/2 cup vegetable oil Mix until smooth and creamy. - In another bowl, whisk together the dry ingredients: - 1 1/2 cups all-purpose flour - 1 teaspoon baking powder - 1 teaspoon baking soda - 1 teaspoon ground cinnamon - 1/2 teaspoon nutmeg - 1/2 teaspoon salt - Fold the dry ingredients into the wet mixture. - Add in 1 cup semi-sweet chocolate chips. Mix gently until combined. - Scoop the batter into the prepared muffin tin, filling each cup about two-thirds full. - Bake for 18-20 minutes. Check with a toothpick for doneness. - Cool in the pan for 5 minutes before moving them to a wire rack. You can follow this method for the full recipe. Enjoy the rich blend of flavors as you bake! To make the best chocolate chip pumpkin cream cheese muffins, avoid overmixing the batter. When you mix too much, the muffins can turn tough. Stir just until you see no dry flour. This keeps the muffins light and fluffy. To test for doneness, use a toothpick. Insert it into the center of a muffin. If it comes out clean, the muffins are ready. If there’s batter on it, bake for a couple more minutes. There are many options for flavor variations. You can add nuts like walnuts or pecans for extra crunch. You can also throw in dried fruits like cranberries. They pair well with pumpkin and chocolate. Using fresh spices makes a big difference, too. Freshly grated nutmeg or cinnamon gives a stronger flavor than pre-ground spices. Try to use them for a richer taste. Serve your muffins warm with a light dusting of powdered sugar. A dollop of whipped cream on the side makes them extra special. For gatherings, get creative! You can arrange them on a pretty plate. Consider pairing them with a warm drink like apple cider or hot chocolate. These ideas make your muffins a hit! {{image_2}} You can make this recipe fit your needs. For a dairy-free option, use vegan cream cheese. This swap keeps the muffins creamy without the dairy. If you want less sugar, try using honey or maple syrup. These natural sweeteners add flavor and moisture, making the muffins just as tasty. Want to boost the taste? Add chopped nuts or seeds for a nice crunch. Walnuts or pecans work great. You can also mix in seasonal spices like ginger or cloves. These spices bring out the pumpkin flavor and add warmth to each bite. If you need gluten-free muffins, use a gluten-free flour blend. This swap keeps the texture light and fluffy. For a vegan version, replace eggs with flax eggs. Mix one tablespoon of ground flaxseed with three tablespoons of water, and let it sit for a few minutes. This mixture works well to bind the ingredients together. Explore these variations to make the muffins your own. For the full recipe, check out the above section. To keep your chocolate chip pumpkin cream cheese muffins fresh, store them in an airtight container. This will prevent them from drying out. Place a piece of wax paper between layers to keep the muffins fluffy. If you want to keep them longer, you can freeze them. Just wrap each muffin in plastic wrap, then place them in a freezer bag. They will stay good for up to three months. When you are ready to enjoy your muffins again, reheating is easy. You can use a microwave for quick warming. Heat each muffin for about 15-20 seconds. If you want a crispier texture, use an oven. Preheat the oven to 350°F (175°C) and bake the muffins for about 5-10 minutes. This will help maintain their soft, moist texture. Enjoy them warm for the best taste! Can I use fresh pumpkin instead of canned? Yes, you can use fresh pumpkin. Cook and puree the pumpkin first. This gives a fresh taste. Make sure it’s not too watery, or it can change the muffin texture. How do I know when the muffins are done baking? Check the muffins with a toothpick. Insert it into the center. If it comes out clean, your muffins are done. They should also look puffed and golden brown. What is the best way to frost or glaze these muffins? For a simple glaze, mix powdered sugar with a little milk. Drizzle it over cooled muffins. You can also use cream cheese frosting for extra richness. Why are my muffins dense or dry? Dense muffins may come from overmixing the batter or too much flour. Always measure flour correctly. Dry muffins can result from overbaking or not enough moisture. How can I achieve a dome shape in muffins? To get that dome shape, fill each muffin cup more than usual. Use an ice cream scoop for even portions. A hot oven also helps create that rise. What goes well with pumpkin muffins? Pair these muffins with a warm drink. Think coffee, tea, or apple cider. They also taste great with butter or cream cheese spread. Can these be served as breakfast or dessert? Yes, these muffins are perfect for both! Enjoy them for breakfast with fruit or as a dessert with ice cream. They fit any time of day. You’ve learned how to make tasty chocolate chip pumpkin muffins with easy steps. From gathering ingredients to baking, following these directions will help you succeed. Remember, not overmixing is key for great texture. Feel free to explore ingredient variations to match your taste. This simple recipe is perfect for any gathering or a cozy treat at home. Enjoy your muffins warm or share them with friends! Happy baking!](https://mysavedrecipe.com/wp-content/uploads/2025/07/4efbcf9e-024b-49a5-a6e9-98dcc95b0ed3-300x300.webp)
![To make Easy Pumpkin Cream Cheese Muffins, you need the following ingredients: - 1 cup pumpkin puree - 1/2 cup cream cheese, softened - 1/2 cup granulated sugar - 1/2 cup brown sugar, packed - 2 large eggs - 1/2 cup vegetable oil - 1 teaspoon vanilla extract - 1 1/2 cups all-purpose flour - 1 teaspoon baking powder - 1 teaspoon baking soda - 1 teaspoon ground cinnamon - 1/2 teaspoon ground nutmeg - 1/4 teaspoon salt For a twist, consider these optional ingredients: - 1/2 cup chopped walnuts or pecans - 1/2 cup chocolate chips Adding nuts or chocolate can enhance flavor and texture. Feel free to mix and match! Accurate measurements are key to great muffins. Here are some best practices: - Use dry measuring cups for flour and sugar. Fill them lightly, then level off with a knife. - Use liquid measuring cups for oil and pumpkin puree. Pour to the marked line for accuracy. - Use a kitchen scale for flour and sugar when possible. This gives the most precise measurement. Tools you may need include: - Measuring cups (dry and liquid) - Measuring spoons - A kitchen scale for precision Getting the measurements right will help you bake muffins that are fluffy and delicious! To start making your Easy Pumpkin Cream Cheese Muffins, gather your ingredients. You need pumpkin puree, cream cheese, sugars, eggs, oil, vanilla, flour, baking powder, baking soda, spices, and salt. Here’s how to prepare the batter: 1. Beat the Cream Cheese: In a medium bowl, beat the softened cream cheese until it is smooth and creamy. This step is key for a rich filling. 2. Mix Wet Ingredients: Add the pumpkin puree, granulated sugar, brown sugar, eggs, vegetable oil, and vanilla extract to the cream cheese. Mix until everything is well blended. 3. Combine Dry Ingredients: In another bowl, whisk together the flour, baking powder, baking soda, cinnamon, nutmeg, and salt. You want these dry ingredients to be evenly mixed. 4. Combine Wet and Dry Mixtures: Gradually add the dry mix to the wet mix. Stir until just combined. Be careful not to overmix. Overmixing can make your muffins tough. 5. Add Optional Nuts: If you want some crunch, gently fold in the chopped walnuts or pecans. This adds flavor and texture. Tips for mixing: Always mix gently and use a spatula to fold ingredients. This helps keep the muffins light and fluffy. Now, it’s time to bake! Follow these steps for perfect muffins: 1. Preheat the Oven: Set your oven to 350°F (175°C). This temperature is crucial for even baking. 2. Prepare the Muffin Tin: Line a muffin tin with paper liners or grease it with cooking spray. This prevents the muffins from sticking. 3. Fill the Muffin Cups: Use a scoop or spoon to fill each muffin cup about 2/3 full with batter. This allows space for the muffins to rise. 4. Bake: Place the muffin tin in the preheated oven. Bake for 18-22 minutes. To check for doneness, insert a toothpick into the center of a muffin. If it comes out clean, they are ready. 5. Cool Down: Let the muffins cool in the tin for 5 minutes. After that, transfer them to a wire rack to cool completely. Proper oven temperature and timing are essential. Too hot can burn the muffins, while too cool may leave them soggy. Enjoy your delicious Easy Pumpkin Cream Cheese Muffins! For the full recipe, check the link above. To make moist and fluffy muffins, follow these tips: - Use fresh ingredients. Fresh pumpkin puree gives the best flavor and moisture. - Don’t overmix. Stir the batter until just combined. Overmixing makes muffins dense. - Check oven temperature. An accurate oven ensures even baking. Use an oven thermometer if needed. Common mistakes to avoid include: - Skipping the cream cheese step. Make sure to beat it until smooth. This adds creaminess. - Filling cups too high. Fill them only 2/3 full. This helps muffins rise properly. - Not testing for doneness. Insert a toothpick. If it comes out clean, your muffins are ready! You can easily change the flavor of your muffins. Here are some ideas: - Spices: Add ginger, cloves, or allspice for a warm kick. - Add-ins: Try adding chocolate chips, raisins, or dried cranberries for extra sweetness. - Nuts: Chopped walnuts or pecans add crunch and flavor. To adjust sweetness or texture: - Sweetness: Reduce sugar by 1/4 cup if you prefer less sweetness. - Texture: For a lighter muffin, use half all-purpose flour and half whole wheat flour. Check out the Full Recipe for more ideas! {{image_2}} You can make these muffins healthier with a few easy swaps. Use whole wheat flour instead of all-purpose flour. Whole wheat adds fiber and nutrients without losing taste. For a low-sugar option, try using applesauce or mashed bananas. These fruits add sweetness and moisture. You can also reduce the sugar by a third. This keeps the flavor rich but cuts calories. If you want creaminess, try Greek yogurt instead of cream cheese. It keeps the muffins moist and adds protein. You can even include a mix of seeds and nuts for added crunch. This will also boost the nutrition of your muffins. Fall is the perfect time to play with flavors. You can mix in spices like ginger or cloves for a warm kick. Try adding dried cranberries or chopped apples for a fruity twist. These fruity additions complement pumpkin well. If you have leftover pumpkin puree, use it in pancakes or smoothies. You can also make pumpkin bread or even soup. As for cream cheese, whip it into dip or spread. This way, nothing goes to waste. These ideas will keep your fall baking fun and fresh. For the full recipe, check out the [Full Recipe]. To keep your Easy Pumpkin Cream Cheese Muffins fresh, store them in an airtight container. This helps keep moisture in and prevents them from drying out. Place a paper towel at the bottom of the container. This will absorb any extra moisture. You can store them at room temperature for up to three days. If you want to save muffins for later, freezing is a great option. Wrap each muffin tightly in plastic wrap or aluminum foil. Then, place them in a freezer-safe bag. They can last up to three months in the freezer. When you’re ready to enjoy them, simply thaw them in the fridge overnight. To reheat your muffins, the oven is the best method. Preheat your oven to 350°F (175°C). Place the muffins on a baking sheet and heat for about 10 minutes. This helps restore their soft texture and warmth. If you are in a hurry, you can use the microwave. Heat one muffin for about 15-20 seconds. Check if it’s warm enough, and add more time if needed. However, be careful! Microwaving too long can make muffins tough. Enjoy your muffins warm for the best taste. How can I ensure my muffins rise properly? To help your muffins rise, use fresh baking powder and baking soda. Make sure your oven is preheated to the right temperature. Fill the muffin cups about two-thirds full. This gives the muffins room to rise without spilling over. Can I make the batter ahead of time? Yes, you can make the batter ahead of time. Store it in the fridge for up to 24 hours. Just remember to stir it gently before filling the muffin cups. This helps keep the batter fresh and ready to bake. What to do if my muffins are too dry or too dense? If your muffins are dry, you might have overbaked them. Make sure to check for doneness with a toothpick. If they are dense, try adding a bit more liquid, like oil or an egg. This can help create a lighter texture. How to tell when muffins are fully baked? To check if your muffins are done, insert a toothpick into the center. If it comes out clean or with a few crumbs, they are ready. If the toothpick has wet batter, bake them a few more minutes. This ensures they are perfectly baked. You now know how to make Easy Pumpkin Cream Cheese Muffins. We covered every key step, from gathering essential ingredients to baking and storage tips. Remember to measure accurately for the best results. Don't forget to personalize your muffins with fun add-ins or healthy swaps. With these straightforward methods, you’ll bake muffins everyone loves. Enjoy your baking and share these tips with friends to spread the joy of homemade treats!](https://mysavedrecipe.com/wp-content/uploads/2025/07/8bc95853-fd84-4fa7-8130-8ef81f0bcd63-300x300.webp)

![- Pumpkin Butter (1 cup) - Unsalted Butter (1 cup, softened) - Granulated Sugar (1 cup) - Brown Sugar (1 cup, packed) - All-Purpose Flour (3 ½ cups) - Cream of Tartar (2 teaspoons) - Baking Soda (1 teaspoon) - Ground Cinnamon (2 teaspoons + 2 tablespoons for rolling) - Ground Nutmeg (1 teaspoon) - Vanilla Extract (1 teaspoon) In this recipe, pumpkin butter is the star. It gives these cookies a soft texture and rich flavor. You can find pumpkin butter in stores or make your own. Just blend cooked pumpkin with sugar and spices. The unsalted butter brings creaminess and helps the cookies spread just right. Next, granulated sugar and brown sugar add sweetness. Brown sugar gives a slight chewiness. The all-purpose flour provides structure, while cream of tartar helps create the classic snickerdoodle tang. Baking soda gives the cookies a nice lift. For flavor, we use ground cinnamon and nutmeg. They create that warm, cozy taste we love in fall. Vanilla extract rounds out the flavors, making each bite delicious. This blend of ingredients makes Pumpkin Butter Snickerdoodles truly special. For the full recipe, check out the instructions. - Preheat the oven to 350°F (175°C). - Line two baking sheets with parchment paper. - In a large bowl, cream together pumpkin butter, unsalted butter, granulated sugar, and brown sugar until smooth. - Add in the eggs and vanilla extract. Mix until everything blends well. - In another bowl, whisk together all-purpose flour, cream of tartar, baking soda, salt, ground cinnamon, and nutmeg. - Gradually mix the dry ingredients into the wet mixture. Stir until just combined. Do not overmix; this keeps the cookies soft. - In a small bowl, mix the sugar and 2 tablespoons of cinnamon for rolling. - Use a cookie scoop or your hands to form balls of dough, about 1.5 inches wide. Roll each ball in the cinnamon-sugar mixture until fully coated. - Place the coated cookie balls on the lined baking sheets, spacing them about 2 inches apart. - Bake for 10-12 minutes. The edges should set while the centers remain soft. - After baking, cool the cookies on the sheets for 5 minutes. Then, transfer them to wire racks to cool completely. For the full recipe, check out Pumpkin Butter Snickerdoodles! - Avoid Overmixing the Dough: When you mix the dough, do it gently. Overmixing makes cookies tough. Stop mixing as soon as the flour disappears. This keeps them soft and chewy. - Ensure Ingredients are at Room Temperature: Let your butter and eggs warm up. Room temperature ingredients blend better. This helps the cookies rise and gives them a nice texture. - Substitute Ideas for Pumpkin Butter: If you can't find pumpkin butter, try using applesauce or butternut squash puree. These can work well, but the flavor will change a bit. You can also mix pumpkin puree with some spices to mimic pumpkin butter. - Choosing Quality Pumpkin Butter: Look for pumpkin butter with real pumpkin and less sugar. Brands that use natural ingredients often taste best. Read labels and choose one with spices like cinnamon and nutmeg for extra flavor. - Presentation Tips and Ideas: Stack the cookies on a nice plate. Dust some extra cinnamon on top for a pretty look. You can also add small gourds or colorful leaves around the plate for a cozy fall touch. - Pairing Ideas with Beverages: These cookies go great with coffee or chai tea. The spices in the cookies match well with warm drinks. You could also serve them with a glass of cold milk for a classic treat. Enjoy them fresh from the oven for the best taste. For the full recipe, check the [Full Recipe]. {{image_2}} You can easily change the flavor of your Pumpkin Butter Snickerdoodles. Here are two great options: - Adding Chocolate Chips: Mix in 1 cup of chocolate chips into the dough. This adds a rich, sweet twist to your cookies. The chocolate pairs well with the warm spices and pumpkin butter, making each bite even more delightful. - Incorporating Nuts or Dried Fruits: Consider adding 1 cup of chopped nuts or dried fruits. Pecans, walnuts, or cranberries can add crunch and a hint of tartness. This gives your cookies a unique texture and flavor that stands out. You can make these cookies fit special diets. Here are some simple swaps: - Gluten-Free Options: Use a gluten-free flour blend in place of all-purpose flour. Look for a blend that has xanthan gum to help with structure. Your cookies will still be soft and delicious. - Vegan Alternatives: Replace the eggs with 1/4 cup of unsweetened applesauce or a flax egg. Just mix 1 tablespoon of ground flaxseed with 2.5 tablespoons of water. Let it sit for a few minutes to thicken. This will keep your cookies moist and tasty. Add a seasonal flair to your cookies with these ideas: - Spiced Pumpkin Butter Snickerdoodles: Boost the spices! Add 1/2 teaspoon of allspice or ginger to the dough. This gives your cookies a deeper, more complex flavor. It enhances that cozy fall vibe. - Holiday-Inspired Variations: During the holidays, consider adding peppermint extract or orange zest. This brings a festive flavor that is perfect for special occasions. You can even top the cookies with a drizzle of white chocolate for added sweetness. These variations let you make the Pumpkin Butter Snickerdoodles truly your own. Try a few and see which ones you love best! Check out the Full Recipe to get started. To keep your Pumpkin Butter Snickerdoodles fresh, store them in an airtight container. This helps prevent them from drying out. You can stack the cookies in layers, using parchment paper between each layer. This way, they won’t stick together. You can freeze unbaked cookie dough easily. Just scoop the dough balls and place them on a baking sheet. Freeze them until firm, then transfer them to a freezer bag. This way, you can bake fresh cookies later. To store baked cookies, place them in an airtight container. They can last for up to three months in the freezer. These cookies stay fresh for about one week at room temperature. If you see any signs of spoilage, such as a strange smell or mold, it’s best to throw them away. Always check for freshness before enjoying your cookies. How to make Snickerdoodles from Scratch? To make Snickerdoodles, start by creaming butter and sugar. Mix in eggs and vanilla. In another bowl, combine flour, cream of tartar, baking soda, and salt. Slowly mix dry with wet. Shape into balls, roll in cinnamon-sugar, and bake. You can find the full recipe above. Can I use pumpkin puree instead of pumpkin butter? Yes, you can use pumpkin puree. However, pumpkin butter has added spices and sweetness. This means your cookies may taste different. You might need to adjust sugar and spice amounts to match pumpkin butter’s flavor. Why are my cookies flat? Flat cookies may happen if your butter is too soft. Use cold or room temperature butter. Also, check if you measured flour correctly. Too little flour can cause flatness. Lastly, make sure your baking soda is fresh. How can I enhance the spice flavor? To boost spice flavor, add more ground cinnamon or nutmeg. You can also mix in ginger or allspice. A pinch of cloves can add warmth. Experiment with your spice blend for a richer taste. Best way to serve Pumpkin Butter Snickerdoodles? Serve these cookies warm for the best taste. Stack them on a plate and sprinkle some extra cinnamon on top. You can also add small pumpkins or leaves for a cozy fall mood. What drinks pair well with these cookies? These cookies go great with warm apple cider or a cup of chai tea. Coffee also makes a nice match, especially with a splash of cream. For something cool, try pumpkin spice lattes or vanilla milkshakes. In this blog post, we explored how to make delicious Pumpkin Butter Snickerdoodles. We covered the key ingredients, step-by-step instructions, and helpful tips for perfecting your cookies. I shared variations so you can adapt to any taste or diet. Finally, we discussed storage methods to keep your cookies fresh and tasty. Enjoy baking these cookies and impressing your family and friends with your skills! Simple recipes like this bring joy and warmth to every occasion.](https://mysavedrecipe.com/wp-content/uploads/2025/07/b2001814-6f29-4db9-a5dc-dc596fad5149-300x300.webp)