
- Sautéed Yellow Squash Tasty and Simple Side Dish
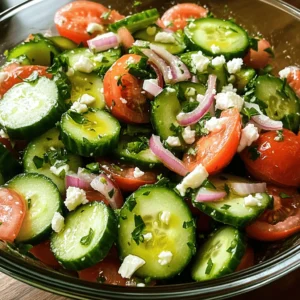
- Simple Cucumber Tomato Salad Fresh and Flavorful Mix
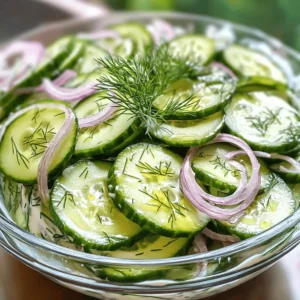
- Creamy Marinated Cucumber Salad Refreshing Side Dish
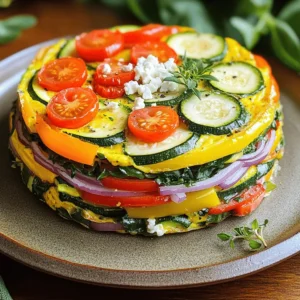
- Vegetable Frittata Flavorful and Easy Breakfast Recipe
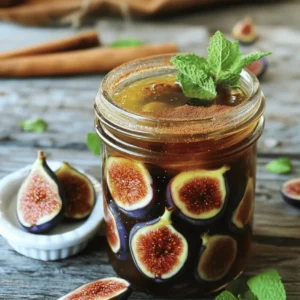
- Quick Fig Jam Easy and Flavorful Homemade Delight
- Crunchy Pickled Okra Flavorful and Easy Recipe
- Moroccan Frittata Flavorful Dish for Easy Meals
- Classic Fried Okra Crispy and Flavorful Delight
- Peach Cobbler with Fresh Peaches Easy Dessert Recipe
- Southern Peach Bread Irresistible and Moist Delight
- Savory Southern Okra Patties Easy and Tasty Recipe
- French Fig Jam Simple Recipe for Delicious Flavor
- Dark Chocolate Zucchini Brownies Rich and Chewy Treat
- Savory Okra Recipes for Crispy Delicious Fritters
- Crisp Pickled Okra Tangy and Tasty Recipe Guide
- Peach Pie Cruffins Irresistible and Easy Recipe
- Cheesy Zucchini Casserole Easy and Flavorful Dish
- Moist Zucchini Bread Simple and Flavorful Recipe
- Whole Fried Okra Crispy and Flavorful Delight
- French Onion Squash Casserole Flavorful Comfort Dish
- Spicy Refrigerator Pickled Okra Flavorful and Easy Recipe
- Moist Zucchini Brownies Perfectly Chewy Delight
- Savory Tomato Pie Flavorful and Easy Dinner Recipe
- Easy Vegetable Frittata Quick and Simple Recipe
- Firecracker Fried Okra Crispy and Flavorful Treat
- Mushroom Spinach Frittata Simple and Tasty Dish
- Fried Okra with Spicy Aioli Irresistible Flavor Boost
- Bourbon Peach Cobbler Delightfully Sweet Dessert Treat
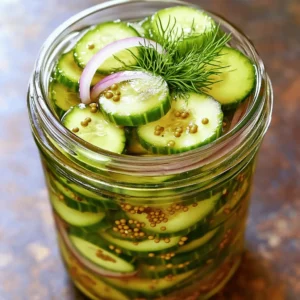
- Refrigerator Sweet Pickles Easy and Delicious Recipe
- Sautéed Yellow Squash Simple and Flavorful Dish
- Sweet Yellow Squash Pickles Flavorful and Easy Recipe
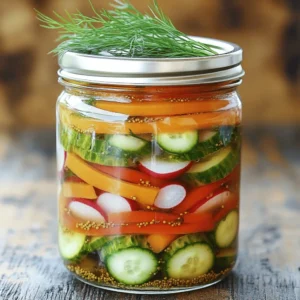
- Tangy Pickled Vegetables Easy and Flavorful Recipe
- Peach Upside Down Cake Delightful and Easy Recipe
- Cheesy Zucchini Casserole Simple and Comforting Dish
- Ingredient Peach Iced Tea Refreshing Summer Drink
- Old Fashioned Peaches and Cream Delightful Dessert
- Southern Tomato Pie Flavorful and Easy to Make
- Quick Refrigerator Pickles Crunchy and Flavorful Treat
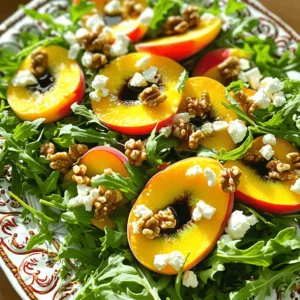
- Peach Feta Salad Fresh and Flavorful Delight
- Peach Cobbler Cheesecake Fruit Salad Delightful Treat
- Garlic Dill Refrigerator Pickles Easy Flavor Burst
- Zucchini Brownies Simple and Delicious Recipe Guide
![- 4 medium yellow squash, sliced into thin rounds - 1 medium red bell pepper, diced - 1 medium onion, thinly sliced - 2 cloves garlic, minced - 1 tablespoon olive oil - 1 tablespoon butter - 1 teaspoon dried oregano - 1 teaspoon chili flakes (adjust for spice preference) - Salt and pepper to taste - Fresh parsley for garnish Yellow squash is not just pretty; it also tastes great! When you pick your squash, look for ones that feel firm and have bright skin. This dish uses simple, fresh ingredients. The red bell pepper adds a nice color and sweet flavor. Onions and garlic give it a tasty base. For cooking, I always use a mix of olive oil and butter. The olive oil keeps it healthy, while the butter adds that lovely richness. You can adjust the chili flakes based on how spicy you like your food. I often use fresh parsley. It brightens the dish and makes it look nice. You can find the full recipe and instructions to make this dish shine in the [Full Recipe]. Enjoy the cooking! - Heat the olive oil and butter in a skillet. - Add onions and garlic; sauté until translucent. First, I use a large skillet for this dish. I pour in the olive oil and butter, letting them heat up over medium heat. This mix gives a rich flavor. Once the oil shimmers, I toss in sliced onions and minced garlic. As they cook, the smell fills the kitchen, creating a warm atmosphere. I watch for the onions to turn translucent, which usually takes about three to four minutes. - Incorporate red bell pepper; cook until softened. - Mix in yellow squash and seasonings; combine well. Next, I add diced red bell pepper. It adds both color and sweetness to the dish. I let it cook for another two to three minutes until it softens. Then, I stir in the star of our recipe: sliced yellow squash. The squash should be fresh and firm. I also sprinkle in dried oregano, chili flakes, salt, and pepper. Mixing it all well is key. I want every piece of squash coated with flavor. - Sauté until squash is tender. - Adjust seasoning; garnish with parsley. Now comes the fun part. I sauté everything together for about five to seven minutes. I keep stirring occasionally, making sure the squash stays tender but not mushy. Once it’s done, I taste to see if it needs more salt or pepper. Lastly, I take it off the heat and sprinkle fresh parsley on top. It adds a pop of color and a fresh note. This dish is now ready to serve warm. You’ll love how simple it is to make this sautéed yellow squash medley. For a full recipe, check out the details provided. When picking yellow squash, you want the best. Look for squash that feels firm and has a bright color. A good squash should not have any blemishes or soft spots. This means it's fresh and ready for cooking. To sauté yellow squash well, use medium heat. This helps cook it evenly without burning. Stir the squash occasionally to keep it from sticking to the pan. This simple step makes a big difference in how your dish turns out. Want to take flavor to the next level? Try adding fresh herbs or spices. Basil, thyme, or even a bit of cumin can make a tasty difference. Also, a splash of lemon juice brightens the dish. It brings out the squash's natural sweetness. For more ideas, check the Full Recipe for creative twists. {{image_2}} You can easily swap yellow squash for zucchini or even mix both. This gives a nice twist to the dish. Different colored bell peppers also add great visual appeal. Try using green or yellow peppers to make the dish more vibrant. Want a heartier meal? Add cooked chicken or shrimp to the sauté. This will not only boost flavor but also make it more filling. If you prefer a vegetarian option, try adding tofu or beans. Both will give you protein while keeping the dish light. For a burst of flavor, try adding cheese like feta or parmesan. They melt beautifully and enhance the taste. You can also include nuts or seeds for a nice crunch. Pine nuts or sunflower seeds work well and add texture to your sautéed yellow squash. For the full recipe, check out the details above! Store your sautéed yellow squash in an airtight container. It will stay fresh for up to 3 days. When you reheat, do it gently. This helps keep the texture just right. You can freeze your sautéed squash in portions. It will last up to 2 months in the freezer. When ready to eat, thaw it overnight in the fridge. This slow thaw helps maintain flavor. For the best results, use a microwave or stovetop to reheat. Add a splash of water while reheating. This step prevents the squash from drying out. Enjoy your tasty dish again! For the full recipe, check the earlier section. Rinse thoroughly under cold water. Pat dry before slicing. This step is key to remove any dirt or residues. I prefer to slice the squash into thin rounds for even cooking. It makes for a lovely presentation too! Yes, you can sauté yellow squash ahead of time. Cook it and store in the fridge for reheating later. This saves you time on busy days. Just warm it up in a pan for the best texture. Sautéed yellow squash pairs well with rice, pasta, or grilled meats. It adds a nice color and flavor to any meal. You can also serve it with a drizzle of balsamic glaze for extra zing. Yellow squash is low in calories and a good source of vitamins A and C. It also offers high levels of antioxidants and fiber. These nutrients support digestive health and boost your immune system. Enjoying yellow squash helps keep your meals both tasty and nutritious! This blog post covers how to make a tasty sautéed yellow squash dish. We discussed the main ingredients, essential cooking supplies, and seasonings. The step-by-step instructions guide you through preparation and cooking. I shared tips on choosing squash and perfecting your sauté. You can also make variations by swapping ingredients or adding proteins. For storage, I provided tips for keeping leftovers fresh. In short, this dish is easy to make and versatile. Give it a try, and enjoy the flavors!](https://mysavedrecipe.com/wp-content/uploads/2025/06/14377482-ec29-4c96-a628-5e9089dc9069-300x300.webp)
![- 2 cups fresh figs, chopped - 1 tablespoon lemon juice - 1 teaspoon vanilla extract To make Quick Fig Jam, fresh ingredients matter. I love using ripe, sweet figs. They give the jam its rich flavor and color. When choosing figs, look for ones that are plump and slightly soft. They should smell sweet and fragrant. Lemon juice adds a nice tartness. It helps balance the sweetness of the figs. The vanilla extract brings warmth and depth to your jam. Don't skip it; it makes a big difference. - 1 cup granulated sugar - 1/2 teaspoon cinnamon (optional) For pantry staples, granulated sugar is key. It helps the figs break down and creates a thick jam. You can adjust the sugar amount based on your taste. If you like a bit of spice, add cinnamon. It pairs well with figs and gives the jam a cozy flavor. - How to measure figs accurately To measure figs, chop them first and then pack them into a cup. Do not press down too hard. You want them to be loosely packed for the best flavor. - Importance of ingredient quality Quality matters in cooking. Always use fresh figs and good sugar. The better the ingredients, the better your jam will taste. This is key to making your Quick Fig Jam shine. For the [Full Recipe], follow the steps outlined, and enjoy making this delightful spread! To start, wash your fresh figs under cool running water. Gently rub them to remove any dirt. Next, cut off the stems and chop the figs into small pieces. This helps them break down easily during cooking. Before you begin cooking, prepare your area. Gather all your ingredients and tools. This includes a medium saucepan, a wooden spoon, and a clean jar for storage. Keeping everything in reach makes the cooking process smooth and fun. In your medium saucepan, combine the chopped figs, granulated sugar, and lemon juice. Stir the mixture well to ensure the sugar coats the figs. Next, place the saucepan over medium heat. Bring the mixture to a gentle boil while stirring occasionally. Once it starts boiling, lower the heat. Allow the mixture to simmer for about 15 to 20 minutes. Stir frequently to prevent it from sticking to the bottom. You want it to thicken to a jam-like consistency. After the jam thickens, remove it from heat. Add the vanilla extract and cinnamon, if you like. These flavors enhance the jam's taste. Stir well to combine. Let the jam cool slightly before transferring it to a clean, sterilized jar. Allow it to cool completely at room temperature. Once cooled, seal the jar and store it in the fridge. Your quick fig jam will stay fresh for about two weeks. - Overcooking your fig jam: Cooking too long can turn your jam into a hard mass. Stay close to the stove as it simmers. Stir often and keep an eye on the time. Aim for a 15-20 minute cook time to achieve that perfect spreadable consistency. - Using unripe figs: Unripe figs lack the sweetness and flavor you want. Always choose ripe, soft figs. They will give your jam a rich taste and smooth texture. Check your figs carefully before using them. - Balancing sweetness with acidity: Figs are sweet, so adding a touch of lemon juice helps balance that sweetness. It makes the flavor pop and keeps it from being too sugary. Adjust the lemon juice to find your perfect balance. - Flavor variations with spices or herbs: You can spice things up by adding cinnamon, nutmeg, or even a hint of ginger. These spices add warmth and depth. Feel free to experiment. Just remember to start small and taste as you go. - Best cookware for making jam: Use a heavy-bottomed saucepan. It distributes heat evenly and helps prevent burning. A wide pan also allows moisture to escape, helping the jam thicken faster. - Recommended storage containers: Glass jars are best for storing your fig jam. They keep the jam fresh and let you see the beautiful color. Make sure to sterilize the jars to ensure safety and longevity. {{image_2}} You can enhance your quick fig jam by adding other fruits. Try chopping apples, pears, or peaches. These fruits pair well with figs. The sweetness and texture give your jam a new twist. Mix and match until you find your favorite blend. Adding spices can elevate your fig jam. Consider using ginger or nutmeg for a warm flavor. When you add spices, reduce the sugar a bit. This balance lets the spices shine without being too sweet. Experiment with different spices to discover your unique blend. You can also try using honey or maple syrup instead of sugar. These natural sweeteners can change the flavor profile. When using them, cook your jam a little longer. This helps to achieve the right thickness. Adjusting the cooking time is key for perfect consistency. Check out the Full Recipe for tips on making quick fig jam. How long does Quick Fig Jam last in the fridge? Quick Fig Jam lasts for up to two weeks in the fridge. Make sure to keep it in a sealed jar. This keeps it fresh and safe to eat. Best practices for sealing jars When sealing your jars, always use clean, sterilized jars. Fill them to about half an inch from the top. Wipe the rim with a clean cloth to remove any jam. Finally, screw the lid on tightly to keep air out. Guidelines for freezing your jam You can freeze Quick Fig Jam for up to six months. Use freezer-safe containers or jars. Leave some space at the top of the jar. The jam will expand as it freezes. Thawing tips for best texture To thaw frozen jam, place it in the fridge overnight. This helps keep the texture smooth. You can also thaw it in a bowl of warm water. Avoid microwaving, as it may change the jam's texture. How to recognize spoilage Look for changes in color or smell. If the jam has an off odor or looks cloudy, it may be spoiled. Mold on the surface is also a clear sign that it’s time to toss it. Proper disposal methods If your jam has spoiled, throw it away in the trash. Do not compost it, as this can attract pests. Always clean the jar before recycling to keep it safe. Making Quick Fig Jam takes about 30 minutes in total. You will spend 10 minutes preparing the figs and other ingredients. The cooking takes about 15-20 minutes. This quick process means you can enjoy your jam in no time. Yes, you can make fig jam without sugar. You can use honey, maple syrup, or agave nectar. These options add sweetness but may change the jam's thickness. Sugar helps create the right texture, so you may need to cook it longer. Always taste as you go to achieve the flavor you like best. If your jam doesn’t thicken, don’t worry! You can cook it longer over low heat. Keep stirring to avoid burning. If it still seems runny, mix in a bit of pectin. You can also let it cool to see if it firms up. If not, you can use it as a sauce instead. This article covered everything you need to make quick fig jam. We discussed fresh ingredients, pantry staples, and measurement tips to ensure you get it right. I shared step-by-step instructions on preparation and cooking, along with helpful tips to avoid common mistakes. We explored tasty variations and how to store your jam safely. Remember, quality ingredients make the best jam. With these tips, you can create a delicious treat that impresses anyone. Enjoy your cooking adventure with figs and have fun experimenting!](https://mysavedrecipe.com/wp-content/uploads/2025/06/22d9fddb-9fe7-4372-851a-d54a165ac2f5-300x300.webp)


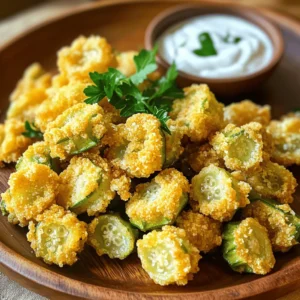
![- 2 cups fresh okra, finely chopped - 1 cup cornmeal - 1/2 cup all-purpose flour - 1/2 cup buttermilk - 1 large egg - 1 small onion, finely diced - 1 clove garlic, minced - 1 teaspoon cayenne pepper - 1 teaspoon baking powder - Salt and pepper to taste - Vegetable oil for frying Southern Okra Patties are simple to make. The main ingredient is fresh okra. You can find it at most grocery stores during the summer months. Cornmeal gives these patties their crunchy texture. All-purpose flour helps bind the mixture. Buttermilk adds a nice tang. The egg helps hold everything together. Chop your okra finely. This helps it mix well with the other ingredients. Dice the onion small for even cooking. Mince the garlic for a strong flavor. For spice, add cayenne pepper. You can adjust it based on how spicy you like your food. Don't forget the baking powder. This helps the patties puff up during cooking. Salt and pepper are essential. They enhance the flavors of the dish. - Fresh herbs (parsley, cilantro) for garnish - Additional spices (paprika, black pepper) for extra heat Feel free to customize your patties! Fresh herbs add brightness to the dish. You can use parsley or cilantro as a garnish. If you love heat, add more spices. Paprika or black pepper can give a nice kick. This recipe is versatile. Enjoy making it your own! For the full recipe, check the earlier section. - In a large bowl, combine 2 cups of fresh okra, 1 small diced onion, 1 minced garlic clove, and 1/2 cup of buttermilk. Mix well. - In another bowl, whisk together 1 cup of cornmeal, 1/2 cup of all-purpose flour, 1 teaspoon of baking powder, 1 teaspoon of cayenne pepper, and salt and pepper to taste. - Add the dry mixture to the wet okra mixture. Stir until just combined. - Heat about 1/4 inch of vegetable oil in a large skillet over medium heat. - Once the oil is hot, drop spoonfuls of the batter into the skillet, flattening them slightly. Fry in batches to avoid crowding. - Cook each patty for 3-4 minutes on each side, until they are golden brown and crispy. - Serve the patties warm with your favorite dipping sauces. - For best presentation, garnish with fresh herbs like parsley or cilantro. Pair with a spicy sauce or homemade ranch for added flavor. This recipe gives you a taste of the South right at home. Enjoy this easy and tasty dish! For the full recipe, check out the detailed instructions above. - To get the perfect crispiness, heat your oil well. A hot skillet helps the patties fry evenly. - Avoid soggy patties by not overmixing the batter. Letting it rest for 10 minutes helps too. - Want more spice? Adjust the cayenne pepper to your taste. Start with less and add more if needed. - You can add other vegetables like bell peppers or corn for extra flavor and texture. Cheese works great too! Try cheddar for a rich twist. - Use a heavy skillet, like cast iron, for even heat. It keeps the oil temperature steady while frying. - A slotted spatula is helpful for turning and removing patties. It lets excess oil drain away easily. For a full recipe with detailed steps, check out the [Full Recipe]. {{image_2}} If you need to make some changes to the recipe, you can easily swap ingredients. - For flour, use almond flour or rice flour for a gluten-free option. - Instead of buttermilk, try using almond milk or coconut milk with a splash of vinegar to mimic the tangy taste. These substitutions keep the essence of the dish while meeting dietary needs. You can cook these patties in several ways. Each method gives a unique taste and texture. - Frying: This is the traditional way. It gives a crispy outside but can be greasy. - Baking: A healthier option, but it may not get as crispy. Set your oven to 400°F. Bake for 15-20 minutes, flipping halfway. If you want to try a modern method, use an air fryer. - Air fryer instructions: Preheat the air fryer to 375°F. Place the patties in a single layer and cook for 10-12 minutes, flipping halfway. This method keeps them crispy with less oil. Every region has its unique flavors. You can easily put your spin on Southern okra patties. - In Louisiana, add Cajun spices like thyme and oregano for a kick. - In Texas, try mixing in jalapeños for added heat. These local twists can transform the dish and make it even more exciting. To keep your leftover Southern okra patties fresh, store them in the fridge. Place the patties in an airtight container. This helps keep them from drying out or absorbing other smells in the fridge. I recommend using glass containers or heavy-duty plastic ones. Just make sure the lid seals tightly. You can store them for up to three days. If you want to save some patties for later, freezing is a great option. First, let the cooked patties cool completely. Then, place them in a single layer on a baking sheet. Freeze them for a couple of hours until solid. This helps keep their shape. After that, transfer them to a freezer-safe bag. Squeeze out as much air as possible. You can freeze them for up to three months. When you’re ready to eat, take out the number of patties you want. Place them in the fridge overnight to thaw. This keeps them from getting too soggy. To reheat your patties, the best method is to use a skillet. Heat a little oil in the pan over medium heat. Place the patties in the skillet and cook for about 3 minutes on each side. This helps them stay crispy. If you want to use the oven, preheat it to 350°F (175°C). Place the patties on a baking sheet and heat for about 10-15 minutes. Cover them with foil to avoid moisture loss. Enjoy your tasty Southern okra patties! Southern okra patties come from the rich food culture of the South. Okra is a staple in many Southern dishes. It is often used in gumbo or fried as a side. The patties reflect the blend of African, Native American, and European cuisines. They are a way to celebrate local ingredients and traditions. People in the South have enjoyed these patties for generations. They hold cultural significance and represent home cooking. Yes, you can prepare these patties in advance. Mix the batter and store it in the fridge for a day. When you're ready, just fry them up. If you want to freeze them, form the patties first. Place them on a baking sheet and freeze until firm. Then, transfer them to a freezer bag. When you're ready to eat, just thaw and cook. Reheating is easy; just fry them again until warm and crispy. You can make this dish vegan with simple swaps. Replace the egg with a flax egg or applesauce. Use almond milk or soy milk instead of buttermilk. For a gluten-free option, try using chickpea flour or a gluten-free flour blend. These changes keep the flavor while making the dish plant-based. You still get a tasty and satisfying meal. To add heat, increase the cayenne pepper in the recipe. You can also mix in diced jalapeños or hot sauce. Another option is to serve the patties with a spicy dipping sauce. Adding spices like smoked paprika can enhance the flavor too. Adjust the spice level to match your taste and enjoy the kick. Southern okra patties pair well with many sides. Try serving them with coleslaw for a crunchy contrast. A fresh salad with tomatoes and cucumbers works nicely too. You can also enjoy them with grits or rice. For a snack, serve them with a flavorful dip, like ranch or hot sauce. These choices complement the flavors of the patties wonderfully. Southern Okra Patties are a tasty treat that brings comfort and flavor. We explored their key ingredients, preparation steps, and cooking methods. You can customize them with spices or herbs. Remember to store leftovers properly and even try different cooking methods. Whether frying or baking, these patties can fit anyone’s taste. I encourage you to experiment with variations and find your ideal version. Enjoy making and sharing these delicious treats!](https://mysavedrecipe.com/wp-content/uploads/2025/06/a23e0b25-e892-45c6-9fd7-84eb97aa06a5-300x300.webp)


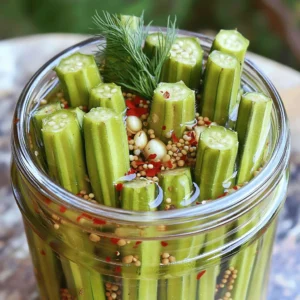


![- 1 pound fresh okra, trimmed - 2 cups distilled white vinegar - 1 cup water - 3 tablespoons sugar - 2 tablespoons kosher salt - 4 cloves garlic, sliced - 2 teaspoons red pepper flakes - 2-4 fresh jalapeños, sliced (adjust for heat preference) - 1 teaspoon mustard seeds - 1 teaspoon black peppercorns - 1 teaspoon dill seeds When making spicy refrigerator pickled okra, you want to ensure you have fresh ingredients. Start with the okra. Choose bright green pods that are firm to the touch. Avoid any that look soft or bruised. Next, distilled white vinegar plays a key role in the pickling process. It adds the sharp tang you crave. The water helps balance the brine's strength, making it more palatable. Now, let’s talk seasoning. Sugar balances the vinegar's tartness. Kosher salt adds depth and enhances flavors. The sliced garlic brings a lovely aroma and taste to your pickles. For the spice lovers, red pepper flakes and fresh jalapeños bring the heat. You can adjust the jalapeño quantity based on how spicy you want your okra. Mustard seeds, black peppercorns, and dill seeds add unique flavors that complement the okra well. For the full experience, follow the [Full Recipe]. Enjoy your pickling adventure! Start by washing the okra under cold water. This step cleans off dirt and bacteria. After washing, trim the stems but keep the pods intact. Keeping the pods whole helps them stay crunchy. If you cut them too much, they may become mushy when pickled. Next, you will make the brine. In a medium saucepan, mix 2 cups of distilled white vinegar, 1 cup of water, 3 tablespoons of sugar, and 2 tablespoons of kosher salt. Heat this mixture on medium heat. Stir until the sugar and salt dissolve completely. This step is key for great flavor. Once it’s dissolved, remove it from the heat. Now, it’s time to pack the jars. Use clean, sterilized jars for best results. Start by placing a layer of okra in the jar. Then, add slices of fresh jalapeños. You can sprinkle fresh dill if you like. Repeat layering until the jars are packed tightly. This helps ensure the flavors mix well. Carefully pour the cooled brine over the okra. Make sure the brine covers the okra completely. This step is very important for a good pickle. Leave about half an inch of space at the top of the jar. Finally, seal the jars with tight-fitting lids. Store them in the fridge right away. Let the okra pickle for at least 24 hours before enjoying. The longer they sit, the better they taste. Check out the Full Recipe for all the details! To get the best flavor from your spicy refrigerator pickled okra, let it sit for at least 24 hours. This time allows the flavors to blend. The longer you wait, the better the taste. You can let it pickle for up to a week for a stronger flavor. You can enhance the flavor by adding more spices. Consider using different herbs or even a splash of pickle juice from other pickles. This can give your okra a unique twist. Experiment with your favorite spices to make it your own. Pickled okra is great on its own but also shines in dishes. You can serve it as a crunchy snack or an appetizer. It pairs well with cheese and crackers. Feel free to chop it up and toss it in salads for a zesty kick. Another fun way to use pickled okra is in cocktails. Try adding it to a Bloody Mary for extra flavor. It adds a nice crunch and a spicy touch that elevates your drink. Presentation matters when serving pickled okra. Use a colorful decorative bowl to catch the eye. You can also serve it with a small dish of the brine for dipping. This adds a fun element to your meal. For a beautiful touch, use whole okra pods as a garnish. Lay a few on top or around the bowl. This not only looks pretty but shows off the vibrant green color of the okra. A little effort in presentation makes a big difference! {{image_2}} You can change the heat of your spicy refrigerator pickled okra easily. Start by adjusting the number of jalapeños you use. For milder pickles, add just one jalapeño. Want more heat? Try four or even more. You can also tweak the red pepper flakes. Less means less heat. More means a spicier bite. If you want to explore other spicy ingredients, consider adding a dash of cayenne pepper or even some sliced serrano peppers. Both will give your pickled okra a unique twist and a nice kick. To change the flavor of your pickles, think about adding fresh herbs. Thyme and oregano work well. Just a little can add a lot of depth to the flavor. You can also play with different types of vinegar. While distilled white vinegar is standard, apple cider vinegar or rice vinegar can add a subtle sweetness and a different taste profile. Try mixing it up! Each vinegar brings its own character. Experimenting can lead to a fun and tasty surprise. Don't limit your pickling to just okra. You can use other vegetables too! Carrots, cucumbers, and green beans are all great options. They soak up the brine nicely and will taste amazing. Want to get creative? Try combining different vegetables in one jar. Just make sure they have similar cooking times. This way, they will pickle evenly. The mix of colors and flavors will make for an eye-catching and tasty treat! You should refrigerate spicy pickled okra for up to two months. This keeps the flavors fresh and bright. After two months, the taste may fade. Look out for signs of spoilage, like mold or a bad smell. If you notice these, it's time to discard the jar. Always seal your jars tightly. This helps keep air out and flavors in. Store your jars in the fridge at a temperature below 40°F (4°C). This coolness slows bacteria growth and keeps your okra safe to eat. There are many fun ways to use pickled okra. You can toss it in salads for a pop of flavor. Try adding it to sandwiches or wraps for a crunchy bite. To extend shelf life, always use clean utensils when serving. This prevents bacteria from getting into the jar. For more ideas, check the [Full Recipe]. To pickle okra, you need at least 24 hours. This time allows the okra to soak up the brine's flavors. However, if you wait longer, the taste will deepen. I often recommend keeping them for at least three days for a better taste. You can use frozen okra, but it may not be as crunchy. Frozen okra may lose some of its texture during freezing. It’s best to use fresh okra for the best results. If you do use frozen, thaw them first and drain any excess water. If the brine doesn’t cover the okra, you can add more brine. Simply mix equal parts of vinegar and water, then pour it into the jar until the okra is submerged. You can also press the okra down gently to ensure they are packed tightly, which might help the brine cover them. To boost the flavor, add more spices. I love using coriander seeds or bay leaves. You can also experiment with herbs like thyme or oregano. If you crave more heat, add more jalapeños or red pepper flakes. In this guide, we explored how to pickle okra step by step. We covered essential ingredients, from fresh okra to a mix of spices. You learned how to prepare the okra, make the brine, and pack the jars tightly. We shared tips for perfect pickling and serving ideas. Pickled okra adds flavor and zest to your meals. Experiment with spices and vegetables to find your favorite twist. Happy pickling!](https://mysavedrecipe.com/wp-content/uploads/2025/06/3c770cf1-cede-4fe9-b320-586c604f0b59-300x300.webp)


. In this blog post, we explored how to make a delicious mushroom spinach frittata. We covered essential and optional ingredients that add flavor and texture. I shared step-by-step instructions and helpful tips for cooking and serving. Variations allow you to customize the dish, and I included storage details for leftovers. With this knowledge, you can create a tasty frittata any time. Experiment with flavors and enjoy the process! Happy cooking!](https://mysavedrecipe.com/wp-content/uploads/2025/06/f123b1d2-b5be-43b7-b8dc-55819e027fa2-300x300.webp)

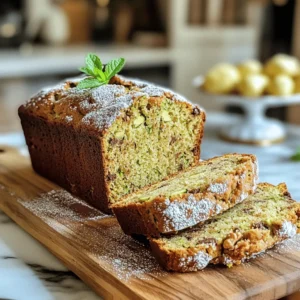
![- 4 ripe peaches, peeled and sliced - 1 cup fresh blueberries - 1/2 cup sugar (adjust based on sweet peachiness) - 1 tablespoon lemon juice - 1 teaspoon vanilla extract - 1 teaspoon cinnamon - 1 cup all-purpose flour - 1 tablespoon baking powder - 1/2 teaspoon salt - 1/3 cup unsalted butter, melted - 3/4 cup milk - 1/2 cup brown sugar for topping - 1 teaspoon nutmeg - You can use frozen or canned peaches if fresh ones are not available. - Try raspberries or cherries to mix up the flavors. Using ripe peaches is key. They add a sweet and juicy taste. The bourbon gives the dish depth and warmth. It enhances the sweet flavors and adds a hint of spice. Just a splash will do. This drink adds a rich note that makes the cobbler stand out. For the best results, choose high-quality bourbon. You’ll love how it pairs with the fruit! For the full recipe, check out Peach Paradise Cobbler. - Preheat your oven to 350°F (175°C). - Grease an 8x8 inch baking dish with butter or cooking spray. In a large bowl, combine: - 4 ripe peaches, peeled and sliced - 1 cup fresh blueberries - 1/2 cup sugar (adjust based on sweet peachiness) - 1 tablespoon lemon juice - 1 teaspoon vanilla extract - 1 teaspoon cinnamon Gently toss the fruit. This helps the flavors blend. Let the mixture sit for about 10 minutes. This step allows the juices to come out and the fruits to sweeten. In a separate bowl, whisk together: - 1 cup all-purpose flour - 1 tablespoon baking powder - 1/2 teaspoon salt After mixing the dry ingredients, add: - 1/3 cup unsalted butter, melted - 3/4 cup milk Stir these until just combined. It's okay if some lumps remain. Overmixing can make the cobbler tough. Pour the batter evenly into your prepared baking dish. Next, spoon the peach and blueberry mixture on top. Allow some fruit to sink into the batter while leaving some on top. This makes for a nice presentation. In a small bowl, mix: - 1/2 cup brown sugar - 1 teaspoon nutmeg Sprinkle this over the fruit layer for added sweetness and spice. Bake in the preheated oven for about 45-50 minutes. Check for doneness by inserting a toothpick in the center. It should come out clean. Once baked, let it cool for about 10 minutes before serving. This helps the cobbler set up and makes it easier to cut. Enjoy your delicious Bourbon Peach Cobbler! For the complete recipe, check the Full Recipe. Add about 1 to 2 tablespoons of bourbon to your peach mix. This small amount brings a deep, warm flavor. Bourbon pairs well with spices like cinnamon and nutmeg. You can also try adding vanilla or almond extract for more depth. Serve your cobbler warm with a scoop of vanilla ice cream. Drizzle caramel sauce over the top for extra sweetness. Garnish with fresh mint leaves for a pop of color and freshness. This makes your dessert look beautiful and inviting. One common mistake is overmixing the batter. This can make your cobbler tough. Mix just until combined; it’s okay if there are lumps. Another mistake is using unripe or underripe peaches. Make sure your peaches are juicy and sweet for the best flavor. {{image_2}} You can switch up the fruits in this cobbler. Try using apples with warm cinnamon. This apple-cinnamon combo gives a cozy feel. You can also use seasonal berries. Blueberries, raspberries, or strawberries add a burst of color and flavor. Mixing different fruits makes it fun and fresh! If you need a gluten-free version, use gluten-free flour. It works well in this recipe. Look for a blend that includes xanthan gum for the best texture. You may need to bake it a bit longer. Keep an eye on it to ensure it stays moist and delicious. For a vegan treat, swap the butter and milk for plant-based options. Coconut oil or vegan butter works great. Use almond milk or oat milk for a creamy base. For sweeteners, maple syrup or agave nectar makes a nice touch. These changes keep the taste rich and the dessert kind to all diets. Feel free to explore the [Full Recipe] for more ideas! To keep your Bourbon Peach Cobbler fresh, let it cool first. Then, cover it tightly with plastic wrap. You can also use aluminum foil. Store it in the refrigerator. It stays good for up to three days. When you're ready to enjoy your cobbler again, try reheating it in the oven. Preheat your oven to 350°F (175°C). Place the cobbler in a baking dish. Cover it with foil to keep it moist. Heat for about 15-20 minutes. You can also use a microwave. Just heat it in short bursts to avoid drying it out. Serve it warm with a scoop of ice cream for a treat! You can freeze the cobbler if you want to save some for later. If you freeze it before baking, wrap it well in plastic wrap and then foil. Freeze for up to three months. When you’re ready to bake, no need to thaw! Just bake straight from the freezer, adding a few extra minutes to the time. If you freeze it after baking, let it cool completely first. Thaw it in the fridge overnight before reheating. Enjoy your cobbler anytime with these easy steps! If you want to swap out peaches, many fruits work well. You can use ripe nectarines for a similar taste. Plums add a nice touch with their tartness. Cherries can give a sweet and juicy flavor. Apples are also a great choice, especially if you like a firmer texture. Experimenting with berries like blueberries or raspberries can add a fun twist too. Just remember to adjust the sugar based on the sweetness of the fruit you choose. Yes, you can make this cobbler ahead of time. I recommend preparing the filling and batter separately. Store the filling in the fridge for up to two days. You can also mix the batter and keep it in the fridge for a short time. When you’re ready to bake, just combine and pour into your dish. This way, the flavors will meld and taste even better! You’ll know your cobbler is done when the top turns golden brown. A toothpick inserted into the center should come out clean. If you see wet batter, it needs more time. Keep an eye on it during the last few minutes of baking. If the edges look brown, but the center isn’t done, you can cover it loosely with foil. This helps the center cook without burning the edges. Adding nuts can boost flavor and texture! Walnuts or pecans work great in this cobbler. Chop them coarsely and mix them in with the fruit. You can also sprinkle some on top before baking. The nuts will toast and add a nice crunch. Just be careful if you are serving guests with nut allergies. Making a Bourbon Peach Cobbler is simple and rewarding. We covered key ingredients, preparation steps, and tips for the best flavor. You can mix and match fruits to fit your taste. Remember, ripe peaches and a hint of bourbon can elevate this dish. Store leftovers properly for fresh taste later. With some care, your cobbler will impress friends and family. Enjoy exploring variations and making this recipe your own!](https://mysavedrecipe.com/wp-content/uploads/2025/06/f7340f07-6233-4e17-9bfd-d8e3b019ebaf-300x300.webp)
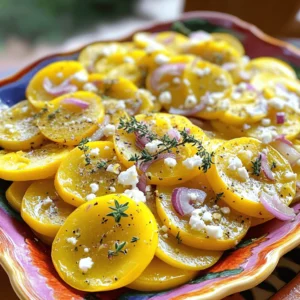
![- 3 medium yellow squash, sliced into thin rounds - 1 cup sugar - 1 cup apple cider vinegar - 1/2 cup water - 1 tablespoon salt - 1 teaspoon mustard seeds - 1 teaspoon black peppercorns - 1 teaspoon turmeric powder - 1 teaspoon crushed red pepper flakes - 1 teaspoon garlic powder - 1 small onion, thinly sliced - Fresh herbs like dill or cilantro Gathering the right ingredients is key to making great sweet yellow squash pickles. Start with fresh yellow squash. Look for ones that are firm and bright in color. The sugar and apple cider vinegar are what give this recipe its sweet and tangy kick. The water helps balance the brine. The spices add depth. Salt draws moisture from the squash, making them crisp. Mustard seeds, black peppercorns, and turmeric bring unique flavors. Crushed red pepper adds a touch of heat, while garlic powder gives a savory note. Sliced onions make the pickles even better. For garnishes, fresh herbs like dill or cilantro can add a lovely touch. These herbs boost flavor and look pretty too. Using high-quality ingredients ensures your pickles taste amazing. You can find the full recipe above if you want to dive right into making these delicious pickles! - Combine 3 medium yellow squash slices with 1 tablespoon of salt. - Let the squash sit for 1 hour to draw out moisture. - After an hour, rinse the squash slices under cold water. - Drain the slices well to remove excess salt. - In a medium saucepan, combine: - 1 cup sugar - 1 cup apple cider vinegar - 1/2 cup water - 1 teaspoon mustard seeds - 1 teaspoon black peppercorns - 1 teaspoon turmeric powder - 1 teaspoon crushed red pepper flakes - 1 teaspoon garlic powder - Bring this mix to a gentle boil over medium heat. - Stir until the sugar dissolves completely. - Reduce the heat and add 1 small thinly sliced onion. - Let it simmer for about 5 minutes to blend the flavors. - Remove the saucepan from heat and add the drained squash slices. - Mix well to coat all the squash with the hot brine. - Pack the mixture into clean, sterilized jars. - Make sure to include onions and spices in each jar. - Pour the hot brine over the squash until fully submerged. - Leave 1/2 inch of headspace at the top of each jar. - Seal the jars with lids and cool to room temperature. - Refrigerate the jars and let the pickles sit for at least 24 hours before serving. For the complete recipe, refer to the [Full Recipe]. - Ensure jars are sterilized properly. This keeps your pickles fresh and safe. - Use fresh, high-quality ingredients. Fresh squash gives the best flavor and crunch. - Adjust sugar for sweetness level. Taste the brine, and add more sugar if needed. - Modify spice amounts to taste. If you love heat, add more crushed red pepper flakes. - Serve pickles in decorative jars. A pretty jar makes your pickles look even better. - Garnish with fresh herbs for visual appeal. Fresh dill or cilantro adds color and flavor. These tips will help you create the best sweet yellow squash pickles. For more details, check out the Full Recipe. {{image_2}} For a sweet and spicy twist, consider adding more crushed red pepper flakes. This simple addition ramps up the heat. If you want even more fire, toss in some jalapeños. Slice them thin and mix them into the squash before packing the jars. This variation creates a fun kick that pairs well with rich meats. Another delightful option is to infuse your pickles with herbs. Fresh dill or rosemary adds a fresh taste to the brine. You can toss in a few sprigs during the cooking process. Don’t be afraid to experiment with other herbs too! Thyme, tarragon, or even basil can bring new flavors to your pickles. You can also try pickling different vegetables. Other summer squashes work great, and cucumbers are a classic choice. Consider blending the squash with colorful carrots or sweet bell peppers. This adds a beautiful look and varied taste to your jars. Mixing vegetables lets you create unique flavors that are fun and delicious. For more ideas, check out the Full Recipe. To keep your sweet yellow squash pickles fresh, store them in the fridge. This helps maintain their crunch and flavor. After making them, let your pickles sit for at least 24 hours. This resting time allows the flavors to blend nicely. Homemade pickles usually last about 2 to 3 weeks in the fridge. Look for signs of spoilage, such as off smells or mold. If the pickles seem slimy or the liquid looks cloudy, it's best to toss them. If you want to keep your pickles longer, consider canning. Use proper canning methods for safe long-term storage. Before canning, make sure your jars are clean and sterilized. This helps prevent bacteria growth and keeps your pickles safe to eat. Sweet yellow squash pickles last about 2 months in the fridge. If you can them properly, they can last up to a year on the shelf. Always check for signs of spoilage before eating. Yes, you can use other types of vinegar. White vinegar works well and gives a clean taste. Red wine vinegar adds a bit of depth and color. Experiment and see what you like best. You can serve these pickles in many ways. They pair nicely with sandwiches, burgers, or as a side for grilled meats. For a fun twist, add them to tacos or salads. A good serving size is about 1/4 cup per person. These pickles are great for picnics and parties. You can adjust the sweetness easily. Add more sugar for a sweeter taste or cut back for less sweetness. If you want a sugar substitute, try honey or agave syrup. Just remember to adjust the liquid in the brine. In this guide, we covered how to make sweet yellow squash pickles. We discussed the key ingredients, flavor tips, and the step-by-step process to pickle squash properly. Remember, adjusting sweetness and spice makes the pickles uniquely yours. Don't forget to store them safely for the best flavor. Enjoy your pickles as a tasty side or snack. Making them adds fun to your kitchen, and you can share them with friends! Happy pickling!](https://mysavedrecipe.com/wp-content/uploads/2025/06/afd8ad7d-43bb-4028-a14f-8632236d1c09-300x300.webp)

. - Preheat the oven to 375°F (190°C). - In a large skillet, heat 2 tablespoons of olive oil over medium heat. - Add 1 chopped onion and sauté until it turns soft, about 5 minutes. - Next, add 4 thinly sliced zucchinis. Cook for 5-7 minutes until they are tender. - Season the zucchini with 1 teaspoon of garlic powder, 1 teaspoon of Italian seasoning, salt, and pepper to taste. - Remove the skillet from the heat and let it cool slightly. - In a large bowl, whisk together 3 eggs and 1/2 cup of milk until smooth. - Stir in 1 cup of shredded mozzarella cheese and 1/2 cup of grated Parmesan cheese. - Add the sautéed zucchini mixture into the egg and cheese mixture. Stir until everything is well mixed. - Transfer the mixture into a greased 9x13 inch casserole dish. Spread it out evenly. - In a separate bowl, mix the remaining mozzarella and Parmesan with 1/2 cup of breadcrumbs. - Sprinkle this breadcrumb topping evenly over the zucchini mixture in the casserole dish. - Bake in the preheated oven for about 30-35 minutes. Look for a golden brown top and bubbling edges. - Once baked, allow it to cool for a few minutes. Serve hot, garnished with fresh parsley. For the full recipe, check out the complete details above! - Choosing the right zucchinis: Look for firm zucchinis with smooth skin. Avoid any with soft spots. Fresh zucchinis have the best flavor and texture. - Achieving the best cheese melt: Use a mix of mozzarella and Parmesan. Mozzarella gives a nice stretch, while Parmesan adds sharpness. Grate the cheese yourself for better melting. - Adjusting baking time based on oven variations: Every oven is different. Keep an eye on your casserole. If the top is not golden after 35 minutes, bake a few more. - Pairing options for side dishes: This casserole pairs well with a fresh salad or crusty bread. You can also serve it with grilled chicken for extra protein. - Garnishing ideas with fresh herbs: Fresh parsley or basil adds a lovely touch. Sprinkle some on top before serving for color and flavor. - Best beverages to complement the dish: A light white wine or sparkling water enhances the meal. A crisp lemonade also works well, especially on warm days. For the full recipe, check out the complete instructions in the earlier section. {{image_2}} You can change the cheese in your casserole. Instead of mozzarella, try cheddar or gouda. For Parmesan, consider using pecorino or nutritional yeast for a twist. Adding proteins can also boost flavor. Chicken or sausage works well here. It makes the dish heartier and more filling. You can even add ground turkey for a leaner option. If you want more veggies, add bell peppers or spinach. They mix well with zucchini and add color. If you need a gluten-free dish, use gluten-free breadcrumbs or skip them altogether. You can also swap the eggs for flaxseed meal mixed with water. This works well for vegans. For cheese, try cashew cheese or vegan cheese brands. If you want to lower the carbs, skip the breadcrumbs and use more zucchini. You can also cut down on milk or use unsweetened almond milk. These changes keep the flavor while meeting your needs. To keep your cheesy zucchini casserole fresh, start by refrigerating leftovers. Place the casserole in an airtight container. This helps prevent it from drying out. Leftovers can last for about 3 to 5 days in the fridge. If you want to save some for later, freezing is a great option. Cut the casserole into serving sizes. Wrap each piece in plastic wrap and then in foil. This extra layer protects it from freezer burn. You can freeze the casserole for up to 2 to 3 months. When you are ready to enjoy it again, reheating is key to maintaining texture. You can reheat it in the oven at 350°F (175°C) for about 20 minutes. This method keeps the top crispy while warming the inside. Leftovers in the fridge usually last up to 5 days. After that, they may not taste as good. Always check for signs of spoilage. If you see any mold or the casserole smells off, it’s best to throw it away. Keep an eye out for changes in texture as well. If the casserole feels slimy or mushy, it’s time to discard it. Staying mindful of these signs helps you enjoy your dish safely. For the full recipe, you can refer to the earlier section. Can I make Cheesy Zucchini Casserole ahead of time? Yes, you can prepare the casserole a day before. Just follow the steps and store it in the fridge. When ready, bake it straight from the fridge. This saves time and allows flavors to meld. What’s the best way to slice zucchini? The best way to slice zucchini is to use a sharp knife. Aim for thin, even slices about 1/4 inch thick. This helps them cook evenly. You can also use a mandoline for speed and uniformity. Can I use frozen zucchini instead of fresh? Yes, frozen zucchini works, but it may have more water. Make sure to thaw and drain it well before using. This prevents a watery casserole. Fresh zucchini has a firmer texture, but frozen is fine in a pinch. How do I know when the casserole is done? You’ll know the casserole is done when the top is golden brown and bubbly. Insert a knife in the center; it should come out clean. Let it cool for a few minutes before serving for the best texture. For the full recipe, check out the section above. This blog post covered a delicious Cheesy Zucchini Casserole. We looked at the ingredients, from zucchini to cheese, and how to make it step by step. I shared tips to make it perfect and ways to serve it. You can even try variations to fit your taste and dietary needs. Remember to store leftovers properly to keep them fresh. With this simple recipe, you can enjoy a tasty dish that offers flexibility. Dive in and enjoy your cooking adventure!](https://mysavedrecipe.com/wp-content/uploads/2025/06/b7445b88-a28e-4eb2-aeb5-986cda669b2a-300x300.webp)


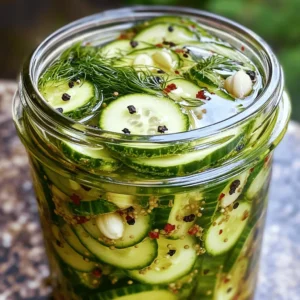

. To boost the taste of your garlic dill refrigerator pickles, try adding other spices. Some great options are mustard seeds, black peppercorns, or coriander seeds. These spices bring new layers of flavor. A pinch of sugar can also balance the heat from red pepper flakes. For the best flavor, let your pickles marinate for 3-5 days. This time allows the cucumbers to soak up all the tasty brine. If you’re in a rush, a minimum of 24 hours will still give you a nice crunch and flavor. One big mistake is skipping sterilization. Always use clean jars to avoid spoilage. Wash them in hot, soapy water, then rinse well. You can also run them through a dishwasher for extra safety. Another common error is not using enough brine. Ensure the cucumbers are fully submerged in the liquid. This step is key for even flavor and crunch. Garlic dill pickles are great on their own, but they can shine in many dishes. Serve them alongside sandwiches for a nice crunch. They also pair well with burgers or grilled meats. Get creative! Use your pickles in salads, or slice them up for a fresh topping on tacos. You can also chop them and mix them into potato or pasta salads for extra zing. Enjoy exploring these tasty options! {{image_2}} To make spicy garlic dill pickles, add more heat. Start by increasing the red pepper flakes. You can add up to 2 teaspoons for a real kick. If you like it hot, try adding sliced jalapeños or crushed chili peppers. These additions bring bold flavors to the mix. The heat pairs well with the crunchy cucumbers and garlic. If you want sweet dill pickles, adjust the sugar. Start with 2 tablespoons of sugar instead of 1. You can also add a small amount of honey for a natural sweetness. To enhance the flavor, consider adding a pinch of cinnamon or allspice. These spices give a warm touch that works well with the sweet notes. To create herb-infused pickles, explore various herbs and spices. Basil, thyme, or tarragon can add unique flavors. Add these herbs along with the dill in the jar. You might also try mustard seeds or black peppercorns for extra depth. Experimenting with different herbs lets you create your signature pickle. How long do pickles last in the fridge? Garlic dill refrigerator pickles can last for up to two months in the fridge. Store them in a sealed jar to keep them fresh. The flavor will improve over time, so feel free to let them sit for a week or more before enjoying. What to look for when checking for freshness? Check for any off smells, unusual colors, or mold on the surface. If the brine becomes cloudy, it may also indicate spoilage. Always trust your senses; if something seems off, it's best to toss the pickles. Can you reuse pickling brine? Yes, you can reuse the brine for another batch of pickles. However, it might lose some flavor and acidity after the first use. Make sure to check the brine for signs of spoilage before reusing it. For the best taste, consider adding fresh spices and herbs each time you use the brine. Garlic Dill Refrigerator Pickles need at least 24 hours to marinate. This time allows the flavors to blend. If you want a stronger taste, let them sit for 3 to 5 days. The longer they marinate, the better they taste. You can check them after the first day, but wait a few days for the full flavor. Yes, you can use many other vegetables for refrigerator pickles. Carrots, radishes, and green beans work well. Just cut them into sizes that fit in your jar. Some veggies may need a bit longer to pickle. Always remember to use the same brine for best results. Experimenting with different vegetables can lead to fun, new tastes. Refrigerator pickles are quick and easy to make. They do not require heat or long-term storage. Canned pickles are sealed in jars and processed for shelf life. This method uses heat to kill bacteria and create a vacuum seal. Both types taste great, but refrigerator pickles stay crispier due to their shorter cooking time. You now have everything you need to make Garlic Dill Refrigerator Pickles. We covered essential ingredients, step-by-step instructions, and helpful tips. You learned how to enhance flavors and avoid common mistakes. Explore variations for more unique tastes, like spicy or sweet options. Remember to store them correctly and check for freshness. Pickling is a fun way to enjoy healthy snacks. Enjoy your pickles and share them with friends!](https://mysavedrecipe.com/wp-content/uploads/2025/06/3f9092e8-0b82-4512-8a98-3f8fbf18b8d0-300x300.webp)
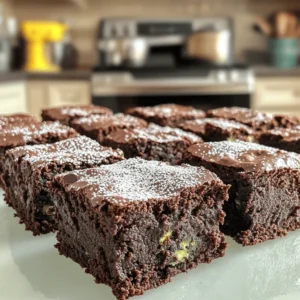
. 1. Start by preheating your oven to 350°F (175°C). Grease an 8x8 inch baking pan. You can also line it with parchment paper. This helps with easy removal later. 2. In a large bowl, mix 1 cup of melted coconut oil and both sugars until they are smooth. You want a creamy texture. 3. Next, add 2 large eggs and 1 teaspoon of vanilla extract. Whisk these together until they blend well. 4. Now, take 1 cup of grated zucchini and fold it gently into your mixture. Make sure the zucchini spreads evenly throughout. 5. In another bowl, sift together 1 cup of all-purpose flour, 1/2 cup cocoa powder, 1/2 teaspoon baking soda, 1/4 teaspoon baking powder, and 1/4 teaspoon salt. 6. Gradually mix the dry ingredients into the wet ingredients. Stir until just combined to keep your brownies soft. 7. If you like, fold in 1/2 cup of chocolate chips and 1/4 cup of chopped walnuts for a tasty crunch. 8. Pour your brownie batter into the prepared pan. Smooth the top with a spatula so it cooks evenly. 9. Bake your brownies in the oven for 25-30 minutes. Check if they are done by inserting a toothpick. It should come out with a few moist crumbs. 10. Let the brownies cool in the pan for about 10 minutes. If you used parchment paper, lift them out carefully. 11. Transfer the brownies to a wire rack to cool completely. Once cool, cut them into squares. 12. For a special touch, serve the brownies on a nice plate. Dust the top with powdered sugar. Add fresh mint leaves for color. 13. Pair these brownies with a scoop of vanilla ice cream for a sweet treat. Enjoy your delicious zucchini brownies! For the full recipe, refer back to the ingredients and instructions. To make the best zucchini brownies, start by using fresh zucchini. Grate it finely. This helps it blend well into the batter. Squeeze out some moisture from the zucchini before adding it. This keeps the brownies from being too wet. Use a good quality cocoa powder for rich flavor. Mixing the wet and dry ingredients separately first makes a smooth batter. Don’t overmix; just stir until combined. This keeps your brownies tender. One common mistake is not measuring zucchini correctly. Too much zucchini can make the brownies soggy. Another mistake is baking at the wrong temperature. Always preheat your oven to 350°F (175°C) for even baking. Be careful not to open the oven door too soon. This can cause the brownies to sink in the middle. Lastly, don’t skip cooling time. Letting them cool helps set their texture. You can boost the flavor of your brownies with spices. A pinch of cinnamon adds warmth. For a kick, try a dash of cayenne pepper. Adding vanilla extract enhances sweetness without extra sugar. If you love nuts, sprinkle in some walnuts or pecans. They add crunch and flavor. Chocolate chips are also a great addition for extra richness. Try experimenting with different flavors to find your favorite mix. For the complete recipe, please refer to the Full Recipe section. {{image_2}} To make vegan zucchini brownies, swap the eggs with flax eggs. Mix 1 tablespoon of flaxseed meal with 2.5 tablespoons of water. Let it sit for 5 minutes to thicken. Use plant-based milk instead of regular milk. You can also replace coconut oil with a vegan butter. This keeps the brownies moist and rich. To make gluten-free brownies, use almond flour or gluten-free all-purpose flour. Both options work well. Check the flour package for a gluten-free label. You might need to adjust the liquid. Keep an eye on the batter's texture. It should still be thick but moist. For a healthier version, try reducing the sugar by half. You can also replace white sugar with maple syrup or honey. These options add flavor and a bit of moisture. Use applesauce instead of oil for a low-fat treat. This keeps the brownies soft and tender. Adding nuts or seeds can boost nutrition. They add a nice crunch and extra protein. For more details, you can refer to the Full Recipe. Store your zucchini brownies in an airtight container. This keeps them moist and fresh. Place a piece of parchment paper between layers to avoid sticking. Keep them at room temperature for up to three days. If you want them to last longer, refrigerate them. They can stay fresh in the fridge for up to a week. Freezing is a great way to save your brownies. First, let them cool completely. Then, cut them into squares. Wrap each square in plastic wrap. Place them in a freezer-safe bag or container. Label it with the date. You can freeze them for up to three months. To eat, just thaw them in the fridge overnight. To enjoy your brownies warm, reheat them in the oven. Preheat the oven to 350°F (175°C). Place the brownies on a baking sheet and cover with foil. Heat them for about 10 minutes. This warms them up without drying them out. You can also microwave a square for about 15-20 seconds. This makes them soft and gooey, just like fresh from the oven. Yes, you can use frozen zucchini. Thaw it and squeeze out extra water. This helps keep the brownies from getting too wet. Frozen zucchini works well since it still has good flavor. Check the brownies at 25 minutes. Insert a toothpick in the center. If it comes out with a few moist crumbs, they are done. If it has wet batter, bake a few more minutes. Remember, overbaking makes them dry. Zucchini adds moisture without many calories. It also packs fiber, vitamins, and minerals. This makes your brownies a bit healthier. Plus, you can sneak in vegetables without changing the taste much. Yes, you can use whole wheat flour or almond flour. These options add a different texture and flavor. Just keep in mind that this may change the taste slightly. Store them in an airtight container at room temperature. They stay fresh for about three days. For longer storage, place them in the fridge or freezer. Yes, you can. Use flax eggs or applesauce as a substitute. They help bind the ingredients together and keep the brownies moist. Absolutely! You can increase the cocoa powder or add more chocolate chips. This makes the brownies richer and more chocolatey. These brownies pair well with ice cream or whipped cream. You can also serve them with fresh fruit like strawberries or raspberries. This adds a nice contrast to the rich brownies. For the complete recipe, check out the Full Recipe section. In this post, we covered how to make delicious zucchini brownies. We explored key ingredients, baking steps, and tips for success. I shared variations like vegan and gluten-free options. Storing and reheating tips ensure your brownies stay fresh. Remember, using zucchini adds moisture and nutrition. Experiment with spices and toppings for more flavor. You now have all the tools to make perfect zucchini brownies. Enjoy the baking process and delight in the results!](https://mysavedrecipe.com/wp-content/uploads/2025/06/fd27540f-66e2-407e-b849-706fbbe77b9d-300x300.webp)