- Chipotle Honey Chicken Flavorful Grilled Delight
- Old Fashioned Strawberry Cake Creamy and Delicious Treat
- Sock It To Me Cake Delicious and Simple Recipe
- Easy Cheeseburger Sliders Tasty and Simple Recipe
- Air Fryer Chicken Tenders Simple Crispy Delight
- Homemade Margherita Pizza Simple and Delicious Recipe
- Buffalo Chicken Dip Comforting and Flavorful Delight
- Cheesy Broccoli Rice Casserole Flavorful and Easy Dish
- No-Bake Peanut Butter Bars Easy and Tasty Treat
- One-Pot Creamy Tuscan Chicken Flavorful Dinner Recipe
- Easy Sheet Pan Chicken Fajitas Flavorful and Quick Meal
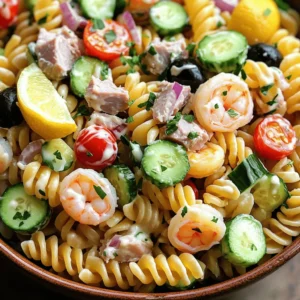
- Quick and Easy Seafood Pasta Salad Flavorful and Simple
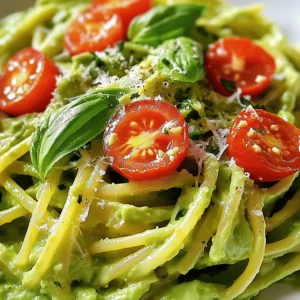
- Creamy Avocado Pasta Quick and Delightful Meal
- Cheesy Garlic Pull Apart Bread Flavorful Comfort Dish
- Spicy Sriracha Honey Wings Flavorsome and Easy Recipe
- Pumpkin Spice Latte Cupcakes Irresistible Fall Treat
- Classic Deviled Eggs Flavorful and Easy Recipe
- Air Fryer Chicken Tenders Crunchy and Delicious Recipe
- Caprese Pasta Salad Fresh and Flavorful Side Dish
- Decadent Ultimate Chocolate Fudge Brownies Recipe
- Sheet Pan Teriyaki Salmon Flavorful and Simple Dish
- Garlic Parmesan Roasted Potatoes Crispy and Tasty Dish
- Spicy Korean Chicken Flavorful and Easy Recipe
- Easy Chicken Enchiladas Quick and Tasty Meal
- Simple Caprese Salad Delight for Fresh Flavors
- Air Fryer Chicken Wings Crispy and Flavorful Recipe
- Buffalo Cauliflower Bites Crunchy and Flavorful Snack
- Creamy Avocado Pasta Simple and Healthy Recipe
- Cajun Chicken Alfredo Pasta Savory and Quick Delight
- Instant Pot Mac and Cheese Simple and Creamy Meal
- Loaded Nacho Casserole Flavorful Family Favorite Dish
- One-Pot Creamy Tuscan Pasta Quick and Flavorful Meal
- Coconut Curry Lentil Soup Flavorful and Nourishing Meal
- Fluffy Ricotta Pancakes Perfectly Light and Delicious
- Savory Stuffed Peppers Flavorful and Easy Recipe
- Instant Pot Chicken and Rice Easy Family Meal Recipe
- No-Bake Chocolate Oat Bars Delightful Sweet Treat
- Spicy Shrimp Tacos Flavorful and Easy Meal Recipe
- Creamy Tomato Basil Soup Hearty and Comforting Meal
- Lemon Blueberry Muffins Fresh and Flavorful Delight
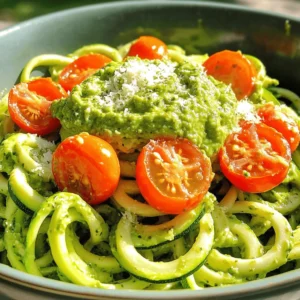
- Zucchini Noodles with Pesto Simple and Flavorful Dish
- Creamy Avocado Pasta Flavorful and Simple Dish

 in the next section. 1. Preheat the oven and prepare cake pans Heat your oven to 350°F (175°C). Grease and flour two 9-inch round cake pans. This helps the cakes come out easily. 2. Creaming the butter and sugar In a mixing bowl, beat the softened butter with granulated sugar. Mix until it becomes light and fluffy. This step adds air to your cake. 3. Adding eggs and vanilla Add the eggs to the butter and sugar mix, one at a time. Mix well after each addition. Then stir in the vanilla extract. This gives your cake great flavor. 1. Whisking together flour, baking powder, and salt In a separate bowl, whisk the flour, baking powder, and salt together. This ensures even mixing of dry ingredients. 2. Incorporating dry ingredients with wet mixture Gradually add the dry mix to the wet ingredients, alternating with the milk. Start and end with the flour mix. Stir until just combined. This keeps your cake light. 1. Gently folding in strawberries Carefully fold in the diced strawberries. Make sure they are evenly spread in the batter. This adds a fresh taste and color. 2. Baking time and testing for doneness Pour the batter into the prepared pans. Bake for 25-30 minutes. Use a toothpick to check if it comes out clean. This means your cakes are done. 1. Preparing the cream cheese frosting In a small bowl, beat the cream cheese, powdered sugar, and heavy cream together. Mix until smooth. This creates a rich frosting. 2. Layering the cake and frosting Once the cakes cool completely, place one layer on a plate. Spread frosting on top, then add the second layer. Frost the top and sides with the remaining frosting. Decorate with fresh strawberries. This makes your cake look beautiful. For a full recipe, check out the [Full Recipe]. To ensure a moist cake, use room-temperature eggs and butter. This helps the batter mix well. Also, do not overbake the cake. Check for doneness around 25 minutes. A toothpick inserted in the center should come out clean. For even baking, rotate your cake pans halfway through the baking time. This helps the heat circulate evenly. If your oven has hot spots, this step is key. Achieving the perfect frosting consistency requires the right ratio of cream cheese to heavy cream. Start with softened cream cheese and mix until smooth. Then, slowly add the powdered sugar. If it’s too thick, add more cream. For decorating, use fresh strawberries on top of the cake. Slice them and arrange them in a pretty pattern. You can also use whole strawberries for a stunning look. To avoid overmixing the batter, mix just until combined. Overmixing can make the cake tough. If you want to prevent a soggy cake, make sure your strawberries are well-drained. Excess moisture can affect the cake’s texture. You can also toss them in a bit of flour before folding them into the batter. Check the [Full Recipe] for more details. {{image_2}} You can make your old-fashioned strawberry cake even more exciting. One fun twist is to add lemon zest. This gives the cake a fresh and zesty flavor. Just a tablespoon of lemon zest can brighten the taste. It pairs well with strawberries. Feel free to experiment with other berries too. Raspberries, blueberries, or blackberries can change the flavor profile. Use the same amount as strawberries for a berry mix. Each berry brings its own unique taste to the cake. If you need gluten-free options, you can use alternative flours. Almond flour or coconut flour works great. Just keep in mind that these flours may change the texture. You might need to adjust the liquid in the recipe as well. For a dairy-free version, replace butter with coconut oil. Use almond milk or oat milk instead of regular milk. You can also use dairy-free cream cheese for the frosting. These swaps help everyone enjoy this treat. Making mini strawberry cakes is simple and fun. Start by using a muffin tin. Fill each cup with batter and bake for about 15-20 minutes. Once they cool, frost each mini cake with cream cheese frosting. Layered cakes are also a classic choice. Bake two or more layers and stack them. Spread frosting between layers for a tasty surprise. Decorate the top with fresh strawberries for a stunning look. These variations keep your cake fresh and exciting. You can find the full recipe at the beginning of this article. Enjoy these variations on your old-fashioned strawberry cake! To store leftovers, wrap the cake well in plastic wrap. This helps keep it moist. Place it in an airtight container to avoid any odors from the fridge. The best practice is to keep the cake in a cool spot. Enjoy your cake within four to five days for the best taste. You can freeze the cake layers for later use. First, let the layers cool completely. Wrap each layer in plastic wrap tightly, then in aluminum foil. This double wrapping keeps the cake fresh. To thaw, move the layers to the fridge overnight. For serving, let them sit at room temperature for a bit before frosting. The cake lasts about five days in the fridge. After that, it may start to spoil. Look for signs like a change in smell or a dry texture. If the strawberries start to look mushy, it's time to toss the cake. Enjoy your Old Fashioned Strawberry Cake while it’s fresh for the best flavor! Can I use frozen strawberries? Yes, you can use frozen strawberries. Just thaw them first. Drain any extra juice to avoid a soggy cake. This keeps the flavor strong and the texture nice. How can I make this cake in advance? You can bake the cake a day ahead. Let it cool, then wrap it well. Store it in the fridge. Frost it just before serving to keep it fresh. What type of frosting pairs best with strawberry cake? Cream cheese frosting is a great choice. It adds a rich flavor that complements the strawberries. You can also use whipped cream for a lighter touch. Can I make the cake without eggs? Yes, you can make this cake without eggs. Use unsweetened applesauce or mashed bananas instead. This makes it moist and keeps the right texture. How to adjust baking time for different pan sizes? For smaller pans, check the cake 5-10 minutes earlier. For larger pans, add about 5-10 minutes. Always test with a toothpick for doneness. What should I do if the cake sinks in the middle? If the cake sinks, it may be underbaked or overmixed. Ensure you mix just until combined. Also, check your oven temperature with a thermometer. What drinks pair well with strawberry cake? I love serving strawberry cake with iced tea or lemonade. Sparkling water adds a nice touch too. For adults, a light rosé or prosecco works well. How do I serve the cake for a gathering? Slice the cake into equal pieces. Place on a large platter. Garnish with fresh strawberries for a pretty look. This makes it inviting and delicious. For the [Full Recipe], check out the step-by-step guide above! This blog post covered everything you need for a delicious strawberry cake. We explored the key ingredients, step-by-step instructions, baking tips, and creative variations. I shared ways to store your cake and answered common questions. Now, you’re ready to bake a tasty treat that impresses friends and family. Whether you stick with classic strawberries or try something new, enjoy the process. Baking should be fun and rewarding. Dive in and create something delicious today!](https://mysavedrecipe.com/wp-content/uploads/2025/06/7eb2042e-eb47-41f8-81ad-8abf66a47019-300x300.webp)


![To make crispy air fryer chicken tenders, you need: - 1 pound chicken breast, cut into strips - 1 cup buttermilk (or milk with 1 tablespoon vinegar added) - 1 cup all-purpose flour - 1 teaspoon garlic powder - 1 teaspoon onion powder - 1 teaspoon smoked paprika - 1/2 teaspoon cayenne pepper (adjust to taste) - Salt and pepper, to taste - Cooking spray (or a little olive oil for brushing) You can swap some ingredients if needed: - Use chicken thighs instead of chicken breast for added flavor. - Try almond flour or panko for a gluten-free option. - Substitute Greek yogurt for buttermilk for a different tang. - Use any of your favorite spices, like Italian herbs or chili powder, for a twist. When measuring ingredients, accuracy helps: - For buttermilk, 1 cup equals about 240 ml. - If you lack buttermilk, mix 1 cup of milk with 1 tablespoon of vinegar. - Adjust cayenne pepper based on your spice level preference. - If you need fewer servings, cut the chicken and spices in half easily. This recipe is flexible, so feel free to experiment while keeping the core ingredients! Check out the Full Recipe for all the details you need. Start by soaking the chicken strips in buttermilk. This step is key. It keeps the chicken juicy and tender. Let the chicken sit for at least one hour. If you have time, marinate it overnight. The longer you wait, the better the flavor. In a separate bowl, mix the dry ingredients. Combine flour, garlic powder, onion powder, smoked paprika, cayenne pepper, salt, and pepper. Stir well so that all spices blend together. This mixture gives your chicken a tasty and crispy coating. After marinating, take the chicken from the buttermilk. Let the excess drip off. Dredge each chicken strip in the seasoned flour. Make sure every piece is well-coated. For extra crunch, dip the chicken back into the buttermilk and then into the flour again. This double coating adds a wonderful texture. Now you’re ready to cook! Check the [Full Recipe] for more details on the cooking process. To start, you need to preheat your air fryer. Set it to 400°F (200°C) for about 5 minutes. Preheating helps the chicken cook evenly and get crispy. Get this step right for the best result. After preheating, lightly spray the air fryer basket with cooking spray. Place the coated chicken tenders in a single layer. This allows hot air to circulate around each piece. Avoid overcrowding, or they won’t crisp up well. If you have many tenders, cook them in batches. Now it’s time to air fry the chicken tenders. Cook them for 10-12 minutes. Flip them halfway through to ensure even cooking. You want them golden brown and crispy. Use a meat thermometer to check the inside temperature. It should read 165°F (75°C) for safety. Once done, let them rest for a few minutes before serving. Enjoy your crispy chicken tenders! For the full recipe, check out the details above. {{image_2}} To make your chicken tenders extra crispy, use cold buttermilk. Cold helps the breading stick better. After coating, let them sit for 5-10 minutes. This helps the breading set. For an even crunchier texture, use panko breadcrumbs instead of regular flour. You can also add a bit of cornstarch to your flour mix for added crispiness. Cooking times may vary based on your air fryer model. Start with 10 minutes at 400°F (200°C). If they are not golden brown, add another 2 minutes. Always check the internal temperature. It should reach 165°F (75°C) to be safe. If your tenders are thicker, you may need a bit more time. These chicken tenders are perfect with a variety of dips. Honey mustard, ranch, or BBQ sauce work well. For a fun twist, serve them with a side of spicy aioli. Present them on a platter with fresh herbs for color. You can also add some crunchy veggies, like carrot sticks or celery, for a complete meal. For the full recipe, check out the details above. You can change the taste of your chicken tenders easily. Try adding herbs like thyme or rosemary for a fresh flavor. For a spicy kick, add more cayenne pepper or some hot sauce to the buttermilk. You can also use different spices, like Italian seasoning or curry powder, for a unique twist. Want a cheesy flavor? Mix grated Parmesan into the breading for a rich taste. Looking for a lighter option? Use whole wheat flour instead of all-purpose flour. This adds fiber and nutrients. You can also skip the breading entirely. Just marinate the chicken and air fry it for a crispy yet healthier meal. For added crunch, coat the chicken in crushed nuts or seeds. This gives you a nutritious boost while keeping it crunchy. Chicken tenders pair well with many sides. Serve them with a simple salad for a fresh touch. Sweet potato fries are a great option, too. They add sweetness and color to your plate. For a classic twist, try pairing them with creamy mashed potatoes. You can even serve them with a side of veggies like steamed broccoli or carrots for added nutrition. Check out the full recipe for more serving ideas! To store leftover chicken tenders, let them cool first. Place them in an airtight container. You can keep them in the fridge for up to three days. For longer storage, freeze them in a freezer bag. They can last for about three months in the freezer. Yes, you can reheat air fryer chicken tenders. The air fryer is great for this! Set it to 400°F (200°C) for about 5-7 minutes. This makes them crispy again. You can also use a microwave, but they will not be as crispy. Yes, you can use frozen chicken. However, thaw it first. It is best to marinate the chicken in buttermilk after thawing. This helps keep the meat juicy. You can follow the full recipe once the chicken is ready. This blog post guided you through making crispy air fryer chicken tenders. We started with essential ingredients, then moved on to step-by-step instructions for marinating and coating the chicken. Next, we covered the air frying method for perfect results. You learned valuable tips to boost crispiness and explored tasty variations. In closing, enjoy your crunchy chicken tenders and try different flavors. Your journey to delicious meals has just begun!](https://mysavedrecipe.com/wp-content/uploads/2025/06/073dec2f-1cae-440e-9c17-97bea6ab0db7-300x300.webp)
![To make a great Margherita pizza, you need some key items. Here’s what you will need: - 2 cups all-purpose flour - 1 teaspoon instant yeast - 1 teaspoon sugar - 3/4 cup warm water (110°F) - 1 teaspoon salt - 1 tablespoon olive oil - 1 cup canned San Marzano tomatoes, crushed - 1 cup fresh mozzarella cheese, sliced or torn - Fresh basil leaves - Salt and pepper to taste - Extra virgin olive oil for drizzling Each ingredient plays a role in making the pizza taste amazing. The flour gives the crust structure. Instant yeast helps it rise. The sugar feeds the yeast. Warm water activates the yeast, while salt adds flavor. Olive oil adds richness to the dough. If you can’t find an ingredient, don't worry! You can swap some items. For flour, you can use bread flour for a chewier crust. If you lack San Marzano tomatoes, any canned tomatoes will work. You can use mozzarella cheese, but block cheese will melt better than pre-shredded. For basil, use dried herbs if fresh isn't available. Just remember, the taste will change slightly. Fresh ingredients are key to a great pizza. Fresh mozzarella melts beautifully, giving a creamy texture. Fresh basil adds a bright flavor. Using ripe tomatoes gives the sauce a rich taste. When you use fresh items, your pizza will taste better. Always try to buy ingredients that are in season. This way, you get the best flavor. Trust me, your taste buds will thank you! For the full recipe, check the [Full Recipe] section. To start, gather your ingredients. You will need 2 cups of all-purpose flour, 1 teaspoon of instant yeast, 1 teaspoon of sugar, 3/4 cup of warm water, 1 teaspoon of salt, and 1 tablespoon of olive oil. In a large bowl, mix the flour, yeast, sugar, and salt. Slowly add the warm water and olive oil. Stir until a shaggy dough forms. Next, transfer the dough to a floured surface. Knead it for about 8-10 minutes until it feels smooth and elastic. Form the dough into a ball. Place it in a lightly oiled bowl and cover it with a damp cloth. Let it rise in a warm spot for 1-2 hours, or until it doubles in size. While your dough rises, it’s time to prepare the sauce. Use 1 cup of canned San Marzano tomatoes, crushed. In a small bowl, mix the crushed tomatoes with salt and pepper to taste. This simple sauce enhances the fresh flavors of your pizza. Set it aside until you are ready to assemble the pizza. Once your dough has risen, punch it down. Transfer it back to the floured surface, and divide it into two equal pieces. Shape each piece into a ball and let them rest for a few minutes. Then, stretch each ball into a 12-inch circle using your hands or a rolling pin. Preheat your oven to its highest setting, usually between 475°F and 500°F. If you have a pizza stone, place it in the oven to heat up. Now, place the stretched dough on a pizza peel or an inverted baking sheet that has flour sprinkled on it. Spread a thin layer of your seasoned tomato sauce over the dough, leaving a small border around the edge. Next, add 1 cup of sliced or torn fresh mozzarella evenly over the sauce. Don’t forget to top it with fresh basil leaves for that authentic touch. Carefully slide the pizza onto the preheated stone or a baking sheet. Bake it for 8-12 minutes until the crust is golden and the cheese bubbles. When it’s ready, drizzle a bit of extra virgin olive oil on top. You can also add more fresh basil leaves if you like. Let it cool for a few minutes before slicing into your delicious homemade Margherita pizza. For the full recipe, check the previous section! To get the right dough, mix your dry ingredients well. Start with flour, yeast, sugar, and salt. Then, slowly add warm water and olive oil. This creates a shaggy dough. Knead it on a floured surface for 8-10 minutes. You want it smooth and elastic. When done, it should spring back when poked. If the dough feels sticky, add a little flour. If it feels too dry, add a splash of water. A hot oven is key for a crispy crust. Preheat yours to the highest setting, around 475°F to 500°F. If you have a pizza stone, place it in the oven to heat up. This helps achieve that nice crunch. Use a pizza peel or an inverted baking sheet to slide the pizza into the oven. Bake for 8-12 minutes. Watch for a golden crust and bubbling cheese. If you like extra crisp, bake a minute longer. For an authentic taste, use high-quality ingredients. Start with San Marzano tomatoes for your sauce. They have a sweet flavor that shines. Fresh mozzarella is a must; it melts beautifully. Don’t forget fresh basil for that burst of herbal goodness. Drizzle with extra virgin olive oil before serving. This adds a rich finish. Feel free to experiment with spices like oregano or crushed red pepper for a personal touch. {{image_2}} You can change your Margherita pizza with many toppings. Try adding pepperoni for spice. Fresh arugula adds a nice peppery taste. If you love veggies, add sliced bell peppers or onions. Mushrooms bring an earthy flavor that pairs well with cheese. You can also switch to different cheeses, like goat cheese or provolone. Each topping creates a unique flavor and makes your pizza special. If you need gluten-free dough, there are easy swaps. Use gluten-free flour blends instead of all-purpose flour. Many brands sell ready-to-use gluten-free pizza dough. Check for a brand that tastes good and fits your needs. You can also make your own dough with almond flour or cauliflower. These options yield great crusts that still taste amazing. Herbs and spices can elevate your pizza's taste. Try adding crushed red pepper for heat. Fresh oregano is a classic herb that pairs well with tomatoes. You can sprinkle garlic powder for a rich flavor. Fresh thyme or rosemary also adds a nice touch. Don’t forget to experiment! Find what you love and make the pizza truly yours. For a full recipe, check out the Classic Margherita Pizza . To keep leftover pizza fresh, wrap each slice in plastic wrap. You can also use aluminum foil. Place the wrapped slices in an airtight container. Store them in the fridge for up to three days. This helps keep the flavors and texture intact. To reheat your pizza, your oven is your best friend. Preheat it to 375°F. Place the pizza slices directly on the oven rack. Heat for about 10 minutes. This helps to crisp the crust and melt the cheese. If you're short on time, use a microwave. Place the slice on a plate and cover it with a damp paper towel. Heat for about 30 seconds. For long-term storage, freezing is great. First, let the pizza cool completely. Then, wrap each slice tightly in plastic wrap. After wrapping, place the slices in a freezer bag. Remove as much air as possible. You can freeze the pizza for up to three months. To enjoy, just thaw in the fridge overnight and reheat as mentioned above. Remember, these tips help you keep your homemade Margherita pizza tasting its best. For the full recipe, check out the previous sections. Making homemade Margherita pizza takes about 2 hours and 30 minutes. This time includes prep, dough rising, and baking. The dough needs about 1 to 2 hours to rise. You will spend another 30 minutes to prepare and bake the pizza. Yes, you can use store-bought dough for Margherita pizza. It saves time and still tastes good. Just roll it out and follow the same steps for sauce and toppings. This option is great for busy days when you want pizza fast. The best cheese for Margherita pizza is fresh mozzarella. It melts well and has a soft texture. You can also use burrata for a creamier taste. Both options give you that classic Margherita flavor. For the best result, choose high-quality cheese. For the full recipe, check out the Classic Margherita Pizza section above! Making Margherita pizza at home is fun and rewarding. You learned about key ingredients, like fresh tomatoes and basil, and how to make the perfect dough. We also covered tips for a crispy crust and tasty variations. Remember, fresh ingredients make a big difference. Enjoy customizing your pizza with fun toppings. Whether you're storing leftovers or wondering about dough options, you've got answers. Now, get ready to impress your friends and family with your pizza-making skills!](https://mysavedrecipe.com/wp-content/uploads/2025/06/0dc8057a-cf99-4bb5-a339-89a84dc9072a-300x300.webp)
![- 2 cups cooked chicken, shredded - 1 (8 oz) package cream cheese, softened - 1 cup buffalo sauce (adjust for spice level) - 1 cup shredded cheddar cheese - 1/2 cup ranch dressing - 1/4 cup green onions, sliced (plus extra for garnish) - Tortilla chips or celery sticks for serving Buffalo chicken dip needs simple ingredients. I love using shredded rotisserie chicken for ease. You can also cook your chicken at home. Just boil or bake it. The cream cheese gives the dip a smooth texture. It blends well with the chicken and sauce. The buffalo sauce brings the heat and flavor. Adjust it to match your spice level. Shredded cheddar adds a rich taste. It melts wonderfully on top. Ranch dressing balances the spice nicely. It makes the dip creamy and tangy. Lastly, green onions add a fresh crunch. They also look great on top. I suggest using tortilla chips for dipping. Celery sticks are a great fresh option too. For the full recipe, check out the instructions that follow. Enjoy making this delightful dish! - Preheat the oven to 350°F (175°C). - In a large mixing bowl, combine the softened cream cheese, shredded chicken, buffalo sauce, ranch dressing, and half of the shredded cheddar cheese. - Mix well until all ingredients are creamy and well combined. This step is key. You want a smooth blend that will create a rich flavor. The cream cheese adds a nice base, while the buffalo sauce gives it that signature kick. - Transfer the mixture to a baking dish, spreading it evenly. - Top with the remaining shredded cheddar cheese and sliced green onions. - Bake in the preheated oven for 20-25 minutes or until bubbling and cheese is melted. Baking brings everything together. The heat melds the flavors, and the cheese gets all gooey and golden. When you pull it out of the oven, let it cool slightly. This dip is best served warm. Enjoy it with tortilla chips or celery sticks for a crunch that complements the creamy dip. For the full recipe, check [Full Recipe]. Choosing the right chicken is key. You can use cooked chicken or rotisserie chicken. Rotisserie chicken adds great flavor and saves time. Shred it well for a smooth texture. Adjust the spice level with buffalo sauce. Start with a cup for a medium heat. If you like it spicier, add more sauce. For milder taste, use less sauce. You can also mix in some ranch dressing to tone down the heat. Letting the dip sit before serving helps the flavors blend. After baking, let it cool for about 10 minutes. This cooling time also helps the dip firm up a bit. For dipping, tortilla chips work great, but celery sticks offer a fresh crunch. Tortilla chips add a rich flavor, while celery sticks give a crisp, cool taste. Pair your buffalo chicken dip with drinks like beer or soda. It also goes well with other appetizers like veggie trays or sliders. If you have leftover dip, get creative! Use it in sandwiches or as a topping for baked potatoes. You can even mix it into pasta for a spicy twist. For the full recipe, check out the details above! {{image_2}} When it comes to Buffalo chicken dip, you can be as creative as you want. You can play around with flavors and textures to make it your own. If you like heat, adding jalapeños can spice things up. Just chop them finely and mix them in with the other ingredients. If you want a unique taste, try different sauces. For example, a smoky chipotle sauce can give your dip a rich flavor. You can also mix in barbecue sauce for a sweet twist. For those looking to lighten things up, swap regular cream cheese for low-fat cream cheese. You can also use low-fat ranch dressing to cut calories. Another great idea is to add vegetables. Chopped spinach or bell peppers add color and nutrients. They also enhance the flavor without adding too many calories. These variations keep the dip fun and fresh. You can enjoy it your way, whether you like it hot or healthy. Check out the [Full Recipe] for more tasty ideas! To keep Buffalo Chicken Dip fresh, use an airtight container. Glass or plastic containers work great. Make sure to let the dip cool before sealing it. You can store leftovers in the fridge for up to four days. If you want to keep it longer, freeze the dip. Use freezer-safe containers, leaving some space for expansion. Frozen dip can last up to three months. When you’re ready to enjoy the dip again, reheating is simple. The best method is to use the oven. Preheat it to 350°F (175°C). Place the dip in an oven-safe dish. Heat for about 15-20 minutes until hot. You can also use the microwave, but be careful. Heat it in short bursts, stirring often. This helps avoid drying out the dip. Add a splash of ranch dressing or buffalo sauce if it seems too thick. Enjoy your comforting and flavorful delight! You can store Buffalo Chicken Dip in the fridge for up to three days. Be sure to keep it in an airtight container. If you want to save it longer, freeze it. It can last in the freezer for about two months. Just remember to let it cool before freezing. Yes, you can make Buffalo Chicken Dip ahead. Simply prepare it, but do not bake it. Cover the dish and store it in the fridge. When you are ready to enjoy it, just bake it as directed. This way, you have a fresh dip without all the last-minute work. If you don't have ranch dressing, don't worry! You can use blue cheese dressing instead. You can also mix sour cream with a bit of garlic powder and herbs for a homemade substitute. This will give you a tasty dip with a different twist. Yes, this recipe can be gluten-free! Just make sure to use gluten-free ranch dressing and buffalo sauce. Many brands offer these options. Always check the labels to be sure. You can enjoy this dip with gluten-free tortilla chips or veggie sticks. Buffalo Chicken Dip comes together with simple ingredients. You mix cooked chicken, cream cheese, and buffalo sauce for a tasty treat. Bake it until cheese melts, and serve with chips or celery sticks. You can adjust spice levels and even go for healthier choices. Store leftovers in tight containers and reheat carefully. This dip is great for parties or game nights. Remember, you can make it ahead and enjoy its flavors fully. Now you're set to impress at your next gathering!](https://mysavedrecipe.com/wp-content/uploads/2025/06/c2d2f29c-6c9b-4791-971e-7c816b0b402a-300x300.webp)

![- 1 cup creamy peanut butter - 1/2 cup honey or maple syrup - 1 teaspoon vanilla extract - 2 cups rolled oats - 1/2 cup dark chocolate chips - 1/4 cup unsweetened cocoa powder - Pinch of salt - Medium saucepan - Baking dish (8x8 inch) - Parchment paper - Spatula You need simple ingredients to make these no-bake peanut butter bars. The star is creamy peanut butter, which gives the bars their smooth texture and rich taste. Honey or maple syrup acts as a sweetener and binds the mixture. Vanilla extract adds a nice touch of flavor. Rolled oats provide a hearty base and make the bars filling. Dark chocolate chips melt into the mix for a sweet and slightly bitter contrast. Unsweetened cocoa powder deepens the chocolate flavor. Finally, a pinch of salt balances the sweetness. For equipment, you will need a medium saucepan to mix and heat the ingredients. An 8x8 inch baking dish is perfect for shaping the bars. Parchment paper helps with easy removal. A spatula is key for mixing and spreading the mixture evenly. This simple setup allows you to create a tasty treat quickly. You can find the full recipe above to guide you through each step. - In a medium saucepan, combine 1 cup of creamy peanut butter, 1/2 cup of honey, and 1 teaspoon of vanilla extract over low heat. - Stir the mix until it's smooth and well blended. - Remove the pan from the heat. - Add 2 cups of rolled oats, 1/4 cup of unsweetened cocoa powder, and a pinch of salt. - Mix until everything is fully incorporated. - Fold in 1/2 cup of dark chocolate chips. - Line an 8x8 inch baking dish with parchment paper. Leave some overhang for easy removal. - Pour the peanut butter mixture into the dish. - Spread it out evenly with a spatula. - Press the mix down firmly to pack it tightly. - Refrigerate the bars for at least 2 hours. - Once firm, lift the bars out using the parchment paper. - Cut them into squares or rectangles. These no-bake peanut butter bars are easy to make and oh so tasty! For the complete recipe, check out the [Full Recipe]. Enjoy your delicious treat! To make the perfect no-bake peanut butter bars, start with a smooth mixture. Heat your peanut butter, honey, and vanilla gently in a medium saucepan. This helps them blend well. Once mixed, pour in the oats, cocoa powder, and salt. Mix until combined. After this, you need to press the mixture down well in the baking dish. This step ensures the bars hold their shape when you cut them. One common mistake is not chilling the bars long enough. They need at least two hours in the fridge to firm up. If you cut them too soon, they may fall apart. Another mistake is overmixing the ingredients. This can make the bars tough instead of soft and chewy. Mix just until combined for the best texture. You can enhance the flavor of your bars in fun ways. Try using different nut butters like almond or cashew. Each nut butter adds its unique taste. Another idea is to sprinkle a bit of sea salt on top before chilling. This small addition can make the flavors pop and give your bars a gourmet touch. For the full recipe, check the detailed steps above. {{image_2}} You can make these bars even more fun. Try adding dried fruit like raisins or cranberries. These fruits give a nice chew and add sweetness. You can also mix in some nuts or seeds. Chopped walnuts or sunflower seeds bring a crunch that makes each bite exciting. If you want to make these bars vegan, swap honey for maple syrup. Also, use dairy-free chocolate chips. This keeps the flavor great while meeting vegan needs. For those who are gluten-free, make sure to use gluten-free oats. This way, everyone can enjoy these tasty treats without worry. Serve these bars with fresh fruit or yogurt for a bright touch. Sliced bananas or berries work well. If you want to make them extra special, drizzle some chocolate on top. This adds a sweet touch and makes them look fancy. Try these ideas to enhance your no-bake peanut butter bars. For the complete recipe, check out the Full Recipe. To keep your no-bake peanut butter bars fresh, store them in an airtight container. Make sure to refrigerate them right away. This will help them stay firm and tasty. I also recommend placing parchment paper between layers. This prevents sticking and makes it easy to grab a bar when you want one. These bars stay fresh for up to one week. After that, they might lose their great taste and texture. Look for signs of spoilage. If the bars smell off or feel too soft, it’s best to toss them. If you want to keep your bars longer, you can freeze them. Wrap each bar in plastic wrap and place them in a freezer-safe bag. This way, they last for about three months. When you’re ready to eat, thaw them in the fridge overnight. Enjoy the same great taste! Making no-bake peanut butter bars is quick and easy. You need about 10 minutes to prep. After mixing, chill the bars for at least 2 hours. This makes the total time around 2 hours and 10 minutes. You can enjoy these tasty treats in no time! Yes, you can use crunchy peanut butter! It adds a nice texture and a bit more crunch. The taste will also change slightly. Creamy peanut butter gives a smooth bar, while crunchy offers a fun bite. Choose whichever you prefer! If you lack honey or maple syrup, you have options. You can try agave syrup or brown rice syrup. Both will add sweetness. You might also use granulated sugar, but dissolve it in a bit of water first. This way, your bars will still be sweet and yummy! Absolutely! These bars are great for kids. They have healthy fats from peanut butter and fiber from oats. Plus, they are easy to make. Kids love the chocolate chips too! These bars are a tasty treat that also packs some nutrition. You can easily make no-bake peanut butter bars at home. Start with simple ingredients like peanut butter, oats, and honey. Follow the clear steps outlined for mixing and chilling the bars. Remember to avoid overmixing and ensure they chill long enough. In the end, these bars are not only tasty but also flexible. Try different flavors and store them right to enjoy longer. With practice, you will make the perfect treat that everyone loves. Now, enjoy your delicious creation!](https://mysavedrecipe.com/wp-content/uploads/2025/06/8ad4c2f3-2e44-4c67-ac9c-5354e6dd5e84-300x300.webp)
![- 4 boneless, skinless chicken thighs - 2 tablespoons olive oil - 1 teaspoon garlic powder - 1 teaspoon Italian seasoning - Salt and pepper to taste - 1 cup cherry tomatoes, halved - 1 cup fresh spinach - 1 cup heavy cream - 1 cup chicken broth - ½ cup grated Parmesan cheese - 1 teaspoon red pepper flakes (optional) - 12 oz penne pasta To make One-Pot Creamy Tuscan Chicken, gather these ingredients first. The chicken thighs are the star of the dish. They stay juicy and tender when cooked. Olive oil adds flavor and helps in browning the chicken. Garlic powder and Italian seasoning give it a great taste. Next, the cherry tomatoes and fresh spinach add color and nutrition. Heavy cream makes the sauce rich and creamy. Chicken broth adds depth. Parmesan cheese brings a nutty flavor. Red pepper flakes give a hint of heat, but you can skip them if you want. Finally, the penne pasta rounds out the meal. - Additional grated Parmesan - Fresh basil leaves Garnishing is key for presentation. Extra Parmesan gives a creamy finish. Fresh basil adds a pop of green and freshness. These toppings make your dish not just tasty, but beautiful too. For the full experience, check out the Full Recipe. - Seasoning the chicken thighs First, take your chicken thighs and season them well. Use garlic powder, Italian seasoning, salt, and pepper. This step adds a lot of flavor. Make sure to coat each piece evenly. - Searing the chicken Next, heat the olive oil in a large pot. Once hot, add the chicken thighs. Sear them until they turn golden brown. This should take about 5-6 minutes on each side. Once done, remove the chicken and set it aside. - Sautéing cherry tomatoes In the same pot, add the halved cherry tomatoes. Sauté them for 2-3 minutes. They'll soften and release their juices. This adds a sweet flavor to your sauce. - Adding spinach and simmering broth Now, stir in the fresh spinach. Cook it until it wilts, which takes about 1-2 minutes. After that, pour in the chicken broth and bring it to a simmer. This step will build the base of your sauce. - Incorporating cream and cheese Once simmering, add the heavy cream and grated Parmesan cheese. If you like some heat, toss in red pepper flakes. Stir everything together well. The sauce should start to thicken. - Cooking pasta with chicken Finally, add the penne pasta into the pot. Make sure it's submerged in the sauce. Place the seared chicken thighs back on top. Cover the pot and cook on low heat for 15-20 minutes. The pasta should be tender, and the chicken will be fully cooked. This One-Pot Creamy Tuscan Chicken recipe is simple, yet it delivers fantastic flavors with minimal cleanup. For the complete recipe, check the [Full Recipe]. To make your dish extra creamy, choose heavy cream. It blends well with flavors and adds richness. If you want a lighter option, you can use half-and-half. This will still give you a nice creaminess. Adjusting cheese is key for perfect flavor. Use fresh grated Parmesan. It melts better than pre-grated cheese. You can mix in other cheeses like mozzarella for a different taste. Just add it in the last few minutes of cooking. To ensure your chicken is cooked just right, check the internal temperature. It should reach 165°F. Use a meat thermometer for best results. This ensures your chicken stays juicy and safe to eat. If you prefer other cooking methods, you can grill or bake the chicken. Grilling will add a smoky flavor. Baking keeps it tender. Just remember to adjust cooking time if you change methods. For the full recipe, check the earlier section. Enjoy your cooking! {{image_2}} You can make this dish even better by adding vegetables. Try bell peppers, zucchini, or broccoli. They add color and crunch. You can toss them in right after the chicken. Sauté them until tender before you add the cream. You can also think about using seasonal veggies. Fresh asparagus in spring or butternut squash in fall can change the dish. Just remember to adjust the cooking time so they stay crisp. If you want to switch up the protein, shrimp or sausage works well. For shrimp, add them after the tomatoes but before the cream. Cook them until they turn pink. For sausage, slice it and brown it along with the chicken. If you prefer a vegetarian option, mushrooms are a great choice. Use cremini or portobello for a meaty texture. Sauté them with the tomatoes for a rich flavor. This way, you keep the dish exciting and tasty. Check out the Full Recipe for more ideas! To store leftovers, let the dish cool first. Place it in an airtight container. This keeps it fresh for up to three days. I recommend using glass containers. They do not absorb smells and are easy to clean. For reheating, the best methods are the stovetop or microwave. On the stovetop, use low heat. Stir often to keep it creamy. If using the microwave, heat in short bursts. Stir in between to avoid hot spots. Adding a splash of cream can help maintain creaminess. This keeps the dish rich and smooth. Enjoy your leftovers just as much as the first meal! How to make One-Pot Creamy Tuscan Chicken gluten-free? You can make this dish gluten-free by using gluten-free pasta. Many brands offer great options that taste just as good. Just be sure to check the package for cooking times, as they may differ from regular pasta. Can I use frozen chicken thighs for this recipe? Yes, you can use frozen chicken thighs. However, it’s best to thaw them first. This helps them cook evenly and makes the dish more flavorful. What can I serve with One-Pot Creamy Tuscan Chicken? This dish pairs well with a simple green salad or steamed vegetables. You might also enjoy garlic bread or a light pasta side. How long does it take to make One-Pot Creamy Tuscan Chicken? This dish takes about 35 minutes total. You’ll spend 10 minutes prepping and 25 minutes cooking. It’s quick and perfect for busy nights. Can I make this dish ahead of time? Yes, you can make it ahead. Cook the dish, let it cool, and store it in the fridge. Reheat it when you’re ready to enjoy. Is it possible to freeze One-Pot Creamy Tuscan Chicken? Yes, this dish freezes well. Just let it cool completely before transferring it to a freezer-safe container. When you’re ready to eat, thaw it in the fridge and reheat on the stove. For the complete recipe, check out the Full Recipe. This blog post covered how to make One-Pot Creamy Tuscan Chicken with various ingredients. You learned about key steps, storage tips, and answers to common questions. The dish is simple and can be adjusted to fit your taste. Incorporate your favorite veggies or use shrimp for a twist. Enjoy this easy, flavorful meal any time!](https://mysavedrecipe.com/wp-content/uploads/2025/06/f23cd5b1-fcbe-4cee-9d4c-e8580efa1843-300x300.webp)

![To make creamy avocado pasta, you'll need some simple ingredients. Here’s what you will need: - Ripe avocados: 2 - Garlic: 3 cloves, minced - Lemon juice: 1 tablespoon - Fresh basil leaves: 1/4 cup - Grated Parmesan cheese: 1/4 cup (or nutritional yeast for vegan option) - Fettuccine or spaghetti: 8 ounces - Olive oil: 1/4 cup - Salt and pepper: to taste - Cherry tomatoes: halved (for garnish) - Extra basil leaves: for garnish These fresh ingredients create a rich, creamy sauce that brings out the best flavors. Ripe avocados give the dish its smooth texture. Garlic adds a nice kick. Lemon juice brightens the dish, while basil gives a fresh taste. You can use grated Parmesan or switch to nutritional yeast for a vegan version. The olive oil helps blend everything smoothly. I love adding cherry tomatoes for a pop of color and taste. They make the dish look beautiful and add a sweet touch. You can find the full recipe to guide you through every step. - Bring a large pot of salted water to a boil. - Cook the fettuccine or spaghetti until al dente. Start by filling a pot with water. Add a good amount of salt. I use about a tablespoon for flavor. Once it boils, toss in your pasta. Stir it up so it doesn’t stick. Check the package for cooking time. You want it firm but not hard. When done, save a cup of water. Drain the rest and set the pasta aside. - Blend avocados, garlic, lemon juice, basil, and Parmesan. - Add olive oil and adjust consistency. Now, grab your food processor. Cut the ripe avocados in half and scoop them out. Add the avocados, garlic, lemon juice, basil, and Parmesan to the bowl. Blend until smooth. You want a creamy texture. While blending, drizzle in olive oil. This makes it even silkier. If it’s too thick, add some of that reserved pasta water. Blend again until it’s just right. - Toss pasta with avocado sauce. - Adjust with reserved pasta water if necessary. In a big mixing bowl, add your pasta. Pour the creamy avocado sauce over it. Use tongs or a spoon to mix it well. If the sauce is too thick, add more pasta water. This helps coat the pasta nicely. Taste it! Adjust salt and pepper as needed for flavor. This creamy avocado pasta is ready to enjoy. It looks bright and tastes amazing! For the full recipe, check out the details above. To get that perfect creamy texture, start with ripe avocados. They should feel soft but not mushy. When you blend them, add lemon juice right away. This keeps the color bright and adds taste. If the sauce is thick, pour in some of the reserved pasta water. Blend again until smooth. Be sure to taste as you go. Add salt and pepper gradually. This step helps you reach the flavor balance you want. For a beautiful presentation, serve the pasta in a large bowl. Drizzle olive oil on top for shine. Sprinkle more Parmesan or nutritional yeast to enhance the look. Fresh garnishes make a big difference too! Use halved cherry tomatoes and extra basil leaves. These add color and freshness. If you want a heartier meal, mix in protein like grilled chicken or shrimp. This turns your creamy avocado pasta into a filling dish that everyone will love. For the complete recipe, check out the [Full Recipe]. {{image_2}} You can make this dish vegan by swapping Parmesan cheese with nutritional yeast. Nutritional yeast adds a cheesy flavor without dairy. You can use about 1/4 cup to match the taste. This simple swap makes the dish creamy and rich. For a fully vegan experience, check your pasta. Some brands add eggs, so look for pasta marked vegan. Also, use fresh veggies like spinach or arugula for extra nutrients. If you need a gluten-free option, choose gluten-free pasta like rice or quinoa noodles. These alternatives work well with the creamy avocado sauce. When using gluten-free pasta, follow the package instructions. Cooking times may differ, so keep an eye on it. Rinse the pasta briefly after cooking to avoid sticking. To jazz up your creamy avocado pasta, try adding spices like red pepper flakes or smoked paprika. These spices give a nice kick to the dish. Seasonal ingredients can also help. In summer, toss in fresh tomatoes or corn. In fall, add roasted butternut squash or pumpkin. These swaps make the dish exciting and fresh while keeping it creamy. For the full recipe, check the earlier section. Enjoy making this delightful meal! To store leftovers, place the creamy avocado pasta in an airtight container. This helps keep it fresh. You can keep it in the fridge for up to three days. If you notice that the pasta starts to brown, that’s normal. The avocado may oxidize, but it still tastes great. For reheating, use a microwave or stovetop. If using the microwave, heat it for 30 seconds at a time, stirring in between. This helps heat it evenly. If you use the stovetop, add a splash of water or olive oil to avoid drying out. Be careful not to overcook the pasta. This could make it mushy and less tasty. Enjoy your creamy avocado pasta warm and fresh! For the complete dish, check the full recipe. If you don’t have avocados, you can use silken tofu. It gives a similar creaminess. You can also try mashed banana, though it will change the flavor. Another option is cashew cream, made by blending soaked cashews with water. Each substitute will create a different taste, but they can work in a pinch. Yes, you can prepare this dish ahead of time. Cook the pasta and make the avocado sauce separately. Store them in the fridge for up to two days. When you are ready to eat, combine them and heat gently. Just be careful not to overcook the pasta. You can add a splash of pasta water to revive the sauce. Creamy avocado pasta is quite healthy! Avocados are full of good fats, fiber, and vitamins. They can help with heart health and digestion. This dish also includes garlic and basil, both of which have health benefits. Overall, it’s a tasty way to enjoy a nutritious meal. In this article, I shared a simple way to make creamy avocado pasta. You learned about the ingredients and steps needed to prepare it. I discussed tips to perfect the texture and how to serve it nicely. Variations like vegan and gluten-free options were highlighted, along with storage tips. This pasta dish is tasty, healthy, and versatile. You can easily make it your own while enjoying the rich flavors of avocados. I hope you try this recipe soon!](https://mysavedrecipe.com/wp-content/uploads/2025/06/c19706a9-5e79-4299-b286-dd731c6cb435-300x300.webp)
![- 1 loaf of Italian or French bread - 1 cup shredded mozzarella cheese - 1 cup shredded cheddar cheese - 1/2 cup unsalted butter, melted - 4 cloves garlic, minced - 1 tablespoon fresh parsley, finely chopped - 1/2 teaspoon dried oregano - Salt and black pepper to taste - Optional: red pepper flakes for added spice To make Cheesy Garlic Pull Apart Bread, you need a few key ingredients. The base is one loaf of Italian or French bread. This bread gives a nice texture and flavor. You also need a cup each of shredded mozzarella and cheddar cheese. These cheeses melt well and create that gooey goodness we love. Next, you’ll whip up a garlic butter mixture. For this, melt half a cup of unsalted butter. Add in four cloves of minced garlic for a punch of flavor. This mixture infuses the bread with rich, savory notes. Don’t forget the seasonings! Use one tablespoon of fresh parsley, finely chopped. It adds a fresh touch. You also need half a teaspoon of dried oregano. Finally, season with salt and black pepper to taste. If you like spice, add red pepper flakes. These ingredients create a delightful balance of flavors. These simple yet bold ingredients make the dish special. For the full recipe, check out [Full Recipe]. Enjoy the process of making this cheesy, garlicky delight! - Preheat your oven to 350°F (175°C). - In a small bowl, mix the melted butter, minced garlic, chopped parsley, oregano, salt, and black pepper. If you want it spicy, add red pepper flakes. To cut the loaf properly, start by placing it on a clean cutting board. Slice it horizontally and vertically. Make small cuts, like a grid, but do not cut all the way through the bottom crust. This keeps the loaf intact while allowing the flavors to seep in. Now for the fun part! Take your garlic butter mixture and drizzle it into each cut of the bread. Use a spoon or pastry brush for this. Make sure each section gets enough butter. Next, stuff the shredded mozzarella and cheddar cheese into the cuts. Spread the cheese evenly throughout the loaf for the best flavor. Wrap the prepared bread tightly in aluminum foil. This keeps it moist while baking. Place it on a baking sheet to catch any drips. Bake in the preheated oven for 15-20 minutes. You want the cheese to melt and the bread to toast. For a golden finish, unwrap the foil and bake for 5 more minutes. Enjoy your delicious Cheesy Garlic Pull Apart Bread! Check out the Full Recipe for more details. For the best taste, use fresh herbs. Fresh parsley and oregano add bright notes. Dried herbs work too but lack the same punch. When it comes to cheese, balance is key. I love mixing mozzarella and cheddar. Mozzarella adds stretch, while cheddar brings sharpness. This combo makes each bite rich and flavorful. To get that cheese melting just right, place the bread in the center of the oven. The heat should surround it evenly. Wrapping the bread in aluminum foil helps keep moisture in. This makes the cheese gooey inside, while the crust gets crispy. For extra crunch, unwrap the bread for the last few minutes. This gives you a golden, crunchy crust that everyone will love. Dips can make your Cheesy Garlic Pull Apart Bread even better. Try serving it with marinara sauce or a creamy ranch dip. These add great flavor contrasts. This dish shines at parties or family gatherings. It’s perfect for game nights or movie marathons. Everyone loves tearing off pieces and sharing. For the full recipe, check out the instructions above to create this crowd-pleaser. {{image_2}} You can change the cheese for different flavors. Try using gouda or pepper jack for a twist. You can also mix in cream cheese for a richer taste. If you want a healthier option, use low-fat cheese. For the bread, Italian or French works best. But you can also try sourdough or whole wheat. Each bread type gives a different flavor and texture. Add herbs like thyme or rosemary to boost the taste. You can also use spices like smoked paprika for depth. If you want a kick, black pepper or red pepper flakes work great. Incorporating vegetables can add a fun twist. Try adding sautéed spinach or roasted peppers. You could also mix in cooked bacon or ham for a savory bite. For holidays, shape the bread into festive forms. You can twist it into a wreath or roll it into a log. This adds a fun touch to your table. Explore cultural twists too. For a Mediterranean flair, add feta cheese and olives. Or, mix in sun-dried tomatoes for a burst of flavor. Each theme brings its own unique taste to the dish. For the full recipe, check out the earlier sections. To keep Cheesy Garlic Pull Apart Bread fresh in the refrigerator, wrap it tightly in plastic wrap or aluminum foil. This keeps the bread from drying out. Place it in an airtight container for extra protection. It can last up to 3 days in the fridge. For long-term storage, you can freeze the bread. First, let it cool completely. Then, wrap it in plastic wrap and aluminum foil. This double wrapping prevents freezer burn. You can store it in the freezer for up to 3 months. When you're ready to enjoy it, thaw it in the fridge overnight. To rewarm leftovers, preheat your oven to 350°F (175°C). Unwrap the bread and place it on a baking sheet. Cover it with aluminum foil to keep it moist. Bake for 10-15 minutes until heated through. If you want a crispy crust, remove the foil for the last 5 minutes. Enjoy your cheesy goodness warm! You can use olive oil instead of butter. It adds flavor and keeps the bread moist. Mix minced garlic with olive oil, parsley, and spices. Drizzle this mixture into the bread cuts just like the butter version. The taste will be slightly different but still delicious. Yes, gluten-free bread works well. Choose a soft, high-quality loaf. Make sure it's fresh for the best texture. Follow the same steps as with regular bread. The cheese and garlic will still give it a tasty flavor. This bread is best eaten fresh. If you have leftovers, store them in an airtight container. It can last for about 2-3 days in the fridge. Reheat in the oven for a few minutes to regain its texture. To add more cheese, mix different types. Try gouda, parmesan, or cream cheese. You can also layer cheese between the cuts. This makes every bite extra cheesy and fun. For a twist, add some cooked bacon bits for extra flavor. Yes, you can prep the bread a few hours ahead. Slice and fill it with cheese and garlic mixture. Wrap it tightly in foil and store it in the fridge. When ready, just bake it as directed. This makes it great for parties or gatherings. For the full recipe, refer to the main article. Cheesy Garlic Pull Apart Bread is a fun and tasty recipe. We covered the key ingredients, from the fresh bread to the gooey cheese. I shared steps to prepare, cut, assemble, and bake your bread. You learned helpful tips for flavor and baking techniques. Plus, we explored variations and storage for leftovers. This dish is a crowd-pleaser at any occasion. Get creative and enjoy every bite of this cheesy goodness!](https://mysavedrecipe.com/wp-content/uploads/2025/06/07f459e8-ade0-4f5d-b9d3-dfd4ed7bcb4b-300x300.webp)

![- 1 1/2 cups all-purpose flour - 1 cup granulated sugar - 1/2 cup packed brown sugar - 1 teaspoon baking powder - 1 teaspoon baking soda - 1 teaspoon ground cinnamon - 1/2 teaspoon ground nutmeg - 1/4 teaspoon ground ginger - 1/2 teaspoon salt - 1/2 cup unsalted butter, softened - 2 large eggs - 1 cup pumpkin puree - 1 teaspoon vanilla extract - 1/2 cup strong brewed coffee, cooled - 1/4 cup milk - Cream cheese frosting - Cinnamon sprinkle - Optional: mini marshmallows Each of these ingredients plays a key role in making the perfect Pumpkin Spice Latte Cupcakes. The all-purpose flour gives structure, while the sugars add sweetness. Baking powder and baking soda help the cupcakes rise and stay fluffy. Spices like cinnamon, nutmeg, and ginger bring that warm fall flavor. The salt balances the sweetness and enhances taste. For the wet ingredients, unsalted butter provides richness, while eggs add moisture and help with rising. Pumpkin puree is the star, offering flavor and a lovely color. Vanilla extract adds depth, and the brewed coffee enhances the cupcakes' flavor profile. Milk rounds out the batter, ensuring a soft texture. For toppings, cream cheese frosting brings a tangy sweetness. A sprinkle of cinnamon adds a nice touch. You can even add mini marshmallows for a fun twist. Check the [Full Recipe] for more details! - Preheat your oven to 350°F (175°C). - Line a muffin tin with cupcake liners. - In a large bowl, whisk together the dry ingredients. This includes the flour, granulated sugar, brown sugar, baking powder, baking soda, cinnamon, nutmeg, ginger, and salt. Make sure everything is well mixed. - In another bowl, cream the softened butter. It should be light and fluffy. Add the eggs, one by one. Mix well after each egg. - Next, mix in the pumpkin puree and vanilla extract. Stir until everything is combined. - Gradually add the dry mix to the wet mix. Alternate this with the cooled coffee and milk. Start and end with the dry mix. Mix until just combined; avoid overmixing. - Fill each cupcake liner about two-thirds full with the batter. - Bake for 18 to 20 minutes. Check doneness by inserting a toothpick into the center. It should come out clean. - Let the cupcakes cool in the tin for 5 minutes. Then, transfer them to a wire rack to cool completely. For the full recipe, refer to the ingredients section above. To get the best cupcakes, avoid overmixing your batter. Overmixing adds too much air, making your cupcakes dense. Mix until just combined for a fluffy texture. When you cream the butter, use a room temperature stick. Beat it well until it’s light and smooth. This step is key for a soft, airy cupcake. You can make these cupcakes your own by adjusting spices. Try adding more cinnamon or a pinch of cloves for warmth. If you want to use fresh pumpkin, it packs more flavor. Simply roast a pumpkin, scoop it out, and mash. If you choose canned pumpkin, look for 100% pumpkin without additives for the best taste. Frosting can be fun! Cream cheese frosting pairs well with these cupcakes. You can add a sprinkle of cinnamon on top for flair. For a festive look, place mini marshmallows on each cupcake. They add a cute touch and a hint of sweetness. Enjoy making these treats as much as eating them! {{image_2}} You can make your Pumpkin Spice Latte Cupcakes healthier. Try using whole wheat flour instead of all-purpose flour. This adds fiber and nutrients. You can also swap granulated sugar with a sugar substitute, like stevia or monk fruit sweetener. For a dairy-free option, use almond milk or oat milk. If you want an egg-free version, substitute eggs with applesauce or flaxseed meal mixed with water. To add extra flavor, consider mixing in chocolate chips or chopped nuts. Chocolate adds sweetness, while nuts give a nice crunch. You can also switch up the spices. Try cardamom or allspice for a unique twist. These changes can give your cupcakes a brand-new taste without losing that fall vibe. Cupcake cakes are a fun way to present these treats. Simply bake the batter in a round cake pan and frost it like a cake. Mini versions are great for parties, too. Bake smaller cupcakes and serve them on a colorful platter. Both options make your fall gathering feel special and festive. To keep your pumpkin spice latte cupcakes fresh, store them in an airtight container. Place a piece of wax paper between layers if stacking. This will help avoid sticking. Keep them at room temperature for up to three days. If you want to store them longer, freezing is a great option. To freeze cupcakes, wrap each one tightly in plastic wrap. Then, place them in a freezer-safe bag or container. They can last in the freezer for up to three months. When you are ready to enjoy them, just remove the cupcakes from the freezer and let them thaw at room temperature. If you want to reheat your pumpkin spice latte cupcakes, the oven is the best choice. Preheat your oven to 350°F (175°C). Place the cupcakes on a baking sheet and cover them with foil. Heat for about 10 minutes or until warm. This method helps keep the texture soft and the flavor rich. You can also use a microwave. Place a cupcake on a microwave-safe plate. Heat it in short bursts of 10-15 seconds. Check to see if it feels warm. This method is quick but may change the texture slightly, so keep an eye on it. Enjoy your delicious cupcakes warm! To make these cupcakes from scratch, start by gathering your ingredients. You will need flour, sugars, spices, butter, eggs, pumpkin puree, coffee, and milk. Mix the dry ingredients in one bowl. In another bowl, cream the butter and add the eggs. Then, mix in the pumpkin and vanilla. Combine both mixtures, adding coffee and milk. Fill your cupcake liners with the batter and bake at 350°F for 18-20 minutes. You can find the full recipe for detailed steps. Yes, you can use a box cake mix to save time. Choose a spice or vanilla cake mix. Add pumpkin puree and coffee to the mix for flavor. Adjust the liquid amounts according to the box instructions. This method gives you a quick and tasty option for pumpkin spice latte cupcakes. The best toppings for these cupcakes include cream cheese frosting. You can sprinkle cinnamon on top for added flavor. Mini marshmallows also make a fun and cute addition. Whipped cream can be used for a café-style touch. Feel free to get creative with your toppings! These cupcakes last for about 3-4 days when stored in an airtight container. Keep them in a cool, dry place. If you want to keep them longer, you can freeze them for up to 3 months. Just make sure to wrap them well to avoid freezer burn. Yes, you can make these cupcakes ahead of time. Bake them a day or two in advance and store them properly. You can also prepare the batter and refrigerate it for a day before baking. This gives you flexibility and makes serving easy for gatherings or special events. You learned how to make Pumpkin Spice Latte Cupcakes. We covered ingredients, tips, variations, and storage. Remember to mix the batter gently for the best texture. Feel free to customize flavors and toppings to your taste. Now you can impress your friends with delightful treats. Enjoy baking, and share your tasty creations!](https://mysavedrecipe.com/wp-content/uploads/2025/06/f58d2e27-c337-4c6e-8a7f-0b3f217815af-300x300.webp)

![- 1 lb chicken breast, cut into strips - 1 cup buttermilk - 1 cup all-purpose flour - 1 cup breadcrumbs (panko for extra crunch) - 1 teaspoon garlic powder - 1 teaspoon onion powder - 1 teaspoon paprika - 1 teaspoon dried oregano - Salt and pepper, to taste - Cooking spray (optional) Using these ingredients gives you a tasty base. The chicken breast is lean and full of protein. Buttermilk adds moisture and flavor. Flour gives the chicken a good coating. The breadcrumbs, especially panko, create that desired crunch. The seasoning ingredients add depth. Garlic powder and onion powder boost the flavor. Paprika gives the chicken a nice color and a hint of spice. Oregano adds a fresh note. Salt and pepper enhance everything. If you want even less sticking, use cooking spray. It helps the tenders crisp up nicely in the air fryer. This list will help you prepare for a fun cooking session. For the full recipe, check out the detailed steps to create these crunchy chicken tenders. Start by taking your chicken strips and placing them in a bowl. Add one cup of buttermilk to the chicken. Mix well to coat each piece. This step is key for flavor and moisture. Let the chicken marinate for at least 30 minutes. You can even let it sit overnight for extra flavor. While the chicken marinates, set up your breading stations. In one bowl, mix one cup of flour with garlic powder, onion powder, paprika, oregano, salt, and pepper. Stir it well to combine the spices and flour. In another bowl, place one cup of breadcrumbs. I recommend using panko for that extra crunch. Preheat your air fryer to 400°F (200°C) for about five minutes. After the chicken has marinated, take it out of the buttermilk. Let any excess liquid drip off. Now, dredge each chicken strip in the flour mixture. Make sure to coat it well. Then dip it back into the buttermilk and finally coat it with breadcrumbs. This double coating gives you a great crunch. Next, lightly spray the air fryer basket with cooking spray to prevent sticking. Arrange the chicken tenders in a single layer in the basket. Don't overcrowd; work in batches if needed. Air fry the chicken tenders at 400°F for 10-12 minutes. Flip them halfway through cooking. They should turn golden brown and be fully cooked. Enjoy your crispy air fryer chicken tenders! For the complete recipe, check [Full Recipe]. To boost flavor, add some spices. Here are my top picks: - Cayenne pepper for heat. - Italian seasoning for a herb mix. - Lemon zest for a fresh taste. - Parmesan cheese in the breadcrumbs for a cheesy kick. You can blend these spices into your flour mix. This adds layers of flavor to every bite. Panko breadcrumbs are key for crunch. Here’s how to use them well: 1. Double coat your chicken. After the flour, dip in buttermilk, then coat in panko. This adds that extra layer of crunch. 2. Press firmly on the chicken when coating. This helps the panko stick better. 3. Air fry in batches. Avoid overcrowding the basket. This ensures each piece gets hot air and stays crispy. For a fun presentation, serve your chicken tenders on a wooden platter. Here are some garnish ideas: - Fresh parsley for color. - Lemon wedges for a zesty touch. - Pickles for a tangy crunch. Pair your chicken with dipping sauces like: - Honey mustard for sweetness. - Barbecue sauce for a smoky flavor. - Ranch dressing for a classic choice. These additions make your meal not just tasty but visually appealing too. {{image_2}} You can change the coating for your chicken tenders. Instead of regular breadcrumbs, try coconut flakes for a tropical twist. They add a nice crunch and sweetness. Crushed cornflakes also work great. They give a crispy texture and a fun flavor. You can mix and match these options for different tastes. Changing the flavor is easy with marinades and spices. Try using hot sauce in the buttermilk for a spicy kick. You can also add lemon juice for a fresh taste. For a sweet option, mix honey into the buttermilk. When mixing the flour, add more spices like cumin or chili powder for warmth. Experiment with different herbs too, like thyme or rosemary, to find your favorite flavor. If you don’t have an air fryer, don’t worry! You can bake the chicken tenders. Preheat your oven to 425°F (220°C). Place the coated chicken strips on a baking sheet. Bake for about 20-25 minutes, flipping halfway through. For frying, heat oil in a pan over medium heat. Fry the chicken tenders in batches until golden brown. This way, you can still enjoy crispy chicken tenders, even without an air fryer. Check out the Full Recipe for more details! To keep your chicken tenders fresh, place them in an airtight container. This helps to lock in moisture. If you plan to store them for a long time, consider freezing them. Wrap each tender in plastic wrap before placing them in a freezer bag. This will prevent freezer burn. When reheating, avoid using the microwave. Instead, use the air fryer to keep them crispy. Preheat the air fryer to 350°F (175°C). Place the tenders in a single layer and heat for about 5-7 minutes. This method helps maintain their crunchy texture. You can also use an oven at the same temperature for better results. Cooked chicken tenders will last in the fridge for 3-4 days. If you freeze them, they can last up to 2-3 months. Just make sure to label the bags with the date. This makes it easy to track how long they have been stored. Enjoy your crispy chicken tenders later with the Full Recipe! You can use frozen chicken breasts for this recipe. However, fresh chicken works better. If you choose frozen, be sure to thaw them fully first. This helps the chicken marinate well in buttermilk. Proper marination ensures the meat stays juicy and flavorful. Just remember, cooking time might change slightly. Always check for doneness to be safe. To check if your chicken is done, use a meat thermometer. The center should reach 165°F (75°C). If you don’t have one, cut into a tender. Make sure the juices run clear and there’s no pink meat. Cooking times may vary based on the size of your strips. Flipping halfway helps ensure even cooking. Dipping sauces can elevate your chicken tenders. Here are my top picks: - Honey mustard - Barbecue sauce - Ranch dressing - Buffalo sauce - Sweet and sour sauce Each sauce adds a different flavor and flair. Feel free to mix and match to find your favorite! For an extra touch, garnish with herbs or fresh veggies. Enjoy exploring different tastes! In this blog post, we explored how to make delicious chicken tenders from scratch. We covered the main ingredients, the steps for preparing and cooking, and ways to enhance flavor. We also discussed storage tips to keep your tenders fresh. Remember, experimentation is key. Feel free to try new spices or cooking methods. Your kitchen is your playground. Enjoy your tasty chicken tenders with your favorite sauces.](https://mysavedrecipe.com/wp-content/uploads/2025/06/c5be8f72-db5e-4335-9ab7-cab3ec23900f-300x300.webp)
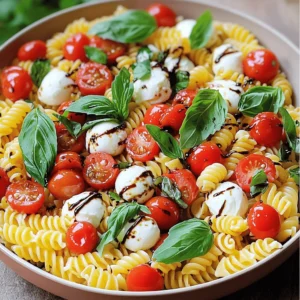
![For the ultimate chocolate fudge brownies, you need some core ingredients. These ingredients create a rich and delicious treat. - 1 cup unsalted butter (2 sticks) - 2 cups granulated sugar - 1 cup packed light brown sugar - 4 large eggs - 1 tablespoon vanilla extract - 1 cup all-purpose flour - 1 cup unsweetened cocoa powder - 1 teaspoon baking powder - 1/2 teaspoon salt - 2 cups semi-sweet chocolate chips Butter gives the brownies their rich flavor and fudgy texture. Sugar adds sweetness and helps create a shiny crust. Eggs bind all the ingredients together, making the brownies moist. Vanilla extract adds depth to the flavor. Flour gives structure, while cocoa powder provides that intense chocolate taste. Baking powder helps the brownies rise slightly, but we want them dense. Lastly, chocolate chips add extra chocolate goodness. You can enhance your brownies with some optional add-ins. Here are a few ideas to make them even better: - 1/2 cup chopped walnuts (optional) Adding nuts gives a nice crunch and flavor contrast. You can also consider these options: - Sea salt on top for a sweet-salty kick - Caramel swirls for a gooey texture - Peanut butter swirls for a nutty flavor These additions can take your brownies from great to spectacular. Feel free to mix and match based on what you enjoy! For the complete recipe, check out the [Full Recipe]. 1. Preheat your oven to 350°F (175°C). This step is key for even baking. 2. Prepare your baking pan. Grease a 9x13 inch pan or line it with parchment paper. This helps with easy removal of brownies later. 3. Melt the butter. Use a medium saucepan over low heat to melt 1 cup of unsalted butter completely. This gives the brownies a rich texture. 4. Combine wet ingredients. Remove the butter from heat and let it cool slightly. In a large bowl, mix the melted butter, 2 cups of granulated sugar, and 1 cup of packed light brown sugar. Stir until well mixed. 5. Add eggs and vanilla. Crack 4 large eggs into the bowl one at a time. Make sure to whisk well after each egg. Finally, stir in 1 tablespoon of vanilla extract. 1. Sift dry ingredients. In a separate bowl, sift together 1 cup of all-purpose flour, 1 cup of unsweetened cocoa powder, 1 teaspoon of baking powder, and 1/2 teaspoon of salt. This helps avoid lumps. 2. Incorporate dry ingredients into wet. Gradually add the dry mixture to your wet ingredients. Stir until just combined. Be careful not to overmix. This keeps the brownies fudgy and soft. 3. Fold in extras. If you want extra flavor, fold in 2 cups of semi-sweet chocolate chips and 1/2 cup of chopped walnuts, if desired. This adds crunch and richness. 1. Pour and spread. Pour the brownie batter into your prepared baking pan and spread it evenly. 2. Bake. Place the pan in your preheated oven. Bake for 25-30 minutes. To check for doneness, insert a toothpick in the center. It should come out with a few moist crumbs, not wet batter. 3. Cool properly. After baking, remove the brownies from the oven. Let them cool in the pan for 15 minutes. Then, transfer them to a wire rack to cool completely before slicing. This cooling step is important for the best texture. You can find the full recipe for Ultimate Chocolate Fudge Brownies to ensure you get every detail right! To get the perfect brownie texture, you need to choose between fudgy and cakey. For fudgy brownies, use more fat and less flour. This gives you a chewy, dense treat. For cakey brownies, use more flour and add baking powder. This makes them light and airy. Make sure your ingredients are at room temperature. Cold eggs or butter can affect how they mix. If you melt your butter, let it cool slightly before adding it to the mix. This helps keep your brownies rich and moist. Using the right tools is key for great brownies. I recommend using a metal or glass 9x13 inch baking pan. Metal pans heat evenly, while glass lets you see the bottom. Always grease your pan or line it with parchment paper. This makes it easy to lift out the brownies. To check if your brownies are done, use a toothpick. Insert it into the center of the brownies. If it comes out with a few moist crumbs, they are ready. If it comes out wet, they need more time. For a beautiful presentation, cut your brownies into squares and arrange them on a platter. You can dust them with powdered sugar for a nice touch. Drizzle some chocolate sauce on top for extra flair. Brownies pair wonderfully with ice cream or coffee. A scoop of vanilla ice cream on top makes them even more decadent. You could also enjoy them with a cup of strong coffee to balance the sweetness. For the ultimate treat, try both! For the full recipe, check out the Ultimate Chocolate Fudge Brownies! {{image_2}} You can change the taste of your Ultimate Chocolate Fudge Brownies in fun ways. One idea is to add mint extract. This gives a fresh, cool flavor that pairs well with chocolate. You can also swirl in peanut butter for a rich, nutty taste. Just drop spoonfuls of peanut butter into the batter and swirl with a knife before baking. Switch up the chocolate you use, too. Try dark chocolate for a deeper flavor. White chocolate chips can add a sweet touch to your brownies. Mixing different types of chocolate creates a rich, layered taste that excites your palate. If you need gluten-free brownies, you can use almond flour or coconut flour instead of all-purpose flour. These flours give a nice texture without gluten. Just make sure to adjust the amount since these flours absorb more liquid. For vegan brownies, swap the eggs with flaxseed meal. Mix one tablespoon of flaxseed with three tablespoons of water. Let it sit for a few minutes until it thickens. You can replace the butter with coconut oil or vegan butter. This keeps your brownies rich and moist without any animal products. These variations allow you to enjoy brownies that suit your taste and dietary needs. Check the Full Recipe for more details! To keep your brownies fresh, store them properly. Place them in an airtight container. This helps to lock in moisture. You can also wrap them tightly in plastic wrap. Avoid letting them sit out too long, as they can dry out. For best results, store brownies at room temperature for up to four days. If you want to keep them longer, refrigeration is an option, but it may change the texture slightly. Freezing brownies is a great way to save some for later. First, let the brownies cool completely. Then, cut them into squares. Wrap each piece in plastic wrap. This helps keep the flavor and texture. Next, place the wrapped brownies in a freezer-safe bag or container. They can last up to three months in the freezer. When you are ready to enjoy them, simply take them out and thaw them at room temperature. For a warm treat, you can microwave them for a few seconds. This will bring back some of that fudgy goodness. You can use many things in place of eggs. Common substitutes include: - Applesauce: Use 1/4 cup for each egg. It adds moisture and sweetness. - Mashed banana: A ripe banana works well. Use 1/2 banana per egg. - Yogurt: Use 1/4 cup of plain yogurt for each egg. It keeps brownies soft. - Flaxseed meal: Mix 1 tablespoon of flaxseed with 2.5 tablespoons of water. Let it sit until it thickens. These substitutes change the texture. Applesauce and banana add moisture. Flaxseed gives a slight nuttiness. Choose based on your taste and what you have at home. Watch for these signs when baking brownies: - Edges pull away: The edges will look firm and pull from the pan. - Shiny top: The surface will have a glossy sheen. - Toothpick test: Insert a toothpick into the center. It should come out with a few moist crumbs, not wet batter. These signs help you catch the perfect bake. Overbaking will make them dry. Keep an eye on your brownies during the last few minutes. Yes, you can use cocoa powder as the main chocolate source. Cocoa gives a rich chocolate flavor, but balance is key. - Dry to wet ratio: Cocoa is dry, so you need enough wet ingredients. - Add extra fat: Consider using more butter or oil for moisture. This method can make a delicious brownie, but adjust your other ingredients. Too much cocoa can lead to a dry brownie. Aim for that perfect balance! For the full recipe, check out the Ultimate Chocolate Fudge Brownies. In this post, we covered all you need to make Ultimate Chocolate Fudge Brownies. You learned about essential ingredients, the mixing process, and baking tips. We explored variations and how to store your brownies for later. Remember, choose your flavors and store them well for the best taste. Enjoying brownies can bring joy, whether alone or with friends. Get baking today and share your delicious results! Your taste buds will thank you.](https://mysavedrecipe.com/wp-content/uploads/2025/06/ecf212a4-d0fa-4c74-8ed0-c26c3d044df8-300x300.webp)
![- 4 salmon fillets (about 6 ounces each) - 1 red bell pepper, sliced - 1 cup broccoli florets - 1 cup snap peas - 1/3 cup low-sodium soy sauce - 1/4 cup honey - 2 tablespoons rice vinegar - 2 tablespoons sesame oil - 2 cloves garlic, minced - 1 tablespoon fresh ginger, grated - 2 tablespoons sesame seeds - 2 green onions, finely chopped - Salt and pepper to taste When I cook sheet pan teriyaki salmon, I love choosing fresh ingredients. The salmon is the star, and I pick fillets about six ounces each. They should be bright and firm. I also add vibrant vegetables, like red bell pepper, broccoli, and snap peas. The colors make the dish pop. For the teriyaki sauce, I keep it simple but flavorful. I use low-sodium soy sauce to control the salt. Honey adds sweetness, while rice vinegar gives it a tangy kick. Fresh ginger and garlic bring warmth and depth. This sauce is key in making the salmon and veggies shine. To finish, I sprinkle sesame seeds and chopped green onions. These add crunch and freshness. It’s not just about taste; it’s about making your plate look good too. For the full recipe, you can check out the link. To start, you’ll want to make the teriyaki sauce. Grab a mixing bowl and whisk together the following ingredients: - 1/3 cup low-sodium soy sauce - 1/4 cup honey - 2 tablespoons rice vinegar - 2 tablespoons sesame oil - 2 cloves garlic, minced - 1 tablespoon fresh ginger, grated Mix them well until everything blends smoothly. This sauce is sweet and salty, giving your salmon a rich flavor. Next, take your salmon fillets and place them in a shallow dish. Pour half of the teriyaki sauce over the salmon. Make sure each fillet is covered. Let the salmon marinate for at least 15 minutes. If you have time, let it sit for up to an hour in the fridge. This helps enhance the flavors even more. Now it’s time to bake! Preheat your oven to 400°F (200°C). Line a large sheet pan with parchment paper for easy cleanup. On the sheet pan, spread the sliced red bell pepper, broccoli florets, and snap peas. Drizzle a little olive oil and sprinkle some salt and pepper. Toss them to coat evenly. Remove the salmon from the marinade and place it among the veggies on the pan. Drizzle the remaining teriyaki sauce over everything. Bake for 12 to 15 minutes. The salmon should flake easily with a fork, and the veggies should be tender-crisp. For the full recipe, check out [Full Recipe]. Enjoy your delicious meal! For the best flavor, marinate your salmon for at least 15 minutes. If you have more time, try marinating for up to 1 hour. This allows the flavors to soak in and makes the salmon delicious. You can experiment with the teriyaki sauce, too. For a twist, add orange juice or pineapple juice for sweetness. You can also use brown sugar instead of honey for a deeper flavor. If you use thicker salmon fillets, adjust your bake time. Bake for about 15 to 18 minutes instead of the usual 12 to 15. This ensures your salmon cooks all the way through. For the vegetables, keep an eye on them. You want them tender-crisp, not mushy. They should stay bright and colorful for a fresh look. For a fun presentation, serve the salmon and veggies right from the sheet pan. This gives a rustic feel to your meal. If you want to dress it up, plate them individually. Add a sprinkle of extra sesame seeds and a slice of lime for a pop of color. You can pair this dish with rice or quinoa for a complete meal. Steamed jasmine rice or a fresh salad also works well. You will impress your family and friends with this simple yet tasty dish. Check out the Full Recipe for more details. {{image_2}} You can switch the salmon for chicken or tofu. Chicken thighs work well. They stay moist and soak up the teriyaki sauce. If you choose tofu, use firm tofu for the best texture. Press it first to remove excess water. This helps the tofu absorb flavors better. To boost flavor, try adding spices or different vegetables. You can use chili flakes for heat or garlic powder for extra depth. Swap in bell peppers, carrots, or zucchini for a colorful mix. Each vegetable adds a unique taste and crunch. This keeps the dish fresh and exciting each time you make it. While baking is simple, you can also grill the salmon. Grilling adds a smoky flavor that many people love. Keep an eye on the salmon so it doesn’t overcook. You can grill the veggies too. This makes for a great meal with different textures and tastes. To keep your sheet pan teriyaki salmon fresh, store leftovers in the fridge. Use an airtight container. This method helps the salmon and vegetables stay juicy. Consume the leftovers within three days for the best taste. If you want to store them longer, freeze the salmon and veggies separately. Place them in freezer-safe bags. They will stay good for up to three months. When ready to eat, just thaw them overnight in the fridge. When reheating, avoid the microwave if you can. Instead, use the oven or a skillet. Preheat your oven to 350°F (175°C). Place the salmon and vegetables on a baking sheet. Cover them with foil to keep them moist. Heat for about 10-15 minutes. If using a skillet, add a splash of water and cover it. This will help keep everything tender and flavorful. Meal prep makes weeknight dinners quick and easy. You can marinate the salmon a day ahead. Store it in the fridge with the sauce. Chop your vegetables in advance too. Keep them in the fridge in a sealed bag. On busy nights, just bake everything on the sheet pan and enjoy a tasty meal in no time. This dish works great for meal prep because it’s simple and quick. You can find the full recipe for even more help. To check if the salmon is done, look for a few signs. First, the flesh should turn from bright pink to opaque. You can also use a fork to gently flake the fish. If it flakes easily, it is ready. The internal temperature should reach 145°F (63°C). This is the safe zone for fish. Yes, you can use regular soy sauce. However, it will change the taste and salt level. Low-sodium soy sauce is milder and allows you to control the saltiness. If you use regular soy sauce, cut back on added salt in the recipe. This helps balance the flavors. Many sides pair well with this dish. Here are some ideas: - Steamed rice or quinoa - Stir-fried vegetables - Cucumber salad - Asian slaw - Noodles with sesame oil These sides enhance the meal and add variety. Each option complements the teriyaki flavor well. Enjoy mixing and matching! For the full recipe, check out the main article. We explored a simple recipe for Sheet Pan Teriyaki Salmon. We discussed key ingredients like salmon, veggies, and a tasty homemade sauce. You learned the steps to prepare, marinate, and bake your dish. Plus, we shared tips for the perfect meal. Remember, you can switch proteins or flavors for variety. Finally, proper storage and reheating keep leftovers fresh. Enjoy making this dish and impressing your family with your cooking skills!](https://mysavedrecipe.com/wp-content/uploads/2025/06/63b73d3c-0e00-4215-9468-8a0910bbc862-300x300.webp)


![- 4 ripe tomatoes, sliced - 8 ounces fresh mozzarella cheese, sliced - 1 cup fresh basil leaves - 4 tablespoons extra-virgin olive oil - 2 tablespoons balsamic glaze - Salt and freshly ground black pepper to taste How to choose ripe tomatoes When you pick tomatoes, look for ones that feel firm. They should have smooth skin and vibrant color. A ripe tomato will smell sweet and fresh. Try to choose tomatoes that are slightly soft when you press them gently. This means they are ready to eat! Selecting high-quality mozzarella For the best flavor, choose fresh mozzarella. It should be soft and moist, not dry. Look for mozzarella packed in water or whey. This keeps it fresh. If you can, buy it from a local cheese shop or farmer's market for the best quality. Importance of fresh basil Fresh basil adds bright flavor to your salad. Look for basil with deep green leaves. Avoid any brown or wilted leaves. When you smell fresh basil, it should smell sweet and herbal. This smell means it is fresh and ready to use in your dish. For the full details on making this delightful salad, check out the Full Recipe. To make this salad, start with ripe tomatoes. Choose bright red tomatoes that feel slightly soft. Next, select fresh mozzarella. It should be creamy and firm. Slice the tomatoes and mozzarella into even pieces. Aim for about 1/4 inch thick. This helps each bite taste perfect. Use a sharp knife for clean cuts. Now it's time to layer the salad. Take a large platter. Start with a slice of tomato, then add mozzarella, and a basil leaf. Repeat this until all ingredients are used. Drizzle extra-virgin olive oil over the salad. This adds a rich flavor. Next, drizzle balsamic glaze for sweetness and tang. Season your salad with salt and freshly ground black pepper. This boosts the taste. For a spicy kick, you can add red pepper flakes. Allow the salad to rest for about 5 minutes. This helps the flavors blend nicely. Enjoy your Simple Caprese Salad Delight! You can find more details in the Full Recipe. Serve your Caprese salad cold for the best taste. A cool salad brings out fresh flavors. Pair it with crusty bread or a light white wine. This adds depth and makes the meal even better. To add a kick, sprinkle red pepper flakes on your salad. This small step makes a big difference. You can also try different oils, like infused olive oil. Each oil brings a new twist to the dish. For gatherings, serve your salad on a large, colorful platter. This makes the dish eye-catching. You can also use creative bowls or even rustic wooden boards. Add extra basil leaves on top for a pop of color. These small touches make your Caprese salad stand out. For the full recipe, check out the Caprese Delight Salad 🥗 section above. {{image_2}} For your Caprese salad, you can switch up the cheese. Try using burrata for a creamier texture. Goat cheese also works well for a tangy twist. If you have seasonal veggies, toss in sliced cucumbers or peppers. They add a nice crunch and fresh flavor. You can also use heirloom tomatoes for a colorful and tasty option. If you want a vegan version, replace mozzarella with plant-based cheese. There are many good options made from nuts or soy. For a nut-free salad, ensure you choose a cheese that does not contain nuts. This way, everyone can enjoy your dish without worry. Infusing your olive oil can elevate your salad. Try adding garlic or herbs to the oil for extra flavor. Different balsamic reductions can also change the taste. A sweeter version can add depth, while a more tangy one can brighten the dish. Experiment with these ideas to make your Caprese salad unique. For the complete recipe, check out the [Full Recipe]. Store your Caprese salad in a clean, airtight container. This keeps it fresh and tasty. Use a glass or plastic container with a tight lid. The salad stays good in the fridge for 1-2 days. After that, the ingredients may wilt or lose flavor. If you want to keep your salad fresh for longer, store the parts separately. Keep the tomatoes, mozzarella, and basil in their own containers. This way, they stay crisp and flavorful. Assemble your salad just before you plan to eat. If you have a ready-to-eat salad, eat it within one day for the best taste. Freezing Caprese salad is not ideal. The tomatoes and mozzarella can become mushy when thawed. If you must freeze, consider just the basil. Chop it and freeze it in a small bag. To thaw, place it in the fridge overnight. Use it in soups or sauces later. For best results, enjoy your salad fresh using the Full Recipe. Caprese salad stays fresh in the fridge for about two days. After that, the tomatoes and mozzarella may get soggy. To keep it fresh, store it in an airtight container. Yes, you can prepare Caprese salad ahead of time. However, it’s best to add the oil and glaze just before serving. This keeps the flavors vibrant and the texture fresh. You can add a few herbs to your Caprese salad. Fresh oregano or parsley works well. You can also try mint for a unique twist. Mix and match to find your favorite flavor. Balsamic vinegar is a raw, tangy liquid. Balsamic glaze is thicker and sweeter, made by cooking down the vinegar. The glaze adds a rich finish to dishes like Caprese salad. Yes, Caprese salad is gluten-free. It contains no wheat or gluten ingredients. You can enjoy this salad without worrying about gluten. This blog shared how to create a delicious Caprese salad. We covered fresh ingredients, easy steps, and great tips. Choosing ripe tomatoes and fresh mozzarella is key to flavor. Layer your salad carefully for the best look. Remember to season and let it rest for better taste. Feel free to experiment with variations and enjoy it fresh. Whether it’s for a meal or a gathering, your Caprese salad will impress. Keeping ingredients fresh ensures a delightful experience every time. Happy cooking!](https://mysavedrecipe.com/wp-content/uploads/2025/06/1b81fb84-be7d-4121-86ad-cb500c438595-300x300.webp)

![To make Buffalo Cauliflower Bites, you need: - 1 medium head of cauliflower, cut into bite-sized florets - 1 cup all-purpose flour - 1 cup water - 1 teaspoon garlic powder - 1 teaspoon onion powder - 1 teaspoon smoked paprika - 1/2 teaspoon salt - 1/4 teaspoon black pepper - 1 cup buffalo sauce - 2 tablespoons olive oil - 1 tablespoon fresh parsley, chopped (for garnish) These ingredients work together to create a crispy, flavorful snack that packs a punch. If you don’t have some ingredients, here are good substitutes: - Cauliflower: You can replace it with broccoli for a similar crunch. - All-purpose flour: Use chickpea flour or gluten-free flour for a different twist. - Buffalo sauce: Try hot sauce mixed with melted butter for a quick fix. - Olive oil: Any neutral oil, like canola or vegetable oil, will work well. These alternatives maintain the taste and texture of the bites, so you won't miss a thing. Buffalo Cauliflower Bites are healthy and flavorful. Here’s a quick look at their nutritional value per serving (about 4 bites): - Calories: 150 - Protein: 4g - Fat: 7g - Carbohydrates: 20g - Fiber: 3g - Sodium: 400mg These bites are not just delicious; they offer a mix of nutrients and a good amount of fiber. Enjoy these tasty treats without guilt! For the full recipe, check out the [Full Recipe]. Start with a fresh head of cauliflower. Remove the leaves and stem. Cut it into bite-sized florets. Make sure they are all similar in size. This helps them cook evenly. Rinse the florets under cold water. Pat them dry with a clean towel. A dry surface helps the batter stick better. In a large mixing bowl, combine flour, garlic powder, onion powder, smoked paprika, salt, and black pepper. Whisk them together. Gradually add the water while mixing. You want a smooth batter. If it feels too thick, add a bit more water. The batter should coat the cauliflower without dripping too much. Preheat your oven to 450°F (232°C). Line a baking sheet with parchment paper. Dip each cauliflower floret into the batter. Let any extra batter drip off. Place the florets on the baking sheet in a single layer. Bake for 25-30 minutes. Flip them halfway for even cooking. They should be golden and crispy. While the cauliflower is baking, mix buffalo sauce and olive oil in a large bowl. Once the florets are done, remove them from the oven. Toss them in the buffalo sauce mixture until well coated. Return the bites to the baking sheet. Bake for another 10 minutes for extra crispiness. Finally, garnish with fresh parsley before serving. Enjoy your Buffalo Cauliflower Bites! For the complete recipe, check the [Full Recipe]. To get your Buffalo cauliflower bites extra crispy, focus on the batter. The mix of flour and water works best when it is smooth. You want the batter to coat the florets well. Dip each piece and let the excess drip off. This step helps avoid soggy bites. Bake them at 450°F to lock in the crunch. Flip them halfway through cooking to ensure even crispiness. For even better results, bake them a bit longer for that golden finish. Enhancing flavor is key to making these bites truly special. Add spices like garlic powder and smoked paprika to the batter. This gives the cauliflower a rich taste before you even add the buffalo sauce. After baking, toss the florets in a mix of buffalo sauce and olive oil. This adds depth and moisture, making each bite juicy. You can also experiment with different hot sauces or spices to find your perfect mix. When it comes to serving, think about fun and flavor. Pair your bites with a cool dip like ranch or blue cheese. Fresh veggies like carrot sticks or celery add a nice crunch. You can also serve them on a platter with fresh parsley for a nice touch. For a fun twist, use them as a topping on a salad or in a wrap. The options are endless! If you want the full recipe, check out the [Full Recipe]. {{image_2}} You can easily make Buffalo Cauliflower Bites vegan. Just swap the all-purpose flour with chickpea flour. This change adds protein and a nice flavor. Use water to make the batter, just like in the original recipe. Chickpea flour gives the bites a great texture. You will love how well they hold the sauce. If you want to mix things up, try different flavors. Add honey or maple syrup for sweetness. This creates a sweet and spicy balance. You can also use different sauces. Try teriyaki or barbecue sauce for a fun twist. Mix and match spices like cayenne for heat or curry powder for a warm taste. Your Buffalo Cauliflower Bites can become a whole new dish! You don’t have to bake your bites. An air fryer works great! It cooks them fast and makes them super crispy. Set the air fryer to 400°F (204°C) and cook for about 15 minutes. Shake the basket halfway to ensure even cooking. Grilling is another fun method. Toss the cauliflower on the grill for a smoky flavor. Just be sure to use a grill basket or foil. This keeps small pieces from falling through. Both methods give you tasty results. You can find the full recipe to explore more ways to make these bites delicious! Store your Buffalo Cauliflower Bites in an airtight container. Make sure they cool down first. This keeps them fresh for up to three days. If you have a lot left, you can separate them into smaller portions. This way, you can grab a quick snack later. Reheat your cauliflower bites in the oven for the best crispiness. Set your oven to 350°F (175°C). Place the bites on a baking sheet and warm them for about 10-15 minutes. You can also use an air fryer if you have one. Just cook them for around 5-7 minutes for that crunchy texture. You can freeze these bites for up to three months. First, bake them as usual. Let them cool completely, then place them in a single layer on a baking sheet. Freeze them for a couple of hours until solid. After that, transfer the bites to a freezer bag. When you're ready to eat, bake them straight from frozen. This makes for an easy snack anytime you want. For the full recipe, check out the earlier section. Yes, you can prepare Buffalo Cauliflower Bites ahead of time. First, make the batter and coat the cauliflower. Place them on the baking sheet but don’t bake them yet. Cover the sheet with plastic wrap and keep it in the fridge. You can store them this way for up to 24 hours. When you're ready to eat, just bake them right from the fridge. This saves time and lets the flavors blend well. Buffalo Cauliflower Bites are perfect for many sides. Here are some ideas: - Celery sticks - Carrot sticks - Ranch dressing for dipping - Blue cheese dressing - A fresh salad - Chips and salsa These options add crunch and flavor. They also balance the spicy taste of the bites. The heat level of Buffalo Cauliflower Bites comes from the buffalo sauce. It can be spicy, but you can adjust it. If you want less heat, mix the buffalo sauce with some olive oil or butter. This will tone down the spice. You can also try a milder sauce or use a homemade version. Just keep tasting as you mix until you find the right level for you. In this blog post, we explored making delicious Buffalo Cauliflower Bites. We discussed the important ingredients, including substitutes, and shared key nutritional details. I outlined step-by-step instructions for preparing, battering, and baking the bites. We also talked about tips for crispiness and serving. You can create variations, like vegan options or different flavor profiles. Finally, we covered storage tips for leftovers. Remember, you can adjust spice levels to fit your taste. Enjoy making this tasty dish!](https://mysavedrecipe.com/wp-content/uploads/2025/06/1f95edf8-102b-4d3f-90ee-1a521df22ad8-300x300.webp)
![- 2 ripe avocados - 1 medium garlic clove, minced - 2 tablespoons lemon juice - 1/4 cup fresh basil leaves, plus more for garnish - 1/4 cup grated Parmesan cheese (or nutritional yeast for a vegan option) - 2 tablespoons extra virgin olive oil - Salt and pepper to taste - 12 ounces spaghetti or your pasta of choice - Cherry tomatoes, halved (for garnish) - Crushed red pepper flakes (optional, for garnish) To make creamy avocado pasta, you need fresh and simple ingredients. Start with ripe avocados. They should feel soft but not mushy. Garlic adds a nice kick. Lemon juice gives a zesty touch and keeps the avocado from browning. Fresh basil brings a burst of flavor. Parmesan cheese adds richness, but if you want it vegan, use nutritional yeast. Extra virgin olive oil helps blend everything smoothly. Don’t forget salt and pepper; they enhance all the flavors. Choose spaghetti or your favorite pasta type. For a pretty finish, add halved cherry tomatoes and crushed red pepper flakes if you like heat. This recipe is quick and perfect for busy days. You can find the full recipe above. Enjoy cooking this easy and healthy dish! To start, boil a large pot of salted water. Add the spaghetti to the boiling water. Cook it according to the package instructions until it is al dente. This means it should be firm to the bite, not mushy. Once cooked, reserve about 1 cup of pasta water before draining the rest. This water helps to make the sauce creamy later. Grab a blender or food processor. You will use this to make the sauce. Add the ripe avocados, minced garlic, lemon juice, basil leaves, and Parmesan cheese (or nutritional yeast) to the blender. Blend these ingredients until the mixture is smooth and creamy. While blending, slowly drizzle in the olive oil. This helps to mix everything well and makes the sauce rich. Now it’s time to mix the pasta with the sauce. In a large mixing bowl, toss the cooked spaghetti with the creamy avocado sauce. Make sure every strand of pasta is well coated. For serving, divide the pasta into bowls. Top each bowl with halved cherry tomatoes and extra basil leaves for a fresh look. If you like a little heat, add some crushed red pepper flakes on top. Enjoy your delicious meal! For the complete recipe, check out the [Full Recipe]. To pick the best avocados, look for a few key signs. First, check the color. Ripe avocados usually have a dark green to almost black hue. Next, gently squeeze the avocado. It should feel firm but yield slightly to gentle pressure. If it feels mushy, it is overripe. Finally, look at the stem. If it comes off easily and is green underneath, the avocado is ripe. If it is brown, the avocado is likely bad. Sometimes the sauce may be too thick. You can fix this easily. After blending, save some pasta water. Slowly add this water to the sauce while mixing. Add a little at a time until you reach your desired creaminess. This will help you get the perfect texture for your creamy avocado pasta. To make the dish even tastier, try adding extra seasonings. A pinch of garlic powder or onion powder can boost the flavor. Fresh herbs like cilantro or parsley can offer different tastes. You can also add toppings like crumbled feta cheese or toasted pine nuts for a nice crunch. If you like spice, sprinkle some crushed red pepper flakes on top. These simple changes will make your creamy avocado pasta shine. For the complete recipe, check out the Full Recipe. {{image_2}} For a vegan twist on creamy avocado pasta, you can skip the Parmesan cheese. Use nutritional yeast instead. It gives a cheesy flavor without any dairy. Just add 1/4 cup of nutritional yeast to your sauce. This keeps your dish tasty and plant-based. If you need a gluten-free option, choose pasta made from rice or chickpeas. These types cook well and pair nicely with the creamy sauce. Look for brands like gluten-free spaghetti or penne. They will work perfectly in this dish. You can make this pasta even more fun by adding veggies or proteins. Try mixing in spinach, peas, or broccoli for extra nutrition. You can also add grilled chicken or shrimp for a protein boost. This makes the meal hearty and satisfying. To keep your creamy avocado pasta fresh, store leftovers in an airtight container. Make sure to cover the top with plastic wrap to limit air exposure. This helps slow down oxidation, keeping your pasta from turning brown. You can store it in the fridge for up to two days. When you’re ready to eat it again, give it a quick stir. Can you freeze avocado pasta? Yes, but with caution. Freezing can change the texture of the avocado. If you want to freeze it, do so without the pasta. Instead, freeze just the avocado sauce in a freezer-safe container. This will keep it fresh. You can freeze the sauce for up to three months. When you want to use it, thaw it overnight in the fridge. To reheat your creamy avocado pasta, you have a few great options. You can use the stove or the microwave. If using the stove, heat it on low in a pan. Stir it gently and add a splash of water or olive oil to keep it creamy. If you choose the microwave, place it in a bowl and cover it. Heat in short bursts of 30 seconds, stirring in between. This way, it warms evenly. To tell if an avocado is ripe, look for these signs: - The skin should be dark green or black. - Gently squeeze the avocado; it should feel soft but not mushy. - Check the stem; if it comes off easily and is green underneath, it’s ripe. Ripe avocados taste the best in creamy avocado pasta. If they are hard, let them sit at room temperature for a few days. Yes, you can prepare creamy avocado pasta ahead of time. Here are some meal prep tips: - Make the avocado sauce and store it in an airtight container. Add a bit of lemon juice to help prevent browning. - Cook the pasta and let it cool before storing it in the fridge. - When ready to eat, mix the pasta and sauce together for a fresh taste. This dish tastes best when served fresh, but prepped ingredients save time. Serve creamy avocado pasta with these tasty side dishes for a complete meal: - A fresh green salad with a light vinaigrette. - Garlic bread or toasted ciabatta for a crunchy texture. - Grilled vegetables like zucchini or bell peppers add color and flavor. These sides complement the creamy avocado pasta nicely, making for a well-rounded dinner. This blog post guides you through making a delicious creamy avocado pasta. You learned about the key ingredients, step-by-step instructions, tips for success, variations, storage methods, and answers to common questions. This dish is simple, tasty, and great for various diets. Enjoy customizing it to fit your needs. Now, you’re ready to impress friends and family with your new cooking skill. Pasta night will never be the same!](https://mysavedrecipe.com/wp-content/uploads/2025/06/a61ba880-dfe9-47cb-b6aa-6d20faf72ef6-300x300.webp)
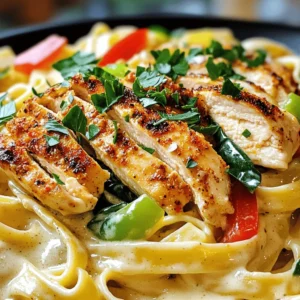

![For a tasty Loaded Nacho Casserole, you need the right base. Here are the must-haves: - 1 lb ground beef or turkey - 1 packet taco seasoning - 1 can (15 oz) black beans, drained and rinsed - 1 can (10 oz) diced tomatoes with green chilies These ingredients give your casserole its rich flavor. The ground meat provides protein and substance. Taco seasoning adds a kick, while black beans offer fiber. Diced tomatoes bring moisture and zest. Cheese makes everything better! For this dish, use: - 2 cups shredded cheddar cheese - 1 cup shredded Monterey Jack cheese - 3 cups tortilla chips, crushed - 1 cup sour cream - ½ cup green onions, chopped The cheese melts into gooey perfection. Cheddar adds sharpness, while Monterey Jack smooths it out. Tortilla chips give a crunchy layer, and sour cream cools the spice. Green onions add a fresh crunch. Want to take your casserole up a notch? Consider adding: - 1 jalapeño, sliced (optional for heat) - 1 cup corn (fresh or frozen) - Fresh cilantro for garnish (optional) Jalapeños add heat and depth. Corn brings sweetness and texture. Fresh cilantro gives a burst of freshness. You can mix and match these extras based on your taste. For the full experience, follow the [Full Recipe]. It guides you through the process step by step! 1. First, preheat your oven to 350°F (175°C). This helps your casserole cook evenly. 2. Next, in a skillet over medium heat, brown 1 lb of ground beef or turkey. Stir it well until it is fully cooked. Drain any extra fat. 3. Add 1 packet of taco seasoning and ¼ cup of water. Stir and let it simmer for about 5 minutes. This thickens the sauce and adds flavor. 4. Now, in a large bowl, combine the cooked meat, 1 can of black beans (drained and rinsed), 1 can of diced tomatoes with green chilies, and 1 cup of corn. If you want some heat, add 1 jalapeño, sliced. Mix it all well and season with salt and pepper. 1. In a baking dish, spread half of 3 cups of crushed tortilla chips evenly on the bottom. This creates a nice base. 2. Next, layer half of the meat and bean mixture over the chips. Then, sprinkle half of 2 cups of shredded cheddar cheese and half of 1 cup of shredded Monterey Jack cheese on top. 3. Repeat these layers with the remaining chips, meat mixture, and cheeses. The more layers, the better the flavor! 1. Cover your baking dish with aluminum foil. This keeps the moisture in while it cooks. Place it in the preheated oven and bake for 20 minutes. 2. After 20 minutes, remove the foil. Bake uncovered for an additional 10-15 minutes. You want the cheese to bubble and turn slightly golden. This gives it a great look and taste. Enjoy your delicious Loaded Nacho Casserole! For the full recipe, check out the details above. To keep your chips crisp, layer them wisely. Place them at the bottom of the dish. The warm toppings should not sit long on the chips. This helps avoid soggy chips. You can also bake the casserole for a shorter time. It allows chips to stay crunchy. For the perfect cheese melt, use a mix of cheeses. Cheddar and Monterey Jack work best together. Spread cheese evenly on each layer. This ensures that every bite is cheesy. Bake until the cheese bubbles. It should look golden brown. Want to spice up the meat mixture? Add chili powder or smoked paprika. These spices give extra depth. You can also mix in some chopped bell peppers or onions. They add crunch and flavor too. Using different cheeses can change the taste. Try pepper jack for a kick. You can also use queso fresco for a fresh twist. Don’t forget toppings like sliced olives or diced tomatoes. They add color and flavor. Pair your loaded nacho casserole with guacamole or salsa. Both add freshness and creaminess. You can also serve it with a side salad. This gives a nice balance to the meal. This dish is great for game days or family movie nights. It’s fun and easy to share. You can also serve it at potlucks. Everyone loves a hearty, cheesy dish. Try the Full Recipe to make your own! {{image_2}} To make a vegetarian version of this dish, swap ground meat for lentils or quinoa. These options provide protein while keeping the dish hearty. Lentils cook fast, while quinoa adds a nice texture. You can also add more vegetables. Consider bell peppers, zucchini, or mushrooms. They enhance flavor and add nutrition. If you like heat, try a spicy version. Add more jalapeños or a splash of hot sauce. This gives the casserole a kick. You can also use pepper jack cheese instead of cheddar. It melts well and adds extra spice. Make sure to taste as you go, so it suits your heat level. For a low-carb meal, replace tortilla chips with cauliflower. Simply steam or roast the cauliflower and chop it into bite-sized pieces. This keeps the texture fun while lowering carbs. You can also choose alternative cheese options, like mozzarella or cream cheese. Both melt nicely and keep the dish creamy without the extra carbs. Feel free to explore these variations. Each one adds a unique twist to the original Loaded Nacho Casserole, making it a hit for every family meal. For the complete recipe, check out the Full Recipe. To keep your Loaded Nacho Casserole fresh, store leftovers in the fridge. Use airtight containers to prevent air and moisture from ruining the taste. Make sure to let the casserole cool before sealing it. This way, you save all the great flavors for later. When it's time to eat again, reheating is easy. The best way is in the oven. Preheat it to 350°F (175°C). Place the casserole in an oven-safe dish and cover it with foil. Heat for about 20 minutes. If you want the cheese to melt nicely, remove the foil for the last 5 minutes. This keeps the texture and flavor just right. If you want to save your Loaded Nacho Casserole for a longer time, freezing works well. Cut it into portions before freezing. Wrap each piece in plastic wrap, then place it in a freezer bag. When you are ready to eat, thaw it in the fridge overnight. Reheat it in the oven using the same steps as before. Enjoy your dish even after a long time! Loaded Nacho Casserole can last for about 3 to 4 days in the fridge. To keep it fresh, store it in an airtight container. Make sure to let it cool before placing it in the fridge. This helps prevent condensation and sogginess. Always check for any signs of spoilage before eating leftovers. If it smells off or looks strange, it's best to toss it out. Yes, you can prepare Loaded Nacho Casserole ahead of time. You can assemble it and store it in the fridge for up to a day before baking. Just cover it tightly with foil or plastic wrap. When you're ready to bake, add a few extra minutes to the cooking time, since it will be cold. This makes it a great option for busy days or family gatherings. If you're looking for alternatives to ground beef, you have a few great options. Ground turkey is a lean choice that works well. For a vegetarian option, try cooked lentils or quinoa. You can also use crumbled tofu or tempeh for a meatless meal. Each substitute adds its own flavor, so feel free to experiment! Yes, Loaded Nacho Casserole is great for freezing. To freeze, let it cool completely and then wrap it tightly in plastic wrap and foil. This helps prevent freezer burn. It can stay in the freezer for about 2 to 3 months. When you're ready to eat, thaw it in the fridge overnight. Then, bake it until it's hot and bubbly again. Loaded nacho casserole is a fun dish packed with flavor. We covered essential ingredients, preparation steps, and baking tips for the perfect casserole. You can switch it up with variations like vegetarian or spicy options. Storing leftovers is easy if you follow the right methods. This dish is versatile and fits many occasions. I hope these tips inspire you in the kitchen. Enjoy crafting your loaded nacho casserole!](https://mysavedrecipe.com/wp-content/uploads/2025/06/e429c594-0a74-45a2-b3fc-4126c24436ce-300x300.webp)
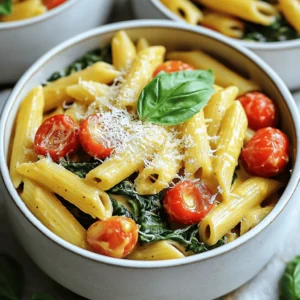


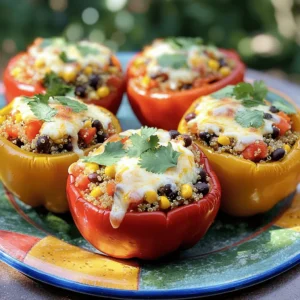


![To make a delicious creamy tomato basil soup, you need simple, fresh ingredients. Each item plays a key role in bringing out rich flavors. Here’s what you will need: - Olive Oil - Onion - Garlic - Diced Tomatoes - Vegetable Broth - Sugar - Dried Oregano - Cream - Fresh Basil - Optional Toppings Using quality ingredients makes a huge difference. Olive oil adds a nice richness. Onions provide sweetness, while garlic gives depth. Diced tomatoes are the base of the soup, bringing acidity and flavor. Vegetable broth enhances the overall taste and keeps it light. Sugar balances the acidity of the tomatoes. Dried oregano adds a hint of earthiness. Cream makes the soup velvety and smooth. Finally, fresh basil adds a burst of freshness and aroma. You can also top your soup with grated Parmesan cheese for extra flavor. For the complete recipe, check out the Full Recipe section. It guides you through each step to make this comforting meal with ease. Sautéing Onions and Garlic Start by heating 2 tablespoons of olive oil in a large pot over medium heat. Once the oil is hot, add 1 chopped onion. Cook it for about 5 minutes. You want the onion to be soft and translucent. Next, add 3 minced garlic cloves. Stir and cook for 1 more minute. The smell will be amazing! Adding Tomatoes and Broth Now, add 2 cans of diced tomatoes, undrained, to the pot. Pour in 2 cups of vegetable broth, too. Mix in 1 teaspoon of sugar and 1 teaspoon of dried oregano. This helps balance the flavors. Season with salt and pepper to taste. Simmering the Soup Bring the mixture to a simmer. Let it cook for about 15 minutes. This step lets all the flavors come together nicely. You’ll notice the rich aroma filling your kitchen. Pureeing the Mixture After simmering, take the pot off the heat. Use an immersion blender to puree the soup until it’s smooth. If you don’t have one, carefully transfer it to a countertop blender in batches. Be careful with the hot liquid! Incorporating Cream and Basil Return the pureed soup to the pot over low heat. Stir in 1 cup of heavy cream or coconut cream if you want a dairy-free option. Add 1 cup of fresh basil leaves, packed. Heat gently for about 5 minutes. This makes the soup creamy and flavorful. Final Heating and Seasoning Make sure the soup is warmed through. Taste and adjust seasoning if needed. Serve hot! You can garnish with grated Parmesan cheese and a few extra basil leaves for a nice touch. For more details, check out the full recipe! - Choosing Fresh Basil: Always use fresh basil. It gives the soup a bright taste. Look for vibrant green leaves. Avoid any that are brown or wilting. - Adjusting Seasoning: Taste your soup as it cooks. Add salt and pepper to enhance the flavor. A pinch of sugar balances the acidity of tomatoes too. - Alternative Cream Substitutes: If you want a lighter soup, use coconut cream. It adds a nice twist and is dairy-free. You can also try cashew cream for a nutty flavor. - Cooking on Low Heat: After blending, keep the soup on low heat. This helps the flavors blend well without burning. Stir occasionally to prevent sticking. - Soup Too Thick Solutions: If your soup is too thick, add more vegetable broth. Stir well to get the right consistency. - Adjusting Acidity: If the soup tastes too acidic, add a pinch of sugar. It offsets the tanginess from the tomatoes. - Avoiding Burnt Garlic: Be careful when cooking garlic. Add it after the onions are soft. Cook it just until fragrant to avoid burning. This will help you make a perfect creamy tomato basil soup. For more details, check the Full Recipe. {{image_2}} For a vegan option, swap heavy cream with coconut cream. This change keeps the soup creamy and rich, while also making it dairy-free. Coconut cream adds a slight sweetness that goes well with the tomatoes. If you need a gluten-free version, you are in luck! This creamy tomato basil soup naturally fits the bill. Just make sure your vegetable broth is gluten-free. Many brands are safe, but always check the label. You can add more veggies to boost nutrition. Carrots and celery work great in this soup. Chop them up and sauté them with the onion. This step brings out their natural sweetness. Herbs can also change the flavor profile. You might try thyme or parsley for a different taste. These herbs add freshness and depth, making the soup even more delightful. If you like heat, spice it up! Add crushed red pepper flakes or a dash of cayenne. Start with a little, taste, and add more if you want. This way, you can control the spice level to your liking. Feel free to explore these variations to make the creamy tomato basil soup your own. Each option adds a unique twist, while still keeping the comfort of this classic dish. For the full recipe, check out the [Full Recipe]. To keep your creamy tomato basil soup fresh, store it in the right containers. Use airtight containers to avoid any spills or odors. Glass jars or BPA-free plastic containers work well. Let the soup cool to room temperature before sealing. For freshness, the soup lasts about 3 to 5 days in the fridge. Always check for any changes in smell or color before eating. If you want to save some soup for later, freezing is a great option. First, let the soup cool completely. Then, pour it into freezer-safe containers or heavy-duty freezer bags. Leave some space at the top, as the soup will expand when frozen. For thawing, move the soup to the fridge overnight. If you're in a hurry, you can use the microwave on defrost mode. Reheat it on the stove until it’s piping hot. Stir often to keep the texture creamy. Enjoy your soup anytime! For the full recipe, check out the details above. To boost flavor, use fresh herbs. Add more garlic and onion for depth. A splash of balsamic vinegar adds tang. You can also try a pinch of red pepper flakes for warmth. Don’t forget to taste and adjust salt and pepper as you go. Yes, you can use fresh tomatoes! For best results, use ripe, juicy tomatoes. Peel and chop them before cooking. Fresh tomatoes may take longer to cook down, so adjust your simmer time. Creamy tomato basil soup stays fresh for about 3 to 4 days in the fridge. Store it in an airtight container. Reheat gently on the stove, adding a splash of broth if it seems too thick. This soup pairs well with crusty bread or grilled cheese. A simple salad adds freshness. You can also serve it with crackers for a fun crunch. For a complete meal, try it with a side of roasted vegetables. This blog post covered how to make a delicious creamy tomato basil soup. We went over the key ingredients you need, from olive oil to fresh basil. I shared step-by-step instructions to make it easy. Think about tips for flavor and common issues you might face. You can also explore variations, storage tips, and FAQs to make this soup your own. Enjoy creating this dish, and feel confident in customizing it to fit your taste!](https://mysavedrecipe.com/wp-content/uploads/2025/06/226caccb-a126-491b-87a4-91657a8c57f8-300x300.webp)