• Recipes
    • Dinner
    • Dessert
    • Appetizers
    • Drinks
  • About
  • Contact Us
  • Privacy Policy
menu icon
go to homepage
  • Recipes
    • Dinner
    • Dessert
    • Appetizers
    • Drinks
  • About
  • Contact Us
  • Privacy Policy

search icon
Homepage link
  • Recipes
    • Dinner
    • Dessert
    • Appetizers
    • Drinks
  • About
  • Contact Us
  • Privacy Policy

×
Savannah

Savannah

Savannah is the creative force behind My Saved Recipe, a space where food becomes both art and adventure. A passionate home chef, she delights in exploring flavors from around the world while honoring timeless classics.

Savannah’s philosophy centers on the power of food to bring people together, spark creativity, and create lasting memories. Through thoughtfully crafted recipes and practical tips, she inspires cooks of all levels to embrace fresh ingredients, experiment with confidence, and find joy in the kitchen.

  • - 1 cup orzo pasta - 2 cups vegetable broth - 1 cup cremini mushrooms, sliced - 2 cups fresh spinach, roughly chopped - 1 small onion, finely chopped - 2 cloves garlic, minced - 1 tablespoon olive oil - 1 tablespoon butter - ½ cup grated Parmesan cheese - Salt and pepper to taste - Fresh parsley for garnish When making Mushroom Spinach Orzo Risotto, the right ingredients make all the difference. Each item adds its unique flavor and texture. Orzo pasta is the base of our dish. It cooks quickly and becomes creamy, just like rice in risotto. Using vegetable broth gives a rich taste. Cremini mushrooms bring an earthy flavor, while spinach adds freshness. Onion and garlic create a sweet aroma when sautéed. Olive oil and butter enhance the dish's richness. Parmesan cheese adds a nutty flavor and creaminess. Don't forget salt and pepper! They balance all the tastes. - Additional vegetables such as peas or bell peppers - Protein options (chicken or tofu) You can customize your risotto with optional add-ins. Add peas or bell peppers for extra color and nutrition. For protein, consider chicken or tofu. These choices make your dish heartier and more filling. First, we need to make the broth warm. Take a medium saucepan and bring the vegetable broth to a simmer over low heat. This keeps it ready for the orzo. Next, we prepare the other ingredients. Chop one small onion finely and mince two cloves of garlic. Slice one cup of cremini mushrooms. In a large skillet, heat one tablespoon of olive oil and one tablespoon of butter over medium heat. Add the chopped onion and sauté for three to four minutes. You want the onion to turn translucent. Then, add the minced garlic and sliced mushrooms to the skillet. Cook for five to seven minutes. The mushrooms should look tender and golden. Now it’s time to toast the orzo. Stir in one cup of orzo pasta and cook for one to two minutes. This step adds a nice flavor to the dish. Gradually add the warm vegetable broth, one ladle at a time. Stir frequently as you add the broth. Allow the orzo to absorb the broth before adding more. Repeat this until the orzo is creamy and al dente. This should take about 15 to 20 minutes. Once the orzo is cooked, it’s time for the finishing touches. Stir in two cups of roughly chopped spinach and half a cup of grated Parmesan cheese. Season with salt and pepper to taste. Cook for one more minute. This allows the spinach to wilt down and all the flavors to blend nicely. Let the risotto rest for a couple of minutes. This helps the flavors meld together beautifully. To make your risotto creamy, add broth slowly. Pour in one ladle at a time. Stir often as you add broth. This helps the orzo soak up the liquid and become tender. Keep the heat medium to low. This way, the orzo cooks evenly. Stirring constantly gives you that perfect risotto texture. Herbs and spices boost the flavor of your dish. Try adding fresh thyme or basil for a fresh taste. A pinch of red pepper flakes can add heat. You can use homemade broth for richer flavor. Store-bought broth works too, but check for low sodium. This keeps your dish from becoming too salty. Serve the risotto in deep bowls for a cozy feel. Top it with extra Parmesan and fresh parsley. This adds color and makes the dish pop. For a fancy touch, drizzle a little olive oil on top. You want your risotto to look as good as it tastes! {{image_2}} You can change this dish with different veggies based on the season. In spring, add fresh peas or asparagus for a bright touch. In summer, try zucchini or bell peppers for a pop of color and flavor. Fall calls for butternut squash to bring in a warm, sweet taste. In winter, add broccoli or carrots for a hearty feel. You can also change the herbs. For a fresh taste, add basil in summer. In winter, use thyme or rosemary for a cozy aroma. If you want a vegan risotto, swap the butter and cheese for plant-based options. Use vegan butter and nutritional yeast for a cheesy flavor. You can also use almond or cashew milk to add creaminess. For gluten-free pasta options, replace orzo with rice or gluten-free pasta. This keeps the dish yummy and safe for those with gluten issues. Pair your risotto with a fresh salad. A simple green salad with lemon vinaigrette works well. You can also serve it with roasted veggies for a colorful plate. For wine lovers, a glass of white wine like Sauvignon Blanc complements this dish nicely. It balances the creaminess and enhances the flavors of the mushrooms and spinach. To store leftover Mushroom Spinach Orzo Risotto, let it cool to room temperature. Place it in an airtight container. This keeps moisture in and air out. Properly stored, it lasts up to three days in the fridge. Always check for any off smells or changes in texture before eating. For longer storage, freezing is a great option. Place the cooled risotto in freezer-safe containers. Make sure to leave some space at the top for expansion. It can last up to three months in the freezer. To reheat, let it thaw overnight in the fridge or use the microwave. When reheating, the key is to add moisture back. Use a splash of broth or water to keep it creamy. Heat it gently on the stove over low heat. Stir often to avoid sticking. Avoid high heat, as it can dry out the risotto. Common mistakes include reheating too quickly or not adding enough liquid. This can lead to a rubbery texture. It takes about 30 minutes to make this dish. You need 10 minutes to prep. Cooking takes around 20 minutes. This time includes sautéing, toasting, and simmering the orzo. Keeping the broth warm helps speed things up. Yes, you can make this dish ahead of time. To do so, cook the risotto but stop before adding the spinach and cheese. Let it cool fully. Store it in an airtight container in the fridge for up to two days. When ready to serve, reheat in a pan. Add the spinach and cheese while reheating. This helps keep the dish fresh and tasty. You can use various pasta types if you don't have orzo. Some great options are: - Arborio rice for a more traditional risotto feel - Small pasta shapes like ditalini or acini di pepe - Quinoa for a gluten-free option These substitutes will change the texture slightly but will still taste great. You learned how to make a delicious Mushroom Spinach Orzo Risotto. We covered key ingredients, step-by-step cooking, and tips for the best flavor and texture. You can adapt this dish with seasonal veggies and dietary needs. Storing and reheating it properly keeps it tasty for later. Remember, cooking should be fun and creative. Enjoy making this dish your own!
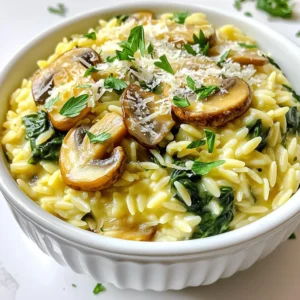
    Mushroom Spinach Orzo Risotto Creamy and Flavorful Dish
  • To make Teriyaki Salmon Sheet Pan with Broccoli, gather these fresh items: - 4 salmon fillets - 2 cups broccoli florets - 1 bell pepper, sliced (red or yellow) - 1 medium carrot, julienned - 1/4 cup soy sauce (low sodium) - 2 tablespoons honey - 2 tablespoons sesame oil - 1 tablespoon rice vinegar - 2 garlic cloves, minced - 1 teaspoon ginger, grated - 1 tablespoon sesame seeds (for garnish) - Salt and pepper to taste - Cooked rice or quinoa (for serving, optional) These ingredients combine to create a dish full of flavor and nutrition. When you choose fresh salmon, look for bright color and a firm texture. The vegetables add crunch and color. Each component works together to make your meal both tasty and healthy. The teriyaki marinade gives a sweet and savory touch. You can adjust the flavors to suit your taste, making this recipe fun and flexible. Enjoy cooking! First, set your oven to 400°F (200°C). This temperature helps cook the salmon and veggies just right. It also makes sure everything bakes evenly. Preheating is key for great results. Next, grab a small mixing bowl. Add 1/4 cup of low-sodium soy sauce. Then, mix in 2 tablespoons of honey for sweetness. Pour in 2 tablespoons of sesame oil to give it a rich flavor. Now, add 1 tablespoon of rice vinegar for a little tang. Don't forget 2 minced garlic cloves and 1 teaspoon of grated ginger for a burst of taste. Whisk everything together until smooth. This marinade adds a tasty glaze to the salmon. Now, take a large sheet pan and line it with parchment paper. Place 4 salmon fillets on one side of the pan. Season each fillet with salt and pepper. Then, brush them with the teriyaki marinade. On the other side, arrange 2 cups of broccoli florets, 1 sliced bell pepper, and 1 medium julienned carrot. Drizzle a bit of sesame oil over the veggies and season with salt and pepper. Pour any leftover marinade over the vegetables. This step helps everything soak up the flavors. Slide the sheet pan into your preheated oven. Bake for about 15-20 minutes. You’ll know it’s done when the salmon flakes easily and the veggies are tender but crisp. The salmon should look glossy and caramelized. Once it's ready, take the pan out of the oven. Let it cool for a few minutes. Sprinkle 1 tablespoon of sesame seeds over the salmon and veggies for a nice touch. Serve your teriyaki salmon and vegetables warm over cooked rice or quinoa if you like. When picking salmon, look for bright, shiny skin. The flesh should be firm and moist. Fresh salmon smells like the sea, not fishy. Wild-caught salmon often tastes better than farmed. Varieties like sockeye or king have rich flavors. If you can, buy salmon from a trusted source. Always check the sell-by date to ensure freshness. The teriyaki marinade is key to this dish. Use low-sodium soy sauce for a balanced taste. Honey adds sweetness, while sesame oil gives a nutty flavor. Rice vinegar adds a tangy kick. For depth, don't skip the garlic and ginger. Mix all ingredients well. Let the salmon marinate for at least 15 minutes for the best flavor. To keep your vegetables crisp, don't overcook them. Arrange them on the sheet pan in a single layer. This helps them cook evenly. Drizzle a little sesame oil on top for extra flavor. Season with salt and pepper, but don’t drown them. Bake until they are bright in color and tender but still crunchy. Serve the teriyaki salmon over warm rice or quinoa. This adds a nice base and absorbs the sauce. Top with fresh herbs like cilantro or green onions for color. A sprinkle of sesame seeds adds a lovely crunch. You can also add lime wedges for a zesty twist. Enjoy your meal with a side salad for balance. {{image_2}} You can change up the veggies in this dish. Use snap peas for a crisp bite. Carrots add color and sweetness. Zucchini slices cook fast and soak up flavor. Cauliflower florets are a great option too. Each veggie brings its own taste and texture. Feel free to mix and match based on what you love. Not a fan of teriyaki? Try a honey mustard glaze. Mix honey, mustard, and a splash of vinegar for a tangy kick. You can also use a simple lemon and herb mix. This brings a fresh taste that pairs well with salmon. Barbecue sauce can add a smoky flavor. Choose a sauce that excites your taste buds. Baking is easy, but you can grill the salmon too. This adds a nice char and smoky flavor. Cooking it in a skillet works well for a quick meal. Just sear the salmon on medium heat. If you have a steamer, use it for tender salmon. Each method gives a unique taste to your dish. Experiment to find your favorite way! After enjoying your teriyaki salmon, let any leftovers cool down. Place the salmon and veggies in an airtight container. This keeps them fresh longer. You can store them in the fridge for up to three days. Make sure to cover them well to keep out air. To reheat your salmon, you can use the oven or a microwave. If using the oven, set it to 350°F (175°C). Place the salmon and veggies on a baking sheet. Heat for about 10 minutes or until warmed through. If you prefer the microwave, heat in short bursts, about 30 seconds at a time. Check often to avoid overcooking. You can freeze leftover teriyaki salmon for later. Wrap each fillet tightly in plastic wrap. Then, place them in a freezer-safe bag or container. This keeps the salmon fresh for up to three months. When you are ready to eat, thaw it in the fridge overnight and reheat as mentioned above. You can serve teriyaki salmon with cooked rice or quinoa. Both options soak up the sauce well. You can also add a side of fresh salad for a crunchy feel. Sliced cucumbers with a bit of vinegar make a nice touch. Adding a fruit salad can bring sweetness to your meal. Yes, you can prep the salmon and vegetables ahead of time. Marinate the salmon and chop the veggies. Store them in the fridge for up to a day. When you are ready, just bake them. This saves time and makes dinner easy. The salmon is done when it flakes easily with a fork. It should look glossy and have a nice caramelized color on top. For safety, the internal temperature should reach 145°F (63°C). Use a food thermometer for the best results. To make this recipe gluten-free, use tamari instead of soy sauce. Tamari is a great substitute that tastes similar. Check the labels on honey and other sauces to ensure they are gluten-free too. This way, you can enjoy teriyaki salmon without worry. This blog post explains how to make teriyaki salmon, covering ingredients and steps. I provided tips for choosing salmon and using fresh vegetables. You can also explore variations and smart storage tips. In the end, cooking teriyaki salmon is simple and fun. Enjoying this tasty meal can impress your family and friends. Experiment with flavors and ingredients to make it your own. Enjoy your cooking adventure!
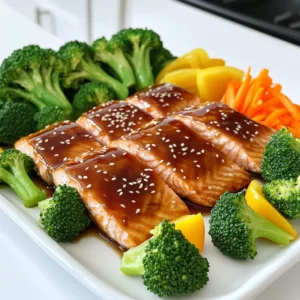
    Teriyaki Salmon Sheet Pan with Broccoli Delight
  • - 1 lb Brussels sprouts, halved - 4 tablespoons unsalted butter - 3 cloves garlic, minced - 1 teaspoon red pepper flakes (optional) - Salt and pepper to taste - 1/2 cup grated Parmesan cheese - 1 tablespoon lemon juice - Fresh parsley, chopped (for garnish) To make this dish, you will need one pound of Brussels sprouts. Use four tablespoons of unsalted butter for richness. Three cloves of garlic add great flavor. Use one teaspoon of red pepper flakes if you like some heat. Salt and pepper help to season your dish. You will also need half a cup of grated Parmesan cheese for a cheesy finish. One tablespoon of lemon juice adds a nice zing. Finally, chop fresh parsley for a colorful garnish. You can choose to add red pepper flakes for a spicy kick. If you prefer a milder taste, skip these. Adding nuts, like pine nuts or walnuts, can give a nice crunch. A squeeze of extra lemon juice can brighten up the flavors even more. Start by preheating your oven to 400°F (200°C). This step is key to getting crispy Brussels sprouts. While the oven heats, take 1 pound of Brussels sprouts and cut them in half. Place them in a large bowl. Toss the halved sprouts with olive oil, salt, and pepper. Ensure every piece gets coated well. This helps in the roasting process. Spread the Brussels sprouts onto a baking sheet in a single layer. Make sure they are not crowded. Roast them in the oven for 20 to 25 minutes. Halfway through, toss them for even cooking. You want them golden brown and crisp-tender. While they roast, melt 4 tablespoons of unsalted butter in a saucepan over medium heat. Add 3 cloves of minced garlic and optional red pepper flakes. Cook this for 1-2 minutes, just until the garlic smells good. Be careful not to burn it; burnt garlic can taste bitter. Once the Brussels sprouts are roasted, take them out of the oven. Drizzle your garlic butter mixture over them. Add 1 tablespoon of lemon juice for a bright flavor. Next, sprinkle 1/2 cup of grated Parmesan cheese on top. Return them to the oven for 5 more minutes. This melts the cheese nicely. Finally, garnish with chopped parsley. Serve these warm for the best taste. Enjoy your Garlic Butter Brussels Sprouts with Parmesan! To boost the flavor of your Garlic Butter Brussels Sprouts, use fresh garlic. Fresh garlic gives a punchy taste. You can also add lemon zest for a bright flavor. A sprinkle of balsamic vinegar adds depth. If you like heat, include more red pepper flakes. Try adding herbs like thyme or rosemary for a nice twist. Roasting the Brussels sprouts at 400°F helps them get crispy. Make sure they are in a single layer on the baking sheet. Toss them halfway through to get even cooking. The goal is golden brown, crisp-tender sprouts. Keep an eye on them to avoid burning the garlic in the butter. This step is key for a rich taste. If you don't have Brussels sprouts, use green beans instead. They roast well and taste great with garlic butter. For a dairy-free option, try nutritional yeast instead of Parmesan cheese. You can also swap lemon juice with vinegar for a different tang. Adjust the red pepper flakes based on your heat preference. {{image_2}} To make this dish vegan, swap the butter for plant-based butter or olive oil. Use nutritional yeast instead of Parmesan cheese for some cheesy flavor. The steps remain the same, and you can enjoy a delicious vegan version. You can add extra veggies for more color and flavor. Try mixing in sliced bell peppers or diced onions. Nuts like walnuts or almonds also add a nice crunch. For a heartier dish, toss in cooked quinoa or farro before serving. To change the taste, try adding different herbs. Rosemary or thyme pairs well with Brussels sprouts. For a spicy kick, increase the red pepper flakes or add a splash of hot sauce. A drizzle of balsamic glaze adds sweetness and depth, making each bite even better. You can store leftover Garlic Butter Brussels Sprouts in an airtight container. Make sure they cool down first. Place them in the fridge for up to three days. This keeps them fresh and tasty. To reheat, use the oven for the best results. Preheat it to 350°F (175°C). Spread the sprouts on a baking sheet. Heat for about 10-15 minutes. This helps keep them crispy. You can also use a microwave. Just heat for 1-2 minutes, but they may lose some crispness. You can freeze Brussels sprouts, but they need prep. First, let them cool completely. Then, place them in a freezer bag. Remove as much air as possible. They can last up to three months in the freezer. When you are ready, thaw them in the fridge before reheating. Yes, you can use frozen Brussels sprouts. They save time and are easy to find. Just remember to thaw them first. Drain any extra water before cooking. This helps keep the texture nice and firm. To make this dish gluten-free, ensure all your ingredients are gluten-free. The butter, garlic, and Parmesan cheese are typically gluten-free. Just check labels to be sure. You can also use gluten-free breadcrumbs instead of cheese for a crunchy topping. Garlic butter Brussels sprouts pair well with many dishes. Try serving them with roast chicken or grilled fish. They also taste great with pasta or quinoa. If you want a vegetarian option, serve them with a hearty grain salad. This guide covered all you need to make delicious Garlic Butter Brussels Sprouts. We reviewed the key ingredients, precise measurements, and optional add-ins. I shared detailed steps for preparation and cooking, plus tips for great taste and texture. You learned variations, storage info, and answers to common questions. Enjoy making this tasty dish. It’s simple and rewarding. With practice, you’ll impress everyone with your cooking skills.
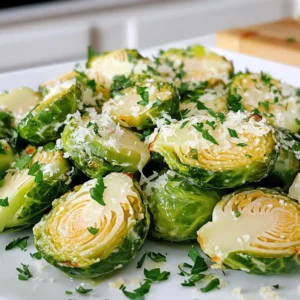
    Garlic Butter Brussels Sprouts with Parmesan Delight
  • - 1/2 cup unsalted butter, melted - 1 cup granulated sugar - 2 large eggs - 1 teaspoon vanilla extract - 1/3 cup unsweetened cocoa powder - 1/2 cup all-purpose flour - 1/4 teaspoon salt - 1/4 teaspoon baking powder The brownie layer gives a rich, chocolatey base. Start by melting the butter in a bowl. Mix it with granulated sugar until smooth. Add eggs and vanilla next. Stir these in well. Then, sift in the cocoa powder, flour, salt, and baking powder. Stir just until mixed. Do not overmix. This keeps the brownies soft and chewy. - 8 oz cream cheese, softened - 1/2 cup pumpkin puree - 1/2 cup powdered sugar - 1 large egg - 1 teaspoon vanilla extract - 1 teaspoon pumpkin pie spice For the pumpkin cheesecake layer, beat the softened cream cheese in a bowl until smooth. Add pumpkin puree and powdered sugar. Mix these in well. Then, crack in the egg, add vanilla, and sprinkle in pumpkin pie spice. Mix until creamy. This layer adds a delightful pumpkin flavor. It contrasts nicely with the brownie base. Use a spatula to ensure all ingredients blend. - Preheat the oven to 350°F (175°C). - Grease or line an 8x8 inch baking pan with parchment paper. To start, you need to get your oven ready. Preheating the oven helps cook the bars evenly. Greasing or lining the pan makes sure the bars don’t stick. You’ll want them to come out easily. - Mix melted butter and granulated sugar. - Add eggs and vanilla extract, and combine. - Sift and incorporate dry ingredients carefully. Next, let’s make the brownie layer. In a medium bowl, whisk the melted butter and sugar together. Then, add the eggs and vanilla extract. Mix until everything is smooth. Sift in the cocoa powder, flour, salt, and baking powder. Stir carefully to combine. Don’t overmix. This helps keep the brownies soft. - Beat cream cheese until smooth. - Add pumpkin puree, powdered sugar, egg, vanilla, and pumpkin pie spice. - Mix until creamy and well combined. Now, we will prepare the pumpkin cheesecake layer. In a separate bowl, beat the softened cream cheese until it is smooth. Then add the pumpkin puree, powdered sugar, egg, vanilla extract, and pumpkin pie spice. Mix until it is creamy and everything blends well. This layer adds a rich taste that pairs well with the brownies. - Spread the brownie batter evenly. - Pour and swirl the pumpkin cheesecake mixture over the brownie layer. - Bake for 30-35 minutes, checking for doneness. Time to assemble! Pour the brownie batter into the prepared pan. Spread it evenly across the bottom. Next, pour the pumpkin cheesecake mixture over the brownie layer. Use a knife to gently swirl the two layers together for a marbled effect. Now, bake in the preheated oven for 30-35 minutes. Check for doneness with a toothpick. It should come out with a few moist crumbs. - Cool on a wire rack; chill in the refrigerator for at least 2 hours. - Cut into squares or bars before serving. Once baked, let the bars cool in the pan on a wire rack. After they cool, chill them in the fridge for at least two hours. This makes cutting easier. When ready, cut into squares or bars. Enjoy the delicious blend of flavors! To get the best brownie layer, avoid overmixing the batter. Mixing too much can make your brownies tough. Just stir until the dry and wet ingredients blend well. After you pour the batter into the pan, check for doneness with a toothpick. Insert it in the center. If it comes out with a few moist crumbs, it’s perfect! For a smooth cheesecake layer, use cream cheese at room temperature. Cold cream cheese mixes unevenly and can cause lumps. When adding the pumpkin and other ingredients, mix until creamy and smooth. Use a gentle swirling technique to create a nice marbled look. Just run a knife through the cheesecake layer lightly, and you’ll achieve a beautiful design. To make your bars look extra special, dust them with powdered sugar before serving. This gives a nice touch and adds sweetness. You can also sprinkle some cinnamon on top. Whipped cream is another great idea. A dollop on each bar makes them even more appealing and tasty! {{image_2}} You can make your pumpkin cheesecake brownie bars even more exciting. Try adding nuts or chocolate chips to the brownie layer. Chopped walnuts or pecans add a nice crunch. Chocolate chips bring a rich sweetness that pairs well with the pumpkin flavor. For the cheesecake layer, you can play with spices. Instead of just pumpkin pie spice, try cinnamon or nutmeg. You could even add a hint of ginger for a spicy kick. Each option gives your bars a new twist. To change the flavor, consider using maple syrup. It adds a sweet, earthy taste that screams fall. Replace some of the sugar with maple syrup in the brownie mix. A chocolate ganache topping works wonders too. Just melt some chocolate with cream and pour it over the cooled bars. It adds a rich layer that enhances every bite. These twists will impress your guests and make your bars stand out. To keep your pumpkin cheesecake brownie bars fresh, store them in an airtight container in the fridge. This helps maintain their taste and texture. If you want to save some for later, consider freezing them. Wrap the bars well in plastic wrap and foil. This method can extend their shelf life for up to three months. When you're ready to enjoy a bar, you can easily reheat it. For the microwave, place one bar on a microwave-safe plate. Heat it for about 15-20 seconds. Check if it's warm enough; if not, heat for a few more seconds. If you prefer the oven, preheat it to 350°F (175°C). Place the bars on a baking sheet and cover with foil. Heat for about 10 minutes, and enjoy your treat warm! Yes, you can make these bars ahead of time. I suggest baking them a day before you plan to serve. After they cool, store them in an airtight container in the fridge. This helps the flavors meld nicely. You can also freeze them for up to three months. Just wrap them well in plastic wrap and foil. Thaw in the fridge before serving. Yes, you can substitute pumpkin puree. Use butternut squash puree for a similar taste. Sweet potato puree is another option, giving a sweeter flavor. Both substitutes keep the texture creamy. Just remember, the recipe may taste a bit different. You can use leftover cream cheese in many ways. Make a cream cheese spread for bagels or toast. Mix with herbs for a tasty dip. You can also add it to pancakes for a richer flavor. It works well in frosting for cakes, too. You learned how to make delicious brownie and pumpkin cheesecake bars. We covered the key ingredients, detailed steps, and helpful tips. You can easily customize the recipe to fit your taste. Remember, the key is to not overmix and to let the bars cool before cutting. Enjoy sharing these treats with friends and family! Your baking skills just got better. Now, get cooking and treat yourself to these tasty bars!
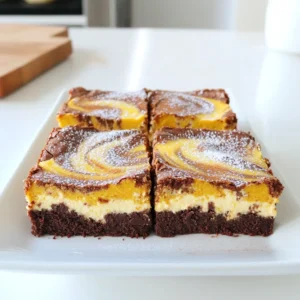
    Pumpkin Cheesecake Brownie Bars Delightful Treat
  • Here’s what you need for this tasty breakfast: - 1 cup steel cut oats - 4 cups water or almond milk - 2 medium apples, peeled and diced - 1 teaspoon ground cinnamon - 1/2 teaspoon nutmeg - 1/4 cup maple syrup or honey - 1/2 cup chopped walnuts or pecans - 1/4 teaspoon salt - Optional toppings: additional diced apples, a sprinkle of cinnamon, or a dollop of Greek yogurt Gather these ingredients before you start. Steel cut oats give a chewy texture, while the apples add sweetness. Cinnamon and nutmeg bring warmth and spice to the dish. Maple syrup or honey adds natural sweetness. Walnuts or pecans add a nice crunch. You can customize the toppings based on your taste. Enjoy the process of preparing this delightful bowl of oats! - Combining Ingredients in the Slow Cooker First, grab your slow cooker. Add 1 cup of steel cut oats. Pour in 4 cups of water or almond milk for a creamier taste. Next, add 2 medium apples, peeled and diced. Then, sprinkle in 1 teaspoon of ground cinnamon and 1/2 teaspoon of nutmeg. Drizzle in 1/4 cup of maple syrup or honey for sweetness. Finally, toss in 1/2 cup of chopped walnuts or pecans and 1/4 teaspoon of salt. Stir all the ingredients well. - Setting the Cooking Time and Temperature Cover your slow cooker with the lid. Set it to cook on low for 6 to 8 hours. If you are short on time, you can set it on high for 3 to 4 hours. This helps the flavors blend perfectly. - Stirring for Consistency After cooking, remove the lid and stir the oats. This helps create a nice, even texture. If you like your oats creamier, add a splash more water or almond milk. Mix well until you reach your desired consistency. - Serving Temperature Serve the oats hot in bowls. This dish is perfect for breakfast or a cozy brunch. - Recommended Toppings for Garnishing You can top your oats with more diced apples for crunch. A sprinkle of cinnamon adds extra flavor. A dollop of Greek yogurt brings creaminess and protein. Feel free to get creative and add your favorite toppings! For the best taste, choose Granny Smith or Honeycrisp apples. These apples add a nice balance of sweetness and tartness. Their firm texture holds up well during cooking, ensuring you enjoy bites of apple in every spoonful. To make your oats creamy, use almond milk instead of water. It adds richness and flavor. If you prefer water, just add a splash more at the end. This simple step gives you a velvety texture that elevates your breakfast. You can save time by prepping your ingredients the night before. Peel and dice the apples, and measure your oats and spices. Just toss everything into the slow cooker in the morning. This way, you can enjoy a warm meal without any hassle. Set your slow cooker to cook overnight. It can work while you sleep! When you wake up, your oats will be ready. This way, you start your day with a warm and hearty breakfast, making it a perfect morning treat. {{image_2}} You can use almond milk instead of water. Almond milk adds a rich, creamy taste. It also boosts the nutrients in your oatmeal. If you want a lighter dish, stick with water. Both choices work well. You can swap maple syrup for other sweeteners. Honey offers a nice flavor, too. Agave nectar or coconut sugar also work well. Each sweetener changes the taste just a bit. Choose what you like best! Adding dried fruits or berries can enhance your oats. Raisins, cranberries, or blueberries add sweetness and texture. Just toss them in before cooking. They will plump up nicely as they cook. You can also incorporate other spices. Try ginger or cardamom for a new twist. A pinch of vanilla extract can add a lovely aroma. Mix and match to find your favorite flavors. The options are endless! - Best Containers for Storage: Use air-tight glass or plastic containers. These keep your oats fresh. Avoid metal containers, as they can react with food. - Refrigeration and Freezing Tips: Store leftover oats in the fridge for up to five days. For longer storage, freeze them in portions. They last up to three months in the freezer. Thaw overnight in the fridge before reheating. - Best Methods to Reheat Oats for Optimal Texture: To reheat, use the microwave or stove. For the microwave, heat in 30-second intervals. Add a splash of water or almond milk to keep them creamy. If using the stove, warm them over low heat, stirring often. This helps maintain a smooth texture. Can I make this recipe without a slow cooker? Yes, you can cook these oats on the stovetop. Use a pot, add ingredients, and bring to a boil. Then, reduce the heat and simmer for 20 to 30 minutes, stirring often until creamy. How long do steel cut oats last in the fridge? Steel cut oats stay good in the fridge for about 4 to 5 days. Store them in an airtight container. This keeps them fresh and ready for quick breakfasts. Can I use quick oats instead of steel cut oats? I do not recommend using quick oats for this recipe. Quick oats cook faster and have a different texture. Steel cut oats give a heartier, chewier bite that enhances the dish. What are the health benefits of steel cut oats? Steel cut oats are rich in fiber, which helps digestion. They also provide long-lasting energy and keep you full longer. Plus, they contain essential vitamins and minerals, making them a nutritious choice. Can I prepare this recipe in advance? Absolutely! You can prepare the dry ingredients and store them in a container. In the morning, add water or almond milk to your slow cooker, and it will be ready for you. Is it possible to make this recipe vegan? Yes, this recipe is easily vegan. Just use almond milk instead of regular milk and maple syrup instead of honey. The oats will still be delicious and creamy! This blog post covered how to make a delicious slow cooker oatmeal dish. You learned about the key ingredients, step-by-step instructions, and helpful tips. I also shared variations and storage options. Effective meal prep makes breakfast easy and tasty. Each step lets you create something special. Enjoy the wholesome flavors, and get creative with toppings. Oatmeal can fit many diets and tastes. Remember to store leftovers well for later enjoyment. You now have all you need to succeed in this recipe!
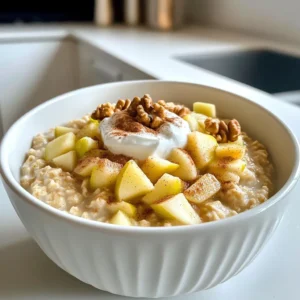
    Cinnamon Apple Steel Cut Oats Slow Cooker Delight
  • - 1 pound large shrimp, peeled and deveined - 1 cup orzo pasta - 4 tablespoons olive oil, divided - 4 cloves garlic, minced - Zest and juice of 1 large lemon - 1 teaspoon red pepper flakes (adjust to taste) - 1 cup cherry tomatoes, halved - 2 cups baby spinach - Salt and pepper to taste - Fresh parsley, chopped (for garnish) - Lemon wedges (for serving) - Large pot for boiling water - Large skillet for sautéing - Colander for draining orzo - Measuring cups and spoons - Knife and cutting board - Tongs or spatula for stirring - If you cannot find large shrimp, use medium shrimp. - You can swap orzo for any small pasta like couscous. - For a gluten-free option, try rice or quinoa. - Use garlic powder if fresh garlic is not available. - If you prefer less heat, reduce red pepper flakes or skip them. - Spinach can be replaced with kale or arugula for a twist. To start, bring a large pot of salted water to a boil. Add 1 cup of orzo pasta once the water is bubbling. Cook the orzo according to the package instructions until it is al dente, which usually takes about 8-10 minutes. Stir occasionally to keep it from sticking. Once it’s cooked, drain the orzo and set it aside. This pasta will be the base of your dish and soak up all those tasty flavors. Next, grab a large skillet and heat 2 tablespoons of olive oil over medium-high heat. Once the oil is hot, add 4 minced garlic cloves and 1 teaspoon of red pepper flakes. Sauté them for about 30 seconds until the garlic smells amazing. Then, add the 1 pound of peeled and deveined shrimp. Season the shrimp with salt and pepper. Cook the shrimp for about 2-3 minutes on each side. They should turn pink and opaque. Cooking shrimp too long will make them tough, so keep an eye on them! Now it’s time to bring everything together. Add the cooked orzo, 1 cup of halved cherry tomatoes, and 2 cups of baby spinach to the skillet. Zest and juice 1 large lemon, then add that in too. Drizzle the remaining 2 tablespoons of olive oil over the mixture. Toss everything gently to combine. Cook for another 2 minutes until the spinach wilts and everything is hot. This step is where all the flavors blend together. Once done, remove the skillet from heat. Serve the orzo mixture in bowls, and don’t forget to garnish with fresh chopped parsley. Add lemon wedges on the side for an extra burst of flavor. Enjoy your delicious Lemon Garlic Shrimp Orzo Bowls! To cook shrimp well, start with fresh or thawed shrimp. Heat your skillet over medium-high heat. Use two tablespoons of olive oil for a great sear. When the oil is hot, add minced garlic and red pepper flakes. Cook them for about 30 seconds. This step adds flavor. Next, add the shrimp. Cook them for 2-3 minutes on each side. They should turn pink and opaque. Avoid overcooking. Overcooked shrimp can become tough. Remember, they cook quickly! If you like spice, add more red pepper flakes. Start with the teaspoon in the recipe. You can always add more later. For a milder dish, cut the flakes to half a teaspoon. The lemon juice and zest balance the spice well. You can also add a pinch of salt and pepper to enhance the taste. Taste as you cook. Adjust the flavors to your liking. This dish is all about your preferences. Presentation makes a meal more inviting. Use deep bowls for serving. This allows you to layer the orzo and shrimp nicely. Start with a base of orzo. Add shrimp, spinach, and tomatoes on top. Finish with a sprinkle of fresh parsley. Place lemon wedges on the side. This adds color and zest. You can also add a drizzle of olive oil for shine. Serve warm for the best experience. Enjoy your vibrant, tasty meal! {{image_2}} You can easily change the flavor by adding different vegetables. Try bell peppers for sweetness. Zucchini adds a nice crunch. Broccoli or asparagus brings a fresh taste. For a colorful dish, use a mix of these veggies. Just add them when you toss the orzo. This way, they cook lightly but keep their texture. If you want a simple clean-up, make this a one-pot meal. Start by cooking the orzo in the same pot. After you drain it, use the same pot for the shrimp. This saves time and dishes. Just follow the same steps and enjoy all the flavors in one pot. It’s a great way to keep the cooking process quick and easy. Don’t feel tied to shrimp. You can use chicken or tofu instead. For chicken, cut it into small pieces and cook until golden. Tofu can be cubed and sautéed until crisp. Adjust cooking times to make sure everything is cooked through. This gives you more choices while keeping the dish delicious. To keep your Lemon Garlic Shrimp Orzo Bowls fresh, first let them cool. Store them in an airtight container. Make sure to keep leftovers in the fridge. They will stay good for up to three days. If you want to keep them longer, freezing is a great option. When reheating, I suggest using a skillet. Add a splash of water or olive oil. Heat over medium-low until warmed through. Stir often to avoid sticking. You can also use a microwave. Place in a microwave-safe bowl and cover it. Heat in short bursts, stirring in between. To freeze, place the cooled orzo bowls in freezer bags. Squeeze out all the air before sealing. Label the bags with the date. They can last up to three months in the freezer. When you’re ready to eat, thaw them overnight in the fridge. Reheat as mentioned above for the best taste. Yes, you can use frozen shrimp. Just thaw them first. Place them in cold water for about 15 minutes. This makes them easier to cook. Frozen shrimp can taste great in this dish. If you do not have orzo, you can use other small pasta shapes. Options include ditalini, couscous, or even quinoa. These work well and still give a nice texture to the dish. The spice level depends on the red pepper flakes. Start with one teaspoon for mild heat. You can add more if you like it spicy. Always taste as you go to get the heat right. Yes, you can prepare this dish ahead of time. Cook the orzo and shrimp, then mix them. Store in the fridge for up to two days. Just reheat before serving. Adding fresh spinach at the end keeps it bright and tasty. In this blog post, I covered how to cook a tasty shrimp and orzo dish. I went over key ingredients, tools, and useful substitutions. You also learned step-by-step cooking instructions, tips for perfect shrimp, and ideas for variations. Finally, I shared how to store leftovers and answered common questions. Cooking can be fun and easy. With these tips, you can create a great meal and impress your friends. Enjoy your cooking journey!
    Lemon Garlic Shrimp Orzo Bowls Flavorful and Quick Meal
  • - 2 medium sweet potatoes - 2 tablespoons olive oil - 1 teaspoon paprika - 1 teaspoon garlic powder - ½ teaspoon cayenne pepper - Salt and pepper to taste - ½ cup mayonnaise - 1 tablespoon lemon juice - 1 teaspoon Dijon mustard - 1 garlic clove, minced - 1 teaspoon sriracha - Salt to taste Sweet potato fries make a great snack. They are healthy and tasty. You need just a few simple ingredients to make them. First, grab two medium sweet potatoes. Peel them and cut them into fry shapes. The thinner you cut them, the crispier they will be. Next, add two tablespoons of olive oil. This helps the spices stick and gives flavor. Now, it's time for spices. You will need one teaspoon of paprika and garlic powder. The paprika adds color and a hint of smokiness. The garlic powder gives a savory twist. Add half a teaspoon of cayenne pepper if you like heat. Adjust this to your taste. Finish with salt and pepper. Mix everything in a big bowl until the fries are well-coated. Now for the spicy aioli. In a bowl, combine half a cup of mayonnaise. Add one tablespoon of lemon juice for brightness. Then, stir in one teaspoon of Dijon mustard for a tangy kick. Mince one garlic clove and mix it in. Finally, add one teaspoon of sriracha for spice. Use salt to taste. With these ingredients, you are ready to make sweet potato fries with spicy aioli. Start by peeling and cutting your sweet potatoes into fries. In a large bowl, toss the fries with olive oil, paprika, garlic powder, cayenne pepper, salt, and pepper. Use your hands to mix well, ensuring every fry gets coated. If you want more heat, add more cayenne or sriracha later. Next, set your air fryer to 400°F (200°C). Preheat it for about 5 minutes. Preheating is key. It helps the fries get crispy and golden brown. Place the seasoned fries in the air fryer basket in a single layer. You may need to cook them in batches to avoid overcrowding. Cook for 15-20 minutes, shaking the basket halfway through. This ensures even cooking and crispiness. While the fries cook, it’s time to whip up the spicy aioli. In a bowl, mix mayonnaise, lemon juice, Dijon mustard, minced garlic, sriracha, and a pinch of salt. Blend until smooth. Taste your aioli and adjust the flavors. Add more sriracha if you like it spicier. Once your fries are done, serve them hot. Arrange the fries in a rustic basket or on a wooden board. Place a small bowl of spicy aioli in the center. Garnish with chopped parsley to add color. Enjoy this delightful dish with friends or family! To get the best crispy fries, start by cutting sweet potatoes evenly. This helps them cook uniformly. I suggest soaking the fries in cold water for 30 minutes. This removes excess starch, making them crispier. When coating the fries, use a large bowl. Toss them with olive oil, paprika, garlic powder, cayenne, salt, and pepper. Make sure each fry gets a nice layer of the mix. This enhances the flavor and texture during cooking. For cooking, set your air fryer to 400°F (200°C). Cook the fries for 15-20 minutes. Shake the basket halfway through. This ensures even cooking. The fries should be golden and crunchy when done. You can adjust the spice to your taste. If you want more heat, add more cayenne. For a kick in the aioli, increase the sriracha. Start with a small amount and taste. This way, you can find the perfect heat level for you. You can also experiment with other spices. Try adding chili powder or smoked paprika. These can give a unique twist to your fries. Mix it up and see what you like best! To keep your air fryer in top shape, clean it after every use. Wipe down the outer surface with a damp cloth. For the basket, soak it in warm soapy water. Use a soft brush to remove any stuck bits. Avoid using metal utensils inside the basket. This can scratch the non-stick surface. Instead, use silicone or wooden tools. Following these tips will help your air fryer last longer and cook better. {{image_2}} You can make sweet potato fries in the oven if you don’t have an air fryer. Start by preheating your oven to 425°F (220°C). Toss your sweet potato fries in olive oil and spices just like you would for the air fryer. Spread them in a single layer on a baking sheet. Bake for 25 to 30 minutes. Flip the fries halfway through for even cooking. This method gives you crispy fries without an air fryer. While spicy aioli is great, you can try other dips too. Garlic aioli is a rich option. Just mix mayonnaise with minced garlic and a splash of lemon juice. For a lighter choice, use yogurt. Combine plain yogurt with herbs and a pinch of salt. You can also add a sprinkle of paprika for a kick. Each dip brings out different flavors in the fries. Want to change things up? Try different seasonings! Italian seasoning can add a fresh twist. Mix dried basil, oregano, and thyme into your oil. For a smoky flavor, use smoked paprika instead of regular paprika. You can also go spicy. Add chili powder or even onion powder for a unique taste. Each blend can make your fries a new experience. To keep your sweet potato fries fresh, store them in an airtight container. Place a paper towel inside to absorb extra moisture. This helps keep the fries crispy. Refrigerate them right after they cool down to room temperature. When you want to reheat them, preheat your air fryer to 400°F (200°C). Place the fries in the basket and cook for about 5 to 7 minutes. This method helps maintain their crunch. Avoid using a microwave, as it can make them soggy. For the spicy aioli, store it in a sealed container in the fridge. It will last about one week. Ensure the container is clean to avoid spoilage. If you want to enjoy it later, you can also freeze the aioli in ice cube trays. Once frozen, transfer the cubes to a freezer bag. This makes it easy to use small amounts later. Just thaw as needed for dipping! To make sweet potato fries crispy, start with a good cut. Cut your fries evenly. This helps them cook at the same rate. Toss the fries in olive oil and seasonings. Use just enough oil to coat them. Too much oil can make them soggy. Preheat your air fryer to 400°F (200°C) for five minutes. This step is key. Cook the fries in a single layer. If you crowd them, they won't crisp up well. Shake the basket halfway through cooking. This helps them brown evenly. Cook for about 15-20 minutes. Keep an eye on them towards the end. Yes, you can use regular potatoes. They will not taste the same, though. Sweet potatoes are sweeter and have a creamy texture. Regular potatoes are starchy and can be crispier. If you want a classic fry taste, use russets or Yukon golds. Adjust cooking time as needed. Regular potatoes might need a little less time than sweet potatoes. You can substitute mayonnaise with several options. For a vegan version, use avocado or silken tofu. Both provide a creamy texture. You can also use Greek yogurt for a tangy flavor. If you want something different, try cashew cream. Blend soaked cashews with lemon juice and garlic. This creates a rich and tasty dip. Adjust the other flavors in the aioli to match your choice. In this post, we explored making crispy sweet potato fries and a tasty spicy aioli. You learned the key ingredients, step-by-step methods, and helpful tips to ensure your fries are perfect. Remember, you can customize the flavors and try different sauces. Whether you air fry or bake, enjoy these fries fresh and hot. Storage tips will help you keep your extras crispy. With these ideas, you can impress family and friends at your next meal. Dive in, experiment, and enjoy every crunchy bite.
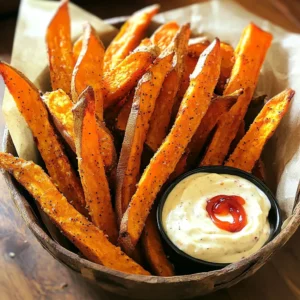
    Sweet Potato Fries with Spicy Aioli Air Fryer Delight
  • - 2 cups cooked chicken breast, shredded - 1 large apple, cored and diced - 1 cup red seedless grapes, halved - 1/2 cup walnuts, roughly chopped - 1/3 cup celery, finely chopped - 1/4 cup red onion, finely diced I love using cooked chicken breast for this salad. It adds protein and flavor. You can use leftover chicken or rotisserie chicken for ease. I suggest a crisp apple like Honeycrisp. It adds a sweet crunch. Red grapes bring a burst of juicy sweetness. Walnuts add a nice crunch and healthy fats. Celery and red onion provide freshness and a bit of bite. - 1/2 cup plain Greek yogurt - 2 tablespoons honey - 1 tablespoon Dijon mustard - 1 tablespoon lemon juice - Salt and pepper to taste For the dressing, Greek yogurt gives a creamy base. Honey adds a touch of sweetness. Dijon mustard provides a bit of tang. Lemon juice brightens the flavors. Adjust salt and pepper to your taste. - Large mixing bowl - Small bowl for dressing - Whisk - Spoon for mixing You’ll need a large bowl to mix everything together. A small bowl works well for whisking the dressing. A whisk helps blend the dressing smoothly. A spoon makes mixing easy. - Combine the chicken, apple, grapes, walnuts, celery, and onion in a bowl. - Prepare the dressing separately in another bowl. - Mix the dressing with the salad ingredients until everything is well coated. When you combine these ingredients, the flavors start to shine. The chicken gives protein, while the apple and grapes add sweetness. The walnuts give a nice crunch, and celery and onion add freshness. This blend creates a dish that feels both cozy and bright. - Pour the dressing over the salad mixture. - Gently fold until well coated. - Adjust seasoning if necessary with salt and pepper. Make sure to fold gently to keep the grapes intact. You want that satisfying burst of flavor when you bite into them. Taste the salad after mixing. If it needs more salt or pepper, add a little. This step lets you personalize the flavor to your liking. - Cover and refrigerate for at least 30 minutes. - Serve on mixed greens or in sandwiches. - For a fun twist, serve in a hollowed-out apple. Chilling the salad allows the flavors to meld nicely. It also makes it extra refreshing. If you serve it in a hollowed-out apple, it looks great and adds more apple flavor. Garnish with fresh parsley and extra walnuts for a lovely touch. Enjoy your Harvest Chicken Salad with Apples and Grapes! - Best apple varieties for salads: Honeycrisp apples are my top choice. They stay crisp and add a sweet taste. Other great options are Granny Smith for tartness or Fuji for sweetness. - How to select fresh grapes: Look for firm, plump grapes with no soft spots. The color should be bright and vibrant. Fresh grapes should remain attached to their stems. - Tips for cutting vegetables: Use a sharp knife for neat slices. For celery, cut thin, even pieces. Dice the onion small for balanced flavor. - Preparation tips for meal prep: Cook your chicken in advance. Chop your apples and grapes right before serving. This keeps everything fresh and crunchy. - Storing salad components separately: Keep the dressing separate from the salad. This prevents soggy ingredients and keeps flavors bright. - Ways to ensure freshness: Store cut fruits in an airtight container. Use lemon juice on apples to prevent browning. - Spice and herb additions: Try adding a pinch of cinnamon for warmth. Fresh herbs like parsley or dill can brighten the dish. - Using different creamy dressings: Swap Greek yogurt for ranch or avocado dressing. Each option adds a unique twist to the flavor. - Customizing sweetness levels: Adjust the honey to match your taste. You can also add more fruit for extra sweetness if desired. {{image_2}} To make this salad nut-free, swap the walnuts for seeds. Sunflower seeds work great. They add crunch and flavor without nuts. You can also use pumpkin seeds for a different texture. Another option is to add more crunchy veggies. Try diced bell peppers or sliced radishes for that extra bite. If you don’t have cooked chicken, use canned chicken or rotisserie chicken. These options save time and taste great. For a vegetarian twist, chickpeas are a fantastic choice. They add protein and fiber, making the salad filling. You can mix in other fruits for seasonal flair. Consider pears, berries, or even citrus fruits like oranges. These fruits bring a fresh taste and color. Think about sweet versus savory combinations. Apples and grapes are sweet, but adding a touch of cheese can balance the flavors. Experiment and find your favorite mix! To keep your Harvest Chicken Salad fresh, store it in an airtight container. This helps prevent the salad from drying out. Place it in the fridge right after serving. The salad lasts for about three to four days when stored properly. Freezing this salad is not a good idea. The apples and grapes can become mushy when thawed. If you want to freeze it, consider freezing the chicken and dressing separately. This keeps the flavors fresh. Enjoying leftovers is easy! If you prefer a warm dish, heat the chicken separately and mix it back in. For a day-old salad, serve it on fresh greens or in a wrap. You can also add new ingredients like fresh nuts or herbs to brighten it up. You can add grains or legumes to make the salad heartier. Here are some great options: - Quinoa: This tiny grain packs a punch of protein. - Brown rice: A nutty flavor that adds texture. - Chickpeas: These legumes will boost protein and fiber. Mix any of these into your salad for extra bulk and nutrition. Yes, you can easily make this salad vegan. Here are some plant-based swaps: - Chicken: Use chickpeas, tofu, or tempeh as a protein source. - Greek yogurt: Substitute with vegan yogurt or silken tofu blended smooth. - Honey: Replace with maple syrup or agave nectar for sweetness. These changes keep the flavor while making it plant-based. Pair this salad with these side dishes for a complete meal: - Crusty bread: A nice baguette or sourdough goes well. - Soup: A light vegetable or chicken soup complements the salad. - Fresh fruit: Serve with a fruit platter for a sweet touch. These sides will round out your meal nicely. Absolutely! You can use other yogurts, but flavors may change: - Regular yogurt: It’s less thick than Greek yogurt but works fine. - Almond or coconut yogurt: These add a unique taste; be sure they are unsweetened. - Sour cream: It offers a tangy flavor but is not dairy-free. Experiment with these options to find your favorite flavor! This salad mixes cooked chicken, fresh fruit, and crunchy nuts for flavor. It’s easy to make with just a few steps, equipment, and simple ingredients. I shared tips on selecting the best fruits, making it in advance, and enhancing its taste. The variations allow you to customize it to your liking. Store leftovers properly to enjoy them later. Whether you serve it fresh or as a sandwich, this salad is a winner for any meal.
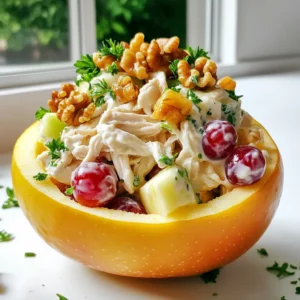
    Harvest Chicken Salad with Apples and Grapes Delight
  • - 8 oz penne pasta - 1 pound smoked sausage (andouille or kielbasa) - 1 medium onion, chopped - 2 cloves garlic, minced - 1 red bell pepper, diced - 1 green bell pepper, diced - 2 tablespoons Cajun seasoning - 1 teaspoon paprika - 1 cup heavy cream - 1 cup chicken broth - 1/2 cup grated Parmesan cheese - Olive oil, salt and pepper to taste - Fresh parsley for garnish This dish starts with penne pasta. I love penne for its ability to hold sauce well. Use 8 ounces, enough for four servings. Next, grab 1 pound of smoked sausage. Andouille or kielbasa works best for that deep flavor. Now, let’s talk veggies. You need a medium onion, two cloves of garlic, one red bell pepper, and one green bell pepper. Chop them to add color and taste. For the spices, mix in 2 tablespoons of Cajun seasoning and 1 teaspoon of paprika. These spices give the dish that warm, bold Cajun flavor. Next, we’ll create the creamy sauce. Grab 1 cup of heavy cream and 1 cup of chicken broth. These will make the sauce rich and smooth. Don’t forget 1/2 cup of grated Parmesan cheese for extra creaminess. Finally, use olive oil, salt, and pepper to taste. Fresh parsley will garnish your dish, adding a pop of color and freshness. With these ingredients, you are set to make a delicious creamy Cajun sausage pasta! - Boil the penne pasta according to package instructions. - Drain and set aside. - Heat olive oil in a skillet over medium heat. - Brown the sliced sausage until golden and crisp. - Sauté the chopped onion, minced garlic, and diced bell peppers in the skillet. - Pour in the chicken broth and heavy cream. - Stir in Cajun seasoning and paprika for a bold flavor. - Toss the cooked pasta into the skillet with the creamy sauce. - Let it simmer on low heat for a few minutes. - Stir in grated Parmesan cheese until melted and creamy. - Season with salt and pepper to taste. - Garnish with fresh parsley for a pop of color. To get the right cream sauce, focus on simmering. After adding chicken broth and heavy cream, let it cook gently. This helps it thicken without burning. Stir it often to keep it smooth. To prevent curdling, avoid high heat. If the sauce gets too hot, the cream can separate. Keep the heat low and gradually mix in the cheese. This will help it melt evenly and stay creamy. For the best flavor, use smoked sausage like andouille or kielbasa. These sausages add a rich, spicy taste that pairs well with the cream. If you want alternatives, try chicken sausage or turkey sausage. They have less fat but still provide good flavor. Some even enjoy using chorizo for a different kick. Adding extra spices can elevate your dish. Try a pinch of cayenne pepper for extra heat. You can also mix in a bit of Italian seasoning for depth. Using fresh herbs like parsley or basil as a garnish adds a burst of freshness. They brighten the dish and make it look beautiful. Plus, they add a nice flavor that balances the creaminess. {{image_2}} You can easily switch up the meat in this dish. If you want a lighter option, use chicken. Simply cut the chicken into bite-sized pieces and cook it until golden. Chicken works great with the creamy sauce and spices. If you prefer seafood, shrimp is a fantastic choice. Just add them at the same time as the sausage. Cook until they turn pink and opaque. For those who skip meat, there are tasty vegetarian options. Try using mushrooms or zucchini for a hearty feel. These veggies add flavor and texture. You can also use plant-based sausage for a great meat-like taste. While penne is my go-to, many other pasta types work well. Bowtie or fusilli can add a fun twist to your dish. They hold the sauce nicely. For a lighter option, consider whole grain pasta. The nutty flavor pairs well with the creamy sauce. If you need gluten-free options, there are many choices available. Rice pasta or chickpea pasta can be great substitutes. They cook a bit differently, so check the package for cooking times. You can make this dish lighter or dairy-free if you like. Swap heavy cream for coconut milk. This adds a lovely flavor and keeps it creamy. For a lighter sauce, use low-fat milk or a mix of broth and cream. Adding vegetables to the sauce is a smart way to boost nutrition. Spinach or kale can blend right into the cream, making it green and healthy. You could also stir in some diced tomatoes for extra flavor. These changes keep the dish delicious while adding variety. To keep your creamy Cajun sausage pasta fresh, store it in the fridge. Place it in an airtight container. This helps prevent moisture loss. You can store it for up to three days. Make sure to let it cool down before sealing it. Use glass or plastic containers with tight lids for best results. You can reheat your pasta on the stove or in the microwave. The stove method is better for keeping the creamy texture. Heat it on low, stirring often. If you use a microwave, cover it to avoid drying out. Add a splash of cream or broth to keep it creamy. Heat in short bursts, stirring in between. Yes, you can freeze creamy Cajun sausage pasta! To freeze, let it cool completely. Transfer it to freezer-safe bags or containers. Remove as much air as possible to prevent freezer burn. It can last for up to three months in the freezer. To defrost, place it in the fridge overnight. Reheat gently on the stove with extra cream or broth. You can use whole milk mixed with butter. Use 3/4 cup of whole milk with 1/4 cup of melted butter. This mix gives you a creamy texture. Coconut milk is another good option. It adds a unique flavor. For a lighter choice, try Greek yogurt. Whisk it well before adding it to your sauce. Yes, you can make this dish ahead of time. Cook the pasta and sauce separately. Then, store each in airtight containers. When ready to serve, combine and heat gently. This helps the flavors blend well. Just be careful not to overcook the pasta when reheating. Cajun seasoning has a medium level of spice. It usually contains paprika, cayenne, garlic, and onion powder. If you want more heat, add extra cayenne. For a milder taste, use less Cajun seasoning. You can always adjust to fit your taste. This pasta goes well with a simple green salad. You can also serve garlic bread on the side. Another option is roasted vegetables. They add color and flavor. Some people enjoy pairing it with corn on the cob too. Absolutely! Adding vegetables boosts nutrition and flavor. You can include spinach, zucchini, or mushrooms. Just sauté them along with the other veggies. This will keep them tender and flavorful. Feel free to get creative with what you have! In this blog post, we explored a delicious creamy Cajun sausage pasta recipe. We covered the main ingredients, step-by-step cooking instructions, and helpful tips. Don’t be afraid to experiment with different meats or vegetables to make it your own. You can easily store and reheat leftovers for later enjoyment. This dish is versatile and can suit many dietary needs. Enjoy cooking this flavorful dish and impress your family and friends with each bite!
    Creamy Cajun Sausage Pasta Flavorful Dinner Delight
  • - 2 large apples (Granny Smith or Honeycrisp), diced - 1 cup Greek yogurt (vanilla flavor) - 1/2 cup granola (your choice) - 1/4 cup caramel sauce (store-bought or homemade) - 1/2 teaspoon cinnamon - 1 tablespoon lemon juice - Whipped cream (optional, for garnish) - Chopped nuts (optional, such as walnuts or pecans, for added crunch) For this recipe, I prefer using Granny Smith or Honeycrisp apples. These types give a great mix of tart and sweet. You can dice them easily to fit into your parfait. I always choose vanilla Greek yogurt. It adds a creamy texture and a slight sweetness. You can use plain yogurt if you want less sugar. Granola is a fun part of this recipe. Choose your favorite brand or make your own. It adds crunch and flavor. You can use store-bought caramel sauce for quick prep. If you want to make it special, try homemade caramel. It tastes rich and fresh. A little cinnamon goes a long way. It adds warmth and spice. Lemon juice keeps the apples bright and fresh. For a fun touch, add whipped cream on top. It makes the parfait feel fancy. Also, sprinkle some chopped nuts like walnuts or pecans for extra crunch. Gather these ingredients, and you’re ready to create a delicious dessert or snack! Start by dicing two large apples. I like using Granny Smith or Honeycrisp for their crisp texture. In a medium bowl, mix the diced apples with 1 tablespoon of lemon juice and 1/2 teaspoon of cinnamon. This step is key. The lemon juice stops the apples from browning, and the cinnamon adds nice flavor. Now, gather your parfait glasses or bowls. Begin with a layer of Greek yogurt at the bottom of each glass, about 1/4 cup per serving. This creamy base is essential for a rich taste. Next, spoon a third of the apple mixture over the yogurt. Drizzle 1 tablespoon of caramel sauce on top of the apples. The caramel adds a sweet touch. After that, sprinkle about 2 tablespoons of granola over the caramel for crunch. Repeat these layers until your glass is full. Finish with a layer of yogurt and a drizzle of caramel sauce. If you want to make it special, add a dollop of whipped cream on top. You can also sprinkle some chopped nuts, like walnuts or pecans, for extra texture. Serve these parfaits right away, or you can refrigerate them for up to an hour. This wait helps the flavors blend nicely. When making caramel apple yogurt parfaits, the right apple matters. I recommend using Granny Smith or Honeycrisp apples. - Granny Smith: This variety is tart and crisp. It balances well with sweet caramel. - Honeycrisp: This apple is sweet and juicy. It adds a pleasant crunch to your parfait. You can mix these apples for a fun flavor twist! You can switch up the yogurt and granola to fit your taste. Use any yogurt flavor you love. Greek yogurt adds creaminess, but you can go for dairy-free too. For granola, choose your favorite. - Substitutes: Try coconut yogurt or almond milk yogurt for a dairy-free option. - Flavor Variations: Add spices like nutmeg or ginger for extra warmth. You can also use vanilla or almond extract to enhance the flavor. How you serve your parfaits can make a big difference. Use clear glassware to show off those beautiful layers. - Different Glassware: Mason jars or small bowls work great. They add charm to your dish. - Garnishing Tips: Top with a sprinkle of nuts or a drizzle of caramel. This makes your parfaits look even more tempting! These tips will help you create a delicious and beautiful dessert that everyone will love! {{image_2}} You can change the flavors of caramel apple yogurt parfaits with the seasons. For fall, try adding pumpkin puree or diced pears. This will give your parfait a warm, cozy feel. The pumpkin adds creaminess, while the pear offers sweetness. In the summer, mix in berries like strawberries, blueberries, or raspberries. Their bright flavors and colors make your parfait fun and fresh. Just replace some apple with your chosen berries. This twist keeps the dish vibrant and delicious. If you're looking for gluten-free options, choose gluten-free granola. Many brands offer tasty blends that fit this need. They still add crunch and flavor to your parfait. For those needing dairy-free options, swap Greek yogurt for a dairy-free yogurt. Almond or coconut yogurt works well. They offer a creamy texture without the dairy. Make sure to check the label for added sugars or artificial flavors. You can easily adjust the parfait for breakfast or dessert. For breakfast, stick to yogurt, apples, and granola. This keeps it light and healthy. If you want a dessert, add more caramel and whipped cream. You can also layer in chocolate or nuts for extra richness. This way, you can enjoy the same base recipe but switch it up for any meal! You can store the parfaits in the fridge for up to one day. Keep them in an airtight container. This will keep them fresh and tasty. After one day, the apples may brown and the granola can get soggy. If you want, you can separate the layers in different containers. This helps keep everything fresh longer. You can freeze these parfaits, but it’s not the best idea. Freezing can change the texture of the yogurt and apples. If you still want to freeze them, here are some tips: - Use freezer-safe containers to avoid freezer burn. - Freeze the layers separately, if possible. This helps maintain their original taste and texture. - When ready to eat, thaw in the fridge overnight. Enjoy them within a week. If you have extra yogurt, apples, or granola, there are many fun ways to use them: - Mix yogurt with fruits for a smoothie. - Use leftover apples in muffins or pancakes. - Top yogurt with granola for a quick snack. - Add granola to salads for a crunchy kick. Getting creative with leftovers helps reduce waste and adds variety to your meals. Yes, you can prepare these parfaits one hour ahead. Layer them in glasses, then cover and chill in the fridge. The flavors blend well in this time. However, store the apples separately if you want them crisp. Mix diced apples with lemon juice and cinnamon. This method keeps the apples fresh and tasty. The lemon juice slows browning, while cinnamon adds a warm flavor. To make dairy-free parfaits, use coconut yogurt or almond yogurt instead of Greek yogurt. Both options provide a creamy texture. You can also use a dairy-free caramel sauce for sweetness. Absolutely! You can try flavored yogurt, like honey or maple. Non-dairy options also work well. Just pick a yogurt that matches your taste. To make these parfaits healthier, use low-sugar granola. You can add chia seeds for extra fiber. Try mixing in some fresh berries or nuts for added nutrients and crunch. You now have all the tools to create your own amazing parfaits. Use your favorite apples and yogurt for the best taste. Don’t forget to mix in lemon juice and cinnamon to keep apples fresh. Feel free to customize your recipe with seasonal fruits or dietary needs. Store extras wisely to enjoy later. Making parfaits is fun and easy, perfect for breakfast or dessert. Try different toppings to keep it exciting. Dive into this delicious treat for any meal and enjoy!
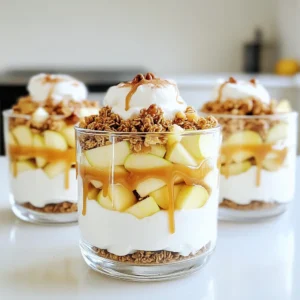
    Caramel Apple Yogurt Parfaits Flavorful and Easy Recipe
  • To make Butternut Squash Alfredo Pasta, you need a few simple items. Here’s the list of ingredients: - Fettuccine pasta (12 oz) - Butternut squash (2 cups, peeled and cubed) - Olive oil (2 tablespoons) - Garlic (4 cloves, minced) - Vegetable broth (1 cup) - Heavy cream (1 cup) - Nutmeg (1 teaspoon) - Salt (1 teaspoon) - Black pepper (1/2 teaspoon) - Grated Parmesan cheese (1/2 cup) - Fresh parsley, chopped (for garnish) Each ingredient plays a key role in building flavor and creaminess. Fettuccine pasta is great for holding the sauce. It’s thick and chewy. Butternut squash gives a sweet and nutty taste. Roasting it enhances its flavors. Olive oil and garlic add depth and aroma. The vegetable broth gives the sauce a savory base. Heavy cream makes it rich and smooth. Don’t forget the nutmeg, salt, and black pepper. They bring warmth and balance. Finally, Parmesan cheese adds a salty kick, while fresh parsley offers a bright finish. Gather these ingredients before you start cooking. This way, you’ll have everything at hand for a fun and smooth cooking experience! - First, preheat your oven to 400°F (200°C). - Next, toss the cubed butternut squash with 1 tablespoon of olive oil, salt, and pepper. - Spread the squash on a baking sheet. - Roast for 25 to 30 minutes until it is tender and slightly caramelized. - While the squash roasts, boil a large pot of water. - Add a good pinch of salt to the water. - Once boiling, add 12 oz of fettuccine pasta. - Cook according to the package instructions until al dente, which is usually about 8 to 10 minutes. - Drain the pasta and set it aside, but reserve 1/2 cup of the pasta water. - In a large skillet, heat the remaining tablespoon of olive oil over medium heat. - Add 4 cloves of minced garlic to the skillet. - Sauté for about 1 minute until it smells fragrant but not burnt. - Add the roasted butternut squash to the skillet with the garlic. - Pour in 1 cup of vegetable broth and 1 cup of heavy cream. - Stir everything together and let it simmer for 5 minutes. - Use an immersion blender to puree the mixture until smooth. - If you don’t have an immersion blender, carefully transfer it to a regular blender. - Stir in 1 teaspoon of nutmeg, 1 teaspoon of salt, and 1/2 teaspoon of black pepper. - If the sauce is too thick, add some reserved pasta water to reach your desired consistency. - Add the cooked fettuccine to the creamy butternut squash sauce. - Toss gently to coat the pasta evenly. - Stir in 1/2 cup of grated Parmesan cheese until it melts and blends in. - For serving, plate the pasta and sprinkle with more Parmesan and chopped fresh parsley. - Choosing the right butternut squash: Look for a squash that feels heavy for its size. The skin should be smooth and free from blemishes. A good squash will have a deep orange color, which means it is ripe and sweet. - Cooking pasta al dente: When cooking fettuccine, boil it in salted water. Check the package for timing but aim for just under the suggested time. It should feel firm when you bite into it. This helps the pasta hold its shape and texture in the creamy sauce. - Proper storage techniques: Store any leftovers in an airtight container. Refrigerate within two hours of cooking. Eat them within three days for the best taste. - Best reheating methods: To reheat, warm the pasta on the stove over low heat. Add a splash of broth or cream to restore the creamy texture. Stir often to avoid burning. You can also use a microwave, but use short increments of time and stir in between. - Vegetarian or vegan options: To make this dish vegan, swap heavy cream for coconut cream or cashew cream. You can also use nutritional yeast instead of Parmesan cheese for that cheesy flavor without dairy. - Gluten-free pasta alternatives: If you need a gluten-free option, use rice or chickpea pasta. These options work well and provide a nice texture in the dish. Always check the cooking time, as it may differ from traditional pasta. {{image_2}} You can easily add protein to your Butternut Squash Alfredo Pasta. Here are some great options: - Cooked chicken or turkey adds flavor and heartiness. - Shrimp brings a nice seafood touch. - For a meat-free choice, try chickpeas or lentils. - Tofu is a great vegetarian option. Use firm tofu for the best texture. These proteins make the dish filling. Adding more veggies can make your dish vibrant and healthy. Here are some tasty choices: - Spinach wilts nicely into the warm pasta. - Broccoli adds crunch and color. - Peas mix well and add a sweet touch. - Roasted red peppers bring a smoky flavor. Feel free to mix and match your favorites! You can boost the taste of your Alfredo sauce with herbs and spices. Here are some great ideas: - A sprinkle of red pepper flakes gives a spicy kick. - Fresh basil or thyme adds a lovely aroma. - A squeeze of lemon juice brightens the flavors. - Smoked paprika adds depth and warmth. Experiment with these flavor enhancements to make the dish your own! Each serving of Butternut Squash Alfredo Pasta has about 600 calories. This number may change with portion size and added ingredients. Butternut squash is rich in vitamins and minerals. It has a lot of vitamin A, which helps vision. It also contains vitamin C and fiber. These nutrients help boost your immune system and support digestion. Eating butternut squash can help you feel full and satisfied. In one serving, you get approximately: - Protein: 15 grams - Carbohydrates: 80 grams - Fats: 25 grams This dish has a nice balance of macros. The carbs give you energy, while the fats help you feel full. The protein helps with muscle repair and growth. You can easily make Butternut Squash Alfredo Pasta vegan. Here are some simple swaps: - Use vegan fettuccine pasta. - Replace heavy cream with full-fat coconut milk or cashew cream. - Instead of Parmesan cheese, try nutritional yeast for a cheesy flavor. - Use vegetable broth, which is already vegan. These swaps keep the dish creamy and delicious without dairy. Yes, you can use different types of pasta. Here are some great options: - Penne: This shape holds the sauce well. - Rigatoni: Its ridges catch the sauce nicely. - Gluten-free pasta: There are many good brands available. Feel free to choose any pasta you enjoy. Just cook it according to package instructions. This dish pairs well with many sides. Here are a few ideas: - Garlic bread: A crunchy side that complements the creamy pasta. - Salad: A fresh green salad adds balance. - Roasted vegetables: Carrots, broccoli, or Brussels sprouts work great. These sides make your meal complete and satisfying. If your Alfredo sauce turns out lumpy, don’t worry. Here’s how to fix it: - Use an immersion blender to smooth the sauce. - If you don’t have one, transfer the sauce to a regular blender. - Blend until smooth and creamy. If the sauce is too thick, add a little reserved pasta water. This will help get the right consistency. In this post, I shared a simple butternut squash Alfredo pasta recipe. We covered key ingredients, step-by-step cooking instructions, and helpful tips for success. I also explored delicious variations and provided nutritional insights. This dish offers flavor and comfort while being easy to prepare. Whether you want to try new flavors or adapt it for different diets, you now have all the tools. Enjoy making this dish, and share it with others to spread the joy of cooking!
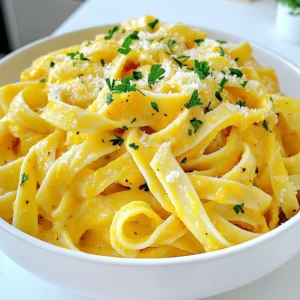
    Butternut Squash Alfredo Pasta Creamy Comfort Dish
  • To make pumpkin streusel muffins, you need a few key items. Here’s what you will need: - 1 cup canned pumpkin puree - 1/2 cup vegetable oil - 3/4 cup brown sugar, packed - 1/2 cup granulated sugar - 2 large eggs - 1 teaspoon vanilla extract - 1 1/2 cups all-purpose flour - 1 teaspoon baking soda - 1 teaspoon baking powder - 1 teaspoon ground cinnamon - 1/2 teaspoon ground nutmeg - 1/4 teaspoon ground ginger - 1/4 teaspoon salt These ingredients create a moist and flavorful muffin. The pumpkin puree gives a rich taste and a lovely color. The streusel topping adds a crunchy texture. You will need the following for it: - 1/2 cup rolled oats - 1/3 cup all-purpose flour - 1/4 cup brown sugar, packed - 1/4 cup unsalted butter, melted - 1 teaspoon ground cinnamon Mix these ingredients to create a crumbly blend. This topping is what makes your muffins feel like a treat from a bakery. You can enhance your muffins with fun add-ins. Here are some great options: - Chopped nuts like walnuts or pecans - Chocolate chips for a sweet twist - Dried fruit like cranberries or raisins These add-ins can bring new flavors and textures to your muffins. Feel free to get creative! To start, preheat your oven to 350°F (175°C). Line a muffin tin with paper liners or grease it with cooking spray. In a big bowl, mix together: - 1 cup canned pumpkin puree - 1/2 cup vegetable oil - 3/4 cup brown sugar, packed - 1/2 cup granulated sugar - 2 large eggs - 1 teaspoon vanilla extract Stir until everything looks smooth. In another bowl, whisk these dry ingredients: - 1 1/2 cups all-purpose flour - 1 teaspoon baking soda - 1 teaspoon baking powder - 1 teaspoon ground cinnamon - 1/2 teaspoon ground nutmeg - 1/4 teaspoon ground ginger - 1/4 teaspoon salt Now, slowly add the dry mix to the wet mix. Stir gently until just combined. Be careful not to overmix. This can make your muffins tough. In a separate bowl, prepare the streusel topping. Combine: - 1/2 cup rolled oats - 1/3 cup all-purpose flour - 1/4 cup brown sugar, packed - 1/4 cup unsalted butter, melted - 1 teaspoon ground cinnamon Mix until it looks crumbly. This topping adds a sweet crunch to your muffins. Now, scoop the muffin batter into your lined muffin tin. Fill each cup about 2/3 full. Sprinkle the streusel topping generously over each muffin. Bake in your preheated oven for 18 to 22 minutes. Use a toothpick to check if they are done. When the toothpick comes out clean, they are ready. Once baked, remove the muffins from the oven. Let them cool in the pan for about 5 minutes. Then, transfer them to a wire rack to cool completely. Enjoy the warm, sweet smell as they cool. To get that perfect bakery-style muffin, focus on mixing. First, mix your wet and dry ingredients separately. When you combine them, mix gently. Stop as soon as you see no dry flour. Overmixing makes muffins tough. Also, fill your muffin cups 2/3 full for the right rise. One big mistake is using old baking powder and baking soda. Always check their freshness. Another mistake is skipping the streusel topping. It adds a nice crunch and flavor. Lastly, don't open the oven too soon. This can cause your muffins to sink in the middle. For precise measuring, use dry measuring cups for flour and sugar. Spoon the flour into the cup, then level it off with a knife. Avoid packing it down. For liquids, use a liquid measuring cup. Check the measurement at eye level for accuracy. This ensures your muffins turn out just right every time. {{image_2}} You can add nutmeg or cloves for a warm taste. Simply use one teaspoon of ground nutmeg. This spice deepens the pumpkin flavor. If you prefer cloves, add a quarter teaspoon. Cloves give a bold, cozy note. Mix these spices into the dry ingredients before combining them with the wet mixture. To make these muffins gluten-free, swap all-purpose flour for a gluten-free blend. Check that the blend contains xanthan gum. For a vegan option, replace eggs with flax eggs. Use one tablespoon of ground flaxseed mixed with three tablespoons of water per egg. Let it sit until it thickens. Also, use a plant-based oil in place of vegetable oil. Adding nuts or chocolate chips can enhance the muffins. Chopped walnuts or pecans add crunch and flavor. Gently fold in half a cup of nuts into the batter. For a sweet twist, add chocolate chips. Use the same amount; half a cup works well. This creates a delightful surprise in each bite. To keep your pumpkin streusel muffins fresh, place them in an airtight container. This helps lock in moisture and keeps them soft. You can store them at room temperature for up to three days. If you need them to last longer, consider refrigeration. Just remember to let them come back to room temp before serving. Freezing these muffins is easy. First, let them cool completely. Next, wrap each muffin in plastic wrap or place them in a freezer bag. Be sure to remove as much air as possible. Label the bag with the date. You can freeze them for up to three months. When you’re ready to enjoy, just thaw them overnight in the fridge. To reheat your muffins, you can use the microwave or the oven. If using the microwave, heat them for about 15-20 seconds. For the oven, preheat it to 350°F (175°C) and warm the muffins for 5-10 minutes. This will bring back their fresh-baked taste and aroma. Enjoy your muffins warm for the best flavor! Yes, you can use fresh pumpkin. First, cook the pumpkin until soft. Then, blend it into a smooth puree. This can give your muffins a fresh taste and texture. Just make sure to drain any excess water to keep the muffins from getting soggy. Pumpkin muffins last about 3 to 5 days at room temperature. Store them in an airtight container. For longer storage, you can refrigerate them for up to a week. Always check for mold or off smells before eating. Yes, you can make mini muffins! Use a mini muffin tin and adjust the baking time. Bake them for about 10 to 15 minutes. Check for doneness with a toothpick. They should be golden and spring back when lightly touched. You can serve pumpkin streusel muffins with various treats. A hot cup of coffee or tea pairs well. For a fun twist, try spreading cream cheese or butter on warm muffins. You can also serve them with a scoop of vanilla ice cream for a dessert option. You now have all you need to make perfect pumpkin streusel muffins. We covered key ingredients, step-by-step instructions, and helpful tips. You learned about variations to suit your taste and how to store your muffins for later. In making them, keep it simple. Enjoy the process and share your muffins with others. They are perfect for any occasion. Happy baking!
    Pumpkin Streusel Muffins Bakery-Style Delightful Treat
  • To make this pudding, you need some simple ingredients. Here’s what you will use: - 2 cups cottage cheese (low-fat or full-fat) - 1/4 cup unsweetened cocoa powder - 1/4 cup honey or maple syrup - 1 teaspoon vanilla extract - 1/4 cup almond milk (or any milk of choice) - A pinch of salt - Dark chocolate shavings or chips (for garnish) - Fresh berries (for serving) Cottage cheese gives the pudding its creamy base. Cocoa powder adds rich chocolate flavor. Honey or maple syrup sweetens it, while vanilla enhances the taste. Almond milk helps blend everything smoothly. You can change this recipe to fit your taste. Here are some fun ideas: - Add a splash of coffee for a mocha twist. - Mix in a tablespoon of nut butter for extra creaminess. - Use a different sweetener like agave syrup or stevia. These options let you play with flavors and textures. Feel free to experiment and make it your own! If you lack an ingredient, don’t worry! Here are some easy swaps: - Use Greek yogurt instead of cottage cheese for a thicker texture. - Swap honey or maple syrup with sugar or a sugar substitute. - Try coconut milk instead of almond milk for a tropical flavor. These substitutions maintain the pudding’s taste and texture while making it fit your kitchen needs. Enjoy creating your version of chocolate cottage cheese pudding! First, gather all your ingredients. You need: - 2 cups cottage cheese - 1/4 cup unsweetened cocoa powder - 1/4 cup honey or maple syrup - 1 teaspoon vanilla extract - 1/4 cup almond milk - A pinch of salt - Dark chocolate shavings (for garnish) - Fresh berries (for serving) Make sure your cottage cheese is smooth. If it has lumps, it won’t blend well. You can use low-fat or full-fat cottage cheese based on your taste. Next, place the cottage cheese in a blender. Add the cocoa powder, honey or maple syrup, vanilla extract, almond milk, and salt. Blend this mixture until it is smooth. Scrape the sides with a spatula as you blend. This helps mix everything evenly. Taste the pudding after blending. If it’s not sweet enough, add more honey or syrup. Blend again briefly to mix in the extra sweetness. The goal is a creamy, rich texture. Once your pudding is smooth, spoon it into serving bowls. Cover them and put them in the fridge. Chill the pudding for at least 30 minutes. This time helps the flavors blend and the pudding to thicken. When you are ready to serve, top each bowl with dark chocolate shavings and fresh berries. This adds color and extra taste. Enjoy your delicious chocolate cottage cheese pudding! You can change the sweetness to fit your taste. Start with a quarter cup of honey or maple syrup. After blending, taste the pudding. If it needs more sweetness, add a little more syrup. Blend again to mix it well. This way, you can make it just right for you. To get a creamy texture, use a good food processor or blender. Blend the cottage cheese, cocoa powder, and other ingredients until smooth. Stop to scrape the sides if needed. This will help mix everything evenly. If it feels too thick, add a bit more almond milk. Blend again until it’s just how you like it. Make your pudding look great when serving. Use clear glasses to show off the creamy layers. Top with dark chocolate shavings and fresh berries for color. You can also add a sprig of mint for a nice touch. This will make your dessert look fancy and appetizing. {{image_2}} You can boost the flavor of your pudding by adding Nutella or peanut butter. Start by blending in 2 tablespoons of either ingredient with the other ingredients. This gives it a rich, creamy taste that you will love. Nutella adds a sweet chocolatey flavor, while peanut butter gives a nutty twist. Both options make your pudding even more delicious! The recipe calls for almond milk, but you can use any milk you like. Try dairy milk for a creamier texture. If you prefer plant-based options, oat milk or coconut milk work well too. Each type of milk changes the flavor slightly. Experiment to find your favorite! Garnishing your pudding with fresh fruit makes it pop! In spring and summer, use berries like strawberries or blueberries. In fall, sliced apples or pears add a nice touch. For winter, try pomegranate seeds for a burst of color and flavor. The fruits not only look great but also add freshness to your dessert. To keep your Chocolate Cottage Cheese Pudding fresh, store it in the fridge. Always cover the pudding with plastic wrap or a lid. This helps prevent it from absorbing other smells in the fridge. If you leave it uncovered, it may dry out or get hard on top. Use airtight containers for the best results. Glass jars or plastic containers work great. I prefer glass jars. They are easy to clean and look nice. You can see the pudding, which makes it more tempting! Your pudding will stay fresh for about 3 to 5 days in the fridge. After that, the texture may change. If you notice any off smells or flavors, it's best to toss it. Always trust your senses! Enjoy your pudding within the week for the best taste and texture. Yes, you can use Greek yogurt. It will change the taste and texture. Greek yogurt is creamier, making the pudding smooth. If you want a tangy flavor, this is a great choice. This recipe can fit into a low-carb diet with some tweaks. Use low-carb sweeteners instead of honey or maple syrup. You can also reduce the cocoa powder to lower carbs. Just watch your portion sizes. Freezing is not ideal for this pudding. The texture may change when thawed. Instead, enjoy it fresh or store it in the fridge for later. If you must freeze it, put it in an airtight container. To make this pudding vegan, swap cottage cheese with silken tofu. Use maple syrup as your sweetener. Choose plant-based milk like almond or oat milk. This way, you can keep the creamy texture and flavor. Toppings can add fun and flavor. Try dark chocolate shavings for richness. Fresh berries like strawberries or raspberries add a fruity twist. You can also sprinkle nuts for crunch or drizzle more syrup for sweetness. This blog post shared a simple recipe for Chocolate Cottage Cheese Pudding. You learned about key ingredients, step-by-step instructions, and tips for perfecting it. Customizing your pudding with different flavors or fruits can make it unique. Proper storage helps keep it fresh and tasty. Enjoy making this easy dessert! With a few tweaks, you can make this treat your own. Happy pudding making!
    Chocolate Cottage Cheese Pudding Easy and Delicious Treat
  • - 2 lbs beef short ribs - 1 cup balsamic vinegar - 1 cup beef broth - 2 tablespoons brown sugar - 1 tablespoon Dijon mustard - 4 cloves garlic, minced - 1 large onion, sliced - 2 carrots, chopped - 1 teaspoon dried thyme - 1 teaspoon dried rosemary - Salt and pepper to taste - 2 tablespoons olive oil - Fresh parsley, chopped (for garnish) Each ingredient plays a key role in the flavor. The beef short ribs bring richness. Balsamic vinegar adds a sweet and tangy taste. Beef broth gives depth to the sauce. Brown sugar balances the acidity of the vinegar. Dijon mustard adds a subtle kick. Garlic, onion, and carrots create a savory base. Thyme and rosemary add herbal notes that enhance the dish. Don't forget salt and pepper, as they bring all the flavors together. You can customize this recipe. Consider adding chopped celery for crunch. A splash of red wine can deepen the flavor. For a touch of heat, add red pepper flakes. If you like sweetness, try using honey instead of brown sugar. Each option can bring a new twist to your meal. Start by seasoning the beef short ribs. Use salt and pepper generously on all sides. This step enhances the flavor. It only takes a few minutes but makes a big difference. Next, heat olive oil in a large skillet over medium-high heat. Once hot, add the short ribs. Sear each side for about 3-4 minutes. You want them nicely browned. This step locks in juices and adds flavor. Once done, remove the ribs and place them in the slow cooker. In the same skillet, add sliced onions, chopped carrots, and minced garlic. Sauté these for about 5 minutes. You want them to soften, but not too much. Then, in a separate bowl, mix balsamic vinegar, beef broth, brown sugar, Dijon mustard, dried thyme, and dried rosemary. Whisk until combined. Pour this sauce over the ribs in the slow cooker. Now, add the sautéed vegetables on top of the ribs. Cover the slow cooker. Set it on low for 8 hours or high for 4 hours. The meat should be tender and fall off the bone. This long cook time allows all the flavors to meld beautifully. Once cooked, serve with some sauce drizzled on top for extra flavor. When picking beef short ribs, look for meat with good marbling. This fat helps keep the meat juicy. Choose ribs that are thick and have a nice layer of meat. Fresh ribs should smell clean and not have any off odors. If you can, buy from a local butcher. They often have high-quality options. Searing is key for great flavor. Start with a hot skillet and olive oil. Place the ribs in the pan without crowding them. Sear each side for 3-4 minutes until browned. This step locks in juices and adds depth. After searing, transfer the ribs to your slow cooker. Don’t skip this part; it makes a big difference. You can boost the flavor of your short ribs with extra herbs and spices. Try adding bay leaves or a pinch of red pepper flakes for heat. Fresh herbs like thyme or rosemary can also work well. Experiment to find your favorite mix. Just remember to keep the balance and not overpower the dish. {{image_2}} You can make balsamic short ribs in several ways. A pressure cooker is a great choice. It cooks the ribs fast while keeping them tender. Just follow the same steps but cook for about 45 minutes on high pressure. You can also use an oven. Brown the ribs in a pan, then place them in a covered pot. Cook at 300°F for about 3 hours. If you want to adjust the recipe for dietary needs, you can swap some ingredients. Use chicken broth instead of beef broth for a lighter taste. For a gluten-free twist, choose gluten-free Dijon mustard. You can replace brown sugar with a sugar substitute if you want less sugar. Lastly, if you like a different flavor, try using red wine vinegar instead of balsamic vinegar. Balsamic short ribs pair well with many side dishes. Consider creamy mashed potatoes for a comforting meal. Roasted vegetables, like carrots and Brussels sprouts, add a nice crunch. You can also serve them with a fresh salad for a light touch. If you want something heartier, consider polenta or rice to soak up the delicious sauce. After serving, let the short ribs cool down. Place any leftovers in an airtight container. Store them in the fridge for up to three days. Make sure the ribs are covered with sauce to keep them moist. If you want, you can also store the sauce separately. For longer storage, you can freeze the short ribs. First, let them cool completely. Pack the ribs in a freezer-safe bag or container. You can freeze them for up to three months. Be sure to label the container with the date. This helps keep track of how long they have been frozen. When you're ready to enjoy the leftovers, reheating is easy. You can use the oven or microwave. For the oven, preheat it to 350°F. Place the short ribs in a baking dish and cover with foil. Heat for about 20-30 minutes or until warm. If using the microwave, place the ribs in a microwave-safe dish. Cover and heat in short bursts, stirring in between. Always check that they are hot throughout before serving. Yes, you can use other cuts of beef. Chuck roast or brisket works well. These cuts have enough fat to keep the meat moist. If you choose a leaner cut, add more broth to prevent dryness. To change the flavor, try adding different herbs. Fresh rosemary or thyme adds a nice touch. You can also switch the balsamic vinegar for red wine vinegar. Adding a splash of soy sauce can give it a savory kick. Balsamic short ribs go great with mashed potatoes. Creamy polenta is another lovely choice. Roasted vegetables add color and crunch. You can also serve a fresh salad for a light side. This post shared how to make delicious balsamic short ribs. We covered key ingredients, preparation steps, and cooking methods. You learned helpful tips for choosing the best meat and enhancing flavor. We also explored variations to suit your taste and dietary needs. Lastly, we discussed storage and reheating for tasty leftovers. Embrace the process, and enjoy cooking these ribs. You’ll impress your family and friends with your skills. Follow these steps, and you'll create a meal that everyone will love.
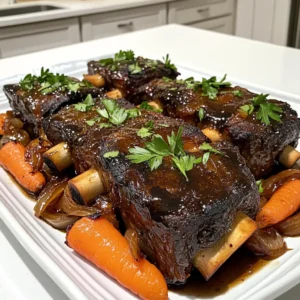
    Slow Cooker Balsamic Short Ribs Tasty and Simple Meal
  • To make these tasty apple cider donuts, you need: - 2 cups apple cider - 2 cups all-purpose flour - 1 cup granulated sugar - 1 teaspoon baking powder - 1 teaspoon baking soda - 1 teaspoon ground cinnamon - ½ teaspoon nutmeg - ½ teaspoon salt - 2 large eggs - ½ cup buttermilk - 4 tablespoons unsalted butter, melted These ingredients work together to create a soft and flavorful donut. The apple cider adds a sweet and tangy taste that makes them special. For the delicious cinnamon sugar coating, gather: - 1 cup granulated sugar - 3 tablespoons ground cinnamon This coating gives the donuts a sweet crunch and a warm spice flavor. It’s the final touch that makes them irresistible. You can also try these optional ingredients for extra flavor: - A pinch of clove for warmth - A splash of vanilla extract for sweetness These additions can elevate your donuts even more. Enjoy experimenting with these options to find your perfect taste. Start by pouring 2 cups of apple cider into a small saucepan. Heat it on medium-high until it boils. Once it boils, lower the heat to low. Let it simmer for about 15 to 20 minutes. You want it to reduce to about ¾ cup. This step adds a rich apple flavor. Once reduced, take it off the heat and let it cool slightly. Next, preheat your oven to 375°F (190°C). Grease your donut pan with cooking spray or butter. In a large bowl, whisk together the dry ingredients: 2 cups of flour, 1 cup of sugar, 1 teaspoon of baking powder, 1 teaspoon of baking soda, 1 teaspoon of ground cinnamon, ½ teaspoon of nutmeg, and ½ teaspoon of salt. In another bowl, beat 2 large eggs. Stir in ½ cup of buttermilk, 4 tablespoons of melted butter, and the cooled, reduced apple cider. Mix well. Now, gently combine the wet and dry ingredients. Be careful not to overmix; a few lumps are okay. Now it’s time to fill the donut pan. Use a piping bag or a spoon to fill each cavity about ¾ full with the batter. Bake for 10 to 12 minutes. The donuts should be lightly golden. To check if they’re done, insert a toothpick. It should come out clean. Let the donuts cool in the pan for 5 minutes. After that, transfer them to a wire rack. While still warm, mix 1 cup of granulated sugar and 3 tablespoons of ground cinnamon in a shallow bowl. Roll the warm donuts in this mixture until they are fully coated. Enjoy your fresh apple cider donuts! To get light and fluffy donuts, follow these tips: - Use Fresh Ingredients: Always check your baking powder and baking soda. If they are old, your donuts may not rise well. - Do Not Overmix: Mix the wet and dry ingredients until just combined. A few lumps are okay. Overmixing can make the donuts dense. - Correct Baking Time: Bake until they turn lightly golden. If you bake too long, the donuts can dry out. Here are some mistakes to avoid: - Skipping the Cider Reduction: Reducing the cider gives a stronger flavor. Don’t skip this step! - Not Greasing the Pan: Always grease your donut pan well. This helps the donuts come out easily. - Ignoring the Cool Down: Cool the donuts slightly before coating them in cinnamon sugar. This helps the sugar stick better. For a beautiful display of your donuts, try these ideas: - Wooden Board: Serve the donuts on a wooden board for a rustic look. - Garnish: Add sliced fresh apples around the donuts. This adds color and freshness. - Extra Cinnamon Sugar: Place a small bowl of cinnamon sugar on the side for dipping. It makes the serving fun and interactive! {{image_2}} You can make these donuts gluten-free! Replace all-purpose flour with a gluten-free blend. Look for blends that include xanthan gum. This keeps the donuts soft and fluffy. Follow the same steps in the recipe. Want to mix it up? You can add flavors to your donuts. Try adding caramel for a sweet twist. A splash of vanilla extract adds warmth. You can also use spices like ginger or allspice for a unique taste. Adjust the amounts to fit your taste buds. Adding fruit can take your donuts to the next level. Chopped apples or pears give a fresh bite. You can even mix in dried fruits like cranberries or raisins. Just make sure to keep the fruit pieces small. This way, they blend well into the batter. Enjoy your creative spin on these delicious treats! To keep your apple cider donuts fresh, store them in an airtight container. This helps keep them moist. Place parchment paper between layers to prevent sticking. Store at room temperature for up to 2 days. If you want them to last longer, consider refrigeration. Freezing is a great way to save extra donuts. First, let them cool completely. Then, wrap each donut in plastic wrap. Place the wrapped donuts in a freezer bag. This keeps them fresh for up to 2 months. When you're ready to enjoy, you can thaw them at room temperature. Reheating brings back that fresh-baked taste. You can use your oven or microwave. For the oven, preheat to 350°F (175°C). Heat the donuts for 5-10 minutes until warm. If using a microwave, heat for 10-15 seconds. Enjoy them warm for the best flavor! Yes, you can use fresh apple juice. However, apple cider gives a richer flavor. Apple cider has a deeper taste from pressing apples, while juice is sweeter and lighter. If you use juice, you might want to add a bit more spice to boost the flavor. These donuts stay fresh for about 2 days at room temperature. To keep them longer, store them in an airtight container. You can also freeze them for up to 3 months. Just make sure to wrap them well to prevent freezer burn. Yes, you can make the batter ahead. Store it in the fridge for up to 24 hours. Just remember to stir it gently before filling the donut pan. Overmixing can make the donuts tough, so take care when mixing. You learned how to make tasty apple cider donuts. We covered the key ingredients, from the essential components to fun flavor options. You saw the step-by-step method to bake perfect donuts and tips for the best texture. We also talked about variations, storage tips, and answered common questions. Now you can enjoy these tasty treats. Experiment with flavors and share them with friends. Happy baking!
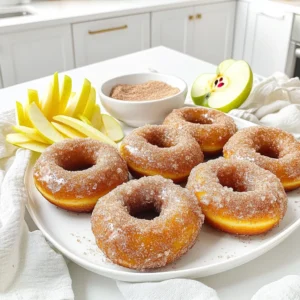
    Apple Cider Donuts with Cinnamon Sugar Delight
  • To make this one-pot broccoli cheddar soup, you need simple and fresh ingredients. Here’s what you will use: - 4 cups fresh broccoli florets - 1 onion, diced - 2 cloves garlic, minced - 1 medium potato, diced - 4 cups vegetable broth - 1 cup milk (or plant-based alternative) - 2 cups shredded sharp cheddar cheese - 2 tablespoons olive oil - 1 teaspoon thyme (dried or fresh) - Salt and pepper to taste - Optional: Croutons and fresh chives for garnish These ingredients come together to create a rich and creamy soup. The fresh broccoli adds great flavor and color. The potato gives it a nice body, making it filling. The sharp cheddar cheese adds a comforting richness that warms you up. You can easily find these items at your local grocery store. Plus, you can adjust the recipe to fit what you have on hand. For instance, you can swap the potato for cauliflower or add in some carrots for extra color. Enjoy preparing this delicious meal! - Step 1: Heat olive oil and sauté onion Start by adding two tablespoons of olive oil to a large pot over medium heat. Once hot, toss in one diced onion. Sauté it for about five minutes until it is soft and translucent. - Step 2: Add garlic and thyme Next, stir in two minced garlic cloves and one teaspoon of thyme. Cook this mix for one more minute. You want to release that wonderful aroma. - Step 3: Incorporate potato and broccoli Now, add one diced medium potato and four cups of fresh broccoli florets. Mix it all well. - Step 4: Bring to a boil and simmer Pour in four cups of vegetable broth, and bring the pot to a boil. Once boiling, lower the heat, cover the pot, and let it simmer. This should take about 15 to 20 minutes. The goal is to make the potato and broccoli tender. - Step 5: Blend the soup After simmering, take the pot off the heat. Use an immersion blender to blend the soup until it is smooth. If you don’t have one, carefully transfer the soup to a regular blender in batches. Be careful, as hot soup can splatter. - Step 6: Stir in milk and cheese Put the blended soup back on low heat. Now, stir in one cup of milk and two cups of shredded sharp cheddar cheese. Keep stirring until the cheese melts and the soup is creamy. - Step 7: Season and adjust consistency Taste the soup and add salt and pepper as needed. If the soup is too thick, pour in a bit more milk to reach your desired consistency. - Step 8: Serve warm with garnishes Serve the soup hot. For a nice touch, add croutons and fresh chives as garnishes if you like. Enjoy your warm, creamy bowl of broccoli cheddar soup! - Cook broccoli for 15-20 minutes until tender. - Use a potato for creaminess and texture. - Blend the soup until smooth for a rich finish. - Add a pinch of cayenne for heat. - Try using gouda for a smoky twist. - Nutritional yeast gives a cheesy flavor for vegans. - Serve in warm bowls for comfort. - Top with croutons and fresh chives for color. - Drizzle with olive oil for a glossy look. {{image_2}} You can change the cheese in this soup. Try using gouda for a smoky taste. A mix of cheeses can also add depth. If you want more veggies, add carrots or cauliflower. Both options give extra flavor and nutrition. To make this soup gluten-free, use a gluten-free broth. Most vegetable broths are safe. For a vegan version, swap the cheese with nutritional yeast. Use coconut milk or almond milk instead of regular milk. This keeps the creamy texture without dairy. This soup pairs well with crusty bread. A fresh salad is also a great match. For side dishes, serve some roasted vegetables or a light quinoa dish. These sides balance the rich flavor of the soup. To store your broccoli cheddar soup, first let it cool. Pour the soup into an airtight container. This keeps it fresh. You can keep it in the fridge for about 3 to 4 days. If you want to enjoy it later, follow these steps. To freeze broccoli cheddar soup, let it cool completely. Then, pour it into freezer-safe containers. Leave some space at the top for expansion. You can freeze it for up to 3 months. When you are ready to eat, thaw it in the fridge overnight. Reheat it in a pot over low heat. Stir it often. If it is too thick, add a splash of milk. You can repurpose leftover soup in many ways. Try using it as a sauce for pasta. It also works well as a base for casseroles. Another option is to mix it with rice or grains for a hearty meal. You can even pour it over baked potatoes for a tasty twist. Get creative and enjoy your leftovers! Can I use frozen broccoli instead of fresh? Yes, you can use frozen broccoli! It saves time and is still healthy. Just add it to the pot in the same way as fresh. The soup will taste great, and it cooks just fine. How can I make the soup spicier? To spice it up, add red pepper flakes or chopped jalapeños. You can also use a spicy cheese like pepper jack. Stir in a little at a time and taste as you go. This way, you find your perfect spice level. Is broccoli cheddar soup healthy? Yes, broccoli cheddar soup is healthy. It has vitamins from broccoli and protein from cheese. You can make it even healthier by using low-fat milk and less cheese. What are the calorie counts per serving? Each serving has around 300-400 calories, depending on how much cheese you add. It’s a filling meal that can fit into a balanced diet. How to make this recipe dairy-free? Swap the milk with a plant-based alternative, like almond or oat milk. Use dairy-free cheese for the cheddar. This makes it creamy and tasty without any dairy. Can I add protein to the soup? Yes! You can add cooked chicken, beans, or lentils for extra protein. Just mix them in after blending the soup. This makes it heartier and more filling. This blog post covered a simple and tasty broccoli cheddar soup recipe. You learned the key ingredients, each step of preparation and cooking, and helpful tips to enhance flavor. We also explored variations to fit diets, how to store leftovers, and answered common questions. In the end, this soup is not just comforting; it’s fun to make. Enjoy cooking and sharing it with others!
    Broccoli Cheddar Soup One Pot Simple and Tasty Meal
  • To make Garlic Butter Steak Bites, gather these key ingredients: - 1 lb sirloin steak, cut into 1-inch cubes - 4 tablespoons unsalted butter - 4 cloves garlic, minced - 1 tablespoon fresh rosemary, minced (or 1 teaspoon dried) - 1 tablespoon fresh thyme, minced (or 1 teaspoon dried) - Salt and pepper to taste - Fresh parsley, chopped for garnish These ingredients create a tasty dish that is easy to cook. The sirloin steak gives a nice texture. The butter and garlic add rich flavor, while the herbs bring freshness. You can customize your Garlic Butter Steak Bites with a few add-ins: - A pinch of red pepper flakes for heat - A splash of Worcestershire sauce for depth - Sliced mushrooms for added texture These options can change the taste and make it your own. Feel free to mix and match based on your taste. While sirloin is great, you can also use other cuts: - Ribeye for more fat and flavor - Tenderloin for a leaner option - Flank steak for a different texture Each cut offers a unique bite. Choose based on your preference and budget. Enjoy crafting your perfect Garlic Butter Steak Bites! {{ingredient_image_1}} To start, pat the steak cubes dry with paper towels. This step is key. It helps the meat brown nicely. Next, season the steak cubes generously with salt and pepper on all sides. You want bold flavor in every bite. Now, your steak is ready for the skillet! Grab a large skillet and melt 2 tablespoons of butter over medium-high heat. Wait until it is hot and bubbling. Then, add the steak cubes in a single layer. Do not overcrowd the skillet. Sear the steak for about 2-3 minutes without moving them. This creates a nice crust. Flip the steak bites and sear the other side for another 2-3 minutes. Aim for medium-rare for the best taste. Once done, remove the steak bites and set them aside. In the same skillet, lower the heat to medium. Add the remaining 2 tablespoons of butter. Once it's melted, toss in the minced garlic, rosemary, and thyme. Stir for about 30 seconds until fragrant. This step fills your kitchen with a wonderful aroma. Now, return the steak bites to the skillet. Toss them in the garlic herb butter for 1-2 minutes. Make sure they are well coated. Finally, remove from heat, garnish with fresh parsley, and serve right away. Enjoy your tasty steak bites! To sear steak bites well, start with dry meat. Pat the cubes with paper towels. This step helps them brown nicely. Use a hot skillet. Heat it over medium-high heat. Add butter and let it melt until bubbly. Place the steak cubes in a single layer. Don’t overcrowd the pan. Give them space to sear. Cook for 2-3 minutes on one side. Flip them to brown the other side for another 2-3 minutes. This gives a great crust and keeps the inside juicy. A heavy skillet works best for searing. Cast iron or stainless steel pans hold heat well. They help form a nice crust. Avoid non-stick pans for this step. They can’t get hot enough for a good sear. If you have a grill pan, that’s great too. Just ensure it’s preheated before adding the steak. Seasoning is key to tasty steak bites. Start with salt and pepper. Sprinkle them generously on all sides. You can add more flavors too. Fresh herbs like rosemary and thyme bring great taste. If you like heat, try some red pepper flakes. Taste the garlic butter as you cook. Adjust seasonings to make it perfect for you. Remember, cooking is about your personal touch! Pro Tips Pat the Steak Dry: Ensuring the steak is dry before seasoning helps achieve a perfect sear and crust. Don't Overcrowd the Pan: Searing in batches allows for better browning and prevents steaming the meat. Let It Rest: After cooking, allow the steak bites to rest for a few minutes to retain their juices. Customize the Herbs: Feel free to experiment with different herbs like oregano or basil for unique flavor profiles. {{image_2}} For a kick, add red pepper flakes to the garlic butter. Start with 1/2 teaspoon and adjust to your taste. This spice enhances the flavor and gives the dish a nice heat. You can also mix in some sriracha or hot sauce. Toss the steak bites in the spicy butter for a bold twist. Want to change the flavor? Use different herbs! Try fresh basil or oregano instead of thyme and rosemary. Both add a lovely taste. You can also use a mix of dried herbs if fresh ones are not handy. This change will keep your steak bites fresh and exciting. For a Mediterranean flair, add some olives, sun-dried tomatoes, or feta cheese to the dish. After cooking, toss in these ingredients with the garlic butter. They will add saltiness and rich flavor. Serve with a side of tzatziki sauce for a refreshing dip. This variation will take you on a tasty trip to the Mediterranean coast. To keep your garlic butter steak bites fresh, store them in an airtight container. Let them cool to room temperature before sealing. This helps prevent moisture buildup. Place the container in the fridge if you plan to eat them within three days. When you're ready to enjoy your leftovers, reheating gently is key. Use a skillet over low heat for the best results. Add a small pat of butter to the pan. Heat the steak bites for about 3-5 minutes, stirring often. This keeps the meat juicy and tasty. You can also reheat them in the microwave. Use a microwave-safe dish and cover it with a damp paper towel. Heat for 30 seconds, then check. If you have extra steak bites, freezing is a great option. Place them in a freezer-safe bag or container. Make sure to remove as much air as possible before sealing. Label the bag with the date. You can freeze them for up to three months. When you're ready to eat, thaw in the fridge overnight. Reheat as mentioned above for the best taste. The best way to cook steak bites is by searing them in a hot skillet. Start with a well-heated pan. Use a good amount of butter for flavor. This method gives a nice crust while keeping the inside tender. Don't overcrowd the pan; cook in batches if needed. This way, each piece gets the right amount of heat. You can tell steak bites are done by checking their color and firmness. For medium-rare, look for a warm red center. You can also use a meat thermometer. It should read 130°F for medium-rare. If you want them more done, aim for 145°F for medium. Letting them rest for a few minutes helps keep them juicy. Yes, you can use other cuts for steak bites. Cuts like ribeye, tenderloin, or flank steak work well. Each cut gives a different flavor and texture. Just adjust cooking times based on the cut's thickness and fat content. The key is to ensure even cooking for the best taste. Garlic butter steak bites are a tasty treat that anyone can make. We covered key ingredients, from steak types to butter blends. I shared step-by-step instructions to cook them just right. Tips for searing steak and adjusting flavors enhance your dish. You can even try tasty variations. Store leftovers properly and reheating tips ensure great flavor. Enjoy these bites as a meal or snack. With the right approach, you can impress everyone at home. Happy cooking!
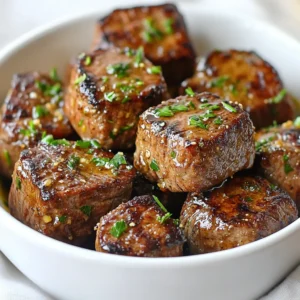
    Garlic Butter Steak Bites Simple and Tasty Delight
  • To make a hearty Greek moussaka, gather these simple ingredients: - 2 medium eggplants, sliced into 1/2-inch rounds - 3 medium potatoes, peeled and sliced into 1/4-inch rounds - 1 lb (450g) ground beef or lamb - 1 onion, finely chopped - 2 cloves garlic, minced - 1 can (14 oz) crushed tomatoes - 1 tablespoon tomato paste - 1 teaspoon cinnamon - 1 teaspoon dried oregano - Salt and pepper to taste - 1 cup (240ml) milk - 1/2 cup (60g) grated Parmesan cheese - 2 large eggs - 1/4 cup (30g) unsalted butter - 1/4 cup (30g) all-purpose flour You can swap some ingredients for different flavors or diets: - Use zucchini instead of eggplant for a lighter dish. - Substitute ground turkey or chicken for beef or lamb. - Almond milk works well instead of regular milk for a dairy-free option. - Use a vegan cheese in place of Parmesan for a plant-based meal. Choosing the best produce makes your moussaka shine. Here’s how: - Look for firm, smooth eggplants with shiny skin. Avoid soft spots. - Select potatoes that feel heavy for their size and have no sprouts. - Choose onions that are dry and firm with no soft spots. - Pick garlic bulbs that are plump and have tight, unbroken skins. By choosing fresh ingredients, your moussaka will taste even better! {{ingredient_image_1}} First, gather all your ingredients. You will need: - 2 medium eggplants, sliced into 1/2-inch rounds - 3 medium potatoes, peeled and sliced into 1/4-inch rounds - 1 lb ground beef or lamb - 1 onion, finely chopped - 2 cloves garlic, minced - 1 can crushed tomatoes - 1 tablespoon tomato paste - 1 teaspoon cinnamon - 1 teaspoon dried oregano - Salt and pepper to taste - 1 cup milk - 1/2 cup grated Parmesan cheese - 2 large eggs - 1/4 cup unsalted butter - 1/4 cup all-purpose flour Next, preheat your oven to 375°F (190°C). This step is key for even cooking. In a large skillet, heat some olive oil over medium heat. Add your sliced eggplants and sprinkle them with salt. Cook them until they soften and turn golden brown, about 5 to 7 minutes. Remove them from the skillet and set them aside. Now, add a bit more oil if needed. Sauté the chopped onion and minced garlic until they become translucent, which takes about 3 minutes. Then, add the ground meat. Break it apart and cook it until it turns brown. Drain any extra fat from the skillet. Now, stir in the crushed tomatoes, tomato paste, cinnamon, oregano, salt, and pepper. Let the mixture simmer for about 20 minutes, stirring it occasionally to mix the flavors. While the meat sauce simmers, let’s prepare the potatoes. Bring a pot of water to a boil. Add the potato slices and cook them for about 5 minutes, just until they are tender. Drain them and set them aside. In a separate saucepan, melt the butter over medium heat. Whisk in the flour and cook for 1 minute while stirring. Slowly pour in the milk while whisking to make a smooth béchamel sauce. Keep cooking until it thickens, about 5 minutes. Remove it from the heat and let it cool a bit. Next, whisk in the grated Parmesan cheese. Then, beat in the eggs until everything blends well. Now, let’s build the moussaka. Grease a baking dish and layer half of the cooked potatoes at the bottom. Follow this with half of the eggplant slices. Spread half of the meat sauce over the eggplants. Then, add another layer of potatoes, followed by the rest of the eggplants. Top this with the remaining meat sauce. Finally, pour the béchamel sauce over all the layers. Make sure it covers everything evenly. Bake your moussaka in the oven for 30 to 40 minutes. Look for a golden, bubbling top. Let it sit for 15 to 20 minutes before serving. This helps the layers set and makes it easier to cut. Enjoy your hearty and flavorful Greek moussaka! When you layer your moussaka, start with potatoes at the bottom. This helps catch any juices. Next, add a layer of eggplant. Make sure to season each layer with salt and pepper. This will enhance the flavor as it cooks. After that, spread half of your meat sauce. Repeat the layers again. Finish with the béchamel sauce on top. This creates a rich and creamy finish. Taste your meat sauce as it cooks. If it’s bland, add more salt and pepper. A bit of cinnamon adds warmth and depth. If you like it spicy, add a pinch of red pepper flakes. Remember, the layers will absorb some seasoning while baking. So, don’t be shy with spices. This ensures a flavorful moussaka. If your moussaka is too watery, it might be due to undercooked potatoes or eggplant. Make sure they are cooked enough before layering. If the top burns, lower the oven temperature. Cover it with foil if needed. If the béchamel sauce is too thick, whisk in a bit more milk. This will help it spread smoothly. If you follow these tips, your moussaka will impress everyone! Pro Tips Use a Mix of Meats: For a richer flavor, consider using a combination of beef and lamb in your moussaka. Salt the Eggplants: Salting the eggplant before cooking helps to draw out moisture and bitterness, resulting in a better texture. Layering Technique: Make sure to layer your ingredients evenly to ensure each bite has a perfect combination of flavors. Let it Rest: Allow the moussaka to rest for at least 15-20 minutes after baking; this helps the layers to set and makes serving easier. {{image_2}} You can make a tasty vegetarian moussaka easily. Instead of meat, use lentils or mushrooms. Both options add great flavor and texture. Cook the lentils until soft, around 20 minutes. For mushrooms, sauté them until they release their moisture. This keeps the dish hearty and satisfying. You can also add diced zucchini or bell peppers for extra veggies. If you want a twist, try different meats. Ground turkey or chicken works well. They are leaner and still tasty. For a unique flavor, consider using spiced lamb. Just adjust the cooking time to ensure it browns nicely. You can also use tofu for a plant-based protein. Make sure to press it first to remove excess water. To make a gluten-free moussaka, swap the flour for a gluten-free blend. This will work well in the béchamel sauce. You can use cornstarch or almond flour too. Both thickening agents keep the sauce creamy. For the layers, check that your ingredients are gluten-free. Most vegetables and meats are safe, but read labels carefully. Enjoy this classic dish without worry! To store leftover moussaka, let it cool first. Place it in an airtight container. You can keep it in the fridge for up to 3 days. If you want to enjoy it later, freezing is a great option. To reheat moussaka, preheat your oven to 350°F (175°C). Place the moussaka in an oven-safe dish. Cover it with foil to keep moisture in. Bake for about 20-25 minutes, or until it is hot throughout. You can also use a microwave. Heat it in short bursts, checking often to avoid drying it out. Freezing moussaka is simple. Cut it into portions and wrap each piece tightly in plastic wrap. Then, place the wrapped pieces in a freezer bag. Label the bag with the date. You can keep it frozen for up to 3 months. To cook, thaw it in the fridge overnight and reheat as mentioned above. Enjoy this hearty dish whenever you crave it! Moussaka is a classic dish from Greece. It has roots in Middle Eastern cooking. The Greeks adapted it over time, adding their spin. This dish often features layers of eggplant, potatoes, and meat. Each layer brings its own flavor and texture. You can find variations in Turkey and the Arab world, too. The rich history makes moussaka special and beloved. Yes, moussaka can be made ahead of time. In fact, it often tastes better the next day! You can prepare it fully, then store it in the fridge. Just cover it well to keep it fresh. When you're ready, bake it until hot and bubbly. This makes it a great dish for gatherings or meal prep. To create a lighter moussaka, you can use several easy swaps. Replace ground beef or lamb with leaner turkey or chicken. You can also use zucchini instead of eggplant. For the béchamel, try using low-fat milk and less butter. This keeps the creamy texture but cuts the calories. These changes still give you a tasty dish without the heaviness. Moussaka is a tasty dish with layers of flavor and history. We covered important ingredients, tips for picking fresh produce, and smart substitutions. You learned how to cook the meat sauce and assemble the layers. Plus, I shared best practices for seasoning and troubleshooting. We explored fun variations, like vegetarian and gluten-free options, and how to store leftovers. Now you have all the tools to make your own perfect moussaka. Enjoy this dish and share it with others!
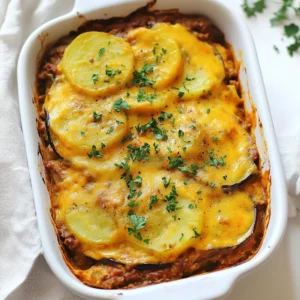
    Classic Greek Moussaka Flavorful and Hearty Dish
  • - 4 cups all-purpose flour - 1/4 cup granulated sugar - 1 packet (2 1/4 tsp) active dry yeast - 1 cup whole milk, warmed - 1/2 cup unsalted butter, melted - 2 large eggs For the main ingredients, we need all-purpose flour for the dough. Granulated sugar adds sweetness. Active dry yeast helps the dough rise. Whole milk makes the dough soft and rich. Unsalted butter gives flavor and moisture. Eggs add structure and richness. - 1 tsp vanilla extract - 1/2 tsp salt - 1 cup brown sugar, packed - 1 tbsp ground cinnamon - 1/4 cup pure maple syrup For flavoring, vanilla extract gives a warm taste. Salt balances sweetness. Brown sugar adds depth with its molasses flavor. Ground cinnamon brings warmth and spice. Pure maple syrup adds that sweet, rich flavor we love. - 1/2 cup chopped pecans - 1/4 cup chopped pecans (for topping) For the topping, pecans add crunch and a nutty taste. We use chopped pecans both in the filling and on top for added texture. 1. In a large bowl, pour the warm milk. Add the sugar and mix well. 2. Sprinkle the active dry yeast over the milk mixture. Let it sit for 5-10 minutes until it becomes frothy. 3. In a separate bowl, mix the melted butter, eggs, and vanilla extract. Once the yeast mixture is ready, add this butter mixture to it. 1. Stir in the flour and salt until fully combined. 2. Knead the dough on a floured surface for about 5-7 minutes. You want it to be smooth and elastic. 3. Place the dough in a greased bowl. Cover it with a damp cloth and let it rise in a warm spot for about 1 hour or until it doubles in size. 1. Preheat your oven to 350°F (175°C). 2. In a small bowl, mix the brown sugar, cinnamon, and chopped pecans together. 3. Roll the risen dough into a large rectangle, about 16x24 inches. Brush it with melted butter, then evenly sprinkle the brown sugar mixture. 1. Starting from one long side, tightly roll the dough into a log. 2. Cut the log into 12 equal pieces. 3. Place the pieces in a greased 9x13 inch baking dish. Drizzle maple syrup over the top and sprinkle with more pecans. 1. Cover the dish with plastic wrap and let the rolls rise again for about 30 minutes. 2. Bake in the preheated oven for 25-30 minutes. Look for a golden brown color. 3. Let the rolls cool for 5-10 minutes. Then, invert them onto a serving platter to let the sticky topping drizzle down. - Types of flour: I always use all-purpose flour for sticky buns. It gives the right texture. You can also mix in some bread flour for extra strength. - Kneading tips: Knead the dough for about 5-7 minutes. This helps the gluten develop. If the dough sticks, add a little flour. It should feel smooth and elastic. - Optimal rising conditions: Find a warm spot for the dough to rise. A turned-off oven or a sunny window works well. Cover the bowl with a damp cloth to keep it warm. - Quality of maple syrup: Use pure maple syrup for the best taste. The flavor shines through in the buns. Avoid fake syrups; they lack the rich flavor. - Choosing the right pecans: Fresh pecans add crunch and flavor. Look for ones that smell sweet and nutty. Toast them lightly before using for extra flavor. - Adjusting sweetness and spice: You can tweak the sugar and spice levels. If you like it sweeter, add more brown sugar. For a spicier kick, increase the cinnamon. - Garnishing ideas: Dust the sticky buns with powdered sugar before serving. It adds a nice touch. You can also drizzle more maple syrup on top. - Pairing with beverages: These buns pair well with coffee or tea. A warm cup of milk also complements them nicely. - Storing and reheating tips: Store leftover buns in an airtight container. They stay fresh at room temperature for a few days. To reheat, warm them in the oven for a few minutes. {{image_2}} You can change up the flavors in your sticky buns. Here are some ideas: - Adding chocolate chips: Mix in chocolate chips for a sweet twist. - Incorporating dried fruits: Try raisins, cranberries, or apricots for a fruity kick. - Using different nuts: Swap pecans for walnuts or almonds for a new crunch. These additions can make your sticky buns unique and fun! You can also make your sticky buns fit your diet. Here are three easy swaps: - Making it gluten-free: Use gluten-free flour to keep the texture right. - Vegan alternatives: Replace eggs with flax eggs and use plant-based milk and butter. - Lowering sugar content: Cut down on sugar or use natural sweeteners like honey or agave. These changes help you enjoy this treat while sticking to your dietary needs. How you serve your sticky buns can change the whole experience. Here are some fun ideas: - Serving as a pull-apart bread: Keep them in one big piece for guests to tear apart. - Individual portion ideas: Bake in muffin tins for easy, single servings. - Creative serving platters: Use a wooden board or colorful dish to make your sticky buns pop. These presentation styles make your sticky buns look as good as they taste! To keep your sticky buns fresh, store them in an airtight container. This works well for short-term storage. Place the container in a cool, dry spot. Avoid direct sunlight, which can dry them out. These buns taste best within two days of baking. If you need to store them longer, refrigeration is an option. Place the sticky buns in a sealed container and keep them in the fridge for up to a week. For longer storage, freezing is ideal. Wrap each bun tightly in plastic wrap, then place them in a freezer bag. This keeps them fresh for up to three months. To defrost, move the buns to the fridge overnight. For reheating, you can use the microwave or the oven. The microwave is quick but might make them soft. Heat on low for about 15-20 seconds. The oven is better for keeping the texture. Preheat it to 350°F (175°C) and warm them for about 10 minutes. This restores their golden crust and gooey filling. Enjoy the warm, sticky goodness! What is the best way to make sticky buns rise? To make sticky buns rise, keep the dough warm and moist. Place the dough in a greased bowl. Cover it with a damp cloth. Let it rise in a warm spot for about one hour. The dough should double in size. Can I make the dough ahead of time? Yes, you can make the dough ahead of time. Prepare the dough and let it rise. Then, punch it down and cover it. Place it in the fridge overnight. The next day, let it come to room temperature before shaping the buns. How do I know when sticky buns are done baking? Sticky buns are done when they turn golden brown. You can also test them with a toothpick. If it comes out clean, they are ready. The tops should feel firm but springy. Can I use alternative sugars? Yes, you can use alternative sugars. Try using coconut sugar or brown sugar instead of granulated sugar. Both will add a nice flavor. Keep in mind that the sweetness may vary. What can I substitute for pecans? If you don’t have pecans, you can use walnuts or almonds. Both nuts will provide a similar crunch. You can also skip the nuts for a nut-free option. Can I make sticky buns without yeast? Yes, you can make sticky buns without yeast. Use baking powder instead. This will create a quicker dough. However, the texture will be different—less chewy and more cake-like. How can I add more flavor to the recipe? You can add more flavor by mixing in spices. Try adding nutmeg or cardamom to the filling. You can also add a splash of orange or lemon zest for a bright note. You can now make delicious maple pecan sticky buns with ease. We covered key ingredients, step-by-step instructions, and helpful tips. Don't forget the variations to match your taste. Experiment with flavors or dietary needs to make a unique treat. Proper storage ensures freshness, and reheating keeps them tasty. Enjoy your sticky buns warm, with friends or family. Your baking journey will create lasting memories around the table. Happy baking!
    Bakery-Style Maple Pecan Sticky Buns Delicious Treat
  • - 1 can (28 oz) crushed tomatoes - 4 cups vegetable broth - 2 cups frozen cheese tortellini - 1 medium onion, diced - 3 cloves garlic, minced The main ingredients form the base of your soup. The crushed tomatoes give a rich flavor. The vegetable broth adds depth. Frozen cheese tortellini makes it hearty and fun. Diced onion and minced garlic bring out the sweetness. These fresh flavors blend well in the slow cooker. - 1 teaspoon Italian seasoning - 1 cup heavy cream - 1 cup fresh basil, chopped - 1 tablespoon olive oil - Salt and pepper to taste Seasoning is key. Italian seasoning adds warmth and earthiness. Heavy cream creates a velvety texture. Fresh basil adds brightness. Olive oil enhances the flavors. Salt and pepper help balance everything. These simple touches make your soup shine. - Grated Parmesan cheese - Additional herbs or spices If you want to boost the flavor, add grated Parmesan cheese. It brings a salty, nutty taste that complements the soup. You can also add more herbs or spices. Try thyme or oregano for an extra kick. These options let you customize your soup to your liking. First, gather your ingredients. You will need to work with fresh veggies and tomatoes. In your slow cooker, add: - 1 medium onion, diced - 3 cloves garlic, minced - 1 can (28 oz) crushed tomatoes - 4 cups vegetable broth - 1 teaspoon Italian seasoning - Salt and pepper to taste Next, drizzle 1 tablespoon of olive oil over the mix. Stir well to combine everything. This base will set the rich flavor for your soup. Now, it’s time to cook your soup. Cover the slow cooker with its lid. You can choose to cook on low for 4 hours or on high for 2 hours. Both methods will yield a delicious result. Avoid opening the lid too often. Each time you do, heat escapes. This prolongs the cooking time. Keep the lid on for the best outcome. When your base is ready, it’s time to add the frozen tortellini. After your initial cooking time, toss in 2 cups of frozen cheese tortellini. Cook for an additional 30 minutes on high, or until the tortellini is tender. Once the tortellini is soft, stir in 1 cup of heavy cream and 1 cup of chopped fresh basil. Mix well and let it heat through for about 5 to 10 minutes. This will create that creamy texture everyone loves. Taste your soup and adjust the seasoning if needed. Add more salt and pepper for extra flavor. To get a smooth and creamy soup, add the cream at the end of cooking. This keeps it from cooking too long and curdling. Stir the cream in gently over low heat. This helps blend it well. If you want an even richer soup, try using half and half instead of heavy cream. Taste your soup after it cooks. You might want more salt or pepper. If you like a strong flavor, add more Italian seasoning. Fresh herbs add depth, so try adding thyme or oregano. You can also mix in a bit of garlic powder for extra taste. After cooking, let your slow cooker cool before cleaning. Use warm soapy water to wash the pot. If food sticks, soak it in warm water. This makes cleanup easier. To prevent sticking next time, lightly coat the pot with olive oil before adding your ingredients. {{image_2}} You can easily make this soup vegetarian or vegan. To replace heavy cream, use coconut milk or cashew cream. These give a rich taste. For cheese, try nutritional yeast or vegan cheese. Both options add flavor and keep it plant-based. Want to make your soup heartier? Add chicken or sausage. For chicken, use rotisserie chicken for ease. Just shred it before adding to the slow cooker. If you prefer sausage, choose Italian sausage. Cook it first, then slice, and toss it in. Adding protein boosts the meal and makes it filling. You can switch up the tortellini for fun. Look for different flavors like spinach or roasted garlic. You can even use gluten-free tortellini if needed. Each type brings a new taste to the soup, keeping your meals exciting. To keep your soup fresh, store it in the fridge. Let the soup cool first. Place it in an airtight container. This helps prevent spills and keeps it safe from other odors. Use the soup within three to four days for the best taste. You can reheat your soup in two ways: microwave or stovetop. For the microwave, place a bowl in and heat for 1-2 minutes. Stir halfway to ensure even heating. If you choose the stovetop, pour the soup into a pot. Heat it over medium-low heat, stirring often. This keeps the creamy texture nice and smooth. To freeze your soup, let it cool completely. Pour it into freezer-safe bags or containers. Leave a little space at the top, as the soup will expand when frozen. For the best quality, use it within three months. When ready to eat, thaw it in the fridge overnight. You can also use the microwave for quick thawing. Just make sure to stir it well after thawing to keep it creamy. Yes, you can make this soup on the stovetop. It is quick and easy. For stovetop cooking, follow these steps: - Sauté the onion and garlic in a pot for about 5 minutes. - Add the crushed tomatoes, vegetable broth, and seasoning. - Bring to a boil, then reduce the heat and simmer for 20 minutes. - Add the frozen tortellini and cook for another 5-7 minutes. - Stir in the heavy cream and basil, heating through. The stovetop method takes about 30-35 minutes total. In contrast, the slow cooker takes 4 hours on low or 2 hours on high. You can tell when the tortellini is cooked by checking a few signs: - The pasta should be tender but still firm, not mushy. - Look for the tortellini to float to the top of the soup. - Taste a piece to ensure it has that perfect bite. Perfectly cooked tortellini adds the right texture to your soup. Yes, you can use dried basil instead of fresh. However, the flavor will differ. Fresh basil has a bright, vibrant taste. Dried basil is more concentrated and less fresh. If you use dried basil, use one-third of the amount called for with fresh. So, if the recipe says 1 cup of fresh basil, use about 1/3 cup of dried basil. Add it earlier in the cooking process to let the flavors meld. This blog post covered how to make a delicious tortellini soup in a slow cooker. We discussed key ingredients like crushed tomatoes, vegetable broth, and fresh herbs. You learned step-by-step instructions, tips for creaminess, and ways to customize the soup. Remember, you can swap ingredients to suit your taste or dietary needs. In conclusion, this soup is versatile and easy to prepare. Enjoy making it your own!
    Slow Cooker Creamy Tomato Basil Tortellini Soup Delight
  • - 4 cod fillets (about 6 oz each) - 4 tablespoons unsalted butter - 3 cloves garlic, minced - Zest and juice of 1 large lemon - 1 teaspoon dried thyme (or 2 teaspoons fresh thyme) - Salt and pepper to taste - 2 tablespoons fresh parsley, chopped (for garnish) - Lemon slices (for serving) - White wine for deglazing - Capers for a briny twist - Red pepper flakes for heat The main ingredients for this dish are simple yet flavorful. You need cod fillets, which are mild and flaky. Butter adds richness, while garlic gives a nice kick. The lemon zest and juice brighten the dish. Thyme brings an earthy note, and salt and pepper add balance. Adding white wine can enhance the sauce’s depth. Capers provide a tangy burst, while red pepper flakes bring some heat if you like spice. Feel free to mix and match these flavors. That’s the fun of cooking! To start, you need to prepare the cod fillets. First, pat the fillets dry with paper towels. This step is key. Drying the fish helps it cook better and get a nice sear. If the fillets are wet, they will steam instead of sear. After drying, season each side with salt and pepper. This will enhance the fish's natural flavor. Now, let’s get cooking! In a large skillet, melt 2 tablespoons of butter over medium heat. Once the butter melts, add the minced garlic. Sauté the garlic for about 1 minute until it smells great. Make sure not to let it burn because burnt garlic tastes bitter. Next, stir in the lemon zest, juice, and thyme. Let this mixture bubble for about 30 seconds. Then, it's time to cook the cod. Place the fillets in the skillet. Cook them for about 3-4 minutes on each side. You’ll know the cod is ready when it flakes easily with a fork. Pour the remaining melted butter over the fillets while they cook. This adds extra flavor and keeps the fish moist. Once your cod is cooked, remove it from the heat. Garnish with fresh parsley for color. This adds a nice touch to the dish. Serve the cod with lemon slices on the side. It’s not just about taste; the way food looks matters too. A well-presented meal makes you feel good and adds to the dining experience. To check if your cod is done, look for flakiness. When you gently press it with a fork, it should break apart easily. This means your fish is ready to serve. It usually takes about 3-4 minutes per side over medium heat. To avoid overcooking, keep an eye on the fish. If it looks white and firm, it’s time to remove it from the heat. Remember, it continues to cook a bit after you take it off the stove. You can switch out ingredients for more flavor. For a zestier taste, try adding white wine to the butter sauce. Capers can add a nice briny touch. If you like heat, sprinkle in red pepper flakes. When choosing herbs, fresh thyme gives a brighter taste than dried thyme. If you use dried thyme, remember it is stronger. Use one teaspoon of dried thyme for every two teaspoons of fresh thyme. Use a non-stick skillet for cooking cod. This type of pan helps prevent sticking and burning. A well-seasoned cast iron skillet is also a great choice. Having a digital thermometer is key for perfect cooking. This tool helps you measure the fish's temperature. The cod should reach 145°F for safe consumption. It ensures that your meal is both delicious and safe to eat. {{image_2}} Baked Lemon Garlic Butter Cod To bake cod, preheat your oven to 375°F. Place the seasoned cod fillets in a baking dish. Melt 4 tablespoons of butter and mix with garlic, lemon juice, and thyme. Pour this mixture over the fish. Bake for 15-20 minutes until the fish flakes easily. This method gives the cod a tender texture and lets the flavors blend nicely. Grilled Lemon Garlic Butter Cod For grilled cod, brush the fillets with the lemon garlic butter mix. Preheat your grill to medium heat. Place the cod on the grill for about 4-5 minutes on each side. Grilling adds a smoky flavor and a nice char. This method is great for outdoor meals. Using Different Herbs and Spices You can switch things up by using different herbs. Try basil, dill, or oregano instead of thyme. Each herb brings a unique taste. Experimenting with spices like paprika or cumin can also add a fun twist to your cod dish. Incorporating Seasonal Vegetables Add seasonal veggies like asparagus, zucchini, or bell peppers. Toss them in with the cod while cooking. This adds color and nutrition. You can also roast the vegetables separately for a crunchy texture. Gluten-Free Options This recipe is naturally gluten-free. Just make sure your butter and any added sauces are gluten-free too. You can enjoy this dish without any worries. Low-Fat Alternatives for Butter If you want a lighter version, replace butter with olive oil. Use 4 tablespoons of olive oil instead. It still gives a nice flavor while cutting down on fat. You can also try unsweetened applesauce for a unique twist. To store leftovers of your lemon garlic butter cod, place the fillets in an airtight container. Make sure to seal it tightly. This helps keep the flavors fresh. You can store it in the fridge for up to 3 days. If you want to enjoy it later, try not to wait too long. If you want to freeze cooked cod, it’s easy! First, let the cod cool completely. Then, wrap each fillet in plastic wrap. Place the wrapped fillets in a freezer-safe bag. Squeeze out the air to avoid freezer burn. You can freeze it for up to 3 months. When you're ready to eat, thaw the cod in the fridge overnight. To reheat, place it in a skillet over low heat until warm. For meal prep, portion the cod into single servings. This makes it easy to grab when you’re busy. You can add sides like rice or veggies in the same container. For best results, eat your pre-cooked lemon garlic butter cod within 3 days. This keeps it fresh and tasty. To cook cod well, timing is key. For fillets that are about 1 inch thick, cook them for 3 to 4 minutes per side. If your fillets are thicker, like 1.5 inches, you might need 4 to 5 minutes per side. The fish is done when it flakes easily with a fork. You can check this by gently pulling at the flesh. If it separates, it's ready! Yes, you can swap cod for other fish. Some great alternatives are haddock, tilapia, or halibut. Each of these options has a mild flavor that works well with lemon and garlic. You may need to adjust cooking times slightly. Thicker fish fillets will require longer cooking. Pairing sides with Lemon Garlic Butter Cod can enhance your meal. Here are some ideas: - Steamed broccoli - Roasted asparagus - Garlic mashed potatoes - Quinoa salad - Rice pilaf These sides add nutrients and balance to your dish. They complement the flavors of the cod without overpowering it. Enjoy your meal! This blog post shared how to make delicious Lemon Garlic Butter Cod. We covered ingredients, cooking steps, tips, and variations. You can enhance your dish with items like wine or capers. Remember to check doneness for the best texture. Don’t hesitate to explore different methods and flavors to suit your taste. With proper storage, your leftovers can stay fresh, allowing tasty meals throughout the week. Enjoy cooking and impressing your family with this easy cod recipe!
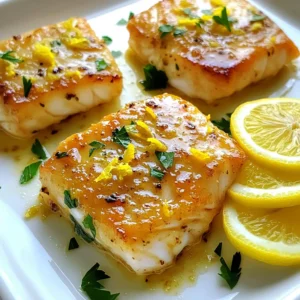
    Minute Lemon Garlic Butter Cod Quick and Easy Meal
  • - 1/2 cup popcorn kernels - 1 cup pecans, chopped - 1 cup brown sugar - 1/2 cup unsalted butter - 1 teaspoon ground cinnamon - 1/4 teaspoon salt - 1/4 teaspoon baking soda - 1 teaspoon vanilla extract Gathering the right ingredients is key to making Brown Sugar Cinnamon Pecan Popcorn. First, you need popcorn kernels. Choose fresh ones for the best pop. Next, get chopped pecans. They add crunch and flavor. Brown sugar gives the popcorn its sweet, caramel-like taste. Unsalted butter helps bind everything together. For flavor, grab ground cinnamon. It gives warmth and spice. A bit of salt enhances the sweetness. Baking soda works magic in the caramel, making it light. Finally, vanilla extract adds a rich note. Each ingredient plays a role in making this popcorn a tasty treat. When you have everything, you’re ready to start making this delicious snack. - Equipment Used: You need a large pot with a lid and some oil. - Tips for Popping: Heat about 2 tablespoons of oil over medium heat. Add 1/2 cup of popcorn kernels. Cover the pot and shake it gently. When the popping slows, transfer the popcorn to a large bowl. - Optimal Toasting Time: Toast 1 cup of chopped pecans for about 3-4 minutes. - How to Avoid Burning: Stir the pecans frequently as they toast. Watch them closely for a golden color and nice smell. - Key Temperature Tips: Reduce heat to medium-low before adding the sauce ingredients. - Stirring Techniques: In the pot, mix 1/2 cup unsalted butter, 1 cup brown sugar, 1 teaspoon ground cinnamon, and 1/4 teaspoon salt. Stir until smooth and let it boil gently for 2 minutes without stirring. - Proper Mixing Tips: Pour the caramel over the popcorn and pecans at once. - Ensuring Even Coating: Use a spatula to gently mix everything until the popcorn is fully coated. - Best Practices for Cooling: Spread the popcorn mixture on a parchment-lined baking sheet. - Presentation Ideas: Allow it to cool for 20-30 minutes. Once cool, break it into pieces. Serve it in a large bowl or individual bags. To avoid soggy popcorn, start with high-quality kernels. Use fresh kernels for the best pop. When popping, use medium heat and shake the pot often. This helps the heat spread and pop evenly. Once popped, transfer the popcorn to a bowl right away. This stops cooking and keeps it crisp. You can add more spices to boost the flavor. Consider adding a pinch of nutmeg or ginger for warmth. If you love chocolate, drizzle melted chocolate over the cooled popcorn. For a fun twist, try adding a dash of cayenne pepper for heat. Each spice can give your snack a unique flair. Pair this popcorn with warm apple cider or hot chocolate for a cozy treat. If you want a fun snack for a party, serve it in small bags or cups. Store any leftovers in an airtight container. This keeps the popcorn fresh and crunchy. If you need to refresh it, pop it in the oven for a few minutes. {{image_2}} You can switch out pecans for other nuts. Almonds add a nice crunch. They have a lighter flavor but still taste great with brown sugar. Walnuts work well too. They offer a rich, earthy taste. Just chop them up like you would with pecans. Toast them in the pot before adding the caramel sauce for the best flavor. If you want a vegan version, swap the butter for coconut oil or vegan butter. This keeps the rich texture without dairy. For a gluten-free option, double-check your brown sugar and baking soda. Most brands are gluten-free, but it’s good to be sure. You can enjoy this treat without worry! Want to mix it up? Try adding other flavors! A pinch of nutmeg or ginger can give a warm twist. You might also consider a dash of cocoa powder for a chocolatey kick. Try adding a splash of maple syrup instead of some brown sugar for a unique taste. These little changes can make your popcorn stand out! To keep your Brown Sugar Cinnamon Pecan Popcorn fresh, use airtight containers. These containers stop air and moisture from ruining your snack. You can also use resealable bags. Make sure to squeeze out as much air as you can before sealing. Store the popcorn at room temperature. Avoid putting it in the fridge or freezer, as this can make it soggy. How long can it last? Your popcorn will stay tasty for about 1 week when stored properly. After a week, it may still taste good, but it will lose its crunch. To refresh the popcorn, preheat your oven to 250°F (120°C). Spread the popcorn on a baking sheet. Heat for about 10 minutes. This restores its crunch and warmth. Enjoy your snack as if it were fresh! You can use coconut oil or a dairy-free margarine instead of butter. These options give a nice flavor and keep the popcorn soft. You may also try using nut milk in your caramel sauce. Just ensure all ingredients are dairy-free. Experimenting can lead to new flavors and textures you might enjoy. Yes, you can use microwave popcorn, but there are some things to note. Store-bought microwave popcorn often has added flavors and salt. This can change the taste of your final snack. If you decide to use it, choose plain popcorn. You will need to adjust the amount of salt in your caramel sauce since microwave popcorn can be salty. Yes, you can make this popcorn ahead of time. Store it in an airtight container to keep it fresh. It stays crunchy for about a week. For best results, do not mix it with other snacks. This keeps the flavors pure and the texture perfect. If you want to make it even earlier, consider freezing it in a sealed bag. Just let it thaw before serving. This blog post covered how to make brown sugar cinnamon pecan popcorn. We explored the main ingredients like popcorn kernels, pecans, and brown sugar. I shared step-by-step instructions, tips for perfect texture, and ways to store it. You can customize this recipe by using different nuts or making it vegan. With these simple steps, you can enjoy a tasty snack. Remember, the right methods and ingredients lead to the best results. Happy popping!
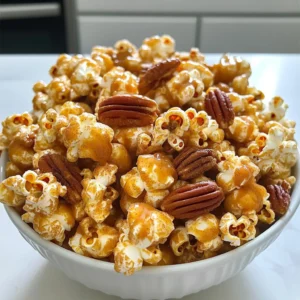
    Brown Sugar Cinnamon Pecan Popcorn Irresistible Snack
  • - 2 medium sweet potatoes, peeled and cubed - 1 can (15 oz) black beans, rinsed and drained - 1 red bell pepper, diced - 1 red onion, sliced - 2 tablespoons olive oil - 1 teaspoon cumin - 1 teaspoon smoked paprika - ½ teaspoon chili powder - Salt and pepper, to taste - 8 corn tortillas - 1 avocado, sliced - Fresh cilantro, for garnish - Lime wedges, for serving Sweet potatoes are the star here. They bring a natural sweetness and great texture. Black beans add protein and fiber, making this meal satisfying. The bell pepper and onion add crunch and flavor. Olive oil helps everything roast nicely, while spices like cumin and smoked paprika add warmth and depth. You can adjust the spices to fit your taste. Add more chili powder for heat or skip it if you like milder flavors. Fresh toppings like avocado and cilantro make each bite fresh and bright. Lime juice gives a zesty finish that ties all the flavors together. Enjoy this vibrant and healthy taco dish! 1. Preheating the oven: First, set your oven to 425°F (220°C). This high heat helps roast the veggies well. 2. Preparing the vegetables for roasting: Peel and cube 2 medium sweet potatoes. Dice 1 red bell pepper and slice 1 red onion. Spread these on a large sheet pan. 3. Seasoning and tossing the ingredients: Drizzle 2 tablespoons of olive oil over the veggies. Sprinkle 1 teaspoon of cumin, 1 teaspoon of smoked paprika, and ½ teaspoon of chili powder. Add salt and pepper to taste. Use your hands to toss everything until well coated. 1. Timing and temperature for roasting: Place the sheet pan in the oven. Roast for 25 to 30 minutes. Check for tenderness and a bit of caramelization. Toss the mixture halfway through to ensure even cooking. 2. Combining with black beans: In the last 5 minutes of roasting, add 1 can of rinsed and drained black beans to the pan. Stir to mix and heat through. 1. Warming tortillas: While the filling cooks, warm 8 corn tortillas on a skillet. Heat them for about 30 seconds on each side. This makes them soft and easy to fold. 2. Topping suggestions: Fill each tortilla with a generous amount of the sweet potato and black bean mix. Top with sliced avocado, fresh cilantro, and a squeeze of lime juice for extra flavor. - Ensuring perfectly roasted sweet potatoes: To get sweet potatoes just right, cut them into even cubes. This helps them cook at the same pace. Toss them well with olive oil and spices for flavor. Roast them until they are tender and slightly caramelized. This usually takes about 25 to 30 minutes at 425°F. Don't forget to stir them halfway through for even cooking. - Using fresh versus canned ingredients: Fresh ingredients often provide the best flavor. Use fresh sweet potatoes, bell peppers, and onions for a crisp texture. Canned black beans are handy and save time. Just make sure to rinse them well to reduce sodium. This mix gives you a balance of fresh and convenient. - Creative plating suggestions: Arrange the tacos on a colorful plate. You can stack them or lay them side by side. Use a large platter for a family-style meal. This invites everyone to dig in and enjoy. - Garnishing tips: Top each taco with slices of avocado and fresh cilantro. A squeeze of lime adds brightness. Consider adding some radish slices for crunch. These garnishes make the dish pop and add extra flavor. - Substitutions for common allergens: If you have allergies, you can swap corn tortillas for lettuce wraps. This keeps it gluten-free. For nut allergies, ensure any toppings are nut-free. - Making the recipe vegan or gluten-free: This recipe is already vegan since it uses plant-based ingredients. For gluten-free, stick with corn tortillas. Always check labels to ensure no hidden gluten in your ingredients. {{image_2}} You can switch up the sweet potatoes for other veggies. Carrots or zucchini add a nice touch. If you want more protein, try chickpeas or lentils instead of black beans. They work great in tacos too. For spices, feel free to mix it up. Add some garlic powder, or try curry powder for a twist. These swaps keep your tacos fresh and fun. Want to try something different? You can serve these as lettuce wraps. Just use large leaves like romaine or butter lettuce. They are crunchy and light. If you prefer a burrito-style taco, use larger tortillas. Stuff them full of the sweet potato mix and roll them up. It's a filling option that’s easy to eat. To boost flavors, add sauces or toppings. A drizzle of lime crema or salsa adds zest. You can also top with sour cream or Greek yogurt for creaminess. If you love cheese, sprinkle some feta or vegan cheese on top. These add-ons make your tacos even tastier and more exciting. To keep your tacos fresh, place leftovers in an airtight container. Make sure to cool the filling first. Store it in the fridge for up to four days. When you're ready to eat, reheat the filling in a pan over medium heat. Stir it often to warm it evenly. You can also use the microwave for quick reheating. Just cover the dish to keep moisture in. You can freeze the taco filling if you want to save some for later. Let it cool completely, then transfer it to a freezer-safe bag. Squeeze out as much air as possible before sealing. It can last up to three months in the freezer. When you're ready to use it, thaw it overnight in the fridge. Reheat it on the stove or in the microwave until hot. In the fridge, your sweet potato black bean tacos will last about four days. Look for signs of spoilage, like a sour smell or mold. If the filling looks dry or off, it’s best to throw it away. Keeping an eye on your food helps ensure a tasty meal each time! How to make the sweet potatoes crispy? To make sweet potatoes crispy, cut them into small cubes. Spread them out on the sheet pan, avoiding crowding. Use olive oil and spices for flavor. Roast them at 425°F (220°C) for 25-30 minutes. Toss halfway through for even cooking. Can I use other beans instead of black beans? Yes, you can use other beans! Pinto beans or kidney beans work well too. Chickpeas are also a fun option. Just rinse and drain them before adding to the mix. What are good side dishes to serve with these tacos? These tacos pair well with simple sides. Try a fresh salad or some Mexican rice. You can also serve corn on the cob or chips with salsa. These add color and flavor to your meal. Is it possible to make this dish in advance? Yes, you can prep the filling ahead of time. Roast the sweet potatoes and beans, then store in the fridge. When ready to eat, warm them up and assemble your tacos. What toppings work best with these tacos? Avocado, cilantro, and lime juice are great toppings. You can also add diced tomatoes or shredded cheese. Pickled onions or jalapeños add extra flavor. Choose what you love! Calorie count per serving Each serving of these tacos has about 400 calories. This can vary based on toppings and portion size. Dietary benefits of sweet potatoes and black beans Sweet potatoes are rich in vitamins and fiber. They support good vision and digestion. Black beans provide protein and iron, making them a healthy choice. Together, they make a balanced meal. This blog post showed you how to make delicious sweet potato and black bean tacos. You learned about the key ingredients, step-by-step instructions for preparation, and roasting. We covered tips for great texture and presentation, plus ways to customize your dish. Finally, you now know how to store leftovers safely. Enjoy making these tasty tacos your way! They are not just easy but also packed with nutrition. Happy cooking!
    Sheet-Pan Sweet Potato Black Bean Tacos Delight
  • To make Air Fryer Crispy Garlic Parmesan Shrimp, you will need: - 1 pound large shrimp, peeled and deveined - 1 tablespoon olive oil - 1 teaspoon garlic powder - 1 teaspoon onion powder - 1/2 teaspoon smoked paprika - 1/4 teaspoon cayenne pepper (optional) - 1/2 cup grated Parmesan cheese - 1 cup panko breadcrumbs - Salt and pepper to taste - Fresh parsley, chopped (for garnish) - Lemon wedges (for serving) These ingredients make a perfect blend that ensures great flavor and crunch. The shrimp are the main star of this dish. Look for large, fresh shrimp, as they cook well in the air fryer. Olive oil adds richness and helps the spices stick. Garlic and onion powders provide a savory base, while smoked paprika gives a nice depth of flavor. Cayenne pepper adds a little heat but is optional. The Parmesan cheese and panko breadcrumbs create a crispy outer layer. They give the shrimp a delightful crunch that you will love. Remember to season with salt and pepper to enhance all the flavors. Garnish with fresh parsley for color and serve with lemon wedges. The lemon juice brightens the dish and adds a fresh zing. Enjoy cooking this quick and tasty dish! First, set your air fryer to 400°F (200°C). Let it heat up for about 5 minutes. This step makes the shrimp crispy. In a big bowl, mix the shrimp with 1 tablespoon of olive oil. Add 1 teaspoon of garlic powder, 1 teaspoon of onion powder, and 1/2 teaspoon of smoked paprika. If you want heat, add 1/4 teaspoon of cayenne pepper. Then, sprinkle salt and pepper to taste. Toss everything well until the shrimp are fully coated. In a separate bowl, combine 1/2 cup of grated Parmesan cheese and 1 cup of panko breadcrumbs. Mix them together until they are even. Take each shrimp and dip it into the cheese and breadcrumb mix. Make sure each shrimp gets a thick layer of the coating. Place them on a plate once coated. After preheating, place the shrimp in the air fryer basket. Arrange them in a single layer. Avoid overcrowding the basket. If you have many shrimp, cook them in batches. Air fry the shrimp for 8 to 10 minutes. Shake the basket halfway through to help them cook evenly. They should turn golden brown and crispy. Once done, carefully take the shrimp out of the air fryer. Sprinkle fresh chopped parsley on top for color. Serve the crispy garlic Parmesan shrimp hot. Include lemon wedges on the side for squeezing over the shrimp. Enjoy your tasty dish! To get that perfect crunch, use panko breadcrumbs. They are light and airy. Make sure to coat each shrimp well. Press the shrimp into the breadcrumb mix. This helps the crumbs stick. Place the shrimp in a single layer in the basket. Avoid crowding them. This way, each shrimp gets plenty of hot air. Shake the basket halfway through cooking. This ensures even crisping. Want a little kick? Add cayenne pepper to the mix. Just a pinch can add warmth. For less heat, leave it out. You can also use other spices. Try paprika or chili powder for different flavors. Always taste before you cook. This way, you can adjust to your liking. You can prep the shrimp ahead of time. Coat them and store in the fridge. Just cook them when you are ready to eat. They taste best fresh and hot. Serve with lemon wedges to brighten the flavor. Fresh parsley adds a nice touch too. It makes your dish look great and taste better. Share this dish at parties or family dinners. Everyone will love it! {{image_2}} You can use various shrimp types for this dish. Large shrimp give the best result, but medium or small shrimp work too. Just adjust the cooking time. For smaller shrimp, check for doneness after 6-8 minutes. You can also try pre-cooked shrimp for a quick fix. Just warm them through without overcooking. Adding herbs or spices can change the taste. For a fresh touch, try adding chopped basil or cilantro. A squeeze of lime juice can boost the flavor. You can also add chili flakes for more heat. Mixing in lemon zest can give a bright flavor. Feel free to experiment with your favorite seasonings! Using different coatings can make your shrimp unique. Try crushed crackers for a crunchy texture. You can use crushed cornflakes or tortilla chips too. For a gluten-free option, use almond flour or coconut flakes. Each choice adds a different twist to the shrimp while keeping it delicious. After enjoying your shrimp, let them cool down first. Then, place the shrimp in an airtight container. Store the shrimp in the fridge for up to 2 days. Keeping them sealed helps maintain their flavor and texture. To reheat the shrimp, use the air fryer for the best results. Preheat the air fryer to 350°F (175°C). Place the shrimp in a single layer and heat for about 5 minutes. This keeps the shrimp crispy. You can also use a microwave, but the shrimp may lose some crunch. If you have extra shrimp, freezing is a great option. Arrange the cooled shrimp in a single layer on a baking sheet. Freeze them for 1 hour until solid. Then, transfer them to a freezer-safe bag. They can stay frozen for up to 3 months. When ready to eat, thaw in the fridge overnight before reheating. You cook shrimp in an air fryer for 8 to 10 minutes. Shake the basket halfway. This helps the shrimp cook evenly and get crispy. Yes, you can use frozen shrimp. Just thaw them first. Rinse the shrimp under cool water. Pat them dry with a towel. This gives you the best results. You can serve this shrimp with many sides. Some great options are rice, pasta, or a fresh salad. Garlic bread also pairs nicely. Add lemon wedges for zest. To make this recipe dairy-free, skip the Parmesan cheese. Use a dairy-free cheese alternative instead. Nutritional yeast also adds a nice flavor without dairy. The best shrimp size is large, around 16-20 count per pound. This size cooks well in the air fryer. They stay juicy and get crispy. This guide covered everything for making crispy garlic Parmesan shrimp in an air fryer. You learned about the key ingredients, step-by-step instructions, and helpful tips for perfect results. I shared fun variations and storage advice to keep your dish fresh. You can adjust the spices and try different coatings to make it your own. Enjoy creating this tasty meal! Remember, cooking is fun, so try new things and savor every bite.
    Air Fryer Crispy Garlic Parmesan Shrimp Delight
  • - 1 cup pumpkin puree - 1/2 cup unsalted butter, softened - 1 cup brown sugar, packed - 1/2 cup granulated sugar - 1 large egg - 2 cups all-purpose flour - 1 teaspoon baking soda - 1 teaspoon baking powder - 1 teaspoon pumpkin pie spice - 1/2 teaspoon salt - 1 cup semi-sweet chocolate chips - 1/2 cup chopped pecans (optional) The main ingredients create a soft and flavorful cookie. The pumpkin puree gives it a moist texture and a warm, autumnal taste. The butter and sugars blend to give the cookie a rich base. The egg binds everything together for a chewy bite. The dry ingredients add structure to the cookie. Flour forms the base, while baking soda and baking powder help it rise. Pumpkin pie spice brings that cozy flavor we all love. The salt balances the sweetness perfectly. For a delicious twist, I love adding semi-sweet chocolate chips. They melt slightly while baking, creating gooey pockets of chocolate. If you enjoy a little crunch, toss in some chopped pecans. They add a nice texture and nutty flavor. Remember, use fresh pumpkin puree for the best taste. You can also use canned puree, but check for additives. This recipe is perfect for a cozy night in or a gathering with friends. - Preheat your oven to 350°F (175°C). - Grease your skillet to prevent sticking. In a large bowl, I cream the softened butter with the brown and granulated sugars. I mix until it becomes light and fluffy. This step is key to a soft cookie. Next, I add the pumpkin puree, egg, and vanilla extract to the butter mixture. I stir until everything is well combined. In a separate bowl, I whisk the flour, baking soda, baking powder, pumpkin pie spice, and salt together. This mix adds flavor and structure to my cookies. Then, I gradually add the dry mix to the wet mix. I stir until it is almost combined but not fully mixed. Now, I fold in the chocolate chips and chopped pecans, if I choose to use them. This adds a nice crunch and flavor. I transfer the dough to the greased skillet, spreading it evenly. Then, I bake the skillet cookie for 25 to 30 minutes. I look for golden edges and check with a toothpick. If it comes out clean, I know it’s done! After baking, I let the skillet cookie cool for about 10 minutes. This makes it easier to serve and enjoy. - Bake your skillet cookie at 350°F (175°C). This is the best temperature for even cooking. - Check for doneness after 25 minutes. The edges should be golden brown. - Use a toothpick to test the center. If it comes out clean, it's ready. - Serve the cookie warm from the skillet. Add a scoop of vanilla ice cream on top. - Drizzle caramel sauce over the ice cream for an extra treat. - Pair with hot apple cider or a warm cup of coffee for a cozy feel. - Store leftovers in an airtight container. This keeps them fresh. - Keep in the fridge for up to three days. You can also freeze them for later. - To reheat, place the cookie in the oven at 350°F (175°C) for about 10 minutes. This brings back the warmth and texture. {{image_2}} You can change the pumpkin puree if you want. Try using sweet potato puree or even applesauce. Each will change the taste a bit but still keep the texture nice. If you want a different spice kick, adjust the pumpkin pie spice. You could use cinnamon, nutmeg, or even ginger for a twist. Feel free to switch up the chocolate types. Dark chocolate chips work well if you want a richer taste. You can also try white chocolate for a sweeter note. For a crunch, add nuts like walnuts or almonds. Dried fruits, such as cranberries or raisins, add sweetness and chewiness. If you need a gluten-free option, swap the all-purpose flour for a gluten-free blend. Make sure the blend has a good mix of starches and flours for the best results. If you want a vegan version, use a flax egg instead of a regular egg. You can also replace the butter with coconut oil or a vegan butter substitute. These changes keep the flavor rich while meeting dietary needs. To keep your Pumpkin Spice Chocolate Chip Cookie Skillet fresh, use airtight containers. Glass or plastic containers work great. You can also wrap it tightly in plastic wrap. In the refrigerator, it lasts about 3 to 4 days. If you want to store it longer, freeze it. In the freezer, it can last up to 3 months. Just remember to cut it into pieces before freezing for easy serving later. To reheat your skillet cookie, use the oven or microwave. For the oven, preheat it to 350°F (175°C). Place the cookie in an oven-safe dish and warm it for about 10 minutes. This keeps the edges nice and crisp. If you prefer the microwave, heat it in 10 to 15-second bursts. This method is faster but may make the cookie a bit softer. To maintain freshness and flavor, top it with a scoop of ice cream or a drizzle of caramel right before serving. Enjoy the warm, gooey goodness! Yes, you can make this cookie ahead of time. Here’s how: - Prepare the dough: Follow the recipe to mix all the ingredients. - Chill the dough: Cover it and place it in the fridge for up to 24 hours. - Bake when ready: When you are ready, just spread it in the skillet and bake. This method keeps the flavors fresh and allows the spices to blend well. Absolutely! Freezing is a great way to save this cookie. - Cool it first: Let the baked cookie cool completely. - Wrap well: Use plastic wrap and then foil to cover it tightly. - Store in the freezer: It can last up to three months. To enjoy later, thaw it in the fridge overnight before serving. If you don’t have pumpkin pie spice, don’t worry! - Create your own mix: Use equal parts cinnamon, nutmeg, and ginger. - Try allspice: It gives a warm flavor similar to pumpkin pie spice. - Adjust to taste: You can add more or less of each spice based on your liking. These options keep the cozy flavor you want in your skillet cookie. Perfectly baked cookies have some signs. - Watch the edges: They should look golden brown. - Check the center: Insert a toothpick; it should come out clean. - Look for slight puffiness: The cookie will rise a bit while baking. These tips ensure your skillet cookie is warm and delicious! This blog post covered how to make a delicious pumpkin spice skillet cookie. We explored the key ingredients, step-by-step instructions, and tips for perfect baking. You also learned about storage and variations for different diets. In conclusion, this recipe is perfect for any time you crave something sweet. You can make it your own with fun add-ins or adjustments. Enjoy baking, sharing, and savoring every bite!
    Pumpkin Spice Chocolate Chip Cookie Skillet Delight
  • - Puff pastry: Use 1 sheet of thawed puff pastry. This is the base of your puffs. It creates a flaky and light texture that pairs well with the filling. Choose a good quality brand for the best results. - Spinach and other vegetables: You need 2 cups of fresh spinach, chopped. Spinach adds a nice green color and healthy nutrients. You can also use kale or Swiss chard if you want a change. Both are rich in vitamins and add great flavor. - Cheese options: Use 1 cup of crumbled feta cheese for that tangy taste. Feta melts nicely and gives a creamy texture. You can mix in 1/2 cup of softened cream cheese for extra creaminess. This blend makes the filling rich and tasty. 1. Sauté the Vegetables: Start by heating the olive oil in a skillet over medium heat. Add the finely chopped onion. Sauté for about 3 to 4 minutes until it turns translucent. Then, stir in the minced garlic and cook for 1 more minute. This brings out the garlic's flavor. Next, add the chopped spinach. Cook until the spinach wilts, about 2 to 3 minutes. Season with salt, pepper, and nutmeg if you like. Once done, remove it from heat and let it cool slightly. 2. Prepare the Puff Pastry: Take the puff pastry sheet out of the fridge and let it thaw. On a lightly floured surface, roll it out gently. This helps make it smooth and easy to work with. Cut the pastry into squares, each about 4 inches by 4 inches. Make sure the edges are even for a nice shape. 3. Assemble the Breakfast Puffs: Grab your cooled spinach mixture. Place a spoonful of it in the center of each pastry square. Be careful not to overfill, or they won't seal well. Fold the corners over the filling to form a pocket. Press the edges closed with a fork or your fingers. To give your puffs a nice shine, brush the tops with the beaten egg. This will make them golden and tempting when baked. Now you’re ready for the oven! These steps will help you create savory breakfast puffs that are both delicious and easy to make. To make the best Savory Spinach and Feta Breakfast Puffs, start with the right temperature. Preheat your oven to 400°F (200°C). This heat helps the puffs rise well and turn golden. Timing is key too. Bake the puffs for 15-20 minutes. Keep an eye on them! They should be golden brown when done. For a golden finish, use an egg wash. Brush the tops with a beaten egg before baking. This gives them that nice shine and color. Avoid common mistakes to ensure your puffs come out great. Don't overfill the pastry. A spoonful of the filling is enough. If you add too much, the filling may leak out while baking. Make sure to seal the edges well. Press them with a fork or your fingers. This helps keep the filling inside. Another tip is to let the spinach mixture cool slightly before filling. If it's too hot, it can make the pastry soggy. Enjoy making your breakfast puffs! {{image_2}} You can make these breakfast puffs even better with simple swaps. Try different cheeses for a new flavor. Goat cheese adds a tangy twist. Cheddar gives a rich taste. You can also mix in cooked meats. Crumbled bacon or diced ham work well. For a vegetarian option, add more veggies. Bell peppers or mushrooms can enhance the filling. You can also use artichoke hearts for a unique taste. Spices and herbs can change the whole dish. Add fresh herbs like dill or parsley for brightness. A pinch of red pepper flakes gives a nice kick. You can also try adding a bit of lemon zest for a fresh burst of flavor. Experimenting with these options can help you find your favorite version of these savory puffs! To keep your Savory Spinach and Feta Breakfast Puffs fresh, follow these simple tips: - Refrigeration tips for leftovers: Once cooled, place the puffs in an airtight container. Refrigerate them for up to three days. This keeps them safe and tasty. - Freezing instructions for puffs: If you want to store them longer, freeze them. Place the cooled puffs on a baking sheet. Freeze until firm, then transfer them to a freezer bag. They last up to three months in the freezer. - Reheating methods for optimal taste: To reheat, bake the puffs at 350°F (175°C) for about 10-15 minutes. This method keeps them crispy. You can also microwave them, but they may lose their crunch. Following these storage tips helps you enjoy these delicious puffs later. Yes, you can use store-bought spinach. Fresh spinach gives a nice taste. However, if you’re short on time, frozen spinach works too. Just make sure to thaw and drain it well. This keeps the puffs from getting soggy. You can prepare the filling a day before. Just store it in the fridge. When ready, cut the puff pastry and fill it. You can also assemble the puffs and freeze them. Bake straight from the freezer; just add a few extra minutes to the baking time. These puffs pair well with a simple salad. A light yogurt dip adds a nice touch too. You can also serve them with fresh fruit or a smoothie for a balanced breakfast. Enjoy your meal! This blog post covered the essentials for making savory spinach and feta breakfast puffs. We explored ingredients like puff pastry, various cheeses, and vegetables that boost flavor. I shared clear steps for preparation and assembly, along with helpful tips to perfect your puffs. You learned about ingredient variations and best storage methods too. Remember, each puff can be a tasty canvas for your creativity and taste. Enjoy making these delightful treats for breakfast!
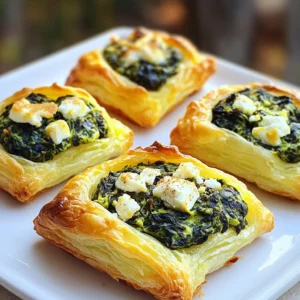
    Savory Spinach and Feta Breakfast Puffs Delight
  • - 1 cup Arborio rice - 2 cups assorted mushrooms (such as cremini, shiitake, and button), sliced - 1 cup heavy cream - 1/2 cup grated Parmesan cheese - 1 medium onion, finely chopped - 3 cloves garlic, minced - 4 cups vegetable broth - 2 tablespoons olive oil - 2 tablespoons unsalted butter - Salt - Pepper - Fresh parsley, chopped for garnish The main ingredients bring the heart of this dish to life. Arborio rice is key for its creamy texture. It absorbs flavors well, making it perfect for risotto. The assorted mushrooms add depth and umami. You can use any mix you like, but I love cremini and shiitake for their rich taste. Heavy cream makes the risotto extra creamy, while Parmesan gives it that cheesy goodness. The additional ingredients add layers of flavor. The onion and garlic provide a savory base. The vegetable broth is essential for cooking the rice and infusing it with taste. Using both olive oil and butter adds richness. The blend creates a perfect balance. Seasoning is simple but crucial. Salt and pepper enhance all the flavors. Fresh parsley adds a pop of color and freshness. It makes the dish look nice and bright. This combination of ingredients makes one pot creamy mushroom risotto a delightful meal you will love. - Heating the oils: Start by pouring 2 tablespoons of olive oil and 2 tablespoons of unsalted butter into a large pot or Dutch oven. Turn the heat to medium. Wait until the butter melts and starts to sizzle. This blend gives great flavor to the risotto. - Sautéing the onion: Next, add 1 finely chopped medium onion to the hot oil. Sauté it for about 5 minutes. The onion should turn translucent. This step adds a sweet base flavor to your dish. - Adding garlic and mushrooms: Now, stir in 3 minced cloves of garlic and 2 cups of assorted sliced mushrooms. Cook them for about 5 to 7 minutes. The mushrooms will soften and turn golden. This step adds earthy notes that make the risotto rich. - Toasting the Arborio rice: Add 1 cup of Arborio rice to the pot. Stir it well for about 2 minutes. This toasting process enhances the rice's flavor and helps it absorb liquids better. - Gradually adding vegetable broth: Slowly pour in 4 cups of vegetable broth, one cup at a time. Stir constantly. Wait for each cup to be absorbed before adding the next. This should take about 20 to 25 minutes. The rice should become creamy and tender. - Stirring in heavy cream and Parmesan: Once the rice is cooked, reduce the heat to low. Add 1 cup of heavy cream and 1/2 cup of grated Parmesan cheese. Stir until everything melts together. Season with salt and pepper to taste. This gives the risotto its final creamy texture and flavor. To get that perfect creamy texture in your risotto, use Arborio rice. Its high starch content makes the dish rich and smooth. Stirring is key! Stir your rice often as it cooks. This helps release the starches, giving your risotto its creamy feel. Use a wooden spoon to avoid scratching your pot. Adjusting cooking times is simple. After adding the broth, keep an eye on the rice. It should take about 20-25 minutes to cook fully. You know your risotto is done when the rice is tender but still has a slight bite. Taste it often as it cooks to ensure it's just right. If you want a lighter option, you can swap heavy cream for half-and-half or coconut milk. Both can still give you a nice creaminess. For mushrooms, try different types like portobello or oyster mushrooms. Each type adds its unique flavor to the dish, so feel free to mix and match! {{image_2}} You can make this risotto heartier by adding proteins. Chicken or shrimp work well. For chicken, use diced pieces and add them when you sauté the onion. Cook until they are no longer pink. For shrimp, toss them in during the last few minutes of cooking. They cook fast and add a nice flavor. If you prefer a vegetarian option, consider adding chickpeas or lentils. They provide great protein without meat. Just stir them in with the rice and broth. They will blend well and make the dish filling. Herbs and spices can elevate the taste of your risotto. Fresh thyme or rosemary add a lovely aroma. Just chop them finely and mix them in while cooking. You can also try adding a pinch of red pepper flakes for a bit of heat. Adding vegetables brings color and nutrition. Peas or spinach are excellent choices. Add them near the end of cooking. This keeps them bright and fresh. You can also experiment with roasted red peppers or sun-dried tomatoes for extra flavor. To make a vegan risotto, swap out the cream and cheese. Use coconut cream or cashew cream instead. They provide a creamy texture without dairy. For cheese, nutritional yeast offers a cheesy flavor. Just stir it in before serving. You can easily make this dish plant-based. Use vegetable broth and ensure your mushrooms are vegan-friendly. This way, you keep all the rich flavors while sticking to your dietary needs. Enjoy the creamy goodness without any animal products! To store leftover risotto, cool it quickly. Place it in an airtight container. This helps keep it fresh. You can store it in the fridge for up to three days. Keep an eye on it; if it smells off, throw it out. If you want to freeze risotto, use a freezer-safe container. Divide it into portions for easy meals later. It freezes well for about two months. Just remember to label the containers with the date. To reheat, the stovetop works best. Add a splash of broth or cream for moisture. Stir gently over low heat until warm. This keeps the risotto creamy. You can also use a microwave, but cover it to trap steam. Stir halfway through for even heating. The best rice for risotto is Arborio rice. This rice has a high starch content. When cooked, it creates a creamy texture. Arborio rice absorbs flavors well, making it perfect for risotto. You can find it in most grocery stores. Yes, you can make risotto ahead of time. If you plan to do this, cook the risotto fully. Let it cool down, then store it in an airtight container. When you are ready to serve, reheat it on the stove. Add a splash of broth or water to keep it creamy. Stir well to bring it back to life. You know your risotto is done when the rice is creamy and tender. It should have a slight bite, or "al dente," texture. Taste a few grains to check for doneness. The risotto should not be dry or too runny. The right texture is key for a perfect dish. This blog post covered key ingredients, cooking steps, and storage tips for risotto. You learned about the main ingredients like Arborio rice and assorted mushrooms. I shared techniques to achieve the perfect creamy texture and variations for personal taste. Remember, risotto can adapt easily, whether you want a vegan version or to add proteins. Use the tips for storage and reheating to enjoy your dish longer. With practice, you will master risotto and delight everyone at your table. Happy cooking!
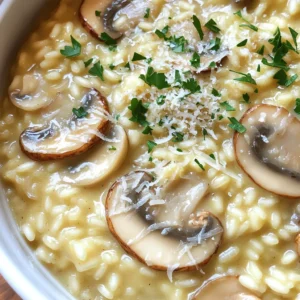
    One Pot Creamy Mushroom Risotto Delightful Meal
  • - 1 pound ground beef - 1 cup breadcrumbs - 1/2 cup grated Parmesan cheese - 8 cubes fresh mozzarella cheese (about 1/2 inch each) - 2 cloves garlic, minced - 1 teaspoon dried oregano - 1 teaspoon dried basil - 1/2 teaspoon salt - 1/4 teaspoon black pepper - 1 cup marinara sauce for dipping - Fresh basil leaves for garnish Gathering the right ingredients is key for making tasty meatballs. I use ground beef for a juicy base. Breadcrumbs help bind everything together. Grated Parmesan adds a salty kick, while fresh mozzarella brings the gooey goodness. For seasonings, I love using minced garlic, dried oregano, and basil. They give the meatballs a burst of flavor. Don't forget the salt and black pepper to enhance the taste. When serving, a warm marinara sauce acts as the perfect dip. Fresh basil leaves make a lovely garnish. This combination makes each bite a treat! In a large bowl, you will mix the meat and spices. Combine these ingredients: - 1 pound ground beef - 1 cup breadcrumbs - 1/2 cup grated Parmesan cheese - 1 large egg - 2 cloves garlic, minced - 1 teaspoon dried oregano - 1 teaspoon dried basil - 1/2 teaspoon salt - 1/4 teaspoon black pepper Make sure you mix them well. Use your hands to get everything blended evenly. This is key for good meatballs. Now, it’s time to form the meatballs. Take about 2 tablespoons of the meat mixture. Flatten it in your palm. Next, place a cube of mozzarella cheese in the center. Wrap the meat around the cheese. Shape it into a ball. Repeat this step until you use all the mixture. Before cooking, preheat your air fryer to 375°F (190°C). This should take about 5 minutes. Place the meatballs in the air fryer basket in one layer. Make sure they don’t touch each other. Cook them for 12-15 minutes. Flip them halfway through for even cooking. Look for a golden brown color to know they are done. To make great meatballs, you need the right balance of moisture and breadcrumbs. The breadcrumbs help absorb some of the juices. This keeps the meatballs tender. If you add too many breadcrumbs, your meatballs become dry. Use about 1 cup of breadcrumbs for 1 pound of meat. Next, avoid overmixing. When you mix the meat and other ingredients, do it gently. Overmixing can make the meatballs tough. Mix just until everything is combined. Check for doneness by using a food thermometer. The meatballs should reach an internal temperature of 160°F (71°C). This ensures they are safe to eat. If they are not done, cook them a few more minutes. Adjust cooking time based on the size of your meatballs. Smaller meatballs may cook faster. Larger ones will need more time. Keep an eye on them as they cook. Pair these meatballs with warm marinara sauce. The sauce adds a rich flavor that complements the meatballs. You can also use it for dipping. For a nice touch, garnish with fresh basil leaves. This adds color and flavor. You can also sprinkle some extra Parmesan cheese on top for extra taste. {{image_2}} You can switch up the cheese in your meatballs. Instead of mozzarella, try using cheddar for a sharper flavor. Cream cheese adds a rich, creamy texture. Just remember, whatever cheese you choose, keep it in small cubes. This helps the cheese melt nicely in the air fryer. Herbs and spices can really change the taste. Add some chopped parsley for freshness. A pinch of red pepper flakes gives a nice kick. Don't be afraid to try different flavors. For a Mediterranean twist, add some thyme or rosemary. The options are endless! If you need to make it gluten-free, use gluten-free breadcrumbs. For a low-carb version, swap breadcrumbs for almond flour. This keeps the meatballs tasty without the carbs. You can still enjoy the cheesy goodness while sticking to your diet. To keep your meatballs fresh, place them in an airtight container. Make sure they cool down first. Store them in the fridge for up to three days. Label the container with the date. This helps you track how long they have been stored. To reheat your meatballs, the air fryer works best. Set the air fryer to 350°F (175°C). Place the meatballs in the basket and heat for about 5-7 minutes. This keeps them crispy and warm. If you don’t have an air fryer, you can use the oven. Preheat it to 350°F (175°C). Place the meatballs on a baking sheet and heat for about 10-12 minutes. You can also use the microwave, but this may make them softer. Heat for 30-60 seconds, checking frequently. To freeze the meatballs, first, let them cool completely. Then, place them in a single layer on a baking sheet. Freeze them for about an hour. Once frozen, transfer the meatballs to a freezer-safe bag. Make sure to remove excess air. They can last up to three months in the freezer. When you want to eat them, thaw them in the fridge overnight. You can reheat them in the air fryer or oven as mentioned before. Enjoy your tasty treat even later! To know if your meatballs are ready, check their internal temperature. Use a meat thermometer to ensure it reaches 160°F (71°C). This temperature shows the meat is safe to eat. If you don’t have a thermometer, cut one open. The meat should be brown inside, and the cheese should be melted. Yes, you can prepare these meatballs ahead of time. Mix the ingredients and shape the meatballs. Then, cover them tightly and place them in the fridge. They can stay fresh in the fridge for up to 24 hours. If you want to store them longer, freeze them. Just make sure to thaw them before cooking. Dipping sauces can really enhance your meal. Marinara sauce is a classic choice that pairs perfectly. You might also enjoy garlic aioli or a spicy arrabbiata sauce. For a twist, try ranch dressing or a creamy blue cheese dip. These sauces add flavor and make each bite even better. This blog post covered how to make delicious stuffed meatballs. We looked at main ingredients like ground beef, cheese, and seasonings. You learned about mixing, shaping, and cooking in an air fryer. We shared tips for perfect texture and tasty serving ideas. You can even explore variations for cheese and spices. Remember, practice makes perfect! Try these tips, and enjoy your meatballs. They’re fun to make and share.
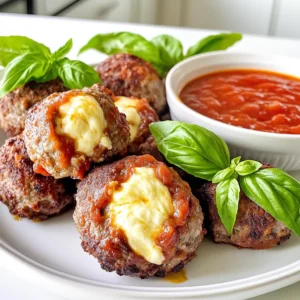
    Air Fryer Mozzarella Stuffed Meatballs Tasty Treat
  • To make this creamy tomato basil soup, you'll need: - 2 cans (28 oz each) crushed tomatoes - 1 medium onion, chopped - 3 cloves garlic, minced - 3 cups vegetable broth - 1 teaspoon dried oregano - 1 teaspoon sugar - Salt and pepper to taste - 1 cup heavy cream or coconut milk for a dairy-free option - 1 cup fresh basil leaves, chopped - 2 tablespoons olive oil These ingredients create a rich and savory base. The crushed tomatoes bring a deep flavor. The onion and garlic add aroma and taste. Use fresh basil for a bright finish. You can enhance the soup with these optional ingredients: - Parmesan cheese for serving - Red pepper flakes for heat - A splash of balsamic vinegar for tang These add-ins can give your soup a unique twist. Parmesan adds creaminess and umami. Red pepper flakes bring warmth if you like spice. If you're looking for dairy-free or vegan options, consider these swaps: - Replace heavy cream with coconut milk - Omit Parmesan cheese or use a vegan version These swaps keep the soup creamy and delicious. Coconut milk adds a hint of sweetness while being dairy-free. Enjoy your creamy tomato basil soup without worry! First, gather all your ingredients. You will need two cans of crushed tomatoes, one chopped onion, and three minced garlic cloves. Measure three cups of vegetable broth and set aside a teaspoon of dried oregano. Don’t forget the teaspoon of sugar, salt, and pepper for taste. You should also prepare a cup of heavy cream or coconut milk and a cup of chopped fresh basil. Lastly, grab two tablespoons of olive oil. Next, take your slow cooker and pour in the crushed tomatoes. Add the chopped onion and minced garlic. Stir in the vegetable broth, dried oregano, sugar, salt, and pepper. Then, drizzle in the olive oil. This will help bring out the flavors. Now, it’s time to cook your soup. You can choose between two settings: low or high. If you pick the low setting, let the soup cook for 6 to 8 hours. This slow method allows the flavors to blend well. If you’re in a hurry, use the high setting and cook for 3 to 4 hours. Either way, the soup will be tasty! After cooking, you need to blend your soup. For a smooth texture, use an immersion blender right in the slow cooker. Blend until the soup is creamy and rich. If you like some chunks, blend only half the soup. This adds texture and makes each spoonful interesting. Finally, stir in the heavy cream or coconut milk and the chopped basil. Let it sit on low heat for 15 to 20 minutes to combine all the flavors. Enjoy your creamy tomato basil soup! To boost the taste of your creamy tomato basil soup, think about adding more herbs. Fresh or dried thyme, for example, pairs well with tomatoes. You can also add a splash of balsamic vinegar for depth. A pinch of red pepper flakes can add a gentle kick. Don't forget to taste your soup before serving. Adjust the salt and pepper as needed for the best flavor. If you have extra soup, store it right! Let it cool, then place it in a container. Use airtight containers to keep it fresh. This soup can last in the fridge for about 3 to 4 days. If you want to store it longer, consider freezing it. Just make sure to leave some space in the container for expansion. Freezing your soup is easy and smart! Pour the cooled soup into freezer bags. Lay them flat for easy stacking. When you want some, take it out and thaw it in the fridge overnight. To reheat, warm it on the stove over low heat, stirring often. If the soup seems thick, add a bit of broth or water to adjust the texture. Enjoy your delicious soup anytime! {{image_2}} Want to add some heat? You can easily spice up your creamy tomato basil soup. Just add a pinch of red pepper flakes or a chopped jalapeño. This small change brings a kick that pairs well with the creamy base. If you want more spice, try adding a splash of hot sauce before serving. This twist keeps things exciting and warms you up on a cold day. You can boost the nutrition and texture of your soup by adding veggies. Carrots, bell peppers, or zucchini work great. Dice them small so they cook well. Add these vegetables at the start with your other ingredients in the slow cooker. They will soften and blend beautifully with the tomatoes. This way, you get extra flavor and vitamins in every bite. What goes well with creamy tomato basil soup? A grilled cheese sandwich is a classic choice. You can also serve it with a light salad for a fresh contrast. If you want something crunchy, try toasted bread or crackers. These sides help balance the soup's creaminess. You can mix and match to find your perfect pairing! To keep your creamy tomato basil soup fresh, use airtight containers. Glass jars work well. They let you see the soup inside. You can also use plastic containers, but ensure they are safe for food. Label the containers with the date. This helps you track freshness. You can store creamy tomato basil soup in the fridge for up to 5 days. Make sure it cools before sealing it in a container. If you want to keep it longer, consider freezing it. Frozen soup lasts about 3 months. Just remember to leave some space in the container for expansion. When you reheat your soup, use a pot on the stove. Heat it over medium heat for even warming. Stir often to avoid sticking. If the soup seems too thick, add a splash of broth or water. You can also use a microwave. Heat in short bursts and stir in between. Yes, you can use fresh tomatoes. You will need about 10-12 medium ripe tomatoes. Start by blanching them in boiling water for about a minute. This makes peeling easy. Once peeled, chop them and add to your slow cooker. Fresh tomatoes give a bright flavor, but they can be watery. You may want to reduce the broth slightly for a thicker soup. To thicken your soup, try these methods: - Add more cream or coconut milk for richness. - Stir in a tablespoon of cornstarch mixed with cold water. - Blend more of the soup to create a smooth base. - Add cooked rice or small pasta for extra body. Each option adds a different taste and texture. This soup pairs well with many sides. Consider these options: - Grilled cheese sandwiches for a classic combo. - A fresh garden salad for a light touch. - Crusty bread or breadsticks to soak up the soup. - Garlic bread for an extra kick. Each option adds a nice balance to the meal. In this blog post, I shared how to make creamy tomato basil soup. You learned about essential ingredients, optional add-ins for flavor, and substitutions for a dairy-free option. We covered steps to prepare and cook the soup, tips for enhancing the flavor, and storage advice for leftovers. I also shared variations like spicy twists and vegetable additions. Experiment with your own ideas to make the recipe your own. Enjoy this comforting dish anytime!
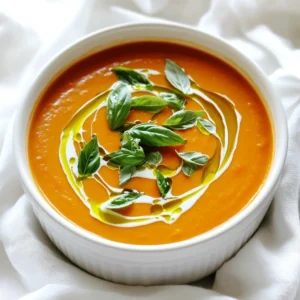
    Creamy Tomato Basil Soup Slow Cooker Delight
  • The ingredients for No Bake Strawberry Cheesecake Bars are simple and fresh. Here's what you need: - 1 ½ cups graham cracker crumbs - ½ cup unsalted butter, melted - 2 cups cream cheese, softened - 1 cup powdered sugar - 1 teaspoon vanilla extract - 2 cups heavy whipping cream - 2 cups fresh strawberries, hulled and sliced - ½ cup strawberry preserves (or jam) - Fresh mint leaves for garnish (optional) Each ingredient plays a key role in making these bars creamy and delicious. The graham cracker crumbs form a crunchy base, while the cream cheese gives it a rich texture. The heavy whipping cream adds lightness. Fresh strawberries bring bright flavor and color. Strawberry preserves add sweetness and a beautiful swirl, enhancing the look and taste of the bars. You can also use mint leaves to add a pop of color and freshness on top. Using fresh ingredients will make your dessert stand out even more. To start, mix 1 ½ cups of graham cracker crumbs with ½ cup of melted butter in a medium bowl. Stir until it looks like wet sand. This mixture will form a tasty base for our bars. Now, press the mixture firmly into the bottom of a 9x9 inch baking dish. Make sure it is even. Place the dish in the fridge while you work on the filling. Next, take 2 cups of softened cream cheese and beat it in a large bowl. Use an electric mixer on medium speed for about 2 minutes. The cream cheese should be smooth and creamy. Gradually add 1 cup of powdered sugar and 1 teaspoon of vanilla extract. Mix until everything is well combined. In a separate bowl, pour in 2 cups of heavy whipping cream. Whip the cream with a mixer until stiff peaks form. This should take about 3-4 minutes. Gently fold this whipped cream into your cream cheese mixture. Be careful not to deflate it. You want it to stay fluffy and light. Now, it’s time to layer the filling. Pour half of the cheesecake filling over the prepared crust. Spread it out evenly. Take 1 cup of sliced strawberries and arrange them on top. Pour the rest of the cheesecake filling over the strawberries and smooth it out. Next, dollop ½ cup of strawberry preserves evenly over the top of the cheesecake filling. Use a knife or spatula to swirl the preserves into the cheesecake. This will add a sweet, fruity flavor. Cover the dish with plastic wrap and refrigerate for at least 4 hours. For best results, chill overnight. Once set, take the cheesecake out of the fridge. Cut it into bars and garnish with fresh strawberries and mint leaves if you like. Enjoy your no bake strawberry cheesecake bars! To get the best texture, whip the cream well. You want it to form stiff peaks. This makes the cheesecake light and fluffy. If the cream is not whipped enough, the bars will be heavy. For cream cheese, make sure it is very soft. Soft cream cheese blends easily and gives a smooth filling. Beat it until there are no lumps. This adds to the creaminess of the bars. You can change the fruit toppings if you like. Try raspberries, blueberries, or peaches instead of strawberries. Each fruit adds a new flavor twist to your bars. You can also use flavored extracts. A bit of almond or lemon extract can change the taste. Just start with a small amount and taste as you go. This lets you create a unique bar each time. These cheesecake bars pair well with other desserts. Serve them with a scoop of vanilla ice cream. You can also add a drizzle of chocolate sauce on top. They are perfect for summer parties, birthdays, or family gatherings. The bright colors make them look nice on any table. You can even garnish with fresh mint leaves for a pop of color. {{image_2}} Want to add a chocolate twist? Use chocolate graham crackers for the crust. Mix 1 cup of chocolate crumbs with ½ cup of melted butter. Press this mixture into your baking dish as you did before. For an extra touch, drizzle melted chocolate over the top before serving. This adds a rich flavor that pairs well with strawberries. If you want a vegan version, swap cream cheese for vegan cream cheese. Use maple syrup instead of powdered sugar for sweetness. You can also replace heavy cream with coconut cream. Make sure to chill the can overnight for the best results. This keeps the texture creamy without any dairy. For a gluten-free treat, choose gluten-free graham crackers. Crush them as you would regular crackers. You may want to add a bit more butter to hold the crust together. This small change helps keep the bars from falling apart. The taste remains just as delicious, so you won’t miss the gluten! You can keep these cheesecake bars in the fridge for about 4 to 5 days. Wrap them tightly in plastic wrap or store them in an airtight container. This helps keep the bars fresh and tasty. Always remember to keep them chilled until you are ready to serve. To freeze, slice the bars first. Then, wrap each piece in plastic wrap. Place them in a freezer-safe bag or container. For thawing, put them in the fridge overnight. Freezing may change the texture slightly, making it a bit softer. However, the taste remains delicious. When you're ready to serve, take the bars out of the fridge or freezer. Let them sit at room temperature for about 10 minutes. This helps bring back some of the flavors. You can add fresh strawberries or mint leaves on top to make them look even better. Yes, you can use frozen strawberries. Just thaw them first. Drain any excess juice. This helps keep the bars from becoming too watery. Fresh strawberries give a brighter flavor, but frozen work well too. These cheesecake bars need to chill for at least 4 hours. For the best results, chill them overnight. This allows the flavors to mix and the bars to set properly. Yes, you can make these bars ahead of time. They can be made up to 2 days in advance. Just keep them covered in the fridge until you’re ready to serve. You can substitute cream cheese with Greek yogurt or vegan cream cheese. Both options give a nice creamy texture. They may alter the taste a bit, but they still work well. To keep the crust from getting soggy, ensure you press it firmly into the dish. Use melted butter to bind the crumbs well. Chill the crust before adding the filling, too. This extra step helps keep it crisp. In this post, we covered how to make delicious strawberry cheesecake bars. We explored the key ingredients and detailed steps, from preparing the crust to serving your tasty treat. I shared tips for the perfect texture and offered fun variations to try. Remember, use fresh ingredients and follow the chilling times. These bars are great for any occasion. Enjoy creating your own sweet twist on this classic dessert!
    No Bake Strawberry Cheesecake Bars Delightful Treat
  • - 1 cup egg whites (about 8 large eggs) - 1/2 cup fresh spinach, chopped - 1/4 cup cherry tomatoes, halved - 1/4 cup bell pepper, diced (any color) - 1/4 cup low-fat feta cheese, crumbled - 1 tablespoon olive oil - 1/4 teaspoon garlic powder - Salt and pepper to taste - Fresh herbs (like parsley or chives) for garnish Egg whites are the star of this dish. They are low in calories and high in protein. Each cup of egg whites packs about 26 grams of protein. This makes them great for muscle building and weight loss. Next, I add fresh spinach. Spinach brings vitamins and minerals. It also adds a lovely green color. Cherry tomatoes provide a sweet burst of flavor. Bell peppers add crunch and color. You can use any color pepper you like. Low-fat feta cheese adds a nice, salty flavor. It melts slightly when added at the end, making the dish creamy. For cooking, I use olive oil. It adds healthy fats and a nice taste. Garlic powder gives an extra kick. I season with salt and pepper to taste. You can also garnish with fresh herbs. Parsley or chives work well. They add flavor and color to your plate. This ingredient list is simple and healthy. It boosts your meals with protein and nutrients. - Heat olive oil in a non-stick skillet. - Sauté bell pepper and cherry tomatoes. Start by warming the olive oil in your skillet over medium heat. This step helps create a nice base for your veggies. Next, toss in the diced bell pepper and halved cherry tomatoes. Cook them for about 2-3 minutes, or until they start to soften. The colors will brighten, and the smells will fill your kitchen. It’s a delightful start! - Incorporate spinach and whisk egg whites. - Combine egg whites with the sautéed vegetables. Now, add the chopped spinach to the skillet. Stir it in and cook for another minute until it wilts. In a separate bowl, whisk your egg whites with garlic powder, salt, and pepper. This mix will boost the flavor. Pour the egg whites into the skillet over your sautéed vegetables. Let them sit for a minute to cook slightly before stirring. Gently stir until the egg whites are fully cooked and set, which should take about 3-4 minutes. - Add feta cheese and garnish with herbs. - Serve immediately. Once cooked, sprinkle crumbled feta cheese on top. Let it warm for about a minute. This step adds a creamy texture and a tangy flavor. Remove your skillet from the heat and garnish with your choice of fresh herbs, like parsley or chives. This dish looks bright and inviting. Enjoy it while it's warm for the best taste! - Use a non-stick skillet for the best results. It helps to cook evenly. - To make egg whites fluffy, whisk them well before cooking. Air makes them rise. - Add spices like paprika or cumin for warmth. Fresh herbs like chives or parsley add brightness. - Balance flavors by mixing salty and sweet. A touch of feta cheese brings nice contrast. - Serve your scramble with whole grain toast or creamy avocado slices. - For meal prep, divide into containers. You can eat it later or on the go. {{image_2}} You can change the veggies to mix up the flavor. Here are some tasty swaps: - Use zucchini or mushrooms for a different texture. - Swap in kale or Swiss chard instead of spinach. - Try adding onions or garlic for extra taste. If you want to replace feta cheese, consider these options: - Use goat cheese for a tangy kick. - Try nutritional yeast for a vegan cheese flavor. - Crumbled tofu works well for a dairy-free choice. If you need a dairy-free or vegan version, here’s how: - Replace egg whites with silken tofu. - Use almond milk or coconut milk to add creaminess. - Skip the cheese or use a plant-based cheese alternative. For gluten sensitivities, this recipe is already gluten-free. Just be sure to check all labels. You can turn your egg white scramble into a fun meal: - Wrap it in a tortilla for a breakfast burrito. - Add salsa and avocado to make it a complete meal. You can also serve it as a brunch side dish. Pair it with whole grain toast or fresh fruit for balance. Store your egg white scramble in an airtight container. This keeps it fresh. The scramble is best in the fridge for up to three days. Make sure to cool it to room temperature before placing it in the fridge. To freeze your egg white scramble, use a freezer-safe container. Make sure to leave some space at the top, as the mixture can expand. It stays good in the freezer for about one month. When ready to eat, thaw it overnight in the fridge. Reheat the scramble gently to keep the texture nice. You can use a microwave for quick heating. Heat it in 30-second intervals, stirring in between. The ideal serving temperature is warm, around 165°F. Enjoy it fresh for the best taste! What are the health benefits of egg whites? Egg whites are low in calories and fat. They are high in protein and have no cholesterol. This makes them a great choice for anyone looking to eat healthy. They also contain important vitamins and minerals. These include riboflavin and selenium, which help your body in many ways. How do I know when my egg whites are fully cooked? Your egg whites are done when they turn from clear to white and firm up. They should not be runny. If you stir them gently and they hold their shape, they are ready. Cook them for about 3-4 minutes over medium heat for the best result. Can I use whole eggs instead of egg whites? Yes, you can use whole eggs. Whole eggs add more flavor and richness. They will also increase the fat and calorie content. If you want a lighter meal, stick with egg whites. Why is my egg white scramble watery? A watery scramble can happen if you add too many vegetables. Some vegetables release water when cooked. To fix this, try cooking the veggies first and draining excess moisture before adding the egg whites. How can I make my scramble fluffier? To make your scramble fluffier, whisk the egg whites well before cooking. This adds air and makes them lighter. You can also try cooking them on lower heat. This helps them set slowly and stay fluffy. What is the protein content per serving? Each serving of egg white scramble has about 20 grams of protein. This is based on using 1 cup of egg whites. It is a great way to boost your protein intake. Are egg whites healthier than whole eggs? Egg whites are considered healthier if you want to lower fat and cholesterol. Whole eggs offer good nutrients too. They contain healthy fats and vitamins. It depends on your diet goals and needs. This recipe for egg white scramble is simple and tasty. You learned about the main ingredients like spinach, tomatoes, and feta cheese. I shared step-by-step instructions to make cooking easy for you. There are tips to enhance flavor and options for meal prep. With variations, you can keep it fresh each time. Proper storage keeps your leftovers safe. If you have questions, I answered common ones. Try this dish for a healthy meal that you can enjoy every day. Your cooking skills will shine!
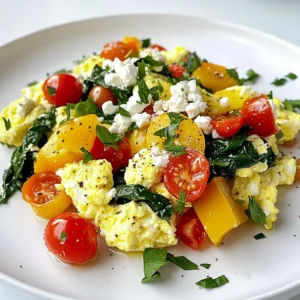
    High Protein Egg White Scramble Easy and Tasty Meal
  • - 1 lb beef flank steak - 4 cups broccoli florets - 1 red bell pepper - 3 tablespoons soy sauce - 2 tablespoons oyster sauce - 1 tablespoon cornstarch - 1 tablespoon sesame oil - 2 cloves garlic, minced - 1 teaspoon fresh ginger, grated - Sesame seeds - Green onions - Cooked jasmine rice for serving When I prepare this dish, I focus on fresh ingredients. The beef can make or break this meal. I choose flank steak for its flavor and tenderness. Slicing it thin against the grain ensures each bite is easy to chew. Broccoli adds a nice crunch. I recommend using bright green florets. They look good and taste fresh. The red bell pepper adds color and sweetness. It balances well with the savory beef. The sauces give depth to the dish. Soy sauce brings umami, while oyster sauce adds a rich savor. Cornstarch helps thicken the sauce and coat the beef. Sesame oil rounds out the flavors with its nutty aroma. Garlic and ginger are key in this recipe. They provide warmth and depth. Mince the garlic fine and grate the ginger for best results. Don't skip the garnishes! Sesame seeds add texture and a nice finish. Green onions give a fresh bite. I serve this dish over jasmine rice, which soaks up the sauce perfectly. First, take a medium bowl. Add the beef slices, soy sauce, oyster sauce, and cornstarch. Mix all the ingredients well. Let this sit for at least 15 minutes. This helps the beef soak up the flavors. The cornstarch will also help make the beef tender. Next, heat a large skillet or wok over medium-high heat. Add vegetable oil to the skillet. Once hot, add minced garlic and grated ginger. Stir them for about 30 seconds. This will fill your kitchen with a lovely aroma. Now, add the marinated beef to the skillet. Spread it out in a single layer. Sear the beef for 2-3 minutes. You want it browned and just cooked through. Then, remove the beef and set it aside. In the same skillet, add a bit more oil if needed. Toss in the broccoli florets and sliced red bell pepper. Stir-fry for about 5 minutes. You want the vegetables to stay bright and just tender. This keeps them crunchy and tasty. Now it’s time to bring everything together. Return the cooked beef to the skillet with the veggies. Drizzle sesame oil over the mixture. Stir everything together to heat through for another 1-2 minutes. Now, your Better Than Takeout Beef and Broccoli is ready to serve! To get a nice sear on your beef, start with high heat. Use a large skillet or wok. Make sure it is hot before adding the beef. This creates a caramelized crust. Sear the beef in one layer. Avoid crowding the pan. Cook for just 2-3 minutes until brown. Remove it quickly to keep it tender. To keep broccoli bright and crisp, do not overcook it. Stir-fry for about 5 minutes. You want the florets to be tender but still vibrant green. Add a splash of water if they start to dry out. This helps steam them slightly. The bright color makes the dish pop. Timing is key to perfect beef and broccoli. Start by marinating the beef first. While it sits, prepare the broccoli and bell pepper. Cook the beef separately, then remove it. Stir-fry the veggies until bright and tender. Finally, combine the beef and veggies together. This method ensures everything is hot and fresh at the same time. {{image_2}} You can switch up the protein in this dish. Use chicken for a lighter taste. Tofu is great for a vegetarian option. Shrimp adds a nice seafood flavor. Each choice brings a unique twist to your beef and broccoli delight. Feel free to mix different sauces for fun flavors. Try teriyaki sauce for a sweet touch. Hoisin sauce adds a nice depth. You can even go spicy with sriracha. These sauces can change the whole dish experience. Don't limit yourself to just broccoli and bell peppers. Snap peas add crunch. Carrots give a sweet flavor. Mushrooms bring a rich taste. Feel free to add any veggies you love. Customize your dish to suit your taste buds! To keep your beef and broccoli fresh, place it in an airtight container. Let the dish cool to room temperature first. Store it in the fridge for up to three days. If you notice any excess moisture, use a paper towel to absorb it. This helps keep the dish from getting soggy. To reheat without losing texture, use the stovetop. Place the dish in a skillet over medium heat. Add a splash of water or broth to keep it moist. Stir gently for about five minutes until heated through. This method helps to restore that fresh, crisp taste. Yes, you can freeze beef and broccoli! Store it in a freezer-safe container. It will stay good for up to three months. When you’re ready to eat, thaw it in the fridge overnight. Reheat it on the stovetop for the best texture. To make this dish gluten-free, swap soy sauce for tamari sauce. Tamari has a similar taste but lacks gluten. Check the oyster sauce too; some brands offer gluten-free options. This way, you can enjoy the same great taste without gluten. Yes, you can use frozen broccoli. It saves time and is still nutritious. Just thaw it before cooking to avoid excess water in the pan. Frozen broccoli may cook faster, so keep an eye on it. Beef and broccoli goes well with several tasty sides. Here are some ideas: - Jasmine rice - Fried rice - Steamed dumplings - Egg rolls - Simple green salad These sides add variety and balance to your meal. You can keep leftovers in the fridge for up to three days. Store them in airtight containers to keep them fresh. This dish reheats well, so you can enjoy it again without losing flavor. Yes, you can prepare some parts in advance. Marinate the beef a day before. Cook the dish and store it in the fridge. Just reheat it when you are ready to serve. This dish combines tasty beef flank steak, fresh veggies, and savory sauces. You learned key steps for marinating, cooking, and stir-frying. I shared tips for great texture and flavor, plus variations for proteins and sauces. Storing and reheating leftovers can keep your meal fresh. Enjoy exploring your options! Dive into this recipe to impress your family and friends. Simple steps await you, so get cooking!
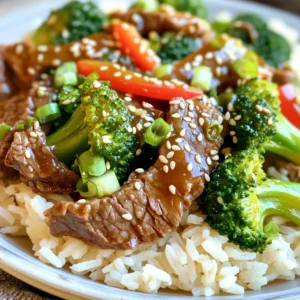
    Better Than Takeout Beef and Broccoli Delight
  • - 1 lb ground beef (or ground turkey) - 1 medium sweet potato, peeled and diced - 1 red bell pepper, diced - 1 green bell pepper, diced - 1 medium onion, chopped - 2 cloves garlic, minced - 1 can (15 oz) black beans, drained and rinsed - 1 cup corn (fresh or frozen) To create the best Southwest Beef and Sweet Potato Skillet, you need fresh, quality ingredients. Ground beef gives richness, while ground turkey offers a lighter choice. Sweet potatoes add natural sweetness and nutrition. Bell peppers bring color and crunch, enhancing the dish's texture. Onions and garlic provide a savory base. Black beans and corn add heartiness and fiber, making each bite satisfying. - 1 teaspoon cumin - 1 teaspoon chili powder - 1/2 teaspoon smoked paprika - Salt and pepper to taste - 2 tablespoons olive oil - Fresh cilantro, chopped (for garnish) - Lime wedges (for serving) Seasoning is key for flavor. Cumin and chili powder deliver warmth and depth. Smoked paprika adds a hint of smokiness, making the dish more complex. Salt and pepper help balance the flavors. Olive oil is perfect for cooking and adds richness. Fresh cilantro brightens the dish, while lime wedges offer a zesty kick. {{ingredient_image_1}} First, grab a large skillet. Heat two tablespoons of olive oil over medium heat. Once the oil is hot, add one chopped onion. Sauté it for about three to four minutes until it turns soft and translucent. This builds a great flavor base for your dish. Next, add two minced garlic cloves. Cook them for one minute until you smell that delicious aroma. Now, it's time to introduce one medium sweet potato, peeled and diced. Stir it all together. Cook the sweet potato for about ten minutes, stirring often. You want it to start softening up. Now, push the sweet potato mixture to one side of the skillet. Add one pound of ground beef (or ground turkey for a lighter touch) to the empty side. Cook the beef for about five to seven minutes. Break it apart with your spatula as it cooks. You want it to brown nicely and cook all the way through. When the beef is ready, mix it in with the sweet potato. This is where the magic starts to happen! Next, add in one diced red bell pepper and one diced green bell pepper. They add color and crunch. Then, toss in one can of black beans, drained and rinsed, and one cup of corn (fresh or frozen). Now, for the seasonings! Sprinkle in one teaspoon of cumin, one teaspoon of chili powder, and half a teaspoon of smoked paprika. Don’t forget to add salt and pepper to taste. Stir everything together well. Cover the skillet and cook for another five to seven minutes. This lets the sweet potatoes soften completely and melds all those great flavors together. Finally, adjust the seasonings if needed. Your dish is almost ready. Enjoy the delightful aroma filling your kitchen. - To ensure sweet potatoes are perfectly cooked, dice them evenly. Smaller pieces cook faster and more evenly. - Start cooking the sweet potatoes before adding other ingredients. This gives them a head start. - Stir occasionally, but not too often. Let them brown slightly for better flavor. - Taste and adjust seasonings. Each sweet potato may vary in sweetness. - Pair your skillet dish with rice or warm tortillas. Both add texture and flavor to your meal. - Add a side salad to bring freshness. A simple green salad works well. - Serve with lime wedges. Squeezing lime over the dish brightens the flavors. - Garnish with fresh cilantro for a pop of color and taste. It adds a nice touch. Pro Tips Prep Your Ingredients: Before you start cooking, make sure all your ingredients are chopped and ready to go. This will help streamline the cooking process and ensure you don't miss anything. Use Fresh Spices: For the best flavor, use fresh spices rather than old ones. They have a more vibrant taste that can elevate your dish significantly. Customize Your Heat: If you enjoy a spicier dish, feel free to add jalapeños or a dash of hot sauce. Adjust the spices to your preference for the perfect flavor. Leftover Ideas: This dish makes great leftovers! You can repurpose it into tacos, burrito bowls, or even a hearty soup by adding some broth. {{image_2}} You can change the meat in this dish. Try using ground turkey for a lighter meal. This keeps the flavor but cuts fat. If you want a vegetarian dish, use lentils or chickpeas instead. They add protein and fiber without meat. Feel free to mix in other veggies. Zucchini adds a nice texture and flavor. Spinach is also a great choice and adds color. You can swap out black beans for pinto beans or kidney beans. This gives a new taste and keeps it interesting. For extra richness, sprinkle some cheese on top. Cheddar or Monterey Jack works well. You can also add slices of avocado for creaminess. Changing up the spices can boost flavor too. Try adding some oregano or cayenne pepper for a kick. To keep your Southwest Beef and Sweet Potato Skillet fresh, store leftovers in an airtight container. Let the dish cool to room temperature before sealing it. This helps to lock in flavor and moisture. In the fridge, it lasts up to three to four days. Always check for signs of spoilage before eating. You can freeze this dish for longer storage. First, allow it to cool completely. Then, place it in a freezer-safe container or bag. It keeps well for up to three months. When you’re ready to eat, thaw it in the fridge overnight. To reheat, warm it on the stove over medium heat until hot. Stir occasionally to make sure it heats evenly. Enjoy your meal without losing any flavor! Yes, you can easily make this dish gluten-free. Here are a few options: - Use gluten-free ground beef or turkey. - Check that your spices are gluten-free. - Serve with gluten-free tortillas or rice. If you don’t have sweet potatoes, try these: - Regular potatoes work well. - Butternut squash adds a nice flavor. - Cauliflower can also be a lighter choice. Yes, you can prep this dish ahead of time. Here are some tips: - Cook the sweet potatoes and beef mixture a day before. - Store it in an airtight container in the fridge. - Reheat it on the stove before serving. This blog post covered a delicious skillet dish made with ground beef, sweet potatoes, and colorful veggies. You learned how to prepare it step-by-step, with tips for cooking and serving. Variations let you switch up proteins and veggies, ensuring every meal feels fresh. Proper storage ensures you can enjoy leftovers later. With this guide, you have all the tools to create a tasty, versatile meal. Enjoy your time cooking and experimenting in the kitchen!
    Southwest Beef and Sweet Potato Skillet Delight
  • For this Sheet-Pan Teriyaki Chicken Pineapple Rice, you will need: - 1 lb boneless, skinless chicken thighs, cut into bite-sized pieces - 2 cups jasmine rice, rinsed - 2 cups low-sodium chicken broth - 1 cup fresh pineapple, diced - 1 red bell pepper, chopped - 1 cup sugar snap peas - 1/4 cup teriyaki sauce (store-bought or homemade) - 2 tablespoons soy sauce - 2 tablespoons olive oil - 2 cloves garlic, minced - 1 teaspoon ginger, minced - 2 green onions, sliced (for garnish) - Sesame seeds (for garnish) If you don’t have a specific ingredient, don’t worry! Here are some easy swaps: - Chicken thighs can be replaced with chicken breasts or tofu for a vegetarian option. - Jasmine rice can be swapped for basmati or brown rice, but cooking times may vary. - Fresh pineapple can be replaced with canned pineapple in juice for convenience. - Sugar snap peas can be changed to snow peas or green beans. To get the best taste, focus on these key ingredients: - Teriyaki Sauce: This adds a sweet and savory profile. You can use homemade for a fresher taste. - Fresh Pineapple: It brings brightness and sweetness that balances the dish well. - Garlic and Ginger: These ingredients give depth and warmth to the meal. Using these core items will help you create a dish that is both delicious and satisfying. Enjoy the vibrant flavors! Begin by cutting your chicken thighs into bite-sized pieces. This helps them cook evenly. In a large bowl, mix the chicken with teriyaki sauce, soy sauce, olive oil, garlic, and ginger. Toss the chicken well to coat it. Marinate the chicken for about 15 minutes. This step boosts flavor. Take a large rimmed baking sheet and spread the rinsed jasmine rice evenly across it. This rice will soak up all the tasty juices. Pour the chicken broth over the rice, ensuring it is fully covered. Next, place the marinated chicken pieces on top of the rice. Avoid stirring to keep the layers separate. Scatter the diced pineapple, chopped bell pepper, and sugar snap peas over the chicken. This adds color and nutrition. Cover the baking sheet tightly with foil. Preheat your oven to 400°F (200°C) and bake for 25-30 minutes. This allows the rice to become tender and the chicken to cook through. After baking, remove the foil and gently stir the mixture. This helps blend the flavors. Return the tray to the oven, uncovered, for another 10 minutes. This step gives a nice finish. Once done, let it sit for 5 minutes before serving. Garnish with sliced green onions and sesame seeds for a beautiful touch. Enjoy your meal! Marinating chicken adds depth to your dish. I recommend using teriyaki sauce, soy sauce, garlic, and ginger for a burst of flavor. Mix them in a bowl and toss the chicken pieces in the marinade. Let the chicken sit for about 15 minutes. This quick soak makes a big difference. The longer you marinate, the more flavor the chicken absorbs. Cooking jasmine rice is simple but key to this dish. Rinse the rice to remove excess starch. This helps the rice stay fluffy. Use low-sodium chicken broth instead of water for added flavor. The ratio is two cups of broth for every two cups of rice. Pour the broth over the rice on the baking sheet. This step ensures the rice cooks perfectly while absorbing all the flavors. The mix of sweet pineapple and savory teriyaki sauce creates a great balance. Don't forget to add veggies like bell pepper and sugar snap peas. They add crunch and color to your meal. If you want more sweetness, add extra pineapple. For a savory kick, drizzle more soy sauce. Taste as you go to find your perfect balance. {{image_2}} You can swap chicken for other proteins. Try shrimp or tofu for a change. Both options cook well and soak up flavors. Shrimp adds a sweet taste, while tofu gives a nice texture. Just remember to adjust cooking times. Shrimp cooks fast, so add it later in the baking process. Tofu can be marinated like chicken for more flavor. Feel free to mix in seasonal veggies. Broccoli, zucchini, or carrots can bring fresh tastes. Add these veggies when you bake the dish. They will cook perfectly with the chicken and rice. You can also use snap peas, as they add a nice crunch. The key is to keep the colors bright and flavors fresh. Rice is the base, but you can switch it up. Try brown rice for a nuttier taste. Quinoa works too, adding protein and a unique texture. Remember, different grains need different cooking times. Just follow the instructions on the package for the best results. This way, you can enjoy a new flavor twist in every bite. To keep your Sheet-Pan Teriyaki Chicken Pineapple Rice fresh, store it in an airtight container. This helps prevent moisture loss and keeps flavors intact. Make sure to cool the dish to room temperature first. Once cooled, seal it tightly and place it in the fridge. This dish stays good for about three to four days. When reheating, you want to keep the rice moist. Place your leftovers in a microwave-safe dish. Add a splash of chicken broth or water to keep it from drying out. Cover the dish with a lid or microwave-safe wrap. Heat it in the microwave for about two to three minutes, stirring halfway through. If you prefer the oven, heat it at 350°F (175°C) for about 15-20 minutes. Stir it occasionally to warm evenly. If you want to save some for later, freezing works well too. Allow the dish to cool completely, then divide it into portions. Use freezer-safe bags or containers for easy storage. Make sure to remove as much air as possible. Label with the date and freeze for up to three months. When ready to eat, thaw in the fridge overnight and reheat as mentioned above. This way, you can enjoy your tasty teriyaki chicken anytime! Yes, you can skip soy sauce. Instead, use coconut aminos or tamari for a gluten-free option. Both give a nice umami flavor. You might want to adjust the teriyaki sauce, as it can be salty. Test the taste as you go. Check the chicken for a safe internal temperature of 165°F (74°C). You can use a meat thermometer for this. The chicken should look white and juicy, not pink. If you don’t have a thermometer, cut a piece open. The juices should run clear, and the meat should not be rubbery. This dish is great on its own! You can add a side salad for crunch. A simple cucumber salad with rice vinegar is perfect. Feel free to serve extra teriyaki sauce for dipping. If you want more, steamed broccoli or sautéed bok choy can work well. Enjoy your meal! This blog post covered how to make delicious Sheet-Pan Teriyaki Chicken with Pineapple Rice. We explored key ingredients, cooking steps, and tips to enhance flavor. Remember, marinating adds taste, and using seasonal veggies keeps it fresh. You can switch proteins and rice for fun variations, too. By storing leftovers properly, you keep meals tasty longer. Enjoy your cooking and share your results!
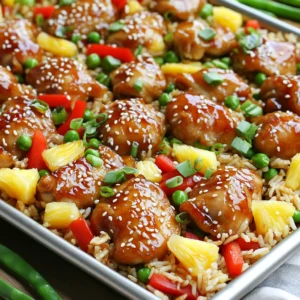
    Sheet-Pan Teriyaki Chicken Pineapple Rice Delight
  • - 1 cup rolled oats - 2 cups almond milk (or your preferred milk) - 1 tablespoon chai tea blend (or 1 chai tea bag) - 1 tablespoon maple syrup or honey (optional) - 1/2 teaspoon cinnamon - 1/4 teaspoon ginger powder - 1/4 teaspoon cardamom powder - 1/4 cup almond butter - 2 tablespoons chopped nuts (almonds or walnuts) - Fresh fruit for topping (like sliced bananas or berries) You can use any milk you like. Soy milk or oat milk works well. For sweeteners, try agave syrup or coconut sugar. If almond butter isn’t your favorite, peanut butter or sunflower seed butter can be great options. Chai latte oatmeal provides about 350 calories per serving. It has around 10 grams of protein and 7 grams of fiber. This dish is filling and nutritious, perfect for a busy morning. To start, grab a medium saucepan. Pour in 2 cups of almond milk. Set the heat to medium and bring it to a gentle simmer. This step helps the milk absorb the chai flavor well. Once it simmers, add 1 tablespoon of your chai tea blend or drop in one chai tea bag. Let the mixture steep for about 5 minutes. Stir it occasionally to mix the flavors. If you used loose tea, strain it out with a fine mesh sieve to keep your oatmeal smooth. Now, it's time to cook the oats. Add 1 cup of rolled oats to the almond infusion. Stir in 1/2 teaspoon of cinnamon, 1/4 teaspoon of ginger powder, and 1/4 teaspoon of cardamom powder. Bring this mixture to a boil while stirring. Once it boils, reduce the heat to low. Simmer the oats for 5 to 7 minutes. Stir frequently to prevent sticking and ensure even cooking. Your oats should absorb most of the liquid and become soft but not mushy. If you like your oatmeal sweeter, stir in 1 tablespoon of maple syrup or honey just before serving. This step adds a nice touch of flavor. Now, divide the oatmeal into bowls. Top each bowl with a dollop of almond butter. Scatter 2 tablespoons of chopped nuts over the top, and then finish with some fresh fruit, like sliced bananas or berries. For a pretty presentation, swirl the almond butter and arrange the nuts and fruit artfully. This makes your dish look as great as it tastes! To make your oatmeal just right, you need to know cooking times. Rolled oats cook quickly, usually in about 5-7 minutes. Steel-cut oats take longer, around 20-30 minutes. Instant oats are the fastest, just needing a minute in boiling water. To stop oats from sticking to the pot, stir them often while they cook. You can also add a tiny bit of oil or butter to the pot before cooking. This keeps them from clumping together. Want to boost the flavor of your chai latte oatmeal? Consider adding spices like nutmeg or cloves. Just a dash can make a big difference! You can also use flavored almond butter. Vanilla or cinnamon almond butter adds a lovely twist. This small change can elevate your dish to a new level. Toppings can change the whole meal. For a varied experience, try fresh fruit like bananas or berries. You can also add seeds or shredded coconut. If you’re meal prepping, divide your oatmeal into bowls and store them in the fridge. Just heat them up when you’re ready to eat. This makes your breakfast quick and easy! {{image_2}} To make this dish vegan, use almond milk as your base. It is a great dairy-free choice. Ensure your chai tea blend is also vegan. Most brands are, but it’s wise to check the label. For gluten-free oats, choose certified gluten-free rolled oats. Regular oats may have gluten from cross-contamination. These oats still provide a hearty base for your breakfast. You can switch up the flavor by using different tea blends. Try rooibos for a sweet twist. Earl Grey adds a lovely bergamot taste. Each blend brings a unique element to your oatmeal. Seasonal fruits can also enhance your dish. In summer, use fresh berries for a burst of flavor. During fall, sliced apples with a sprinkle of cinnamon are divine. These additions make each bowl exciting and fresh. Want more protein? Add a scoop of your favorite protein powder while cooking. This step is easy and effective for a filling meal. You can also mix in seeds like chia or flaxseed for healthy fats. Incorporating yogurt on top adds creaminess and extra protein. Greek yogurt works well and makes your dish more satisfying. This twist keeps your Chai Latte Oatmeal with Almond Butter delightful and nourishing. Store your Chai Latte Oatmeal in an airtight container. It will stay fresh for up to four days in the fridge. Make sure to let it cool down before sealing. This helps keep the moisture in check. To reheat, simply add a splash of almond milk to your bowl. Heat it in the microwave for about one minute. Stir halfway through to ensure even heating. You can also reheat it on the stove over low heat. Add a little milk to make it creamy again. You can prepare this oatmeal in advance for a quick breakfast. Cook a big batch and divide it into single servings. Store each serving in separate containers. This makes it easy to grab and go. If you want to keep it fresh, store the toppings separately. Keep your almond butter and fruit in small containers. This way, they won’t get soggy. Freezing Chai Latte Oatmeal is easy. Let it cool completely before transferring it to freezer-safe containers. Portion it out to make reheating simple later. To thaw, move the oatmeal to the fridge overnight. You can also use the microwave for a quick thaw. Just heat it on low in short bursts. Stir often to avoid hot spots. This way, you can enjoy your delicious oatmeal any time! Yes, you can make Chai Latte Oatmeal ahead of time. To meal prep this recipe, cook the oatmeal as directed. Allow it to cool completely, then store it in airtight containers. This oatmeal keeps well in the fridge for about three to five days. When you're ready to eat, just reheat it on the stove or in the microwave. You can add a splash of almond milk to loosen it up. This way, you enjoy a warm and tasty breakfast all week long. If you need a milk substitute, there are many options. You can use oat milk or soy milk for similar creaminess. Coconut milk gives a rich, tropical flavor. If you're avoiding nuts, try rice milk or hemp milk. Each alternative will change the taste slightly, but they all work well in this recipe. Chai Latte Oatmeal lasts about three to five days in the fridge. Store it in airtight containers to keep it fresh. When you reheat, check for the right consistency. If it's too thick, simply add a bit of water or milk. This way, you’ll have a quick breakfast ready to go. Yes, adding protein powder is easy and boosts nutrition. Mix in a scoop of your favorite protein powder once the oatmeal is cooked. Stir it well to combine. If you use flavored protein, like vanilla or chocolate, adjust the sweetness as needed. This addition makes your breakfast even more filling and satisfying. This article covered how to make a tasty Chai Latte Oatmeal. You learned about the ingredients, step-by-step instructions, and tips for perfecting the dish. Remember, you can customize it with various flavors and toppings. Storing leftovers and meal prep ideas help make this easy and convenient. Enjoy your delicious oatmeal any time. With these tips, you can create a warming meal that is both fun and healthy. Dive in and experiment with your favorites!
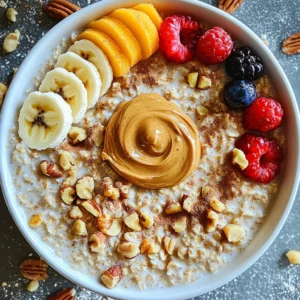
    Chai Latte Oatmeal with Almond Butter Delight
  • To make this mousse, you need a few simple items: - 2 cups plain Greek yogurt - 1/2 cup unsweetened cocoa powder - 1/3 cup honey or maple syrup - 1 teaspoon vanilla extract - 1/2 teaspoon espresso powder (optional) - 1/4 teaspoon salt - 1/2 cup dark chocolate chips These ingredients blend to create a rich, creamy mousse. Greek yogurt gives protein and a smooth texture. Cocoa powder adds a deep chocolate taste. Honey or maple syrup sweetens it just right. You can enhance the flavor with these extras: - A pinch of cinnamon - A splash of almond extract - A few drops of peppermint extract These options can add a twist to your mousse. They make it more fun and tasty! Each serving of this mousse packs a punch! Here’s what you can expect: - Calories: About 180 - Protein: 10g - Carbohydrates: 25g - Fat: 5g - Sugars: 12g This mousse is not only delicious but also a smart choice for a snack or dessert. You get protein and flavor in every bite! Start by melting the dark chocolate chips. Use a microwave-safe bowl. Heat the chocolate in 30-second bursts. Stir it after each burst. This helps it melt smoothly. Once melted, let it cool a bit before mixing. Next, take a large mixing bowl. Add the plain Greek yogurt and cocoa powder. Use a hand mixer or a whisk to blend the two. Mix until the yogurt is smooth and free of lumps. This makes a rich base for your mousse. Now, it’s time to sweeten your mixture. Add honey or maple syrup for sweetness. Stir in the vanilla extract and salt. If you like coffee flavor, add the espresso powder. Mix everything until it is creamy and well blended. Drizzle the cooled melted chocolate into the yogurt mixture. Use a spatula to fold it gently. Make sure the chocolate is fully mixed in. This step gives your mousse a rich, chocolatey taste. Spoon the mousse into serving dishes or cups. Cover them with plastic wrap. Place them in the refrigerator for at least 1 to 2 hours. This helps the mousse set and become nice and fluffy. Once chilled, your mousse is ready to serve. Garnish each serving with fresh berries. A sprig of mint adds a nice touch too. Serve in clear cups to show off the lovely chocolate color. Enjoy your high-protein treat! To get that perfect creamy texture, start with high-quality Greek yogurt. Choose plain yogurt with full fat for the best results. Mix it well with cocoa powder until smooth. Use a hand mixer for a light, airy mousse. This helps to incorporate air, making it fluffy. For a rich flavor, use dark chocolate. I recommend chocolate that is at least 70% cocoa. This gives a deep, bold taste. If you prefer sweeter notes, try semi-sweet chocolate. Always melt it slowly to avoid burning. Adjust the sweetness to fit your taste. You can use honey or maple syrup. Start with 1/3 cup and add more if needed. Taste the mixture before chilling. This lets you control how sweet your mousse will be. To impress, serve the mousse in clear glass cups. This shows the rich chocolate color. Add fresh berries on top for a pop of color. A sprig of mint adds a nice touch. Drizzle a little honey on top for extra sweetness and flair. {{image_2}} You can make a vegan version of this mousse. Use silken tofu instead of Greek yogurt. Blend the tofu until smooth. Add cocoa powder, maple syrup, vanilla extract, and salt. This mix keeps the mousse rich and creamy without dairy. Fruits and nuts add fun textures to your mousse. Try adding chopped walnuts, almonds, or hazelnuts. Fresh fruits like raspberries or strawberries also work well. Fold them into the mousse before chilling. This gives each bite a nice crunch or burst of flavor. If you love peanut butter, mix it into your mousse. Stir in a few tablespoons of creamy peanut butter. This adds a nutty taste that pairs well with chocolate. You can also top the mousse with peanuts for extra crunch. To store leftover mousse, place it in an airtight container. Cover it tightly. This keeps the mousse fresh and tasty. You can store it in the fridge for up to three days. If you see any changes in color or smell, it's best to toss it. Always use clean utensils when serving mousse. Avoid double-dipping to keep it safe. If you have not finished the mousse, cover it well. This helps prevent it from absorbing other smells in the fridge. You can freeze this mousse for longer storage. Use a freezer-safe container and leave some space at the top. The mousse may change in texture after thawing, so it's best to enjoy it fresh. To thaw, place it in the fridge overnight before serving again. Yes, you can use flavored Greek yogurt. It will change the taste. If you want a rich chocolate flavor, choose a chocolate or vanilla flavor. Just be careful with the sweetness, as flavored yogurts often have added sugar. To make this mousse sugar-free, skip the honey or maple syrup. Use a sugar substitute, like stevia or erythritol, instead. Adjust the amount to your taste. Make sure to check the sweetness level after mixing. Yes, you can use dairy-free yogurt made from almond, coconut, or soy. Look for options that are thick and creamy. Make sure they have a similar protein content to keep the mousse rich and satisfying. The mousse lasts about 3 to 5 days in the fridge. Store it in an airtight container to keep it fresh. The texture may change a bit, so give it a quick stir before serving. You can use sliced bananas, crushed nuts, or granola as a garnish. Shredded coconut or a sprinkle of cinnamon can add extra flavor. For a fun twist, try crumbled cookies or a drizzle of nut butter. This blog post outlined the steps to make a delicious high-protein chocolate Greek yogurt mousse. We covered key ingredients and provided tips to enhance flavor and texture. You also learned about variations and storage options for leftover mousse. Enjoy personalizing your mousse with different flavors. Remember, it’s a healthy treat that fits your diet. Play with ingredients and make it your own! Try these steps, and enjoy your tasty creation.
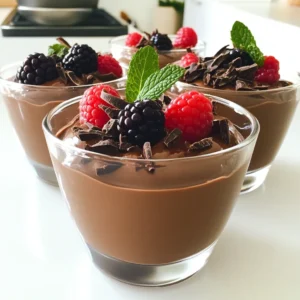
    High-Protein Chocolate Greek Yogurt Mousse Delight
  • - 8 oz cream cheese, softened - 1 cup powdered sugar - 1 teaspoon vanilla extract - 1 cup heavy whipping cream - 10 Oreo cookies, crushed (plus extra for garnish) - 1/4 cup chocolate syrup (for drizzling) - 1/2 cup whipped topping (optional, for added fluffiness) - Fresh mint leaves (optional) To make my No-Bake Cookies & Cream Cheesecake Cups, I start with cream cheese. It gives the dessert a rich and smooth base. Next, I mix in powdered sugar for sweetness and add vanilla to enhance the flavor. Heavy whipping cream is key. It adds lightness and makes the cheesecake fluffy. I love using Oreo cookies in this recipe. They give a delicious cookie crunch. For the best taste, I crush them into small pieces. Chocolate syrup adds a sweet and fun drizzle on top. If you want extra fluff, whipped topping is a good option. Lastly, fresh mint leaves can add a pop of color and freshness. Gather these ingredients, and you're ready to create a delightful treat! To start, place the softened cream cheese in a large mixing bowl. Use an electric mixer to beat it until it becomes creamy and smooth. This step is key to a nice texture. Next, gradually add the powdered sugar and the vanilla extract. Mix until everything is blended well. The mixture should look light and fluffy. In a separate bowl, pour in the heavy whipping cream. Use a hand mixer to whip it until stiff peaks form. This means when you lift the beaters, the cream holds its shape. Be careful not to overwhip, or it can turn grainy. Once whipped, gently fold the cream into the cheesecake mixture. Use a spatula and make slow, sweeping motions. This keeps the mixture light and airy. Now, it’s time to fill the serving cups. Spoon the cheesecake mixture into each cup, filling them about two-thirds full. Smooth the tops with a spatula for a neat look. Afterward, place the cups in the fridge. Let them chill for at least two hours so they can set properly. This waiting time builds the flavors, making each bite even better! To make your No-Bake Cookies & Cream Cheesecake Cups look great, use clear dessert cups. These cups show off the lovely layers of your dessert. You can see the creamy filling and the crunchy cookie bits. For a fun touch, garnish each cup with a whole Oreo on top. This adds a nice look and tells guests what’s inside. A few fresh mint leaves can also brighten the dessert. They add a pop of color and a hint of freshness. If you need an alternative for cream cheese, try using ricotta or mascarpone. These options can give a different taste and texture. For a dairy-free version, use coconut cream instead of heavy whipping cream. Just make sure to whip the coconut cream until it is fluffy. This will keep your dessert light and airy while still being creamy. One common mistake is overmixing the cream. When folding in the whipped cream, do it gently. This keeps the mixture light. Another mistake is not letting the cheesecake cups set long enough. Refrigerate them for at least two hours. This time helps the flavors meld and the texture firm up nicely. If you skip this step, your cups might not hold their shape. {{image_2}} You can make your no-bake cookies and cream cheesecake cups even more fun! Try using different cookies, like chocolate chip or peanut butter. Each cookie brings its own taste. You can also mix in flavoring extracts. Almond or lemon can add a nice twist. Just a drop or two can change the whole flavor. Serving your cheesecake cups can be a creative adventure. Pair them with fresh fruits like strawberries or raspberries for a pop of color and flavor. You could also serve them alongside other desserts, like brownies or cookies, for a sweet treat platter. For special occasions, think about fun, themed presentations. Use festive cups or add sprinkles to match the holiday. You can even place a whole Oreo on top for a nice touch. To keep your No-Bake Cookies & Cream Cheesecake Cups fresh, use airtight containers. These containers help prevent air from drying out the dessert. You can also cover each cup with plastic wrap for extra protection. Store the cups in the fridge for up to four days. This keeps them tasty and safe to eat. Yes, you can freeze these cheesecake cups! Freezing is a great way to save leftovers or make them ahead. To freeze, first, let the cups chill in the fridge for two hours. Then, cover each cup tightly with plastic wrap and place them in a freezer-safe container. These cups can last up to three months in the freezer. When you're ready to enjoy, remove a cup from the freezer. Let it thaw in the fridge for about four hours, or overnight for best results. Avoid microwaving, as it can ruin the texture. Enjoy your cheesecake cups at their best! These cheesecake cups can stay fresh for up to 4 days in the fridge. To keep them tasty, store them in airtight containers. This helps prevent them from drying out or absorbing other smells. If you notice any changes in texture or smell, it’s best to toss them. Yes, you can make these cups a day before you plan to serve them. This allows the flavors to blend better. Just remember to keep them in the fridge until you are ready to enjoy. They taste best when chilled. If you want to switch things up, try using other cookies. Chocolate chip cookies or peanut butter cookies work great too. You can even use graham crackers for a different texture. Just crush them as you would Oreos. This gives you fun new flavors to explore! In this post, we explored how to make delicious no-bake cookies and cream cheesecake cups. We covered the key ingredients and provided clear step-by-step instructions. You learned tips to enhance the presentation, avoid common mistakes, and even variations to try. Remember, these cups are easy to store, and you can even freeze them. Have fun experimenting with flavors and serving styles. Now, get ready to impress your friends and family with these tasty treats!
    No-Bake Cookies & Cream Cheesecake Cups Delight
  • - 1 lb flank steak, thinly sliced against the grain - 2 tablespoons cornstarch - 3 tablespoons vegetable oil - 4 cloves garlic, minced - 1-inch piece ginger, grated - 1/2 cup soy sauce - 1/4 cup brown sugar Flank steak gives this dish its rich flavor. Make sure you slice it thin and against the grain. This method helps keep the meat tender. You will also use cornstarch to coat the beef. This step adds a nice texture and helps thicken the sauce later. The sauce is a mix of soy sauce and brown sugar. Together, they create a sweet and savory flavor that pairs well with the beef. The garlic and ginger add warmth and depth. - 4 green onions, chopped - Sesame seeds Green onions bring a fresh, crunchy bite. Just chop them up and sprinkle them on top when serving. Sesame seeds add a nice visual touch and a nutty flavor. They make your dish look great and taste even better. - 1 tablespoon rice vinegar - 1/2 teaspoon crushed red pepper flakes Rice vinegar adds a bit of tanginess to the sauce. The crushed red pepper flakes give it a spicy kick. You can adjust the heat level to your liking, making the dish more or less spicy. Mix and match these optional ingredients to find the perfect taste for you. First, take your flank steak and slice it thin. Cut against the grain to keep it tender. Next, place the sliced beef in a bowl. Add the cornstarch and toss it well. This coating helps create a nice crust when you cook it. Let the beef sit for about 10 minutes. This will tenderize the meat and allow the cornstarch to stick. Heat a large skillet or wok over medium-high heat. Add vegetable oil and make sure it gets hot. You want the oil to shimmer. Now, cook the beef in batches. Don’t crowd the pan! Cooking in batches helps the beef sear nicely. Sear the beef for about 2-3 minutes on each side until it’s browned. Once done, remove the beef and set it aside. In the same skillet, add chopped green onions, minced garlic, and grated ginger. Stir and sauté for 1-2 minutes. You want to release those amazing aromas. In a separate bowl, mix soy sauce, brown sugar, rice vinegar, and crushed red pepper flakes. Pour this mixture into the skillet and stir it with the aromatics. This is where the magic happens! Return the seared beef to the skillet. Toss it in the sauce until well-coated. Let it cook for 3-5 minutes. This will help the sauce thicken and glaze the beef. Serve the sizzling Mongolian beef over bowls of jasmine rice. For a finishing touch, sprinkle sesame seeds and add more green onions on top. Enjoy your delicious creation! Slicing flank steak against the grain is key. This makes the beef tender and easy to chew. When you cut with the grain, the meat can be tough. Aim for thin, even slices for the best texture. To avoid overcooking, cook the beef quickly. Sear it on high heat for just a few minutes. Remove it from the pan once it's browned. The beef will continue to cook in the sauce. This keeps it juicy and delicious. You can adjust the spice levels to fit your taste. If you like it hot, add more crushed red pepper flakes. For a milder dish, use less. Marinating the beef is a great way to boost flavor. Mix soy sauce with garlic and ginger. Let the beef sit for at least 30 minutes. This adds depth to each bite. Serve your Mongolian beef in deep bowls for a nice touch. Place jasmine rice at the bottom. Then, top it with the beef. Drizzle some sauce around the edges for a beautiful finish. Add garnishes like chopped green onions and sesame seeds. These not only look good but also add extra flavor. A pop of color makes your meal more appealing. {{image_2}} You can switch the flank steak for chicken, pork, or tofu. Each choice will bring a new taste. For chicken, use thin breast slices. If you prefer pork, try tenderloin. Tofu is a great option for a meat-free meal. Remember to press and cube the tofu first. Each protein will soak up the sauce and still taste great. While jasmine rice is a classic, you can use cauliflower rice or quinoa as bases. Cauliflower rice is low in carbs and adds a nice crunch. Just sauté it lightly before serving. Quinoa packs more protein and adds a nutty flavor. Both options make your bowl healthier and just as tasty. To make your dish special, add vegetables or spices. Bell peppers, broccoli, or snap peas work well. They add color and nutrition. For spices, try adding five-spice powder or even sesame oil for a twist. These changes keep the dish fresh and exciting for every meal. Store any leftover Mongolian beef bowls in airtight containers. This keeps the flavors fresh. Let the dish cool before sealing it. Place it in the fridge within two hours of cooking. Properly stored, it can last for up to three days. When ready to eat, just take out what you need. To keep your Mongolian beef tasty, heat it gently. You can use the microwave or a skillet. If using a microwave, cover the bowl to trap moisture. Heat in short bursts, stirring in between. This helps avoid dry spots. In a skillet, add a splash of water or broth. Warm over low heat, stirring occasionally. This method keeps the beef tender and juicy. Yes, you can freeze Mongolian beef. Place it in a freezer-safe container. Make sure to leave some space for expansion. Label the container with the date. The dish can last up to three months in the freezer. To reheat, let it thaw overnight in the fridge. Once thawed, use the same reheating tips as above. This method helps maintain the flavor and texture. Enjoy your meal just like when it was fresh! Mongolian beef does not come from Mongolia. It is a dish from Chinese-American cuisine. It became popular in the U.S. in the 1980s. The dish features tender beef, soy sauce, and sweet brown sugar. It is known for its rich flavors and quick cooking time. Yes, you can prepare Mongolian beef ahead of time. Cook the beef and sauce as usual. Let the dish cool and store it in the fridge. It lasts well for 2-3 days. When ready to serve, just reheat in a skillet. Add a splash of water to keep the sauce moist. Mongolian beef is not gluten-free due to soy sauce. You can use gluten-free soy sauce instead. Look for tamari or coconut aminos. These options taste great and keep the dish flavorful. Always check labels to ensure they meet your dietary needs. To spice up your Mongolian beef, add more crushed red pepper flakes. You can also mix in fresh chili peppers. Another great option is to drizzle sriracha on top. Adjust these ingredients to match your heat preference. Start small and taste as you go. Mongolian Beef is a delightful dish, easy to make at home. You learned about the key ingredients, preparation methods, and various options to fit your taste. Remember to slice against the grain for tender beef and choose your garnishes wisely. Whether you prefer chicken or tofu, there are endless ways to enjoy this recipe. Lastly, proper storage can keep your leftovers fresh. Embrace the joy of cooking and make this dish your own! Enjoy your culinary journey!
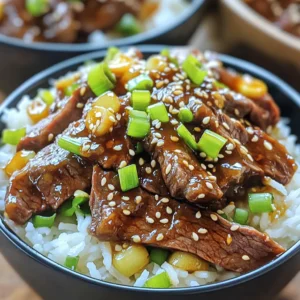
    Mongolian Beef Bowls Flavorful and Simple Recipe
  • To make Apple Crumble Bakery Scones, you need these key ingredients: - 2 cups all-purpose flour - 1/3 cup granulated sugar - 1 tablespoon baking powder - 1/2 teaspoon salt - 1/2 teaspoon ground cinnamon - 1/2 cup unsalted butter, cold and cubed - 3/4 cup buttermilk - 1 cup apples, peeled and diced (Granny Smith or Honeycrisp) - 1/2 cup rolled oats - 1/4 cup brown sugar, for crumble topping - 1/4 cup chopped walnuts (optional) - 1/2 teaspoon vanilla extract Using high-quality ingredients is key to great scones. Fresh apples add flavor and moisture. Good butter gives a rich taste. Quality flour helps with texture. Always choose ingredients that you enjoy and trust. They will make your scones taste better. If you have dietary needs, here are some easy swaps: - For gluten-free scones, use a gluten-free flour blend. - Swap buttermilk for almond milk or oat milk for dairy-free scones. - If you don’t like walnuts, leave them out or use pecans instead. - You can use honey or maple syrup instead of granulated sugar for a unique flavor. Feel free to experiment with these options to find what works best for you! First, preheat your oven to 400°F (200°C). This step is key for a good bake. Next, line a baking sheet with parchment paper. This helps prevent sticking and makes cleanup easy. In a large bowl, whisk together the flour, granulated sugar, baking powder, salt, and ground cinnamon. These dry ingredients give your scones structure and flavor. Make sure they are well combined for even taste. Take the cold, cubed butter and add it to your dry mix. Use your fingers or a pastry cutter to blend until it looks like coarse crumbs. This is where the magic happens! Next, fold in the diced apples and rolled oats. They add sweetness and texture to your scones. Pour the buttermilk and vanilla into the bowl with the dry mix. Gently stir until just combined. Avoid overmixing; this keeps the scones light. Turn the dough onto a floured surface and knead it a few times. Pat it into a circle about 1 inch thick. Cut the circle into 8 wedges. Place these on the prepared baking sheet. For the crumble topping, mix the brown sugar and chopped walnuts in a small bowl. If you love crunch, add those walnuts! Sprinkle this mixture generously over each scone. This will give a delightful crunch. Bake your scones for about 15-18 minutes or until they are golden brown. Keep an eye on them! Once baked, remove them from the oven. Let them cool slightly before serving. Enjoy your warm, fragrant scones with a nice cup of tea! To get the right scone texture, keep the butter cold. Cut it into small cubes before adding it to the flour mix. This helps create that flaky texture we all love. Mix gently, and don’t overwork the dough. The less you handle it, the better. Aim for a soft, slightly sticky dough. One common mistake is overmixing the dough. This can lead to tough scones. Always stir until just combined. Another mistake is using warm butter. Cold butter gives scones their fluffy, airy quality. Lastly, watch the baking time. Overbaking can lead to dry scones. Keep an eye on them and take them out when golden. Using the right tools can make a big difference. Here are a few must-haves: - Mixing bowls: A large bowl for dry ingredients and a smaller one for wet ingredients. - Pastry cutter: This tool helps blend butter into flour easily. - Baking sheet: Use one lined with parchment paper for easy cleanup. - Measuring cups and spoons: Accurate measurements ensure your scones turn out great. - A sharp knife or bench scraper: This helps cut the dough into wedges neatly. These tools make the scone-making process smooth and enjoyable. Happy baking! {{image_2}} You can choose many apple types for your scones. Granny Smith apples offer a nice tartness, which gives a great contrast to the sweet crumble. Honeycrisp apples provide a sweet and juicy bite. Other good choices are Fuji or Braeburn apples. Each apple brings its unique taste and texture. Feel free to mix different types for a more complex flavor! Adding spices can make your scones even better. Nutmeg and ginger are two great options. A pinch of nutmeg adds warmth and depth. Ginger gives a nice zing that pairs well with apples. You can also try adding a bit of lemon zest. This will brighten the flavors. Experiment with these spices to find your perfect mix! You can also add other fruits to your scones. Blueberries work well with apples, adding a burst of sweetness. Try cranberries for a tangy twist. You might also like to mix in some chopped pears or peaches. These fruits bring juicy flavors that complement the apples. The key is to balance sweet and tart for a delicious treat! To keep your Apple Crumble Bakery Scones fresh, store them in an airtight container. This method prevents moisture loss and keeps the scones soft. You can store them at room temperature for up to two days. If you want to keep them longer, consider refrigeration. However, this may change their texture slightly. Reheating can bring back that fresh-baked taste. For the best results, preheat your oven to 350°F (175°C). Place the scones on a baking sheet and warm them for about 5-10 minutes. This helps to revive their flaky texture. If you're in a hurry, you can use a microwave. Heat them for 10-15 seconds, but be careful not to overheat, or they will become tough. Freezing is a great option if you want to save some scones for later. First, let the scones cool completely. Then, wrap each one in plastic wrap and place them in a freezer bag. They can stay fresh in the freezer for up to three months. To enjoy, simply remove a scone from the freezer and let it thaw at room temperature for about 30 minutes. For a warm treat, reheat it in the oven. Scones and biscuits have key differences. Scones are sweeter and denser than biscuits. They often include fruits or nuts. Biscuits are flaky and light, made mainly with butter and flour. Scones use cold butter and buttermilk, which gives them a rich taste. A scone is often served with jam and cream, while biscuits may be paired with savory dishes. Yes, you can make apple crumble bakery scones ahead of time. You can prepare the dough and cut it into wedges. Then, wrap the scones in plastic wrap and store them in the fridge for up to a day. When you are ready to bake, just take them out and bake as usual. This method saves you time and effort on busy mornings. You can tell when the scones are done baking by checking their color. They should turn a golden brown on top. You can also gently tap the bottom of a scone. If it sounds hollow, it is ready. A toothpick inserted in the center should come out clean. This ensures the inside is cooked thoroughly. Yes, you can replace buttermilk if needed. Use regular milk mixed with a bit of vinegar or lemon juice. For every cup of buttermilk, use 1 cup of milk and add 1 tablespoon of vinegar. Let it sit for about five minutes. This mix will mimic the tangy taste of buttermilk, helping your scones stay moist. This guide covers everything you need for making apple crumble scones. We discussed key ingredients, the step-by-step baking process, and tips for perfect texture. Remember to choose quality ingredients and avoid common pitfalls for great results. You can also explore fun variations with different fruits and flavors. Finally, practice good storage methods to keep your scones fresh. Enjoy your baking journey and those delicious scones!
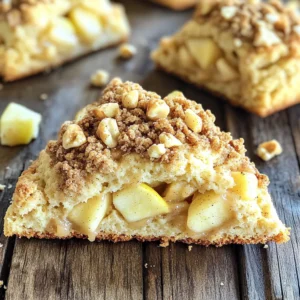
    Apple Crumble Bakery Scones Delightful and Simple Recipe
  • - 2 packs instant ramen noodles (any flavor, discard the seasoning packet) - 2 tablespoons gochujang (Korean chili paste) - 1 tablespoon soy sauce - 1 teaspoon sesame oil - 1 green onion, sliced (reserve some for garnish) - 1 cup baby spinach - 1 teaspoon garlic paste (or minced garlic) - 2 large eggs - Sesame seeds for garnish - Salt and pepper to taste This dish starts with simple, quick ingredients. Instant ramen noodles serve as the base. You can choose any flavor, but I suggest discarding the seasoning packet. Gochujang brings a spicy kick that makes the dish special. It pairs well with soy sauce and sesame oil. You can add fresh elements to boost flavor. Sliced green onion adds a nice crunch. Baby spinach gives a pop of color and nutrients. Garlic paste or minced garlic enhances the taste. The eggs become a creamy topping, making it even better. Don't forget sesame seeds for garnish! They add a nice touch and a bit of texture. Salt and pepper will help you season your dish to your liking. Each ingredient plays an important role in making this meal tasty and quick. Start by grabbing a large pot. Pour in 4 cups of vegetable broth. Heat it over medium-high until it boils. This will take a few minutes. Once boiling, add 2 packs of instant ramen noodles. Follow the package instructions, cooking for about 3 to 4 minutes. While the noodles cook, mix your flavor base. In a small bowl, combine 2 tablespoons of gochujang, 1 tablespoon of soy sauce, and 1 teaspoon of sesame oil. Stir until smooth. In the last minute of cooking, add 1 teaspoon of garlic paste and 1 cup of baby spinach to the pot. This will add great taste and color. After that, stir in your gochujang mixture. Make sure the noodles and greens are well coated. Cook for another minute before removing from heat. For the eggs, fill a separate pot with water. Bring it to a boil, which takes about 2 to 3 minutes. Carefully add 2 large eggs to the boiling water. Boil for 6 to 7 minutes for soft-boiled eggs. If you want firmer yolks, just boil them longer. After boiling, transfer the eggs to an ice bath. This cools them quickly and makes peeling easier. Let them sit for a few minutes before peeling. Now you are ready to serve your tasty Minute Gochujang Ramen with Egg! Enjoy every bite! To get the best texture, cook the noodles for just 3-4 minutes. This timing gives you al dente noodles. If you want more flavor, try adding a splash of soy sauce or extra gochujang to the broth. You can also toss in some additional veggies while cooking for a boost. For soft-boiled eggs, boil them for 6-7 minutes. If you like firmer yolks, add another minute or two. After boiling, cool the eggs in an ice bath. This makes peeling easy. Just gently tap the egg on a hard surface to crack the shell before peeling. Make your ramen look great by garnishing it well. Add sliced green onions and a sprinkle of sesame seeds on top. You can also serve the ramen with a side of pickled vegetables or kimchi. This adds color and flavor, making your meal complete. {{image_2}} You can boost your ramen with protein. Here are some great options: - Chicken: Cooked, shredded chicken adds flavor and heartiness. - Tofu: Firm tofu works well. Dice it and add it in with the greens. - Shrimp: Add shrimp for a quick seafood twist. Toss them in when the noodles are almost done. These proteins make your meal more filling and flavorful. Feel free to mix in other vegetables. Here are some that work great: - Carrots: Shredded or sliced thin. - Mushrooms: Add shiitake or button mushrooms for umami. - Broccoli: Small florets add crunch. You can also use frozen vegetables. They save time and are just as healthy. Toss them in with the noodles in the last minute of cooking. Add spices or sauces to make your ramen shine. Here are some ideas: - Chili flakes: For extra heat. - Sesame oil: A splash can deepen the flavor. - Soy sauce: Mix in more for a saltier taste. Customize your ramen with toppings: - Nori: Seaweed sheets add texture. - Kimchi: A spicy kick and tang. - Cilantro: Fresh herbs brighten the dish. These variations let you create a unique meal every time. To keep your Minute Gochujang Ramen fresh, store the ramen and eggs separately. This helps maintain their textures. Use airtight containers for the ramen and eggs. Glass or plastic containers work well. Make sure the ramen cools before sealing. The best way to reheat ramen is on the stove. Heat a pot over low heat. Add a splash of broth or water to prevent drying out. Stir gently until warm. For eggs, place them in hot water for a few minutes. This keeps the yolk soft and creamy. Avoid microwaving, as it can change the texture. You can freeze the noodles and broth. Cook the noodles just until al dente. Let them cool before placing in a freezer bag. For the broth, freeze in portions. As for eggs, it’s best to store them boiled. Once cooled, place them in a container. This keeps them ready for your next ramen night! Cooking this dish is quick. It takes about 10 minutes to prep and 10 minutes to cook. Here’s a breakdown: - Prep Time: 10 minutes - Cook Time: 10 minutes - Total Time: 20 minutes This means you can enjoy a tasty meal in just 20 minutes! Yes, you can easily make this dish vegetarian. Here are some substitutes: - Use vegetable broth instead of chicken broth. - Replace the eggs with tofu for protein. - Add more vegetables like mushrooms, carrots, or bell peppers. These swaps keep the dish tasty and satisfying! If you don't have gochujang, here are some options: - Use sriracha for a similar heat. - Try red chili paste for a different flavor. - Mix miso paste and chili powder for a unique twist. These alternatives are often easy to find in stores. This blog post covered how to make Minute Gochujang Ramen with Egg. You learned the main ingredients, step-by-step cooking instructions, and tips for perfect noodles and eggs. We also explored variations and storage options. In my view, this dish is a simple yet tasty meal. You can easily customize it to fit your taste. Whether you prefer it spicy or mild, this ramen is sure to satisfy. Enjoy your cooking journey!
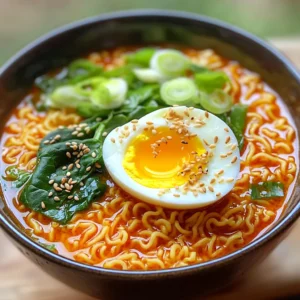
    Minute Gochujang Ramen with Egg Tasty and Quick Meal
  • - 1 cup all-purpose flour - 1/2 cup brown sugar - 1/2 cup rolled oats - 1/4 teaspoon salt - 1/2 teaspoon ground cinnamon - 1/2 cup unsalted butter, melted - 1 cup pumpkin puree - 1/2 cup sweetened condensed milk - 1/4 cup granulated sugar - 1 large egg - 1 teaspoon vanilla extract - 1 teaspoon ground nutmeg - 1/2 teaspoon ground ginger - 1/4 teaspoon ground cloves - 1/4 cup chopped pecans (optional) You can add chopped pecans for a nice crunch. If you want a twist, try adding chocolate chips. They give a fun flavor that pairs well with pumpkin. If you need to swap some items, here are a few ideas: - Use whole wheat flour for a healthier option. - Swap brown sugar with coconut sugar for a different taste. - You can replace unsweetened condensed milk with coconut milk for a dairy-free version. - If you want to skip the egg, use a flax egg instead. Just mix 1 tablespoon of flaxseed meal with 3 tablespoons of water. Let it sit for 5 minutes before adding it to your mix. Start by preheating your oven to 350°F (175°C). Grab a 9x9 inch baking pan and line it with parchment paper. Make sure to leave some paper hanging over the edges. This helps you lift the bars out later. In a medium bowl, mix the following: - 1 cup all-purpose flour - 1/2 cup brown sugar - 1/2 cup rolled oats - 1/4 teaspoon salt - 1/2 teaspoon ground cinnamon Now, pour in 1/2 cup of melted unsalted butter. Stir until it looks crumbly. Set aside 1/2 cup of this mixture for the topping. Press the rest into the bottom of your prepared pan. This forms the crust. In another bowl, combine: - 1 cup pumpkin puree - 1/2 cup sweetened condensed milk - 1/4 cup granulated sugar - 1 large egg - 1 teaspoon vanilla extract - 1 teaspoon ground nutmeg - 1/2 teaspoon ground ginger - 1/4 teaspoon ground cloves Mix these well until smooth. This filling will be rich and tasty. Pour the pumpkin mixture over your crust. Use a spatula to spread it evenly. Next, sprinkle the reserved streusel mixture on top. If you like, add 1/4 cup of chopped pecans for a crunchy touch. Bake in the oven for 30-35 minutes. The center should be set and the edges lightly golden. Once baked, let the bars cool in the pan on a wire rack. This helps them firm up. After cooling, lift the bars out using the parchment paper. Cut them into squares. For extra flair, dust with powdered sugar or serve with whipped cream. Enjoy your delicious pumpkin pie streusel bars! To make a great crust, always use cold butter. Cold butter gives your crust a flaky texture. Mix the dry ingredients well. This helps the flavors blend nicely. Press the crust firmly into the pan. A solid base supports the filling. Bake until the edges look slightly golden. This step ensures a well-cooked bottom. Spices make your pumpkin bars pop! Use a mix of nutmeg, ginger, and cloves. These spices add warmth and depth to your filling. Don’t skip the cinnamon! It pairs perfectly with pumpkin. Adjust the spice amounts to fit your taste. Add a pinch of salt to balance the sweetness. This makes every bite burst with flavor. Presentation matters, especially for dessert. Dust the bars with powdered sugar for a lovely look. Serve with a dollop of whipped cream on the side. This adds a creamy touch that many love. Cut the bars into even squares for a neat display. For extra flair, add some chopped pecans on top. They give a nice crunch and look fancy! {{image_2}} You can make these pumpkin pie streusel bars gluten-free. Swap out the all-purpose flour for a gluten-free blend. Look for a mix that includes xanthan gum. This will help keep the bars from crumbling. The taste will still be great, and everyone can enjoy them! Pecans are tasty, but you can use other nuts too. Walnuts and almonds work well in this recipe. If you want a nut-free option, try adding seeds. Sunflower seeds or pumpkin seeds can add a nice crunch without nuts. Just sprinkle them on top for some fun texture. Feel free to get creative with seasonal flavors! Add dried cranberries or chopped apples for a twist. You might also like to mix in some chocolate chips. This adds a rich flavor that pairs well with pumpkin. Think about adding a bit of orange zest for a fresh, bright taste. Each variation can make this dessert unique and fun! To keep your Pumpkin Pie Streusel Bars fresh, place them in an airtight container. You can stack them with parchment paper between layers. This method prevents sticking and keeps flavors intact. Store them in the fridge for up to five days. If you want to save some bars for later, freezing works well. Cut the bars into squares first. Wrap each square tightly in plastic wrap, then place them in a freezer-safe bag. They can last up to three months in the freezer. When you're ready to enjoy them, simply thaw in the fridge overnight. These bars stay fresh in the fridge for five days. If you freeze them, just remember they last about three months. To reheat, place bars in the microwave for about 15-20 seconds. You can also warm them in the oven at 350°F for about 10 minutes. Enjoy warm for a cozy treat! Yes, you can easily make these bars ahead of time. I like to prepare them the day before serving. Just bake the bars, let them cool, and store them in an airtight container. They taste even better the next day as the flavors blend nicely. For the best cuts, allow the bars to cool completely. Use a sharp knife to slice them into squares. To get nice edges, wipe the knife with a damp cloth between cuts. This method keeps the pieces looking neat and tidy. Absolutely! Fresh pumpkin can give your bars a unique flavor. To use fresh pumpkin, roast it until soft, then mash it well. Make sure to remove excess moisture to avoid a soggy filling. This will keep your bars rich and tasty. The bars are done when the center is set and slightly firm to the touch. You can also check for a golden edge around the sides. If a toothpick inserted in the center comes out clean, your bars are ready to cool. Enjoy the warm aroma as they bake! You learned how to make delicious Pumpkin Pie Streusel Bars with easy steps. We covered the main ingredients and some fun options to add. You also discovered tips for the best crust and ways to present your bars nicely. Remember, you can store and freeze leftovers for later. Experiment with variations to suit your taste. Enjoy making these bars for yourself and your loved ones. Happy baking!
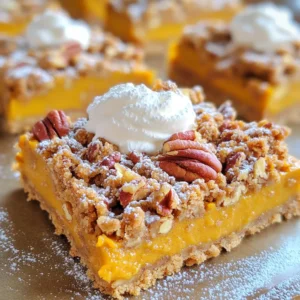
    Pumpkin Pie Streusel Bars Tasty Fall Dessert Delight
  • - 2 lbs boneless, skinless chicken thighs - 1 cup BBQ sauce (store-bought or homemade) - 1/2 cup chicken broth - 1 tablespoon apple cider vinegar - 1 tablespoon brown sugar - 1 teaspoon garlic powder - 1 teaspoon onion powder - 1/2 teaspoon smoked paprika - Salt and pepper to taste - 4 hamburger buns - Optional toppings: coleslaw, pickles Using these ingredients, you can create a delicious BBQ pulled chicken sandwich. I love using boneless, skinless chicken thighs. They stay moist and tender, making them perfect for shredding. You can use your favorite BBQ sauce, whether it's store-bought or homemade. The choice of chicken broth adds moisture and depth to the dish. Next, seasonings play a key role. Apple cider vinegar adds a nice tang, while brown sugar gives it a touch of sweetness. Garlic powder and onion powder enhance the flavor, and smoked paprika adds a bit of smokiness. Don’t forget salt and pepper to taste; they bring all the flavors together. For serving, I recommend using soft hamburger buns. They are ideal for holding the juicy chicken. You can also add toppings like coleslaw and pickles. They give the sandwich a great crunch and extra flavor. Start by placing the boneless, skinless chicken thighs in the bottom of your slow cooker. Make sure they sit flat and don’t overlap. This helps them cook evenly. Chicken thighs are great for this dish because they stay moist and tender. Next, grab a mixing bowl. Combine 1 cup of BBQ sauce, 1/2 cup of chicken broth, 1 tablespoon of apple cider vinegar, 1 tablespoon of brown sugar, 1 teaspoon of garlic powder, 1 teaspoon of onion powder, and 1/2 teaspoon of smoked paprika. Add salt and pepper to taste. Mix well until the sauce is smooth. This blend gives your chicken rich flavor. Now, pour the sauce mixture over the chicken thighs. Make sure the chicken is coated well. Cover the slow cooker and set it on low for 6 to 7 hours. If you're short on time, you can set it on high for 3 to 4 hours. The chicken will be done when it is tender and easily shreds with a fork. Once the chicken is cooked, take it out of the slow cooker. Use two forks to shred the chicken into bite-sized pieces. Return the shredded chicken to the slow cooker and stir it well into the sauce. This adds even more flavor. Toast your hamburger buns lightly in the oven or on a skillet for a crispy bite. To assemble, place a generous portion of pulled chicken on each bun. If you like, add coleslaw and pickles on top for extra crunch and flavor. Enjoy each bite of your delicious BBQ pulled chicken sandwich! For the best BBQ flavor, choose a sauce you love. Sweet sauces work well with chicken. Try a spicy sauce for a kick. You can mix different sauces for a unique taste. Adjust sweetness by adding brown sugar or honey. If you want it hotter, add hot sauce or cayenne pepper. To ensure tender chicken, use boneless, skinless thighs. They stay moist during cooking. Avoid overcooking by sticking to the time guide. If you cook on low, plan for 6-7 hours. On high, aim for 3-4 hours. To keep the meat juicy, add chicken broth to your sauce. This adds moisture and flavor. Pair your BBQ pulled chicken sandwiches with tasty sides. Classic choices include coleslaw, potato salad, or baked beans. You can also serve chips or fries for crunch. For extra flavor, top your sandwiches with coleslaw or pickles. These add texture and a nice contrast to the BBQ. Enjoy your meal with friends and family! {{image_2}} You can switch the chicken thighs for chicken breasts or pork. Chicken breasts cook faster and can be just as juicy. They provide a leaner option. Pork, like shoulder or butt, adds a rich flavor. It also shreds nicely, making it perfect for BBQ sandwiches. You can try different sauces for your pulled chicken. A homemade BBQ sauce can be a fun twist. Combine ketchup, vinegar, brown sugar, and spices for a quick mix. You can also use teriyaki sauce or even hot sauce for a kick. Each sauce gives a unique flavor, so feel free to experiment! Toppings can make your sandwich even better. Coleslaw adds crunch and creaminess. Pickles give a nice tang. You can even try sliced jalapeños for heat. Avocado or guacamole lend a creamy touch. For a different twist, add pineapple slices for sweetness. Get creative and mix flavors to find your favorite combo! To store your pulled chicken, cool it first. Place it in an airtight container. Make sure to keep it in the fridge. It will stay fresh for about 3-4 days. If you want to keep it longer, consider freezing it. You can freeze pulled chicken for later meals. First, let it cool completely. Then, pack it in a freezer-safe bag. Try to remove as much air as possible. Label it with the date. It can last up to 3 months in the freezer. When you are ready to use it, just thaw it in the fridge overnight. Reheating pulled chicken is easy. You can use the microwave or the stove. If using a microwave, heat it in short bursts. Stir in between to ensure even heating. If using a stove, add a splash of chicken broth to keep it moist. Heat on low until warm. Enjoy your sandwiches with that fresh BBQ flavor! Yes, you can use frozen chicken thighs in this recipe. Just make sure to adjust the cooking time. If you use frozen chicken, cook it on high for about 4-5 hours or on low for 7-8 hours. This will help ensure the chicken cooks through and becomes tender. You can skip thawing to save time. Pulled chicken can last in the fridge for up to 3-4 days. Keep it in an airtight container to maintain freshness. If you want to store it longer, you can freeze it. Frozen pulled chicken is good for up to 3 months. Just remember to label the container with the date. Yes, you can easily make this recipe in an Instant Pot. Use the sauté function to brown the chicken for added flavor. Then add the sauce and cook on high pressure for about 15-20 minutes. Let the pressure release naturally for best results. This method will give you juicy chicken in less time! You now have the tools to make tasty BBQ pulled chicken. We covered ingredients, seasoning, and easy steps. I shared tips for perfecting flavor and suggested variations to try. You can store and reheat leftovers too. BBQ pulled chicken is simple and fun. Use your favorite sauces and toppings. Enjoy making this dish with family and friends. Your meals will be delicious and satisfying!
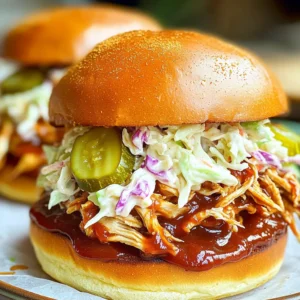
    Slow Cooker BBQ Pulled Chicken Sandwiches Delight

Posts pagination

← Newer 1 2 3 4 … 33 Older →

Footer

↑ back to top

More information

  • Dinner
  • Drinks
  • Appetizers
  • Dessert
  • About
  • Contact Us

    Our Policies

    • Privacy Policy
    • Cookie Policy
    • Copyright Policy
    • Disclaimer
    • GDPR Policy
    • Terms Of Us

    Copyright © 2024 My Saved Recipe