- Spicy Garlic Shrimp Tacos Flavorful and Easy Recipe
- Vegan Chocolate Chip Cookies Delicious and Simple Recipe
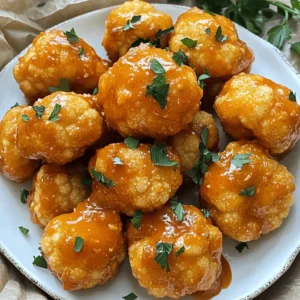
- Buffalo Cauliflower Bites Crispy and Flavorful Snack
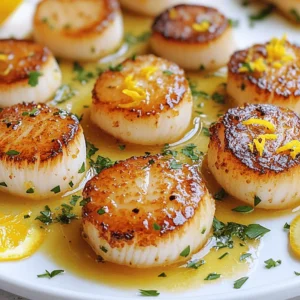
- Pan-Seared Scallops Simple and Flavorful Recipe
- One-Pan Honey Pineapple Chicken Flavorful Delight
- Mini Cheesecake Desserts Delightful and Easy Recipe
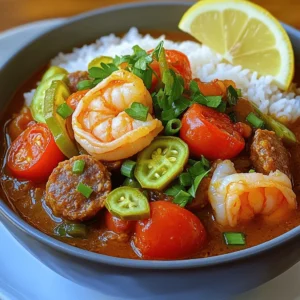
- Savory Louisiana Gumbo with Sausage & Shrimp Recipe
- Easy Dinner Recipe Zesty Lemon Herb Quinoa Bowl
- BBQ Grilled Chicken Thighs Flavorful and Juicy Meal
- Quick Curry Noodles Tasty and Easy Weeknight Meal
- Pineapple Coconut Smoothie Refreshing and Creamy Treat
- Cheesy Spinach Stuffed Shells Comforting Dinner Idea
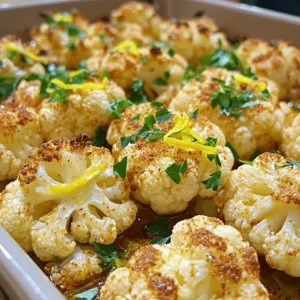
- Lemon Garlic Roasted Cauliflower Flavorful Side Dish
- Creamy Tomato Basil Pasta Delight in Every Bite
- Savory Herb Roasted Chicken Flavorful and Easy Recipe
- Chocolate Chip Banana Bread Easy and Delicious Treat
- Vegan Stuffed Bell Peppers Savory and Nutritious Meal
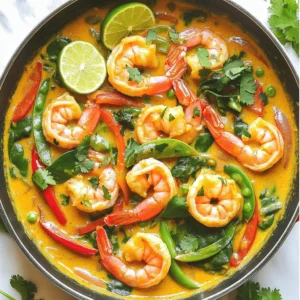
- Coconut Curry Shrimp Flavorful and Easy Recipe Guide
- Oven-Baked Chicken Fajitas Flavorful and Simple Recipe
- Lemon Blueberry Shortbread Mousse Cake Delight
- Garlic Butter Shrimp Hawaiian Style Dish to Savor
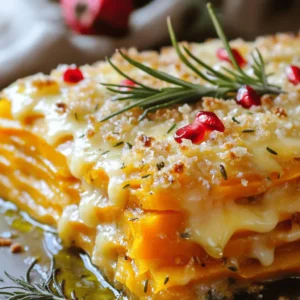
- Sweet Potato Gratin with Rosemary Crust Delightful Dish
- Philly Cheesesteak Egg Rolls Crispy and Delicious Snack
- Homemade King Cake Tasty and Fun Recipe Guide
- Coffee Chocolate Brownie Cheesecake Delight Recipe
- Jumbo Chocolate Cupcakes Irresistible Treat Recipe
- Honey Mustard Chicken Tenders Delightful and Easy Meal
- Savory Stuffed Shells with Ground Beef Recipe
- Spicy Shrimp & Sausage Jambalaya Flavorful Dinner Treat
- Savory French Onion Meatloaf Flavorful and Hearty Dish
- Linguini with Clam Sauce Easy and Flavorful Recipe
- Creamy Seafood Pasta Rich and Flavorful Delight
- Garlic Butter Baked Scallops Easy Gourmet Delight
- Sweet Potatoes & Andouille Sausage Flavorful Meal Guide
- Greek Chicken Gyros Flavorful and Easy Recipe Guide
- Tuscan Grilled Rib Eye Steak Savory Delightful Meal
- Sticky Toffee Pudding Decadent and Easy Dessert Delight
- Creamy Garlic Sauce Potatoes Easy and Flavorful Dish
- Oven Baked Crispy Garlic Shrimp Simple and Tasty Meal
- Slow Cooker Birria Tacos Flavorful and Simple Recipe
- Brownie Cheesecake Delight Easy and Tasty Treat
- Garlic Parmesan Cheeseburger Bombs Flavorful Delight


![- 4 boneless, skinless chicken thighs - 1 cup fresh pineapple, diced - 1/4 cup honey - 2 tablespoons soy sauce (or coconut aminos for gluten-free option) - 1 tablespoon olive oil - 1 teaspoon garlic powder - 1 teaspoon ginger powder - 1/2 teaspoon salt - 1/4 teaspoon black pepper - 1/4 cup green onions, chopped - Toasted sesame seeds The main ingredients shine in this dish. The chicken thighs provide a juicy base. Fresh pineapple adds sweetness and acidity. Honey gives a lovely glaze that makes every bite special. For a savory touch, soy sauce ties the flavors together. You can use coconut aminos if you prefer a gluten-free option. The seasoning mix is simple yet powerful. Olive oil helps the spices cling to the chicken. Garlic and ginger powders give the dish warmth. Salt and pepper balance the sweetness from the honey and pineapple. When it comes to garnishes, green onions add a nice crunch. Toasted sesame seeds bring a nutty flavor. These small touches elevate your meal. For the full recipe, check the complete steps to create this flavorful delight. - Preheat the oven to 400°F (200°C). - Coat chicken thighs with seasoning mixture. First, you need to get your oven ready. Preheating it to 400°F (200°C) gives the chicken a nice, even cook. Next, take a big bowl and mix olive oil, garlic powder, ginger powder, salt, and black pepper. This mixture adds great flavor. Toss the chicken thighs in this mix until they are fully coated. This step makes sure every bite is tasty. - Combine diced pineapple, honey, soy sauce, and lime juice. Now, let’s make the sauce. In a separate bowl, combine diced pineapple, honey, soy sauce, and lime juice. Stir them well until they mix together. This sauce adds sweetness and tang, making your chicken shine. The pineapple gives it a fruity twist that everyone loves. - Arrange ingredients in the skillet and roast until chicken is cooked through. Time to cook! Grab a large oven-safe skillet. Place the coated chicken thighs in a single layer. Pour half of your pineapple sauce over the chicken. Then, add sliced red and green bell peppers around the chicken. Pour the rest of the sauce on top. Put the skillet in your preheated oven. Roast it for about 25 to 30 minutes. You want the chicken to reach an internal temperature of 165°F (74°C). This way, it is safe to eat. The bell peppers should be tender too. Once done, let the skillet sit for 5 minutes before serving. This helps the flavors mix better. For the final touch, garnish with green onions and sesame seeds if you like. Enjoy your One-Pan Honey Pineapple Chicken! For the complete recipe, check [Full Recipe]. To cook the best chicken, make sure the internal temperature hits 165°F (74°C). You can check this with a meat thermometer. Once done, let the dish rest for five minutes. This helps the juices settle, making the chicken moist and tasty. Want even more taste? Marinate the chicken in your favorite sauce for at least an hour. Using the pineapple mixture as a marinade adds sweetness and tang. This simple step takes the flavor to a whole new level. Not a fan of chicken? You can use pork, shrimp, or tofu instead. Each protein brings its own flavor. If you want to add more veggies, bell peppers, snap peas, or broccoli work great. Just adjust the cooking time based on what you choose. Enjoy experimenting with your One-Pan Honey Pineapple Chicken! For the complete method, check the Full Recipe. {{image_2}} You can easily adapt this dish to fit different diets. For gluten-free needs, swap soy sauce with coconut aminos. This keeps the flavors rich and adds a hint of sweetness. If you follow a low-carb diet, replace honey with a sugar substitute like erythritol. This allows you to enjoy the taste without the extra carbs. To take your One-Pan Honey Pineapple Chicken to the next level, try adding spices or herbs. A pinch of chili flakes boosts the heat, while fresh cilantro adds a nice touch. You can also mix in different fruits. Mango and peach work beautifully and bring a tropical twist. The natural sugars in these fruits caramelize when cooked, enhancing the dish's sweetness. While the oven method is simple, you can grill this dish for a smoky flavor. Just marinate the chicken in the sauce and grill until fully cooked. A slow cooker is another great option. Simply layer the chicken and sauce in the pot and cook on low. This method tenderizes the chicken and lets the flavors meld together beautifully. For the full recipe, check out the detailed instructions above. To keep your One-Pan Honey Pineapple Chicken fresh, store leftovers in an airtight container. Place the chicken and vegetables together. This helps maintain flavor and moisture. Make sure it cools down first before sealing. The chicken will stay good in the fridge for up to four days. If you want to freeze the dish, let it cool completely. Then, portion it into freezer bags or containers. Squeeze out any air to avoid freezer burn. To reheat, thaw it in the fridge overnight. You can then warm it in the oven at 350°F (175°C) until heated through. This will help keep the chicken tender. In the fridge, your One-Pan Honey Pineapple Chicken lasts about four days. If frozen, it can last up to three months. Always check for signs of spoilage before eating. If it looks or smells off, it’s best to throw it away. Yes, you can use chicken breasts. They will work well in this recipe. Chicken breasts cook faster than thighs. Keep an eye on the time. They may need only 20-25 minutes in the oven. If you want to swap honey, use maple syrup or agave nectar. Both will add a nice sweetness. You can also use brown sugar mixed with a little water for a similar effect. Check the chicken's internal temperature. It should reach 165°F (74°C). You can use a meat thermometer for accuracy. If you don’t have one, cut a piece open. The meat should be white, not pink. For the full recipe, check the details above. This blog covers a tasty recipe for Honey Pineapple Chicken. You learned about the key ingredients, cooking steps, and options to customize the dish. I shared tips for perfect chicken and ways to store leftovers. Try different flavors and cooking methods to keep meals exciting. Use these ideas to make your cooking fun and easy. Enjoy your time in the kitchen, and remember that simple ingredients can create great meals!](https://mysavedrecipe.com/wp-content/uploads/2025/06/c23aa523-d97b-41ec-817d-5b287fee7cf2-300x300.webp)

![To make this tasty quinoa bowl, gather these fresh ingredients: - 1 cup quinoa, rinsed - 2 cups vegetable broth - 1 cup cherry tomatoes, halved - 1 cucumber, diced - 1 bell pepper (yellow or red), diced - ¼ cup red onion, finely chopped - 1 avocado, sliced - 2 tablespoons olive oil - 2 tablespoons fresh lemon juice - 1 tablespoon fresh parsley, chopped - 1 tablespoon fresh basil, chopped - Salt and pepper to taste - Optional: Feta cheese for topping You can swap some ingredients to fit what you have. Here are some ideas: - Quinoa: Try brown rice or farro for a different base. - Vegetable broth: Use water or chicken broth if you prefer. - Cherry tomatoes: Diced regular tomatoes work well too. - Cucumber: Zucchini or bell pepper can replace it. - Bell pepper: Any color works, or use shredded carrots. - Avocado: You can skip it or use diced mango for sweetness. - Fresh herbs: Dried herbs can work in a pinch but adjust amounts. Each serving of this quinoa bowl is not just tasty but healthy. Here’s what you get: - Calories: About 300 - Protein: 8g - Carbohydrates: 40g - Fat: 12g - Fiber: 7g - Sugars: 3g This dish packs a punch of flavor and nutrition, making it a great choice for dinner. For the full recipe, check out the detailed instructions. 1. Start by rinsing 1 cup of quinoa under cold water. This step helps remove any bitterness. 2. In a medium pot, mix the rinsed quinoa with 2 cups of vegetable broth. Bring this to a boil. 3. Once boiling, lower the heat. Cover the pot and let it simmer for about 15 minutes. The liquid should absorb fully. 4. After 15 minutes, take the pot off the heat. Let it sit covered for 5 more minutes. Then, use a fork to fluff the quinoa. 5. While the quinoa cooks, make the dressing. In a small bowl, whisk together 2 tablespoons of olive oil, 2 tablespoons of fresh lemon juice, salt, and pepper. 6. In a large bowl, mix 1 cup of halved cherry tomatoes, 1 diced cucumber, 1 diced bell pepper, and ¼ cup of finely chopped red onion. Add 1 tablespoon each of fresh parsley and basil. 7. Gently add the cooked quinoa to the vegetable mix. Pour the dressing over and toss everything together. 8. Finally, top your bowl with sliced avocado and sprinkle optional feta cheese on top. - Use vegetable broth for flavor. It makes the quinoa tastier. - Always rinse the quinoa. This step removes any bitter taste. - Keep the lid on while cooking. It helps the quinoa cook evenly. - Fluff the quinoa with a fork. This keeps it light and airy. - Serve this bowl warm or chilled. It tastes great either way! - Pair it with grilled chicken or shrimp for added protein. - Add a side of crusty bread for a complete meal. - Garnish with extra lemon juice and herbs for a fresh touch. For the full recipe, click [Full Recipe]. Many people make a few common mistakes when cooking quinoa. First, not rinsing quinoa can lead to a bitter taste. Always rinse it well before cooking. Second, overcooking quinoa makes it mushy. Cook it just until all the water is absorbed. Lastly, skipping the fluffing step can lead to clumpy quinoa. Fluff it gently with a fork for the best texture. You can easily boost the flavors in your Zesty Lemon Herb Quinoa Bowl. Add more herbs like dill or cilantro for a fresh taste. A splash of balsamic vinegar can also add depth. If you love spice, try adding red pepper flakes for heat. You can also add nuts or seeds for crunch and extra flavor. To save time, prep your ingredients before cooking. Chop vegetables while the quinoa cooks. Use one bowl for mixing to limit the dishes you use. To clean up faster, soak pots and pans immediately after use. This makes washing them easier when you're done eating. {{image_2}} Adding protein options to your quinoa bowl makes it heartier. You can use cooked chicken, shrimp, or even canned beans. If you want a plant-based option, try black beans or chickpeas. These add flavor and nutrition. Next, let’s talk about vegan and gluten-free options. This recipe is naturally gluten-free since quinoa is gluten-free. For a vegan meal, skip any cheese and focus on fresh veggies and healthy fats like avocado. You can replace feta with a vegan cheese option if you like. Flavor variations can also spice up your dish. Try adding spices like cumin or paprika for warmth. Fresh herbs like dill or cilantro can give it a new twist. You can even add a pinch of red pepper flakes for heat. Experiment with these flavors for a unique taste each time you make the bowl. For the full recipe, check out the first section. To keep your Zesty Lemon Herb Quinoa Bowl fresh, store it in an airtight container. This helps lock in flavor and moisture. Make sure the bowl is completely cool before sealing it. If you have leftover dressing, store it separately to keep the veggies crisp. Your quinoa bowl stays tasty in the fridge for about 3 to 5 days. If you notice any off smells or changes in color, it’s best to toss it. Always check before eating to ensure it’s still good. You can freeze this dish if you want to save some for later. Place it in a freezer-safe container. This way, it can last up to 3 months. When you’re ready to eat, thaw it overnight in the fridge. Reheat it gently on the stove or in the microwave. This method keeps the flavors intact. For the best taste, add fresh herbs after reheating. You can add protein to this bowl. Grilled chicken, chickpeas, or black beans work well. These options boost the protein and fiber content. You can also add more grains. Try brown rice or farro for extra texture. Don't forget to include nuts or seeds for crunch. Almonds or sunflower seeds are great choices. Yes, you can make this meal ahead. Cook the quinoa and store it in the fridge. This keeps well for about five days. Chop your veggies and store them in a separate container. You can mix everything just before serving. This helps keep the vegetables fresh and crisp. You can use many vegetables in this bowl. Try zucchini, carrots, or spinach for variety. Roasted sweet potatoes add great flavor too. Bell peppers come in many colors, so mix it up! Just make sure to chop them small for easy eating. This blog post covers how to make a Zesty Lemon Herb Quinoa Bowl. We looked at ingredients, cooking steps, and tips to make it perfect. You can swap ingredients for what you have on hand and still enjoy great flavors. I shared ways to store leftovers, so nothing goes to waste. Remember, cooking can be fun and simple. With a few tips, you can make this dish your own. Enjoy your healthy meal and happy cooking!](https://mysavedrecipe.com/wp-content/uploads/2025/06/3969e326-3b6e-4a45-a96a-25e269a26bec-300x300.webp)
![For flavorful BBQ grilled chicken thighs, you need just a few key ingredients. Here’s what you’ll need: - Bone-in, skin-on chicken thighs - 1/4 cup olive oil - 1/4 cup apple cider vinegar - 1/4 cup honey - 2 tablespoons Dijon mustard - 4 cloves garlic, minced - 2 teaspoons smoked paprika - 1 teaspoon salt - 1 teaspoon black pepper - 1 teaspoon cayenne pepper (optional, for heat) These ingredients come together to create a tasty marinade that makes the chicken juicy and full of flavor. The key here is the chicken thighs. They have more fat than breasts, which keeps them moist. The skin adds crispness and flavor, especially when grilled. The marinade works its magic by tenderizing the meat and infusing it with taste. I love using olive oil for its rich flavor and health benefits. Apple cider vinegar adds a tangy kick, while honey balances it with sweetness. Dijon mustard brings depth and a slight tang. Garlic and smoked paprika add layers of flavor. The salt and black pepper enhance everything, and cayenne gives it a spicy edge if you like heat. You can find the full recipe above to make sure you get everything just right. Enjoy the process and the delicious results! To make the marinade, start by mixing the following ingredients in a medium bowl: - 1/4 cup olive oil - 1/4 cup apple cider vinegar - 1/4 cup honey - 2 tablespoons Dijon mustard - 4 cloves garlic, minced - 2 teaspoons smoked paprika - 1 teaspoon salt - 1 teaspoon black pepper - 1 teaspoon cayenne pepper (optional) Whisk these ingredients until they blend well. This marinade gives your chicken its rich flavor. Marinating time is key. I recommend marinating for at least 2 hours. If you can wait overnight, the taste improves even more. Next, preheat your grill to medium-high heat, around 375°F to 400°F. This heat gives the chicken a nice sear. After marinating, take the chicken thighs out. Let any excess marinade drip off. Discard the leftover marinade to keep things safe. Place the chicken thighs skin-side down on the grill. Cook for about 6-8 minutes. Look for crispy skin and nice grill marks. After that, flip the chicken thighs. Grill them for another 6-8 minutes. You want the internal temperature to reach 165°F. The juices should run clear. To check for doneness, use a meat thermometer. The safe internal temperature for chicken is 165°F. You can also tell the chicken is ready when the juices run clear. If the chicken is still pink, give it more time on the grill. Once done, let the chicken rest for about 5 minutes before serving. This helps keep it juicy. You can find the full recipe above for more details. Enjoy your flavorful and juicy BBQ grilled chicken thighs! To set up your grill, start with a clean grate. A clean grill helps prevent sticking. Preheat the grill to medium-high heat, around 375°F to 400°F. This heat level cooks chicken thighs evenly and creates a nice crust. To avoid sticking, oil the grill grates before placing the chicken on them. You can use a paper towel soaked in oil. Just hold it with tongs and wipe the grates. This small step makes a big difference. You can enhance the flavor of your BBQ grilled chicken thighs with a few optional ingredients. For a zesty kick, try adding lemon juice or zest to your marinade. Fresh herbs like thyme or rosemary can also add depth. A splash of soy sauce might give it a unique twist. Resting the meat is vital. After grilling, let the chicken thighs sit for about 5 minutes. This step allows the juices to redistribute. If you skip this, the juices will run out when you cut into the meat. The result? Dry chicken, and nobody wants that. For the full recipe, check out the detailed instructions provided earlier. {{image_2}} For BBQ grilled chicken thighs, marinades make all the difference. You can create many flavors to match your taste. Citrus-based marinade options: - Lemon and lime: Use juice from two lemons and two limes. Add a bit of zest for extra flavor. - Orange and ginger: Mix juice from two oranges with a teaspoon of minced ginger. It gives a sweet touch. Citrus marinades help tenderize the meat. They also add a bright flavor that pairs well with chicken. Spicy marinade variations: - Chipotle lime: Blend chipotle peppers in adobo sauce, lime juice, and olive oil. This adds a smoky and spicy kick. - Sriracha and honey: Mix Sriracha sauce with honey for sweet heat. A tablespoon of soy sauce can deepen the flavor. Spicy marinades bring excitement to your chicken. They work well if you enjoy bold flavors. When it comes to BBQ, sauces and rubs can elevate your grilled chicken. Popular BBQ sauces to use: - Kansas City style: This sauce is thick and sweet, made with molasses and brown sugar. - Carolina vinegar sauce: This sauce is tangy and thin, made with vinegar and spices. It adds a nice kick. BBQ sauces can be brushed on during the last few minutes of grilling. This helps create a sticky glaze. Dry rub combinations for extra flavor: - Classic BBQ rub: Combine brown sugar, smoked paprika, garlic powder, and black pepper. This mix brings a sweet and smoky flavor. - Herb blend: Use dried thyme, oregano, and rosemary for a fresh taste. This adds a nice depth to the chicken. Dry rubs can be applied before marinating or grilling. They create a flavorful crust on the chicken. Experiment with these options for your BBQ grilled chicken thighs. You’ll find a mix that suits your taste. For a full recipe, check out the detailed steps above. After enjoying your BBQ grilled chicken thighs, store any leftovers in the fridge. First, let the chicken cool to room temperature. Then, place it in an airtight container. This helps keep moisture in and prevents odors from mixing. Use a container with a tight lid or a resealable plastic bag. Remove as much air as possible. Store the chicken for up to four days. To freeze grilled chicken thighs, start by letting them cool fully. Wrap each piece tightly in plastic wrap. Then, place the wrapped chicken in a heavy-duty freezer bag. Write the date on the bag. This helps you keep track of how long it's been frozen. You can freeze the chicken for up to three months. When you’re ready to eat, thaw the chicken in the fridge overnight. To reheat, place the chicken in a preheated oven at 350°F (175°C). Heat it for about 20-25 minutes. This keeps it juicy. You can also use a microwave, but be careful. Microwaving can dry the chicken out if you’re not careful. Enjoy your flavorful and juicy meal again! For more details, check the full recipe. Marinate chicken thighs for at least 2 hours. For the best flavor, I suggest marinating overnight. This allows the chicken to soak up all the tasty goodness from the marinade. The longer you marinate, the more flavor you get in each bite. Just remember, you should not exceed 24 hours. Too long can make the meat mushy. Yes, you can cook BBQ chicken thighs in the oven. Preheat your oven to 400°F. Place the marinated chicken thighs on a baking sheet. Bake for about 35-40 minutes. Use a meat thermometer to check for 165°F internal temperature. You can also broil for the last few minutes to get crispy skin. It’s a great way to enjoy BBQ chicken when you can't grill outside. BBQ grilled chicken thighs pair well with many sides. Here are some popular choices: - Coleslaw - Corn on the cob - Baked beans - Grilled vegetables - Potato salad These dishes balance the rich flavors of the chicken. They also add color and variety to your meal. To reheat grilled chicken thighs, you can use the oven or microwave. For the oven, set it to 350°F. Place the chicken on a baking dish and cover it with foil. Heat for about 15-20 minutes. This keeps the chicken moist. If using a microwave, heat on medium power for about 2-3 minutes. Always check that the chicken is heated through to 165°F. This way, you can enjoy juicy chicken again. For more tips and the full recipe, check out the [Full Recipe]. Grilling bone-in chicken thighs can be simple and fun. You learned about the perfect marinade and cooking steps. I shared tips to enhance flavors and avoid sticking on the grill. Remember, marinating time makes a big difference. You can try different marinades and sauces to mix things up. Store leftovers properly to enjoy later. Whether you grill outside or cook inside, these tips will help you serve tasty chicken. Enjoy your cooking and happy grilling!](https://mysavedrecipe.com/wp-content/uploads/2025/06/3aaf060a-ae6b-4fb2-84b5-06eb056edd7e-300x300.webp)


. Start by cooking the jumbo pasta shells. Boil a large pot of salted water. Add the shells and cook until they are al dente, which takes about 8-10 minutes. Drain the pasta and let it cool for a bit. Make sure the shells do not stick together. You want them soft, but firm enough to hold the filling later. In a mixing bowl, combine the chopped spinach, ricotta cheese, half of the mozzarella cheese, and grated Parmesan. Add the beaten egg, garlic powder, onion powder, and salt and pepper. Mix everything well until it forms a creamy filling. The spinach adds a fresh taste, while the cheeses give a rich flavor. Now it's time to stuff those shells. Use a spoon or a piping bag to fill each shell with the spinach and cheese mixture. Be generous, but don’t overfill. Place the filled shells seam-side up in a baking dish. Spread 1 cup of marinara sauce on the bottom of the dish first. This keeps the shells from sticking and adds flavor. Cover the stuffed shells with aluminum foil and bake them in a preheated oven at 375°F (190°C) for 25 minutes. This helps them heat up evenly. After 25 minutes, remove the foil and sprinkle the rest of the mozzarella on top. Bake for an additional 10-15 minutes until the cheese is bubbly and golden. Let the shells cool for a few minutes before serving. Garnish with fresh basil leaves for a nice touch. For the complete recipe, check the Full Recipe section. To cook pasta shells perfectly, start by using a large pot. Fill it with water and add salt. The salt helps flavor the pasta. Bring the water to a rolling boil. Then, add the jumbo shells gently. Stir them to prevent sticking. Cook the shells for 8 to 10 minutes until they are al dente. This means they should be firm but not hard. After cooking, drain the shells and let them cool. This step helps with stuffing later. A great cheese blend makes your dish stand out. For Cheesy Spinach Stuffed Shells, mix ricotta, mozzarella, and Parmesan. Ricotta adds creaminess. Mozzarella gives that stretchy texture, while Parmesan adds a sharp taste. Use fresh cheeses for the best flavor. I recommend using shredded mozzarella and freshly grated Parmesan. Combine these cheeses with spinach and seasonings for a tasty filling. This mix ensures every bite is cheesy and delightful. When serving Cheesy Spinach Stuffed Shells, think about balance. A fresh salad pairs well with the rich flavors. A simple green salad with lemon vinaigrette is refreshing. If you want to add crunch, serve with garlic bread. The bread soaks up the marinara sauce beautifully. You can also top the shells with fresh basil for color and flavor. A glass of red wine complements the dish nicely. For a fun twist, try a light Italian white wine. For the full recipe, check out the details above. {{image_2}} You can change up the filling for your Cheesy Spinach Stuffed Shells. Try adding cooked ground meat, like beef or turkey, for a heartier meal. You could also use sautéed mushrooms for extra flavor. If you want a touch of spice, mix in some diced jalapeños. For a Mediterranean twist, add sun-dried tomatoes or feta cheese. These options let you customize your dish for any mood or taste. For a lighter take on this dish, swap out ricotta for cottage cheese. This change reduces calories but keeps the creamy texture. You can also use whole wheat pasta shells for added fiber. Instead of marinara sauce, try a homemade tomato sauce with fresh herbs. This option lowers sugar and adds more flavor. Using less cheese or a reduced-fat version can also help make this meal a bit healthier. You can easily make Cheesy Spinach Stuffed Shells vegan. Replace the ricotta with a blend of soaked cashews and nutritional yeast. This mix gives a creamy texture and cheesy flavor. Use vegan cheese for the mozzarella and Parmesan. For the egg, try a flaxseed meal or chia seed mixture to bind the filling. With these swaps, you can enjoy a delicious, plant-based version of this classic dish. For the full recipe, check the recipe section above. To store leftover stuffed shells, let them cool first. Place them in an airtight container. Make sure to layer them with parchment paper. This keeps them from sticking together. Keep the container in the fridge. They will stay fresh for up to three days. When you are ready to eat the leftovers, take them out of the fridge. Preheat your oven to 350°F (175°C). Place the stuffed shells in a baking dish. Pour some marinara sauce on top to keep them moist. Cover the dish with foil. Bake for about 20 minutes, or until heated through. For long-term storage, you can freeze the stuffed shells. After cooling, place them in a freezer-safe container. Use layers of parchment paper to separate them. Seal the container tightly. They will last for up to three months in the freezer. To cook, thaw them overnight in the fridge before reheating. Enjoy your cheesy spinach stuffed shells anytime! For the full recipe, check out the details above. Cheesy Spinach Stuffed Shells can last about 3 to 5 days in the fridge. Store them in an airtight container. This keeps the shells fresh and tasty. If they smell off or look dry, it's best to toss them. Yes, you can use different cheeses. Try using feta, gouda, or cheddar for a twist. Each cheese brings a new taste. Mixing cheeses can add depth and fun to your dish. Just keep the total amount the same for best results. Absolutely! You can prepare the shells and stuffing a day in advance. Just cover them tightly and store in the fridge. You can also bake them ahead of time. Reheat them in the oven for a warm meal. Many sides pair well with these stuffed shells. A fresh salad adds crunch and brightness. Garlic bread is great for soaking up sauce. Roasted vegetables offer a healthy, colorful plate. For a more filling meal, serve with a side of pasta or rice. For the full recipe, check out the details above! Cheesy spinach stuffed shells are simple and fun to make. We explored key ingredients, tools, and steps to create this dish. I shared tips to perfect your cooking and ideas for tasty variations. After mastering this recipe, you can store leftovers easily or serve them fresh. Remember, cooking should be enjoyable. Experiment with flavors and make it yours. Your kitchen can be a place of creativity and joy with these shells. Dive in and savor every bite!](https://mysavedrecipe.com/wp-content/uploads/2025/06/122d6c08-a9f4-4f56-8193-acd2d8f43b5e-300x300.webp)

![To make a great savory herb roasted chicken, you need some key ingredients. Here’s what you’ll need: - 1 whole chicken (about 4-5 lbs) - 2 tablespoons olive oil - 1 tablespoon Dijon mustard - 1 lemon, zested and juiced - 4 cloves garlic, minced - 2 teaspoons fresh rosemary, chopped - 2 teaspoons fresh thyme, chopped - 2 teaspoons fresh sage, chopped - Salt and pepper to taste - 1 onion, quartered - 2 carrots, chopped - 2 potatoes, cubed These ingredients work together to create a flavorful meal. The chicken is the star, while the herbs and veggies add depth. Herbs make a big difference in this dish. I love using fresh herbs for their bright taste. Here’s what I recommend: - Rosemary: It gives a pine-like flavor. - Thyme: Adds an earthy note. - Sage: Offers a warm, savory taste. These herbs blend well and elevate the chicken. You can also mix them or use your favorites. Feel free to add extra ingredients for more flavor. Here are some suggestions: - Lemon slices: They add brightness and moisture. - Garlic cloves: Whole cloves can roast and sweeten. - Bell peppers: They add color and sweetness to the dish. Using these options can make your dish even more special. Experiment with different ingredients to find what you love! To see how to cook this dish step-by-step, check out the Full Recipe. Start with a whole chicken that weighs about 4-5 lbs. First, remove any giblets inside the cavity. Pat the chicken dry with paper towels. This helps the skin crisp up later. Place the chicken in a roasting pan, ready for flavor. In a small bowl, mix together: - 2 tablespoons olive oil - 1 tablespoon Dijon mustard - 1 lemon, zested and juiced - 4 cloves garlic, minced - 2 teaspoons fresh rosemary, chopped - 2 teaspoons fresh thyme, chopped - 2 teaspoons fresh sage, chopped - Salt and pepper to taste This marinade makes the chicken taste great. Carefully lift the skin on the breast and thighs. Rub about half of the marinade underneath the skin. Use the rest to coat the outside of the chicken. Stuff the cavity with: - 1 onion, quartered - 2 carrots, chopped - 2 potatoes, cubed This will add flavor as the chicken cooks. Preheat your oven to 425°F (220°C). Roast the chicken for about 1 hour and 15 minutes. Check the internal temperature; it should reach 165°F (75°C). Halfway through cooking, baste the chicken with the pan juices. This keeps it moist and adds more flavor. After roasting, let the chicken rest for 10-15 minutes before carving. Serve it with the roasted vegetables. Enjoy your delicious meal! For the full recipe, check out the instructions I provided above. To get that crispy skin on your chicken, start by drying the skin well. Use paper towels to pat it dry. This helps remove moisture, which can make it soggy. Next, rub olive oil all over the skin. This adds flavor and helps it crisp up nicely in the oven. Make sure to season the skin with salt. Salt draws out moisture during cooking, leading to a golden, crispy result. Basting your chicken is key to keeping it moist. Halfway through cooking, open the oven and use a spoon to scoop up the juices from the pan. Drizzle these juices over the chicken. This adds flavor and keeps the meat juicy. You can baste every 20 minutes or so for the best results. Just be careful not to let too much heat escape from the oven. A meat thermometer is a must-have for perfect chicken. Insert the thermometer into the thickest part of the thigh, avoiding the bone. You want the temperature to reach 165°F (75°C) for safe eating. This tells you when the chicken is done and juicy. If it’s not there yet, put it back in the oven and check again in a few minutes. This simple tool helps ensure your chicken is cooked just right. For the full recipe and detailed steps, check the [Full Recipe]. {{image_2}} You can change the flavor of your savory herb roasted chicken by using different herbs. Try using tarragon for a hint of anise. Parsley can lighten the taste and add freshness. For a spicy kick, use oregano or basil. Each herb offers a unique twist. You can even mix herbs for a more complex flavor. Just remember, fresh herbs usually give the best taste. When it comes to side dishes, many options work well with roasted chicken. Classic choices include roasted vegetables like carrots, potatoes, and onions. You can also serve a fresh salad with a light vinaigrette. For something hearty, consider creamy mashed potatoes or fluffy rice. Adding a sauce can enhance the dish. Think about a tangy lemon sauce or a garlic butter drizzle. You can cook savory herb roasted chicken in different ways. The oven gives crispy skin and golden color. It usually takes about 1 hour and 15 minutes at 425°F. If you prefer a slow cooker, it’s easy and great for busy days. Cooking in a slow cooker takes about 4 to 6 hours on low. The chicken will be tender and juicy but won’t have the same crispy skin. Choose the method that fits your time and taste best. After enjoying your savory herb roasted chicken, store leftovers in an airtight container. Place the chicken in the fridge within two hours of cooking. This helps keep it fresh and safe to eat. It can last for about three to four days in the fridge. If you have leftover vegetables, store them in a separate container. When you’re ready to enjoy your leftovers, I recommend reheating in the oven. Preheat your oven to 350°F (175°C). Place the chicken in a baking dish and cover it with foil. Heat for about 20-25 minutes or until warmed through. This keeps the skin crispy and the meat juicy. You can also use a microwave, but it may not keep the skin crisp. Heat in short intervals, checking often. If you want to save your chicken for later, freezing is a great option. Let the chicken cool completely before wrapping. Wrap each piece tightly in plastic wrap or foil. Place the wrapped pieces in a freezer-safe bag or container. It can last for up to three months in the freezer. When you’re ready to eat, thaw it in the fridge overnight before reheating. This way, your savory herb roasted chicken will taste just as great! For the full recipe, check out the detailed instructions above. The best temperature for roasting chicken is 425°F (220°C). This heat helps the skin get crispy and brown. It cooks the meat evenly and keeps it juicy. Roasting at this temperature also reduces cooking time. Aim for about 1 hour and 15 minutes. Yes, you can use dried herbs instead of fresh. Dried herbs have a stronger flavor. Use about one-third the amount of dried herbs. For example, if a recipe calls for 2 teaspoons of fresh rosemary, use only about 1 teaspoon of dried. Make sure to crush the dried herbs before adding them. This helps release their flavor. To check if the chicken is fully cooked, use a meat thermometer. Insert it into the thickest part of the thigh without touching the bone. The temperature should reach 165°F (75°C). If you don’t have a thermometer, cut into the thickest part. The juices should run clear, not pink. After cooking, let the chicken rest for a few minutes before carving. This allows the juices to settle. For more tips and ideas, check out the Full Recipe. In this post, we explored how to make savory herb roasted chicken. We covered essential ingredients, fresh herbs, and optional flavors. You learned step-by-step instructions, tips for crispy skin, and how to store leftovers. Cooking can be fun and rewarding. Enjoy trying different herbs and side dishes. Remember, practice makes perfect. You’ll impress your family and friends with your delicious chicken.](https://mysavedrecipe.com/wp-content/uploads/2025/06/1814e9b4-3987-4302-ae63-3ba9edb997b8-300x300.webp)
. 1. Preheat your oven to 350°F (175°C). Grease a 9x5 inch loaf pan with butter or a non-stick spray. 2. In a large bowl, mash 3 ripe bananas. Pour in 1/2 cup of melted butter. Mix until smooth. 3. Add 3/4 cup of brown sugar to the banana mix. Stir until it blends well. 4. Now, mix in 1 beaten egg and 1 teaspoon of vanilla extract. Make sure everything is combined. 5. Sprinkle 1 teaspoon of baking soda and 1/4 teaspoon of salt over the mixture. Stir well to combine. 6. Gently fold in 1 1/2 cups of all-purpose flour until just mixed. Don’t overmix. If you want, add 1/2 teaspoon of cinnamon, 1/2 cup of chocolate chips, and 1/4 cup of chopped nuts for extra flavor. 7. Pour the batter into the greased loaf pan. Smooth the top with a spatula for an even bake. 8. Bake for 60-65 minutes. Check doneness by inserting a toothpick into the center. It should come out clean. 9. Let the bread cool in the pan for about 10 minutes. Then, transfer it to a wire rack to cool completely. For the full recipe, refer back to the ingredients section. To get the best texture in your chocolate chip banana bread, avoid overmixing the batter. When you mix too much, the bread can turn out dense and tough. Stir just until the ingredients blend together. This keeps the bread light and fluffy. Using ripe bananas is key. They should be soft and brown. Ripe bananas add natural sweetness and moisture. They help to create a softer crumb in your bread. If your bananas are not ripe, the bread may taste starchy and dry. You can enhance the flavor of your banana bread by using different types of chocolate. Dark chocolate gives a rich taste, while semi-sweet chocolate is sweeter. Try mixing these types for a fun twist. Adding spices can also elevate the flavor. A pinch of cinnamon or nutmeg warms up the taste. Nuts like walnuts or pecans add crunch. They also provide a nice contrast to the soft bread. For serving, slice the bread while it is warm. It tastes best fresh from the oven. You can drizzle melted chocolate on top for a rich finish. A sprinkle of powdered sugar also adds a nice touch. Garnish with a banana slice to make it look pretty. This simple step can impress your guests. Enjoy it with a cup of tea or coffee for a delightful treat. For the complete baking experience, check the Full Recipe for all the details. {{image_2}} You can use different types of chocolate in your banana bread. Dark chocolate gives a rich, deep flavor. It pairs well with the sweetness of bananas. Semi-sweet chocolate adds a nice balance of sweet and bitter. This type is popular and easy to find. If you want something different, try white chocolate. It adds a creamy taste and a lovely sweetness. You can mix and match chocolates to find your favorite! Adding other fruits can make your banana bread even better. Berries like blueberries or raspberries work well. They add a burst of flavor and color. You can also use chopped apples or peaches for a fruity twist. For those who want a nut-free option, skip the nuts and focus on fruits. This makes the bread soft and moist. It’s a great way to experiment with different flavors! If you want a healthier version, try whole wheat flour. It adds fiber and gives a nutty taste. You can also reduce the sugar in the recipe. Using half the amount or swapping it for honey or maple syrup works well. These choices keep the bread tasty while being better for you. Remember, small changes can make a big difference in health and flavor! Check out the Full Recipe for details on how to make this delicious treat! To keep your chocolate chip banana bread fresh, wrap it well. Use plastic wrap or foil to seal it. This helps retain moisture and flavor. Store it at room temperature for a few days. If you live in a warm place, refrigerate it. This prevents mold from growing. You can freeze chocolate chip banana bread for long-term storage. First, let the bread cool completely. Then, wrap it tightly in plastic wrap. After that, place it in a freezer bag. Label it with the date. It will stay good for up to three months. When you're ready to eat it, thaw it in the fridge overnight. For a quick option, microwave slices for about 20 seconds. Chocolate chip banana bread stays fresh for about four days at room temperature. If kept in the fridge, it lasts about a week. Always check for signs of spoilage. If you see mold or if it smells off, don't eat it. Fresh bread should feel moist and smell sweet. If it’s dry or has dark spots, it’s time to toss it. Yes, you can use frozen bananas. They work well in banana bread. To thaw them, place them in the fridge overnight. If you're short on time, you can microwave them for about 30 seconds. Just make sure to drain any excess liquid before mashing. This helps keep the bread from being too wet. If you want an egg-free option, there are many substitutes. You can use 1/4 cup of unsweetened applesauce or mashed banana. A tablespoon of ground flaxseed mixed with three tablespoons of water also works well. Let it sit for a few minutes to thicken before using. These swaps keep the bread moist and tasty. To make banana bread gluten-free, you can use gluten-free flour. Almond flour or coconut flour are great options. You can also try a gluten-free all-purpose blend. Just make sure the blend has xanthan gum for better texture. This keeps your bread soft and fluffy. Dense banana bread can happen for a few reasons. If you overmix the batter, it can become tough. Using too many bananas can also weigh it down. Make sure to mix just until combined and use the right amount of flour. If it’s too heavy, try adding a bit more baking soda next time. This blog post covers how to make chocolate chip banana bread. We discussed key ingredients, step-by-step instructions, and baking tips. I shared ideas for variations, storage practices, and answers to common questions. With this knowledge, you can bake a delicious treat at home. Experiment, enjoy, and share with others. Happy baking!](https://mysavedrecipe.com/wp-content/uploads/2025/06/3245b15b-88a1-4a86-b532-af5536a0cb4b-300x300.webp)
![- 4 large bell peppers (any color) - 1 cup quinoa, rinsed - 2 cups vegetable broth - 1 can (15 oz) black beans, rinsed and drained - 1 cup corn (fresh or frozen) - 1 medium onion, chopped - 2 cloves garlic, minced - 1 tsp cumin - 1 tsp smoked paprika - 1 tsp chili powder - Salt and pepper to taste - 1 cup diced tomatoes (canned or fresh) - 1 avocado, diced (for topping) - Fresh cilantro, chopped (for garnish) I love using fresh bell peppers for this dish. They add color and crunch. You can pick any color you like, whether it’s red, yellow, or green. Each has its own taste, but all work well! Quinoa serves as the base of our filling. It’s rich in protein and very filling. Rinsing it helps remove any bitter taste. Cooking it in vegetable broth makes it extra flavorful. Black beans add great texture and protein. They mix well with corn, which brings sweetness. Both are staples in many dishes, making them perfect for these peppers. Chopped onions and minced garlic bring a lovely aroma and depth of flavor. For seasoning, cumin, smoked paprika, and chili powder are key. They create that warm, earthy taste. Don’t forget salt and pepper to balance all the flavors. Finally, diced tomatoes add moisture and brightness to the filling. Topping with creamy avocado and fresh cilantro adds a special touch. All these ingredients come together in the full recipe, creating a savory and nutritious meal. - Preheat the oven to 375°F (190°C). - Cut the tops off the bell peppers and remove seeds and membranes. - Bring vegetable broth to a boil and cook quinoa. - Sauté onion and garlic until translucent. - Mix in black beans, corn, and seasonings. - Stir in cooked quinoa and diced tomatoes. - Stuff bell peppers and bake covered. - Remove foil and bake until tender. For the full recipe, be sure to check the details provided. Each step is simple and easy to follow, making this dish perfect for anyone wanting a hearty meal. Enjoy the bright colors and rich flavors of these vegan stuffed bell peppers! - Ensure quinoa is well-cooked for best texture. It should be light and fluffy. - Don’t overstuff the peppers to avoid spilling. Leave some room for the filling to expand. - Consider adding nutritional yeast for a cheesy flavor. It brings a nice depth to the dish. - Experiment with different spices or herbs for variety. Try adding oregano or basil for a twist. - Serve with a side salad for a complete meal. A fresh salad pairs well with the stuffed peppers. - Use a squeeze of lime juice for added freshness. It brightens the flavors and adds a nice touch. {{image_2}} You can easily swap out some ingredients in this recipe. If you don’t have quinoa, try rice or couscous instead. Both options offer a nice texture and will hold the flavors well. You can also mix up the beans. Kidney or pinto beans work great if you want a different taste. Each bean adds its unique twist to the dish. To spice things up, consider adding diced jalapeños for heat. This adds a kick that wakes up your taste buds. If you prefer a more Mediterranean vibe, use Italian herbs like oregano and basil. They add a fresh taste that pairs well with the sweet peppers. You can really play with flavors to suit your mood! For cheese lovers, there are great vegan options to explore. Try cashew cheese for a creamy texture. If you want convenience, grab some store-bought vegan cheese. It melts beautifully and adds a delicious layer of flavor. Don’t forget to top your stuffed peppers with a vegan cheese sauce before baking. It gives a rich finish that makes the dish even more delightful. For the full recipe and to get started, check out the [Full Recipe]. Store your vegan stuffed bell peppers in an airtight container for up to 4 days. This keeps them fresh and ready to eat. The flavors will deepen as they sit, making them even tastier. For convenience, freeze the stuffed peppers before baking. This way, you can enjoy a quick meal later. Just thaw them overnight in the fridge before baking. This method helps maintain their texture and flavor. To reheat, use the oven for the best texture. Simply place them in a baking dish at 350°F (175°C) until warmed through. If you need a quick meal, you can microwave them. Just be sure to cover them to keep them moist while heating. Enjoy your meal without the fuss! Peppers should be tender but still holding their shape. You can test them with a fork. If they poke easily, they are done. The skin may wrinkle a bit, but that’s fine. This texture means the peppers are soft and ready to eat. Yes, you can prepare them a day in advance and refrigerate before baking. Just cover them tightly with foil or plastic wrap. When you are ready to cook, remove the cover and bake as directed. This saves time on busy days. You can replace it with any grain such as rice or bulgur. Both options work well and will still give a nice texture. Just ensure to cook them according to their specific instructions before mixing with the other ingredients. Yes, this recipe is naturally gluten-free since it uses quinoa and rice. You can enjoy these stuffed peppers without worrying about gluten. Always check your ingredients to ensure they are gluten-free, especially canned items. Pair with a light salad or enjoy with bulgur or quinoa as a side. A crisp green salad adds freshness to the meal. You can also serve it with a drizzle of lime juice for a zesty kick. For the full recipe, check out the detailed instructions. In this article, we explored how to make delicious stuffed bell peppers. We covered the main ingredients, cooking steps, and helpful tips. You can customize these peppers with various grains, beans, or spices. Whether you are making them for a meal or freezing for later, they are simple and tasty. Enjoy mixing flavors and make this dish your own. With easy storage and reheating options, delicious meals are always within reach. Now, it’s your turn to try this recipe!](https://mysavedrecipe.com/wp-content/uploads/2025/06/94553ddc-b429-43b9-8a70-eb64ac3cc9e5-300x300.webp)
. Preheat the Oven Start by preheating your oven to 400°F (200°C). This step is very important. A hot oven helps cook the chicken and veggies just right. Prepare the Vegetables and Chicken Next, gather your fresh ingredients. Slice the chicken breast into thin strips. Cut the red, yellow, and green bell peppers into pieces. Make sure the onion is also sliced thin. This way, all the pieces cook evenly. Place everything in a large bowl. Combine Ingredients Pour 3 tablespoons of olive oil over the chicken and veggies. Then, sprinkle the spices: 2 teaspoons of chili powder, 1 teaspoon each of cumin, smoked paprika, garlic powder, onion powder, plus salt and pepper to taste. Toss everything well. You want all the pieces to be coated in the yummy seasoning. Spread on Baking Sheet Now, take a large baking sheet and line it with parchment paper or grease it lightly. Spread the chicken and veggie mixture evenly on the sheet. This helps them cook evenly and get nice and golden. Bake the Mixture Place the baking sheet in the oven. Bake for 25-30 minutes. Halfway through, give everything a good stir. This ensures even cooking. The chicken should be cooked through, and the vegetables will be tender. Warm Tortillas and Serve While the fajitas bake, you can warm the tortillas. Use a dry skillet over medium heat for about 30 seconds on each side. Alternatively, wrap them in foil and heat in the oven for the last 5 minutes of cooking. Once the fajitas are ready, squeeze fresh lime juice over them. Serve the fajitas on warm tortillas. Garnish with chopped cilantro and lime wedges. Enjoy every bite! For the full recipe, check above. Choosing the Right Chicken For the best fajitas, I recommend using boneless, skinless chicken breasts. They cook evenly and stay juicy. Aim for chicken strips about half an inch thick. This size helps them cook well and absorb all those tasty spices. How to Cut Vegetables for Even Cooking Slice your bell peppers and onion into similar sizes. I like to cut them into thin strips, about a quarter-inch thick. This ensures they cook evenly in the oven. If you want more crunch, cut them slightly thicker. Just remember to keep them uniform for the best results. Marinating Tips for Extra Flavor For an extra flavor boost, marinate your chicken. Mix olive oil, lime juice, and spices in a bowl. Let the chicken soak for at least 30 minutes. This step makes a big difference! It adds depth and richness to your fajitas. Adding Extra Toppings and Sides Don’t forget about toppings! Fresh cilantro, diced tomatoes, and avocado can elevate your dish. You can also serve your fajitas with sides like rice or beans. They add color and nutrition. Explore different options to make each meal unique. For the full recipe, check out the complete guide! {{image_2}} You can switch things up by using different proteins in your fajitas. If you prefer beef, choose flank steak or sirloin. Slice the meat thin for quick cooking. Simply follow the same steps as the chicken. Shrimp is another tasty option. It cooks faster than chicken. Add it to the mix for only 15 minutes, and you’ll have a delightful seafood fajita. For those who want a meatless meal, try using firm tofu or tempeh. Marinate them in the same spices to add flavor. Cook them until golden brown, and enjoy a veggie-packed dish. You can customize the heat level of your fajitas. For mild fajitas, stick to the recipe as is. The spices provide flavor without too much heat. If you like a medium kick, add a bit more chili powder. You could also mix in some diced bell peppers for added taste. For those who love spice, fresh jalapeños are a great choice. Chop them and toss them with the chicken and veggies before baking. You can also drizzle hot sauce on top before serving for an extra punch. Feel free to explore these variations in the full recipe for more ideas! After you enjoy those oven-baked chicken fajitas, store any leftovers properly. First, let them cool down. Then, place them in an airtight container. This keeps them fresh and tasty. You can store them in the fridge for up to three days. If you want to save them for later, consider freezing. To freeze, wrap the fajitas tightly in plastic wrap or foil. Then, place them in a freezer bag. They can last up to three months in the freezer. Just remember to label the bag with the date. When it's time to eat your leftovers, you have two good options: the microwave or the oven. Microwave Reheating: Place the fajitas on a microwave-safe plate. Cover them with a damp paper towel to keep them moist. Heat in short bursts of 30 seconds until they're warm throughout. Oven Reheating: Preheat your oven to 350°F (175°C). Spread the fajitas on a baking sheet. Heat for about 10-15 minutes, or until warm. This method helps keep the texture nice and crispy. To keep the fajitas fresh, avoid reheating them more than once. Enjoy the delicious flavors of your oven-baked chicken fajitas again! How do I know when the chicken is cooked through? You can check if the chicken is cooked by using a meat thermometer. Insert it into the thickest part of the chicken. It should read 165°F (75°C). If you don’t have a thermometer, you can also cut a piece of chicken in half. The meat should be white and no longer pink. Can I use frozen chicken for this recipe? Yes, you can use frozen chicken. However, it’s best to thaw it first. Thaw the chicken in the fridge overnight or use the defrost setting on your microwave. This way, it cooks evenly and absorbs the flavors well. What are the best sides to serve with chicken fajitas? I love serving chicken fajitas with: - Mexican rice - Black beans - Guacamole - Salsa - Corn salad These sides add color and flavor to your meal. They also balance the spices in the fajitas. How can I make this recipe dairy-free? To make chicken fajitas dairy-free, simply skip any cheese or sour cream. You can use avocado or guacamole instead. They add creaminess without dairy. Fresh lime juice adds a nice tang, too. How long do leftovers last in the fridge? Leftovers can last about 3 to 4 days in the fridge. Store them in an airtight container. This keeps the fajitas fresh and tasty. Can I prepare fajitas in advance? Yes, you can prep fajitas in advance. Slice the chicken and veggies, then store them in the fridge. Just mix and bake when you’re ready. This saves time on busy nights. For the full recipe, refer to the earlier section. To sum up, this article covered how to make tasty chicken fajitas. We discussed key ingredients like chicken, bell peppers, and spices. You learned about step-by-step preparation and cooking. I shared tips for perfecting your dish and options for different proteins and spice levels. Lastly, we addressed storage and reheating for leftovers. Enjoy making and sharing your delicious fajitas. With practice, you will master this easy and fun meal!](https://mysavedrecipe.com/wp-content/uploads/2025/06/8f12a0b8-0d21-45c5-a458-2fedd08aac6d-300x300.webp)
![To make a Lemon Blueberry Shortbread Mousse Cake, gather these simple ingredients: - 1 cup all-purpose flour - 1/2 cup unsalted butter, softened - 1/4 cup powdered sugar - 1/4 teaspoon salt - 1 cup blueberries (fresh or frozen) - 1 tablespoon lemon juice - Zest of 1 lemon - 1 cup heavy cream - 1/2 cup granulated sugar - 1 teaspoon vanilla extract - 1 packet (1/4 ounce) unflavored gelatin - 2 tablespoons cold water These ingredients work together to create layers of flavor and texture. The buttery shortbread crust gives a solid base. The blueberries add a burst of sweetness and tartness. The light mousse adds creaminess, making each bite a delight. Using fresh blueberries boosts flavor. You can also use frozen ones if fresh are not available. Fresh lemon juice and zest enhance the cake's brightness. They balance the sweetness of the mousse. This recipe is easy to follow. You will enjoy making this wonderful dessert. For the full experience, check the Full Recipe. First, gather your ingredients: - 1 cup all-purpose flour - 1/2 cup unsalted butter, softened - 1/4 cup powdered sugar - 1/4 teaspoon salt Preheat your oven to 350°F (175°C). In a large bowl, cream the softened butter and powdered sugar until light and fluffy. Next, add the flour and salt. Mix until a crumbly dough forms. Press this dough into the bottom of a 9-inch springform pan evenly. Bake for 15 to 18 minutes or until it turns lightly golden. Allow it to cool completely. For the filling, you need: - 1 cup blueberries (fresh or frozen) - 1 tablespoon lemon juice - Zest of 1 lemon In a saucepan on medium heat, combine the blueberries, lemon juice, and lemon zest. Cook for about 5 to 7 minutes until the blueberries soften and release their juices. Once it cools, you can blend it briefly if you want a smoother texture. Now, let’s make the mousse. You will need: - 1 cup heavy cream - 1/2 cup granulated sugar - 1 teaspoon vanilla extract - 1 packet (1/4 ounce) unflavored gelatin - 2 tablespoons cold water Start by blooming the gelatin. In a small bowl, sprinkle the gelatin over the cold water. Let it sit for 5 minutes. While waiting, whip the heavy cream with the granulated sugar and vanilla extract in a medium bowl until it forms stiff peaks. Gently heat the bloomed gelatin in the microwave for about 10 seconds until it dissolves. Take a small amount of whipped cream and mix it with the gelatin to temper it. Now, fold the gelatin mixture into the rest of the whipped cream until no streaks remain. To layer your cake, spread half of the blueberry filling over the cooled shortbread crust. Spoon the mousse mixture carefully on top of the blueberries and smooth the surface. Then, finish with the remaining blueberry filling, spreading it evenly over the mousse layer. Cover the cake with plastic wrap and refrigerate for at least 4 hours, or until it sets. When ready to serve, release the springform pan and slice the cake into portions. For a nice touch, garnish each slice with a few fresh blueberries and a sprig of mint. For the full recipe, click [Full Recipe]. To make a great shortbread crust, you need the right texture. Here are some tips: - Avoiding sogginess: Use cold butter when mixing. This keeps the crust firm. - Ensuring the right texture: Mix until just combined. Overmixing can make it tough. Aim for a crumbly dough that holds shape when pressed. You can enhance the blueberry filling with simple tweaks: - Flavor adjustments with spices: Try adding a pinch of cinnamon or nutmeg. This adds warmth and depth. - Using alternative sweeteners: If you want less sugar, consider honey or maple syrup. Both add unique flavors while sweetening. Mousse can be tricky, but here’s how to fix common issues: - Problems with mousse thickness: If too thin, whip the cream longer until stiff peaks form. This adds volume. - Achieving proper folding technique: Always fold gently. This keeps air in the mousse and makes it light. Use a spatula and turn the bowl as you mix. These tips will help you create a perfect Lemon Blueberry Shortbread Mousse Cake. For the full guide, check the Full Recipe. {{image_2}} You can change the fruit in this cake. Try strawberries for a sweeter taste. Raspberries add a nice tartness. You can also mix fruits for fun flavors. Adjust the lemon juice to taste. More lemon gives a brighter flavor. Less lemon makes it milder. Play around until you find your perfect mix. If you need gluten-free options, use gluten-free flour. It works well in the crust. For vegan substitutions, swap the butter with coconut oil. Use plant-based cream for the mousse. You can even use aquafaba as a whipped cream substitute. These swaps keep the cake tasty while meeting your needs. Pair the cake with a berry sauce for extra flavor. A drizzle of lemon sauce brightens each bite. For garnishes, fresh mint adds a pop of color. You can also sprinkle some crushed nuts on top. They add a nice crunch and flavor. Each slice can become a work of art! Check out the Full Recipe for more details and tips. To store leftovers, cover the cake with plastic wrap. This helps keep it fresh. Place it in the fridge. The mousse can last up to three days this way. Make sure to keep it away from strong-smelling foods. This prevents any strange flavors from mixing in. To keep the mousse fresh, always scoop from the center. Avoid touching the edges with your serving spoon. This helps maintain its lovely look and texture. If you notice any topping starting to lose its shape, gently smooth it out with a spatula. Can you freeze the cake? Yes, you can! Freezing is a good option if you have extra cake. Wrap it tightly in plastic wrap and then in foil. This helps protect it from freezer burn. It can stay frozen for up to two months. For thawing, move the cake to the fridge for several hours or overnight. This method keeps the mousse texture smooth. Avoid quick thawing in the microwave. It can ruin the creamy feel of the mousse. Enjoy your Lemon Blueberry Shortbread Mousse Cake whenever you like! For the complete process, check out the Full Recipe. You can use agar-agar or cornstarch. Agar-agar is a plant-based gelling agent. It sets well when heated. You need to dissolve it in boiling water first. Cornstarch can also work but will yield a different texture. Mix it with water, then heat until thickened. Dried blueberries can work, but they change the flavor and texture. They are sweeter and chewier. If you choose dried, soak them in warm water to soften. This helps mimic the juiciness of fresh blueberries. The Lemon Blueberry Shortbread Mousse Cake lasts up to five days in the fridge. Make sure to cover it well with plastic wrap. This keeps it fresh and prevents it from absorbing other smells. Yes, you can make this cake a day or two ahead. It actually tastes better after sitting in the fridge. Just be sure to allow ample time for it to chill and set properly. You can use coconut cream, whipped topping, or even Greek yogurt. Coconut cream gives a rich taste, while whipped topping is lighter. Greek yogurt adds tanginess but may change the mousse's texture. Yes, you can use lemon extract, but adjust the amount. Extract is stronger than fresh zest and juice. Start with half a teaspoon and taste as you mix. This way, you can find the right balance of flavor. For the complete recipe, check out the Full Recipe. This blog post covered how to make a delicious Lemon Blueberry Shortbread Mousse Cake. We explored essential ingredients, step-by-step instructions, and helpful tips. You can create variations and adjust for dietary needs too. Remember, practice will help you master this recipe. Enjoy experimenting with flavors and serving styles. With a bit of patience, you'll impress your friends and family. Get ready to relish each bite of your sweet creation!](https://mysavedrecipe.com/wp-content/uploads/2025/06/cca0620b-34cd-4be4-a65e-f549c2490a09-300x300.webp)
![- 1 pound large shrimp, peeled and deveined - 4 tablespoons unsalted butter - 4 cloves garlic, minced - 1/2 cup pineapple chunks (fresh or canned) - 1 red bell pepper, diced - 1/4 cup green onions, chopped - 1 tablespoon soy sauce - 1 teaspoon sesame oil - 1/2 teaspoon red pepper flakes (adjust for spice preference) - Salt and pepper to taste Gather these fresh ingredients to make a tasty dish. The shrimp should be large and fresh for the best flavor. I love using unsalted butter, as it allows me to control the saltiness. Garlic brings a lovely aroma, and I always use fresh cloves. The pineapple adds a sweet touch that balances the garlic. Red bell pepper adds color and crunch. Green onions give a fresh finish. For flavor, soy sauce and sesame oil blend well. Adjust red pepper flakes to match your spice level. Add salt and pepper to enhance all the flavors. This mix creates a dish you will want to savor. For the full experience, check the Full Recipe. Enjoy cooking! First, rinse the shrimp under cold water. Pat them dry with paper towels. Then, season the shrimp with salt and pepper to taste. Next, melt the butter in a large skillet over medium heat. This will create a rich base for our dish. Now, add the minced garlic to the melted butter. Sauté it for one to two minutes until it smells great. Be careful not to burn the garlic; it can turn bitter. Increase the heat to medium-high. Add the seasoned shrimp to the skillet. Cook the shrimp for two to three minutes on each side. They should turn pink and opaque when done. Next, toss in the diced red bell pepper and pineapple chunks. Cook these for an additional two to three minutes. This will soften the peppers and add sweetness. Then, drizzle in the soy sauce and sesame oil. Stir the mixture well to combine everything. Finally, sprinkle the red pepper flakes over the dish. Mix it all together and remove it from heat. Stir in the chopped green onions. Now the dish is ready to serve! For the full recipe, check the section above. To make the best garlic butter shrimp, start by deveining and peeling the shrimp. Use a sharp knife to cut along the back and remove the dark vein. This step is key for a clean bite. Rinse them well to wash away any grit. Timing is crucial to avoid overcooking. Cook the shrimp for just 2-3 minutes on each side. They should turn pink and opaque. Overcooked shrimp become tough and rubbery, which nobody enjoys. Fresh herbs can take your dish up a notch. Try adding cilantro or basil for a burst of flavor. These herbs add brightness and a fresh taste that pairs well with the shrimp. If you want alternatives to soy sauce, consider coconut aminos or tamari. Each brings a unique flavor that still complements the dish. For butter, you can use olive oil or ghee for a different twist. Serve your garlic butter shrimp over jasmine rice or quinoa for a hearty meal. Both options soak up the sauce well and add a nice texture. For a true Hawaiian touch, garnish your dish with lime wedges and sesame seeds. You can also add slices of fresh pineapple. This not only looks pretty but enhances the tropical vibe of the meal. For the full recipe, refer to the [Full Recipe]. {{image_2}} You can change up this dish with fun ingredient swaps. Try using different vegetables like bell peppers or snap peas. These will add color and crunch. For protein, scallops or chicken work well too. They cook fast and soak up the flavors. Adjusting the sweetness can make a big difference. You can add fruits like mango or kiwi for a new twist. For sauces, try different spices. Lime juice or ginger can give a bright flavor. Experiment to find your favorite taste. If you need gluten-free options, use tamari instead of soy sauce. It gives the same great taste without gluten. For low-carb diets, switch to cauliflower rice instead of jasmine rice. It keeps the meal light and delicious. These variations make garlic butter shrimp Hawaiian style fun and flexible. You can enjoy it in many ways. For the full recipe, check out the earlier section. To store leftovers, place them in an airtight container. This keeps the garlic butter shrimp fresh. I recommend using glass containers for best results. They do not absorb odors and are easy to clean. Let the shrimp cool first before sealing. Store in the fridge for up to three days. For longer shelf life, you can freeze the shrimp. Place it in a freezer-safe bag or container. Remove as much air as possible before sealing. This helps prevent freezer burn. Garlic butter shrimp can last in the freezer for up to three months. When you’re ready to eat, thaw in the fridge overnight. This keeps the shrimp tender and juicy. When reheating, use gentle heat to keep the shrimp tender. You can warm it in a skillet over low heat. Add a splash of water or broth to help steam it. Another option is to use the microwave. Heat in short bursts to avoid overcooking. Always check the temperature. It should be at least 165°F for safe eating. Hawaiian-style garlic butter shrimp stands out due to its bright, tropical flavors. The addition of pineapple gives it a sweet twist. Other shrimp recipes might focus on spices or creamy sauces. This dish is light, fresh, and full of life. You get the rich taste of garlic butter, combined with juicy shrimp and fruity notes. Yes, you can easily spice it up! Start with the red pepper flakes. Add more for extra heat. You can also use fresh jalapeños or a dash of hot sauce. For a smoky flavor, consider adding chipotle powder. Adjust the spice level to match your taste. Make it as spicy as you like! Perfectly cooked shrimp turns pink and opaque. You should not see any gray. When you cook it, it should curl up slightly. If it forms a tight "C" shape, it’s done. Avoid overcooking, as shrimp can become rubbery. Keep an eye on the time; it usually takes only a few minutes. This blog post gives you all the details to make Hawaiian-style garlic butter shrimp. You learned which ingredients are key and how to cook them perfectly. I shared tips for flavor and serving to impress guests. Stored properly, you can enjoy leftovers later. Remember to adjust spices to suit your taste. With this recipe, you can easily share a taste of the tropics with friends and family. Enjoy creating a delightful meal that brings a burst of flavor to your table. Happy cooking!](https://mysavedrecipe.com/wp-content/uploads/2025/06/18387631-e931-4356-9a08-94a818666e91-300x300.webp)


![- 1 ½ cups all-purpose flour - 1 cup granulated sugar - ½ cup unsweetened cocoa powder - 1 teaspoon baking powder - 1 teaspoon baking soda - ½ teaspoon salt - 2 large eggs - 1 cup whole milk - ½ cup vegetable oil - 2 teaspoons vanilla extract - 1 cup boiling water - 1 cup semi-sweet chocolate chips These ingredients work together to create rich, moist cupcakes. The flour gives structure, while sugar adds sweetness. Unsweetened cocoa powder gives that deep chocolate flavor. Baking powder and soda help the cupcakes rise. Eggs add moisture and bind the mix. Milk and oil keep the cupcakes tender. Vanilla extract enhances all the flavors, and boiling water makes the batter smooth. Finally, chocolate chips make every bite delicious. Using high-quality cocoa powder is key. It gives the cupcakes a deep chocolate taste. Brands like Valrhona or Ghirardelli have rich flavors. The type of chocolate chips you choose also matters. Semi-sweet chips are great for balance, but dark chocolate chips can add a nice touch. If you like extra sweetness, use milk chocolate chips. If you need an egg substitute, flaxseed meal works well. Mix 1 tablespoon of flaxseed meal with 2.5 tablespoons of water and let it sit until thick. For a dairy-free option, use almond or oat milk. They both work well in this recipe. These swaps can help you enjoy these jumbo cupcakes no matter your diet. First, preheat your oven to 350°F (175°C). This ensures even baking. Next, line your jumbo muffin pan with paper liners. This step helps with easy cupcake removal. Measuring ingredients is key too. Use accurate measurements for the best results. Even a little extra flour can change the texture. In a large bowl, whisk together your dry ingredients: flour, sugar, cocoa powder, baking powder, baking soda, and salt. Mix well to avoid lumps. Next, add your wet ingredients: eggs, milk, vegetable oil, and vanilla. Stir gently until just combined. Be careful not to overmix; this keeps the cupcakes light. Now, gradually add the boiling water. Stir continuously to avoid splashes. Your batter might look thin, but that’s just right! Finally, fold in the chocolate chips. This adds extra richness to your cupcakes. Pour the batter into each muffin cup, filling them about two-thirds full. This allows space for rising. Bake in the oven for 18-20 minutes. To check if they are done, insert a toothpick into the center. If it comes out clean, they’re ready! Once baked, take them out and let them cool for 5 minutes in the pan. After that, move them to a wire rack to cool completely. Enjoy the smell as they cool! You can find the full recipe in the earlier sections. To make great jumbo cupcakes, start with an oven thermometer. This tool helps you check if your oven runs hot or cold. A consistent temperature ensures your cupcakes bake evenly. Next, use the right muffin pan. Choose a pan made for jumbo cupcakes. These pans are deeper and wider. They help your cupcakes rise perfectly, giving you that tall, fluffy look. Now, let’s talk about frosting. Two great options are buttercream and ganache. Buttercream is sweet and creamy, while ganache is rich and smooth. Both make your cupcakes look amazing. For toppings, get creative! Try chocolate shavings for an elegant touch. You can also add colorful sprinkles for fun. These little details make your cupcakes pop on the table. Watch out for these common mistakes. First, don’t overmix the batter. Mixing too much can make your cupcakes dense. Just stir until the ingredients combine, and you’re good. Another mistake is not letting the cupcakes cool properly. Cooling them in the pan for too long can make them soggy. After five minutes, move them to a wire rack to cool completely. This step keeps them light and fluffy. For the full recipe, be sure to check out the full recipe section. {{image_2}} You can boost the flavor of your jumbo chocolate cupcakes in fun ways. Adding different extracts, like almond or orange, makes a big difference. A splash of espresso extract can deepen the chocolate taste too. You can also mix in fruits or nuts. Chopped cherries or walnuts add texture and a new taste. Want a gluten-free treat? Use almond flour or a gluten-free blend instead of all-purpose flour. For a vegan version, swap eggs with flaxseed meal. You can use almond milk to replace whole milk. These adjustments make the cupcakes suitable for everyone. Get creative with themed decorations for special occasions. For Halloween, try adding spooky designs using orange frosting. For birthdays, colorful sprinkles make a great touch. You can also add spices to fit the season. A pinch of peppermint can brighten up winter treats. Cinnamon adds warmth for fall. Each change keeps your cupcakes exciting and fresh! For the complete recipe, check out the [Full Recipe]. To keep your jumbo chocolate cupcakes fresh, start by letting them cool completely after baking. Store them at room temperature if you plan to eat them within two days. Place them in an airtight container. This keeps them soft and moist. If you want to keep them longer, refrigeration is a good option. Use a container that seals tightly. This helps prevent them from drying out. Freezing your cupcakes is easy! First, let them cool down completely. Then, wrap each cupcake tightly in plastic wrap. After that, place them in a freezer-safe bag or container. Make sure to label the bag with the date. To thaw, take them out and leave them at room temperature for about an hour. This keeps the texture and flavor just right. For the best results, do not refreeze thawed cupcakes. Jumbo chocolate cupcakes can stay fresh for about 3 to 4 days at room temperature. In the fridge, they last for about a week. If you freeze them, they can last for up to three months. Watch for signs of staleness. If they smell off or feel dry, it’s time to toss them. Fresh cupcakes should smell sweet and feel soft. Enjoy your treats while they’re still delicious! For the full recipe, check the section above. Jumbo cupcakes are larger than regular ones. Regular cupcakes are about 2-3 inches tall, while jumbo ones are around 4 inches. This size difference means jumbo cupcakes need more baking time. Regular cupcakes usually bake in 15-18 minutes. Jumbo cupcakes can take 18-20 minutes or longer. Always check with a toothpick to see if they are done. Cupcakes can sink due to a few reasons. One common cause is overmixing the batter. This can make them dense. Another reason is using too much leavening agent. Stick to the recipe for baking powder and baking soda. Also, make sure your oven is at the right temperature. An oven thermometer can help you with this. Yes, you can make these cupcakes ahead of time. Bake them and let them cool completely. Store them in an airtight container at room temperature. They will stay fresh for about 2-3 days. If you want to keep them longer, consider freezing them. Wrap each cupcake tightly in plastic wrap, then place them in a freezer bag. You can find jumbo chocolate cupcakes at gourmet bakeries. Check local shops or specialty stores. Some grocery stores also carry them. If you want a specific flavor or design, consider ordering online. Many bakeries offer delivery options. You now have a complete guide to making jumbo chocolate cupcakes. We covered essential ingredients, mixing techniques, and baking tips. Remember to use quality ingredients for the best taste. Substitutions can help accommodate dietary needs. Don't forget the fun of decorating! With a few easy tips, you can avoid common mistakes. Store cupcakes properly to keep them fresh. Enjoy sharing these sweet treats with friends and family! Happy baking!](https://mysavedrecipe.com/wp-content/uploads/2025/06/a596c567-3f29-43b2-962b-0b791569c5f9-300x300.webp)
![For Honey Mustard Chicken Tenders, you will need: - 1 pound (450g) chicken breast tenders - 1/4 cup honey - 1/4 cup Dijon mustard - 2 tablespoons olive oil - 1 teaspoon garlic powder - 1 teaspoon onion powder - 1/2 teaspoon smoked paprika - Salt and pepper to taste - 1 cup Panko breadcrumbs - 1/2 cup all-purpose flour - 2 large eggs Each ingredient plays a key role in the flavor and texture of the dish. Here’s a quick breakdown: - Chicken Breast Tenders: The star of the dish, tender and juicy. - Honey and Dijon Mustard: They create a perfect sweet and tangy glaze. - Olive Oil: Adds moisture and helps the coating crisp up in the oven. - Spices: Garlic powder, onion powder, and smoked paprika give depth. - Panko Breadcrumbs: They provide a light and crispy texture. - All-Purpose Flour and Eggs: These help the breadcrumbs stick well to the chicken. If you want to mix things up or have dietary needs, consider these swaps: - Chicken: You can use tofu or tempeh for a plant-based option. - Honey: Maple syrup works great if you want a vegan choice. - Dijon Mustard: Yellow mustard gives a milder taste if you prefer. - Panko Breadcrumbs: Regular breadcrumbs can be used, but they won’t be as crunchy. - Olive Oil: Avocado oil is a good substitute for a different flavor. Using these ingredients, you will create a dish that is both tasty and easy to make. For the full recipe, check the detailed instructions to guide you through the process. First, gather all your ingredients. You will need chicken breast tenders, honey, Dijon mustard, olive oil, garlic powder, onion powder, smoked paprika, salt, and pepper. You also need Panko breadcrumbs, all-purpose flour, and eggs. Preheat your oven to 400°F (200°C). Line a baking sheet with parchment paper to keep the chicken from sticking. In a medium bowl, whisk together honey, Dijon mustard, olive oil, garlic powder, onion powder, smoked paprika, salt, and pepper. This mixture will be your marinade. Set aside half of it for dipping later. Place the chicken tenders in a large bowl. Pour the marinade over them and toss to coat. Let the chicken sit for at least 15 minutes. This step helps the flavors sink in. Set up your breading station. Use three shallow bowls. Put all-purpose flour in one, whisk the eggs in another, and add Panko breadcrumbs to the last. Take each marinated chicken tender and dip it in the flour first. Shake off any extra flour. Then, dip it in the egg. Lastly, coat it with Panko breadcrumbs. Press gently so the crumbs stick well. Arrange the breaded chicken tenders on your baking sheet in a single layer. This makes sure they cook evenly. Now it’s time to bake. Place the baking sheet in your preheated oven. Bake the chicken tenders for 15 to 20 minutes. They should be golden and crispy when done. Use a meat thermometer to check. The internal temperature should reach 165°F (75°C). Once cooked, take them out and serve warm. Don’t forget to enjoy them with the reserved honey mustard dipping sauce. For the complete recipe, check out the [Full Recipe]. Marinating chicken tenders makes them juicy and full of taste. I suggest marinating for at least 15 minutes. For even more flavor, try to marinate them for an hour or overnight. Use a sealed bag to coat the tenders well in the marinade. This keeps them moist and adds depth to each bite. You can cook honey mustard chicken tenders in three ways. Each method gives a different texture and taste. - Oven: Preheat your oven to 400°F (200°C). This method offers a crispy coating with less oil. Bake for 15-20 minutes. - Air Fryer: Set your air fryer to 400°F (200°C) and cook for about 10-12 minutes. This method is quick and makes the tenders very crisp. - Pan-Frying: Heat oil in a skillet over medium heat. Cook the tenders for about 4-5 minutes on each side. This gives a rich flavor and nice golden color. Choose the method that fits your time and taste. Honey mustard chicken tenders pair well with many sides. Try serving them with: - Fresh salad for a light meal - Crispy fries for a fun treat - Creamy coleslaw for added crunch - Steamed veggies for a healthy touch For a dip, use the reserved honey mustard sauce. This adds a sweet and tangy kick that everyone loves. Enjoy your meal! {{image_2}} To make spicy honey mustard chicken tenders, add hot sauce to the marinade. A tablespoon or two will add heat without losing the sweet flavor. You can also use spicy mustard instead of Dijon. This twist gives a nice kick to your meal. Serve it with a cooling dip, like ranch or yogurt, to balance the heat. If you need a gluten-free version, swap regular flour and breadcrumbs for gluten-free ones. Use almond flour or coconut flour for breading. Make sure your mustard and honey are also gluten-free. This way, everyone can enjoy the dish without worry. Using an air fryer cooks chicken tenders quickly. It gives a crispy texture with less oil. This method is also great for busy nights. The oven takes a bit longer, but it can cook more tenders at once. You can choose based on your needs and time. Both methods will yield tasty chicken tenders. For the full recipe, check out the Honey Mustard Chicken Tenders section. After enjoying your honey mustard chicken tenders, you may have some left. To store them, let the chicken cool to room temperature. Place the tenders in an airtight container. You can keep them in the fridge for up to three days. For best taste, eat them within this time. To reheat the chicken tenders, preheat your oven to 350°F (175°C). Place the tenders on a baking sheet lined with parchment paper. Heat them for about 10-15 minutes. This method helps keep the coating crispy. You can also use a microwave, but the coating may become soft. If you want to save some chicken tenders for later, freezing works well. Allow the tenders to cool completely. Then, place them in a freezer-safe bag. Remove as much air as possible before sealing. These tenders can stay in the freezer for up to three months. When you’re ready to eat, thaw them in the fridge overnight before reheating. Enjoy your tasty meal anytime! You can make Honey Mustard Chicken Tenders healthier by swapping some ingredients. Use whole wheat flour instead of all-purpose flour. Try baked tenders instead of fried. You can also reduce the honey or use a sugar substitute. Adding more spices can enhance flavor without adding calories. Serve with a side of veggies for a balanced meal. Yes, you can use regular mustard instead of Dijon. Regular mustard will give a different taste, but it still works. It may be less sweet, so you might want to add a touch more honey. The texture and flavor may change, but it will still taste great. Feel free to experiment with other mustard types too! The best dipping sauces for chicken tenders include ranch, barbecue, and the honey mustard mix. Each sauce adds a unique flavor. If you love spicy food, try adding hot sauce to your honey mustard. You can also mix yogurt with herbs for a fresh option. Each choice can change your meal experience! This post covered simple recipes for Honey Mustard Chicken Tenders. We discussed ingredients, preparation steps, and cooking methods. You learned tips for flavor and storage. Variations for spicy or gluten-free options help you customize. As you try these recipes, remember to enjoy cooking and be creative. You can make each dish your own. Happy cooking!](https://mysavedrecipe.com/wp-content/uploads/2025/06/8428b306-c463-48f3-b3f2-b164fd3574db-300x300.webp)

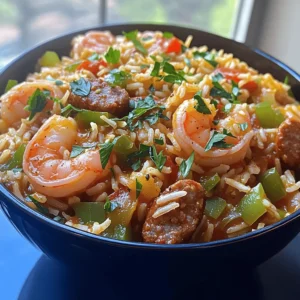
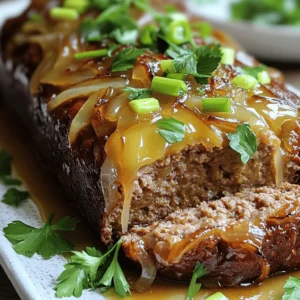
![To make Linguini with Clam Sauce, gather these simple ingredients: - 12 oz linguini pasta - 2 cans (6.5 oz each) chopped clams in juice - 3 tablespoons olive oil - 3 cloves garlic, minced - 1 small onion, finely chopped - 1 teaspoon red pepper flakes (adjust to taste) - Zest of 1 lemon - 2 tablespoons fresh lemon juice - 1/4 cup fresh parsley, chopped - Salt and black pepper to taste - Grated Parmesan cheese for serving You can swap some ingredients for different flavors: - Use spaghetti instead of linguini for a twist. - Fresh clams can replace canned clams for a fresher taste. - Any cooking oil can work instead of olive oil. - For a milder dish, leave out the red pepper flakes. - If you don’t have fresh lemons, use bottled lemon juice. Choosing fresh ingredients makes your dish shine: - Look for linguini that is firm and free from cracks. - Choose clams that are tightly closed or slightly gaping. - Select garlic that is firm and has no sprouting. - Pick onions that feel heavy and have dry skins. - Fresh parsley should be bright green and fragrant. Using the right ingredients sets the stage for a tasty meal. Enjoy cooking! To start making your linguini with clam sauce, grab a large pot. Fill it with water and add a generous amount of salt. Bring the water to a boil. Cook the linguini as directed on the package until it's al dente. Remember to save one cup of pasta water before draining the pasta. Next, take a large skillet and heat the olive oil over medium heat. Add the finely chopped onion and sauté for about 3 to 4 minutes. You want the onion to become translucent, not brown. Once the onion is ready, stir in the minced garlic and red pepper flakes. Cook for one more minute until the garlic smells good. Then, pour in the chopped clams along with their juice. Bring the mixture to a simmer and let it cook for about 5 minutes. This step helps the flavors come together nicely. After that, add the lemon zest and lemon juice to the sauce. Mix it well. If the sauce feels too thick, use some of that reserved pasta water to loosen it up. Now, it's time to combine everything. Toss the drained linguini directly into the skillet. Make sure every strand gets coated with the clam sauce. Season with salt and black pepper to taste. Finally, take the skillet off the heat and stir in the chopped parsley for a fresh touch. To get perfect pasta, always use plenty of water and salt. This helps the pasta cook evenly. Stir the pasta while it cooks to prevent sticking. Check the cooking time on the package, but taste it a minute early. You want it firm but not hard. If you want to save time, you can start the sauce while the pasta cooks. This way, everything is ready at the same time. Use a large pot for boiling so the pasta has room to move. The right consistency is key for a great linguini with clam sauce. If your sauce is too thick, add more pasta water gradually. This water is starchy and helps the sauce cling to the pasta. Stir well after adding water to see how it changes. If you find your sauce too runny, let it simmer for a couple of minutes. This will help it thicken. Always remember, the sauce should coat the pasta nicely. Aim for a balance where it’s not too dry or too watery. To boost the flavor of your linguini with clam sauce, use fresh herbs. Fresh parsley adds brightness. You can also try fresh basil or even chives for a twist. Adding lemon zest brightens the dish and gives it a fresh taste. For a richer flavor, consider adding a splash of white wine while cooking. This adds depth and pairs well with clams. To save time, prep your ingredients first. Chop the onion and garlic before you start cooking. You can even use pre-minced garlic for quicker prep. Cook the pasta while you make the sauce. This saves time and keeps everything hot. Another tip is to use a large skillet for the sauce. This allows you to mix in the pasta easily without needing extra pots. When sautéing, heat your skillet before adding oil. This helps the oil spread evenly. Use medium heat to avoid burning garlic and onion. Garlic can turn bitter if it cooks too long. Stir often to ensure everything cooks evenly. If you want a golden color, let the onions cook until they are soft and slightly brown. This adds flavor and sweetness to your sauce. Follow these tips for a delicious and quick meal. For a detailed recipe, check out the [Full Recipe]. {{image_2}} You can switch out clams for other seafood. Shrimp and scallops work well in this dish. Both add a sweet flavor and cook quickly. Just sauté them until pink before adding to the sauce. You can also use mussels. They bring a briny taste and look great on the plate. When choosing any seafood, always pick fresh options for the best taste. If you want a vegetarian dish, skip the clams. You can use mushrooms instead. Sauté sliced mushrooms until they are golden brown. They add a nice umami flavor. Another option is to add artichoke hearts. They provide a meaty texture and pair well with lemon. For added richness, consider adding a splash of vegetable broth in place of clam juice. To change the flavor, try adding white wine. It brings a nice acidity to the dish. Just pour in half a cup after cooking the garlic. Let it simmer for a few minutes. You can also try different herbs. Basil or thyme can add new layers of taste. Don’t forget about nuts! A sprinkle of toasted pine nuts can give a delightful crunch. For a spicy kick, add more red pepper flakes or use fresh chili peppers. To keep your leftover linguini with clam sauce fresh, place it in an airtight container. Make sure to cool the dish to room temperature before sealing it. This helps to avoid moisture buildup. Store it in the fridge and eat it within three days. If you want to keep it longer, consider freezing it instead. When you’re ready to enjoy your leftovers, reheat them gently. Use a skillet over medium heat. Add a splash of olive oil or a bit of reserved pasta water to keep it moist. Stir often to avoid burning. You can also microwave it in a bowl with a damp paper towel on top. Heat in short bursts, stirring in between. You can freeze linguini with clam sauce if you want to save some for later. First, cool it completely. Then, portion it into freezer bags or containers. Remove as much air as possible to prevent freezer burn. Label the bags with the date. This dish can stay in the freezer for up to three months. When you’re ready to eat, thaw it overnight in the fridge before reheating. Yes, you can make this dish ahead. Cook the pasta and sauce earlier in the day. Store them in separate containers in the fridge. When ready to serve, reheat the sauce and toss it with the pasta. This method keeps the linguini from getting soggy. Just remember, fresh pasta tastes best when served right after cooking. Linguini with clam sauce pairs well with many sides. Here are some great options: - A fresh green salad - Garlic bread or toasted baguette - Steamed vegetables like broccoli or asparagus - A light white wine, such as Pinot Grigio These sides enhance the meal's flavors and add a nice touch. To adjust the spice level, simply change the red pepper flakes. For less heat, use less than a teaspoon. For more heat, feel free to add more. You can also try adding black pepper for a different kick. Always taste as you go to find the perfect balance for your palate! You learned about key ingredients, cooking steps, and helpful tips for making Linguini with Clam Sauce. I shared substitutions, storage tips, and how to modify the dish to fit your taste. Remember, the right ingredients and techniques make a big difference. Enjoy exploring variations and impress your friends with your cooking skills. With this knowledge, you can create delicious meals any day. Now, get in the kitchen and let the cooking begin!](https://mysavedrecipe.com/wp-content/uploads/2025/06/1e163adb-c0f7-46b6-b52b-9df8874a6ba4-300x300.webp)
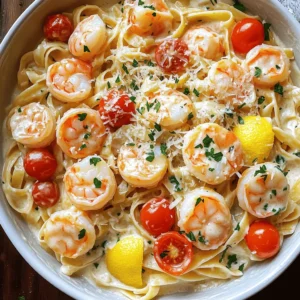
![To make garlic butter baked scallops, you need the following items: - 12 large sea scallops, cleaned - 4 tablespoons unsalted butter, melted - 4 cloves garlic, minced - 1 tablespoon fresh parsley, chopped - 1 tablespoon lemon juice - Zest of 1 lemon - 1/2 teaspoon red pepper flakes (optional) - Salt and black pepper to taste - Breadcrumbs for topping (optional) These ingredients create a rich and flavorful dish that tastes gourmet. When choosing scallops, freshness is key. Here’s how to select the best: - Look for scallops that are firm and slightly moist. - They should have a sweet, briny smell, not a fishy one. - If possible, buy scallops on the same day you plan to cook them. - Store scallops in the fridge and use them within a day or two. Keeping scallops fresh helps ensure the best taste and texture. You can customize your garlic butter baked scallops with these extras: - A dash of white wine for added depth. - Parmesan cheese for a rich, cheesy topping. - Fresh herbs like thyme or basil for extra flavor. - A squeeze of orange juice for a citrus twist. These optional ingredients can elevate your dish and suit your tastes. For the full recipe, check out the detailed cooking steps. First, preheat your oven to 375°F (190°C). This step warms up the oven for even cooking. Next, take your scallops and pat them dry with a paper towel. Removing moisture helps them sear nicely. Arrange the scallops in a single layer in a baking dish. Make sure they have space around them. This allows for even cooking and great flavor absorption. Now it’s time to make the garlic butter sauce. In a small bowl, combine 4 tablespoons of melted butter with 4 cloves of minced garlic. Add in 1 tablespoon of fresh chopped parsley and 1 tablespoon of lemon juice. For extra flavor, include the zest of one lemon. If you like a bit of heat, mix in 1/2 teaspoon of red pepper flakes. Season with a pinch of salt and black pepper. Stir everything together until it looks like a tasty sauce. With your scallops arranged and sauce ready, pour the garlic butter mixture over them. Ensure each scallop gets a nice coating. If you want a crunchy topping, sprinkle breadcrumbs on top. Place the baking dish in the preheated oven. Bake for 12 to 15 minutes. The scallops should turn opaque and tender. For a golden crust, switch to broil for the last 2 to 3 minutes. Keep an eye on them to avoid burning. Once done, let them cool slightly before serving. You can garnish with more parsley and lemon wedges for a bright touch. This step adds a nice presentation to your dish. For the full recipe, see above. When cooking scallops, I focus on a few key points. Always start with dry scallops. Wet scallops do not sear well. Pat them dry using a paper towel before cooking. This helps achieve a nice, golden crust. Cook them on high heat for a short time. This keeps them tender and flavorful. Choose scallops that are fresh and firm. Look for a sweet smell, not a fishy odor. Fresh scallops should have a glossy look. If you’re at a market, ask for "dry" scallops. These scallops are not treated with preservatives. They taste better and cook more evenly. To boost flavor, consider adding fresh herbs. Basil, thyme, or dill work well with scallops. A pinch of paprika or cayenne pepper can add a kick. You might like to use a splash of white wine for depth. Mix these in your garlic butter sauce for added taste. For the full recipe, check out the details above. {{image_2}} You can cook scallops in many ways. Grilling adds a smoky flavor. Just brush them with garlic butter and grill for about 2-3 minutes on each side. Sautéing is also easy. Heat some butter in a pan, add scallops, and cook for 2-4 minutes. Both methods keep the scallops tender and flavorful. You can change some ingredients to fit dietary needs. Use olive oil instead of butter for a dairy-free option. If you want less salt, try using low-sodium butter. You can swap out parsley for fresh basil or cilantro for a different taste. These swaps keep the dish tasty while meeting your needs. Garlic butter baked scallops pair well with many sides. Try serving them with a fresh salad or steamed veggies. A light pasta dish also complements the scallops nicely. For drinks, a crisp white wine enhances the flavors. You can check the Full Recipe for more ideas on how to enjoy this meal. After cooking, let the scallops cool down. Place them in an airtight container. This keeps them fresh. Store the container in the fridge. Use the leftovers within two days for best taste. If you want to keep them longer, consider freezing. To reheat, use the oven for the best results. Preheat your oven to 350°F (175°C). Place the scallops in a baking dish. Add a little butter or olive oil to keep them moist. Cover with foil to retain heat. Bake for about 10 minutes. Check to make sure they are warmed through. If you want to freeze scallops, do it right after cooking. Let them cool first. Then, wrap each scallop in plastic wrap. Place them in a freezer bag. Try to remove as much air as possible. This helps prevent freezer burn. Use frozen scallops within three months for the best flavor. Scallops are fully cooked when they turn opaque and firm. You can check by cutting one in half. If it looks white and not translucent, it’s ready. Cooking time is about 12-15 minutes at 375°F (190°C). If you want a nice crust, broil them for the last few minutes. This gives them a lovely golden top. Yes, you can use frozen scallops! Just be sure to thaw them first. Place them in the fridge overnight or run them under cold water. Pat them dry before cooking. This step helps the garlic butter stick better and keeps them from getting watery. Thawed scallops work very well in this dish. Garlic butter baked scallops pair well with many sides. I recommend serving them with a fresh green salad or roasted vegetables. You can also serve them over a bed of creamy risotto or pasta. A slice of crusty bread is great for dipping in the tasty garlic butter. For a refreshing touch, add a glass of white wine or lemon water. For the full recipe and more details, check the [Full Recipe]. In this article, we discussed how to make garlic butter baked scallops. We covered the main ingredients, giving tips for maximum freshness. I shared step-by-step baking instructions, along with best practices for cooking scallops. We explored variations, storage tips, and common questions. Remember, cooking scallops can be simple and tasty. Use fresh seafood and follow these tips. Enjoy your meal and impress your guests with this dish!](https://mysavedrecipe.com/wp-content/uploads/2025/06/2584ee2d-ac61-4066-9ff8-95936299039c-300x300.webp)
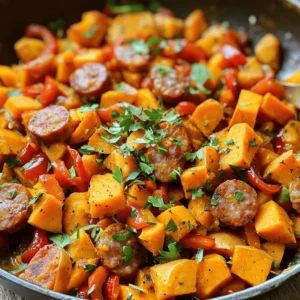
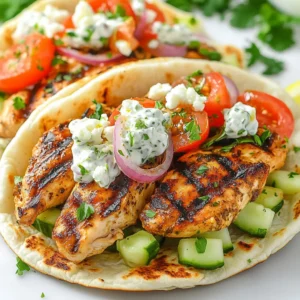
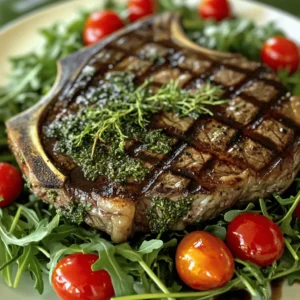
![- 1 cup pitted Medjool dates, chopped - 1/4 cup unsalted butter, softened - 3/4 cup brown sugar - 1 cup heavy cream Sticky toffee pudding shines with its key ingredients. The pitted Medjool dates add natural sweetness and a rich texture. Unsalted butter gives a creamy base, while brown sugar enhances the deep flavors. Heavy cream creates the sticky toffee sauce that makes this dessert truly special. - 1/2 cup chopped walnuts - 1 teaspoon vanilla extract Adding chopped walnuts brings a nice crunch and flavor contrast. A splash of vanilla extract enhances the overall taste. These options make your pudding even more delightful. - Vegan replacements: Use coconut oil instead of butter and almond milk for cream. - Gluten-free alternatives: Substitute all-purpose flour with a gluten-free blend. If you follow a vegan diet, swap in coconut oil and almond milk. For gluten-free needs, a good blend of gluten-free flour works well. These substitutes keep the dessert tasty while fitting your diet. 1. Prepping the oven and baking dish Start by preheating your oven to 350°F (175°C). This helps your pudding bake evenly. Grease an 8-inch square baking dish with butter. If you prefer, you can use individual ramekins. This way, everyone gets their own serving. 2. Soaking the dates In a bowl, chop the pitted Medjool dates. Add baking soda to the bowl. Pour in one cup of boiling water. Let the dates soak for about 10 minutes. This softens the dates, making them sweeter and easier to mix into the batter. 1. Creaming the butter and sugar In a big bowl, take 1/4 cup of softened unsalted butter. Add 3/4 cup of brown sugar. Use a mixer or a spoon to cream them together. Mix until the mixture is light and fluffy. This makes your pudding soft and rich. 2. Incorporating the dry ingredients Next, crack one large egg into the butter mixture. Add 1 teaspoon of vanilla extract. Mix well until everything is combined. Gradually add 1 cup of all-purpose flour, 1 teaspoon of baking powder, and 1/2 teaspoon of salt. Stir until just combined. Don’t overmix! Then, fold in the soaked dates and any chopped walnuts if you like. 1. Ingredients for the sauce You will need 1 cup of heavy cream and 1/2 cup of brown sugar. This sauce is what makes the pudding sticky and sweet. 2. Cooking the sauce to perfection In a saucepan, combine the heavy cream and brown sugar. Heat over medium heat. Stir until the sugar dissolves and the mixture starts to simmer. Let it cook for 2-3 more minutes. This will create a rich, smooth sauce that you can drizzle over the pudding. Now that you have all the steps, you are ready to bake your delicious sticky toffee pudding. Enjoy every bite of this warm dessert delight! For more details, check the Full Recipe. To make the best sticky toffee pudding, getting the baking time right is key. Bake it for 25 to 30 minutes at 350°F (175°C). Check for doneness by inserting a toothpick in the center. If it comes out clean, your pudding is ready. If it has batter stuck to it, give it a few more minutes. Presentation can elevate your pudding. Serve it warm in individual ramekins or slice it into squares. Drizzle warm sticky toffee sauce over the top. For a special touch, add a dollop of whipped cream or a scoop of vanilla ice cream. Fresh mint leaves can also make it look vibrant. Overmixing the batter can make your pudding tough. Mix just until combined. Also, don’t skimp on soaking the dates. They need at least 10 minutes in boiling water to soften fully. This step is crucial for the best flavor and texture in your pudding. {{image_2}} To make a vegan sticky toffee pudding, you need a few simple changes. Replace the egg with a flax egg. To make a flax egg, mix one tablespoon of ground flaxseed with three tablespoons of water. Let it sit for a few minutes to thicken. Use plant-based butter instead of regular butter. This keeps the texture smooth and rich. For texture and flavor, try using almond milk or coconut milk. These can add a nice creaminess to your pudding. You can also sweeten it with maple syrup for extra flavor. Gluten-free sticky toffee pudding is easy with the right flour. Use almond flour or gluten-free all-purpose flour. Both options work well and keep the pudding moist. Almond flour adds a nutty taste that pairs nicely with the dates. To ensure it does not affect the taste, mix the gluten-free flour with a bit of tapioca starch. This helps keep the pudding light and fluffy. You will still enjoy the same great flavor as the classic version. You can make your sticky toffee pudding even more exciting by adding fun flavors. Try adding a teaspoon of cinnamon or nutmeg for warmth. These spices can brighten the dish and make it unique. If you want a chocolate twist, fold in some chocolate chips. Dark chocolate works best, but you can use milk chocolate if you prefer. Adding fruits like chopped apples or pears can also give you a delightful surprise in each bite. To keep your sticky toffee pudding fresh, store it in the fridge. Use an airtight container to prevent it from drying out. If you want to save it longer, freeze it. Wrap it tightly in plastic wrap and then place it in a freezer bag. This method helps keep its taste and texture intact. To reheat, take it out of the fridge or freezer. If frozen, let it thaw in the fridge overnight. Then, warm it in the oven at 350°F (175°C) for about 10-15 minutes. For a quick option, microwave it for about 30 seconds or until heated through. Sticky toffee pudding lasts for about 3-4 days in the fridge. In the freezer, it can stay fresh for up to 3 months. Be sure to check for any signs of freezer burn or off smells before eating. Always trust your senses! If you plan a gathering, making sticky toffee pudding in advance is smart. You can bake it a day before and store it in the fridge. This way, you save time on the day of your event. For serving, cut it into portions before you store it. This makes it easy to grab and serve. Aim for 1-2 servings per person, depending on how sweet your guests like their dessert. Sticky toffee pudding is a rich dessert from England. It is made from moist sponge cake, dates, and a sweet toffee sauce. This treat dates back to the 20th century, with roots in the Lake District. Some say it was created by a hotel in the 1960s. Its warm, gooey texture makes it a favorite among many. Yes, you can make sticky toffee pudding in advance. I recommend baking it a day before serving. Let it cool completely and store it in the fridge. When ready to serve, gently reheat it in the oven. This keeps the cake moist and enhances the flavors. The toffee sauce can also be made ahead and warmed up later. You can find amazing sticky toffee pudding at many restaurants. In London, try The Ivy or Rules. If you prefer a homemade version, consider making it yourself using the [Full Recipe]. This recipe guides you through each step, ensuring a perfect dessert. Enjoy the satisfaction of creating this classic treat at home! Sticky toffee pudding is a delightful treat with rich flavors and a warm texture. I covered key ingredients, like Medjool dates and brown sugar, that make this dessert special. You can enhance it with optional items like walnuts or vanilla. I also shared tips for perfecting your pudding, avoiding common mistakes, and exploring variations for different diets. In the end, everyone can enjoy this dessert through simple swaps and thoughtful preparation. Whether you keep it classic or try something new, you now have all the tools to create your sticky toffee pudding masterpiece.](https://mysavedrecipe.com/wp-content/uploads/2025/06/af1904da-cbb1-406e-b4dd-e578bf33d55d-300x300.webp)
![- 1.5 pounds baby potatoes, halved - 4 tablespoons unsalted butter - 4 cloves garlic, minced - 1 cup heavy cream - 1/2 cup grated Parmesan cheese Baby potatoes are small and tender. They cook fast and hold flavor well. I love using unsalted butter for a rich base. Garlic adds a strong, tasty punch. Heavy cream makes the sauce smooth and rich. Parmesan cheese brings a salty, nutty flavor that ties everything together. - Salt and pepper - 1 tablespoon fresh parsley, chopped - Optional: a pinch of red pepper flakes for heat Seasoning is key to a great dish. Salt and pepper enhance all the flavors. Fresh parsley adds a pop of color and freshness. If you like a bit of heat, add red pepper flakes. They give a little kick to the creamy garlic sauce. For the Full Recipe, check out the detailed steps to bring these ingredients together. First, you need to clean the baby potatoes. Rinse them well under cold water. Look for dirt and grime. After washing, cut each potato in half. This helps them cook faster and soak up the sauce. Next, put the halved potatoes in a large pot. Fill it with salted water and bring it to a boil. Let them boil for about 15 to 20 minutes. You want them to be fork-tender. To check, poke one with a fork. If it goes in easily, they are ready. Once done, drain the potatoes and set them aside. Now, let’s make the sauce. In a large skillet, melt the unsalted butter over medium heat. Once it melts, add the minced garlic. Sauté for about 1 to 2 minutes. You want the garlic to be fragrant but not brown. After that, lower the heat. Pour in the heavy cream slowly while stirring. This keeps the sauce smooth. Gradually add the grated Parmesan cheese. Stir until it melts completely. The sauce should be thick and creamy now. It’s time to bring everything together. Add the cooked potatoes to the skillet. Gently fold them into the creamy garlic sauce. Make sure each potato is well-coated. Now, add salt and pepper to taste. If you like a bit of heat, sprinkle in a pinch of red pepper flakes. Let the mixture heat on low for about 5 minutes. Stir occasionally to mix the flavors well. For those looking for the complete process, check out the Full Recipe. How to Avoid Burnt Garlic To keep garlic from burning, cook it on low heat. High heat makes garlic brown too fast. I suggest adding garlic after melting the butter. Stir it for just one to two minutes. You want it fragrant, not dark. If it burns, the sauce will taste bitter. Achieving the Right Creaminess The key to a creamy sauce is the heavy cream. Pour it in slowly and stir. Adding Parmesan cheese helps too. It melts and thickens the sauce. For extra creaminess, try adding a bit more cream. Just watch the heat to keep it smooth. Best Methods for Boiling Potatoes Start with cold water when boiling potatoes. This helps them cook evenly. Salt the water to enhance flavor. Boil the potatoes until fork-tender, about 15-20 minutes. Drain them well to avoid a watery sauce. Choosing the Right Potato Varieties Baby potatoes are perfect for this dish. They are creamy and tender. You can use red or yellow varieties. They hold their shape well and taste great with garlic sauce. Avoid starchy potatoes like russets; they can become too mushy. For the full recipe, check out the [Full Recipe]. {{image_2}} You can make creamy garlic sauce potatoes even better by adding fresh herbs. Thyme and rosemary add depth to the dish. Just chop a small amount and stir it into the sauce. You can also incorporate other vegetables. Try adding spinach or broccoli for color and nutrition. These veggies blend well with the creamy sauce and add a nice crunch. If you want to mix things up, consider using milk or sour cream. Milk creates a lighter sauce, while sour cream adds tang. Both options keep the dish creamy and rich. For those avoiding dairy, there are great dairy-free substitutes. Use almond milk or coconut cream for a creamy texture. These alternatives work well and keep the flavors intact. For the full recipe, check out the detailed instructions! To keep your creamy garlic sauce potatoes fresh, follow these tips: - Refrigeration Tips: Allow the potatoes to cool down. Place them in an airtight container. They can last about three to five days in the fridge. If you plan to eat them later, do not mix in the sauce. Store the sauce separately to keep flavors fresh. - Freezing Creamy Garlic Sauce Potatoes: You can freeze these potatoes, but the texture may change. Let them cool completely before freezing. Use a freezer-safe container or bag. They can last up to three months in the freezer. When ready to eat, thaw in the fridge overnight. For the best taste and texture when reheating, use these methods: - Best Methods to Reheat Without Drying Out: The oven or stovetop works best. If using the oven, preheat it to 350°F (175°C). Place the potatoes in a baking dish, cover with foil, and heat for about 15-20 minutes. Stir halfway through to keep them moist. If using the stovetop, place the potatoes in a skillet over low heat. Add a splash of cream or water to prevent drying. Stir gently until heated through. Enjoy your creamy garlic sauce potatoes just as they were made! Creamy garlic sauce potatoes can last about 3 to 5 days in the fridge. To store them, place the potatoes in an airtight container. This keeps them fresh and tasty. If you want to keep them longer, consider freezing them. However, the texture may change slightly after thawing. Yes, you can make creamy garlic sauce potatoes ahead of time. Prepare the dish as per the recipe and let it cool before storing it in the fridge. When ready to serve, reheat it gently on the stove. Add a splash of cream to keep it creamy and smooth. Creamy garlic sauce potatoes pair well with many dishes. Try serving them with grilled chicken, a fresh salad, or roasted vegetables. They also go well with steak or fish. For a complete meal, add a nice crusty bread to soak up the sauce. For the full recipe, check out the Creamy Garlic Sauce Potatoes section above. You will find all the ingredients and steps needed to create this delightful dish. This blog post covered a delicious recipe for creamy garlic sauce potatoes. We discussed key ingredients like baby potatoes, butter, and garlic, and how to make a rich sauce. I provided tips for cooking and storing these tasty potatoes. As you try this recipe, don't hesitate to customize it with your favorite herbs or veggies. Enjoy every creamy bite, and share it with friends for a delightful meal together!](https://mysavedrecipe.com/wp-content/uploads/2025/06/4c91e82c-2c92-4253-a175-4fc0c4d23db3-300x300.webp)
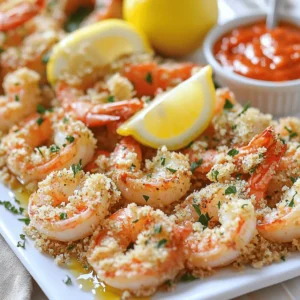
![For my slow cooker birria tacos, I need just a few key items. Here’s what you will gather: - 2 lbs beef chuck roast, cut into chunks - 4 dried guajillo chiles, stems and seeds removed - 2 dried ancho chiles, stems and seeds removed - 1 onion, quartered - 4 cloves garlic - 4 cups beef broth - Corn tortillas The beef chuck roast gives a rich flavor. The guajillo and ancho chiles add depth and spice. Now, let’s spice things up! These are the spices I use: - 2 teaspoons ground cumin - 1 teaspoon dried oregano - 1 teaspoon paprika - Salt and pepper, to taste These spices help create warmth and complexity in the dish. They balance the rich beef and chiles. To finish off the tacos, I suggest these fresh garnishes: - Fresh cilantro, chopped - Diced onion - Lime wedges, for serving The cilantro adds a burst of freshness. Diced onion offers crunch, and lime brings brightness. Together, they elevate the whole dish. Check out the Full Recipe for a delicious journey! Start by toasting the dried guajillo and ancho chiles. Use a dry skillet over medium heat. Toast them for about 2-3 minutes. Flip them often so they brown evenly. You want them fragrant but not burnt. Once they smell great, take them off the heat and let them cool. After cooling, put the chiles in a blender. Add the quartered onion, garlic, ground cumin, oregano, and paprika. Pour in one cup of beef broth. Blend until smooth. If the mix is too thick, add more broth a little at a time. You want a sauce-like consistency that is rich in flavor. Now, it’s time for the beef. Put the chunks of beef chuck roast in your slow cooker. Season them well with salt and pepper. Pour the blended sauce over the beef. Add the rest of the beef broth into the pot. Stir it gently to coat the beef with the sauce. After cooking for eight hours, check if the beef is ready. It should be tender and easy to shred. Take the beef out of the slow cooker. Use two forks to shred it into bite-sized pieces. Then, mix the shredded beef back into the sauce in the slow cooker. To make the tacos, warm the corn tortillas in a hot skillet. Just a few seconds on each side will do. Take a tortilla and spoon in some of the beef and sauce mixture. Top it with chopped cilantro and diced onion for extra flavor. Serve with lime wedges on the side to squeeze over the tacos. Enjoy the burst of flavors in every bite! For the complete recipe, check [Full Recipe]. To get real birria flavors, use dried chiles. Guajillo and ancho give deep taste. Toast them gently to bring out their oils. This step is key; it boosts flavor. Blend the chiles well with onion and garlic. This mix forms a rich sauce that coats the beef. Don't skip this part; it makes your tacos shine. Slow cooking is simple and rewarding. Use beef chuck roast for tender meat. Cut it into chunks for even cooking. Season the beef well with salt and pepper before adding sauce. Keep the slow cooker on low heat for eight hours. This slow process breaks down the meat, making it easy to shred. Stir the beef in the sauce before serving. This keeps every bite juicy and flavorful. Birria tacos shine with fresh toppings. I love cilantro and diced onion for crunch. A squeeze of lime adds brightness, too. You can serve these tacos with a side of rice or beans. They soak up the flavors well. Try pairing them with a cold drink, like agua fresca or beer. These sides balance the rich taste of the tacos. For more ideas, check the full recipe. {{image_2}} You can use many types of meat for birria. Beef is popular, but lamb or goat adds a nice twist. Each meat brings a unique flavor. For a richer taste, try short ribs or brisket. These cuts have more fat, making them juicy and tender. The cooking time may change, so keep an eye on it. If you want a plant-based option, you can use mushrooms. They have a great texture and absorb flavors well. Jackfruit is another awesome choice. It shreds easily and gives a meat-like quality. Use vegetable broth instead of beef broth for the sauce. Add spices and herbs to make it flavorful. Birria varies by region in Mexico. In Jalisco, they serve it with a broth for dipping. In Tijuana, they add cheese for a gooey, tasty bite. Each version shows local flavors and traditions. Try different toppings, like avocado or salsa verde, to mix it up. You can find many ways to enjoy birria tacos. Check out the Full Recipe for more ideas! After enjoying your birria tacos, you might have some left over. To store them, place the beef and sauce in an airtight container. Make sure to cool it first. You can keep it in the fridge for up to 4 days. For the tortillas, wrap them in foil or keep them separate in a bag. This helps keep them soft. When you’re ready to eat again, reheating is easy. You can use a microwave or a skillet. If using a microwave, place the beef in a bowl and cover it. Heat for 1-2 minutes or until hot. If using a skillet, place the beef in the pan and heat on medium until warmed through. For the tortillas, warm them in the skillet for a few seconds on each side. This keeps them nice and soft. If you want to save some for later, freezing is a great option. Let the beef and sauce cool completely, then place them in a freezer-safe container. It can last for up to 3 months in the freezer. When you're ready to eat, thaw it in the fridge overnight. Reheat it as mentioned above. You’ll have a delicious meal ready to enjoy again. Check the [Full Recipe] for all the details on making this tasty dish! Birria tacos are a tasty Mexican dish. They consist of soft corn tortillas filled with tender, spiced meat. The meat is usually beef, but you can also find it made with goat or lamb. The beef is cooked low and slow in a rich broth with dried chiles and spices. This gives it a deep, savory flavor. People often serve them with broth for dipping. Yes, you can use other cooking methods. If you don’t have a slow cooker, try a Dutch oven. Cook on low heat for about three hours. You can also use a pressure cooker. This will cut down the cooking time to about one hour. Both methods will still give you delicious flavors. I love serving birria tacos with a few sides. Here are some great options: - Mexican rice - Refried beans - Fresh salad - Pickled onions - Sliced avocado These sides add color and flavor to your meal. To make birria tacos milder, remove some chiles. You can use just one guajillo chile or skip the ancho chiles. If you like more heat, add a pinch of cayenne pepper or fresh jalapeños. Taste as you go to find the right balance. You can prepare most of the recipe ahead of time. Make the sauce and cook the meat a day before. Store them in the fridge overnight. When ready to serve, just warm them up and assemble the tacos. This saves time and makes your meal stress-free. For the full recipe, check out the earlier sections. Slow cooker birria tacos are a delicious treat. We covered the key ingredients, from chiles to spices. You now know how to prepare the meat and assemble tasty tacos. We also shared tips for authentic flavors and storage advice. Don’t forget to explore different meat options or even go vegan. These tacos are flexible! With the right steps, you can enjoy a fantastic meal. Dive in and try making them yourself. You won’t regret it!](https://mysavedrecipe.com/wp-content/uploads/2025/06/327fc283-f7d4-4c99-80bd-f49c1975ee3e-300x300.webp)