
- Cinnamon Roll Pancakes Irresistible Morning Treat
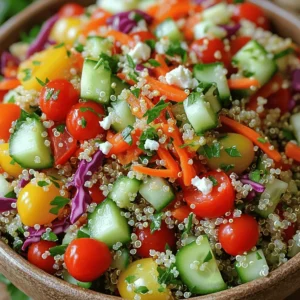
- Rainbow Veggie Quinoa Salad Fresh and Flavorful Dish
- S'mores Dip with Chocolate and Marshmallows Delight
- Stuffed Bell Peppers with Quinoa Flavorful Recipe
- Chocolate Avocado Pudding Creamy and Healthy Delight
- Honey Butter Biscuits Delicious and Simple Recipe
- Savory Apple Cinnamon Overnight Oats Easy Recipe
- Nutella Stuffed Pancakes Irresistible and Fluffy Delight
- Creamy Spinach Artichoke Dip Irresistibly Cheesy Treat
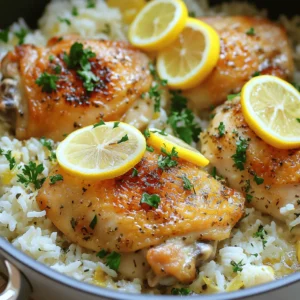
- One-Pan Lemon Herb Chicken and Rice Easy Recipe
- No-Bake Chocolate Oatmeal Cookies Easy and Quick Treat
- Crispy Air Fryer Brussels Sprouts Simple and Tasty
- S'mores Dip in the Oven Easy and Fun Dessert Recipe
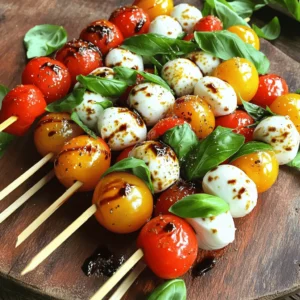
- Easy Caprese Salad Skewers Tasty and Fun Appetizer
- Mouthwatering Tacos Al Pastor Flavorful and Easy Recipe
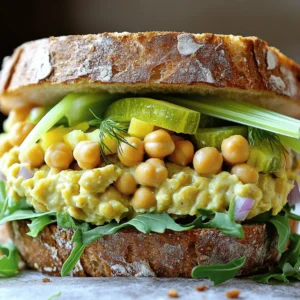
- Vegan Chickpea Salad Sandwich Healthy and Tasty Meal
- Vegetable Stir-Fry with Tofu Quick and Flavorful Meal
- Mediterranean Quinoa Bowl Fresh and Healthy Delight
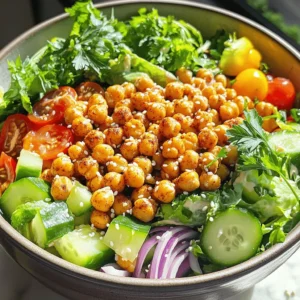
- Crispy Chickpea Salad Fresh and Flavorful Dish
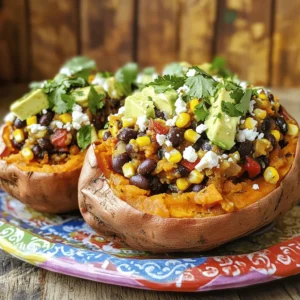
- Savory Stuffed Sweet Potatoes Flavorful and Easy Meal
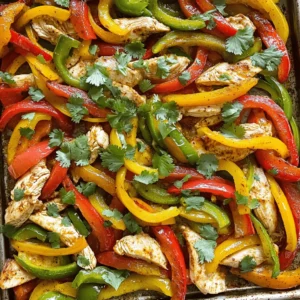
- Sheet Pan Fajitas Simple and Flavorful Dinner
- Honey Garlic Butter Shrimp Tasty and Quick Meal
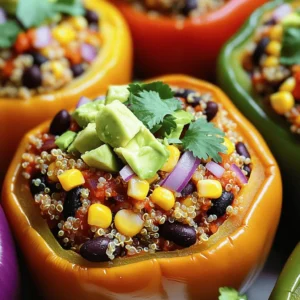
- Vegan Stuffed Bell Peppers Fast and Flavorful Meal
- Mango Salsa Chicken Flavorful Grilled Dinner Delight
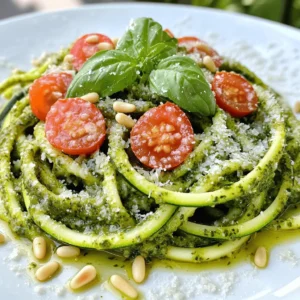
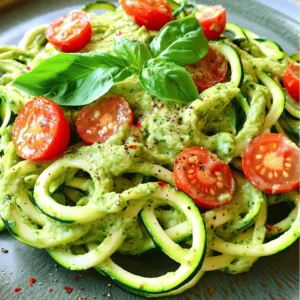
- Zucchini Noodles with Pesto Simple Fresh Delight
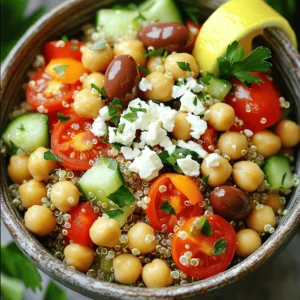
- Mediterranean Chickpea Salad Nourishing and Quick Dish
- Savory Herb Cornbread Muffins Irresistible Recipe Guide
- Mango Salsa Chicken Flavorful and Fresh Grilled Dish
- Chocolate Chip Cookie Skillet Easy and Delicious Treat
- Garlic Butter Shrimp Tacos Flavorful and Easy Meal
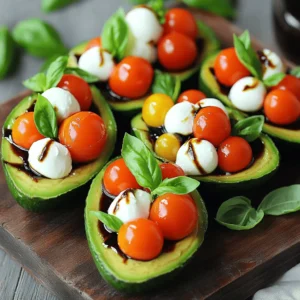
- Caprese Stuffed Avocados Fresh and Flavorful Meal
- Zucchini Noodles with Pesto Flavorful and Healthy Dish
- Crispy Baked Chicken Wings Simple and Flavorful Recipe
- Peach Cobbler Dump Cake Delicious and Easy Dessert
- Vegan Quinoa Stuffed Peppers Flavorful and Nutritious
- Sriracha Honey Cauliflower Bites Crispy and Flavorful
- Oven-Baked Taco Bites Delicious and Easy Snack Recipe
- Crispy Chickpea Tacos Flavorful and Satisfying Meal
- Zucchini Noodles with Pesto Quick and Tasty Recipe
- Chocolate Avocado Mousse Rich and Creamy Delight
- Honey Garlic Shrimp Skewers Quick and Tasty Recipe
- Peach Cobbler Dump Cake Simple and Tasty Delight
![To make delicious cinnamon roll pancakes, you need some pantry staples. Here’s what you need: - 1 cup all-purpose flour - 2 tablespoons granulated sugar - 1 teaspoon baking powder - 1/2 teaspoon baking soda - 1/2 teaspoon salt - 1 cup buttermilk (or 1 cup milk + 1 tablespoon vinegar) - 1 large egg - 2 tablespoons unsalted butter, melted For the cinnamon filling, gather these optional ingredients: - 2 tablespoons ground cinnamon - 1/4 cup brown sugar To top your pancakes, use these recommended ingredients for icing: - 1/4 cup cream cheese, softened - 1/2 cup powdered sugar - 1 tablespoon milk (for icing) - 1 teaspoon vanilla extract These ingredients come together to create a warm, sweet, and creamy breakfast treat. You can find the full recipe above to guide you through the process of making these tasty pancakes. Enjoy! To start, we need to prep our dry ingredients. In a big bowl, mix together: - 1 cup all-purpose flour - 2 tablespoons granulated sugar - 1 teaspoon baking powder - 1/2 teaspoon baking soda - 1/2 teaspoon salt Whisk them until they blend well. This step is key for fluffy pancakes. Next, let's combine our wet ingredients. Grab another bowl and mix: - 1 cup buttermilk (or 1 cup milk + 1 tablespoon vinegar) - 1 large egg - 2 tablespoons unsalted butter, melted Stir these together until they're smooth. Pour the wet mix into the dry mix. Stir gently. Don’t overmix; a few lumps are okay. Now, we make the cinnamon-brown sugar mixture. In a small bowl, mix: - 2 tablespoons ground cinnamon - 1/4 cup brown sugar This mix will add a sweet swirl to your pancakes. For cooking, the right heat is crucial. Heat your non-stick skillet or griddle over medium heat. Lightly grease it with butter or oil to prevent sticking. Pour about 1/4 cup of batter onto the skillet. Before it sets, sprinkle a teaspoon of the cinnamon-brown sugar mix on top. This creates that delicious cinnamon roll swirl. When you see bubbles form on the surface, it’s time to flip the pancake. Cook for another 1-2 minutes until it's golden brown. This ensures even cooking on both sides. Repeat with the rest of the batter. Now, let’s make the icing to top off our pancakes. You’ll need: - 1/4 cup cream cheese, softened - 1/2 cup powdered sugar - 1 tablespoon milk - 1 teaspoon vanilla extract In a small bowl, mix these ingredients until smooth. You want a creamy texture for drizzling. For a nice presentation, use a spoon to drizzle the icing over the stacked pancakes. This will make your dish look as good as it tastes. Enjoy your cinnamon roll pancakes! For the complete recipe, check out the Full Recipe. To make your pancakes fluffy, start by using fresh baking powder. Old baking powder can ruin your rise. Measure your ingredients accurately. A little too much flour can make pancakes dense. Mix wet and dry ingredients separately first. Then, combine them gently. Overmixing leads to tough pancakes. Just stir until you see a few lumps. One big mistake is overmixing the batter. This can make your pancakes chewy instead of fluffy. Another common issue is burning the pancakes. Keep your heat at medium, and check regularly. If the edges brown too fast, turn down the heat. A non-stick skillet helps prevent sticking and burning. For the icing, start with cream cheese and powdered sugar. If it's too sweet, add a bit more milk to balance it. You can also try yogurt or maple syrup for a twist. Drizzle your icing over warm pancakes for the best effect. A light hand with the icing makes for a beautiful presentation. {{image_2}} You can easily boost the flavor of your cinnamon roll pancakes. Adding a splash of vanilla makes them taste richer. Try mixing in a pinch of nutmeg for a warm spice kick. Fruits also work great. Thinly sliced apples add sweetness and texture. Bananas bring a soft and creamy element. Both options make your pancakes extra special. If you need a gluten-free version, swap the all-purpose flour for gluten-free flour. Many blends work well, so pick one you like. This simple change keeps the taste while being friendly for those with gluten sensitivities. Consider other dietary needs too. You can use dairy-free milk instead of buttermilk for a vegan option. This way, everyone can enjoy these delicious pancakes. When it comes to toppings, the sky's the limit! Chopped nuts add crunch and flavor. Fresh berries like strawberries or blueberries can brighten up your plate. Don’t forget about syrups! Maple syrup is a classic choice, but other flavors can shine too. Try caramel or chocolate syrup for a sweet twist. Each of these ideas can make your breakfast even more fun and inviting. For the full recipe, check out the [Full Recipe]. To keep your cinnamon roll pancakes fresh, let them cool completely at room temperature. Place them in an airtight container. This keeps the moisture in. You can also use plastic wrap to cover them tightly. Store the container in the fridge for up to three days. When you're ready to enjoy leftovers, reheat them in a non-stick skillet over low heat. This warms them gently and keeps them soft. You can also use a microwave, but cover the pancakes with a damp paper towel. This prevents them from drying out. If you're serving a crowd, keep the pancakes warm in a low oven while you finish cooking. To freeze pancakes, stack them with parchment paper between each one. This stops them from sticking together. Place the stack in a freezer bag or a tight container. They last for up to two months. When you're ready to eat, thaw them in the fridge overnight. Reheat as mentioned before, and enjoy your tasty treat again! For a full experience, check out the full recipe. Yes, you can make these pancakes ahead. To prepare, cook the pancakes and let them cool. Place the pancakes in a single layer, separated by parchment paper, in an airtight container. Store them in the fridge for up to three days. If you want to keep them longer, freeze the pancakes for up to three months. To reheat, just pop them in the toaster or microwave until warm. This way, you have a tasty breakfast ready in no time! If you don’t have buttermilk, you can easily replace it. Mix one cup of milk with one tablespoon of vinegar or lemon juice. Let it sit for five minutes, and it will thicken. You can also use plain yogurt or sour cream, thinning them with a bit of water or milk. These substitutes work well in the recipe and keep the pancakes tasty and fluffy. To make the pancakes vegan, swap the egg for one tablespoon of ground flaxseed mixed with three tablespoons of water. Let it sit for five minutes to thicken. Use plant-based milk, like almond or soy, instead of buttermilk. Replace the melted butter with coconut oil or a vegan butter substitute. These changes keep the flavor rich and the texture light. Yes, there is a big difference! Regular pancakes are light and fluffy. They have a simple taste. On the other hand, cinnamon roll pancakes have a swirl of cinnamon and sugar in the batter. This gives them a sweet, warm flavor. The texture is slightly denser, richer, and more indulgent, making them a special treat. You’ll enjoy the sweet icing drizzled on top, which adds even more flavor! You learned how to make delicious cinnamon roll pancakes from scratch. We covered essential ingredients, step-by-step cooking, and tips for perfect results. Variations, storage, and common questions helped you gain confidence in the kitchen. Remember, measure well, and don’t rush the cooking. The right heat is key to fluffy pancakes. Experiment with flavors and have fun serving them. Enjoy these pancakes with your favorite toppings or as a cozy treat any time. Happy cooking!](https://mysavedrecipe.com/wp-content/uploads/2025/05/15d49b2f-1417-4d84-9e18-0f72e1961af0-300x300.webp)


![To make apple cinnamon overnight oats, you need simple and fresh ingredients. Here’s what you’ll need: - 1 cup rolled oats - 1 cup almond milk (or any milk of your choice) - 1 medium apple, diced (preferably Granny Smith for tartness) - 1/2 teaspoon ground cinnamon - 1 tablespoon maple syrup (or honey if preferred) - 1/4 cup Greek yogurt (or a plant-based alternative) - 1 tablespoon chia seeds - A pinch of salt These ingredients work together to create a creamy and flavorful dish. The oats soak up the milk and flavors overnight, making them soft and tasty. The apple adds a nice crunch, while cinnamon gives warmth. Adding toppings can make your overnight oats even more special. Try these options: - Sliced almonds - Additional diced apples - A drizzle of almond butter These toppings not only add flavor but also give extra texture. You can mix and match to find your favorite combo. If you want to change things up, here are some substitutions you can use: - For rolled oats, you can use quick oats, but they will be softer. - Swap almond milk for cow's milk, soy milk, or oat milk. - Use any apple variety that you like. Sweet apples work well, too. - If you don’t have Greek yogurt, any yogurt will do. These swaps can help you customize the recipe based on what you have at home. Remember, flexibility is key in cooking! For the full recipe, check out the detailed guide provided above. To make apple cinnamon overnight oats, start by gathering your ingredients. You need rolled oats, almond milk, diced apples, ground cinnamon, maple syrup, Greek yogurt, chia seeds, and a pinch of salt. In a medium bowl, mix the rolled oats with almond milk. Add in the maple syrup, chia seeds, and salt. Stir well. This helps the oats soak up the milk. Next, add the diced apple and ground cinnamon. Make sure to mix gently so everything combines. This will spread the apple and cinnamon flavor throughout. Now, it’s time to divide the mixture. Spoon it into two mason jars or storage containers. Fill each jar about three-quarters full. This gives the oats space to expand. Then, add a layer of Greek yogurt on top. This makes the oats creamy and adds protein. Cover the jars with lids and place them in the fridge. Let them chill overnight, or for at least four hours. This soaking time is key for soft oats. Layering is important for both flavor and texture. Start with the oat mixture at the bottom of the jar. This way, it soaks up the flavors from the apples and cinnamon. After adding the Greek yogurt, you can top with more apples or nuts. This makes it look nice and adds crunch. If you want a stronger cinnamon flavor, sprinkle some on top before serving. You can also layer the oats with yogurt if you like. This keeps the yogurt from mixing in too much. The sweetness of your oats can vary based on your taste. After soaking, taste the oats. If you want them sweeter, add more maple syrup. You can also use honey if you prefer that flavor. If you want a little zing, add a squeeze of lemon juice to the apples. This helps them stay fresh and adds a bright taste. You can even mix in a little nutmeg for extra warmth. For the full recipe, check out the details above. Enjoy your delicious apple cinnamon overnight oats! To make great apple cinnamon overnight oats, follow these tips: - Use old-fashioned rolled oats. They absorb the liquid well and give a nice texture. - Mix your oats well. Stir until all oats are soaked in the milk. This helps with even flavor. - Choose the right container. Use mason jars or airtight containers to keep oats fresh. - Layer your ingredients. Try putting the yogurt on top. It adds creaminess after soaking. - Taste before serving. You can always add more maple syrup to sweeten it up. Apple cinnamon overnight oats are not just tasty; they are also healthy. Here are some benefits: - High in fiber. Oats and apples help keep you full longer, which is great for weight control. - Good for digestion. Chia seeds and oats can aid your digestive system. - Rich in vitamins. Apples provide vitamin C, which supports your immune system. - Low in sugar. Using maple syrup or honey lets you control the sweetness. Sometimes, things don’t go as planned. Here’s how to fix common problems: - Too thick? Add a splash of milk before eating to loosen the oats. - Too runny? If your oats are too wet, use less liquid next time or add more oats. - Bland flavor? Mix in extra cinnamon or a pinch of salt to enhance the taste. - Soggy apples? Add diced apples just before serving for crunch. Follow these tips for a great start to your day with apple cinnamon overnight oats. For the complete recipe, check out the [Full Recipe]. {{image_2}} You can change up your apple cinnamon overnight oats easily. Try adding different fruits. Pears or peaches can bring a sweet twist. You can also use different spices. Nutmeg or cardamom can add warmth. For a nutty flavor, mix in some almond butter. You can switch the sweetener too. Use agave or brown sugar for a different taste. Experiment with these flavors to find your favorite mix. Making this recipe fit your diet is simple. To make it vegan, swap Greek yogurt with a plant-based yogurt. Use maple syrup as your sweetener. For gluten-free oats, just check the label. Look for oats that say gluten-free to be safe. These small changes keep the dish tasty while meeting your dietary needs. If you are in a rush, you can make these oats faster. Use quick oats instead of rolled oats. They soak up the liquid quicker and are ready in less time. You can also prepare them the night before. Just grab and go in the morning. Make them portable by using jars or containers. This way, you can enjoy a healthy breakfast even on your busiest days. For the full recipe, check out the details above! To store Apple Cinnamon Overnight Oats, use airtight containers. Mason jars work great. Fill them up to three-quarters full. This space allows oats to expand as they soak. Keep the lids on tight to lock in freshness. Store the jars in the fridge. These oats last about 3 to 5 days in the fridge. They may get thicker over time. If you prefer them creamier, add a splash of milk before eating. You can enjoy them cold or warm. To reheat, microwave for about 30 seconds to a minute. Stir well for even heat. Making these oats in batches saves time. Prepare a few jars at once for easy breakfasts. You can mix different flavors in each jar. Just be sure to label them with the date. This way, you always know when they were made. Enjoy the ease of a healthy breakfast ready to go each morning. For the full recipe, check the earlier section. Yes, you can use other types of oats. Quick oats or steel-cut oats work too. Each type gives a different texture. Quick oats are soft and mushy. Steel-cut oats are chewier and need longer soaking. Rolled oats are my favorite. They soak well and stay creamy. Overnight oats last about 4 to 5 days in the fridge. Store them in airtight jars. This keeps them fresh and tasty. If you add toppings, wait until you eat them. This keeps them crunchy. You can eat overnight oats warm if you like. Just heat them in a microwave for about 30 seconds. Stir well and enjoy! Some people prefer their oats cold. It all depends on your taste. Apple cinnamon overnight oats are easy to make and taste great. We covered key ingredients, preparation steps, and tips for success. I shared ways to adjust flavors and dietary needs. You can also store your oats to save time. In summary, these oats are healthy, tasty, and versatile. You can enjoy them in many ways. I hope you feel inspired to make your own apple cinnamon overnight oats today!](https://mysavedrecipe.com/wp-content/uploads/2025/05/102ea49d-50b3-4e03-97e9-9c1a9a351c7b-300x300.webp)


![To make crispy air fryer Brussels sprouts, you need: - 1 pound Brussels sprouts, trimmed and halved - 2 tablespoons olive oil - 1 teaspoon garlic powder - 1/2 teaspoon smoked paprika - 1/4 teaspoon cayenne pepper (optional for heat) - Salt and pepper to taste - 2 tablespoons balsamic glaze (for drizzling) - 2 tablespoons grated Parmesan cheese (optional) You can add more taste with these ingredients: - Lemon zest for brightness - Fresh herbs like thyme or rosemary - Crushed red pepper flakes for extra spice - Honey or maple syrup for sweetness If you don’t have some ingredients, here are swaps: - Use avocado oil instead of olive oil. - Try onion powder in place of garlic powder. - Replace smoked paprika with regular paprika for less smoke. - Use nutritional yeast instead of Parmesan for a vegan option. These options help you enjoy the dish even if you're missing something! For the full recipe, check out the complete guide. First, rinse the Brussels sprouts under cold water. I like to dry them well with a clean towel. This helps them get crispy. Next, trim the ends of each sprout. Then, slice them in half. Make sure the pieces are about the same size for even cooking. In a large bowl, toss the halved Brussels sprouts with olive oil. Add garlic powder, smoked paprika, and cayenne pepper. Sprinkle salt and pepper to taste. Mix everything well so each sprout gets coated. This step adds flavor and helps with crispiness. Preheat your air fryer to 375°F (190°C) for about 5 minutes. Place the Brussels sprouts in the basket in a single layer. If your air fryer is small, work in batches. Air fry for 15 to 18 minutes. Shake the basket halfway through cooking. Look for a golden brown color and a crispy texture. Once done, remove them and transfer to a bowl. Drizzle with balsamic glaze and sprinkle with grated Parmesan cheese if you like. Toss gently and enjoy! You can find the Full Recipe for more details. To get that crunchy bite in Brussels sprouts, start with dry sprouts. Moisture can lead to soggy results. After rinsing, dry them well with a towel. Use a good amount of oil, about two tablespoons, to coat them evenly. This helps them crisp up. Spread them out in a single layer in the air fryer. Overcrowding will steam them instead of crisping them. One mistake many make is not preheating the air fryer. This step is key. Preheat it to 375°F (190°C) for about five minutes. Another common error is not shaking the basket halfway through cooking. This ensures even cooking. Keep an eye on the time, too. Cooking them for 15-18 minutes is ideal, but check for the right color and texture. While the basic recipe is tasty, you can boost the flavor. Try adding different spices, like onion powder or lemon zest. A hint of chili powder can add a kick. You can also mix in some fresh herbs, like thyme or rosemary, for freshness. Don’t forget about the balsamic glaze! It adds a sweet touch. For cheese lovers, a sprinkle of grated Parmesan at the end makes them even better. For the full recipe, check above. {{image_2}} You can switch up the flavors with different seasonings. Try using lemon zest for a fresh twist. Add Italian herbs like oregano and basil for a savory touch. For a sweet note, mix in a bit of maple syrup with your olive oil. You can also play with spices. Try cumin or curry powder for a warm flavor. Each combination brings a new taste experience. Make your Brussels sprouts even better by adding other veggies. Carrots, bell peppers, or shallots work great. Chop them into similar sizes. This way, they cook evenly with the Brussels sprouts. You can toss them in the same bowl when seasoning. The mix of colors and flavors makes the dish more fun and tasty. You can easily adapt this recipe for different diets. For a vegan version, skip the Parmesan cheese. Use nutritional yeast for a cheesy flavor instead. If you need it gluten-free, check your seasonings for any hidden gluten. This dish fits many diets while staying delicious and crispy. For the full recipe, check the [Full Recipe] section above. Store leftover Brussels sprouts in an airtight container. Keep them in the fridge. They stay fresh for about three days. Make sure they cool down before sealing. This helps avoid sogginess. To reheat, use the air fryer for the best results. Set it to 375°F (190°C). Heat for about 5-7 minutes. This method keeps them crispy. You can also use an oven. Place them on a baking sheet and heat at 350°F (175°C) for 10 minutes. Yes, you can freeze Brussels sprouts, but they lose some texture. To freeze, blanch them first. Boil for 3-5 minutes, then cool in ice water. Drain and dry them before freezing. Store in freezer bags. They last up to three months. For best taste, use fresh Brussels sprouts from the start. Find the full recipe for air fryer Brussels sprouts to enjoy them fresh! You can tell Brussels sprouts are crispy when they turn golden brown. I like to check the texture by poking one with a fork. If it feels crunchy outside and tender inside, they're ready. Remember to shake the basket halfway through cooking. This helps them cook evenly and get that nice crunch. Yes, you can use frozen Brussels sprouts. However, they may not get as crispy as fresh ones. If you use frozen sprouts, be sure to thaw them first. Pat them dry to remove excess moisture. This step is key to getting that crunchy texture. Adjust the cooking time. Frozen Brussels sprouts may need a few extra minutes to cook. Many sauces go great with air-fried Brussels sprouts. Here are some tasty options: - Balsamic glaze for a sweet touch - Ranch dressing for creaminess - Hot sauce for a spicy kick - Honey mustard for a sweet and tangy flavor Feel free to mix and match to find your favorite! For the full recipe, check out the section above. This article covers all you need for air-fried Brussels sprouts. We looked at key ingredients, cooking steps, and tips for a tasty result. You can try different flavors or add veggies for more variety. Proper storage keeps your leftovers fresh and crispy for later. Remember, great cooking is about experimenting and having fun. Enjoy your crispy Brussels sprouts and make them your own!](https://mysavedrecipe.com/wp-content/uploads/2025/05/879c29d1-d381-49fd-91bb-e5d8663cdcc3-300x300.webp)


![- Firm tofu - Broccoli - Red bell pepper - Yellow bell pepper - Carrot - Snap peas - Soy sauce - Sesame oil - Olive oil - Garlic - Ginger - Sesame seeds - Chopped green onions - Salt - Pepper To make this dish, you need a block of firm tofu. I prefer firm tofu because it holds its shape well when cooked. For the veggies, I choose broccoli, red and yellow bell peppers, a carrot, and snap peas. They add color and crunch. You will also need some sauces and oils. Soy sauce gives it a savory kick. Sesame oil adds a nice nutty flavor, while olive oil helps with cooking. You can add extra seasonings to boost flavor. Garlic and ginger work well. Sesame seeds make a great topping. Don't forget salt and pepper for seasoning. For the full recipe, check out the [Full Recipe]. First, you need to press the tofu. Wrap the block in paper towels. Then place a heavy object on top. This helps remove extra moisture. Let it sit for about 15 minutes. After that, cut the tofu into neat cubes. Next, marinate the tofu in soy sauce. In a medium bowl, mix the cubed tofu with 1 tablespoon of soy sauce. Let it sit for about 10 minutes. This step adds flavor to the tofu. Now it's time to sauté the tofu. Heat olive oil in a large skillet over medium-high heat. Add the marinated tofu cubes to the pan. Cook them until they turn golden brown on all sides. This should take about 8 to 10 minutes. Once done, remove the tofu from the skillet and set it aside. In the same skillet, add sesame oil. Toss in minced garlic and grated ginger. Sauté them for about 30 seconds. This will fill your kitchen with a wonderful aroma. After that, add the broccoli, bell peppers, carrots, and snap peas. Stir-fry these vegetables for about 5 to 7 minutes. You want them to be tender but still crisp. Now it’s time to bring everything together. Return the cooked tofu to the skillet with the vegetables. Add the remaining soy sauce and mix everything well. Cook for an additional 2 to 3 minutes to heat through. Finally, season with salt and pepper to taste. Before serving, sprinkle sesame seeds and chopped green onions on top. Enjoy your colorful veggie tofu stir-fry! For the full recipe, check out the details above. How to achieve perfect tofu texture Tofu can be soft or firm. I prefer using firm tofu for stir-fry. Start by pressing the tofu. Wrap it in paper towels and place a heavy object on top. This step removes extra moisture, helping the tofu get crispy. Let it press for about 15 minutes. After that, cut it into cubes. Marinate the cubes in soy sauce for at least 10 minutes. This adds flavor and helps brown the tofu. Stir-frying tips for vegetable crispness For crisp vegetables, use high heat. Preheat your skillet or wok before adding oil. Use a mix of sesame oil and olive oil for flavor. Add garlic and ginger first for fragrance. Then, toss in the vegetables. Stir-fry them quickly, about 5 to 7 minutes. Keep them moving to avoid steaming. You want them to be tender but still bright and crisp. Ideas for additional sauces or spices While soy sauce is great, try adding hoisin sauce or oyster sauce for extra depth. A splash of rice vinegar can brighten up the dish. For a kick, add a dash of chili sauce or sriracha. You can also sprinkle in some five-spice powder for a unique twist. Suggestions for adjusting spice levels If you like heat, add sliced fresh chili or red pepper flakes. To tone it down, skip the chili sauce. You can also add a bit of honey or sugar to balance out the spice. Adjusting these flavors can make your stir-fry just right for your taste. For the full recipe, check out the Colorful Veggie Tofu Stir-Fry. {{image_2}} You can change the vegetables in your stir-fry each time you make it. Using seasonal vegetables can add freshness and flavor. For example, try zucchini in summer or pumpkin in fall. Different colors also make the dish more fun. You can also experiment with other greens. Spinach and kale add a nice touch. They cook fast and bring a lot of nutrients. Just add them at the end so they stay bright and green. If you want to switch up your protein, tempeh or seitan are great choices. Tempeh has a nutty taste and good texture. You can cut it into cubes and stir-fry just like tofu. Seitan is chewy and packed with protein. It can absorb flavors well, making it a tasty option. Incorporating legumes is another way to boost protein. Chickpeas or black beans can add heartiness. Just rinse and add them to the stir-fry. They fill you up and add fiber. You can mix and match these options to keep meals interesting. For the full recipe, check [Full Recipe]. To keep your stir-fry fresh, store it in an airtight container. Place it in the fridge. It will last for about three to four days. For longer storage, you can freeze it. Use freezer-safe bags or containers. Make sure to remove as much air as possible. This helps prevent freezer burn. The stir-fry can stay good in the freezer for up to three months. When reheating, the goal is to keep the texture nice. You can use a microwave or stovetop. If using a microwave, heat in short bursts. Stir it every minute to warm evenly. For stovetop, place the stir-fry in a skillet over low heat. Add a splash of water or oil to keep it moist. Stir often until heated through. This method helps maintain the veggies' crunch. Enjoy your delicious meal again! For the full recipe, don’t forget to check the detailed steps! What is the best tofu for stir-frying? I recommend using firm tofu for stir-frying. It holds its shape well and absorbs flavors nicely. Silken tofu is too soft and may fall apart. Make sure to press it first to remove excess moisture. This helps it get crispier when cooked. How long can I store vegetable stir-fry leftovers? You can store vegetable stir-fry leftovers in the fridge for up to three days. Make sure to keep it in an airtight container. For longer storage, you can freeze it for about two months. Just remember that freezing may change the texture of the veggies. Caloric content and health benefits A serving of this vegetable stir-fry with tofu has about 300 calories. It's packed with vitamins and minerals from the veggies. Tofu adds protein, making this meal satisfying and nutritious. It's a great option for a healthy diet. Protein and carbohydrate counts per serving Each serving contains around 20 grams of protein from the tofu. The carbohydrates from the vegetables are about 30 grams. This balance makes it a good meal for energy and muscle health. What to serve with vegetable stir-fry? I love pairing this stir-fry with jasmine or brown rice. The rice absorbs the flavors well. You can also serve it with quinoa for a nutty taste. Ideal side dishes and pairings for a complete meal Consider adding a simple salad or steamed dumplings. They complement the stir-fry nicely and add variety. You could also offer a light soup to start the meal for extra warmth. For more ideas, check out the Full Recipe. This blog post guides you through making a tasty vegetable stir-fry with tofu. You learned about key ingredients, preparation steps, and cooking techniques. I shared tips for perfect texture and flavor. Feel free to adjust with your favorite veggies or proteins. Lastly, proper storage and reheating keep your dish fresh. Enjoy cooking this simple, healthy meal that you can easily customize.](https://mysavedrecipe.com/wp-content/uploads/2025/05/4026e871-b59b-492f-8f49-74e3e66c7070-300x300.webp)
![- 1 pound large shrimp, peeled and deveined - 4 tablespoons unsalted butter - 2 tablespoons honey - 4 cloves garlic, minced - 2 tablespoons low sodium soy sauce - 1 tablespoon lemon juice - 1 teaspoon red pepper flakes (optional) - Salt and pepper to taste - Chopped fresh parsley for garnish - Calories per serving: About 250 - Macronutrient breakdown: - Carbohydrates: 10g - Fats: 16g - Proteins: 21g - Possible allergens: Shellfish, soy sauce This meal is simple, tasty, and quick to make. You can whip it up in just 15 minutes! The shrimp becomes sweet and savory from honey and soy sauce. Garlic adds a lovely aroma. Each bite is a burst of flavor. You get protein and healthy fats too. The dish is not only delicious but also easy to adjust for your taste. Use less honey if you want it less sweet. Add more red pepper flakes for extra heat. To start, you need to prep your shrimp. Rinse the shrimp under cold water. Remove the shell and the tail. Next, use a small knife to make a shallow cut along the back. This helps you see and remove the dark vein inside. Rinse the shrimp again to get rid of any debris. For measuring your ingredients, use measuring spoons for liquids like honey and soy sauce. For solid ingredients, like butter, use a kitchen scale if you have one. This helps you get the right amounts and keeps your dish balanced. First, melt the butter in a large skillet over medium heat. Wait until it starts to bubble. Then, add the minced garlic and stir it for 1-2 minutes. You want the garlic to smell good but not brown. Next, make the honey garlic sauce. Stir in the honey, soy sauce, and lemon juice. Mix it well until smooth. Now, add the shrimp to the skillet. Make sure they are all coated with the sauce. Cook the shrimp for 2-3 minutes on one side. Flip them over and cook for another 2-3 minutes. They are done when they turn pink and opaque. Season with salt, pepper, and red pepper flakes if you like heat. Honey Garlic Butter Shrimp pairs well with rice or steamed vegetables. You can also serve it with a fresh salad for a light meal. For plating, use a large, shallow bowl. Place the shrimp in the center and drizzle some sauce on top. Garnish with chopped parsley for a pop of color. This makes your dish look fancy and inviting. For the complete instructions, check out the Full Recipe. To perfect the sweetness, add more honey bit by bit. If you want more salt, use soy sauce. For a thicker sauce, let it cook longer on low heat. This allows the sauce to reduce and become rich. Stir well to mix all flavors together. Use a non-stick or cast-iron skillet for best results. These types help the shrimp cook evenly. Set your heat to medium. This ensures the butter melts but doesn't burn. A steady heat cooks shrimp just right without drying them out. Do not overcook shrimp. They can become tough and rubbery if cooked too long. Cook them until they are pink and opaque, about 4-6 minutes total. Also, always measure your sauce ingredients. Skipping this can lead to an unbalanced flavor in your dish. {{image_2}} You can swap honey for maple syrup or agave. These options work well in the sauce. If you want to try something different, use chicken or tofu instead of shrimp. Both cook nicely in the honey garlic sauce. For a zesty twist, add lime or orange juice. The citrus brightens the dish. You can also mix in ginger or sesame oil for extra depth. These spices will add layers of flavor that make each bite exciting. You can serve this dish over rice or noodles. This adds heartiness and helps soak up the sauce. If you want to include veggies, try adding bell peppers or snap peas. They add color and nutrition, making the meal even better. For the complete recipe, check out the Full Recipe. To keep your Honey Garlic Butter Shrimp fresh, store it in an airtight container. This helps lock in flavors and moisture. Place the container in the fridge within two hours of cooking. The dish stays good for up to three days. If you want to enjoy it later, make sure to label the container with the date. Reheat shrimp gently to prevent overcooking. The best method is using a skillet on low heat. Add a splash of water or broth to keep it moist. Stir occasionally until heated through. Aim for a serving temperature of 145°F for safety and taste. Yes, you can freeze Honey Garlic Butter Shrimp! Place it in a freezer-safe bag or container. Remove as much air as possible to prevent freezer burn. It can last for up to three months. When you're ready to eat, thaw it overnight in the fridge. Reheat using a skillet for the best results. Cooking shrimp takes about 4 to 6 minutes. The time depends on their size. For large shrimp, cook them for 2 to 3 minutes on each side. They turn pink and opaque when done. Overcooking makes shrimp tough, so keep an eye on them! Yes, you can prep this dish a bit early! Peel and devein the shrimp in advance. You can also mix the sauce and store it in the fridge. Just cook the shrimp and sauce together when you're ready to eat. This makes dinner quick and easy. Several sides pair well with this dish. Here are some popular options: - Steamed rice - Garlic bread - Roasted vegetables - Salad with fresh greens These sides balance the sweet and savory flavors of the shrimp. For a detailed guide, check out the [Full Recipe] for Honey Garlic Butter Shrimp. This recipe will help you create a tasty meal with ease! In this post, we explored making Honey Garlic Butter Shrimp with easy steps and tips. We covered main and additional ingredients, cooking techniques, and helpful variations. Remember, perfect shrimp should be tender, not overcooked. Feel free to swap ingredients to match your taste. Store any leftovers properly, and enjoy the meal later. Cooking shrimp can be simple and fun. I hope this guide inspires you to try this dish and impress yourself or your guests. Happy cooking!](https://mysavedrecipe.com/wp-content/uploads/2025/05/fc2856e5-4f28-409d-ad98-9ca96b82f7a4-300x300.webp)
![- 2 boneless, skinless chicken breasts - 1 ripe mango, diced - 1 red bell pepper, finely chopped - 1/2 red onion, finely chopped - 1 jalapeño, deseeded and minced - 2 tablespoons fresh cilantro, chopped - Juice of 1 lime - 2 tablespoons olive oil - Salt and pepper to taste - 1 teaspoon garlic powder - 1 teaspoon cumin - Grilling equipment (grill or grill pan) - Mixing bowls - Knife and cutting board - Measuring spoons When I prepare Mango Salsa Chicken, I focus on fresh ingredients. The chicken is the star. I use two boneless, skinless chicken breasts. They grill up so nicely and stay juicy. The ripe mango adds sweetness. Make sure it's perfectly ripe for the best flavor. The red bell pepper brings crunch and color. I chop it finely so it blends well in the salsa. Half a red onion adds a nice bite. I love the mild flavor it gives. A jalapeño kicks up the heat. Just remove the seeds for less spice. Fresh cilantro adds a pop of flavor. I chop it finely and mix it in. Lime juice adds brightness. It balances all the flavors. I also use olive oil to help marinate the chicken. Salt, pepper, garlic powder, and cumin round out the taste. For the tools, I keep it simple. A good grill is key. I prefer a grill pan for indoor cooking. Mixing bowls help me combine ingredients easily. A sharp knife and cutting board make prep quick. Measuring spoons ensure I get the right amounts. With these ingredients and tools, you're set to make a delicious Mango Salsa Chicken dinner. If you're ready for the full recipe, let's get cooking! - First, gather your marinade ingredients. You need olive oil, lime juice, garlic powder, cumin, salt, and pepper. - Mix these in a small bowl until well combined. - Take the chicken breasts and put them in a shallow dish. Pour the marinade over the chicken. - Make sure the chicken is covered well. - Cover and refrigerate it for at least 30 minutes. You can marinate it for up to 2 hours if you want more flavor. - While the chicken marinates, let’s prepare the mango salsa. - In a medium bowl, combine diced mango, red bell pepper, red onion, jalapeño, and fresh cilantro. - Gently toss the ingredients together. - Add a pinch of salt to taste. This step helps enhance the flavors. - Set the salsa aside to let the flavors meld while the chicken absorbs the marinade. - Preheat your grill or grill pan over medium heat. - Once it’s hot, remove the chicken from the marinade. - Place the chicken on the grill. - Grill the chicken for about 6-7 minutes on each side. - Use a meat thermometer to check that the inside temperature reaches 165°F (75°C). - When done, take the chicken off the grill. Let it rest for a few minutes. - Just before serving, top the grilled chicken with the mango salsa. For the full recipe, check the section above. Enjoy your flavorful grilled dinner! To get perfect grill marks, preheat your grill well. Aim for medium-high heat. Place the chicken at a 45-degree angle on the grill. Flip the chicken after about three minutes for those beautiful crosshatch marks. To check chicken doneness, use a meat thermometer. Insert it into the thickest part of the chicken. The safe internal temperature is 165°F (75°C). If you don’t have a thermometer, cut into the chicken. Look for clear juices and no pink meat inside. For side dishes, rice or quinoa works great. They soak up the salsa juices. A simple green salad adds a fresh crunch. You might also try grilled veggies for a colorful plate. For garnishing, add extra cilantro on top of the chicken. Lime wedges give a bright look and taste. Consider serving on a colorful plate to make it pop. To streamline prep, gather all your ingredients first. Chop the mango and veggies while the chicken marinates. This way, you save time and keep your space tidy. While the chicken grills, clean up your prep area. You can also prepare the salsa during this time. It’s a great way to multitask and keep everything flowing. For the full recipe, check the section above. {{image_2}} You can switch the chicken for turkey or tofu. Both options work well. Turkey has a similar taste and can keep the dish light. Tofu absorbs flavors, making it a great choice for vegetarians. For the salsa, you can try different fruits. Pineapple adds a sweet zing. Peaches bring a juicy twist, while avocado adds creaminess. Each fruit brings a unique flavor to the table. You can boost the flavor by adding spices. Try smoked paprika for a hint of smokiness. Cumin adds warmth, while chili powder gives a kick. Fresh herbs like basil or mint can brighten the dish. Pairing with sauces can also change the taste. A drizzle of honey mustard adds sweetness. Alternatively, a spicy barbecue sauce gives a smoky flavor. These small changes can make a big impact. To make this dish low-carb, skip the rice or quinoa. Instead, serve it with a side salad. You can also use cauliflower rice for a light option. This keeps the flavors while cutting carbs. For a gluten-free meal, ensure all sauces are gluten-free. Most ingredients in the recipe are already gluten-free. If you choose to add any sauces, check their labels to be safe. Vegetarian options are easy too. Replace the chicken with grilled vegetables. Zucchini, bell peppers, and eggplant work well. Marinate them just like the chicken for great flavor. For the full recipe, check out the detailed instructions above. To keep your mango salsa chicken fresh, store it in the fridge. Place the chicken and salsa in separate airtight containers. This helps keep the chicken juicy and the salsa bright. The chicken stays good for about three days. The salsa can last for two days. Always check for any strange smells before using leftovers. When reheating the grilled chicken, use the oven or a skillet. Preheat your oven to 350°F (175°C). Place the chicken on a baking sheet and cover it with foil. Heat for about 15-20 minutes. If using a skillet, warm it on low heat for about 5-7 minutes. To keep the salsa fresh, try not to heat it. Serve it cold or at room temperature for the best taste. Yes, you can freeze mango salsa. Just place it in an airtight container, leaving some space for expansion. It lasts up to three months in the freezer. For the chicken, wrap it tightly in plastic wrap and then foil. It can also freeze for about three months. When ready to eat, thaw both in the fridge overnight before reheating. Enjoy the full flavor of your mango salsa chicken later! For the full recipe, check out the detailed instructions above. Grilling chicken depends on its thickness. Generally, it takes about 6-7 minutes per side. For thicker pieces, like those over one inch, it may take longer. Always check the internal temperature. It should reach 165°F (75°C) for safe eating. This ensures the chicken is juicy and flavorful. You can use canned mango, but fresh is best. Canned mango can be sweeter and softer. This might change the texture of your salsa. Fresh mango offers a firm bite and bright flavor. If you choose canned, drain it well to avoid excess liquid. This keeps your salsa from becoming too watery. This dish pairs well with several sides. Here are some tasty options: - Cilantro-lime rice - Quinoa salad - Grilled vegetables - Black beans - Fresh green salad These sides complement the chicken's flavor and add color to your plate. Enjoy mixing and matching for a complete meal. For the complete recipe, check out the [Full Recipe]. This blog post covered a tasty grilled chicken dish with mango salsa. We explored key ingredients, kitchen tools, and step-by-step instructions. You learned tips for perfect grilling and creative variations. I shared how to store leftovers and reheat them. Final thoughts: With this recipe, you can impress at any meal. Enjoy the fresh flavors and simple steps to create a delightful dish. Happy cooking!](https://mysavedrecipe.com/wp-content/uploads/2025/05/8b913ddf-7a90-4244-8209-7a2bd7138ee8-300x300.webp)
![- 1 can (15 oz) chickpeas, drained and rinsed - 1 cup cherry tomatoes, halved - 1 cucumber, diced - 1 bell pepper (red or yellow), diced - 1/4 red onion, finely chopped - 1/2 cup kalamata olives, pitted and sliced - 1/4 cup fresh parsley, chopped - 1/4 cup feta cheese, crumbled (optional) - 3 tablespoons olive oil - 2 tablespoons lemon juice - 1 teaspoon dried oregano - Salt and pepper to taste I love using good ingredients to make this salad. Chickpeas are the star here. They add protein and fiber. I make sure to rinse them well to remove any extra salt. Fresh veggies bring color and crunch. I like cherry tomatoes for their sweetness. Cucumbers add a cool bite, while the bell pepper gives a nice crunch. The red onion adds a bit of zing. Kalamata olives are salty and rich, making the salad so tasty. Fresh parsley adds a bright touch. If you like cheese, feta is a great choice. It adds creaminess and flavor. For the dressing, I use olive oil and lemon juice. The oil gives richness, while the lemon brings brightness. Dried oregano adds a nice herby note. I always taste for salt and pepper. This will make sure every bite is perfect. For the full recipe, you can check the details. Enjoy making this easy and tasty Mediterranean Chickpea Salad! To start, gather all your ingredients. You want to have everything ready. This makes the process fast and easy. In a large bowl, add the chickpeas, cherry tomatoes, cucumber, bell pepper, red onion, olives, and parsley. Mix these together gently. Each bite should have a mix of flavors. In a small bowl, whisk the olive oil, lemon juice, oregano, salt, and pepper. Blend them well. This dressing brings the salad to life. Pour the dressing over the salad mix. Toss it gently so all ingredients get coated. Taste your salad and see if it needs more salt, pepper, or lemon juice. Adjust as needed. Let the salad sit for 10-15 minutes. This helps the flavors meld. For an extra touch, add crumbled feta cheese before serving. This recipe is a breeze and full of bright flavors. Check the Full Recipe for more details. Fresh ingredients make this salad shine. Start with vibrant cherry tomatoes. Look for ones that are firm and colorful. Next, choose a crisp cucumber. A good cucumber should feel firm and have smooth skin. For bell peppers, pick ones that are bright and heavy for their size. A small red onion adds crunch and a slight bite. Don’t forget kalamata olives; they add depth. Fresh parsley brings a burst of flavor too. Always wash your veggies well before use. Fresh ingredients make every bite better. The dressing is key to flavor. Use high-quality olive oil for the best taste. Combine it with fresh lemon juice for brightness. The dried oregano adds a nice herbal note. Mix salt and pepper to taste. Whisk them together until blended well. This ensures a smooth and zesty dressing. Pour it over the salad right before serving. Letting it sit for a few minutes helps flavors blend. You can always adjust the dressing based on your taste. Presentation matters in a salad. Use a large bowl to mix everything gently. This keeps your ingredients intact. To serve, scoop the salad onto plates or in bowls. If using feta cheese, sprinkle it on top for a nice touch. A few parsley leaves can add color. For an extra pop, add lemon wedges on the side. This gives guests a chance to add more zest if they like. A well-presented salad not only looks good but tastes better too. Want to try making this dish yourself? Check out the Full Recipe for step-by-step instructions! {{image_2}} You can boost the protein in this salad easily. Try adding grilled chicken, shrimp, or canned tuna. Each option adds flavor and makes the dish heartier. You can also use cooked quinoa or lentils for a plant-based twist. These choices keep the meal healthy and filling. Feel free to mix the veggies! You can use diced zucchini, shredded carrots, or even artichoke hearts. Each vegetable brings a new taste and texture. If you love a crunch, add radishes or snap peas. The more colors you add, the more fun the salad looks! Making this salad vegan is simple. Just skip the feta cheese and add more olives or avocado. You won’t miss the cheese at all! For gluten-free needs, this salad is already safe. Just make sure any added ingredients are also gluten-free. You can enjoy this dish without worry. For the full recipe, check out the [Full Recipe]. To store your Mediterranean chickpea salad, place it in an airtight container. This keeps it fresh. Make sure to cover it well to avoid odors from the fridge. You should store it in the fridge right after making it. If you plan to eat it later, do not add the feta cheese until you serve it. This keeps the cheese from getting too soft. You can enjoy Mediterranean chickpea salad cold. If you prefer it warm, heat it gently. Use a skillet over low heat. Stir it often to avoid burning. Do not microwave it, as this can make the chickpeas mushy. Heat just until warm, then serve. The salad lasts about 3 to 5 days in the fridge. After that, it may lose its taste. Always check for off smells or changes in texture before eating. If you see any signs of spoilage, it is best to discard it. Make your Mediterranean chickpea salad in small batches to enjoy it fresh. For the full recipe, check the section above. You can keep Mediterranean Chickpea Salad in the fridge for up to five days. Store it in an airtight container. This helps keep the flavors fresh and delicious. If you notice any changes in smell or texture, it's best to toss it out. Yes, you can make this salad in advance. Preparing it a few hours before serving allows flavors to blend well. If you want to keep the salad fresh, add the feta cheese just before serving. This keeps it from becoming soggy. If you don’t have chickpeas, try black beans or lentils. You can swap cherry tomatoes for diced regular tomatoes. Any crunchy vegetable works well, like zucchini or carrots. For olives, you can use green olives or skip them if preferred. If you want a dairy-free version, leave out the feta cheese. Yes, Mediterranean Chickpea Salad is healthy. It is packed with protein and fiber from chickpeas. The fresh veggies provide vitamins and minerals. Plus, olive oil is a healthy fat that supports heart health. This salad is not only tasty but also nourishing. This blog post covered how to make a delicious Mediterranean chickpea salad. You learned the key ingredients, simple steps, and tips to enhance flavors. I shared storage advice and answered common questions about the recipe. This salad is fresh, healthy, and easy to make. You can customize it to fit your needs. I encourage you to enjoy this tasty dish, whether as a side or main meal. With a little effort, you can create something satisfying that everyone will love.](https://mysavedrecipe.com/wp-content/uploads/2025/05/f236f63c-6226-456f-b013-cd87a79311a5-300x300.webp)

. When you gather these ingredients, you're on your way to a meal that's sure to impress. - Seasoning the Chicken Breasts Start by mixing salt, pepper, and cumin in a small bowl. This mix gives the chicken a nice flavor. Rub this seasoning evenly on both sides of the chicken breasts. This step helps bring out the chicken’s taste. - Preheating the Grill Preheat your grill or grill pan over medium-high heat. This heat level is perfect for cooking the chicken evenly. Once the grill is hot, brush it with olive oil to stop the chicken from sticking. - Combining Salsa Ingredients In a medium bowl, combine diced mango, chopped red onion, diced red bell pepper, minced jalapeño, and chopped cilantro. Each ingredient adds its own unique flavor. Mixing them creates a bright and fresh salsa. - Adding Lime Juice Squeeze the juice from two limes over the salsa mixture. This adds a nice zing and helps balance the sweetness of the mango. Stir gently to blend the flavors. Set the salsa aside and let it rest while you cook the chicken. - Grilling Times and Techniques Place the seasoned chicken breasts on the hot grill. Grill each side for about 6-7 minutes. This timing helps achieve a juicy interior while getting nice grill marks. - Checking Doneness Use a meat thermometer to check the chicken's internal temperature. It should reach 165°F (75°C). If you don’t have a thermometer, cut into a breast. The meat should be white and juices should run clear. Once cooked, let the chicken rest for a few minutes. Then, serve it with the mango salsa on top. This recipe makes a flavorful, fresh dish that is sure to impress. For the full recipe, check out the details above. Recommended Seasonings For mango salsa chicken, I love using simple and fresh flavors. You should season your chicken with: - Salt - Pepper - Cumin These spices give the chicken a warm, earthy taste. You can also try adding garlic powder or chili powder for more depth. Marinating Tips To really boost the flavor, marinate the chicken. Mix lime juice, olive oil, and seasonings in a bowl. Let the chicken sit in this mixture for at least 30 minutes. This step helps the chicken soak up all the tasty goodness. Grill Temperature Guidance Grill the chicken over medium-high heat. The grill should be around 375°F to 450°F for the best results. This temperature helps get those beautiful grill marks and a nice sear. Avoiding Sticking To prevent the chicken from sticking, brush your grill with olive oil. You can also oil the chicken lightly before placing it on the grill. Both steps help ensure easy flipping and clean removal. Pairing with Sides Serve your mango salsa chicken with fresh sides. I recommend: - Rice - Quinoa - Grilled veggies These sides balance the sweetness of the salsa and make your meal complete. Garnishing Ideas For a lovely presentation, add fresh cilantro on top. You can also include avocado slices for creaminess. This not only looks nice but adds even more flavor. Check out the Full Recipe for more tips! {{image_2}} You can easily swap chicken for other proteins. Tofu is a great choice for a plant-based meal. It soaks up the salsa flavors well. Cut the tofu into thick slices. Press it gently to remove extra moisture. Season it like chicken and grill until golden. Shrimp and fish also work nicely. For shrimp, peel and devein them first. Grill them quickly, just a few minutes per side. If using fish, choose a firm type like salmon or cod. Season and grill until it flakes easily with a fork. These options add new flavors and textures. Mango salsa is flexible. You can mix in different fruits for fun twists. Pineapple or peach add sweetness. If you like a tangy kick, try adding kiwi or pomegranate seeds. Adjust spice levels to suit your taste. Add more jalapeño for heat. If you want milder salsa, remove the seeds or use bell pepper instead. You can also mix in diced cucumber for crunch. Experiment until you find your favorite blend. If you don’t have a grill, you can bake or use a slow cooker. For baking, preheat the oven to 400°F (200°C). Place the seasoned chicken in a baking dish. Bake for 20-25 minutes, or until it reaches 165°F (75°C). Using a slow cooker is simple. Place the chicken in with the salsa. Cook on low for 4-6 hours. This method makes the chicken super tender. These methods keep the dish fresh and flavorful. For the full recipe, check the recipe section above. Refrigerator Guidelines After enjoying your Mango Salsa Chicken, store leftovers in an airtight container. This keeps the chicken juicy and the salsa fresh. The chicken can last up to four days in the fridge. Make sure it cools to room temperature before sealing. Freezing Capabilities You can freeze leftover chicken, but the salsa does not freeze well. Wrap the chicken tightly in plastic wrap and then in aluminum foil. It will stay good for up to three months in the freezer. When you're ready to eat, thaw it in the fridge overnight. Best Methods for Reheating To reheat chicken, use the oven or stovetop. Preheat your oven to 350°F (175°C). Place the chicken in a baking dish, cover it with foil, and heat for about 15-20 minutes. On the stovetop, heat a pan over low heat. Add a splash of water to keep it moist and cover it. Maintaining Flavor and Texture To keep the salsa fresh, do not reheat it. Instead, serve it cold on top of the chicken. Adding fresh lime juice can brighten the flavors after reheating. Enjoy your delicious Mango Salsa Chicken just like you made it! For the full recipe, check out the details above. Can I use frozen mango for the salsa? Yes, you can use frozen mango. Just thaw it first. Frozen mango works well if fresh mango is not available. It will still taste great in the salsa. How long does Mango Salsa Chicken last in the fridge? Mango Salsa Chicken lasts up to four days in the fridge. Make sure to store it in an airtight container. This keeps it fresh and safe to eat. Is this dish healthy? Yes, this dish is healthy. It includes lean chicken and fresh veggies. The mango adds vitamins and fiber. This meal is balanced and good for you. How many calories are in Mango Salsa Chicken? Mango Salsa Chicken has about 300 calories per serving. This depends on the size of the chicken breasts. The salsa adds very few extra calories. Gluten-free options This dish is naturally gluten-free. All the ingredients are gluten-free. You can enjoy it without worry if you have a gluten allergy. Dairy-free alternatives Mango Salsa Chicken is dairy-free. You do not need to change any ingredients. If you want creaminess, use avocado slices as a topping. This blog post covered a tasty mango salsa chicken recipe. We explored the best ingredients, step-by-step instructions, and helpful tips. You learned how to enhance flavor, perfect grill marks, and store leftovers. Plus, you found creative variations with different proteins and cooking methods. In my view, this dish is versatile and easy to make. It fits many diets, making it a great choice for everyone. Enjoy cooking and sharing this delightful meal!](https://mysavedrecipe.com/wp-content/uploads/2025/05/1e5cc0ad-aabb-4a81-b39c-3e393f6b5d8f-300x300.webp)


![- Chicken Wings: 2 pounds of fresh or thawed chicken wings. - Baking Powder: 2 tablespoons for crispiness. - Salt: 1 teaspoon to enhance flavor. - Black Pepper: 1 teaspoon for a bit of spice. - Garlic Powder: 1 teaspoon for savory taste. - Onion Powder: 1 teaspoon for depth of flavor. - Smoked Paprika: 1 teaspoon for a smoky kick. - Cayenne Pepper: ½ teaspoon (or adjust for heat). - Olive Oil: 2 tablespoons to help spices stick. - Lime Juice: 1 tablespoon for a fresh zing. - Optional: Fresh herbs like parsley or cilantro for garnish. Getting the right mix of these ingredients is key. The baking powder helps achieve that golden and crispy skin. The spices add layers of flavor that make every bite delicious. If you want to change things up, fresh herbs can add a nice touch. You can find the [Full Recipe] to guide you through the steps. 1. Preheat your oven to 425°F (220°C). 2. Line a large baking sheet with aluminum foil. 3. Place a wire rack on top of the foil. This helps air flow for crispiness. 4. In a large bowl, mix the dry ingredients: - 2 tablespoons baking powder - 1 teaspoon salt - 1 teaspoon black pepper - 1 teaspoon garlic powder - 1 teaspoon onion powder - 1 teaspoon smoked paprika - ½ teaspoon cayenne pepper (adjust for heat preference) 5. Make sure to mix well so all spices blend evenly. 6. Pat the chicken wings dry with paper towels. This step is key for crispiness. 7. Add the wings to the bowl with the spice mix. 8. Drizzle 2 tablespoons of olive oil and 1 tablespoon of lime juice over the wings. 9. Toss the wings until every piece is coated in the spice blend. 1. Arrange the wings in a single layer on the wire rack. 2. Make sure the wings don't touch each other. This helps them cook evenly. 3. Bake in the preheated oven for 40-45 minutes. 4. Flip the wings halfway through cooking for even crispiness. 5. Once they turn golden brown and crispy, take them out of the oven. 6. Let the wings rest for a few minutes. This keeps them crispy. 7. Garnish with fresh herbs if you like. Serve hot with your favorite dip. For a full recipe, check the Crispy Baked Chicken Wings with Zesty Spice Blend. To get your wings super crispy, start by patting them dry. Use paper towels to soak up any moisture. If the wings are wet, they won’t crisp up well. This is a key step! Next, use baking powder wisely. It helps create that crunchy texture we all love. When mixed with the spices, it draws moisture out and makes the skin crisp. Just be sure to mix it evenly with your seasonings for the best result. For dipping sauces, try classic choices like ranch or blue cheese. You can also go for a spicy buffalo sauce if you like heat. These will enhance the flavor of your wings perfectly. Pair your wings with sides for a full meal. Celery sticks and carrot sticks are great for crunch. You can add a simple salad or fries for extra fun. This combo makes for a perfect game day feast or a cozy dinner at home. For the full recipe, check out the section above. {{image_2}} You can play with flavors to make your wings unique. For a sweet touch, try honey and soy sauce. Mix these in a bowl and toss your wings before baking. This adds a nice glaze. You can also use a dry spice rub. Combine different spices like cumin, turmeric, or lemon pepper for a zesty kick. After baking, toss your wings in sauce for more flavor. Classic choices include buffalo sauce, barbecue sauce, or teriyaki sauce. This adds moisture and a burst of taste. You can even mix sauces for a fun twist. Try a buffalo-barbecue blend for something special! Baking chicken wings gives a crispy texture while keeping them healthier. You can also fry or air fry them. Frying gives a crunchy texture but adds more fat. Air frying is a great middle ground. It cooks wings quickly and uses less oil. Adjust the cooking time, as air fryers often cook faster than ovens. If your oven runs hot or cold, check the temperature. Ovens can vary, so you might need to adjust by 5 to 10 degrees. Use an oven thermometer for the best results. This helps ensure your wings come out perfectly crispy every time. For the full recipe, check back to the cooking steps provided. To keep your leftover wings fresh, place them in an airtight container. This helps prevent sogginess. You can refrigerate them for up to three days. If you want to save them for longer, freezing is a great option. Place them in a freezer-safe bag. Remove as much air as possible. Frozen wings can last up to three months. To re-crisp your wings, use the oven. Preheat it to 400°F (200°C). Place the wings on a baking sheet. Bake for about 10-15 minutes. This will make them crispy again. You can also use a microwave, but it may change the texture. To keep some crispiness, place a paper towel on the plate. Heat them for short intervals, about 30 seconds at a time. Check them often, so they don't overcook. Wings can turn out soggy for several reasons. Here are some common mistakes to avoid: - Not drying the wings: Moisture prevents crispiness. Always pat the wings dry with paper towels. - Too much oil: Using too much oil can make wings greasy. Stick to the recipe for the right amount. - Overcrowding the pan: When wings touch, they steam instead of bake. Arrange them in a single layer. - Wrong baking temperature: Make sure your oven is set to 425°F (220°C). This high heat helps achieve that crispy skin. If you follow these tips, you’ll enjoy perfectly crispy wings every time! Yes, you can use frozen wings! Here’s how to prepare them: - Thawing: Always thaw wings in the fridge overnight. This keeps them safe and helps them cook evenly. - Cooking adjustments: If wings are still a bit frozen, add 5 to 10 extra minutes to the baking time. Just make sure they reach an internal temperature of 165°F (75°C). - Drying: After thawing, pat the wings dry. This step is still key for crispiness. So, feel free to grab those frozen wings and enjoy! A variety of sauces can enhance your baked wings. Here are some popular choices: - Buffalo Sauce: This classic adds a spicy kick. Mix hot sauce with melted butter for a simple recipe. - Ranch Dressing: Creamy and cool, ranch is a fan favorite. You can buy it or make your own using yogurt, herbs, and spices. - BBQ Sauce: Sweet and tangy, BBQ sauce is great for a different flavor. Try making a homemade version with ketchup, brown sugar, and vinegar. - Honey Mustard: This mix of sweet and tangy is easy to whip up. Just blend honey with mustard to taste. Explore these sauces to find your favorite pairing with crispy baked chicken wings! This blog post covered everything you need to make perfect baked chicken wings. We discussed the important ingredients and seasoning, simple steps to prepare and cook them, and helpful tips for achieving that perfect crunch. We also explored various flavor options, side dishes, and how to store leftovers properly. In the end, enjoying great wings is all about flavor and crispiness. With these guidelines, you can make delicious wings every time. Now, it's your turn to try them out!](https://mysavedrecipe.com/wp-content/uploads/2025/05/35808d45-6f8d-4a99-ba0d-b54b116d03e3-300x300.webp)

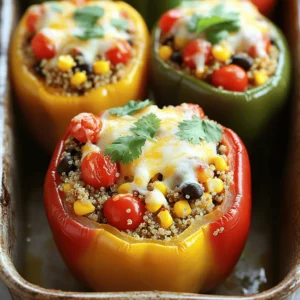
![Here is what you need to make Vegan Quinoa Stuffed Peppers: - 4 large bell peppers (any color) - 1 cup quinoa, rinsed - 2 cups vegetable broth - 1 can (15 oz) black beans, rinsed and drained - 1 cup corn (fresh or frozen) - 1 medium red onion, diced - 2 cloves garlic, minced - 1 teaspoon cumin - 1 teaspoon smoked paprika - 1 teaspoon chili powder - Salt and pepper to taste - 1 cup diced tomatoes (fresh or canned) - 2 tablespoons fresh cilantro, chopped (for garnish) - Lime wedges (for serving) This list makes a colorful and tasty dish. Each ingredient adds flavor and nutrition. Quinoa serves as a great base, packing protein. Black beans add extra fiber and texture. The spices give a warm kick, while the bell peppers hold it all together. You can find the full recipe at the start of this article. Don't forget to gather everything before you start cooking! - Preheat the oven to 375°F (190°C). - Cut the tops off the bell peppers and remove the seeds and membranes. This makes room for the tasty filling. You can choose any color of bell pepper you like. They all add a nice touch. - Combine rinsed quinoa and vegetable broth in a saucepan. Rinsing helps remove any bitter taste. - Bring to a boil and then simmer until liquid is absorbed. This usually takes about 15 minutes. The quinoa should fluff up nicely when done. - Sauté red onion until translucent; add garlic. This step adds a lot of flavor. - Mix in the cooked quinoa, beans, corn, tomatoes, and spices. Stir well to combine everything. You’ll see how colorful and inviting this mixture looks. - Spoon the quinoa mixture into each pepper and pack gently. Make sure to fill them well. - Cover with foil and bake. This keeps the peppers moist while they cook. - Bake for 30 minutes, then uncover and bake for an additional 10-15 minutes. The peppers should be slightly soft and have a bit of char. This gives them a nice flavor. For the complete recipe, check the [Full Recipe]. This dish is not only easy to make but also full of nutrients and flavor. - Rinse quinoa to remove bitterness. This simple step enhances its flavor. - Use a mix of fresh and canned ingredients for the best taste. Fresh veggies add crunch, while canned beans save time. - Pair your stuffed peppers with creamy avocado or a crisp side salad. This balances the meal. - Drizzle with lime juice to add a zesty kick. It brightens the flavors and makes each bite pop. - Serve on a colorful plate to make your meal look vibrant. This adds to the dining experience. - Garnish with extra cilantro and lime wedges. This not only looks good but also gives a fresh aroma. For the complete recipe, check out the Full Recipe section. Enjoy your cooking! {{image_2}} You can boost the protein in your stuffed peppers. Try adding shredded tofu or tempeh for a hearty bite. They soak up the flavors well and add texture. You can also mix in more beans or lentils. This way, you enhance the protein and keep the dish filling. Feel free to swap out some veggies in your recipe. If you want a change, use zucchini, mushrooms, or spinach instead of corn. Each option brings its own taste. You can even replace bell peppers with zucchini boats or eggplant. These alternatives make the dish just as colorful and tasty. Want some heat? Add jalapeños to your filling for a spicy kick. Or, get creative with different spices like curry powder. This can give your dish a unique flavor profile. Don’t be afraid to experiment with seasonings. Adjusting spices can make a simple meal exciting and new. For the full recipe, check out the details above. Store leftovers in an airtight container in the fridge. They taste best when eaten within 3-4 days. This keeps them fresh and safe to enjoy later. You can freeze stuffed peppers individually or in batches. Wrap them well to prevent freezer burn. When you're ready to eat, thaw overnight in the fridge. This makes reheating easier and keeps the flavor. To reheat, the oven works best. Preheat it to 350°F (175°C) and bake until warm. This helps keep the peppers from getting soggy. You can also use the microwave for a quick option. Just remember, the texture may not be the same. For the full recipe, check the details above. Yes, you can prep these stuffed peppers in advance. Just store them in the fridge before baking. This makes meal prep easy and saves time on busy nights. If you want to switch things up, try using rice, couscous, or another grain. Each option gives a different taste and texture but still tastes great. You’ll know they are ready when the peppers are slightly softened and have a light char on them. This adds flavor and makes them extra tasty. Absolutely! Just make sure all your ingredients are certified gluten-free. This way, you can enjoy the dish without worry. Yes, these stuffed peppers are packed with nutrients. They offer protein, fiber, and vitamins, making them a healthy meal choice for everyone. For a complete meal, pair them with a quinoa salad, roasted vegetables, or a fresh green salad. These sides complement the stuffed peppers well and add even more flavor. You learned how to make tasty vegan quinoa stuffed peppers. The main steps include prepping, cooking, and baking the peppers. You can also customize them with different veggies or spices. Storing leftovers is easy, and you can enjoy them later. Remember, these peppers are not just healthy; they are fun to make. I hope you try this recipe and share it with friends!](https://mysavedrecipe.com/wp-content/uploads/2025/05/e08cdb3b-866a-4331-9ec5-7c6be07abcee-300x300.webp)
![- 1 large head of cauliflower, cut into bite-sized florets - 1 cup all-purpose flour (or gluten-free flour) - 1 teaspoon garlic powder - 1 teaspoon paprika - 1/2 teaspoon salt - 1/4 teaspoon black pepper - 1/2 cup water (adjust as needed for batter consistency) - 1/4 cup sriracha sauce (adjust for spice preference) - 2 tablespoons honey (or maple syrup for a vegan option) - 1 tablespoon soy sauce (or tamari for gluten-free) - 1 tablespoon sesame oil - 2 tablespoons chopped green onions (for garnish) - Sesame seeds (for garnish) Using fresh ingredients makes a big difference. For cauliflower, look for firm florets with no browning. This ensures a crisp bite. If you use gluten-free flour, check that it's a 1:1 substitute. Store your flour in a cool, dry place to keep it fresh. When it comes to sriracha, you can adjust the amount based on your spice level. Honey adds sweetness and helps balance the heat. If you're vegan, maple syrup works just as well. Always taste as you go to find your perfect mix. For the best texture, ensure your batter is smooth. It should coat your cauliflower but not be too thick. Enjoy experimenting with these ingredients, and don't forget to check the [Full Recipe] for all the details! 1. Preheating the oven and preparing the baking sheet Start by preheating your oven to 425°F (220°C). This high heat helps make the cauliflower crispy. Line a baking sheet with parchment paper. This will keep the bites from sticking and make cleanup easy. 2. Mixing dry ingredients and creating the batter In a large bowl, mix together the flour, garlic powder, paprika, salt, and black pepper. Make sure all the dry ingredients are well combined. Next, slowly add water to the dry mix. Stir until you have a smooth batter. It should be thick enough to coat the cauliflower but not too runny. 3. Coating the cauliflower florets Take each cauliflower floret and dip it into the batter. Let any extra batter drip off before placing it on the baking sheet. Arrange the florets in a single layer. This helps them cook evenly and get crispy. 1. Baking time and ideal texture Bake the cauliflower for 20-25 minutes. You want them to be golden brown and crispy. Keep an eye on them near the end to avoid overcooking. 2. Tips for achieving crispiness For extra crispiness, make sure the florets are not crowded on the baking sheet. If they are too close, they will steam instead of bake. You can also flip them halfway through baking for even crispiness. 1. Combining and heating the sriracha honey sauce While the cauliflower bakes, prepare the sauce. In a small saucepan, combine sriracha sauce, honey, soy sauce, and sesame oil. Heat it on low, stirring until everything is well mixed and warmed up. 2. Adjustments for spice level and sweetness You can change the spice level by adding more or less sriracha. If you like it sweeter, add a bit more honey. Taste the sauce as you go to find the perfect balance for you. For the complete recipe, check the [Full Recipe]. To get that perfect crispiness, set your oven to 425°F (220°C). This hot temperature helps the cauliflower become golden and crunchy. Make sure to line your baking sheet with parchment paper. It keeps the bites from sticking and helps achieve a nice, even browning. For even coating of the batter, let the excess batter drip off each floret. This way, you won’t have soggy spots. The batter should be thick enough to coat but not too thick. If it doesn't stick, add a little more flour to thicken it. Adjusting the water helps here too. These Sriracha honey cauliflower bites shine with simple dips. Try ranch, blue cheese, or even a yogurt sauce. They also pair well with a fresh salad or crunchy veggies. For a party, serve them on a platter with toothpicks. Guests love finger foods! You can also make mini sliders. Use soft rolls and add a few bites inside. This gives a fun twist and makes them easy to eat. Want to amp up the flavor? Add herbs like cilantro or parsley to the batter. They give a fresh taste that blends well with the sriracha. For garnishing, beyond green onions and sesame seeds, consider using crushed peanuts or cilantro. These add crunch and a burst of flavor. A drizzle of extra honey on top can bring out the sweet notes too. For the full recipe, check out the details linked above. {{image_2}} For a tasty vegan version, swap honey with maple syrup. This keeps the sweet touch. Use gluten-free flour if you need a gluten-free option. It works just as well in the batter. Make sure to check labels for hidden gluten in sauces. Want to mix it up? Try different sauces! Buffalo sauce adds heat, while barbecue sauce gives a sweet twist. You can also add veggies like broccoli or bell peppers for more crunch. For protein, toss in some chickpeas or tofu. They pair well with the sauce and add a nice bite. Planning a party? Double or triple the recipe to serve more guests. To scale the ingredients, just keep the same ratios. This way, you get the same great taste, even in bigger batches. You can also serve them as appetizers or a side dish. Whatever the occasion, these bites will shine. For the complete instructions, check the Full Recipe. To store your Sriracha honey cauliflower bites, let them cool fully. Place the bites in an airtight container. This way, they stay fresh in the fridge. They will last up to three days. If you want them crisp, avoid stacking them. The air needs to flow to keep them crunchy. You can freeze these bites for longer storage. Just place them in a single layer on a baking sheet. Freeze until firm, then transfer to a freezer-safe bag. They can stay frozen for up to three months. To reheat, bake them at 400°F (200°C) for about 10-15 minutes. This helps bring back their crispy texture. You can also use an air fryer for a quicker option. Enjoy these bites again without losing their yummy crunch. For the full recipe, check the main section of this article. To lower the spice, use less sriracha. Start with a tablespoon. You can also add more honey to balance the heat. For a kick, add more sriracha. If you want it hot, try a spicy chili sauce too. This gives you control over the spice level. Yes, you can! Broccoli works well. Brussels sprouts are tasty too. You can even use carrots or zucchini. Just make sure they are cut into similar sizes for even cooking. Each veggie will bring its own flavor. I love pairing these bites with a cool dip like ranch or yogurt. They go great with rice or a fresh salad. For drinks, try iced tea or a light beer. These choices balance the heat and make the meal fun. To find the complete instructions and details, check the [Full Recipe](#). You've learned how to make Sriracha Honey Cauliflower Bites, focusing on key ingredients and baking steps. We covered tips for crispiness, serving ideas, and variations to fit your needs. Remember, freshness matters for ingredients. Think about how you can adjust spice levels or use different veggies. Enjoy creating this dish for any occasion. It's a fun way to explore flavors and impress your friends. For full recipe details, check the link. Happy cooking!](https://mysavedrecipe.com/wp-content/uploads/2025/05/50e64dfc-2a5f-4222-8e96-9ee502047306-300x300.webp)
![- 1 lb ground turkey or beef - 1 tablespoon olive oil - 1 small onion, finely chopped - 2 cloves garlic, minced - 1 packet taco seasoning - 1 cup black beans, drained and rinsed - 1 cup corn kernels (fresh or frozen) - 1 cup shredded cheese (cheddar or a blend) - Mini tortilla cups - Fresh cilantro, chopped - Sour cream and salsa To create Oven-Baked Taco Bites, you need simple, fresh ingredients. I love using ground turkey or beef for the filling. Ground turkey is leaner, while beef has a richer flavor. You can choose based on your taste. Olive oil gives a nice touch when you sauté the onions and garlic. The onion adds sweetness, and the garlic adds depth. These two work together like a dream, making your kitchen smell amazing! Taco seasoning is key here. It brings all the flavors together. I like to use a packet for convenience, but you can mix your own spices if you prefer. Black beans and corn add texture and nutrition. They make this snack hearty but still light. You can use fresh or frozen corn based on what you have. Finally, cheese! I like to use a blend of cheddar for its sharpness, but any shredded cheese works well. It melts beautifully and adds creaminess to each bite. For serving, mini tortilla cups are a must. They hold everything together and add a nice crunch. Don't forget fresh cilantro, sour cream, and salsa for garnishing. They add freshness and flavor to your Taco Bites. For the full recipe, you can check the detailed instructions above. - Preheat the oven to 375°F (190°C). - In a large skillet, heat 1 tablespoon of olive oil over medium heat. - Add 1 small onion, finely chopped. Sauté for about 3-4 minutes. - Stir in 2 cloves of minced garlic. Cook for 1 minute until fragrant. - Add 1 lb of ground turkey or beef to the skillet. - Cook until browned, breaking it apart, about 5-7 minutes. - Mix in 1 packet of taco seasoning, 1 cup of black beans, and 1 cup of corn. - Cook for another 3-4 minutes until everything is heated through. - Remove from heat and fold in half of the shredded cheese. - Place mini tortilla cups on a baking sheet. - Spoon the filling mixture into each cup, packing it gently. - Top each filled tortilla cup with the remaining cheese. - Bake in the preheated oven for 12-15 minutes until cheese is melted and bubbly. Follow these steps for a tasty treat! You can find the Full Recipe for more details. You can change the protein in this recipe. Try using chicken or a plant-based meat. Each option gives a new taste. To add some heat, sprinkle in chili powder or cayenne pepper. These spices wake up the flavors and make the bites exciting. For best results, make sure the meat browns evenly. This step helps lock in flavor. When filling the tortilla cups, don’t pack them too tightly. This allows the taco bites to cook evenly and stay crispy. Serve the taco bites warm. This way, the cheese melts and is gooey. Add fresh toppings like diced tomatoes, avocados, or shredded lettuce for extra crunch. For side dishes, consider serving with a simple salad or tortilla chips. These pair well and make for a fun meal. Enjoy your delicious taco bites! If you want to see the full recipe, check out the [Full Recipe]. {{image_2}} You can make Oven-Baked Taco Bites fit your diet. For gluten-free options, choose corn tortilla cups. They work great instead of regular flour ones. If you want a vegetarian version, use meat alternatives like lentils or textured vegetable protein. These swaps keep the taco bites tasty and satisfying. Feel free to play with the ingredients. You can use different types of cheese like pepper jack for a spicy kick. If you want to swap beans, try using pinto beans or chickpeas instead. These changes keep the recipe fresh and fun. Adding veggies to the filling can enhance taste. Consider bell peppers, zucchini, or spinach for extra crunch and nutrition. You can also experiment with different taco seasonings. Try spicy chipotle or smoky paprika to change the flavor profile. Each variation brings a new twist to your taco bites. For the full recipe, check out the earlier section. To store leftover taco bites, let them cool down first. Place them in an airtight container. This keeps them fresh and tasty. I recommend using glass or plastic containers with tight lids. They help avoid any unwanted odors in your fridge. Leftover taco bites can last for up to three days. If you want to freeze taco bites, first let them cool completely. Then, place them in a single layer on a baking sheet. Freeze them for about an hour. This step helps keep them from sticking together. After that, transfer the bites to a freezer-safe bag. Remove as much air as you can. Taco bites can stay good in the freezer for up to three months. When you're ready to eat them, you can use either the oven or microwave. The oven is best for keeping the bites crispy. Preheat your oven to 350°F (175°C). Place the taco bites on a baking tray and heat for about 10 minutes. If you use the microwave, heat them in 30-second bursts. This keeps them moist but may make them a bit soft. To keep the bites crispy, you can cover them with foil while reheating in the oven. For the full recipe, check out the earlier section. Oven-Baked Taco Bites stay fresh for about 3 to 4 days in the fridge. Store them in an airtight container to keep them tasty. If you want to save them longer, you can freeze them. In the freezer, they last for up to 3 months. Just make sure to wrap them well to avoid freezer burn. Yes, you can prep these bites ahead of time! You can cook the filling and store it in the fridge. Just keep it in a sealed container. You can also assemble the taco bites and place them on a baking sheet. Cover them with plastic wrap and store them in the fridge for up to a day. When you're ready, just pop them in the oven! If you can't find mini tortilla cups, don't worry! You can use small flour or corn tortillas. Cut them into smaller circles and then shape them into cups using a muffin tin. You can also use phyllo dough for a crispy twist. Another option is to serve the filling in lettuce cups for a fresh, low-carb choice. You now have a great recipe for Oven-Baked Taco Bites. We've covered the key ingredients, step-by-step cooking methods, and tips for serving. You can easily adjust this recipe to suit your needs or preferences. Whether you want to make it vegetarian or need gluten-free options, the possibilities are endless. Store leftovers properly for later enjoyment. Cooking can be fun and easy with this snack. Now, gather your ingredients and try making these bites today!](https://mysavedrecipe.com/wp-content/uploads/2025/05/378a6d94-8405-417e-b6e1-8031a2e3e5f0-300x300.webp)
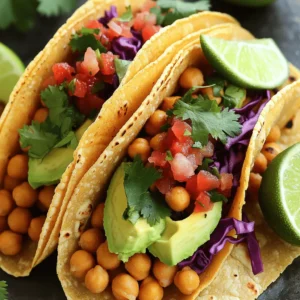
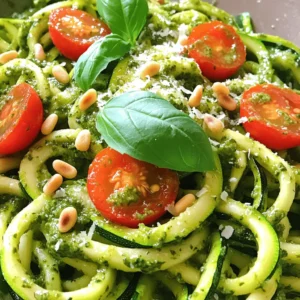
![- 2 ripe avocados, peeled and pitted - 1/2 cup unsweetened cocoa powder - 1/4 cup maple syrup (or agave syrup) - 1/4 cup almond milk (or any plant-based milk) - 1 teaspoon vanilla extract - A pinch of sea salt - Dark chocolate shavings (for garnish) - Fresh mint leaves (for garnish) When making Chocolate Avocado Mousse, you need fresh, ripe avocados. They give a creamy base. Look for avocados that yield slightly when you press them. This shows they are ready. Next, unsweetened cocoa powder adds rich chocolate flavor. Using a natural sweetener like maple syrup keeps it healthy. You can also swap it for agave syrup if you prefer. Almond milk helps blend the mousse smoothly. It also keeps the dessert plant-based. Vanilla extract adds a lovely aroma and depth to the flavor. Just a pinch of sea salt brightens the taste. Finally, dark chocolate shavings and mint leaves make the mousse look special. These garnishes add color and a fresh touch. - Calories per serving: About 200 - Breakdown of macronutrients: 15g fat, 20g carbs, 3g protein - Health benefits of avocados in desserts: Avocados are full of healthy fats and vitamins. They help improve heart health and skin. Using avocados in desserts makes them richer and creamier without adding dairy. You can enjoy a sweet treat that is good for you! To make this chocolate avocado mousse, start with your avocados. Choose ripe ones; they should feel soft when you squeeze them. Cut each avocado in half and remove the pit. Use a spoon to scoop out the green flesh into a bowl. Next, measure out your other ingredients. You will need: - 2 ripe avocados, peeled and pitted - 1/2 cup unsweetened cocoa powder - 1/4 cup maple syrup (or agave syrup) - 1/4 cup almond milk (or any plant-based milk) - 1 teaspoon vanilla extract - A pinch of sea salt Put all these ingredients near your blender. Now we blend! Place the avocado, cocoa powder, maple syrup, almond milk, vanilla extract, and sea salt into a food processor. Start blending on high speed. Scrape down the sides to mix well. You want a creamy texture. If it seems too thick, add a bit more almond milk. Taste your mousse! If it's not sweet enough, add a little more maple syrup. Blend again to mix it in. Aim for a smooth and silky consistency. Once your mousse is ready, scoop it into bowls or cups. Cover each bowl with plastic wrap. Chill them in the fridge for at least 30 minutes. This helps the flavors blend and the mousse firm up. When you’re ready to serve, take the mousse out of the fridge. Top each serving with dark chocolate shavings and a fresh mint leaf. This adds a nice touch and looks great! To make your mousse just right, adjust the sweetness if needed. Taste the mix before serving. If it’s too bitter, add more maple syrup. Blend again to make it smooth. You can also spice it up. A pinch of cinnamon adds warmth. For a coffee kick, stir in espresso powder. These small tweaks can make a big difference. Serving matters! Use clear dishes to show off the mousse's rich color. It looks great in glass cups. You can also drizzle extra maple syrup on top. This adds shine and sweetness. Try adding fresh mint leaves for a pop of green. Dark chocolate shavings make it look fancy too. Be careful when blending. Overblending can make the mousse too runny. Blend just until smooth and creamy. Check your avocados too. Always use ripe ones. Unripe avocados can ruin the taste and texture. Make sure they feel soft when you press them gently. Using the right ingredients ensures a perfect mousse. For the full recipe, check out the [Full Recipe]. {{image_2}} You can easily change the flavor of your chocolate avocado mousse. Adding peanut butter or almond butter gives it a rich, nutty taste. Just mix in about 2 tablespoons when you blend. You can also add spices to enhance the flavor. A pinch of cinnamon adds warmth, while a splash of espresso gives a nice coffee kick. These small changes make your mousse unique and exciting. This mousse is great for different diets. It is naturally gluten-free, making it perfect if you avoid gluten. If you follow a vegan diet, this recipe is already vegan-friendly. You can replace maple syrup with agave syrup or coconut sugar if you prefer. Just ensure all your ingredients are plant-based to keep it vegan. Serving your chocolate avocado mousse is fun and easy. You can pair it with fresh fruits like strawberries or bananas for a fresh taste. Adding nuts, like crushed almonds or walnuts, gives a nice crunch. For an extra treat, consider incorporating the mousse into other desserts. Use it as a filling for cakes or as a topping for pancakes. The options are endless! For the full recipe, check out the details above. To keep your mousse fresh, use airtight containers. Glass jars work well. They keep moisture out and flavor in. Store the mousse in the fridge for up to three days. After that, the texture may change. You don’t need to reheat mousse. If it feels dense, stir it gently. This helps restore its creamy texture. Serve it cold, right from the fridge. You can also add a splash of almond milk for a lighter feel. You can freeze the mousse if needed. Portion it into small containers. Leave some space at the top for expansion. To thaw, place it in the fridge overnight. You may need to blend it again to restore its smoothness. This mousse is a rich treat that can last longer with proper care. Chocolate avocado mousse is a treat that offers many health benefits. The main star, avocado, is rich in healthy fats and fiber. These fats help your heart and keep you full longer. Here are some key benefits: - Avocados: They provide good fats and vitamins like E and K. - Cocoa Powder: This adds antioxidants, which are great for your skin and heart. - Maple Syrup: It has nutrients like zinc and manganese, plus it’s a natural sweetener. - Almond Milk: A low-calorie option that is dairy-free and full of vitamins. This mousse lets you enjoy dessert without guilt. Yes, you can use other sweeteners in this recipe. While I love maple syrup, there are great alternatives. Here are some options: - Agave Syrup: It’s sweeter than maple syrup, so use less. - Honey: A natural choice that blends well. - Coconut Sugar: This offers a caramel flavor and is less processed. - Stevia: A no-calorie option if you want to cut sugar completely. Choose what you like best for your taste and health goals! Chocolate avocado mousse can last in the fridge for about 3 days. Store it in an airtight container to keep it fresh. If you want to save it longer, you can freeze it. It can last up to a month in the freezer. Just remember to thaw it in the fridge before enjoying it again. Freezing may change the texture a bit, but it still tastes great! In summary, this guide takes you through the delicious journey of making Chocolate Avocado Mousse. You learned about the key ingredients, how to prepare and blend them, and tips for serving. We also covered storage tips and common mistakes to avoid. This dessert is healthy, easy to make, and offers tasty variations. It’s perfect for impressing guests or enjoying a treat. Enjoy making this mousse, and remember to share your creations!](https://mysavedrecipe.com/wp-content/uploads/2025/05/c3209d73-d04b-43da-94cb-a44a122d06ed-300x300.webp)

. After making your Peach Cobbler Dump Cake, let it cool. Once cool, cover it with plastic wrap or aluminum foil. Store it in the fridge. It will stay fresh for up to four days. If you want to enjoy it later, proper storage is key. To reheat, use the microwave or oven. If using the microwave, place a slice on a plate and cover it with a paper towel. Heat for 30 seconds to 1 minute. For the oven, cover the cake with foil and heat at 350°F for about 15 minutes. This keeps it warm without drying it out. To freeze, let the cake cool completely. Cut it into individual slices. Wrap each slice in plastic wrap, then in foil. Place the wrapped slices in a freezer bag. They can last for up to three months in the freezer. When ready to eat, thaw in the fridge overnight and reheat as needed. Enjoy your Peach Cobbler Dump Cake whenever you want! For more details, check the Full Recipe. Yes, you can use fresh peaches. Just peel and slice them first. Make sure they are ripe for the best flavor. Fresh peaches give a nice texture and taste. You may need to add a little sugar if they are not sweet enough. Peach Cobbler Dump Cake lasts about 3 to 5 days in the fridge. Store it in an airtight container to keep it fresh. You can also cover it with plastic wrap. The cake might lose some crispness over time, but it will still taste good. Yes, you can prepare the layers ahead. Just assemble everything in the baking dish, then cover it. Store it in the fridge for up to a day. When you are ready, bake it as usual. This saves time when you have guests. You can serve it warm with vanilla ice cream or whipped cream. Ice cream melts slightly and adds creaminess. Whipped cream is light and fluffy on top. You can also add fresh peach slices or a sprinkle of cinnamon for extra flavor. For the full recipe, check out the earlier section. Peach Cobbler Dump Cake is easy and fun to make. You learned about key ingredients, steps, and handy tips. Using different fruits can improve your cake. Don't forget to store leftovers for future treats. This dessert is great for gatherings or cozy nights. With practice, you'll master this recipe and impress others. Enjoy every bite as you share this warm, fruity delight!](https://mysavedrecipe.com/wp-content/uploads/2025/05/d3717c14-90c6-49d6-a982-7117d0988247-300x300.webp)