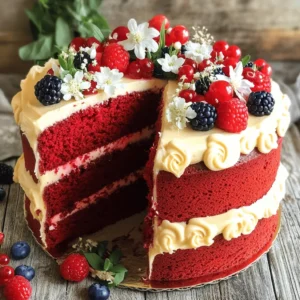
- Red Velvet Cake Irresistible Treat for Any Occasion
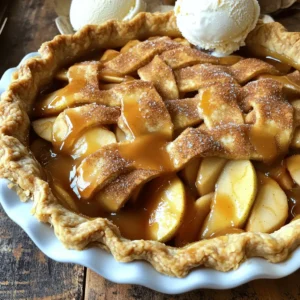
- Apple Pie Delight with Cinnamon and Caramel Toppings
- Healthy Broccoli Pasta Flavorful and Easy Recipe
- Crockpot Mexican Chicken Flavorful and Simple Dish
- Spring Hash Brown Crust Quiche Flavorful and Easy Recipe
- Knock You Naked Cookie Bars Irresistible Delight
- Mushroom Tofu Stir Fry Quick and Flavorful Delight
- Marry Me Shrimp Pasta Irresistible Creamy Delight
- One-Pot Creamy Cajun Sausage Pasta Delight Recipe
- Chewy Pumpkin Cookies Simple and Irresistible Treat
- Sun Dried Tomato Ricotta Stuffed Shells Savory Dish
- Mozzarella Stuffed Meatballs Savory and Flavorful Treat
- Twice Baked Breakfast Potatoes Savory Morning Delight
- Savory Chicken Rice Bowl with Garlic Sauce Recipe
- Savory Slow Cooker Chicken Enchilada Soup Recipe
- Mediterranean Baked Fish Tasty and Healthy Delight
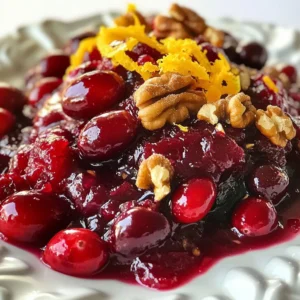
- Old-Fashioned Cranberry Sauce Simple and Tasty Recipe
- Peach Pie Cruffins Delightful and Easy Dessert Recipe
- Honey Garlic Shrimp Bowls Flavorful Meal for Everyone
- Garlic Butter Chicken Broccoli Flavorful Dinner Dish
- Parmesan Mozzarella Party Bites Tasty and Simple Treat
- Leftover Chicken Gyro Bowls for a Flavorful Meal
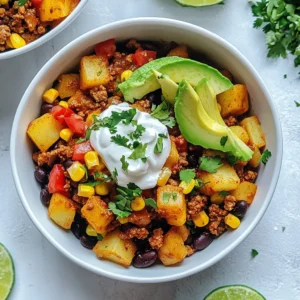
- Ground Beef Potato Taco Bowls Flavorful Dinner Delight
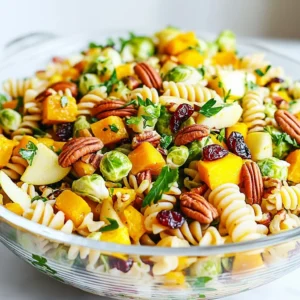
- Fall Harvest Pasta Salad for a Festive Meal
- Chicken Sausage Broccoli Orzo Tasty Dinner Recipe
- Crispy Chicken Ranch Wraps Easy and Flavorful Meal
- Minute One Pot Meals Quick and Easy Recipes
- Pumpkin Cream Cheese Muffins Delightful and Simple Recipe
- Four-Ingredient Orange Chicken Simple and Tasty Dish
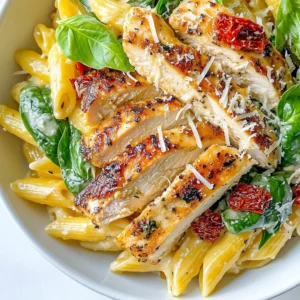
- Marry Me Chicken Pasta Irresistible Dinner Delight
- Chicken Fajita Casserole Tasty and Simple Recipe
- Apple Cider Donut Ice Cream Sandwiches Delightful Treat
- Garlic Parmesan Tortellini with Chicken Delight
- Chicken Piccata Recipe Simple and Flavorful Delight
- One Pot Veggie Mac and Cheese Simple Comfort Food
- Marry Me Chicken Soup Comforting and Tasty Recipe
- Keto Crack Chicken Soup Comforting and Creamy Delight
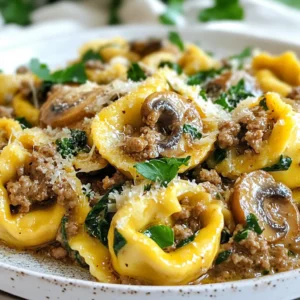
- Beef Mushroom Tortellini Skillet Simple One-Pan Meal
- Slow Cooker Street Corn Chicken Flavorful Delight
- Keto Philly Cheesesteak Rolls Packed with Flavor
- Classic Butter Chicken Rich Flavor and Easy Recipe
- Baked Chicken Chimichangas Crispy and Tasty Meal


![- 1 cup canned pumpkin puree - 1/2 cup cream cheese, softened - 1/2 cup granulated sugar - 1/2 cup brown sugar, packed - 1/4 cup vegetable oil - 2 large eggs - 1 teaspoon vanilla extract - 1 1/2 cups all-purpose flour - 1 teaspoon baking powder - 1 teaspoon baking soda - 1/2 teaspoon ground cinnamon - 1/4 teaspoon ground nutmeg - 1/4 teaspoon salt - 1/4 cup chopped walnuts or pecans (optional) Gathering the right ingredients is key for great pumpkin cream cheese muffins. I love using canned pumpkin puree because it saves time. Make sure your cream cheese is soft. This will help it blend well with the sugars. You need granulated sugar and brown sugar for sweetness and depth. Vegetable oil keeps the muffins moist. Then, you’ll need large eggs for binding. Vanilla extract adds a nice touch of flavor. For the dry mix, you’ll need all-purpose flour, baking powder, and baking soda for rise. Ground cinnamon and nutmeg bring warmth. A pinch of salt enhances all these flavors. If you like nuts, add walnuts or pecans for crunch. This recipe is simple and perfect for fall. You can find the full recipe for more details on how to prepare these tasty treats. - Step 1: Preheat oven and prepare muffin tin First, set your oven to 350°F (175°C). This temperature is perfect for baking. Next, line your muffin tin with paper liners or grease it well. This helps the muffins come out easily. - Step 2: Mix wet ingredients In a large bowl, mix the softened cream cheese, granulated sugar, and brown sugar. Use an electric mixer to beat them until smooth. This mix gives the muffins a rich flavor. Then, add the canned pumpkin, vegetable oil, eggs, and vanilla extract. Mix well until it looks creamy and smooth. - Step 3: Combine dry ingredients In another bowl, whisk together the flour, baking powder, baking soda, cinnamon, nutmeg, and salt. This step is key to making sure your muffins rise well. Mixing these dry ingredients evenly helps create a fluffy texture. - Step 4: Incorporate dry and wet mixtures Gradually add the dry mix to the wet mix. Use a spatula to fold it in gently. Be careful not to overmix; a few lumps are okay. If you want some crunch, fold in the walnuts or pecans now. - Step 5: Fill muffin tin and bake Spoon the batter into the muffin tin. Fill each liner about two-thirds full. This gives the muffins room to rise. Bake them for about 18-20 minutes. To check if they are done, insert a toothpick into the center. If it comes out clean, they are ready! - Step 6: Cooling and serving suggestions Let the muffins cool in the tin for about 5 minutes. After that, transfer them to a wire rack. This helps them cool evenly. Serve the muffins warm. You can sprinkle them with powdered sugar or add a dollop of whipped cream cheese frosting for a special treat. - Prep time: 15 minutes - Cook time: 20 minutes - Total time: 35 minutes For the full recipe, check the ingredients section above. Enjoy your baking! - Avoid overmixing the batter: Mix until just combined. Overmixing makes muffins tough. - Choosing the right pumpkin puree: Use canned pumpkin puree. It has a smooth texture. Fresh pumpkin can be watery and change the taste. - Vegan or gluten-free alternatives: Substitute eggs with flaxseed meal. Use gluten-free flour instead of all-purpose flour. - Flavor variations (spices, nuts, chocolate chips): Try adding ginger or cloves for warmth. Mix in chocolate chips or nuts like pecans for crunch. - Ideal serving suggestions: Serve muffins warm for the best flavor. Pair them with coffee or tea for a delightful treat. - Garnishing ideas for a festive look: Dust with powdered sugar. Top with cream cheese frosting or a sprinkle of cinnamon. For a special touch, add some fall-themed decorations around the plate. {{image_2}} The traditional recipe for pumpkin cream cheese muffins is a true delight. It combines sweet pumpkin with rich cream cheese. This mix creates a soft, moist treat. You can enjoy these muffins warm or cold. Each bite bursts with flavor, making it a favorite for many. If you prefer a vegan version, you can swap out a few ingredients. Use plant-based cream cheese instead of regular cream cheese. Replace eggs with flaxseed meal or applesauce. These changes keep the muffins tasty and soft. You won't miss the original version at all! Want to add a little extra fun? Add chocolate chips to the batter. The sweet chocolate pairs well with the pumpkin flavor. You can also use nuts like walnuts or pecans. These nuts add a nice crunch and earthy flavor. Just fold them in gently before baking. You can get creative with seasonal themes. For the holidays, try adding spices like ginger or cloves. These spices will warm up your muffins. You can also decorate them with festive toppings. In summer, you might want a fruity twist. Consider adding fresh berries or diced peaches. This gives a bright, fresh taste to your muffins. Try these variations to keep your baking exciting! For the full recipe, check out the [Full Recipe]. To keep your muffins fresh, store them in an airtight container. This helps keep moisture in and air out. You can also line the container with paper towels. This way, the towels absorb any extra moisture. If you want to store them in the refrigerator, place the muffins in a sealed bag or container. The fridge can help them stay fresh longer, but they may dry out. Enjoy them within a week for the best taste. You can freeze these muffins for later. First, let them cool completely. Wrap each muffin in plastic wrap. Then, place them in a freezer-safe bag. This keeps them tasty and safe from freezer burn. When you want to eat one, take it out and let it thaw. You can leave it on the counter or thaw it in the fridge overnight. To reheat, pop it in the microwave for about 20-30 seconds. This warms it up nicely. At room temperature, these muffins last about 2-3 days. Keep them in a cool, dry place. If they stay in a warm area, they may spoil faster. Look for signs of spoilage. If the muffins smell off or have visible mold, throw them away. Enjoy your tasty Pumpkin Cream Cheese Muffins while they are fresh! For the full recipe, check out the earlier section. Can I use fresh pumpkin instead of canned? Yes, you can use fresh pumpkin! Just cook and puree it first. Fresh pumpkin gives a nice taste. Make sure to remove excess water to avoid a wet batter. What can I use instead of cream cheese? You can swap cream cheese with Greek yogurt or silken tofu. Both add creaminess. They also reduce fat while keeping your muffins moist. Can I lower the sugar content? Yes, you can reduce the sugar! Cut down by a quarter or use a sugar substitute. Just remember that this may change the taste slightly. How can I make these muffins healthier? To make them healthier, use whole wheat flour instead of white flour. You can also add in some oats for fiber. Adding applesauce can replace some oil too! Why is my batter too thick? If your batter is thick, it could be due to too much flour. Measure carefully! Adding a bit of milk can help make it smoother if needed. What can I do if the muffins are too dense? Dense muffins can happen if you overmix the batter. Mix just until combined. If they are still dense, check your baking powder and baking soda for freshness. You learned about making Pumpkin Cream Cheese Muffins. We covered ingredients, steps, and tips. I shared how to customize your muffins for your taste and dietary needs. Remember to store them for freshness and ask any questions as you bake. Enjoy your delicious muffins! They are perfect for sharing or enjoying alone. Happy baking!](https://mysavedrecipe.com/wp-content/uploads/2025/07/e987f466-f52e-433d-adc2-5792aa253325-300x300.webp)


![To make these tasty sandwiches, you need the following ingredients: - 2 cups apple cider - 1 cup all-purpose flour - 1 cup whole wheat flour - 1 teaspoon baking powder - 1 teaspoon baking soda - 1 teaspoon ground cinnamon - 1/2 teaspoon nutmeg - 1/2 teaspoon salt - 1 cup granulated sugar - 1/4 cup unsalted butter, softened - 2 large eggs - 1/2 cup buttermilk - 1/2 teaspoon vanilla extract - 1 pint cinnamon or vanilla ice cream - 1/4 cup granulated sugar mixed with 1 teaspoon cinnamon (for coating) These ingredients create a sweet and spiced donut base, perfect for ice cream. You can make these sandwiches even better by adding some optional ingredients: - Chopped nuts for crunch - Chocolate chips for extra sweetness - Caramel sauce for drizzling - Different spices like ginger or allspice - Fresh fruit like apple slices or berries Feel free to mix and match based on your taste! To create these delicious treats, gather these tools: - Donut pan or non-stick skillet - Mixing bowls - Whisk or electric mixer - Measuring cups and spoons - Cooling rack - Ice cream scooper These tools will help you whip up these sandwiches with ease. For the full recipe, follow the steps carefully to enjoy this delightful treat! First, we need to make the cider reduction. Grab a small saucepan and pour in the apple cider. Turn the heat to medium and bring it to a boil. Once it boils, lower the heat to let it simmer. This will take about 15 to 20 minutes. You want to cook it until it reduces to about 1 cup. It should look thicker and smell sweet. After it’s done, let it cool a bit before using it in the batter. Now, let’s make the donut batter. In a big bowl, mix together the all-purpose flour, whole wheat flour, baking powder, baking soda, cinnamon, nutmeg, and salt. Stir all the dry ingredients well. In another bowl, beat the softened butter and granulated sugar until it’s light and fluffy. Then add the eggs, buttermilk, and vanilla extract. Mix it all together until smooth. Slowly pour in the cooled cider reduction and stir. Finally, add the dry mix to the wet mix. Just combine them until you see no dry flour. Do not overmix! Next, we need to cook the donuts. Preheat your donut pan to 350°F (175°C). If you don’t have a pan, you can use a non-stick skillet for donut holes. Fill each cavity of the donut pan about 3/4 full with batter. Bake for 10 to 12 minutes or until golden brown. To check, insert a toothpick; it should come out clean. If you’re using a skillet, cook small dough balls, flipping them until they are brown all over. After baking, place the donuts on a wire rack to cool completely. Once cooled, you can roll each donut in the cinnamon-sugar mixture to coat it. This adds extra flavor, making your treats even more special. Now you’re ready to assemble those delicious ice cream sandwiches! For the complete recipe, check the [Full Recipe]. To get the best donut texture, start with fresh ingredients. Use the right mix of all-purpose and whole wheat flour. This mix gives a nice balance of flavor and texture. Make sure not to overmix the batter. Overmixing can lead to dense donuts. Aim for a smooth, thick batter. Lastly, let your donuts cool completely before coating them. This helps the cinnamon-sugar stick well. Assembling your ice cream sandwiches is fun and easy! First, take one donut and add a scoop of ice cream. I like using cinnamon or vanilla ice cream for a tasty combo. Place another donut on top and gently press down. This helps the ice cream stick. If you want a fun twist, try rolling the edges in sprinkles or nuts for added crunch. Coating your donuts in cinnamon-sugar is key for flavor. Once cooled, roll them in the sugar mix. Make sure to coat all sides evenly. If you want a thicker coating, dip the donuts in melted butter first, then roll in the sugar mix. This adds extra sweetness and gives a nice shine. Remember, fresh donuts taste best, so coat them just before serving for the best experience. For the complete recipe, check out the Full Recipe section. {{image_2}} You can use many ice cream flavors for these sandwiches. Classic vanilla pairs well with the warm spices. Cinnamon ice cream adds an extra kick. Try caramel for a sweet twist. For a fruity touch, apple or pear flavors work great. Mix and match to find your favorite! Making this treat gluten-free is easy. Substitute all-purpose flour with a gluten-free blend. Use a vegan butter for the dough. For a vegan ice cream option, try coconut or almond milk ice cream. You can create a tasty, inclusive treat everyone can enjoy. Seasonal toppings can elevate your sandwiches. Drizzle with caramel or chocolate sauce for sweetness. Add chopped nuts for crunch. You can sprinkle pumpkin spice for a fall vibe or use crushed candy canes for winter. Fresh fruit like sliced apples or berries adds a nice touch too. To keep your leftover donuts fresh, place them in an airtight container. This will stop them from drying out. Store them at room temperature for up to two days. If you want to keep them longer, refrigerate them for up to a week. Just be aware that refrigeration can change their texture. You can freeze your ice cream sandwiches for later enjoyment. Wrap each sandwich tightly in plastic wrap. Then, place them in a freezer bag or container. They can last up to three months in the freezer. When you’re ready to eat, let them sit at room temperature for a few minutes to soften. If you want to warm up your donuts, use the oven. Preheat it to 350°F (175°C). Place the donuts on a baking sheet and warm them for about five minutes. This will make them soft again. Avoid using the microwave, as it can make them chewy. To make Apple Cider Donut Ice Cream Sandwiches from scratch, follow this simple method. First, prepare a cider reduction by boiling 2 cups of apple cider in a saucepan until it reduces to 1 cup. This should take about 15-20 minutes. Let it cool slightly. Next, mix the dry ingredients. Combine 1 cup of all-purpose flour, 1 cup of whole wheat flour, 1 teaspoon each of baking powder and baking soda, 1 teaspoon of ground cinnamon, 1/2 teaspoon of nutmeg, and 1/2 teaspoon of salt in a large bowl. In another bowl, cream together 1/4 cup of softened unsalted butter and 1 cup of granulated sugar until light. Add 2 large eggs, 1/2 cup of buttermilk, and 1/2 teaspoon of vanilla extract, mixing well. Slowly pour the cooled cider into the wet mixture and stir. Gradually add the dry ingredients. Mix until just combined. Now, preheat your oven to 350°F (175°C). If you have a donut pan, fill it about 3/4 full with batter. Bake for 10-12 minutes until golden. If using a skillet, cook small dough balls until browned. Once cooled, roll the donuts in a mixture of 1/4 cup of sugar and 1 teaspoon of cinnamon. Assemble the sandwiches by placing ice cream between two donuts. You can find the full recipe for more details. Yes, you can make these treats ahead of time! Prepare the donuts a day or two before serving. Store them in an airtight container at room temperature. Assemble the ice cream sandwiches just before you want to serve them. This keeps the donuts fresh and soft. You might find pre-made Apple Cider Donut Ice Cream Sandwiches at local ice cream shops or specialty dessert stores. Some grocery stores may also carry them during fall. Check online for local options or delivery services that specialize in unique desserts. You’ve learned how to create delicious Apple Cider Donut Ice Cream Sandwiches from scratch. We covered ingredients, step-by-step instructions, and useful tips. Remember to customize your sandwiches with different flavors and options. Storing leftovers properly will keep them fresh for later. With this guide, you can make tasty treats for any season. Enjoy the process and share your creations with friends. Happy baking!](https://mysavedrecipe.com/wp-content/uploads/2025/07/e706e708-cf74-41ed-9c3e-35e2615b6dc7-300x300.webp)