• Recipes
    • Dinner
    • Dessert
    • Appetizers
    • Drinks
  • About
  • Contact Us
  • Privacy Policy
menu icon
go to homepage
  • Recipes
    • Dinner
    • Dessert
    • Appetizers
    • Drinks
  • About
  • Contact Us
  • Privacy Policy

search icon
Homepage link
  • Recipes
    • Dinner
    • Dessert
    • Appetizers
    • Drinks
  • About
  • Contact Us
  • Privacy Policy

×
Savannah

Savannah

Savannah is the creative force behind My Saved Recipe, a space where food becomes both art and adventure. A passionate home chef, she delights in exploring flavors from around the world while honoring timeless classics.

Savannah’s philosophy centers on the power of food to bring people together, spark creativity, and create lasting memories. Through thoughtfully crafted recipes and practical tips, she inspires cooks of all levels to embrace fresh ingredients, experiment with confidence, and find joy in the kitchen.

  • - 4 large russet potatoes, peeled and diced - 2 cups frozen sweet corn - 1 medium onion, chopped - 3 cloves garlic, minced - 1 teaspoon dried thyme - 1 teaspoon smoked paprika - 4 cups vegetable broth - 1 cup heavy cream or coconut cream - Salt and pepper to taste - 2 tablespoons butter or olive oil - Fresh chives or parsley for garnish Gather these simple yet flavorful ingredients to make your chowder shine. The russet potatoes create a creamy base, while the sweet corn adds a pop of flavor. Onions and garlic bring depth, and the thyme and smoked paprika add warmth to every bite. You can choose heavy cream for richness or coconut cream for a light, dairy-free option. Don't forget your seasonings! Salt and pepper will help balance the flavors, while butter or olive oil adds a nice touch. Finally, fresh herbs like chives or parsley elevate your dish. Prepare these ingredients, and you are ready to cook! - Start by heating the butter or olive oil in a skillet over medium heat. - Add the chopped onion and minced garlic. Sauté until they are soft and smell great, about 3-4 minutes. - In your slow cooker, add the diced potatoes and frozen corn. - Next, mix in the sautéed onion and garlic, vegetable broth, dried thyme, smoked paprika, and a pinch of salt and pepper. Stir well to combine everything. - Cover the slow cooker and set it on low heat for 6-8 hours or high for 3-4 hours. The potatoes should be tender and easy to pierce with a fork. - After cooking, use a potato masher to gently mash some of the potatoes. This gives the chowder a creamier texture while keeping some chunks for bite. - Stir in the heavy cream or coconut cream until it is well mixed. - Taste and adjust the seasoning with more salt and pepper if needed. Let it cook for another 15-20 minutes on low to heat through. To get a creamy chowder, you should mash some of the potatoes. Use a potato masher after cooking. Mash until you see a smooth mix but leave some chunks for texture. This adds both creaminess and interest to your dish. Cooking time is key too. If you cook on low, let it go for 6 to 8 hours. For a quicker meal, set it on high for 3 to 4 hours. Just make sure the potatoes are tender. You can boost the flavor with extra spices. Try a pinch of cayenne for heat or a touch of cumin for warmth. Fresh herbs can make a big difference too. When serving, sprinkle chopped chives or parsley on top. They add a pop of color and fresh taste. Not all slow cookers are the same. Look for one with a good temperature range. Brands like Crock-Pot and Hamilton Beach work well for this chowder. Always check the seal on the lid. A tight seal helps keep the heat in. Also, be safe while using a slow cooker. Keep it on a flat surface and away from edges. If you need to lift it, use oven mitts. Enjoy your cooking! {{image_2}} You can make this chowder dairy-free by using coconut cream. It adds a rich taste without any dairy. For vegetarians, this recipe is already great. If you want a vegan option, just skip the butter and heavy cream. Use olive oil and coconut cream instead. This keeps the dish plant-based while still creamy. Feel free to use different types of potatoes. Yukon Gold or red potatoes work well and add flavor. You can also substitute other vegetables. Try carrots or bell peppers for more color and nutrients. Adding these swaps can change the taste and texture of the chowder. For a heartier chowder, add proteins like bacon or chicken. These will give the dish depth and flavor. You can also mix in fresh herbs. Rosemary and oregano are excellent choices. They bring out the natural sweetness of the corn and potatoes. Don’t be afraid to experiment with flavors! To store your chowder, use airtight containers. Glass or BPA-free plastic work best. Let the chowder cool before placing it in the fridge. This helps keep it fresh longer. You can freeze chowder for later use. First, let it cool completely. Then, pour it into freezer-safe containers. Leave some space at the top for expansion. It lasts about three months in the freezer. For thawing, move it to the fridge overnight before reheating. For reheating, use the stove or microwave. If using the stove, warm it over low heat. Stir often to avoid burning. If using a microwave, heat in short bursts, stirring in between. To restore creaminess, add a splash of cream or milk when reheating. How long does it take to cook Slow Cooker Potato Corn Chowder? Cooking this chowder takes about 6-8 hours on low or 3-4 hours on high. The longer cooking time helps the flavors blend well. It also makes the potatoes very soft and tasty. Can I add more vegetables to the chowder? Yes, you can add more vegetables! Carrots, celery, or bell peppers work great. Just chop them small, so they cook well and blend into the chowder. Can I use fresh corn instead of frozen? Fresh corn is a fantastic option! If you have fresh corn, cut it off the cob and use it. This will add a nice, sweet flavor to your chowder. What can I use instead of heavy cream? You can use coconut cream for a dairy-free option. It gives a nice creamy texture. Another choice is using milk or a nut milk for a lighter chowder. What to serve with Potato Corn Chowder? This chowder pairs well with crusty bread or a fresh salad. You can also serve it with biscuits for a cozy meal. Can I turn this chowder into a casserole? Yes, you can make a casserole! Just pour the chowder into a baking dish, top with cheese, and bake until golden. This gives a fun twist to your classic chowder. This chowder combines simple ingredients, like potatoes and sweet corn, with spices to create a warm dish. You learned how to prepare it step-by-step, ensuring a flavorful outcome. You can modify the recipe to fit dietary needs or personal tastes. Proper storage keeps leftovers fresh, and reheating tips restore creaminess. Overall, this recipe is perfect for cozy meals and gatherings. Enjoy making your own!
    Slow Cooker Potato Corn Chowder Simple and Tasty Dish
  • - 1 pound boneless, skinless chicken breasts - 1 bag tortilla chips - 1 cup shredded cheddar cheese - 2 tablespoons chipotle powder - 1 teaspoon smoked paprika - 1 teaspoon garlic powder - 1 teaspoon onion powder - Salt and pepper to taste - 1 cup black beans, rinsed and drained - ½ cup corn kernels (fresh, frozen, or canned) - 1 medium jalapeño, sliced (optional) - ½ cup diced tomatoes - ¼ cup sliced green onions - Fresh cilantro for garnish When I make these Sheet Pan Chipotle Chicken Nachos, I start with the main ingredients. The chicken forms the base, giving you protein and flavor. I choose boneless, skinless chicken breasts for a lean option. The tortilla chips provide that wonderful crunch. I love a solid layer of shredded cheddar cheese. It melts beautifully over everything. Next, I focus on the spices and seasonings. Chipotle powder brings in that smoky heat. I also add smoked paprika for deep flavor. Garlic and onion powder give a savory kick. Salt and pepper balance the dish, enhancing all the flavors. Lastly, I love to pile on the additional toppings. Black beans add fiber and creaminess. Corn gives a touch of sweetness. If you like heat, slice the jalapeño to add some spice. Diced tomatoes bring freshness, while green onions add a nice crunch. Finally, I finish everything with fresh cilantro for a pop of color and flavor. - Preheat the oven to 400°F (200°C). - In a bowl, mix 2 tablespoons of chipotle powder, 1 teaspoon of smoked paprika, 1 teaspoon of garlic powder, 1 teaspoon of onion powder, 2 tablespoons of olive oil, and salt and pepper to taste. - Rub this mix on 1 pound of boneless, skinless chicken breasts. - Place the chicken in a baking dish and bake for 20-25 minutes. - Check if the chicken is fully cooked; it should reach an internal temperature of 165°F (75°C). - After baking, let it cool for a few minutes, then shred it with two forks. - Spread a bag of tortilla chips evenly on a sheet pan. - Layer the toppings: add half of the shredded cheddar cheese, then the shredded chicken, 1 cup of rinsed black beans, ½ cup of corn kernels, jalapeño slices (if using), and ½ cup of diced tomatoes. - Finish by adding the rest of the cheddar cheese on top. - Bake the nachos for an additional 10-15 minutes until the cheese is melted and bubbly. - Once out of the oven, garnish with ¼ cup of sliced green onions and fresh cilantro. - Serve hot with sour cream and guacamole on the side for dipping. To make the best nachos, cook the chicken to an internal temperature of 165°F (75°C). This ensures the chicken is safe to eat. Use a meat thermometer for accuracy. After cooking, let the chicken cool for a few minutes. Cooling helps the juices settle. This keeps the chicken moist when you shred it. Shredding warm chicken can lead to dry meat. For the best melt, use shredded cheddar cheese. Cheddar melts well and adds a rich flavor. You can mix it with Monterey Jack for extra creaminess. To get crispy cheese, use the broiler. After baking your nachos, turn on the broiler for 1-2 minutes. Watch closely to avoid burning. This step gives your nachos a nice golden top. Serve your nachos right on the sheet pan. This makes for a fun, casual meal. To make it pop, add fresh garnishes. Use cilantro and lime wedges for color. Squeeze lime over the nachos for a zesty kick. This not only looks great but also enhances the flavor. {{image_2}} You can switch up the protein in your nachos. Ground turkey or beef works great. Simply cook the meat with the same spices. For a meatless option, try roasted veggies or tofu. Tofu has a great texture and soaks up flavors well. Roasted peppers, zucchini, or mushrooms add a tasty twist. Cheese is key for flavor. Mixing different cheeses adds depth. Try pepper jack for a kick or mozzarella for stretch. If you need dairy-free options, look for dairy-free cheeses. Many brands offer great substitutes that melt well. Just make sure to check the labels for taste and texture. Toppings can make your nachos unique. Add sliced olives for a briny touch or fresh avocado for creaminess. Salsa brings freshness and a little heat. You can also change the spice level by using different peppers. Consider adding diced jalapeños for heat or sweet bell peppers for crunch. The choices are endless! After enjoying your nachos, storing leftovers is key. Allow the nachos to cool down first. Place them in an airtight container. Try to separate the toppings from the chips. This helps keep the chips crunchy. You can store nachos in the fridge for up to three days. If the nachos sit longer, they may become soggy. Reheating nachos can be tricky. You want to keep them crispy. The oven is your best friend here. Preheat it to 350°F (175°C). Spread the nachos on a sheet pan and bake for about 10 minutes. This method crisps the chips and melts the cheese nicely. The microwave works too, but it can make the chips soft. If you use the microwave, heat in short bursts. Check every 30 seconds to avoid sogginess. Can you freeze nachos? Yes, but it’s best to freeze them without toppings. Prepare the nachos with just chips and cheese. Wrap them tightly in plastic wrap and foil. Store them in the freezer for up to three months. When you're ready to eat, thaw in the fridge overnight. Reheat in the oven using the method above. This way, you get that fresh taste again! To spice up your nachos, add extra chipotle powder. You can also mix in cayenne pepper or use a spicy salsa. If you like fresh heat, top with more sliced jalapeños. For a smoky flavor, try adding diced green chiles. These choices will give your nachos a zesty kick. Yes, you can prep ingredients ahead. Cook the chicken and shred it earlier in the day. Store it in the fridge until you are ready to assemble. You can also chop the veggies and measure out the cheese. Just keep everything in airtight containers. This way, your nacho-making will be quick and easy. Nachos pair well with many sides. Serve with a fresh salad or guacamole for balance. You could also add a side of black bean soup. For drinks, try a cold beer or a fruity mocktail. These options will round out your nacho feast nicely. In this post, we explored how to make delicious Sheet Pan Chipotle Chicken Nachos. We covered key ingredients like chicken, cheese, and spices, plus how to assemble and bake them perfectly. I shared tips for cooking chicken and melting cheese that will help you create a great dish. Remember, you can customize with different proteins and toppings. Enjoy your nachos fresh but don't forget to store leftovers properly. With these guidelines, you can make nachos that impress every time. Get creative in the kitchen and make them your own!
    Sheet Pan Chipotle Chicken Nachos Zesty Flavor Burst
  • - 1 lb sirloin steak - 4 tablespoons unsalted butter - 4 cloves garlic - Fresh rosemary - Fresh thyme - Salt and pepper - Fresh parsley To make these air fryer garlic butter steak bites, start with fresh, high-quality ingredients. I choose sirloin steak for its great flavor and tenderness. You will cut it into bite-sized cubes, making it easy to cook and eat. Next, the unsalted butter adds richness, while the minced garlic brings a punch of flavor. Using fresh herbs like rosemary and thyme will elevate the taste. Season with salt and pepper to balance all the flavors. Finally, fresh parsley makes a lovely garnish, adding color and a hint of freshness. This ingredient list is simple, yet it creates a dish full of savory goodness. Each element plays a role in making your steak bites truly delicious. To start, I combine melted butter and minced garlic in a bowl. This mix brings rich flavor. Next, I add chopped rosemary and thyme. These herbs give a fresh taste. I stir everything until well mixed. This garlic butter mixture is key to our dish. Now, I take my sirloin steak and cut it into bite-sized cubes. I season these pieces with salt and pepper. This step is simple but important. Then, I pour the garlic butter mixture over the steak. I toss the steak gently in the bowl. This ensures each piece gets coated well. Next, I preheat the air fryer to 400°F (200°C). This usually takes about 5 minutes. Once ready, I place the steak bites in the air fryer basket. I make sure they are in a single layer. If there are too many, I cook them in batches. I then cook the steak for 8 to 10 minutes. Halfway through, I shake the basket for even cooking. I check the doneness to see if they reach my desired level. I like medium-rare, which is about 135°F (57°C) inside. After cooking, I remove the steak bites from the air fryer. I drizzle any leftover garlic butter over them for added flavor. Finally, I sprinkle chopped parsley on top before serving. To cook steak bites just right, check the internal temperature. - Medium-rare: 135°F (57°C) - Medium: 145°F (63°C) - Medium-well: 150°F (66°C) Adjust the cooking time for your taste. If you like it more cooked, add a couple of extra minutes. This way, every bite matches your preference. For well-cooked steak bites, shake the basket halfway through cooking. This helps them brown evenly. If you fill the basket too much, some pieces might not cook well. If needed, cook steak bites in batches. This keeps them juicy and delicious. To add even more flavor, try using different herbs. - Thyme and rosemary work great, but you can also use: - Oregano - Basil - Parsley Marinades can boost taste, too. A simple mix of soy sauce, garlic, and olive oil can add a nice twist. You can marinate the steak bites for 30 minutes before cooking for extra flavor. {{image_2}} You can use different cuts for this recipe. Ribeye and filet mignon are great options. - Ribeye: This cut is tender and full of flavor. It has more fat, which makes it juicy. However, it can be richer in taste. - Filet Mignon: This cut is lean and very tender. It cooks quickly and offers a subtle flavor. Its lack of fat means it may need added moisture. Both cuts can work well for steak bites. Choose based on your taste and budget. You can easily change the flavor of your steak bites. Adding chili flakes gives a nice kick. This spice enhances the garlic without overpowering it. You can also try different kinds of butter. Use garlic herb butter for more flavor. Herb-infused butter adds a fresh twist. Each option makes the steak bites unique and fun to explore. These steak bites are versatile. Pair them with sides like mashed potatoes or roasted veggies. The creamy potatoes balance the savory steak. Fresh veggies add color and crunch. You can serve steak bites as appetizers or main dishes. For appetizers, offer toothpicks for easy eating. For main dishes, plate them with your favorite sides. They bring joy to any table setting. To store leftover steak bites, first let them cool. Place the bites in an airtight container. This keeps them fresh and prevents odors from mixing. You can also wrap them tightly in plastic wrap. Store them in the fridge for up to three days. When you're ready to enjoy them again, simply reheat for a few minutes in the air fryer or microwave. If you want to keep steak bites longer, freezing works well. Let them cool completely before freezing. Arrange the bites in a single layer on a baking sheet. This helps them freeze separately. Once frozen, transfer them to a freezer-safe bag. Remove as much air as you can. They can last up to three months in the freezer. To reheat, cook them in the air fryer at 350°F (175°C) for about 8-10 minutes. Cooked steak bites last about three days in the fridge. In the freezer, they can stay good for up to three months. Always check for any signs of spoilage before eating. If they smell off or look strange, it's best to discard them. Following these storage tips ensures you enjoy your delicious garlic butter steak bites later! Cooking steak bites in an air fryer usually takes about 8 to 10 minutes. The exact time depends on the size of the steak cubes. For medium-rare, aim for an internal temperature of 135°F (57°C). Larger pieces require a bit more time, while smaller ones cook faster. Always check the doneness halfway through and adjust as needed. Yes, you can use frozen steak, but it needs some extra care. When cooking from frozen, increase the cooking time by about 5 to 7 minutes. Make sure to check the internal temperature to ensure doneness. Thawing the steak first can help it cook more evenly and give you a better result. If you don’t have fresh herbs, dried herbs work great too. Use half the amount of dried herbs compared to fresh. For example, if the recipe calls for 1 teaspoon of fresh rosemary, use ½ teaspoon of dried. You can also use spice blends that include similar flavors. These options still add delicious taste to your steak bites. In this blog post, we explored how to make delicious steak bites using sirloin, garlic, and herbs. I provided step-by-step instructions for preparation, cooking tips, and variations to enhance flavor. Remember, you can customize your dish with different cuts of steak or exciting flavor combinations. With these tips, you will create a meal that impresses. Enjoy cooking and share your tasty results!
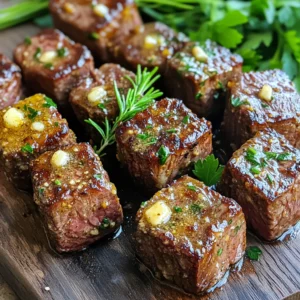
    Air Fryer Garlic Butter Steak Bites Savory and Simple
  • To make No Bake Matcha White Chocolate Truffles, gather these simple ingredients: - 1 cup white chocolate chips - 2 tablespoons unsweetened matcha powder - 1/2 cup heavy cream - 1 teaspoon vanilla extract - 1/4 cup crushed pistachios (for coating) - 1/4 cup desiccated coconut (for coating) - Pinch of sea salt These ingredients create a rich and tasty treat. The white chocolate gives a sweet base. Matcha adds a unique flavor and color. Heavy cream makes the truffles creamy. Vanilla gives a warm note. The coatings of pistachios and coconut add crunch and visual appeal. When choosing your matcha, look for a vibrant green color. This means it is fresh and high quality. The same goes for white chocolate; choose good quality chips for the best taste. You can find these ingredients at most grocery stores. This recipe is easy to follow and great for sharing. It takes simple items to make something special. Enjoy the fun of making these truffles! 1. Heating the heavy cream: Start by pouring the heavy cream into a small saucepan. Heat it over medium-low heat. Watch it closely so it doesn’t boil. You want it hot, just before simmering. 2. Melting the white chocolate: Once the cream is hot, remove it from heat. Add the white chocolate chips right into the cream. Let them sit for about one to two minutes. This helps them melt perfectly. 3. Mixing in the matcha and flavors: After the chocolate is melted, whisk it well. Add the unsweetened matcha powder, vanilla extract, and a pinch of sea salt. Keep whisking until the mixture is smooth and creamy. 1. Cooling the mixture: Transfer the mixture into a bowl. Cover it tightly with plastic wrap. Place this bowl in the fridge for about one hour. This helps it firm up nicely. 2. Scooping and rolling the truffles: After chilling, take the mixture out of the fridge. Use a small cookie scoop or your hands to scoop out small balls. Roll each ball quickly between your palms. This forms smooth truffles. 1. Combining coating ingredients: In a shallow dish, mix the crushed pistachios and desiccated coconut. This will be your coating for the truffles. 2. Rolling and setting the truffles: Roll each truffle in the coating mixture. Make sure they are fully covered. Place the finished truffles on a parchment paper-lined baking sheet. Chill them in the fridge for another 30 minutes to set. These steps ensure your no-bake matcha white chocolate truffles turn out perfect every time. Enjoy the fun of making these delicious treats! To make the best truffles, smoothness is key. Start by gently heating the heavy cream. Use low heat to avoid burning it. When the cream is close to simmering, take it off the heat. Next, add the white chocolate chips to the hot cream. Let them sit for one to two minutes. This allows the chocolate to melt without stirring. Once melted, whisk in the matcha powder, vanilla extract, and a pinch of sea salt. This creates a smooth and creamy mixture. After mixing, transfer it to a bowl. Cover the bowl with plastic wrap and place it in the fridge. The ideal refrigeration time is about one hour. This ensures the mixture firms up enough for easy scooping. Presentation matters. Arrange the truffles on a decorative plate. For added flair, sprinkle some extra matcha powder on top. You can also add whole pistachios for a nice touch. If you want to impress, consider using small cupcake liners. These can make your truffles look more elegant. Adding garnishes not only enhances visual appeal but also adds texture and flavor. Enjoy your beautiful creations! {{image_2}} To make your truffles unique, try different coatings. You can use cocoa powder for a rich taste. Crushed nuts, like almonds or hazelnuts, add crunch and flavor. You can also switch up the flavorings. Almond extract gives a nice twist to the matcha. Just a few drops will change the taste. If you need vegan options, use dairy-free white chocolate. Coconut cream works great instead of heavy cream. This way, you can still enjoy the creamy texture. For gluten-free options, check your chocolate chips. Most are gluten-free, but always read the labels. This way, everyone can enjoy these tasty truffles. To keep your matcha white chocolate truffles fresh, store them in an airtight container. This method keeps moisture out and helps maintain their texture. Place a piece of parchment paper between layers if stacking them. I recommend storing the truffles in the fridge. This keeps them cool and firm. The shelf life of these truffles is about one week in the fridge. If you want them to last longer, freezing is a great option. Freezing your truffles is easy. First, place the truffles on a baking sheet lined with parchment paper. Make sure they are not touching. Freeze them for about one hour until they are solid. Once frozen, transfer them to an airtight container or a freezer bag. Be sure to label the bag with the date. When you're ready to serve, take out only what you need. Thaw them in the fridge for a few hours. This helps them regain their creamy texture. Enjoy their rich flavor once they are thawed! How to make the truffles vegan? To make these truffles vegan, use dairy-free white chocolate chips. You can replace heavy cream with coconut cream or almond milk. Both options work well and add flavor. What can I substitute for heavy cream? You can use coconut cream, almond milk, or cashew cream instead of heavy cream. These options give you a nice texture. They also keep the truffles rich and creamy. Can I use different types of chocolate? Yes! You can use dark or milk chocolate instead of white chocolate. Each chocolate type will change the flavor a bit. Feel free to experiment with your favorite chocolate. What to do if my truffles are too soft? If your truffles are too soft, chill them longer in the fridge. If they still don’t firm up, add a bit more matcha powder or melted chocolate. Mix well and chill again. How can I prevent the coating from falling off? To keep the coating on, make sure the truffles are cold before rolling. You can also press the coatings gently onto the truffles. This helps them stick better. These matcha white chocolate truffles are fun to make and delicious to eat. You learned about the key ingredients and followed easy steps to create them. With tips for perfect texture and presentation, you can impress anyone. You also saw how to store and freeze your truffles for later enjoyment. Experimenting with flavors and dietary swaps makes this treat even more exciting. Now, gather your ingredients and start crafting your own sweet masterpieces!
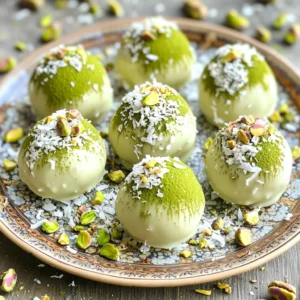
    No Bake Matcha White Chocolate Truffles Delight
  • To make Chicken Broccoli Baked Alfredo, gather these main items: - 2 cups cooked chicken, shredded - 2 cups broccoli florets, steamed - 12 oz fettuccine pasta, uncooked - 4 cups alfredo sauce (store-bought or homemade) - 1 cup shredded mozzarella cheese - 1 cup grated Parmesan cheese - 1 teaspoon garlic powder - 1 teaspoon onion powder - Salt and pepper to taste - Fresh parsley, chopped (for garnish) These ingredients create a creamy and rich dish. The mix of chicken and broccoli adds flavor and nutrition. You can change up the dish with some fun options: - Cooked mushrooms for added earthiness - Spinach for extra greens - Sun-dried tomatoes for a burst of flavor - Crushed red pepper for some heat - Different types of cheese like cheddar or gouda These variations keep the meal exciting and allow you to use what you have on hand. If you're looking for a great store-bought alfredo sauce, here are some brands I trust: - Rao's Homemade Alfredo Sauce - Bertolli Alfredo Sauce - Classico Creamy Alfredo Pasta Sauce These brands offer tasty options that save time. However, making your own sauce can be rewarding and delicious, too! {{ingredient_image_1}} Start by gathering your ingredients. You need cooked chicken and steamed broccoli. Use two cups of each. Next, measure out twelve ounces of uncooked fettuccine. Get four cups of alfredo sauce ready. You can use store-bought or homemade. Don’t forget the cheese! You will need one cup of shredded mozzarella and one cup of grated Parmesan. Finally, grab garlic powder, onion powder, salt, and pepper for flavor. Boil a large pot of water. Add salt to the water for taste. Cook the fettuccine according to the package instructions until it is al dente. This usually takes about eight to ten minutes. Once done, drain the pasta well and set it aside. Make sure you do not overcook it; you want it firm, not mushy. In a large mixing bowl, combine the chicken, broccoli, and fettuccine. Add garlic powder, onion powder, salt, and pepper. Mix everything well. Pour the alfredo sauce over the mixture and stir gently. Now, transfer this mix to a greased 9x13 inch baking dish. Sprinkle mozzarella and Parmesan cheese on top. Cover the dish with aluminum foil, ensuring it does not touch the cheese. Bake in the oven at 350°F for 25 minutes. After that, remove the foil and bake for an extra 10 to 15 minutes. You want the cheese to be bubbly and golden. Once baked, let it cool for a few minutes. Garnish with fresh parsley before serving. Enjoy your tasty meal! To make a great alfredo sauce, start with good quality butter. Use fresh garlic for the best taste. Heat the butter in a pan over medium heat. Add garlic and sauté until it smells nice. Then, slowly stir in heavy cream. Keep stirring as it heats up. Add grated Parmesan cheese slowly, mixing well. If it seems too thick, add a little milk. Season with salt and pepper. Taste and adjust as needed. This sauce should be creamy and rich. When cooking chicken, use fresh or thawed meat. Cut the chicken into small pieces for even cooking. Season with salt, pepper, and garlic powder. You can cook it in a skillet until golden brown. This takes about 5 to 7 minutes per side. Make sure the chicken reaches 165°F (74°C) to be safe. Shred the cooked chicken with two forks. This makes it easy to mix into your alfredo bake. To get a creamy bake, don’t overcook the pasta. Cook it al dente, so it stays firm. When mixing, pour the sauce evenly over the chicken and pasta. Stir gently but well to coat everything. Use a greased baking dish to prevent sticking. Cover with foil while baking to keep moisture in. Remove the foil near the end to let the cheese brown. This gives a nice texture to the top. Enjoy your creamy, delicious meal! Pro Tips Cook Pasta Al Dente: Make sure to cook the fettuccine just until al dente, as it will continue to cook in the oven and become too soft if overcooked. Customize Your Veggies: Feel free to add other vegetables like bell peppers or spinach for extra flavor and nutrition. Use Fresh Herbs: Fresh parsley not only adds a pop of color but also enhances the flavor of the dish. Consider adding fresh basil or thyme for a different twist. Make Ahead: This dish can be assembled a day in advance. Just cover it tightly and refrigerate. Bake it straight from the fridge, adding a few extra minutes to the cooking time. {{image_2}} You can easily turn this dish into a vegetarian delight. Instead of chicken, use 2 cups of sautéed mushrooms or roasted red peppers. These options add great flavor and texture. For protein, toss in some chickpeas or lentils. They are hearty and filling. Make sure your alfredo sauce is vegetarian. Many store-bought sauces fit this need. You can also make your own with cream, butter, and cheese. To boost the taste of your baked alfredo, try adding spices. A pinch of nutmeg brings warmth to the dish. You can also mix in some crushed red pepper for heat. Fresh herbs like basil or thyme can elevate the flavor too. They add freshness and a lovely aroma. If you enjoy garlic, increase the garlic powder to 2 teaspoons. This makes every bite more savory. While fettuccine is classic, feel free to experiment. Penne or rigatoni are great choices too. These shapes hold sauce well and create a nice bite. For a gluten-free option, use gluten-free pasta. It cooks similarly and tastes great. Zucchini noodles or spaghetti squash are fun, low-carb alternatives. They add nutrition and flavor without the carbs. Just remember to adjust cooking times for these options. To keep your Chicken Broccoli Baked Alfredo fresh, let it cool. Once cool, cover it with plastic wrap or transfer it to an airtight container. Store it in the fridge for up to three days. This way, you can enjoy it again soon. When you want to reheat your meal, preheat your oven to 350°F (175°C). Place the dish in the oven for about 15-20 minutes. You want it warm all the way through. If you're in a hurry, you can also microwave it. Use a microwave-safe dish and heat it for 2-3 minutes. Stir halfway to ensure even heating. If you want to save some for later, freezing is great. First, let the dish cool completely. Then, portion it into freezer-safe containers. Make sure to leave some space at the top for expansion. It can stay in the freezer for up to three months. When you're ready to eat, thaw it in the fridge overnight before reheating. Yes, you can use frozen broccoli. Just cook it before adding it to your dish. Steam it until tender, then drain any excess water. This method keeps your bake creamy and tasty. Frozen broccoli is a great time-saver and still gives great flavor. You can use other pasta types if you like. Penne or rotini work well too. These shapes hold the sauce nicely and add fun to the dish. Choose a pasta that you enjoy. Just follow the cooking time on the package for perfect results. This chicken broccoli baked alfredo stays fresh for about three to four days. Store it in an airtight container to keep it tasty. When you want to eat it again, just reheat it in the oven or microwave. Enjoy your warm, comforting meal! This blog post showed you how to make a great Alfredo dish. We covered the main ingredients, fun variations, and helpful tips. You learned the steps to create this creamy delight and how to store leftovers. Remember, you can switch up the pasta or add veggies for extra flavor. I hope the information helps you make this dish your own. Enjoy your cooking, and have fun experimenting!
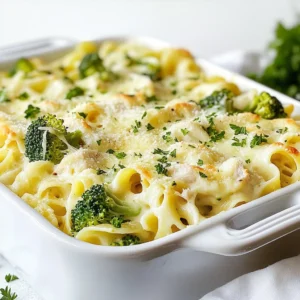
    Chicken Broccoli Baked Alfredo Tasty Comfort Meal
  • To make a delicious cranberry coffee cake, you need some key ingredients. Here’s what you will need: - 2 cups all-purpose flour - 1 teaspoon baking powder - 1/2 teaspoon baking soda - 1/4 teaspoon salt - 1 cup granulated sugar - 1/2 cup unsalted butter, softened - 2 large eggs - 1 teaspoon vanilla extract - 1 cup sour cream - 1 1/2 cups fresh cranberries (or frozen, but thawed) - 1/2 cup chopped pecans (optional) - 1 teaspoon cinnamon (for topping) - 1 tablespoon brown sugar (for topping) These ingredients come together to create a moist, flavorful cake that pairs perfectly with coffee. If you want to take your cake up a notch, consider these optional ingredients: - 1/2 cup chopped pecans for added crunch - A splash of orange juice or zest for a citrus twist - 1 teaspoon almond extract for a nutty flavor These options can add more depth to the cake and make it even more enjoyable. You can easily adjust this recipe to fit different dietary needs. Here are some substitutions: - Use whole wheat flour instead of all-purpose flour for more fiber. - Swap sour cream with Greek yogurt for a lighter option. - For a dairy-free version, use coconut oil instead of butter and almond milk in place of sour cream. These changes will help everyone enjoy this tasty treat! {{ingredient_image_1}} 1. Start by preheating your oven to 350°F (175°C). Grease and flour a 9-inch round cake pan or a 9x9-inch square pan. This helps the cake not to stick. 2. In a medium bowl, whisk together 2 cups of all-purpose flour, 1 teaspoon of baking powder, 1/2 teaspoon of baking soda, and 1/4 teaspoon of salt. Set this bowl aside for later. 3. In a large bowl, cream together 1/2 cup of softened unsalted butter and 1 cup of granulated sugar. Mix until it looks fluffy, about 2-3 minutes. 4. Next, add 2 large eggs, one at a time. Mix well after each egg. Then stir in 1 teaspoon of vanilla extract. 5. Gradually add the dry mix to the wet mix. Do this by alternating with 1 cup of sour cream. Start and end with the flour mix. Mix until just combined. Avoid overmixing. 6. Now gently fold in 1 1/2 cups of fresh cranberries and 1/2 cup of chopped pecans if you want. 7. Pour the batter into your prepared cake pan. Use a spatula to smooth the top. 8. In a small bowl, mix together 1 teaspoon of cinnamon and 1 tablespoon of brown sugar. Sprinkle this mixture evenly over the batter. 9. Place the pan in the preheated oven. Bake for 35-40 minutes. You will know it’s done when a toothpick inserted in the center comes out clean. 10. Once baked, allow the cake to cool in the pan for about 10 minutes. After that, transfer it to a wire rack to cool completely. 11. For a lovely presentation, dust the top with powdered sugar after it cools. Serve it with fresh cranberries on the side. Enjoy it with your favorite cup of coffee for a delightful treat! To get a fluffy texture, you need to cream the butter and sugar well. Mix them together for about 2-3 minutes until light and fluffy. Be sure to add eggs one at a time. This helps incorporate air into the batter. When mixing the dry and wet ingredients, do it gently. Overmixing can make the cake dense, which we don’t want. When you add cranberries, fold them in gently. Use a spatula or a wooden spoon. This keeps the berries whole and prevents them from breaking apart. If you’re using frozen cranberries, make sure they are thawed and drained. Otherwise, they can add excess moisture and make your cake soggy. If your cake is too dense, it might be from overmixing. Stop mixing as soon as the ingredients combine. If your cake sinks in the middle, it could be underbaked or you may have opened the oven too soon. Always check the cake with a toothpick before taking it out. Lastly, if the top browns too quickly, cover it with foil for the last few minutes of baking. Pro Tips Use Fresh Cranberries: Fresh cranberries will give the best flavor and texture to your cake. If using frozen cranberries, ensure they are fully thawed and drained to avoid excess moisture. Don’t Overmix: When combining the wet and dry ingredients, mix just until combined. Overmixing can lead to a dense cake, so a few lumps are okay! Cool Completely: Allow the cake to cool completely before dusting with powdered sugar or serving. This helps maintain its texture and flavor. Customize Toppings: Feel free to experiment with other toppings like cream cheese frosting or a drizzle of caramel for an extra special touch! {{image_2}} You can make this cake healthier by using whole wheat flour. Whole wheat flour adds fiber and makes the cake more filling. You can also cut the sugar. Try using half the amount of granulated sugar. This change will still keep the cake tasty. If you want to reduce calories, swap sour cream for Greek yogurt. It adds a nice creaminess without extra fat. To boost flavor, add a teaspoon of orange zest. This adds a bright, fresh taste that pairs well with cranberries. You can also use almond extract instead of vanilla. Just a half teaspoon will give a lovely nutty flavor. Think about adding spices like ginger or nutmeg for warmth. These small tweaks can create a whole new cake experience. If you need a gluten-free option, use a gluten-free flour blend. Make sure it contains xanthan gum for texture. This will help the cake rise and stay moist. You can also add a bit of almond flour for extra flavor. Just replace a small part of the gluten-free flour with almond flour. This gives a nice nutty taste and keeps the cake light. To keep your cranberry coffee cake fresh, store it in an airtight container. Place a piece of wax paper or parchment paper between the cake and the lid. This helps prevent moisture loss and keeps the cake soft. You can store it at room temperature for up to three days. If you want to keep it longer, move it to the fridge. Just remember, cold air can dry it out. Wrap the cake well with plastic wrap to maintain its moistness. For long-term storage, freezing is a great option. Let the cake cool completely before freezing. Wrap it tightly in plastic wrap, then in aluminum foil. This double wrap helps protect against freezer burn. You can freeze the cake for up to three months. When you're ready to enjoy it, thaw it in the fridge overnight. This slow thaw keeps the texture nice. When it’s time to enjoy your leftover cranberry coffee cake, reheating is key. Preheat your oven to 350°F (175°C). Place the cake in the oven for about 10 to 15 minutes. This warms it gently and keeps it moist. You can also use the microwave for a quick option. Heat a slice for about 15–20 seconds. To keep it soft, place a damp paper towel over it while microwaving. This adds moisture back into the cake. Yes, you can use frozen cranberries. Just make sure to thaw them first. Thawing helps them mix well into the batter. If you add them frozen, the cake may bake unevenly. Frozen cranberries can also be a great option in winter months when fresh ones are hard to find. To check if your cake is done, insert a toothpick into the center. If it comes out clean, the cake is ready. You can also gently press the top; it should spring back. When the edges pull away from the pan, it’s a good sign too. Baking takes about 35 to 40 minutes, so keep an eye on it. Cranberry coffee cake pairs well with coffee or tea. You can also serve it with whipped cream or a scoop of vanilla ice cream. Fresh cranberries on the side add a nice touch. For a fun twist, try adding a drizzle of caramel sauce. Enjoy it for breakfast or as a snack! This blog post covered how to make a delicious cranberry coffee cake. We explored key ingredients, tips for perfect texture, and baking steps. Don’t forget variations for health needs or flavor boosts. Proper storage keeps your cake fresh for longer. Remember, you can enjoy frozen cranberries and pair this treat with your favorite beverages. Armed with these tips, you can bake a great cake that everyone will love. Enjoy your baking journey!
    Cranberry Coffee Cake Tasty and Easy Recipe Guide
  • For Southern Smothered Chicken, you need simple and tasty ingredients. Here’s what you’ll gather: - 4 bone-in, skin-on chicken thighs - 1 cup buttermilk - 1 cup all-purpose flour - 1 teaspoon garlic powder - 1 teaspoon onion powder - 1 teaspoon smoked paprika - Salt and pepper to taste - 2 tablespoons olive oil - 2 tablespoons butter - 1 medium onion, thinly sliced - 3 cloves garlic, minced - 1 bell pepper (any color), sliced - 2 cups chicken broth - 1 tablespoon Worcestershire sauce - 1 teaspoon dried thyme - Fresh parsley, chopped for garnish These ingredients come together to create a meal full of flavor. The chicken thighs provide a rich taste, while the buttermilk makes them tender. The seasonings add depth, and the vegetables bring freshness to the dish. This mix ensures every bite is delicious and comforting. {{ingredient_image_1}} To start, soak the chicken thighs in buttermilk. This makes the meat juicy and tender. You should let the chicken sit in the buttermilk for at least one hour. For the best taste, soak it overnight. Next, prepare the seasoned flour mixture. In a shallow dish, mix together the flour, garlic powder, onion powder, smoked paprika, salt, and pepper. This blend adds a lot of flavor to the chicken. Now it’s time to cook the chicken. Heat olive oil and butter in a large skillet over medium-high heat. Once hot, add the chicken thighs skin-side down. Sear them for about five to seven minutes until they are golden brown. Flip and cook the other side for another five to seven minutes. Once done, remove the chicken and set it aside. In the same skillet, add the sliced onion and bell pepper. Sauté them for about five minutes until they soften. Then, add the minced garlic and cook for one more minute for that aromatic touch. Pour in the chicken broth, Worcestershire sauce, and dried thyme. Stir everything together and scrape up any delicious bits stuck to the bottom of the skillet. Now, return the chicken thighs to the skillet, skin-side up. Reduce the heat to low, cover the skillet, and let it simmer. Cook for about 30 minutes until the chicken is fully cooked and tender. After simmering, take the chicken out and let it rest for a few minutes. If you want a thicker gravy, turn up the heat and let the sauce reduce for about five minutes. Serve the chicken with the rich sauce over rice or mashed potatoes. Don’t forget to sprinkle fresh parsley on top for some color! Soaking chicken in buttermilk is key. This step makes the chicken juicy and tender. I always soak it for at least one hour. For better results, refrigerate it overnight. The buttermilk breaks down the proteins and adds flavor. Cooking at the right temperature is very important. Heat your skillet to medium-high before adding the chicken. This ensures a nice, golden-brown crust. Then, reduce the heat to low when simmering the chicken in the sauce. This helps it cook through without burning. To get the best gravy, you need to reduce the sauce. After removing the chicken, increase the heat. Let the sauce bubble for about five minutes. Stir often to avoid burning. This will thicken your sauce nicely. Adding spices can enhance flavor depth. I like to use garlic powder, onion powder, and smoked paprika. These spices add warmth and depth. Don’t shy away from tasting as you cook. Adjust the seasoning based on your preference. Garnishing is fun and adds flair. Fresh parsley adds a pop of color on top of the chicken. You can also add sliced green onions for a fresh touch. For serving, pair the chicken with rice or mashed potatoes. The gravy will soak into these sides, making each bite delicious. You can also add a side of greens or cornbread for a complete meal. Pro Tips Marinate Longer for Tenderness: For the juiciest chicken, soak the thighs in buttermilk overnight. This not only tenderizes the meat but also enhances the flavor. Don’t Rush the Browning: Allow the chicken to brown properly before flipping. This creates a beautiful crust and enhances the overall flavor. Use Fresh Herbs: Substitute dried thyme with fresh thyme for a more vibrant flavor profile in your sauce. Adjust Thickness as Desired: If you prefer a thicker gravy, let the sauce simmer uncovered for a few extra minutes to reduce and thicken. {{image_2}} You can change up the chicken cuts to suit your taste. Boneless, skinless chicken breasts work well. Drumsticks also add more flavor and fun. For veggies, try mushrooms or carrots instead of bell peppers. They add a nice twist. Want more heat? Add cayenne pepper or hot sauce. Just a little can spice things up. If you want a creamier sauce, swap broth for heavy cream. This will give your dish a rich taste. Pair your smothered chicken with classic Southern sides. Collard greens or cornbread make great choices. If you want to mix it up, try adding curry powder or spices for an international flair. This can really change the dish's vibe! To store your leftovers, let the chicken cool down first. Place it in an airtight container. This keeps out air and moisture. Store it in the fridge. Southern smothered chicken lasts about 3 to 4 days in the refrigerator. If you want to keep it longer, freezing is a great option. First, cool the chicken completely. Then, wrap it tightly in plastic wrap. Place it in a freezer-safe bag. Remove as much air as possible. This helps prevent freezer burn. Smothered chicken can last up to 3 months in the freezer. To thaw, move it to the fridge overnight. This helps keep the texture and flavor. When you're ready to enjoy it again, don't rush the reheating. Use the oven or stove for best results. Preheat the oven to 350°F (175°C). Place the chicken in a baking dish. Add a splash of chicken broth to keep it moist. Cover it with foil to prevent drying. Heat for about 20 to 30 minutes. If using the stove, warm it in a skillet over low heat. Stir gently to avoid sticking. Make sure it reaches an internal temperature of 165°F (74°C) before serving. How long should I soak the chicken in buttermilk? Soak the chicken thighs in buttermilk for at least 1 hour. For the best taste and texture, refrigerate overnight. This extra time helps tenderize the meat and adds flavor. Can I use boneless chicken for this recipe? Yes, you can use boneless chicken. Just adjust the cooking time to avoid drying it out. Boneless thighs or breasts work well, but the skin-on adds more flavor. What if my gravy is too thin? If your gravy is thin, increase the heat. Let it simmer uncovered for about 5 minutes. This helps to reduce the sauce and thicken it. You can also mix a little flour with water and stir it in. How to fix over-seasoned chicken? If your chicken is too salty, add a bit of unsalted broth or water to the sauce. You can also serve it with a side of rice or mashed potatoes to balance the flavor. Is this recipe gluten-free? No, this recipe is not gluten-free due to the all-purpose flour. To make it gluten-free, use a gluten-free flour blend instead. This works well for the dredging step. Can I make a dairy-free version of Southern Smothered Chicken? Yes, you can make a dairy-free version. Substitute buttermilk with a plant-based milk like almond or soy milk. Add a splash of vinegar to mimic the tangy flavor of buttermilk. This recipe for Southern Smothered Chicken combines classic flavors and simple techniques. You learned to soak chicken in buttermilk for tenderness, use seasonings for deep flavor, and create a rich sauce. Remember, the right cooking temperatures and techniques are key to success. Don’t hesitate to try variations for your taste. Enjoy exploring different ingredients and styles. With proper storage and reheating, your leftovers will stay delicious. Let your kitchen become the heart of flavor and comfort. Your next meal can impress with these easy steps.
    Southern Smothered Chicken Flavorful Comfort Meal
  • To make Loaded Veggie White Lasagna, gather these key ingredients: - 9 lasagna noodles - 2 cups ricotta cheese - 2 cups shredded mozzarella cheese - 1 cup grated Parmesan cheese - 3 cups fresh spinach - 1 cup sliced mushrooms - 1 zucchini, thinly sliced - 1 red bell pepper, diced - 2 cloves garlic, minced - 1 teaspoon dried oregano - 1 teaspoon dried basil - 1/2 teaspoon red pepper flakes (optional) - 4 cups alfredo sauce (store-bought or homemade) - Olive oil - Salt and pepper to taste These ingredients create a rich and creamy lasagna that bursts with flavor. In this dish, cheese plays a big role. Ricotta cheese adds a creamy texture and a mild taste. It blends well with the other ingredients. Mozzarella cheese melts beautifully, giving the dish that classic lasagna stretch. It adds a nice gooeyness. Parmesan cheese brings a sharp, salty flavor that enhances every bite. Together, these cheeses create a balanced taste that keeps you coming back for more. Flavors in Loaded Veggie White Lasagna come from fresh and dried herbs. Oregano and basil add an earthy taste that complements the vegetables. Garlic boosts the overall flavor, making every bite savory. Red pepper flakes provide a hint of heat, but you can skip them if you prefer. The combination of these spices creates a delicious depth that truly shines through. {{ingredient_image_1}} To start, bring a large pot of salted water to a boil. Add the lasagna noodles one at a time. Cook them for about 8 to 10 minutes. Check the package for specific times. Once they are soft, drain them and set aside. You want them slightly firm, so they hold up in the layers. Next, grab a large skillet. Heat 1 tablespoon of olive oil over medium heat. Add the minced garlic and let it cook for 30 seconds. It should smell great! Now, toss in the sliced mushrooms, zucchini, and diced red bell pepper. Sauté these for about 5 minutes until they become tender. Stir in the fresh spinach next. Cook just until it wilts down. Season with oregano, basil, red pepper flakes, salt, and pepper. Mix well and then remove the skillet from the heat. Now it's time to layer the lasagna! First, take a 9x13 inch baking dish. Spread 1 cup of alfredo sauce at the bottom. Next, place 3 lasagna noodles over the sauce. Spread half of the ricotta mixture over the noodles. Then, add half of the sautéed veggie mix. Pour another cup of alfredo sauce over the top. Repeat this step with 3 more noodles, the remaining ricotta, the leftover veggies, and another cup of alfredo sauce. Finally, lay down the last 3 noodles. Spread the last of the alfredo sauce on top. Sprinkle the remaining mozzarella and Parmesan cheese over everything. Cover the dish with foil to stop sticking. Bake at 375°F (190°C) for 25 minutes. After that, remove the foil and keep baking for another 15 to 20 minutes. You want the cheese to be bubbly and golden brown. Let the lasagna cool for 10 minutes before slicing. Enjoy your loaded veggie white lasagna! To keep your lasagna from being soggy, focus on the moisture. Drain the cooked noodles well. Use fresh veggies and sauté them to reduce their water. Also, avoid adding too much sauce between layers. You want a nice balance of sauce and filling. Layering is key for a great lasagna. Start with a thin layer of sauce at the bottom. Place three noodles on top. Then, spread half of the ricotta mix. Add half of the veggies and pour one cup of sauce. Repeat this two times for great flavor and texture. Finish with noodles, sauce, and cheese on top. You can use store-bought or homemade alfredo sauce. If you choose store-bought, pick one with simple ingredients. Look for a sauce that has a creamy texture. If you make your own, use butter, cream, and Parmesan cheese. This gives the best taste and pairs well with the veggies. Pro Tips Use Fresh Veggies: Fresh vegetables not only enhance the flavor of your lasagna but also add more nutrients. Opt for seasonal produce for the best taste. Layering Technique: Ensure even cooking by layering your ingredients strategically. Start with sauce at the bottom to prevent sticking, and alternate between cheese and veggies for a balanced texture. Make it Ahead: This lasagna can be assembled a day in advance. Just cover it tightly with foil and store it in the refrigerator. Bake it straight from the fridge, adding a few extra minutes to the cooking time. Customization: Feel free to customize this recipe by adding other vegetables or proteins like grilled chicken or ricotta cheese to suit your taste preferences. {{image_2}} You can make this lasagna your own by adding extra veggies. Try adding carrots, broccoli, or eggplant. Use what you have in your fridge. Each vegetable adds a new flavor and texture. For a twist, consider adding artichokes or roasted red peppers. They bring a great taste that pairs well with the creamy sauce. If you need a gluten-free meal, swap the lasagna noodles with gluten-free ones. Many brands offer tasty options made from rice or corn. Just check the package for cooking times. You can also use thin slices of zucchini as a noodle substitute. This keeps it light and fresh while being gluten-free. For those who love heat, add more red pepper flakes to the veggie mix. You can also sprinkle some crushed red pepper on top before baking. If you crave more cheese, layer in extra mozzarella or try a sharp cheddar. This will give it a wonderful flavor and meltiness. Each variation helps you create a dish that fits your taste perfectly. To keep your loaded veggie white lasagna fresh, cool it to room temperature. Then, cover it tightly with plastic wrap or aluminum foil. You can also place it in an airtight container. Store it in the fridge for up to four days. Make sure not to leave it out too long to avoid spoilage. When you’re ready to enjoy leftovers, preheat your oven to 350°F (175°C). Place your lasagna in an oven-safe dish. Cover it with foil to keep it moist. Heat for about 20-25 minutes, or until it’s hot throughout. You can also reheat individual portions in the microwave for quick meals. Just be careful not to overcook. If you want to save some for later, freezing works well! Slice the lasagna into portions and wrap each slice in plastic wrap. Then, place them in a freezer-safe bag or container. You can keep it frozen for up to three months. When you're ready to eat, thaw it in the fridge overnight. Reheat it as mentioned above for a tasty meal anytime! Yes, you can use no-boil lasagna noodles. They save time and effort. Just layer them with sauce as you would regular noodles. They will soften during baking. Make sure your sauce is not too thick. This helps the noodles cook properly. If you need a substitute for ricotta cheese, try cottage cheese. Blend it for a smoother texture. You can also use cream cheese mixed with sour cream. This gives a rich flavor. Tofu is a great dairy-free option too. Blend it with a little lemon juice for extra taste. You can keep the lasagna in the refrigerator for about 3 to 5 days. Store it in an airtight container. If your lasagna has not been cut, it will stay fresh longer. Always check for any signs of spoilage before eating. Absolutely! You can use marinara or pesto sauce instead of alfredo. Each sauce gives a unique flavor. If you prefer a lighter option, try a white wine sauce. Just make sure to balance the flavors with your chosen veggies. In this blog post, we explored how to create a delicious lasagna. We covered key ingredients like cheeses and spices, as well as step-by-step instructions for cooking. You learned tips for avoiding soggy layers and ways to customize your dish. We also discussed storing leftovers and answered common questions. Remember, making lasagna is both fun and rewarding. Enjoy your cooking, and share your tasty creations with family and friends!
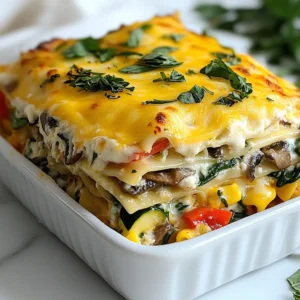
    Loaded Veggie White Lasagna Flavorful and Simple Recipe
  • - Dry Ingredients - 1 ¾ cups all-purpose flour - 1 cup brown sugar, packed - ½ cup granulated sugar - 1 tablespoon baking powder - ½ teaspoon baking soda - ½ teaspoon salt - 1 teaspoon ground cinnamon - Wet Ingredients - ½ cup unsalted butter, melted and cooled - 2 large eggs - ¾ cup buttermilk (or milk with 1 tbsp of vinegar) - 1 teaspoon vanilla extract - Optional Add-ins - 2 ripe pears, peeled and diced - ½ cup chopped walnuts or pecans To make these muffins, gather these ingredients. Each one plays a key role in making the muffins soft and flavorful. The brown sugar adds a rich taste, while the pears give a nice sweetness. The optional nuts add a great crunch. Remember, using ripe pears is crucial. They bring extra juice and flavor to your muffins. - Prepping the Muffin Tin Start by preheating your oven to 350°F (175°C). While it warms up, line a muffin tin with paper liners or grease it lightly. This step helps your muffins release easily after baking. - Mixing Dry Ingredients In a large bowl, whisk together the all-purpose flour, brown sugar, granulated sugar, baking powder, baking soda, salt, and ground cinnamon. Mix these well until they are fully combined. This mix will give your muffins a great rise and flavor. - Combining Wet Ingredients In another bowl, mix the melted butter, eggs, buttermilk, and vanilla extract. Stir until the mix is smooth and well combined. This will create a rich base for your muffins. - Folding in Pears and Nuts Pour the wet mix into the dry ingredients. Stir gently until just combined. You want some lumps to stay in the batter. Then, fold in the diced pears and nuts if you choose to use them. Be gentle to avoid breaking the pears too much. - Filling Muffin Cups Divide the batter evenly among the muffin cups. Fill each cup about ¾ full. This gives the muffins room to rise. For a crunchy touch, sprinkle a bit of turbinado sugar on top of each muffin. - Baking Time and Temperature Place the muffin tin in the preheated oven. Bake for 20-25 minutes. The muffins should rise and turn golden brown. - Testing Muffins for Doneness To check if they are done, insert a toothpick into the center of a muffin. If it comes out clean, your muffins are ready. If there is batter on the toothpick, bake for a few more minutes. Enjoy the process! These steps will help you create delicious bakery-style brown sugar pear muffins that everyone will love. To get the best muffins, follow these tips. - Avoiding Overmixing: Mix the batter just enough. Overmixing makes the muffins tough. A few lumps are okay. This keeps them light and fluffy. - Using Ripe Pears: Choose ripe pears for sweetness. They add moisture and flavor. Firm pears won’t blend well. The ripe ones make your muffins juicy. - Cooling the Muffins Properly: Let the muffins cool in the pan for 5 minutes. This helps them set. Then move them to a wire rack. This prevents sogginess and keeps them fresh. Want to take your muffins to the next level? Try these ideas. - Alternative Toppings: You can use different toppings. Try oats or cinnamon sugar. These add a nice crunch and flavor boost. - Adding Spices: Mix in spices like nutmeg or ginger. They give a warm flavor. Just a little can make a big difference. - Using Fresh Ingredients: Always use fresh ingredients. Fresh pears, eggs, and butter enhance taste. This small change can turn good muffins into great ones. {{image_2}} You can easily change the flavor of your brown sugar pear muffins. Adding chocolate chips is a great idea. They add a rich taste that pairs well with the sweet pears. Just mix in about ½ cup of chocolate chips right before you bake. Introducing spices like nutmeg can also give your muffins a warm twist. Nutmeg has a sweet and nutty flavor. Use about ¼ teaspoon of ground nutmeg along with the cinnamon. This small change can make your muffins stand out. If you need a gluten-free option, you can swap the all-purpose flour. Use a gluten-free flour blend instead. Make sure the blend has xanthan gum for the best texture. This will keep your muffins light and fluffy. For vegan adaptations, replace the eggs with flax eggs. To make a flax egg, mix 1 tablespoon of ground flaxseed with 2.5 tablespoons of water. Let it sit until it thickens. Use plant-based milk instead of buttermilk. Your muffins will still be delicious and moist. Store your brown sugar pear muffins at room temperature. Use an airtight container. They stay fresh for up to three days. If you want to keep them longer, place them in the fridge. They will last for about a week in the fridge. Just let them cool completely before storing them. This helps keep them soft. For long-term storage, freeze your muffins. Wrap each muffin tightly in plastic wrap. Then, place them in a freezer bag. They can last up to three months in the freezer. When you are ready to enjoy them, take them out and let them thaw at room temperature. You can also reheat them from frozen. Reheat your muffins to bring back their fresh taste. The oven works best. Preheat your oven to 350°F (175°C). Place the muffins on a baking sheet for about 10 minutes. This makes them warm and soft again. You can also use a microwave. Heat each muffin for about 15-20 seconds. This is quicker but may make them a bit chewy. Can I use different fruits instead of pears? Yes, you can use different fruits. Apples, peaches, or berries work well. Just make sure to adjust the amount based on the fruit's water content. For example, apples and berries may need less sugar, while peaches could add more juice. How do I know when my muffins are done? Check your muffins at 20 minutes. Insert a toothpick in the center. If it comes out clean, they are done. If there’s batter on the toothpick, bake for another 3-5 minutes. The tops should also look golden brown. Can I make the batter ahead of time? You can make the batter and store it in the fridge. Cover it tightly for up to 24 hours. Just remember, the muffins may not rise as much after sitting. For the best results, bake the batter fresh. This blog post covered how to make tasty muffins with pears and nuts. We discussed the right mix of dry and wet ingredients, plus optional add-ins for extra flavor. The step-by-step guide made preparation and baking easy. I shared tips to ensure your muffins turn out perfect and different flavor variations to try. Remember to store your muffins properly for lasting freshness. Make these delicious treats unique to your taste and enjoy every bite! Your kitchen adventures can lead to sweet moments, so start baking today!
    Bakery-Style Brown Sugar Pear Muffins Irresistible Treat
  • - 1 pound large shrimp, peeled and deveined - 1 pound smoked sausage, sliced - 1 red bell pepper, chopped - 1 green bell pepper, chopped - 1 yellow onion, sliced - 2 cups cherry tomatoes, halved For this sheet-pan meal, I love using large shrimp. They cook fast and soak up the flavor well. Smoked sausage adds a nice, rich taste. You can pick chicken or turkey sausage for a lighter meal. Bell peppers bring color and crunch. I use red, green, and yellow to keep it vibrant. Cherry tomatoes burst with juice and sweetness when baked. - 3 tablespoons olive oil - 2 tablespoons Cajun seasoning - 1 teaspoon paprika - 1/2 teaspoon cayenne pepper Olive oil helps the shrimp and sausage brown nicely. Cajun seasoning gives this dish its bold flavor. I often add paprika for depth. If you enjoy spice, cayenne pepper adds a kick. You can adjust this to meet your taste. - Fresh parsley, chopped Fresh parsley adds a pop of color and freshness. It makes the dish look appealing and bright. A sprinkle right before serving brings it all together. - First, preheat your oven to 400°F (200°C). This makes sure your meal cooks evenly. - Next, line a large baking sheet with parchment paper. This helps with easy cleanup later. - In a big bowl, combine 1 pound of shrimp and 1 pound of sliced sausage. I like using chicken or turkey sausage for a healthier choice. - Now, add chopped red and green bell peppers, sliced onion, halved cherry tomatoes, and minced garlic to the bowl. These veggies add color and flavor. - Drizzle 3 tablespoons of olive oil over everything. Then, sprinkle 2 tablespoons of Cajun seasoning, 1 teaspoon of paprika, and 1/2 teaspoon of cayenne pepper. Adjust the cayenne for your spice level. Add salt and pepper to taste. Toss everything until well coated. - Spread the shrimp and sausage mixture evenly on the lined baking sheet in a single layer. This ensures even cooking. - Bake in the preheated oven for 15 to 20 minutes. Keep an eye on it. The shrimp should turn pink and opaque, and the sausage should be heated through. Stir the mixture halfway through cooking for the best results. To get the best flavor, adjust the spice levels. If you like it hot, add more cayenne pepper. If you prefer it mild, skip the cayenne. Use about 2 tablespoons of Cajun seasoning for a good kick. I often add extra garlic for a rich taste. For the best seasoning blend, mix your spices well. Ensure each piece of shrimp and sausage is coated. This ensures every bite is full of flavor. Remember, fresh spices work best. Check the expiration date for your spices before cooking. To know if your shrimp are done, look for a pink color. They should also curl slightly. If they turn gray or feel rubbery, they are overcooked. Aim for 15-20 minutes of baking time. Stir halfway for even cooking. Common cooking mistakes to avoid include cooking shrimp at too high a temperature. This can make them tough. Never overcrowd the baking sheet. This can lead to steaming instead of roasting. For easy cleanup, line your baking sheet with parchment paper. It helps with sticking and makes washing easier. After cooking, let the pan soak in warm water for a few minutes. This will loosen any stuck bits. You can prepare some ingredients in advance. Chop the veggies and sausage a day before. Store them in the fridge. This saves time when you're ready to cook. {{image_2}} For a twist, you can swap shrimp for chicken. Use boneless, skinless chicken thighs for juiciness. Cut them into bite-sized pieces before adding them to the pan. Turkey sausage is also a great choice. It brings the same smoky flavor but with less fat. If you want a meat-free option, consider using tofu or tempeh. Both absorb flavors well and add protein. Just marinate them in the Cajun seasoning for extra zest. Get creative with your veggie choices! Seasonal vegetables work well here. Think zucchini, squash, or asparagus. They add nice colors and flavors. You can also add corn for sweetness and crunch. It pairs nicely with the Cajun spices. For a fun twist, try adding pineapple chunks. They will bring a sweet contrast to the dish. If you want to make your own Cajun seasoning, it’s easy! Combine paprika, garlic powder, onion powder, and dried oregano. Add cayenne pepper for heat. Adjust the spices to fit your taste. For store-bought options, look for brands that are low in sodium. Many grocery stores carry Cajun blends. Just check the label for quality ingredients. This way, you can enjoy great flavor without any hassle. Store leftovers in an airtight container. This keeps the dish fresh. Ensure it cools to room temperature first. Use within three days for best taste. If you want to keep it longer, consider freezing it. To freeze properly, place the dish in a freezer-safe container. Make sure to leave some space for expansion. You can freeze it for up to three months. When ready to eat, thaw it in the fridge overnight. Reheat in the oven at 350°F (175°C) until warm. In the fridge, the dish lasts about three days. Look for signs of spoilage: off smells, discoloration, or slimy texture. If you notice any of these, it’s best to throw it away. Enjoy your Cajun shrimp and sausage bake while it’s fresh! Yes, you can use frozen shrimp. Just make sure to thaw them first. Place the shrimp in a bowl of cold water for about 15-20 minutes. This method works well and keeps the shrimp fresh. You can also thaw shrimp overnight in the fridge. Avoid using hot water as it can cook the shrimp. Once thawed, pat them dry before adding them to your dish. This helps them stay juicy during cooking. The recipe has some spice, but you can adjust it. Cajun seasoning adds flavor, while cayenne pepper brings heat. If you prefer a milder dish, start with less cayenne. You can add more later if you want more heat. Always taste your dish as you cook. This way, you can get the spice just right for your taste buds. For a milder option, consider using smoked sausage with less spice. This dish pairs nicely with many sides. Here are some great ideas: - Rice: White or brown rice soaks up the flavors. - Salad: A fresh green salad adds crunch. - Cornbread: Sweet cornbread complements the spices well. - Vegetables: Steamed or roasted veggies brighten the plate. Feel free to mix and match! Enjoy your meal with a side that makes you smile. This blog post covers a flavorful dish with shrimp and sausage. We explored the key ingredients, including shrimp, sausage, peppers, and spices. I shared step-by-step instructions for preparation and baking, plus handy tips for perfect flavor and cooking. You learned about variations, from protein choices to vegetable options. Lastly, we discussed storage tips to keep your dish fresh. Try these strategies for a tasty meal and enjoy cooking!
    Sheet-Pan Cajun Shrimp and Sausage Bake Delight
  • - 1 cup canned pumpkin puree - 1/2 cup vegetable oil - 1/2 cup brown sugar - 1/4 cup granulated sugar - 2 large eggs - 1 teaspoon vanilla extract - 1 1/2 cups all-purpose flour - 1 teaspoon baking soda - 1 teaspoon baking powder - 1 teaspoon ground cinnamon - 1/2 teaspoon ground nutmeg - 1/4 teaspoon salt - 1 cup chocolate chips - 1/2 cup chopped pecans (optional) You need simple ingredients to make this tasty loaf. Canned pumpkin puree gives it a smooth texture and rich flavor. Vegetable oil keeps the loaf moist and fluffy. The brown sugar adds a nice hint of caramel, while granulated sugar sweetens it just right. You'll use two large eggs to bind everything together. Vanilla extract brings warmth and depth. All-purpose flour is your base, giving structure to the loaf. Baking soda and baking powder help it rise beautifully. Ground cinnamon and nutmeg add that perfect fall spice. A pinch of salt balances the sweetness. Chocolate chips bring joy, and optional pecans add a nice crunch. All these ingredients turn into a loaf that is sweet, satisfying, and perfect for breakfast! First, set your oven to 350°F (175°C). This is the ideal temperature for our loaf. Next, grease a 9x5-inch loaf pan. You can also line it with parchment paper for easy removal. In a large bowl, combine 1 cup of canned pumpkin puree, 1/2 cup of vegetable oil, and both sugars. I use 1/2 cup of brown sugar and 1/4 cup of granulated sugar. Mix in 2 large eggs and 1 teaspoon of vanilla extract. Whisk until everything blends well. In another bowl, sift together 1 1/2 cups of all-purpose flour, 1 teaspoon of baking soda, 1 teaspoon of baking powder, 1 teaspoon of ground cinnamon, 1/2 teaspoon of ground nutmeg, and 1/4 teaspoon of salt. This step adds air and keeps the loaf light. Slowly add the dry mix to the wet ingredients. Stir gently until just combined. Do not overmix; this keeps the loaf soft. Now, fold in 1 cup of chocolate chips and 1/2 cup of chopped pecans if you choose. Pour this batter into your prepared pan, spreading it evenly. Bake for 50-60 minutes. Check for doneness with a toothpick; it should come out clean. When the loaf is done, let it cool in the pan for about 10 minutes. Then, transfer it to a wire rack. This helps it cool completely and keeps it from getting soggy. Enjoy the aroma while it cools! Measuring ingredients well is key to great baking. When you weigh your ingredients, you ensure accuracy. For flour, spoon it into a cup gently, then level it off. Avoid packing it down. For liquids, use a clear measuring cup. Check the measurement at eye level for best results. Overmixing can make your loaf tough. Stir the wet and dry ingredients gently. Mix until just combined. The batter should look slightly lumpy. This helps keep your loaf light and fluffy. If you see dry flour, it's okay. Don't worry; it will bake well. Baking time can change based on your oven and pan size. Start checking your loaf at 50 minutes. Insert a toothpick in the center. If it comes out clean, it's done. If not, give it a few more minutes. Keep an eye on it to avoid overbaking. {{image_2}} You can easily make this loaf dairy-free. Instead of eggs, use flax eggs. To make one flax egg, mix 1 tablespoon of ground flaxseed with 2.5 tablespoons of water. Let it sit until it thickens. For milk, swap regular milk with almond milk or oat milk. Both work well and keep the loaf moist. If you need a gluten-free option, try a gluten-free flour blend. Look for blends that include rice flour and tapioca flour. These blends work in place of all-purpose flour. You may also need to add a bit of xanthan gum for better texture. Just follow the package instructions for the best results. To boost the flavor, try adding more spices. Ginger and cloves can add warmth. A pinch of allspice gives a nice kick, too. You can also mix in nuts or dried fruit. Walnuts or cranberries add great texture and taste. If you love variety, try different types of chocolate. Dark chocolate or white chocolate chips can change the whole vibe of your loaf! To keep your pumpkin chocolate chip breakfast loaf fresh, use these tips: - Cool it first: Let the loaf cool completely before storing. - Wrap it well: Use plastic wrap or aluminum foil to cover it tightly. - Use a container: Place it in an airtight container for extra protection. These methods help keep your loaf moist and tasty. Freezing is a great way to save leftovers. Here’s how to do it: 1. Slice the loaf: Cut it into individual pieces. 2. Wrap each slice: Use plastic wrap to cover each slice tightly. 3. Place in a bag: Store the wrapped slices in a freezer bag. For best taste and texture, enjoy the frozen loaf within 2-3 months. When you're ready to enjoy your loaf again, follow these steps: - Use the oven: Preheat it to 350°F (175°C). Place the slice on a baking sheet. Heat for about 10 minutes. - Try the microwave: Heat a slice for 15-20 seconds on a microwave-safe plate. After reheating, serve with a dusting of powdered sugar or a drizzle of chocolate sauce. Enjoy! Yes, you can use fresh pumpkin. Just cook the fresh pumpkin until soft. Then, mash or puree it until smooth. This option adds a fresh flavor. It may also change the loaf's texture slightly. The breakfast loaf stays fresh for about three days at room temperature. Wrap it tightly in plastic wrap. For longer storage, keep it in the fridge for up to a week. If you want to keep it longer, freeze it. You can try using butterscotch chips or white chocolate chips. Chopped nuts or dried fruit can also add nice flavors. If you want a healthier option, use cacao nibs. These give a chocolate flavor with less sugar. Yes, you can reduce the sugar. Try cutting the brown sugar by half. You can also use applesauce or mashed bananas for sweetness. This will change the flavor but still keep it tasty. Absolutely! You can use a mini loaf pan. Fill each mini pan about two-thirds full with batter. Bake for around 25-30 minutes. Check for doneness with a toothpick, just like the large loaf. This article has shared a simple and fun recipe for pumpkin chocolate chip loaf. You now know the key ingredients, step-by-step instructions, and useful tips for best results. Remember, you can customize the loaf with different flavors or adapt it for various diets. Use these insights to bake with confidence. Enjoy your delicious creation and share it with others. Your baking journey starts now, so have fun and make it your own!
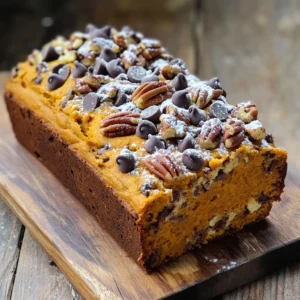
    Pumpkin Chocolate Chip Breakfast Loaf Simple and Sweet
  • - 2 cups white chocolate chips - 1 cup sweetened condensed milk - 1 cup chopped pistachios - 1 teaspoon vanilla extract - 1/4 teaspoon sea salt - Green food coloring (optional) - Microwave-safe bowl - Spatula - 8x8-inch baking dish - Parchment paper When making No-Bake Pistachio White Chocolate Fudge, gather your ingredients first. This helps keep things smooth and fun. You will need two cups of white chocolate chips. These give the fudge its sweet flavor. Next, grab one cup of sweetened condensed milk. This makes the fudge creamy and rich. Then, use one cup of chopped pistachios. They add a nice crunch and flavor. You will also need one teaspoon of vanilla extract. This brings extra warmth to the taste. A pinch of sea salt, about 1/4 teaspoon, balances the sweetness. If you want a pop of color, add some green food coloring. This is optional but makes the fudge look festive. For tools, you will need a microwave-safe bowl. This is where you will melt your chocolate. A spatula helps mix everything well. Use an 8x8-inch baking dish, lined with parchment paper. This makes it easy to lift out the fudge later. Having all these items ready will make your fudge-making easy and fun! - First, grab an 8x8-inch baking dish. - Line it with parchment paper. - Make sure to leave some overhang. This will help you lift the fudge out later. - Now, take a microwave-safe bowl. - Combine 2 cups of white chocolate chips and 1 cup of sweetened condensed milk. - Microwave this mixture in 30-second intervals. Stir between each interval. - Keep doing this until it becomes smooth and creamy. - Next, stir in 1 teaspoon of vanilla extract. - Add 1/4 teaspoon of sea salt for a nice balance. - If you want some color, add a few drops of green food coloring. Mix it well. - Now, grab your chopped pistachios. - Fold in 1 cup of them into the chocolate mixture. - Make sure they are well spread throughout the fudge. - Pour this mixture into your prepared dish. - Use a spatula to spread it evenly. - Gently press down to smooth the top. - Sprinkle the reserved pistachios on top for a nice touch. - Refrigerate for at least 3 hours, or until set. - When firm, lift the fudge out using the parchment overhang. - Cut it into squares and enjoy! To achieve a smooth fudge, melt the chocolate completely. Use a microwave-safe bowl for easy melting. Microwave the white chocolate chips and sweetened condensed milk in 30-second bursts. Stir between each burst. This helps prevent burning. Once smooth, mix in the vanilla and salt well. When folding in the pistachios, use a gentle motion. This keeps them whole and evenly mixed. For a beautiful presentation, cut the fudge into neat squares. Place them on a decorative platter. Sprinkle extra pistachios on top for color and crunch. Drizzle melted white chocolate over the fudge for a fancy touch. Pair the fudge with a cup of hot tea or coffee for a delightful treat. It also goes well with vanilla ice cream for a rich dessert. Store your fudge in the refrigerator for the best taste and texture. Wrap it tightly in plastic wrap or place it in an airtight container. This keeps it fresh longer. The fudge lasts about two weeks when stored properly. If you want to keep it longer, you can freeze it. Just cut it into squares and place it in a freezer-safe bag. {{image_2}} You can change the taste of your fudge in fun ways. Try adding different nuts, such as almonds or walnuts. Each nut brings its own flavor and crunch. You can also mix in treats like dried fruit or chocolate chips. These add a nice twist to your fudge. Flavored extracts can also enhance your fudge. Instead of vanilla, try almond or coconut extract. Just use a small amount to keep the balance. These changes can make your fudge unique and personal. If you need gluten-free options, this fudge works well. All the ingredients are naturally gluten-free. For dairy-free alternatives, use dairy-free chocolate chips and coconut milk. This way, everyone can enjoy your fudge. You can also make vegan fudge. Use vegan chocolate chips and plant-based sweetened condensed milk. These simple swaps keep the taste delicious while meeting dietary needs. Seasonal changes can inspire your fudge. For holidays, add festive colors. Use red and green food coloring for Christmas or pastel shades for Easter. These colors make your fudge perfect for celebrations. You can also use seasonal ingredients. In fall, mix in pumpkin spice or even a touch of maple syrup. In summer, try adding fresh berries for a burst of flavor. These ideas keep your fudge exciting all year round. This fudge stays fresh in the refrigerator for about two weeks. Store it in an airtight container. It may last longer, but the taste and texture could change. Yes, you can use white chocolate bars. Chop them into small pieces. Use the same weight as the chips, about 12 ounces. Melt them slowly in the microwave like you would with chips. If your fudge is too soft, try chilling it longer. Place it back in the fridge for an extra hour. If it's still soft, you can add more melted white chocolate to thicken it. Let it set again. To cut fudge, use a sharp knife. First, let it sit at room temperature for a few minutes. This will make cutting easier. Wipe the knife with a warm cloth between cuts. This helps create clean edges. This No-Bake Pistachio White Chocolate Fudge takes just 15 minutes to prep. You will need to wait about 3 hours for it to set in the fridge. The total time is 3 hours and 15 minutes, making it a quick and easy recipe for any occasion. This recipe yields 16 squares of fudge. Each square is a perfect treat for sharing or enjoying yourself. You can easily double the recipe if you want to make more. Each square contains about 120 calories. It has 6 grams of fat, 16 grams of carbs, and 2 grams of protein. This fudge is a sweet and delightful treat, perfect for a special occasion or a simple snack. We covered everything you need to make delicious No-Bake Pistachio White Chocolate Fudge. You learned the key ingredients, helpful tools, and step-by-step instructions. I shared tips for perfect texture and creative serving ideas. You also discovered fun variations and answers to FAQs. Now it's time to try this simple recipe. Enjoy making it your own!
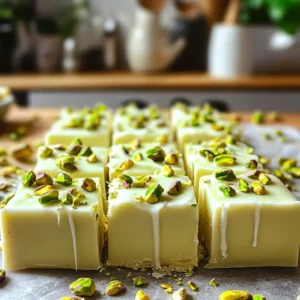
    No-Bake Pistachio White Chocolate Fudge Delight
  • - 1 pound chicken tenderloins - 1 cup buttermilk - 1 teaspoon garlic powder - 1 teaspoon onion powder - 1 teaspoon paprika - 1 teaspoon salt - ½ teaspoon black pepper - 1 cup breadcrumbs (panko preferred for extra crunch) - ½ cup all-purpose flour - Cooking spray - ½ cup ranch dressing (for dipping) The heart of this recipe is the chicken tenderloins. These pieces are juicy and tender. Using buttermilk in the marinade makes the chicken extra moist. It also adds great flavor. The spices like garlic powder, onion powder, paprika, salt, and black pepper give the chicken a bold taste. The coating is key for that crunchy bite. I prefer panko breadcrumbs for a crispy finish. All-purpose flour helps the breadcrumbs stick better. Don’t forget cooking spray! This little step ensures your chicken turns out golden and crisp. Lastly, ranch dressing is a must for dipping. It adds a creamy touch that pairs perfectly with the crispy chicken. With these ingredients ready, you’re on your way to making tasty air fryer crispy chicken tenders. Start by mixing buttermilk with garlic powder, onion powder, paprika, salt, and black pepper. This mix will add great flavor. Take your chicken tenderloins and toss them in the buttermilk mixture. Make sure they are fully coated. Cover the bowl and put it in the fridge for at least 30 minutes. This marinating time helps the chicken soak up all those tasty spices. Now, let’s set up our coating stations. Take a shallow dish and spread out the all-purpose flour. In another dish, pour in the panko breadcrumbs. Keep these stations close. You will need them soon to coat the chicken. Once the chicken has marinated, take it out of the fridge. Let any extra buttermilk drip off. First, dredge each tenderloin in the flour. Make sure they are fully coated. Next, dip them back in the buttermilk for a moment. Finally, roll them in the panko breadcrumbs. Press the breadcrumbs onto the chicken so they stick well. Before cooking, preheat your air fryer. Set it to 400°F (200°C) and let it heat up for about 5 minutes. This step is key for getting that nice, crispy texture. Lightly spray the air fryer basket with cooking spray. Place the chicken tenders in a single layer. Do not overcrowd them, as they need space to cook. Spray the tops of the tenders lightly with cooking spray for extra crispiness. Cook them for 10 to 12 minutes. Flip them halfway through. Keep an eye on them until they turn golden brown and crisp. Ensure the chicken reaches an internal temperature of 165°F (75°C). Once your chicken tenders are done, take them out of the air fryer. Let them cool for a moment. Serve them hot with a side of ranch dressing for dipping. This adds a nice creaminess that pairs perfectly with the crispy chicken. Enjoy your delicious creation! To get that perfect crunch, use panko breadcrumbs. Panko is lighter and airier than regular breadcrumbs. This helps create a crispy texture that you will love. When you coat the chicken, make sure to press the panko onto the chicken. This helps it stick better. Cooking spray plays a big role too. Lightly spray the tops of the chicken tenders just before cooking. This adds more crispiness while keeping the chicken moist inside. Marinating the chicken is crucial. I recommend letting it sit for at least 30 minutes. This helps the chicken soak up all the flavors from the buttermilk and spices. Longer marination can make it even tastier. If you can, marinate for a few hours. The chicken will turn out juicy and full of flavor. When air frying, do not overcrowd the basket. Cook in small batches instead. This allows hot air to circulate around each piece. If the chicken is too close, it won’t crisp up well. After cooking one batch, keep the tenders warm in the oven. Set it to a low temperature. This way, they stay warm and ready to serve! {{image_2}} To make your chicken tenders even tastier, try adding spices and herbs. Here are some great options: - Cayenne pepper for heat - Dried oregano for an Italian twist - Chili powder for a smoky flavor - Thyme for a fresh taste Mix and match these to create your flavor profile. You can also try lemon zest for brightness or smoked paprika for depth. If you want a gluten-free meal, you can swap the flour and breadcrumbs. Use almond flour or coconut flour instead of regular flour. For the coating, try gluten-free panko or crushed cornflakes. These options give the same crunch without the gluten. Always check labels to ensure they are certified gluten-free. Pair your crispy chicken tenders with delicious sides and dips. Here are some ideas: - Sweet potato fries for a tasty contrast - Coleslaw for a crunchy side - Fresh veggies like carrots or celery sticks For dipping, ranch dressing is a classic choice. You can also try honey mustard or BBQ sauce. These pairs will make your meal even more enjoyable! To keep your chicken tenders fresh, let them cool first. Place them in an airtight container. Store them in the fridge for up to three days. Make sure to separate layers with parchment paper. This helps prevent sticking and keeps them nice. Reheating can be tricky. You want them crispy again. Use your air fryer to reheat. Set it to 350°F (175°C). Heat for about 5-7 minutes. This method keeps them crunchy. You can also use an oven. Set it to 375°F (190°C) and bake for 10-12 minutes. Freezing is a great way to save extras. Allow cooked chicken tenders to cool completely. Place them in a freezer bag. Remove as much air as possible. They can stay frozen for up to three months. When ready to eat, thaw them in the fridge overnight before reheating. I recommend marinating the chicken for at least 30 minutes. This time helps the chicken soak up the flavors. For even better results, try marinating for 1-2 hours. The longer marination makes the chicken tender and tasty. Yes, you can use frozen chicken tenderloins! However, make sure to thaw them first. You can thaw them overnight in the fridge or use the defrost setting on your microwave. Once thawed, proceed with the buttermilk marinade. Chicken tenders should reach an internal temperature of 165°F (75°C). Use a meat thermometer to check. This ensures they are safe to eat and perfectly cooked. Making ranch dressing is simple! Mix together: - 1/2 cup mayonnaise - 1/2 cup sour cream - 1 tablespoon dried dill - 1 teaspoon garlic powder - 1 teaspoon onion powder - Salt and pepper to taste Whisk until smooth, then serve with the chicken tenders. Yes, you can cook chicken tenders without breadcrumbs. For a lighter option, skip the coating. Marinate the chicken and cook it directly in the air fryer. The tenders will still be juicy and flavorful without the crunch. In this blog post, we covered how to make crispy air-fried chicken tenders. You learned about key ingredients, including a buttermilk marinade, seasonings, and the right coating. Followed by step-by-step instructions, I highlighted tips to achieve the perfect crunch. Variations and storage information ensure you can adapt recipes to your taste and keep leftovers fresh. Enjoy your delicious chicken tenders, and remember that small tweaks can lead to big flavors!
    Air Fryer Crispy Chicken Tenders with Ranch Delight
  • - 1 pound ground beef or turkey - 1/4 cup breadcrumbs - 1/4 cup grated Parmesan cheese - 1 large egg - 3 cloves garlic, minced - 1 teaspoon salt - 1/2 teaspoon black pepper For the meatballs, I like to use ground beef or turkey. Both work well and taste great. Breadcrumbs help hold everything together. Grated Parmesan adds a nice flavor. I always add a large egg to bind the meatballs. Fresh garlic gives them a tasty kick. Don't forget the salt and pepper to enhance the flavors. - 1/2 cup honey - 1/4 cup soy sauce (or tamari for gluten-free) - 1 tablespoon rice vinegar - 1 teaspoon grated fresh ginger - 1 tablespoon sesame oil The sauce is what makes these meatballs shine. Honey adds sweetness and a lovely glaze. Soy sauce or tamari gives it a savory touch. Rice vinegar adds a hint of tang. Fresh ginger can give it a nice spice. Sesame oil adds depth to the flavor. - 1 tablespoon cornstarch mixed with 2 tablespoons water (for thickening) - Chopped green onions for garnish If you like a thicker sauce, you can add cornstarch mixed with water. It helps make the sauce stick to the meatballs. I also love to top them with chopped green onions for a fresh crunch. They make the dish pop with color and flavor. First, grab a large bowl. Add 1 pound of ground beef or turkey. Next, mix in 1/4 cup of breadcrumbs and 1/4 cup of grated Parmesan cheese. Now, add one large egg, three cloves of minced garlic, 1 teaspoon of salt, and 1/2 teaspoon of black pepper. Use your hands to combine everything well. Make sure all ingredients mix together. Once mixed, shape the mixture into small meatballs, about 1 inch wide. You should have around 20 to 25 meatballs. Now it’s time to cook! Place the formed meatballs into the bottom of your slow cooker. In another bowl, whisk together 1/2 cup of honey, 1/4 cup of soy sauce, 1 tablespoon of rice vinegar, 1 teaspoon of grated ginger, and 1 tablespoon of sesame oil. This will be your honey garlic sauce. Pour this sauce over the meatballs. Ensure that each meatball gets a good coating of sauce. You can cook your meatballs either on low or high heat. If you choose low, let them cook for 6 hours. For high, cook for 3 hours. Both methods will fully cook the meatballs. If you want a thicker sauce, mix 1 tablespoon of cornstarch with 2 tablespoons of water. Stir this mixture into the slow cooker after the cooking time. Let it cook on high for an extra 15 to 20 minutes to thicken. Once done, the meatballs are ready to serve. Enjoy the savory flavors! To get the right texture for your meatballs, use a good meat-to-breadcrumb ratio. I recommend a 4:1 ratio. For every pound of meat, use a quarter cup of breadcrumbs. This gives the meatballs a nice firmness without being too dry. Egg is also key in this mix. It acts as a binder, holding the meatballs together. One large egg for a pound of meat works well. It keeps the meatballs moist and helps them hold their shape during cooking. To boost the flavor of your meatballs, consider adding herbs or spices. Fresh parsley, oregano, or basil can add a fresh taste. You can also try a pinch of red pepper flakes for heat. Using different types of meat can change the flavor too. Ground turkey is a leaner option, while ground beef gives a richer taste. You can also use lamb or a mix for something unique. For a great meal, serve your meatballs over steamed rice or quinoa. This makes a complete dish and adds a nice texture. Drizzle some of the honey garlic sauce on top for added flavor. Garnishing with chopped green onions adds a pop of color and freshness. You can also serve with a side of steamed vegetables for a balanced meal. Keep the presentation simple yet inviting. A clean plate with a splash of sauce can really impress your guests. {{image_2}} You can use different meats for these meatballs. Ground turkey or chicken works great. These options are leaner than beef. You can also use plant-based meat. This makes the dish more friendly for everyone. Each choice adds unique flavors and textures. You can switch up the sauce, too. Try sweet chili sauce for a spicy kick. Barbecue sauce is another fun choice. Want more heat? Add red pepper flakes or hot sauce. Adjust the sweetness by adding more honey or soy sauce. This gives you control over the flavor. Serving these meatballs is easy! They taste great over rice or pasta. You can also put them in a wrap for a quick meal. Top with green onions for a fresh pop. Drizzle some sauce on top for extra flavor. These ideas make your meal more fun and tasty. To store leftover meatballs, first let them cool to room temperature. Then, place them in an airtight container. You can keep them in the fridge for up to three days. For longer storage, freeze them. Use a freezer bag or a container. Make sure to remove as much air as possible from the bag. This helps prevent freezer burn. To reheat meatballs, the best method is using the microwave. Place them on a microwave-safe plate. Heat in 30-second intervals until hot. You can also reheat meatballs on the stove. Put them in a skillet with a splash of water or sauce. Cover and heat on low. This keeps the sauce nice and smooth. Refrigerated meatballs last about three days. If you freeze them, they can stay good for up to three months. Just remember to label your containers with the date. This way, you can enjoy your meatballs later without worry. Yes, you can make these meatballs ahead of time. To prep for a busy week, you can form the meatballs and store them in the fridge for up to 24 hours. If you want to keep them longer, freeze them. Place the raw meatballs on a baking sheet and freeze them for a few hours. Once firm, transfer them to a freezer bag. They can last up to three months in the freezer. When you’re ready to cook, just add them to the slow cooker with the sauce. This makes dinner easy and stress-free! If you need a gluten-free option, you can use coconut aminos instead of soy sauce. Coconut aminos has a similar taste and is made from coconut sap. It’s a great choice for those who avoid gluten. You can also use tamari, which is a gluten-free soy sauce. Both options will keep your meatballs flavorful while meeting dietary needs. To check if your meatballs are fully cooked, use a meat thermometer. Insert it into the center of a meatball; it should read 165°F. If you don’t have a thermometer, look for visual cues. The meatballs should be firm to the touch and no longer pink inside. The sauce should bubble gently around them. These tips will help you serve safe and tasty meatballs every time! This blog post covered how to make delicious meatballs with honey garlic sauce. We looked at main ingredients like ground beef or turkey, breadcrumbs, and honey. I shared tips for perfect texture and flavor, plus variations for meat and sauce. You learned how to store leftovers and reheat them, too. Remember, cooking is fun! Don't hesitate to try new flavors and ideas. Enjoy your tasty meatballs and share them with family. Cooking brings us together, and I hope you savor every bite.
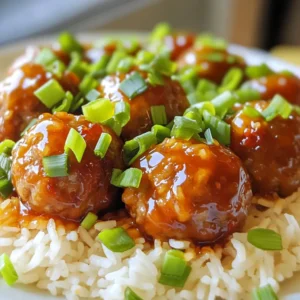
    Slow Cooker Honey Garlic Meatballs Savory and Simple
  • - 8 oz. rice noodles - 1 cup cooked chicken breast, shredded - 1/4 cup creamy peanut butter - 3 tablespoons soy sauce - 2 tablespoons lime juice - 1 tablespoon sriracha (for spice) - 1 tablespoon honey - 1 tablespoon sesame oil - 2 green onions, finely chopped - 1/4 cup crushed peanuts - Fresh cilantro - Salt to taste - Water (as needed for consistency) When making Minute Spicy Peanut Noodles, the right ingredients make all the difference. You need rice noodles as the base. They cook fast and soak up flavor well. Cooked chicken adds protein and makes this meal hearty. Shredded chicken works best for easy mixing. Creamy peanut butter gives the sauce a rich texture. It adds that classic peanut flavor we all love. Soy sauce adds saltiness and depth. Lime juice brings a bright, fresh taste. For a kick, add sriracha. Adjust this based on your spice level. Honey balances the heat and adds sweetness. Sesame oil gives a nutty finish. Chopped green onions add a fresh bite and color. For garnishes, crushed peanuts add crunch. Fresh cilantro brightens the dish. Salt is key for flavor, and water helps adjust the sauce thickness. Gather these ingredients, and you are ready to create a delicious meal! 1. In a large pot, bring water to a boil. 2. Add 8 oz. of rice noodles. Cook them until they are al dente. 3. Drain the noodles and rinse them under cold water. This stops the cooking. 1. In a medium bowl, whisk together these main ingredients: - 1/4 cup creamy peanut butter - 3 tablespoons soy sauce - 2 tablespoons lime juice - 1 tablespoon sriracha - 1 tablespoon honey - 1 tablespoon sesame oil - A pinch of salt 2. If the sauce is too thick, add a little water. Adjust until you reach your desired consistency. 1. In a large mixing bowl, combine cooked rice noodles and 1 cup shredded chicken. 2. Pour the spicy peanut sauce over the noodles and chicken. 3. Toss everything gently to coat evenly. 4. Fold in 2 finely chopped green onions for added flavor and freshness. These steps will lead you to a delightful bowl of Minute Spicy Peanut Noodles with Chicken. - Use pre-cooked chicken for faster prep. This saves time and keeps the dish simple. - Sauté the rice noodles briefly for added texture. A quick toss in a hot pan can make them crispy. - Adjust sriracha for your spice preference. Add more for a fiery kick or less for mild heat. - Substitute lime juice with vinegar for a different zing. This change can add an exciting twist to the sauce. - Serve the noodles in colorful bowls for visual appeal. Add vibrant garnishes like green onions and cilantro. - Use a bamboo platter for an authentic look. This adds a fun touch to your meal and impresses your guests. {{image_2}} If you want a meat-free meal, swap the chicken for tofu or chickpeas. Both options work great. Tofu gives a nice texture, while chickpeas add protein. Make sure to use vegetable broth instead of water for cooking the noodles. This will add more flavor to your dish. You can try different types of noodles for fun. Soba noodles are made from buckwheat. They have a nutty taste that pairs well with the sauce. Udon noodles are thick and chewy. They soak up the sauce nicely. Both noodles are tasty and will change the dish's feel. Want to make the sauce creamier? Add some coconut milk. This will give your dish a rich flavor. You can also try different nut butters. Almond butter or cashew butter can change the taste. Each nut butter brings its own unique flavor, making your noodles special every time you cook them. To keep leftovers fresh, place them in an airtight container. This helps maintain flavor and texture. You can use glass or plastic containers, but glass is often better for reheating. Store your Minute Spicy Peanut Noodles in the fridge for up to three days. For freezing, portion the noodles into smaller containers. This makes it easy to thaw only what you need. When freezing, avoid adding garnishes like peanuts or cilantro. They don’t freeze well. To reheat, thaw in the fridge overnight. Then, warm them on the stove with a bit of water. This keeps them from drying out. Refrigerated noodles last about three days. After that, they may spoil. Signs of spoilage include a sour smell, discoloration, or a slimy texture. If you see any of these signs, it’s best to toss them. Always trust your senses when it comes to food safety. This dish is quick and easy. You need about 10 minutes to prep. Cooking takes another 10 minutes. In total, you spend just 20 minutes to make this meal. Yes! To make it gluten-free, use gluten-free soy sauce or tamari. You can also replace rice noodles with gluten-free noodles. This way, you get the same tasty dish without the gluten. Spicy peanut noodles pair well with many dishes. You can serve them with a fresh salad. A side of steamed broccoli or green beans works great too. For protein, grilled shrimp or tofu are perfect choices. To change the heat, modify the sriracha. Add more for extra spice or less for a milder dish. You can also add crushed red pepper flakes for a different kick. If it’s too spicy, mix in some peanut butter to tone it down. In this article, we covered how to make Minute Spicy Peanut Noodles. We explored essential ingredients, cooking steps, and helpful tips. You learned how to customize your dish with different flavors and ingredients, from protein swaps to spice adjustments. These noodles are quick, tasty, and easy to store. Enjoy experimenting with your own twists. Making this dish can be simple and fun for everyone. Dive in and savor each bite.
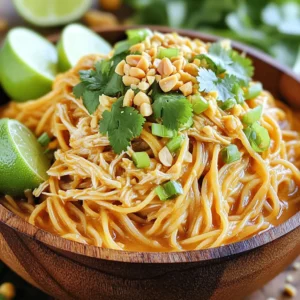
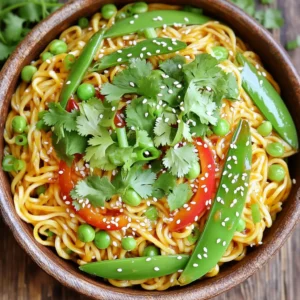
    Minute Spicy Peanut Noodles with Chicken Delight
  • - 1 lb chicken breast, diced - 2 tablespoons olive oil - 3 cloves garlic, minced - 1 cup cherry tomatoes, halved - 2 cups baby spinach - 1 cup heavy cream - 2 cups chicken broth - 10 oz penne pasta - 1/2 cup grated Parmesan cheese - 1 teaspoon dried Italian herbs - Salt and pepper to taste - Fresh basil for garnish When you gather these ingredients, you set the stage for a delicious meal. Each item plays a key role. The chicken breast adds protein and richness. Olive oil brings a nice fat that helps cook the chicken and adds flavor. Garlic gives that wonderful aroma that fills your kitchen. Cherry tomatoes burst with freshness, while baby spinach adds color and nutrients. Dairy is where the magic happens. Heavy cream creates a smooth sauce that coats the pasta. Chicken broth enhances the flavor of the dish. Penne pasta holds the sauce well, making every bite creamy and satisfying. Grated Parmesan cheese adds a salty finish that elevates the whole dish. The seasonings tie it all together. Dried Italian herbs provide depth and warmth. Salt and pepper are essential for balancing flavors. Lastly, fresh basil not only looks nice but offers a pop of freshness. Having these ingredients ready will make cooking a breeze! First, heat 2 tablespoons of olive oil in a large pot over medium heat. Add 1 pound of diced chicken breast. Season the chicken with salt and pepper. Sauté the chicken for about 5 to 7 minutes, until it is browned and cooked through. Once done, remove the chicken from the pot and set it aside. In the same pot, add 3 cloves of minced garlic. Sauté for about 30 seconds until it smells good. Next, add 1 cup of halved cherry tomatoes and 1 teaspoon of dried Italian herbs. Cook this mixture for 2 to 3 minutes until the tomatoes soften. Then, pour in 2 cups of chicken broth and bring it to a simmer. Now, it’s time to add the pasta. Stir in 10 ounces of penne pasta. Cover the pot and cook for 10 to 12 minutes. Stir occasionally. You want the pasta to be al dente, which means it should be firm but not hard. Once the pasta is ready, lower the heat. Stir in 1 cup of heavy cream and 1/2 cup of grated Parmesan cheese. Mix well until the sauce is creamy. Add the cooked chicken back into the pot along with 2 cups of baby spinach. Stir until the spinach wilts and everything is heated through, which takes about 2 minutes. Taste and adjust the seasoning with salt and pepper. Seasoning is key to making this dish shine. Salt and pepper boost the taste of the chicken and pasta. You can also swap dried Italian herbs for others like oregano or thyme. They each add a unique touch. Fresh herbs like basil or parsley can brighten the flavor further. Good sautéing makes all the difference. Make sure the oil is hot before adding chicken. This helps it brown nicely. When making a creamy sauce, keep the heat low after adding cream. High heat can cause it to separate. Stir gently to keep it smooth and rich. Serve your pasta in wide bowls to show off the colors. Top each serving with fresh basil and a sprinkle of Parmesan cheese. This adds a nice pop and makes it look fancy. You can also drizzle a bit of olive oil for shine and flavor. {{image_2}} You can change the protein in this dish to suit your taste. If you like seafood, try shrimp. Cook the shrimp just like the chicken. They will only need a few minutes to sauté. You can also use turkey for a leaner option. Just make sure to cook it fully before adding the other ingredients. For plant-based options, tofu is a great choice. Use firm tofu and sauté it until golden. Chickpeas also work well. They add protein and a nice texture. Just stir them in when you add the spinach. If you're looking for gluten-free options, consider using rice pasta or quinoa pasta. Both cook well and taste great. You can also try whole wheat pasta for a nuttier flavor. Different pasta shapes can change the experience. Fusilli, farfalle, or even spaghetti can make this dish unique. Each shape holds the creamy sauce differently, adding fun to your meal. Want to boost the flavor? Add sun-dried tomatoes for a rich, tangy taste. You can also toss in artichokes for a touch of earthiness. Both add color and depth to the dish. Cheese lovers can experiment with different types of cheese. Try mozzarella for a gooey texture or feta for a salty kick. Mixing cheeses can create a more complex flavor profile. To keep your One-Pot Creamy Tuscan Chicken Pasta fresh, store it in an airtight container. Place it in the fridge as soon as it cools. This helps to keep the flavors intact. Leftovers stay good for about three days. After that, the cream sauce may separate. To reheat, you can use a microwave or stovetop. If using a microwave, heat in short bursts. Stir in between to avoid hot spots. For stovetop, place it in a pan over low heat. Add a splash of chicken broth to keep it creamy. Stir until warm. If you want to freeze this dish, use a freezer-safe container. Make sure to leave some space at the top, as the pasta may expand. When it’s time to eat, thaw it in the fridge overnight. Reheat it on the stovetop, adding a little cream or broth to restore its smooth texture. You can use several options to replace heavy cream. Here are some choices: - Milk and Butter: Mix 3/4 cup of milk with 1/4 cup of melted butter. - Half-and-Half: This works well for a lighter option. - Coconut Cream: Great for a dairy-free version. - Greek Yogurt: Adds creaminess with a tangy flavor. - Silken Tofu: Blend it until smooth for a vegan choice. These substitutes will change the taste slightly, but they can still work well. To add some heat to your dish, try these tips: - Red Pepper Flakes: Sprinkle some in while cooking. - Hot Sauce: Stir in a bit before serving. - Jalapeños: Add diced jalapeños for fresh heat. - Spicy Italian Sausage: Swap out chicken for this for a hearty kick. These options can make your pasta pop with flavor. Yes, you can prepare this dish in advance. Here’s how: - Meal Prep Tips: Cook the chicken and sauce, then store them separately. This keeps flavors fresh. - Storing: Place leftovers in an airtight container. It will stay good for about 3-4 days in the fridge. - Reheating Instructions: Warm it in a pot over low heat. Add a splash of broth to keep it creamy. You can also microwave it, but stir it well to heat evenly. Making this recipe ahead saves time on busy days. This recipe combines chicken, pasta, and tasty herbs for a delightful meal. You learned how to sauté chicken and create a creamy sauce. The cooking steps are simple, and tips will help you make it better. Don't forget to explore variations for unique flavors. Store leftovers properly to enjoy later. I hope you feel confident making this dish. It can be a hit at any meal!
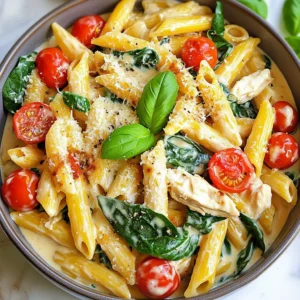
    One-Pot Creamy Tuscan Chicken Pasta Delight
  • To make these tasty Brussels sprouts, you will need: - 1 lb Brussels sprouts, trimmed and halved - 2 tablespoons olive oil - 2 tablespoons maple syrup - 1 tablespoon Dijon mustard - 1 teaspoon garlic powder - 1 teaspoon onion powder - Salt and pepper to taste These ingredients work together to create a sweet and tangy flavor that makes the sprouts shine. If you want to boost the taste, consider adding: - ¼ cup toasted pecans - Fresh parsley for garnish Toasted pecans add crunch, while parsley gives a fresh touch. You'll need some basic kitchen tools and ingredients to cook these sprouts: - Air fryer - Mixing bowl - Measuring spoons Olive oil is key for crisping up the Brussels sprouts, while garlic and onion powders add depth. Together, they help make this dish a standout! First, grab your Brussels sprouts. You need one pound, trimmed and halved. Look for bright green sprouts. Next, rinse them under cold water. Pat them dry with a clean towel. This step helps the sauce stick better. After that, place the sprouts in a large bowl. They should be ready for the next step. Now, let’s create the sauce. In the same bowl, add two tablespoons of olive oil. Then, pour in two tablespoons of maple syrup. Next, add one tablespoon of Dijon mustard. Sprinkle in one teaspoon of garlic powder and one teaspoon of onion powder. Don't forget to add salt and pepper to taste. Mix all these ingredients well until you get a smooth sauce. This sauce is key to the flavor. It’s time to cook! Preheat your air fryer to 375°F (190°C). While it heats, toss the halved Brussels sprouts in the maple Dijon sauce. Make sure they are well-coated. Then, place the sprouts in a single layer in the air fryer basket. Try not to overcrowd them for even cooking. Now, air fry the Brussels sprouts for 15 to 18 minutes. Shake the basket halfway through for great results. They should turn crispy and golden brown. Once done, transfer them to a serving dish. If you want, sprinkle toasted pecans on top. Garnish with fresh parsley for a pop of color. Enjoy your tasty dish! To get crispy Brussels sprouts, start with fresh ones. Trim and halve them evenly. This helps them cook at the same rate. Use enough olive oil to coat each piece lightly. Too much oil can make them soggy. Make sure you space them out in the air fryer. Overcrowding leads to steaming instead of crisping. Shake the basket halfway through cooking. This helps them brown evenly on all sides. Each air fryer can cook a bit differently. If you have a smaller model, reduce the cooking time by a few minutes. Check for doneness after 12 minutes. If they need more time, add a minute or two. Always keep an eye on them as they cook. The end goal is golden brown and crispy, so watch closely! You can boost the flavor of your sprouts easily. Try adding crushed red pepper for some heat. A squeeze of lemon juice adds a nice zing. For a nutty crunch, use toasted pecans. If you like garlic, add fresh minced garlic instead of powder. Experiment with herbs like thyme or rosemary for extra depth. The key is to taste as you go! Adjust the seasonings until you find your perfect mix. {{image_2}} You can replace maple syrup with agave nectar. Agave has a similar sweetness. You can also use brown rice syrup, which works well too. Both options keep the dish plant-based. They add a nice flavor without losing the sweet touch. If you want to avoid nuts, skip the pecans. Instead, try adding sunflower seeds for crunch. They give a nice texture and are safe for nut allergies. You can also add crispy chickpeas for a unique twist. Do you like heat? Add red pepper flakes to the sauce. Start with a pinch and adjust to your taste. For a bolder flavor, mix in a bit of sriracha. This turns the dish into a spicy delight that wakes up your taste buds! To keep your Brussels sprouts fresh, let them cool first. Then, place them in an airtight container. Store them in the fridge for up to three days. This keeps their flavor and texture intact. Reheat your Brussels sprouts in the air fryer for about 5 minutes at 375°F. This method restores their crispiness. You can also use a microwave, but they may lose some crunch. If you choose the microwave, heat in short bursts to avoid overcooking. Freezing is a good option if you have extra Brussels sprouts. First, blanch them by boiling for 3 minutes, then cool in ice water. Drain and dry them before placing in freezer bags. They can last up to three months in the freezer. When ready to use, cook directly from frozen for the best results. To make your Brussels sprouts crispy, follow these steps: - Cut them in half to increase surface area. - Toss them well in the sauce so each piece gets coated. - Don't overcrowd the air fryer basket; this helps them cook evenly. - Shake the basket halfway through cooking to ensure even crispiness. Cooking at 375°F for 15-18 minutes gives the best result. You want them golden brown and crunchy. Yes, you can use frozen Brussels sprouts. However, they may need extra cooking time. - Thaw them first for better texture. - Pat them dry to remove excess moisture. - Coat them in the maple Dijon mixture as you would with fresh ones. Keep in mind, they might not be as crispy, but they will still taste great. Maple Dijon Brussels sprouts pair well with many dishes. Here are some great options: - Roast chicken or turkey for a hearty meal. - Grilled salmon adds a nice touch of flavor. - Serve with quinoa or rice for a healthy side. - They also go nicely with a fresh salad or as part of a holiday spread. These pairings enhance the sweet and savory notes of the sprouts. This blog post covered how to make delicious Air Fryer Maple Dijon Brussels Sprouts. We discussed key ingredients, step-by-step cooking instructions, and useful tips to ensure crispiness. You learned variations and how to store leftovers effectively. In closing, enjoy experimenting with flavors and ingredients for your own twist. Your air fryer can make veggies exciting and tasty!
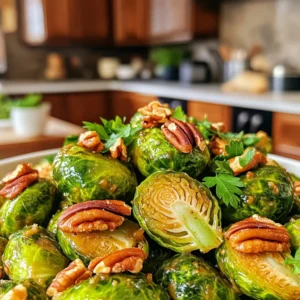
    Savory Air Fryer Maple Dijon Brussels Sprouts Delight
  • To make No-Bake Peanut Butter Cheesecake Jars, you need some simple and tasty ingredients. Here’s what you should gather: - 1 cup creamy peanut butter - 8 oz cream cheese, softened - 1 cup powdered sugar - 1 teaspoon vanilla extract - 1 cup heavy whipping cream - 1 cup crushed graham crackers - 2 tablespoons unsalted butter, melted - Mini chocolate chips for garnish These ingredients come together to create a rich and creamy dessert. The creamy peanut butter and smooth cream cheese blend perfectly. The powdered sugar adds just the right amount of sweetness. Vanilla extract brings warmth to the mix. Heavy whipping cream makes it light and fluffy. The crushed graham crackers add a crunchy base. Finally, melted butter helps the crumbs stick together. Don't forget the mini chocolate chips on top for a fun touch! To start, grab a mixing bowl. Add 8 ounces of softened cream cheese and 1 cup of creamy peanut butter. Use an electric mixer and beat them together. Mix until the blend is smooth and creamy. This makes the base for your cheesecake. Next, slowly add in 1 cup of powdered sugar and 1 teaspoon of vanilla extract. Continue to mix until everything is well combined and smooth. This will add sweetness and flavor to your mixture. Now, take a clean bowl and pour in 1 cup of heavy whipping cream. Use a hand mixer to whip the cream. Beat it until stiff peaks form. This means the cream should hold its shape well. Once you have stiff peaks, gently fold the whipped cream into your peanut butter mixture. Use a spatula and be careful not to deflate the whipped cream. This keeps your cheesecake light and fluffy. In another bowl, mix 1 cup of crushed graham crackers with 2 tablespoons of melted unsalted butter. Stir until the crumbs are fully coated. This will be your crunchy base. To build the jars, start with a layer of the graham cracker mix in the bottom of each jar. Press it down lightly. Next, spoon a layer of your peanut butter cheesecake filling on top of the graham cracker layer. Make sure to spread it evenly. Repeat these layers until the jars are full, finishing with a layer of cheesecake on top. Finally, refrigerate the jars for at least 2 hours, or overnight if you have time. This helps the cheesecake set and flavors meld. When you’re ready to enjoy, sprinkle mini chocolate chips on top for extra crunch and sweetness! How to avoid lumps in the mixture To keep your cheesecake smooth, make sure the cream cheese is at room temperature. Cold cream cheese can create lumps. Use an electric mixer to blend the peanut butter and cream cheese well. Mix until it looks creamy and well combined. Add the powdered sugar and vanilla slowly, mixing at low speed until smooth. Tips for folding whipped cream without deflating When you whip the cream, stop once you see stiff peaks. Use a spatula to fold the whipped cream into the peanut butter mix. Start by adding a small amount of whipped cream to lighten the mixture. Then, gently fold in the rest. This keeps your cheesecake fluffy and light. Ideas for garnishing with chocolate chips Once your jars are filled, you can sprinkle mini chocolate chips on top. This adds a nice crunch and a sweet touch. You can also use a mix of chocolate and peanut butter chips for extra flavor. Drizzling with peanut butter or chocolate sauce For a finishing touch, drizzle some peanut butter or chocolate sauce on top of the jars. It makes them look fancy and adds more taste. You can warm the sauce slightly for easier drizzling. Enjoy your delicious creation! {{image_2}} You can change up the recipe with different ingredients. One fun twist is using crunchy peanut butter instead of creamy. This adds a nice texture and extra peanut flavor. You can also try different cookie bases. For example, crushed Oreos give a rich chocolate taste. They add a great crunch to the jars. To take your cheesecake jars to the next level, think about flavor enhancements. Adding chocolate or caramel sauce on top makes each bite even sweeter. A drizzle of warm sauce can make the jars look fancy, too. You might also want to add nuts or fruit layers. Chopped peanuts or sliced bananas create exciting flavors. These options make your cheesecake jars unique and delicious. To keep your no-bake peanut butter cheesecake jars fresh, choose airtight containers. Glass jars with tight lids work great. You can also use plastic containers, but glass keeps flavors better. Store them in the fridge for up to five days. Just make sure to seal them well. This way, each bite stays tasty! If you want to save some jars for later, you can freeze them. First, let the jars cool in the fridge for at least two hours. Then, cover each jar with plastic wrap and a lid. This will protect them from freezer burn. You can freeze them for up to three months. To enjoy your frozen jars, take them out and place them in the fridge overnight. This slow thawing keeps the texture smooth. Avoid using the microwave, as it can change the creaminess. Enjoy your delicious cheesecake jars anytime you want! Yes, you can make these jars ahead of time. It's best to prepare them the night before. This way, they have enough time to set in the fridge. The longer they chill, the better the flavors blend. Just cover them well before refrigerating. You can use low-fat cream cheese if you prefer. It will change the texture a bit. The cheesecake may not be as rich and creamy. However, it will still taste good. If you're watching your calories, this is a great option. To make this recipe gluten-free, use gluten-free graham crackers. You can find many brands that offer this option. Just check the label when you shop. The rest of the ingredients are already gluten-free, so it will be an easy swap. If you need a substitute for peanut butter, try almond butter or sunflower seed butter. Both options work well in this recipe. They have similar textures and flavors. This makes them great substitutes for those with allergies or who want variety. This blog post covered how to make a tasty peanut butter cheesecake in jars. We talked about the simple ingredients, each step of preparation, and all the tips for success. You learned about cool variations and how to store your treats. Making this dessert should be fun and easy. It’s perfect for any occasion. Enjoy the delicious layers and share them with friends!
    No-Bake Peanut Butter Cheesecake Jars Delight
  • - 1 pound fresh or frozen gnocchi - 2 cups butternut squash, diced - 1 cup Brussels sprouts, halved - 1 red onion, cut into wedges - 2 tablespoons olive oil - Spices: 1 teaspoon garlic powder, 1 teaspoon smoked paprika, salt, and pepper - 1/4 cup grated Parmesan cheese - Fresh parsley for garnish Gather these ingredients before you start cooking. The star of this dish is the gnocchi. You can use fresh or frozen gnocchi. Both work well and cook quickly. Butternut squash adds sweetness and body. Brussels sprouts give a nice crunch. The red onion brings a mild flavor. For cooking, olive oil is key. It helps everything crisp up nicely. The garlic powder and smoked paprika add depth. Salt and pepper bring out the flavors. If you like cheese, consider adding Parmesan. It melts beautifully over the dish. Fresh parsley adds a burst of color and freshness. You can use these ingredients to create a warm and hearty meal. - Preheat the oven to 425°F (220°C). - Toss together 2 cups of diced butternut squash, 1 cup of halved Brussels sprouts, and 1 red onion cut into wedges. - Drizzle with 1 tablespoon of olive oil. - Add 1 teaspoon of garlic powder, 1 teaspoon of smoked paprika, salt, and pepper to taste. - Spread the veggies in a single layer on a large sheet pan. - Bring a pot of salted water to a boil. - Cook 1 pound of fresh or frozen gnocchi according to the package instructions. - This usually takes about 2-3 minutes, or until the gnocchi float. - Drain the gnocchi and set them aside for later. - After 15 minutes, take the sheet pan from the oven. - Add the cooked gnocchi to the roasted vegetables. - Drizzle with the remaining 1 tablespoon of olive oil. - Toss everything gently to combine. - Return the sheet pan to the oven. - Roast for another 15-20 minutes until the gnocchi are crispy and the veggies are tender. - If you want cheese, sprinkle 1/4 cup of grated Parmesan cheese over the top in the last 5 minutes. - Once done, take it out of the oven and garnish with fresh parsley before serving. To make your gnocchi crispy, start by preheating your oven to 425°F (220°C). This high temperature helps create that golden crunch. Spread the gnocchi and veggies in a single layer on the sheet pan. This step is key. If they are too crowded, they will steam instead of roast. Aim for even spacing for the best results. Want to take your dish up a notch? Try adding fresh herbs like rosemary or thyme. They bring a wonderful flavor that pairs great with fall veggies. You can also sprinkle in some red pepper flakes for a bit of heat. Garlic powder and smoked paprika already add depth, but these extras can really shine. For a beautiful plate, use a large serving dish. Create a bed of veggies and gnocchi. If you want to impress, sprinkle grated Parmesan on top. It will melt slightly and add a nice touch. Finally, garnish with fresh parsley. The green color will pop and make your dish look fresh and inviting. {{image_2}} You can swap out the butternut squash, Brussels sprouts, and red onion for other seasonal veggies. Try adding: - Sweet potatoes for a hearty touch. - Carrots, cut into sticks for sweetness. - Cauliflower, chopped into florets for a nice crunch. - Zucchini, sliced for extra freshness. These options keep the dish colorful and tasty. Each veggie brings its own flavor and texture, making your meal unique. If you want to make this dish heartier, adding protein is easy. Consider these options: - Cooked chicken, diced for added protein. - Italian sausage, crumbled and browned for a spicy kick. - Tofu, cubed and baked for a plant-based choice. Adding protein makes this meal more filling and satisfying. You can mix and match to find the right balance for your taste. For those with dietary needs, there are simple swaps. You can use: - Gluten-free gnocchi made from rice or potato flour. - Vegan cheese or skip the cheese for a dairy-free option. These adjustments keep the dish friendly for various diets without losing flavor. Enjoy your meal while catering to your needs! To keep your gnocchi and veggies fresh, store them in an airtight container. Let them cool down first. This will help prevent steam buildup and sogginess. Place them in the fridge if you plan to eat them within three days. For longer storage, consider freezing them. When it's time to enjoy your leftovers, the oven is your best friend. Preheat your oven to 350°F (175°C). Spread the gnocchi and veggies on a baking sheet, drizzle with a little olive oil, and heat for about 15 minutes. This method keeps the gnocchi crispy and the veggies tender. You can also use a microwave, but it may make the gnocchi soft. To freeze your dish, cool it completely first. Transfer the gnocchi and veggies into freezer-safe bags or containers. Squeeze out as much air as possible to avoid freezer burn. You can freeze them for up to three months. When ready to eat, thaw in the fridge overnight before reheating. This will help maintain the best texture and flavor. Gnocchi is a soft dumpling made from potatoes, flour, and egg. It is different from pasta, which is usually made from wheat and water. Gnocchi has a light, fluffy texture. Pasta often has a firmer bite. You can enjoy gnocchi in many sauces, but it shines when roasted like in this dish. The crispy edges add a delightful crunch. Yes, you can use frozen vegetables. They save time and are often just as healthy. Just make sure to thaw them before cooking. If you skip this step, they may release too much water. This can make the dish soggy instead of crispy. Frozen vegetables are a great choice for quick meals. Gnocchi is cooked when it floats in boiling water. This usually takes about 2-3 minutes. If you want to check, taste one. It should feel soft and tender. For this recipe, you will roast the gnocchi after boiling. This gives it a crispy texture that's truly satisfying. Adding cheese is not necessary but can enhance flavor. You can use Parmesan for a salty kick. If you want to skip cheese, try nutritional yeast for a cheesy taste without dairy. You can also use a squeeze of lemon juice for brightness. This adds flavor and keeps the dish fresh. This blog covered a simple and tasty recipe for gnocchi with roasted veggies. You learned about the main ingredients, cooking steps, and useful tips to enhance the dish. The blog also provided storage info and variations to suit your taste. Feel free to adjust ingredients or add proteins for a personal touch. Enjoy this satisfying meal that is easy to make and full of flavor!
    Sheet-Pan Crispy Gnocchi and Fall Veggies Delight
  • - 1 lb flank steak, sliced thin against the grain - 2 tablespoons cornstarch - 2 tablespoons vegetable oil - 4 green onions, chopped (white and green parts separated) - 4 cloves garlic, minced - 1 tablespoon fresh ginger, grated - 1/2 cup low-sodium soy sauce - 1/4 cup brown sugar - 1 tablespoon rice vinegar - 1 teaspoon sesame oil - 1/2 teaspoon crushed red pepper flakes (optional for heat) - Steamed jasmine rice for serving These ingredients help create the rich flavors of Mongolian Beef. The flank steak is tender and flavorful when cooked. Cornstarch gives the beef a crispy texture. Using low-sodium soy sauce keeps the dish tasty without being too salty. Brown sugar adds sweetness, which balances the savory sauce. - Additional vegetables like bell peppers or broccoli - Fresh cilantro for garnish - Sesame seeds for texture - Chili paste for more heat Adding these optional items can enhance your dish. Vegetables add color and nutrition. Fresh herbs like cilantro brighten the flavors. Sesame seeds give a nice crunch. Chili paste can spice things up if you like heat. - Use sirloin or ribeye instead of flank steak for a different texture. - Substitute honey for brown sugar to make it healthier. - Coconut aminos can replace soy sauce for a gluten-free option. - For a vegetarian version, try tofu or seitan instead of beef. These substitutions can make the recipe fit your needs. Each change can alter the taste and texture, so feel free to experiment. You can still achieve a great dish with different ingredients. To start, you need to slice the flank steak thin. Cutting against the grain helps make it tender. After slicing, place the beef in a medium bowl. Add 2 tablespoons of cornstarch. Toss until the meat is well-coated. This step helps create a nice crust when cooking. Let the beef sit for about 10 minutes. This allows the cornstarch to work its magic. Next, heat 2 tablespoons of vegetable oil in a large skillet or wok over medium-high heat. Once the oil is hot, add the coated beef to the pan. Cook the beef for 5 to 7 minutes. You want it to turn brown and crispy. Stir it often to ensure even cooking. When done, remove the beef and set it aside on a plate. In the same skillet, add the white parts of 4 chopped green onions, 4 minced garlic cloves, and 1 tablespoon of grated ginger. Stir-fry these ingredients for 1 to 2 minutes. This step brings out their rich flavors. In a separate mixing bowl, combine 1/2 cup of low-sodium soy sauce, 1/4 cup of brown sugar, 1 tablespoon of rice vinegar, and 1 teaspoon of sesame oil. If you like heat, add 1/2 teaspoon of crushed red pepper flakes. Pour this sauce into the skillet and let it simmer. After a minute, return the cooked beef to the skillet. Toss the beef until it’s evenly coated with the sauce. Cook it for another 2 to 3 minutes. Finally, stir in the green parts of the chopped green onions and remove the skillet from heat. To get crispy beef, start with cornstarch. Toss the sliced flank steak in cornstarch. This helps create a nice crust. Let the beef sit for about 10 minutes. This makes it tender and allows the coating to stick. When cooking, use a hot skillet or wok. Make sure the oil is very hot before adding the beef. Cook the beef in batches if needed. This prevents overcrowding and keeps it crispy. For great flavor, use fresh ingredients. Fresh garlic and ginger add a lot. Don’t skip the soy sauce; it gives depth. Brown sugar adds sweetness and balance. If you want heat, add crushed red pepper flakes. Mix the sauce well before adding it to the beef. Let everything simmer together. This helps the beef soak up all the flavors. One common mistake is not letting the beef sit after coating it. This can lead to chewy meat. Another mistake is cooking the beef for too long, making it tough. Avoid using too much sauce; it can overpower the dish. Finally, don’t forget to stir in the green onions at the end. This adds a fresh touch and enhances the flavor. {{image_2}} You can easily add vegetables to your Mongolian beef. This not only adds color but also boosts nutrition. Good choices include bell peppers, broccoli, or snap peas. Start by slicing the veggies thin. Add them to the skillet when you stir-fry the garlic and ginger. Cook them for about 2-3 minutes. This timing keeps the veggies crisp and bright. Toss the beef back in with the sauce. You’ll have a colorful and tasty dish. If you love heat, make your Mongolian beef spicy. Simply add more crushed red pepper flakes to the sauce. You can also include fresh sliced chilies. For a smoky flavor, try adding a dash of chili oil. Mix it in when you add the sauce to the skillet. This will bring a nice kick without overpowering the dish. Adjust the spice level to your taste. Enjoy the extra warmth in each bite. You can create a vegetarian or vegan version of Mongolian beef. Use tofu or tempeh as a protein substitute. First, press and cube the tofu. Sauté it in the skillet until golden brown. Then follow the same steps for the sauce and veggies. For a heartier option, consider using seitan. It has a chewy texture that mimics beef well. Make sure to keep the sauce vegan by using a plant-based soy sauce. This version is just as delicious and satisfying! To keep your Mongolian beef fresh, store it in an airtight container. Make sure it cools down first. Place it in the fridge within two hours of cooking. It will last for about three to four days. If you want to save it longer, consider freezing. When you're ready to enjoy your leftovers, reheat them gently. You can use a microwave or a skillet. If using a microwave, cover the container to keep moisture in. Heat in 30-second bursts until warm. If using a skillet, add a splash of water to keep it from drying out. Stir frequently over medium heat until heated through. If you want to freeze your Mongolian beef, do it right after cooking. Use a freezer-safe container. It can last for about three months in the freezer. When you're ready to eat, thaw it overnight in the fridge. Reheat as mentioned above. Avoid refreezing after it has been thawed. Enjoy your tasty meal later! Yes, you can use other cuts. Sirloin or ribeye works well. Both cuts have good flavor and tenderness. They also cook quickly, just like flank steak. Slice them thin against the grain to keep them tender. This recipe is quick. It takes about 10 minutes to prep. Cooking adds another 15 minutes. So, in total, you can have this meal ready in just 25 minutes. Perfect for a busy weeknight! Mongolian Beef is not usually spicy. It focuses on sweet and savory flavors. However, you can add crushed red pepper flakes for some heat. Adjust the amount to fit your taste. Enjoy the balance of flavors in every bite! We explored how to make better-than-takeout Mongolian beef at home. I shared essential ingredients and substitutions for rich flavors. The step-by-step guide ensures perfect cooking each time. You learned helpful tips for a crispy finish and how to avoid common mistakes. We also discussed tasty variations and smart storage methods. Keep these insights in mind to impress your family and friends. Enjoy your homemade Mongolian beef, knowing you made it with care and skill!
    Better-Than-Takeout Mongolian Beef Simple Recipe
  • - 1 cup unsalted butter, melted - 1 1/4 cups granulated sugar - 1/4 cup brown sugar, packed - 4 large eggs - 1 teaspoon vanilla extract These main ingredients form the base of our brownies. The butter adds richness and moisture. Granulated and brown sugars give sweetness and depth. Eggs bring structure and help the brownies rise. Vanilla extract offers a warm flavor that enhances the sweetness. - 1 cup all-purpose flour - 1/2 cup unsweetened cocoa powder - 1/4 teaspoon salt The dry ingredients are vital for texture. All-purpose flour provides structure, making the brownies hold together. Cocoa powder adds that deep chocolate flavor we all love. Salt is key; it balances sweetness and boosts flavors. - 1 cup pecans, chopped - 1 cup caramel sauce (store-bought or homemade) - Sea salt flakes for garnish These toppings add crunch and flavor. Chopped pecans give a nice bite and nutty taste. Caramel sauce brings sweetness and gooeyness. A sprinkle of sea salt on top heightens all the flavors. It makes each bite even better! 1. First, preheat your oven to 350°F (175°C). This step ensures even baking. 2. Next, grease a 9x13 inch baking pan or line it with parchment paper. This helps in easy removal later. 3. In a large bowl, whisk together 1 cup of melted unsalted butter, 1 1/4 cups of granulated sugar, and 1/4 cup of brown sugar. Mix well until combined. 4. Add in 4 large eggs, one at a time. Mix after each egg until fully blended. Stir in 1 teaspoon of vanilla extract for flavor. 1. In a separate bowl, sift together 1 cup of all-purpose flour, 1/2 cup of unsweetened cocoa powder, and 1/4 teaspoon of salt. Sifting helps to remove lumps. 2. Gradually mix the dry ingredients into the wet ingredients. Stir gently until just combined. Overmixing can make your brownies tough. 1. Pour half of the brownie batter into the prepared pan. Spread it out evenly. 2. Drizzle half of the caramel sauce over the brownie layer. Make sure it covers the surface. 3. Sprinkle a handful of chopped pecans on top. Reserve some for later. 4. Pour the remaining brownie batter over the caramel and pecans. Spread it evenly to cover everything. 5. Drizzle the rest of the caramel sauce on top. Use a knife to create swirls in the batter. 1. Bake in the preheated oven for 25-30 minutes. Check for doneness by inserting a toothpick. It should come out with a few moist crumbs. 2. Once baked, remove the pan from the oven. Let the brownies cool in the pan for about 15 minutes. 3. If you used parchment paper, lift the brownies out. Transfer them to a wire rack to cool completely. 4. After cooling, cut into squares. Sprinkle a few sea salt flakes on top to enhance the flavor. To get the best brownie texture, avoid overmixing. Mix just until the flour disappears. Overmixing makes brownies tough. You want a fudgy and soft bite. For swirls and layers, drizzle the caramel sauce gently. Use a knife to create pretty swirls without mixing it in completely. You can make these brownies your own! Consider adding chocolate chips for extra richness. Nuts are great too; try walnuts or almonds if you want. If you're feeling adventurous, try a homemade caramel sauce. Just heat sugar until it melts, then stir in cream. It adds a unique touch! A sprinkle of sea salt flakes on top boosts flavor. The salt balances the sweet caramel nicely. For a creative look, serve the brownies on a colorful plate. You can also add a scoop of ice cream for a fun twist. Drizzle extra caramel over the ice cream for added sweetness. {{image_2}} You can make gluten-free brownies easily. Use almond flour or coconut flour instead of all-purpose flour. These options keep the taste rich. Almond flour adds a nutty flavor, while coconut flour adds sweetness. When you switch flours, reduce the amount by 25%. Gluten-free flours absorb more liquid. This change helps keep your brownies soft and moist. To make vegan caramel pecan turtle brownies, swap the eggs for flax eggs. Mix one tablespoon of ground flaxseed with three tablespoons of water. Let this sit for five minutes to thicken. For caramel, use vegan caramel sauce. Store-bought brands are available, or make your own using coconut milk and brown sugar. This keeps your brownies sweet and creamy without any animal products. Want to mix things up? Add espresso or coffee to your batter. This gives the brownies a deep flavor. Just use one tablespoon of espresso powder. You can also use seasonal ingredients. In fall, add pumpkin puree for a cozy twist. It makes the brownies moist and adds a warm spice flavor. Try these ideas to make your brownies unique! Store your Caramel Pecan Turtle Brownies at room temperature. Keep them in an airtight container. This keeps them fresh for about three days. If you prefer, you can refrigerate them. Just know this may change their texture. They will last about a week in the fridge. To keep brownies soft, place a slice of bread in the container. The bread helps retain moisture. You can freeze these brownies for longer storage. First, let them cool completely. Then, wrap them tightly in plastic wrap. After that, place them in a freezer bag. They can stay frozen for up to three months. When you want to eat them, thaw them in the fridge overnight. For best results, warm them in the oven for a few minutes before serving. To enjoy a gooey texture, reheat your brownies gently. Use an oven set to 350°F. Heat for about 5 to 10 minutes. You can also serve them with a scoop of vanilla ice cream. A drizzle of extra caramel sauce adds a nice touch too. Pairing them with coffee enhances their rich flavor. Enjoy your decadent treat! To make caramel, you need just sugar and water. Here’s a simple recipe: - 1 cup granulated sugar - 1/4 cup water 1. Combine sugar and water in a pot over medium heat. 2. Stir until the sugar dissolves. 3. Stop stirring and let it boil until it turns a golden brown. 4. Remove from heat and let it cool slightly. This caramel can be drizzled over your brownies. It adds a rich, sweet taste. Yes, you can swap out pecans for other nuts. Here are some tasty ideas: - Walnuts - Almonds - Hazelnuts These nuts will change the flavor a bit, but they all work great. Just chop them up like you would pecans. To cut brownies cleanly, follow these steps: 1. Let the brownies cool completely in the pan. 2. Use a sharp knife. Dip the knife in warm water for easier cutting. 3. Wipe the knife with a towel between cuts. These steps help prevent sticking and give you nice, clean edges. To check if your brownies are done, follow these tips: - Insert a toothpick in the center. It should come out with a few moist crumbs. - Look for a slight puff and a shiny top. - If the edges pull away from the pan, they are ready. These signs mean your brownies are perfectly baked and ready to be enjoyed! Caramel pecan turtle brownies are a delicious treat made from simple ingredients. You start with butter, sugars, eggs, and vanilla. Then mix in flour, cocoa, and salt. The toppings, including pecans and caramel, make them special. Following precise steps ensures the best texture and taste. You can also customize or adapt the recipe to fit your diet. Store them well to keep them fresh. Enjoy these brownies warm, perhaps with ice cream. They are sure to impress everyone!
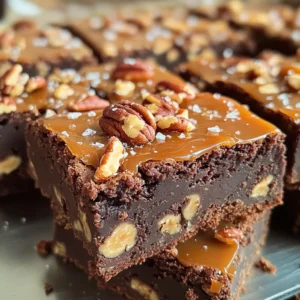
    Caramel Pecan Turtle Brownies Rich and Decadent Treat
  • - 2 cups rolled oats - 1 cup pumpkin seeds - 1/2 cup chopped pecans - 1/2 cup maple syrup - 1/2 cup creamy almond butter - 1 teaspoon vanilla extract - 2 teaspoons pumpkin spice mix (cinnamon, nutmeg, ginger, allspice) - 1/2 teaspoon salt - 1/2 cup dried cranberries or raisins (optional) - 1/4 cup dark chocolate chips (optional) Each ingredient plays a key role in the flavor and texture of the granola. - Rolled oats provide a hearty base. They are rich in fiber and help keep you full. - Pumpkin seeds add crunch and are a good source of protein and healthy fats. - Chopped pecans bring a nutty taste and heart-healthy oils. - Maple syrup serves as a natural sweetener, adding depth to the flavor. - Almond butter gives creaminess and boosts protein content. - Vanilla extract enhances the overall taste, making it more inviting. - Pumpkin spice mix infuses warm flavors that remind you of fall. - Salt brightens all the flavors. - Dried cranberries or raisins add a sweet contrast. - Dark chocolate chips can make it a treat, adding richness. You can adjust this recipe to meet different dietary needs easily. - Use gluten-free oats if you avoid gluten. - Substitute sunflower seeds for pumpkin seeds if you have nut allergies. - Swap peanut butter for almond butter for a different flavor. - Use honey instead of maple syrup if you prefer. - For a vegan option, ensure your almond butter and syrup are vegan-friendly. These swaps make this recipe flexible and enjoyable for everyone! To make pumpkin spice granola clusters, follow these easy steps. First, preheat your oven to 350°F (175°C). This step helps the granola cook evenly. Line a baking sheet with parchment paper, so the granola does not stick. In a large bowl, mix 2 cups of rolled oats, 1 cup of pumpkin seeds, and 1/2 cup of chopped pecans. Add 2 teaspoons of pumpkin spice mix and 1/2 teaspoon of salt to the bowl. Stir these dry ingredients well. Next, in another bowl, whisk together 1/2 cup of maple syrup, 1/2 cup of creamy almond butter, and 1 teaspoon of vanilla extract. Blend these until smooth. Pour this wet mixture over your dry ingredients. Stir everything together until the oats and seeds are fully coated. If you like, you can fold in 1/2 cup of dried cranberries or raisins and 1/4 cup of dark chocolate chips for extra flavor. Spread the mixture evenly on the baking sheet. Press it down firmly to help form clusters. Bake the granola in your preheated oven for 20 to 25 minutes. Stir halfway through to ensure even cooking. Once golden brown, take it out and let it cool on the sheet. The granola will become crunchy as it cools. After it cools, break it into clusters and store in an airtight container. Mixing dry and wet ingredients well is key. Make sure your dry ingredients are combined fully before adding wet ones. This helps the flavors mix nicely. When you pour the wet mixture, stir quickly. You want every piece of oat and seed coated. This will help form great clusters later. Consider using a spatula for better mixing. A spatula helps scrape the sides of the bowl. You can also avoid lumps by mixing gently but thoroughly. Take your time with this step. It sets the stage for your granola's taste. Baking granola for the right time is very important. Keep an eye on it in the oven. If you bake it too long, it can burn. If it's underbaked, it won’t get crunchy. Stirring halfway through helps everything cook evenly. Press the mixture down firmly on the baking sheet. This step helps create bigger clusters. After baking, let it cool completely. This cooling time is when it gets that nice crunch. If you want more texture, you can break it into smaller pieces after it's cool. Enjoy your delicious pumpkin spice granola clusters! To get those perfect crunchy granola clusters, follow these steps. First, press the mixture down firmly on the baking sheet. This helps the clusters stick together. Second, bake until golden brown, stirring only halfway. This keeps the clusters intact and crisp. Lastly, let them cool completely on the sheet. The cooling process makes them crunchy. Store your granola clusters in an airtight container. This keeps them fresh and crunchy. I recommend using glass jars or plastic containers with tight lids. Keep them in a cool, dry place. Avoid moisture or heat, as they can make your granola soft. If you want to extend freshness, consider the fridge. Adding extras can boost your granola's flavor. Dried cranberries or raisins add sweetness and chewiness. Chocolate chips create a nice contrast with the spices. You can also try coconut flakes for a tropical twist. Just mix them into the granola after combining the wet and dry ingredients. Experiment with your favorites! {{image_2}} You can change up your pumpkin spice granola clusters with seasonal flavors. In fall, add apples or pears. For winter, try dried cherries or walnuts. In spring, opt for fresh berries. Each season brings new tastes to enjoy. This way, you keep your granola fresh and exciting. If you want a nut-free option, you can swap out nuts for seeds. Use sunflower seeds or hemp seeds instead. These swaps still provide crunch and nutrition. If you avoid gluten, choose certified gluten-free oats. You can also make this vegan by using maple syrup only. Switching sweeteners can change the flavor and texture of your granola. You can use honey, agave syrup, or coconut sugar. Each sweetener has its own taste and sweetness level. If using sugar, remember to adjust the amount. This can help keep your clusters crunchy and tasty. To keep your pumpkin spice granola clusters fresh, store them in an airtight container. This helps to keep moisture out. You can use a glass jar or a plastic container with a tight seal. Avoid storing them in warm places, as heat can make them soggy. A cool and dry spot in your kitchen works best. When stored correctly, pumpkin spice granola clusters can last up to two weeks. For the best taste, enjoy them within the first week. After this time, they may lose their crunch. Always check for any signs of spoilage, like off smells or a change in texture. If you want to keep your granola clusters for longer, freezing is a great option. Place the clusters in a freezer-safe bag. Make sure to remove as much air as possible. You can keep them in the freezer for up to three months. When you’re ready to eat them, just thaw them at room temperature for a few hours. They will be just as tasty! Yes, you can use quick oats. Quick oats cook faster and can make softer clusters. However, rolled oats give a better crunch. They hold their shape well when baked. If you prefer a chewier texture, stick with rolled oats. To avoid added sugar, use ripe bananas or applesauce. These natural sweeteners help bind the mixture. You can also try using unsweetened nut butters. They add creaminess without extra sugar. Mix these in with the dry ingredients for a tasty, healthy option. You can find ready-made clusters at many grocery stores. Look in the health food aisle or the cereal section. Some brands focus on natural ingredients. You can also check online for specialty products. Many bakeries sell fresh granola, too. We explored making delicious pumpkin spice granola clusters together. You learned about key ingredients, their benefits, and easy substitutes. I shared simple steps to create perfect, crunchy clusters. You also found helpful tips on storage and variations to suit your taste. Whether you want a seasonal treat or a healthy snack, this granola fits the bill. Enjoy experimenting and making it your own. Your kitchen could fill with amazing fall flavors soon!
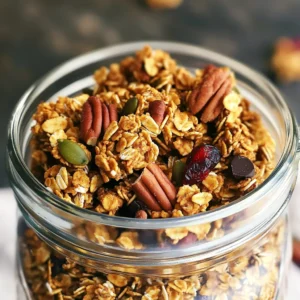
    Pumpkin Spice Granola Clusters Crunchy and Delicious
  • Creating the perfect high-protein spinach breakfast quesadillas starts with gathering fresh, quality ingredients. Here's what you'll need: - 4 large whole wheat tortillas - 1 cup fresh spinach, chopped - 1 cup cottage cheese (or Greek yogurt for a tangy flavor) - 1 cup shredded low-fat cheese (such as mozzarella or cheddar) - 4 large eggs - 1/2 teaspoon garlic powder - 1/2 teaspoon onion powder - Salt and pepper to taste - 1 tablespoon olive oil - Optional toppings: sliced avocado, salsa, or Greek yogurt These ingredients pack a punch of protein and flavor. Whole wheat tortillas offer fiber, while fresh spinach is a great source of vitamins. The cottage cheese or Greek yogurt adds creaminess and protein. I love how the eggs bring everything together, making this dish not only healthy but also very satisfying. Feel free to mix and match toppings based on your taste. Sliced avocado adds creaminess, while salsa gives a fresh kick. Enjoy these quesadillas as a filling breakfast or any meal of the day! First, grab a mixing bowl. Whisk the eggs until they are well beaten. This should take about one minute. Then, add the garlic powder, onion powder, salt, and pepper. Mix these seasonings in until they blend well. This step adds great flavor to the eggs. Now, heat a non-stick skillet over medium heat. Add one tablespoon of olive oil and let it warm up. Pour in the beaten eggs and stir. Scramble them gently until they are just set. This may take around three minutes. Remove the skillet from the heat. Now, stir in the chopped spinach and cottage cheese. Mix everything together until it is well combined. Next, lay a whole wheat tortilla on a clean surface. Spread a quarter of the egg and spinach mixture on one half of the tortilla. Then, sprinkle a quarter of the shredded cheese over the filling. Fold the tortilla in half. Press it gently to seal. Repeat this step with the rest of the tortillas and filling. Return the skillet to medium heat and add a little more olive oil. Place one quesadilla in the skillet. Cook for about 2-3 minutes on each side. You want a nice golden brown color and melted cheese. Once done, remove it from the skillet. Let it cool slightly before slicing into wedges. Repeat this with the remaining quesadillas. Enjoy your tasty high-protein breakfast! To make the best quesadilla, focus on even cooking. Use medium heat to cook your quesadillas. This way, they cook all the way through. If the heat is too high, the outside will burn before the cheese melts. To avoid soggy tortillas, use a non-stick skillet. Heat the pan before adding the quesadilla. This helps crisp the outside. You can also use less filling if you want a crunchier bite. Spices add depth to your quesadillas. I suggest using garlic powder and onion powder, as they blend well. You can also try adding a pinch of cumin or smoked paprika for a smoky taste. Fresh herbs can brighten your dish. Consider adding chopped cilantro or parsley. These herbs pair nicely with spinach and eggs. How you serve your quesadillas matters. Cut them into wedges for easy sharing. Arrange the wedges on a colorful plate for a nice look. For garnishing, add sliced avocado on the side. A dollop of salsa or Greek yogurt gives extra flavor. These touches not only taste great but also make your dish visually appealing. {{image_2}} You can easily make these quesadillas fit your needs. If you're vegetarian, skip the eggs and add more cheese or beans. You can also use tofu or tempeh for extra protein. For a gluten-free option, choose gluten-free tortillas. They work just as well. This way, everyone can enjoy this tasty dish. Cheese adds flavor and creaminess. If you want something different, try feta or pepper jack. These cheeses give a nice twist. Mixing cheese types can also enhance flavor. Use half mozzarella and half cheddar for a balanced taste. The blend melts beautifully in the quesadilla. Want to spice things up? You can add more veggies to your quesadilla. Try bell peppers, mushrooms, or onions. They add crunch and flavor. Add spices like cumin or chili powder for a kick. These small changes can make your breakfast exciting and new. How do I store leftover quesadillas? To keep leftover quesadillas fresh, place them in an airtight container. This helps prevent them from drying out. Make sure to let them cool down before storing. Use parchment paper between layers to avoid sticking. What are the ideal storage containers? Use glass or plastic containers with tight lids. These containers keep moisture in and odors out. You can also wrap each quesadilla in foil or plastic wrap for extra protection. How do I freeze quesadillas? To freeze quesadillas, first, let them cool completely. Then, wrap each one tightly in plastic wrap. Put the wrapped quesadillas in a freezer-safe bag or container. Label the bag with the date. What are the reheating instructions? When you want to eat frozen quesadillas, take one out and unwrap it. Place it on a microwave-safe plate. Heat it in the microwave for about 1-2 minutes. For a crispy texture, you can also reheat in a skillet for a few minutes on each side. To make your quesadillas crispy, cook them in a hot skillet. Use medium heat for even cooking. Press down gently with a spatula. This helps to brown the tortillas. Flip them carefully to avoid spills. For oil options, olive oil works great. It gives a nice flavor and helps with crispness. You can also try butter or avocado oil for added richness. Yes, you can use egg whites. They are lower in calories and fat. This makes them a good choice for a lighter meal. However, whole eggs add richness and flavor. They also provide more protein and nutrients. Egg whites will give you a fluffier texture. But, they may lack the depth of flavor that whole eggs provide. If you want alternatives to cottage cheese, Greek yogurt is a great choice. It has a similar texture and adds a tangy taste. You can also try ricotta cheese for a creamier option. For vegan diets, use silken tofu or a nut-based cheese. These options can mimic the creaminess of cottage cheese without dairy. Look for golden brown tortillas. This means they are cooked well. The cheese inside should be melted and gooey. If you see it oozing out, that’s a good sign! To check the cheese, gently press the quesadilla. If it feels soft and warm, it’s ready. Just make sure to let it cool a bit before slicing. Enjoy! You learned how to make delicious and healthy quesadillas. We covered ingredients like whole wheat tortillas, fresh spinach, and eggs. I shared step-by-step instructions for making the egg mixture and cooking the quesadillas. Tips for perfecting your dish and options for variations were also included. Remember, enjoy experimenting with flavors! These quesadillas are not just tasty but also easy to customize. Store leftovers properly to savor them later. The joyful process of cooking can lead to tasty meals. Now it’s your turn to create and enjoy!
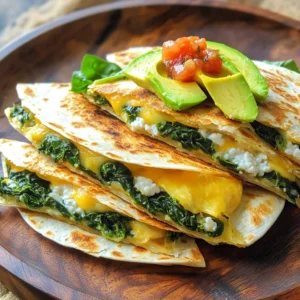
    High-Protein Spinach Breakfast Quesadillas Delight
  • First, I preheat my oven to 350°F (175°C). This step is key to a great bake. Next, I grab a 9x5-inch loaf pan and grease it well. A light dusting of flour follows. This helps the cake pop out easily. In a bowl, I whisk together several dry ingredients. I include 1 ½ cups of all-purpose flour, 1 teaspoon of baking powder, ½ teaspoon of baking soda, ¼ teaspoon of salt, 1 teaspoon of ground cinnamon, and ½ teaspoon of ground nutmeg. Mixing these well helps the cake rise and adds flavor. I set this bowl aside for later. In a large bowl, I beat ½ cup of softened unsalted butter with 1 cup of granulated sugar. I mix until it feels light and fluffy, which takes about 3 to 4 minutes. This step is important for the cake's texture. Then, I add 2 large eggs one at a time. After each egg, I mix well. I also stir in 1 teaspoon of vanilla extract for extra flavor. Next, I take the bowl with the dry mix and slowly add it to the wet mix. I also pour in ½ cup of sour cream and ½ cup of apple cider. As I mix these, I make sure not to overmix. A few lumps are okay. This keeps the cake light. I pour the batter into the prepared loaf pan. I smooth the top with a spatula. I bake the cake for 50 to 60 minutes. To check if it's done, I insert a toothpick into the center. If it comes out clean, the cake is ready. After baking, I let the cake cool in the pan for about 10 minutes. Then, I transfer it to a wire rack to cool completely. To make the glaze, I mix 1 cup of powdered sugar with 3 tablespoons of apple cider and ½ teaspoon of ground cinnamon in a small bowl. I whisk until smooth. If needed, I adjust the glaze’s thickness by adding more cider or powdered sugar. Once the cake is cool, I drizzle the glaze over it. I let it drip down the sides for a lovely finish. To make a moist pound cake, use sour cream. It gives a rich texture. Mix the wet and dry ingredients just until combined. Overmixing can lead to a dry cake. Adding spices like cinnamon and nutmeg enhances the flavor. These spices bring warmth and depth. Feel free to adjust the amounts for your taste. Avoid overmixing the batter. This can make your cake tough. When mixing, stop as soon as the flour disappears. Also, keep an eye on baking times. Every oven is different. Start checking for doneness at about 50 minutes. Insert a toothpick into the center. If it comes out clean, your cake is ready. Serve your Apple Cider Glazed Pound Cake with a scoop of vanilla ice cream. The creaminess balances the sweetness. You can also pair it with fresh apple slices. This adds a nice crunch. For a festive touch, sprinkle some chopped nuts on top. Enjoying this cake with warm cider is a lovely idea, too. {{image_2}} You can add fun flavors to your pound cake. Try mixing in orange zest for a bright twist. You can also use maple syrup instead of sugar for a rich taste. If you want to use different types of cider, go for spiced or sparkling cider. This will change the cake's flavor and make it unique. If you need gluten-free options, use almond flour or a gluten-free blend. This keeps the cake moist and tasty. For a dairy-free cake, swap the butter for coconut oil. Use almond milk or a dairy-free yogurt instead of sour cream. These swaps make a lighter cake without losing flavor. Seasonal fruits or nuts can make your cake special. In fall, add chopped pecans or walnuts for crunch. In summer, mix in fresh blueberries or diced peaches. These ingredients add color and freshness to your pound cake. You can even top the cake with caramelized apples for a fun twist. To keep your Apple Cider Glazed Pound Cake fresh, store it in a cool place. Wrap it tightly in plastic wrap or foil. Alternatively, use an airtight container. This helps keep moisture in and prevents it from drying out. For best taste, enjoy the cake within a week of baking. Freezing this cake is easy. First, let the cake cool completely after baking. Then, wrap it in plastic wrap, followed by aluminum foil. This double wrapping helps prevent freezer burn. When you’re ready to enjoy it, take the cake out and let it thaw at room temperature. This usually takes a few hours. With the glaze, the cake stays fresh for about one week at room temperature. If you keep it in the fridge, it can last up to two weeks. However, the glaze may lose some shine in the fridge. For the best flavor and texture, eat it within the first week. You can use plain yogurt as a good substitute for sour cream. It keeps the cake moist and adds a nice tang. If you want a non-dairy option, try unsweetened coconut yogurt. For a richer flavor, cream cheese works well too. Just mix it with a bit of milk to thin it out. Yes, you can make this pound cake a day or two in advance. After baking, let it cool completely. Wrap it tightly in plastic wrap to keep it fresh. Store it at room temperature. You can also freeze it for longer storage. Just thaw it in the fridge before serving. If your cake turns out dry, don’t worry! Brush it with a simple syrup made from equal parts sugar and water. This adds moisture back into the cake. You can also serve it with a scoop of ice cream or whipped cream to add creaminess. Another trick is to drizzle more apple cider glaze on top. This blog post covered how to make a delicious Apple Cider Glazed Pound Cake. We discussed the essential ingredients, detailed step-by-step instructions, tips for perfect texture, and variations to try. Remember to mix your ingredients well but avoid overmixing. Store your cake correctly for the best taste. This cake is easy to customize for any event! Enjoy baking and sharing this delightful treat. Make it your own with creativity and love. Your baking journey starts here, and I hope you have fun!
    Apple Cider Glazed Pound Cake Simple and Delicious Treat
  • - Canned chickpeas (15 oz) - Olive oil - Ranch seasoning mix - Garlic powder - Onion powder - Smoked paprika - Nutritional yeast - Salt and pepper to taste The main ingredients for Air Fryer Ranch Chickpea Crunch are simple and easy to find. First, grab a can of chickpeas. You need 15 ounces, drained and rinsed. These little legumes pack a punch of protein and fiber. Next, get some olive oil. Two tablespoons will help the spices stick and add richness. Finally, you need ranch seasoning mix. You can use store-bought or make your own. For extra flavor, add garlic powder, onion powder, and smoked paprika. These spices bring out the best in your chickpeas. They add depth and a savory touch that makes them hard to resist. If you want to amp up the flavor even more, consider adding nutritional yeast. This is optional but gives a cheesy taste without dairy. Don't forget to season with salt and pepper to your liking. This will enhance all the other flavors. With these ingredients, you can create a crunchy, tasty snack that everyone will love! 1. Preheat the air fryer: Set it to 400°F (200°C). Let it warm up for about 5 minutes. This step helps cook the chickpeas evenly. 2. Rinse and dry the chickpeas: Open the can and drain the chickpeas. Rinse them under cold water. Pat them dry with paper towels. This helps make them nice and crunchy. 1. Mixing in a large bowl: In a big bowl, add the dry chickpeas. Pour in the olive oil, ranch seasoning, garlic powder, onion powder, smoked paprika, salt, and pepper. Toss everything together until the chickpeas are well coated. 2. Adding optional ingredients: If you like, sprinkle in nutritional yeast. Toss again to mix it well. This ingredient gives a cheesy flavor. 1. Cooking time and temperature: Place the seasoned chickpeas in the air fryer basket. Make sure they are in a single layer. Cook them for 15-20 minutes. 2. Shaking the basket for even cooking: Halfway through cooking, shake the basket. This helps them cook evenly and get crunchy all around. When they are golden brown, they are ready! To get the best crunch with your chickpeas, dry them well. After rinsing, use paper towels to pat them dry. This step is key. It removes moisture that can make them soggy. When you cook the chickpeas, make sure to spread them out in a single layer. This allows hot air to circulate around each chickpea. Cooking in batches is fine, but keep them spaced. Want to amp up the flavor? Try adding spices like cayenne pepper or dill. These bring a new twist to your ranch flavor. If you prefer, make your own ranch seasoning. Mix dried herbs like parsley, dill, and chives for a fresh taste. For a fun presentation, serve the crunchy chickpeas in a colorful bowl. Place a small dish of ranch dressing on the side for dipping. Garnish with fresh herbs like parsley or chives. This adds a nice touch and makes it look appealing. Pair the chickpeas with dips like hummus or guacamole for a tasty snack. They also go well with fresh veggies or pita chips. Enjoy your tasty Air Fryer Ranch Chickpea Crunch! {{image_2}} You can spice up your Air Fryer Ranch Chickpea Crunch in fun ways. - Spicy Ranch Chickpeas: Add some heat by mixing in cayenne pepper or chili powder. Start with a small pinch, then adjust to your taste. This gives your chickpeas a nice kick. - Herb-infused Chickpea Crunch: Try adding dried herbs like dill, oregano, or thyme. They will give your crunchy snack a fresh taste. Mix the herbs in with the ranch seasoning for a more complex flavor. You can easily modify this recipe to fit your dietary needs. - Gluten-free options: Most ranch seasoning mixes are gluten-free. Just check the label to be sure. This way, you can enjoy these crunchy snacks without worry. - Vegan adaptations: This recipe is already vegan since it uses chickpeas and plant-based ingredients. If you want more flavor, increase the amount of nutritional yeast. It adds a cheesy taste without dairy. Switching ingredients can lead to new tastes and textures. - Alternatives to ranch seasoning: If you cannot find ranch seasoning, use a mix of garlic powder, onion powder, and dried herbs. This will create a tasty base for your chickpeas. - Other legumes to use: Chickpeas are great, but you can also use black beans or lentils. Just make sure to adjust the cooking time. Each legume will have a different crunch level. To store leftover chickpeas, place them in an airtight container. Make sure they cool down first. This keeps them fresh and prevents moisture loss. When you want some tasty snacks, you can reheat them in the air fryer. Just cook them at 350°F for 5 minutes. This helps bring back their crunch. In an airtight container, these crunchy chickpeas last about 3 to 5 days. For longer storage, you can freeze them. Spread the chickpeas on a baking sheet and freeze for a few hours. After that, place them in a freezer bag. They can stay good in the freezer for up to 3 months. To avoid sogginess, make sure to store them in a cool, dry place. Do not add any dips or sauces until you are ready to eat. If you want to keep them crispy, try reheating them in the air fryer. This method helps maintain their delightful crunch. Yes, you can use dried chickpeas. First, you need to soak them overnight. This softens the chickpeas. After soaking, cook them until tender. This takes about 1 to 2 hours. Once cooked, drain and rinse the chickpeas. Then, follow the same steps in the recipe. Canned chickpeas are quicker, but dried ones can have a better taste. Cook the chickpeas for 15 to 20 minutes at 400°F (200°C). Shake the basket halfway through cooking. This helps them cook evenly. You'll know they are done when they are golden brown and crunchy. Keep an eye on them to prevent burning, as air fryers can vary in heat. Air Fryer Ranch Chickpea Crunch is great as a snack on its own. You can also serve it with a dip, like ranch dressing. It pairs well with salads for added crunch. You can sprinkle them on soups for texture. Mix them into grain bowls for a tasty meal. Enjoy experimenting with different pairings! In this article, we explored how to make tasty Air Fryer Ranch Chickpea Crunch. You learned about the key ingredients, mainly canned chickpeas, olive oil, and ranch seasoning. The cooking steps, tips for crunchiness, and flavor variations were also covered. You can easily adjust the recipe to fit your taste and diet needs. Enjoy your delicious, healthy snack! With these tips, you will impress others with your cooking skills.
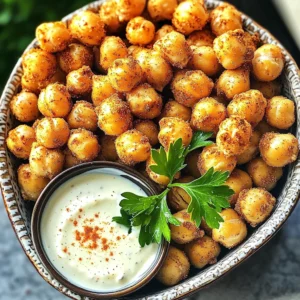
    Air Fryer Ranch Chickpea Crunch for Tasty Snacking
  • To make these tasty bars, gather these main ingredients: - 2 cups rolled oats - 1 cup all-purpose flour - 1/2 cup brown sugar, packed - 1/2 cup unsalted butter, melted - 1 teaspoon cinnamon - 1/4 teaspoon nutmeg - 1/4 teaspoon salt - 1/4 cup honey or maple syrup - 2 cups apples, peeled, cored, and diced (Granny Smith or another tart variety) - 1 tablespoon lemon juice - 1 tablespoon vanilla extract These ingredients blend well, creating a sweet and comforting flavor. The oats provide texture, while the apples add freshness. You can enhance the flavor of your bars with these optional ingredients: - 1/2 cup chopped walnuts or pecans Adding nuts brings a nice crunch. They also add healthy fats, making the bars more filling. If you have nut allergies, you can skip them or use these alternatives: - Sunflower seeds - Pumpkin seeds These options keep the bars crunchy without the nuts. They still taste great and are safe for everyone. Start by preheating your oven to 350°F (175°C). This is important for even baking. Next, grab an 8x8-inch baking pan. You can grease it with a little butter or line it with parchment paper. This makes it easier to lift out the bars later. In a large mixing bowl, combine these ingredients: - 2 cups rolled oats - 1 cup all-purpose flour - 1/2 cup brown sugar, packed - 1/2 cup unsalted butter, melted - 1 teaspoon cinnamon - 1/4 teaspoon nutmeg - 1/4 teaspoon salt - 1/4 cup honey or maple syrup Mix these well until combined. Make sure to leave some clumps. This helps form the tasty crumble crust. Set aside about 1 cup of this mixture for the topping later. In another bowl, prepare your apples. You need 2 cups of apples that are peeled, cored, and diced. Toss the apple pieces with 1 tablespoon of lemon juice and 1 tablespoon of vanilla extract. This adds flavor and keeps the apples fresh. If you like nuts, mix in 1/2 cup of chopped walnuts or pecans for extra crunch. Make sure each piece of apple gets coated in the mixture. I prefer using Granny Smith apples for my filling. Their tartness balances the sweetness of the crumble. You can also try Honeycrisp apples for a sweeter touch. Other good options include Braeburn or Jonagold. Each apple adds a unique flavor and texture. Choose apples that are firm and crisp for the best results. To get that ideal crumble texture, don’t overmix your oat mixture. You want clumps to form, which creates a crunchy top. When combining the ingredients, mix just until they come together. This helps maintain a nice contrast with the soft apple filling. Press down gently on the topping for a better bake. If your bars are too crumbly, try adding a bit more butter. This will help bind the mixture. Too dry? You may need to bake them a little less, or add a splash of water. If they seem too wet, bake them a bit longer to firm up. Always let them cool completely before slicing. This will help the bars hold their shape better. {{image_2}} To make these bars gluten-free, swap the all-purpose flour for a gluten-free blend. Use oats labeled gluten-free to avoid cross-contamination. Ensure the rest of your ingredients, like baking powder and brown sugar, are also gluten-free. This way, you can enjoy the same great taste without the gluten! For a vegan version, replace the unsalted butter with coconut oil or a vegan butter. Use maple syrup instead of honey for sweetness. For the eggs, if a recipe calls for them, you can use flax eggs. Mix one tablespoon of ground flaxseed with three tablespoons of water, let it sit, and use it as a binder. These swaps keep the bars tasty and plant-based! Add a twist to your bars with extra spices or extracts. Try adding a pinch of ginger for warmth. A splash of almond extract enhances the apple flavor. You can also add a dash of cardamom for a unique taste. Feel free to experiment with your favorite flavors to make these bars your own! Store the unbaked bars in the fridge. Cover them tightly with plastic wrap or foil. They will stay fresh for up to 24 hours. If baked, let them cool completely first. Then, cut the bars into squares before storage. Place them in a container with a lid. Baked bars can last for up to one week in the fridge. For best results, use airtight containers. Glass or plastic containers work great. Choose a container that fits the size of your bars. Fill it with parchment paper to prevent sticking. This helps keep the bars fresh and soft. If you stack them, add more parchment between layers. To freeze, wrap each bar in plastic wrap. Then place them in a freezer-safe bag. Remove as much air as you can. This prevents freezer burn. Baked bars can last for up to three months in the freezer. When ready to eat, thaw them in the fridge overnight. You can also warm them up in the oven for a fresh taste. To make the bars healthier, you can use whole-grain flour instead of all-purpose flour. You can also reduce the brown sugar by half. This will still give you sweetness while cutting calories. Adding more apples boosts fiber, too. You could also swap butter for coconut oil or use unsweetened applesauce. Yes, you can use different nuts! Almonds or hazelnuts work great. Pistachios add a fun twist, too. Just chop them finely and mix them into the apple filling or the crumble. This adds extra flavor and crunch. These bars last up to five days when stored properly. Keep them in an airtight container at room temperature. For longer storage, refrigerate them, and they can last up to a week. If you want to keep them even longer, freeze them. They can last up to three months in the freezer. Yes, you can substitute honey with maple syrup or agave nectar. Both options provide sweetness without altering the taste too much. You can also use a sugar substitute, like stevia, if you prefer a low-calorie option. Just follow the package instructions for the correct amount. No, adding nuts is not necessary. They add texture and flavor but can be left out if you prefer. If you want a nut-free version, just skip them entirely. The bars will still taste amazing and have a great crumble. These Apple Pie Oatmeal Crumble Bars combine simple ingredients with easy steps. We explored ways to make the filling and crust, plus tips for a perfect texture. You learned about variations that fit gluten-free and vegan diets. Don't forget proper storage for freshness. I hope you feel ready to try this recipe. Enjoy your delicious bars, and share them with friends and family!
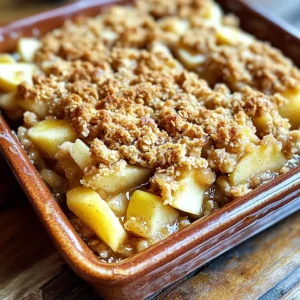
    Apple Pie Oatmeal Crumble Bars Savory Treat Recipe
  • - 2 salmon fillets (about 6 oz each) - 1/4 cup teriyaki sauce - 1 tablespoon sesame oil - 2 cups cooked jasmine rice - 1 cup broccoli florets - 1/2 cup carrots, thinly sliced - 2 green onions, chopped - 1 tablespoon sesame seeds - Salt and pepper to taste The main stars of this dish are the salmon fillets, which bring a rich flavor and healthy fats. The teriyaki sauce adds a sweet and savory glaze that pairs perfectly with the fish. I love using sesame oil for its nutty aroma and taste. Next, we have the accompaniments. Jasmine rice serves as a fluffy base for the bowl. It soaks up all the delicious flavors. Broccoli florets and sliced carrots add color and crunch. They give the dish a fresh feel, making it more vibrant and nutritious. For garnishes, I always sprinkle chopped green onions and sesame seeds. They add a burst of flavor and a nice texture. A dash of salt and pepper enhances everything, making each bite even better. With these ingredients, you can create a quick and tasty meal in just 15 minutes! To start, take a large skillet and heat the sesame oil over medium heat. Add the broccoli florets and thinly sliced carrots. Sauté them for about 3 to 4 minutes. You want them to be tender-crisp. This keeps the veggies bright and crunchy. After that, season with salt and pepper for taste. Once done, remove them from the skillet and set them aside. Next, in the same skillet, place the salmon fillets skin-side down. Pour half of the teriyaki sauce over the top. Cook the salmon for about 4 to 5 minutes. It should look golden and slightly caramelized. Carefully flip the fillets and pour the rest of the teriyaki sauce on top. Cook for another 2 to 3 minutes until the salmon is just barely cooked through. It should flake easily with a fork. For assembly, take each bowl and add a generous scoop of cooked jasmine rice. This rice is fluffy and perfect for soaking up the sauce. Next, layer the sautéed vegetables on top of the rice. Finally, place a salmon fillet in each bowl. To finish, sprinkle chopped green onions and sesame seeds on top. This adds a nice crunch and flavor. For a visual pop, use colorful bowls. A slice of lemon on the side gives a fresh zing. - Prepping ingredients in advance: You can save time by getting ready before you cook. Chop the broccoli and carrots the night before. Store them in the fridge until you are ready to use them. You can also measure out the teriyaki sauce and sesame oil. This way, when you start cooking, everything is ready to go. - Utilizing leftover rice: If you have leftover rice, use it! Leftover jasmine rice heats up well and adds great flavor to your bowls. Just microwave it for a minute or two before serving. This cuts down on cooking time and makes your meal come together even faster. - Suggested seasoning additions: To make your dish even better, try adding garlic or ginger. A little minced garlic gives a nice kick. Fresh ginger adds warmth and depth to the dish. Just sauté them with the vegetables for extra flavor. - Using homemade vs store-bought teriyaki sauce: Store-bought sauces are quick and easy, but homemade ones can taste better. If you have time, try making your own teriyaki sauce. Mix soy sauce, mirin, and sugar for a simple version. This allows you to control the sweetness and saltiness. - Ensuring perfectly cooked salmon: Cooking salmon can be tricky. Always cook it skin-side down first. This helps keep it moist. Cook for about 4-5 minutes, then flip it. Pour the remaining teriyaki sauce on top for flavor. The salmon is done when it flakes easily with a fork. - Alternative cooking methods (grilling, baking): If you prefer grilling, that works great too! Grill the salmon for about 4-5 minutes on each side. Baking is another option. Just place the salmon in the oven at 400°F for 10-12 minutes. Both methods give a nice char and flavor. {{image_2}} You can change the vegetables in your teriyaki salmon rice bowls for fun and color. Broccoli and carrots are great, but you can try: - Bell peppers for sweetness - Snap peas for crunch - Spinach for extra nutrients Seasonal vegetables work well too. In summer, add zucchini or corn. In fall, use squash or kale. This keeps your meal fresh and exciting! If you want a different protein, chicken works well. Use boneless chicken thighs or breasts. Cook them like the salmon for about 5-7 minutes. Tofu is a great choice for a plant-based meal. Press and cube firm tofu. Sauté it in sesame oil until golden. Then, add your teriyaki sauce. For a unique twist, use tempeh. It has a nutty flavor that pairs nicely! You can change the sauce to mix things up. Miso adds depth, while honey gives a sweet touch. If you like heat, try adding: - Red pepper flakes for a kick - Sriracha for bold spice These little changes can make your teriyaki salmon rice bowls lively and fun! Enjoy experimenting with flavors and textures! To keep your teriyaki salmon fresh, use airtight containers. Glass containers work best, but plastic ones are fine, too. Store the salmon and rice separately to keep the rice fluffy. In the fridge, leftovers last about 2-3 days. If you want to keep them longer, freeze the salmon and rice. They can stay good in the freezer for about 2 months. When reheating salmon, do it gently to avoid drying it out. Use a microwave or a skillet with low heat. If using a microwave, cover the salmon with a damp paper towel. This will help keep it moist. For the rice, add a splash of water before microwaving to keep it fluffy. Stir it every 30 seconds until it's warm. You can transform leftover salmon into tasty dishes. Try flaking it into a salad with fresh greens and your favorite dressing. Or, wrap it in a tortilla with some veggies for a fun lunch. You can even mix the salmon with scrambled eggs for breakfast. These ideas help you enjoy your meal in new ways! It takes just 15 minutes to prepare Teriyaki Salmon Rice Bowls. The prep time is about 5 minutes. Cooking the meal takes around 10 minutes. This quick dish is perfect for a busy night. Yes, you can meal prep these bowls. Cook the salmon and veggies in advance. Store them in separate containers in the fridge. When you’re ready to eat, just heat and assemble. This makes for a fast lunch or dinner. If you don’t have salmon, you can use other proteins. Chicken breast works well and cooks quickly. Tofu is a great choice for a plant-based option. Shrimp also makes a tasty alternative. These swaps keep the dish flavorful and fun! This blog post covered how to make delicious Teriyaki Salmon Rice Bowls. We discussed the main ingredients, cooking steps, and helpful tips. You learned how to choose the best vegetables and proteins, along with storage and reheat instructions. Don't forget, you can mix and match flavors and ingredients. Experimenting can lead to new favorite meals! Enjoy preparing this easy dish and make it your own. Simple steps make tasty food. You'll impress your family and friends with these bowls!
    Teriyaki Salmon Rice Bowls Quick and Delicious Meal
  • To make No-Bake Oreo Pumpkin Cheesecake Cups, gather these key items: - 10 Oreo cookies, crushed - 2 tablespoons unsalted butter, melted - 1 cup cream cheese, softened - 1 cup pumpkin puree - 3/4 cup powdered sugar - 1 teaspoon vanilla extract - 1 teaspoon pumpkin pie spice - 1 cup heavy whipping cream - Extra Oreo cookies and whipped cream for topping These ingredients create a rich and creamy dessert. The Oreo cookies add crunch, while the pumpkin gives a warm flavor. You can switch some ingredients if needed: - Use gluten-free cookies instead of Oreos for a gluten-free option. - Replace cream cheese with Greek yogurt for a lighter version. - Swap pumpkin puree with sweet potato puree for a twist on flavor. - Use maple syrup in place of powdered sugar for a natural sweetener. These substitutions keep the taste great while fitting your diet. Adding toppings can make your cheesecake cups even better. Here are some fun options: - Drizzle with chocolate sauce for a sweet touch. - Sprinkle extra crushed Oreos for more texture. - Add chopped nuts like pecans or walnuts for crunch. - Top with caramel sauce for extra sweetness. Feel free to mix and match toppings to suit your taste! To make the crust, you need to crush the Oreo cookies. Place 10 Oreo cookies in a bag and use a rolling pin or your hands to crush them. You want fine crumbs. Next, mix the crushed cookies with 2 tablespoons of melted butter in a medium bowl. Stir until the crumbs are fully coated. This mix forms a tasty base for our cups. Now, take four serving cups or jars. Divide the cookie mix evenly among them. Press the mixture down firmly in each cup. This step helps to create a solid crust that holds up. Set these aside while you make the filling. For the filling, start with 1 cup of softened cream cheese in a large bowl. Beat it with a mixer until it’s smooth and creamy. Then, add 1 cup of pumpkin puree, 3/4 cup of powdered sugar, 1 teaspoon of vanilla extract, and 1 teaspoon of pumpkin pie spice. Mix everything together until it’s creamy and well blended. In another bowl, whip 1 cup of heavy cream until soft peaks form. This is key for a light texture. Now gently fold the whipped cream into the pumpkin mixture. Be careful not to deflate the whipped cream. Stop mixing when no white streaks remain. Now it’s time to assemble the cups. Spoon the pumpkin cheesecake filling over the crust in each cup. Fill them generously, leaving a little space at the top. This step is where you see the beautiful layers. After filling the cups, place them in the fridge. Let them chill for at least 2 hours. This time helps the cheesecake set properly. Before serving, add a dollop of whipped cream on top of each cup. For extra flair, sprinkle crushed Oreo cookies over the whipped cream. Enjoy this delightful treat! To make whipped cream, start with cold heavy cream. Pour it into a chilled bowl. Beat the cream with a mixer until soft peaks form. This takes about 2-3 minutes. Add a little sugar for sweetness. For extra flavor, add a splash of vanilla. This will enhance your cheesecake cups. Use your whipped cream right away for the best texture. Setting the cheesecake cups is key for the best results. After assembling, cover the cups with plastic wrap. Place them in the fridge for at least 2 hours. This helps the filling firm up nicely. If you’re in a hurry, you can chill them for about 30 minutes in the freezer. Just don’t forget to check on them. You want them set but not frozen. Presentation adds a special touch to your dessert. Use clear cups to show off the layers. This makes them look appealing. Top each cup with a swirl of whipped cream. Crushed Oreo cookies on top add a nice crunch. For an extra flair, drizzle chocolate sauce over the whipped cream. You can also add a sprinkle of pumpkin pie spice for color and flavor. Your guests will love how they look and taste! {{image_2}} You can change the flavor of your no-bake cheesecake cups. Try using different cookies for the crust. Instead of Oreos, use graham crackers or chocolate wafer cookies. For the filling, swap pumpkin puree for chocolate or strawberry puree. You can even add peanut butter for a nutty twist. Just adjust the spices to match your new flavor. This way, you can enjoy many tasty options with the same easy recipe. If you want a lighter version, swap some ingredients. Use low-fat cream cheese instead of regular cream cheese. You can also replace heavy cream with Greek yogurt. This change keeps it creamy while lowering the fat. For sweetness, try honey or maple syrup instead of powdered sugar. These swaps make your dessert healthier but still delicious. You can enjoy a guilt-free treat without losing the fun of cheesecake. Serving your cheesecake cups can be fun and unique. Try layering different flavors in one cup. For example, make a layer of chocolate and a layer of pumpkin. Add colorful sprinkles or fresh fruit on top for a bright touch. You can also serve them in mason jars for a rustic look. If you want to impress guests, drizzle chocolate sauce or caramel on top before serving. These creative ideas make your no-bake cheesecake cups stand out at any gathering. To store leftover cheesecake cups, first cover them with plastic wrap or a lid. This keeps them fresh and prevents drying out. Place the cups in the fridge. They will stay tasty for about three days. Avoid stacking them, as this can ruin the layers. If you want to freeze the cheesecake cups, do it before topping them. Wrap each cup tightly in plastic wrap. Then, place them in a freezer-safe bag. They can last up to two months in the freezer. When ready to enjoy, thaw them in the fridge overnight. These cheesecake cups taste best fresh, but they can last. In the fridge, expect them to stay good for about three days. If frozen, use them within two months for the best flavor. Be sure to check for any signs of spoilage before serving. Yes, you can! While Oreo cookies give a rich taste, other cookies work too. Try chocolate wafers, graham crackers, or even shortbread. Each cookie brings its own flavor. Just crush them to a fine crumb and mix with melted butter. This way, you can make the crust your own. These cheesecake cups need at least 2 hours to set. This time helps the flavors meld and firm up. If you can wait, letting them sit longer is even better. The texture becomes creamier and more delicious after chilling. Just cover them well in the fridge. Absolutely! You can make these cups up to two days ahead of time. Just prepare them and keep them in the fridge. This makes them a great option for parties or special events. Just add the whipped cream and Oreo topping right before serving for the best look and taste. This blog post covered all the key steps for making no-bake cheesecake cups. We explored essential ingredients, substitutions, and optional toppings. I shared easy-to-follow instructions for the crust and filling. You also learned tips for perfect whipped cream and creative presentation ideas. We discussed variations and storage info to keep your cheesecake fresh. Now, you can enjoy these delightful treats anytime. Try mixing flavors or using different toppings. Your no-bake cheesecake cups will surely impress friends and family. Happy baking!
    No-Bake Oreo Pumpkin Cheesecake Cups Delight
  • - 1 large head cauliflower, cut into florets - 1 whole bulb of garlic - 1 tablespoon olive oil - ½ cup grated Parmesan cheese - ½ cup unsweetened almond milk (or any milk of choice) - 2 tablespoons unsalted butter - Salt and pepper to taste - Fresh parsley, chopped (for garnish) You can tweak this recipe to match your taste. Here are some ideas: - Use different types of cheese like cheddar or feta. - Add a splash of lemon juice for brightness. - Mix in some cooked bacon for a savory kick. - Try fresh herbs like thyme or rosemary for more flavor. This dish is not only tasty but also healthy. Here’s what you gain per serving: - Calories: About 150 - Protein: 5 grams - Carbohydrates: 10 grams - Fiber: 3 grams - Fat: 10 grams Roasted Garlic Parmesan Mashed Cauliflower is a great choice for a side dish. It gives you the comfort of mashed potatoes but is lighter and full of flavor. You can enjoy it guilt-free! Start by preheating your oven to 400°F (200°C). Take a whole bulb of garlic and slice the top off. This exposes the cloves inside. Drizzle it with olive oil. Wrap the bulb in aluminum foil. Place it in the oven and roast for 30-35 minutes. You want the cloves to be soft and golden. Let it cool slightly after roasting. While the garlic roasts, bring a large pot of salted water to a boil. Add the cauliflower florets to the pot. Cook them for about 10-12 minutes. You want them to be fork-tender. Once cooked, drain the cauliflower and set it aside. Now, take the cooled garlic bulb and squeeze the soft cloves into a large mixing bowl. Add the drained cauliflower to this bowl. Use a potato masher or an immersion blender to mix them together. Aim for a smooth and creamy texture. Next, mix in the grated Parmesan cheese, almond milk, and butter. Stir until everything is well combined and creamy. Adjust the consistency by adding more almond milk if needed. Finally, season with salt and pepper to taste. Serve this warm and garnish with chopped fresh parsley for a lovely touch. To get smooth mashed cauliflower, cook the florets until they are fork-tender. This usually takes about 10-12 minutes. Drain the cauliflower well to remove excess water. For the creamiest result, use an immersion blender or potato masher. Blend until you reach your desired texture. If it feels too thick, add a splash of almond milk for creaminess. Roasted garlic adds a deep, rich flavor. Don’t skip this step! You can also mix in different cheeses, like cheddar or cream cheese, for a unique twist. A pinch of nutmeg can elevate the taste. Fresh herbs, like thyme or chives, also brighten the dish. Season with salt and pepper to enhance all the flavors. One common mistake is not draining the cauliflower fully. Excess water makes the mash watery. Another error is over-blending, which can lead to a gummy texture. Always taste and adjust seasoning as you go. Finally, don’t skip the garnish! Fresh parsley adds color and freshness to your final dish. {{image_2}} You can make this dish dairy-free easily. Replace the Parmesan cheese with a dairy-free cheese. Use a nut milk, like almond or cashew, instead of regular milk. You can also use a vegan butter for a perfect swap. This way, you keep the creamy texture while being dairy-free. To make your mashed cauliflower even more exciting, add herbs or spices. Fresh chives or thyme can add great flavor. If you want a kick, sprinkle in some chili flakes. Garlic powder can boost that garlic taste. Mix in your favorite herbs to make it your own. You can also try other veggies if you like. Turnips or parsnips work well for a twist. Sweet potatoes can give a lovely sweetness. Just make sure to cook them until they are soft. Mash them the same way as the cauliflower for a new favorite dish. After enjoying your Roasted Garlic Parmesan Mashed Cauliflower, let it cool. Transfer the leftovers to an airtight container. This keeps moisture in and prevents the dish from drying out. Store the container in the fridge. It will stay fresh for about three to four days. When you're ready to enjoy the leftovers, take them out of the fridge. You can reheat the mashed cauliflower in a few ways. The microwave is the quickest method. Place the cauliflower in a microwave-safe bowl. Heat it on medium power for one to two minutes. Stir halfway through to ensure even warming. You can also reheat it on the stovetop. Pour it into a small pot over low heat, stirring often. Add a splash of almond milk to help regain creaminess. If you want to keep the mashed cauliflower longer, freezing is a great option. Use a freezer-safe container or a resealable bag. Make sure to remove as much air as possible. Label the bag with the date. It can last in the freezer for up to two months. When you're ready to eat, thaw it in the fridge overnight. Reheat as noted above to enjoy its delicious taste again. Yes, you can use frozen cauliflower. Just cook it according to package directions. Frozen cauliflower can be soft, so watch the cooking time. Drain it well before mashing. This can help keep your dish smooth and creamy. To make this recipe vegan, replace the butter with vegan butter. Use nutritional yeast instead of Parmesan cheese for a cheesy flavor. Substitute almond milk with a plant-based milk of your choice. This keeps the taste rich and satisfying without dairy. Roasted Garlic Parmesan Mashed Cauliflower pairs well with many dishes. Serve it alongside grilled chicken or steak for a hearty meal. It also works great with roasted vegetables or a fresh salad. You can even enjoy it as a base for a savory mushroom stew. In this blog post, we explored the key ingredients for mashed cauliflower, the step-by-step instructions for preparation, and various tips for getting it just right. I shared options for customization and storage tips to keep your dish fresh. Remember, mixing flavors and textures can elevate your mashed cauliflower. Follow the advice shared here to avoid common mistakes and enjoy this healthy side dish. Now you're ready to create a tasty and versatile meal that everyone will love.
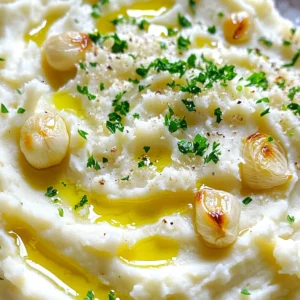
    Roasted Garlic Parmesan Mashed Cauliflower Delight
  • - 2 lbs flank steak - 1 cup soy sauce - 1/2 cup brown sugar - 1/4 cup sesame oil - 4 cloves garlic, minced - 1 tablespoon ginger, minced - 1 tablespoon gochujang - 1 medium onion, sliced - 2 green onions, chopped (for garnish) - 8 small flour or corn tortillas - 1 cup shredded carrots - 1 cup shredded cabbage - 1/4 cup cilantro leaves (optional) - Sesame seeds (for garnish) Using flank steak gives the tacos a great flavor. The marinade is key. Soy sauce adds saltiness. Brown sugar brings sweetness. Sesame oil gives a nutty taste. Garlic and ginger add freshness. Gochujang adds a spicy kick. The toppings make these tacos fun. Sliced onion adds crunch. Green onions bring a mild onion flavor. Shredded carrots add sweetness and color. Shredded cabbage gives a nice crunch. Cilantro adds a fresh note. Sesame seeds give a nutty finish. For tortillas, both flour and corn work well. Flour tortillas are soft and chewy. Corn tortillas have a nice corn flavor. Choose what you like best. With these ingredients, you create a delicious meal that everyone will love! To start, you will need to whisk together a few key ingredients. In a bowl, mix: - 1 cup soy sauce - 1/2 cup brown sugar - 1/4 cup sesame oil - 4 cloves garlic, minced - 1 tablespoon ginger, minced - 1 tablespoon gochujang Whisk these together until they blend well. This marinade gives your beef its rich flavor. Marinating the meat is crucial. It helps the flavors soak in deeply. The longer you marinate, the better the taste. Next, place your sliced flank steak in the slow cooker. Pour the marinade over the beef, making sure to coat every piece. It’s important to layer the beef well. Add the sliced onion on top and stir gently. Cover the slow cooker and set it to cook. You can choose high for 4 hours or low for 6-8 hours. The beef will become tender and easy to shred when it’s done. After cooking, use two forks to shred the beef inside the cooker. Mix it with the sauce for even more flavor. Now it's time to assemble your tacos. Start by heating the tortillas. You can use a skillet or microwave to warm them up until they are soft. Next, spoon the shredded Korean beef bulgogi onto each tortilla. Add your toppings for the best flavor. Top with shredded carrots, shredded cabbage, and chopped green onions. For an extra touch, sprinkle sesame seeds and cilantro leaves on top. This adds color and flavor. Enjoy your delicious tacos! To get the best taste, let the meat marinate for at least 30 minutes. This lets the flavors soak in deeply. You can even do it overnight for a richer taste. For spice lovers, add more gochujang to your marinade. This Korean chili paste gives a nice kick. Adjust it to match your heat level. To ensure tender beef, slice the flank steak thinly against the grain. This makes it easier to chew. If you run out of ingredients, you can swap soy sauce with tamari for a gluten-free option. You can also use honey instead of brown sugar for a different sweetness. Pair these tacos with sides like rice or kimchi. This adds a crunchy contrast to your meal. For garnishing, add chopped green onions and sesame seeds on top. You can also sprinkle cilantro leaves for freshness. Enjoy your delicious creation! {{image_2}} You can switch up the flank steak for other meats. Try using chicken thighs or pork. They both absorb flavor well and cook nicely in the slow cooker. For a lighter option, use turkey breast. If you want a vegetarian or vegan twist, use jackfruit. Jackfruit has a meaty texture that works well in tacos. You can also try marinated tofu or tempeh. Both soak up flavors and add protein. To enhance the flavor, think about adding different spices. A touch of smoked paprika gives a nice depth. You can also try adding cumin for a warm touch. Mixing in fresh herbs can change the taste too. Add chopped basil or mint for a fresh kick. You can create unique topping combinations as well. Try avocado slices or pickled radishes for added crunch. Sauces can take your tacos to the next level. A drizzle of sriracha adds heat. You can also use a creamy sesame sauce for a rich touch. Try serving with a sweet chili sauce for a sweet twist. For a tangy flavor, mix in lime juice with your sauces. Each sauce brings out new flavors in the bulgogi tacos, making them even more enjoyable. To keep your leftover Korean beef bulgogi fresh, follow these tips: - Refrigeration: Place the beef in an airtight container. It will stay good for up to 3 days. The flavors will blend more over time, making it taste even better! - Freezing: If you want to store it longer, freeze the beef. Use a freezer-safe bag, and remove as much air as you can. It can last for up to 3 months. Just remember to label it with the date. When it's time to enjoy your leftovers, here are the best ways to warm them up: - Microwave: Place the beef in a microwave-safe dish. Cover it with a damp paper towel. Heat in short bursts of 30 seconds until warm. This keeps the beef moist. - Stovetop: Heat a skillet over medium heat. Add the beef and a splash of water or broth. Stir occasionally until heated through. This method helps maintain the flavor and texture. Always check that the beef is hot all the way through before serving. Enjoy the deliciousness! Bulgogi is a Korean dish made from marinated beef. The meat is usually thinly sliced, which helps it cook quickly. The marinade often includes soy sauce, sugar, garlic, and sesame oil. This dish is popular for its sweet and savory flavor. You can serve bulgogi on rice or in lettuce wraps, but it's great in tacos too. It brings a taste of Korea to many meals. Yes, you can make bulgogi without a slow cooker. You can use a skillet or grill. Just heat some oil in a pan and add the marinated beef. Cook it on medium-high heat for about 5 to 7 minutes. Stir it often to avoid burning. The beef will cook faster this way. If you grill, cook it for 2 to 3 minutes per side. Both methods give you tasty results. To adjust the spice level, change the amount of gochujang in your marinade. If you want it milder, reduce the gochujang to half a tablespoon. You can also add a tablespoon of honey to balance the heat. For a spicier kick, add more gochujang or some red pepper flakes. Taste the marinade before using it. This way, you can find the perfect heat level for your tacos. This post shared how to make flavorful tacos using flank steak and a tasty marinade. We covered ingredients, step-by-step cooking, and tips to boost flavor. Remember to marinate your meat well for the best taste. You can swap proteins or adjust spices to fit your taste. Leftovers are easy to store and reheat. Enjoy creating your tacos and have fun with different flavors and toppings. Your journey into making delicious tacos starts now!
    Slow Cooker Korean Beef Bulgogi Tacos Flavor Boost
  • Here’s what you need for a tasty Peanut Butter Cup Protein Smoothie: - 1 frozen banana - 2 tablespoons natural peanut butter - 1 scoop chocolate protein powder - 1 cup almond milk (or milk of choice) - 1 tablespoon unsweetened cocoa powder - 1 tablespoon chia seeds (optional) - 1 tablespoon honey or maple syrup (optional) - A pinch of salt - Ice cubes (optional) These ingredients create a rich and creamy smoothie. The frozen banana adds natural sweetness and a smooth texture. Natural peanut butter gives it that classic flavor. The chocolate protein powder boosts nutrition and flavor. Almond milk keeps it light and creamy. Cocoa powder adds a deep chocolate taste. Chia seeds can add extra fiber if you choose to use them. For sweetness, honey or maple syrup works well. The pinch of salt enhances all the flavors. If you like your smoothies thick, ice cubes can help. This blend is quick to make, and you can enjoy it in minutes! To start, gather the ingredients. You need one frozen banana, two tablespoons of natural peanut butter, and one scoop of chocolate protein powder. Next, measure one cup of almond milk and one tablespoon of unsweetened cocoa powder. If you want, add one tablespoon of chia seeds and sweeten it with honey or maple syrup. Lastly, grab a pinch of salt for flavor. Using frozen bananas makes your smoothie creamy. If you don’t have frozen bananas, you can freeze fresh ones. Just peel and slice them, then place them in a bag. Freeze for a few hours or overnight to get the perfect texture. Add the frozen banana, peanut butter, and protein powder into your blender first. Pour in the almond milk next, then add the cocoa powder, chia seeds (if you chose to use them), sweetener, and salt. Now, blend on high. Aim for a creamy texture. If you want it thicker, toss in a few ice cubes and blend again. Taste the mixture. If it needs more sweetness, add extra honey or syrup. Pour your smoothie into a tall glass. For a fun touch, drizzle some peanut butter on top. You can also sprinkle cocoa powder or crushed nuts for added flavor. Choose a glass that showcases your smoothie’s rich color. A clear glass works great! Enjoy your drink right away for the best taste and freshness. To get the right thickness, think about ice and milk. If your smoothie is too thin, add ice cubes. They will help make it thicker and colder. Blend well to mix everything. If it’s too thick, a splash of milk will help thin it out. Almond milk works great, but use any milk you like. Creaminess comes from the peanut butter and banana. They blend together to create a smooth and rich texture. Balancing the sweetness is key for a great taste. The frozen banana adds natural sweetness. If you want more, add honey or maple syrup. Start with a small amount and taste. You can always add more! If you want a healthier option, try dates or agave syrup. Both add sweetness without refined sugar. Elevate your smoothie with superfoods. Chia seeds are a great option. They add fiber and healthy fats. You can also add spinach or kale for more nutrients. They blend right in, so you won’t taste them. If you want more protein, try adding Greek yogurt. This way, you boost your smoothie’s nutrition without changing the flavor. {{image_2}} You can switch up the nut butter for fun flavors. Try almond, cashew, or sunflower butter. Each adds a new twist. You can also use flavored protein powders. Look for vanilla or cookies and cream. They bring a tasty change to your smoothie. For a vegan or dairy-free version, use plant-based protein powder. Almond milk is a great choice. You can skip honey and use maple syrup instead. This keeps it vegan and sweet. If you prefer low-carb or keto, choose sugar-free sweeteners. You can use unsweetened cocoa powder for extra flavor while keeping it low-carb. Want more protein? Try adding Greek yogurt or silken tofu. Both blend well and boost protein. For fiber, add oats or ground flaxseeds. They help keep you full longer. For toppings, think about sliced bananas, nuts, or a sprinkle of cocoa. These add crunch and taste to your smoothie. To store leftover smoothie, pour it into a sealed jar. This keeps it fresh. Make sure to fill the jar to the top. This helps prevent air from getting in. You can store it in the fridge for one day. If you want to keep it longer, try freezing it. Pour the smoothie into ice cube trays or freezer bags. This way, you can use it later in shakes or smoothies. If your smoothie separates, no worries! Just give it a quick blend again. This helps mix everything back together. Add a little milk if it seems too thick. This keeps the flavor and texture nice. Always taste before serving. You may want to adjust sweetness if flavors change. Enjoy your creamy treat! A Peanut Butter Cup Protein Smoothie tastes like a dessert. You get rich chocolate and creamy peanut butter in every sip. The frozen banana adds natural sweetness and a smooth texture. The cocoa powder enhances the chocolate flavor, while the protein powder gives it a nutritious boost. This smoothie feels like a treat but is packed with health benefits. Yes, you can make this smoothie in advance. Blend it and store it in the fridge for up to 24 hours. Just remember to seal it tightly. If you want to keep it longer, consider freezing it. Pour the smoothie into ice cube trays. When you want some, blend the cubes again for a fresh drink. This smoothie offers many health benefits. It provides protein from the powder and peanut butter, which helps build muscle. The banana adds potassium, great for heart health. Chia seeds, if added, give you fiber and omega-3s. Unsweetened cocoa powder is rich in antioxidants. This smoothie is a tasty way to fuel your body. To make your smoothie thicker, add ice cubes before blending. The frozen banana also helps create a creamy texture. If you prefer, you can add more chia seeds. These seeds expand when mixed with liquid, making the smoothie thicker. You can also use less almond milk for a denser drink. This blog post shared a simple recipe for a delicious Peanut Butter Cup Protein Smoothie. We went over the ingredients, step-by-step instructions, and tips for the best results. You learned how to make it creamy and the best ways to adjust sweetness. There are many variations to explore, whether you’re vegan or low-carb. The storage tips ensure you enjoy it later. This smoothie is nutritious, tasty, and easy to customize. I hope you feel inspired to try it yourself!
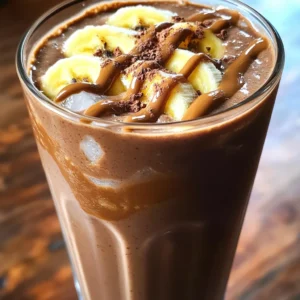
    Peanut Butter Cup Protein Smoothie Quick and Creamy
  • - 4 salmon fillets (about 6 oz each) - 1 bunch of asparagus, trimmed - 3 tablespoons olive oil - 2 tablespoons fresh lemon juice - Zest of 1 lemon - 2 cloves garlic, minced - 1 teaspoon dried oregano - 1 teaspoon fresh thyme leaves - Salt and pepper, to taste - Lemon slices for garnish - Fresh parsley, chopped (optional for garnish) To create this dish, gather your ingredients first. Fresh salmon fillets are the star. They should be about 6 ounces each, perfect for a filling meal. Next, you'll want a bunch of asparagus. Trim the ends to keep them tender. Olive oil adds a rich flavor. It also helps the herbs stick to the fish and veggies. Fresh lemon juice and zest bring brightness. This zest is key; it gives a burst of flavor. Garlic adds depth. Minced garlic infuses the dish with its warm taste. Dried oregano and fresh thyme give an earthy note. Don't forget salt and pepper. They enhance all the flavors. Lemon slices work well as a garnish. They add a pop of color and a fresh smell. If you like, sprinkle some fresh parsley on top. This adds a nice touch. With these ingredients, you’ll create a lovely meal that is simple yet full of flavor. Start by preheating your oven to 400°F (200°C). This high heat helps cook the salmon and asparagus well. Next, grab a large baking sheet. Line it with parchment paper to make cleanup easy. This step keeps the fish and veggies from sticking. Now it’s time to mix the lemon herb marinade. In a small bowl, add 3 tablespoons of olive oil. Squeeze in 2 tablespoons of fresh lemon juice. Then, add the zest of 1 lemon for extra flavor. Mince 2 cloves of garlic and toss them in too. Sprinkle in 1 teaspoon of dried oregano and 1 teaspoon of fresh thyme leaves. Finally, add salt and pepper to taste. Whisk everything together until it’s smooth and well combined. Next, we’ll assemble the salmon and asparagus on the baking sheet. Place 4 salmon fillets on one side of the sheet. Make sure they have some space between them. Brush half of the lemon herb mixture over the salmon fillets. On the other side, arrange the asparagus in a single layer. Make sure each stalk is nice and even. Drizzle the rest of the lemon herb mixture over the asparagus. Toss the asparagus gently to coat it well. Now, place the sheet pan in the oven. Bake for 15-20 minutes. The salmon should flake easily with a fork when done. The asparagus should be tender but still crisp. Once cooked, carefully take the pan out of the oven. Let it rest for a couple of minutes. For a pretty touch, garnish with fresh lemon slices and chopped parsley if you like. Enjoy your meal! To get perfectly cooked salmon, start with fresh fillets. Look for bright color and a clean smell. Preheat your oven to 400°F (200°C) for even cooking. Brush the salmon with the lemon herb mix before baking. Bake for 15-20 minutes. The salmon is done when it flakes easily with a fork. Use a meat thermometer if you want to be precise. Aim for an internal temperature of 145°F (63°C). When cooking asparagus, fresh is best. Choose firm stalks with bright green color. Trim the ends to remove any tough parts. Toss the asparagus in the lemon herb mixture. This adds flavor and helps it cook nicely. Spread the asparagus on the baking sheet in a single layer. This helps it roast evenly. Bake alongside the salmon for about 15-20 minutes. The asparagus should be tender yet still crisp. You can easily change the flavors in this dish. Try adding different herbs like dill or basil. You can also swap lemon juice for lime juice for a fresh twist. For a spicy kick, add a pinch of red pepper flakes. Experiment with different oils too. Avocado oil or sesame oil can add a unique taste. Feel free to mix and match to find your favorite combination! {{image_2}} If you want a change from salmon, try these options. Chicken breasts work great. They soak up the lemon herb flavors well. Shrimp also cooks fast and adds a nice twist. For a meatier taste, consider using pork tenderloin. Cut it into even pieces to ensure even cooking. Switch up the asparagus with your favorite veggies. Broccoli or green beans are good choices. Zucchini adds a nice texture too. Bell peppers give a sweet crunch. Mix in cherry tomatoes for a pop of color. Remember to adjust cooking time for softer veggies. This recipe is naturally gluten-free. Check your olive oil for purity to be safe. All the ingredients used are dairy-free, so you can enjoy it without worry. If you want a creamy element, use avocado slices on the side. This keeps it fresh and tasty. After enjoying your meal, let the leftovers cool. Place salmon and asparagus in an airtight container. You can store them in the fridge for up to three days. Make sure to cover them well to keep flavors fresh. To reheat, preheat your oven to 350°F (175°C). Place the salmon and asparagus on a baking sheet. Cover them with foil to keep moisture in. Heat for about 10-15 minutes or until warm. You can also use a microwave. Just heat in short bursts, checking often. You can freeze your leftovers too! Wrap the salmon and asparagus tightly in plastic wrap. Then, place them in a freezer bag. They can last up to three months in the freezer. To eat, simply thaw in the fridge overnight before reheating. Yes, you can use frozen salmon. Just make sure to thaw it first. Thaw salmon in the fridge overnight or under cold water. Once thawed, pat it dry. This helps the lemon herb mix stick better. I love to serve this dish with rice or quinoa. They soak up the lemon flavor well. A fresh salad also pairs nicely. Try a simple green salad or even a fruit salad. You can also serve crusty bread to soak up the juices. Check the salmon for color and texture. It should be a light pink and flake easily with a fork. You can also use a food thermometer. The internal temperature should reach 145°F (63°C). If you see white albumin on the surface, it is done. This is just protein and not harmful. This blog post covered a simple and tasty recipe for lemon herb salmon and asparagus. We discussed the key ingredients, the step-by-step cooking process, and helpful tips for perfect results. I shared easy variations and storage details for your leftovers too. Cooking can be fun and rewarding, even for beginners. Experiment with flavors and make this meal your own. Enjoy your cooking journey and share your experiences!
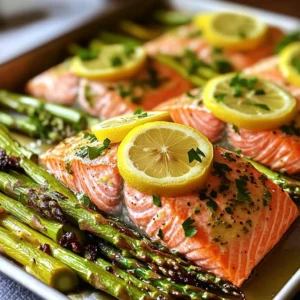
    Sheet-Pan Lemon Herb Salmon and Asparagus Delight
  • To make this spicy pumpkin chili, gather these main ingredients: - 1 can (15 oz) pumpkin puree - 1 can (15 oz) black beans, rinsed and drained - 1 can (15 oz) kidney beans, rinsed and drained - 1 can (14.5 oz) diced tomatoes with green chilies - 1 medium onion, diced - 3 cloves garlic, minced - 1 bell pepper (any color), chopped - 2 tablespoons chili powder - 1 teaspoon cumin - 1 teaspoon smoked paprika - 1/2 teaspoon cayenne pepper (adjust to taste) - Salt and pepper to taste - 2 cups vegetable broth - 1 tablespoon olive oil These ingredients mix together to create a warm and hearty meal. The pumpkin puree adds a creamy texture, while the beans provide protein. The spices deliver a flavor kick that keeps you coming back for more. For extra flavor and texture, consider these toppings: - Fresh cilantro, for garnish - Sour cream or Greek yogurt, for serving Adding a dollop of sour cream or Greek yogurt cools down the heat. Fresh cilantro adds a burst of color and freshness. You can even try avocado or tortilla chips for a fun twist. This chili is naturally vegan and can easily be gluten-free. To ensure it's gluten-free, check the labels on your canned ingredients. Most canned beans and tomatoes are safe. For a heartier meal, you can add extra vegetables like zucchini or carrots. This way, everyone can enjoy a warm bowl of spicy pumpkin chili! Start by gathering all your ingredients. This makes cooking easy and fun. In a skillet, heat 1 tablespoon of olive oil over medium heat. Add the diced onion and bell pepper. Sauté them for about 5 minutes until soft. Next, add 3 minced garlic cloves and cook for 1 more minute. This step adds great flavor! Once done, transfer this mixture to your slow cooker. Now, it’s time to add the rest of your ingredients. In the slow cooker, combine the following: - 1 can (15 oz) pumpkin puree - 1 can (15 oz) black beans, rinsed and drained - 1 can (15 oz) kidney beans, rinsed and drained - 1 can (14.5 oz) diced tomatoes with green chilies - 2 cups vegetable broth - 2 tablespoons chili powder - 1 teaspoon cumin - 1 teaspoon smoked paprika - 1/2 teaspoon cayenne pepper (adjust to taste) - Salt and pepper to taste Stir everything together until well mixed. Cover the slow cooker. Set it to low for 6 to 8 hours or high for 3 to 4 hours. The longer you cook, the better the flavors blend. When the cooking time is up, taste your chili. Adjust seasoning with more salt, pepper, or cayenne if you like it spicier. Once it’s just right, serve it hot. Garnish with fresh cilantro and a dollop of sour cream or Greek yogurt if you want. Enjoy your flavorful bowl of spicy pumpkin chili! To boost the taste of your chili, use fresh herbs. Adding fresh cilantro at the end gives a bright note. You can also use a squeeze of lime or lemon juice. This adds a nice zing. For an extra depth, try adding a splash of balsamic vinegar. This simple trick brightens the whole dish. Adjust the heat to match your taste. To make it spicier, add more cayenne pepper. You can also include diced jalapeños for a fresh kick. If you prefer a milder chili, cut the cayenne in half. Consider using sweet bell peppers instead of spicy ones. This keeps the flavor without too much heat. For the best results, sauté your onions and peppers first. This step adds more flavor. Make sure to stir your ingredients well in the slow cooker. This ensures even cooking. Always taste before serving. You can adjust the spices if needed. Cover your slow cooker tightly to keep moisture in. This helps your chili become thick and rich over time. {{image_2}} You can boost your chili's taste by adding more veggies. Try sweet corn, zucchini, or carrots. These options add texture and flavor. You can also use seasonal veggies for a fresh twist. Just chop them up and toss them in your slow cooker. Remember, the more color, the better! If you want meat in your chili, ground turkey or beef works well. Brown the meat in a skillet before adding it to the slow cooker. This adds a deeper flavor. You can also use shredded chicken for a lighter option. Just make sure to adjust the cooking time to ensure the meat is fully cooked. Beans add protein and heartiness to the dish. You can mix and match different beans. For example, use pinto beans or chickpeas along with the black and kidney beans. Each type brings its own flavor and texture. Rinse and drain them well before adding to the chili. This keeps your dish fresh and tasty. To keep your chili fresh, let it cool first. Use an airtight container to store it. Make sure to leave some space at the top for expansion. This way, it stays tasty and safe. You can freeze your chili, too! Use a freezer-safe container or bag. Remove as much air as possible before sealing. Label the container with the date. Your chili will stay good for about three months in the freezer. When you're ready to enjoy it, thaw the chili overnight in the fridge. Reheat it on the stove over medium heat. Stir it often until it's hot. You can also microwave it in a bowl, but cover it to avoid splatters. Enjoy your warm, spicy treat! Yes, you can use fresh pumpkin. Just cook and mash it first. Fresh pumpkin adds a nice texture. It can also boost the flavor. Cut the pumpkin into small pieces and roast or boil until soft. Then mash it well. This method makes your chili more flavorful. This chili lasts for about five days in the fridge. Store it in an airtight container. This helps keep the chili fresh and tasty. You can enjoy it for lunch or dinner later in the week. Just make sure to reheat it thoroughly before serving. Yes, you can make it on the stovetop. Start by sautéing the veggies as in the slow cooker steps. Then, add all the ingredients to the pot. Bring it to a boil, then reduce the heat. Let it simmer for about 30 to 45 minutes. Stir often to prevent sticking. Serve your chili with crusty bread or cornbread. These pair well and soak up the flavors. You can also top it with sour cream or Greek yogurt. Fresh cilantro adds a nice touch too. For a complete meal, consider a simple salad on the side. This chili recipe blends tasty pumpkin with spices for a unique dish. We explored key ingredients and optional toppings to suit your taste. I offered tips for flavor and adjustments for heat. You can use many vegetables and beans or add meats for variety. For storage, I highlighted safe methods for leftovers and freezing. This chili is easy to adapt, and you’ll love how it warms the soul. Enjoy the fun of cooking, and make it your own!
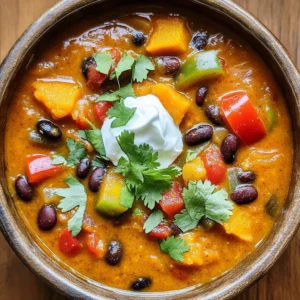
    Slow Cooker Spicy Pumpkin Chili Flavor Explosion
  • - 1 lb chicken tenders - 1 cup breadcrumbs (preferably panko) - 1/2 cup grated Parmesan cheese - 2 cloves garlic, minced - 1 teaspoon dried Italian herbs (oregano, basil, thyme) - 1/2 teaspoon paprika - 1 teaspoon salt - 1/2 teaspoon black pepper - 1 large egg - 2 tablespoons olive oil Gather all these ingredients before you start. Using panko breadcrumbs gives a great crunch. The garlic and herbs add lots of flavor. Make sure to use fresh garlic for the best taste. The egg will help the coating stick to the chicken. Olive oil adds moisture and richness. When you combine these ingredients, you create a tasty base. This mix makes your chicken tenders crispy and full of flavor. Don't skip the seasoning! It makes a big difference in taste. - Preheat the air fryer to 400°F (200°C). - In a bowl, mix breadcrumbs, grated Parmesan cheese, minced garlic, dried herbs, paprika, salt, and black pepper. This blend adds great flavor. - In a separate bowl, beat the egg and add olive oil. Mix well. - Dip each chicken tender into the egg mixture. Ensure it is fully coated. - Next, roll the chicken in the breadcrumb mixture. Press down gently to coat evenly. Repeat this for all chicken tenders. - Place the coated chicken tenders in the air fryer basket. Arrange them in a single layer with space in between. - Air fry for 12-15 minutes. Flip the tenders halfway through. They should be golden brown and cooked through. To be safe, check that the internal temperature reaches 165°F (75°C). - After cooking, let the chicken rest for a few minutes before serving. Enjoy your crispy treat! To get your chicken tenders nice and crispy, use panko breadcrumbs. They add a great crunch that regular breadcrumbs can’t match. Make sure to preheat your air fryer before cooking. This step helps the tenders cook evenly and become crispy. You can adjust the garlic and spice levels to fit your taste. If you love garlic, add more! Feel free to try different herbs too. Oregano and thyme work great, but rosemary or parsley can be fun choices. Always check the chicken's doneness with a meat thermometer. The chicken should reach 165°F (75°C) to be safe to eat. This ensures your chicken is juicy and cooked perfectly every time. {{image_2}} You can change the coating for fun. Use crushed cornflakes or almond flour for a gluten-free option. These choices still give you a crispy bite. You can also swap in different cheeses. Cheddar or mozzarella can add a new flavor twist. Add lemon zest for a fresh taste. It brightens the tenders and makes them pop. If you like it spicy, add cayenne pepper. Just a pinch can give your chicken a nice kick without being too hot. For sides, serve with a fresh salad or steamed veggies. They balance the meal and add good nutrients. You can also dip the tenders in your favorite sauce. Marinara or ranch dressing are great picks. They make each bite even better. You can store leftover chicken tenders in a few simple ways. First, place them in an airtight container. They will stay fresh in the fridge for up to 3 days. If you want to keep them longer, freeze the tenders. Just make sure to wrap them well in plastic wrap or foil before placing them in a freezer bag. When it is time to enjoy your leftovers, the air fryer is your best friend. Reheat the chicken tenders in the air fryer to keep them crispy. Preheat the air fryer to 350°F (175°C) and cook for about 5-7 minutes. Avoid the microwave. Microwaving can make them soggy and lose that nice crunch. Enjoy your garlic parmesan chicken tenders just as delicious as the first time! Yes, you can use frozen chicken tenders. Just remember to adjust the cooking time. They may need a few extra minutes to cook through. Check them at about 15 minutes. Make sure they reach 165°F inside for safety. Marinara, ranch, or garlic aioli are great choices. These sauces add fun flavors. You can even mix these sauces for a unique taste. Try dipping them in more than one sauce for extra fun! To make this recipe healthier, use less oil. You can also bake the tenders instead of air frying. Baking helps cut down on fat while still giving you a tasty meal. Enjoy your chicken tenders guilt-free! In this post, we covered how to make crispy garlic Parmesan chicken tenders. You learned about the main ingredients, seasoning, and how to bind them. We also shared tips for a perfect cook and variations to try. Remember to check the chicken’s doneness for safety. Enjoy these tenders with your favorite sides and sauces. They are easy to make and full of flavor. Cook them right, and you will impress everyone!
    Air Fryer Garlic Parmesan Chicken Tenders Crispy Treat
  • - 1 ½ cups all-purpose flour - 1 teaspoon baking powder - ½ teaspoon baking soda - ½ teaspoon salt - 1 tablespoon ground chai spices (cinnamon, ginger, cardamom, and cloves) For the dry ingredients, you start with all-purpose flour. It gives the cupcakes their structure. Next, add baking powder and baking soda. These help your cupcakes rise and become fluffy. Don't forget the salt; it enhances the sweet and spicy flavors. Finally, mix in ground chai spices. This blend adds warmth and depth to your cupcakes. - ½ cup unsalted butter, softened - 1 cup granulated sugar - 2 large eggs Now, let's move on to the wet ingredients. Begin with softened unsalted butter. This helps create a creamy texture. Add granulated sugar next. This sweetens the batter and helps it become light and fluffy. Then, mix in two large eggs. Eggs bind everything together and add moisture to the batter. - 1 teaspoon vanilla extract - ½ cup whole milk - ½ cup strong brewed chai tea, cooled - 1 tablespoon honey To enhance flavors, use vanilla extract. It adds a lovely aroma and sweetness. Whole milk keeps the cupcakes moist and rich. Strong brewed chai tea gives a bold chai flavor. Make sure it cools before adding it. Lastly, honey adds a touch of natural sweetness and pairs well with chai spices. These ingredients come together to create spiced chai latte cupcakes that are fluffy, flavorful, and fun to eat. - Preheat oven to 350°F (175°C). - Line muffin tin with cupcake liners. Start by getting your oven nice and warm. Set it to 350°F (175°C). While it heats, take a muffin tin and line it with cupcake liners. This keeps the cupcakes from sticking and makes cleanup easy. - Whisk together flour, baking powder, baking soda, salt, and spices. In a medium bowl, mix 1 ½ cups all-purpose flour, 1 teaspoon baking powder, and ½ teaspoon baking soda. Add ½ teaspoon salt and 1 tablespoon of ground chai spices. This blend brings out that warm chai flavor. Whisk until everything is well mixed. - Cream softened butter and sugar until fluffy. - Incorporate eggs and vanilla extract. In a big bowl, cream together ½ cup of softened unsalted butter and 1 cup of granulated sugar. Use a mixer for about 3-4 minutes until it looks light and fluffy. Next, add 2 large eggs, one at a time, mixing well after each. Stir in 1 teaspoon of vanilla extract for extra flavor. - Gradually mix in flour mixture with milk and chai tea. - Fold in honey. Now, slowly add your dry mix to the butter mixture. Alternate it with ½ cup of whole milk and ½ cup of cooled brewed chai tea. Start and end with the flour mix. Be gentle! After it’s combined, fold in 1 tablespoon of honey. This adds a nice sweetness. - Divide batter into liners. - Bake and check for doneness. Spoon the batter evenly into the cupcake liners, filling each about 2/3 full. Bake in your preheated oven for 18-20 minutes. Check if they are done by inserting a toothpick in the center. It should come out clean. - Cool cupcakes in tin before transferring to wire rack. Once they are baked, let the cupcakes cool in the tin for about 5 minutes. Then, carefully move them to a wire rack to cool completely. This step is key to keep them fluffy and delicious! To make your cupcakes fluffy, avoid overmixing the batter. Overmixing can make them dense. Mix just until the ingredients blend. Also, ensure your butter is at room temperature. Softened butter mixes better and traps air, giving you lighter cupcakes. A chai-spiced buttercream frosting pairs perfectly with these cupcakes. To make it, beat soft butter with powdered sugar, chai spices, and a splash of milk. For decoration, sprinkle a little cinnamon on top. You can add a slice of dried orange or a cinnamon stick for a special touch. To ensure even baking, rotate your cupcake tin halfway through. This helps them bake uniformly. To check if your cupcakes are fully baked, insert a toothpick into the center. If it comes out clean, they are done. If it has wet batter, bake a few more minutes. {{image_2}} You can easily change the flavor of these cupcakes. Adding pumpkin spice gives them a nice fall twist. Just mix in one teaspoon of pumpkin spice with your dry ingredients. This will add warmth and depth to your cupcakes. You can also use different types of milk. Almond milk or oat milk works great in this recipe. They add a subtle nutty flavor while keeping the cupcakes moist and fluffy. Substitute the whole milk with an equal amount of your chosen milk. If you need a gluten-free option, try using almond flour instead of all-purpose flour. Almond flour gives a slightly nutty flavor and keeps the cupcakes light. Use the same amount of almond flour as the all-purpose flour in the recipe. For a vegan version, you can replace the eggs with flax eggs. Mix one tablespoon of ground flaxseed with three tablespoons of water for each egg. Let it sit for about five minutes until it thickens. You can also substitute unsalted butter with coconut oil or a vegan butter. This keeps the cupcakes moist and flavorful. Presentation is key to making your cupcakes stand out. You can choose different frosting options. Cream cheese frosting adds tanginess, while chocolate frosting brings richness. Each will pair well with the spiced chai flavor. Get creative with toppings too! For a festive touch, try garnishing with a slice of dried orange or a cinnamon stick. You can also sprinkle chopped nuts or edible flowers on top for an extra pop of color. These small details make your cupcakes look beautiful and inviting. To keep your spiced chai latte cupcakes fresh, store them at room temperature. Place them in an airtight container. This helps to keep the moisture in. They will last for up to three days this way. If you want them to last longer, refrigerate them. Just make sure they are in a sealed container to prevent drying out. In the fridge, they stay good for about a week. Freezing cupcakes is simple and great for later use. First, let the cupcakes cool completely. Then, wrap each one in plastic wrap. After that, place them in a freezer-safe bag. This keeps them fresh for up to three months. When you want to enjoy a cupcake, take it out and thaw it. Leave it at room temperature for about an hour. You can also warm it up in the microwave for a few seconds. Serve them with your favorite frosting for a tasty treat! To make cupcakes fluffy, you must add air into the batter. Start by creaming the butter and sugar well. This adds air and creates a light texture. Use room temperature butter and eggs. Cold ingredients do not mix well and can lead to a dense cupcake. Always mix until just combined, so you don’t overwork the batter. Yes, you can make these cupcakes ahead of time. Keep them fresh by storing them in an airtight container. They will stay good at room temperature for up to three days. If you need more time, place them in the fridge to last up to a week. Just remember to bring them back to room temperature before serving. The best chai spices include cinnamon, ginger, cardamom, and cloves. Each spice adds unique flavors to your cupcakes. You can adjust these spices to match your taste. If you want more warmth, add extra ginger. For sweetness, increase the cinnamon. Feel free to experiment with other spices like nutmeg or allspice too. You can adjust the sugar levels in the recipe. If you prefer less sweet cupcakes, reduce the sugar by a quarter cup. You can also use sugar alternatives like honey or maple syrup. Just remember to adjust the liquid ingredients slightly if you switch to a liquid sweetener. To make these cupcakes festive, consider adding fun decorations. Top each cupcake with chai-spiced buttercream frosting. Sprinkle cinnamon on top for a warm finish. You can also add a slice of dried orange or a cinnamon stick for a holiday touch. For seasonal flair, use colored sprinkles or festive cupcake liners. This blog post covers how to make delicious chai cupcakes. We discussed the key ingredients and provided step-by-step instructions. You learned tips for perfect texture, frosting ideas, and creative variations. Remember to store and freeze your cupcakes properly. Baking is about fun and exploration, so customize your flavors and decorations. Enjoy experimenting with your own chai cupcake creations!
    Spiced Chai Latte Cupcakes Fluffy and Flavorful Treat
  • - Active dry yeast - Warm milk - Granulated sugar - Salt - Unsalted butter - Egg - All-purpose flour - Ground cinnamon - Apple (Granny Smith preferred) - Brown sugar - Chopped pecans (optional) - Caramel sauce To make caramel apple cinnamon rolls, gather these key ingredients. First, you need active dry yeast. This helps the dough rise. Use warm milk to activate the yeast. Make sure the milk is about 110°F. Next, add granulated sugar, which will sweeten the rolls. Salt is also important since it enhances flavor. Unsalted butter adds richness, while an egg gives structure. For the dough, all-purpose flour is essential. Ground cinnamon brings warmth and spice. You should use a Granny Smith apple for a tart bite. Brown sugar gives a deep, caramel flavor. Chopped pecans are optional, but they add a nice crunch. Lastly, pick a good caramel sauce for drizzling on top. This simple list makes a delightful treat. Each ingredient plays a role in creating rich flavors and soft textures. Enjoy the process of gathering your ingredients. To start, combine warm milk and yeast in a small bowl. The milk should be around 110°F. Stir gently. Let it sit for about 5 minutes. You want it to become bubbly and frothy. This shows the yeast is alive and ready. In a large mixing bowl, whisk together granulated sugar, salt, melted butter, and one egg. Next, add the frothy yeast mixture. Stir until well combined. Gradually add all-purpose flour. Mix until a soft dough forms. Transfer the dough to a floured surface. Knead the dough for about 5-7 minutes. You want it to be smooth and elastic. After kneading, place it in a greased bowl. Cover it with a kitchen towel. Let it rise in a warm area for about 1 hour. It should double in size. In a small bowl, mix brown sugar, ground cinnamon, diced apple, and chopped pecans if you like. Make sure to blend well for even distribution. This mix will give the rolls their sweet and spicy flavor. Once your dough has risen, punch it down. Roll it out on a floured surface into a rectangle about 1/4 inch thick. Spread the cinnamon-apple mixture evenly over the dough. Drizzle half the caramel sauce over the filling. Preheat your oven to 350°F (175°C). Place the rolls in a greased baking dish, giving them space to rise. Cover and let them rise for another 30 minutes. Bake for 25-30 minutes until they are golden brown. When they are done, drizzle the remaining caramel sauce over the warm rolls. To get the best dough, look for a few signs. Well-kneaded dough should feel smooth and elastic. If it sticks to your hands, it needs more flour. Dust your hands and the surface lightly while kneading. This helps avoid sticky dough. For the best flavor and texture, I recommend using Granny Smith apples. Their tartness balances the sweetness of the caramel and sugar. You can also try Honeycrisp or Fuji apples for a sweeter twist. Just make sure to peel and core them first. You can choose between store-bought and homemade caramel sauce. Store-bought is quick and easy, while homemade offers a richer taste. If you want to try something different, use cream cheese frosting or a drizzle of chocolate sauce instead. Both add a nice flair! {{image_2}} You can make your caramel apple cinnamon rolls even more exciting by adding spices. Try adding nutmeg or allspice to your filling. Both add warmth and depth. A pinch of ginger can also brighten the flavors. Mix these spices with the cinnamon, brown sugar, and diced apples for a delightful twist. If you need a nut-free version, simply skip the pecans. You can add more apples for crunch instead. Another idea is to include sunflower seeds or pumpkin seeds for extra texture. Just make sure to adjust the amount of filling so it stays balanced and delicious. To make these rolls vegan, you can swap out the dairy and egg. Use almond milk or oat milk in place of the warm milk. For the butter, coconut oil or a vegan butter works well. Replace the egg with a flax egg. To make a flax egg, mix 1 tablespoon of ground flaxseed with 2.5 tablespoons of water. Let it sit for a few minutes until it thickens. These changes will still give you tasty caramel apple cinnamon rolls. To keep your caramel apple cinnamon rolls fresh, store them in an airtight container. Place a piece of wax paper between layers to prevent sticking. Store them in the fridge for up to 5 days. This keeps them tasty and moist. When you want to enjoy your rolls again, reheat them in the oven. Preheat it to 350°F. Wrap the rolls in foil to keep them soft. Heat for about 10-15 minutes. You can also use the microwave, but only for 15-20 seconds. This works best for a quick treat. If you want to save some for later, freezing is easy. Wrap each roll tightly in plastic wrap. Place them in a freezer bag and seal it. They can last for up to 3 months in the freezer. When ready to eat, thaw them in the fridge overnight and reheat. Enjoy your sweet treat anytime! Yes, you can use other flours. Gluten-free flour blends work well. Just ensure the blend has xanthan gum. This helps mimic the texture of wheat flour. You may need to adjust the liquid. Start with less milk and add more if needed. To check if your rolls are done, look for a golden-brown color. Tap the top lightly; it should sound hollow. You can also insert a toothpick. If it comes out clean, your rolls are ready. Keep an eye on them to avoid overbaking. Absolutely! You can prepare the dough the night before. After mixing, place it in a greased bowl. Cover it and let it rise in the fridge overnight. In the morning, take it out and let it warm up before rolling. This saves time and adds flavor. In this blog post, we explored the key ingredients for making delicious cinnamon rolls. We covered steps from activating yeast to baking the rolls. You learned tips on perfecting dough and variations for different diets. Finally, we discussed storage and reheating methods to enjoy your rolls later. Baking can be fun and rewarding. Follow these steps, and you’ll impress everyone with tasty rolls. Enjoy your baking journey!
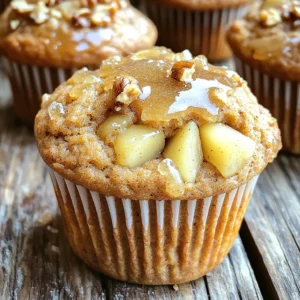
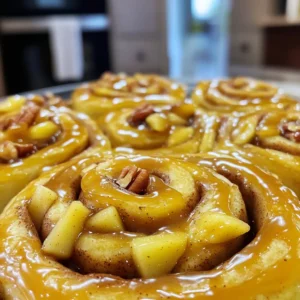
    Caramel Apple Cinnamon Rolls Delightful and Easy Recipe
  • - 1 ½ cups graham cracker crumbs - ½ cup unsalted butter, melted - 1 cup cream cheese, softened - ½ cup powdered sugar - 1 teaspoon vanilla extract - 1 cup heavy whipping cream - 1 ½ cups fresh or frozen cranberries - ½ cup granulated sugar (for cranberries) - 1 tablespoon lemon juice Each ingredient plays a key role in making your no-bake cranberry cheesecake bars both easy and delicious. The graham cracker crumbs form a crispy, sweet crust. You need unsalted butter to help hold the crust together. Cream cheese gives the filling its rich, creamy texture. Powdered sugar sweetens the filling, making it smooth. Vanilla extract adds a lovely flavor to the cheesecake. Heavy whipping cream is crucial for that light, airy texture. Fresh or frozen cranberries create a tart topping. The granulated sugar balances the tartness of the cranberries. Finally, lemon juice brightens the flavor and helps the cranberries cook down into a nice sauce. This mix of ingredients combines to make a treat that is sure to impress. Each step in the recipe uses these ingredients to build layers of taste and texture. You will enjoy the process and the end result, which is a perfect dessert for any occasion. To start, mix 1 ½ cups of graham cracker crumbs with ½ cup of melted butter. Stir until the crumbs look like wet sand. This helps bind the crust together. Next, press the mixture firmly into the bottom of a 9x9 inch baking dish. Make sure it is even and compact. This step is key for a solid base. Now, place the dish in the fridge while you make the filling. In a clean bowl, beat together 1 cup of softened cream cheese, ½ cup of powdered sugar, and 1 teaspoon of vanilla extract. Mix until it's smooth and creamy. This will be the rich layer of your cheesecake. In another bowl, whip 1 cup of heavy cream until it forms stiff peaks. This adds lightness to the filling. Gently fold the whipped cream into the cream cheese mixture. Be careful here; you want to keep it fluffy! Once your filling is ready, pour it over the chilled crust. Use a spatula to spread it out evenly. Tap the dish on the counter a few times to help settle the filling. This helps reduce air bubbles. After this, return the dish to the fridge. Let it set for at least 4 hours, or overnight if you can. For the topping, combine 1 ½ cups of cranberries, ½ cup of granulated sugar, and 1 tablespoon of lemon juice in a saucepan. Cook this mixture over medium heat. Stir until the cranberries start to burst, about 10 to 15 minutes. Once it’s done, remove it from heat and let it cool completely. This tart topping will balance the sweet cheesecake. After the cheesecake layer has set, spread the cooled cranberry sauce evenly on top. This adds a pop of color and flavor. To serve, lift the cheesecake out of the dish using the edges of parchment paper if you used it. Slice into bars and serve chilled. These bars look great on a platter, especially with a fresh cranberry and mint leaf on top. Enjoy your delicious creation! - Achieving the right consistency with whipped cream: Whip the heavy cream until stiff peaks form. This step is key. It makes the cheesecake light and airy. Gently fold it into the cream cheese mix. Be careful not to deflate the whipped cream. This keeps your cheesecake fluffy and smooth. - Importance of chilling time for setting: After pouring the cheesecake filling over the crust, chill it for at least 4 hours. For the best results, leave it overnight. This time helps it to set properly. It also allows the flavors to meld well. - Suggested garnishes: For a lovely touch, garnish each bar with a fresh cranberry and a mint leaf. This adds a pop of color and freshness. You can also sprinkle some crushed graham crackers on top for added texture. - Serving suggestions for presentations: Serve the bars on a beautiful platter. This enhances the visual appeal. Place them in a single layer for easy access. You can also add a drizzle of chocolate sauce for extra flair. - Selecting fresh cranberries: When choosing cranberries, look for firm ones with a bright color. Avoid any that are soft or shriveled. Fresh cranberries create a better topping and add a burst of flavor. - Choosing cream cheese and whipping cream: Always use full-fat cream cheese for a rich taste. Check the expiration date on the cream. Fresh cream ensures the best texture and flavor in your cheesecake. {{image_2}} You can change the cranberry topping to fit your taste. Other berries work great, like strawberries or blueberries. You can even mix them for a colorful look. If you want an easy option, try using fruit preserves or jams. Simply spread them over the cheesecake layer for a quick and tasty topping. To make your bars even more special, add some citrus zest. Lemon or orange zest brightens the flavor. You can also spice things up by adding a pinch of cinnamon. This gives your cheesecake bars a warm, cozy taste. If you need a gluten-free version, swap the graham cracker crumbs. Use crushed gluten-free cookies or almond flour instead. Check all other ingredients too. Make sure they are gluten-free, so everyone can enjoy these tasty bars. To keep your no-bake cranberry cheesecake bars fresh, store them in the refrigerator. Place the bars in an airtight container. This helps prevent them from absorbing any unwanted odors from the fridge. If you used parchment paper, leave a bit sticking out. This makes it easier to lift the bars out later. You can freeze these cheesecake bars for later enjoyment. First, slice the bars into portions. Wrap each portion tightly in plastic wrap, then place them in a freezer-safe container. This keeps them safe from freezer burn. When you want to enjoy them, take a portion out and thaw it in the fridge overnight. Serve them chilled for the best taste. In the fridge, the cheesecake bars will last about 5 days. If you freeze them, they can stay good for up to 2 months. Just be sure to store them properly. This way, you can always have a sweet treat ready when you need it! The cheesecake bars need about 4 hours to set in the fridge. For the best results, I recommend letting them chill overnight. This helps the bars firm up and makes them easier to slice. If you do not wait long enough, they may not hold their shape well. Yes, you can use frozen cranberries! They work well in this recipe. Frozen cranberries save time and are often just as tasty. However, they may release more water when cooked. This can make your cranberry topping a bit runnier. Just keep this in mind when preparing your sauce. If you need a substitute for cream cheese, you have options. Use Greek yogurt or mascarpone cheese for a creamy texture. For a dairy-free choice, try cashew cream or tofu blended until smooth. These alternatives may change the flavor slightly, but they still create a delicious cheesecake layer. Using heavy cream is important for the texture and flavor of the cheesecake. Heavy cream makes the filling rich and creamy. It also helps the bars maintain a nice structure when chilled. If you skip it, the bars may end up too dense or crumbly. This article covered how to make delicious cheesecake bars. We discussed the key ingredients, step-by-step instructions, tips for success, and various storage methods. You learned how to create a smooth filling, a tasty cranberry topping, and the best ways to serve your bars. Remember, using quality ingredients makes a big impact. Whether you try new flavors or stick to the classic, these bars will please everyone. Enjoy making and sharing your cheesecake bars!
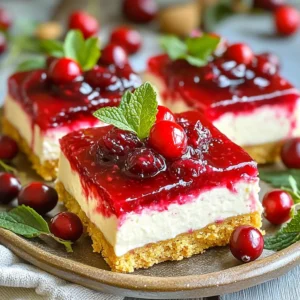
    No-Bake Cranberry Cheesecake Bars Easy and Delicious
  • - 1 cup canned pumpkin puree - 1/2 cup rolled oats - 1/2 cup almond flour - 1/4 cup vanilla protein powder - 1/4 cup honey or maple syrup - 1/2 teaspoon ground cinnamon - 1/4 teaspoon nutmeg - 1/4 teaspoon salt - 1/2 cup dark chocolate chips - 1/4 cup chopped pecans (optional) - Canned pumpkin puree: This adds fiber and vitamins. It helps keep you full. - Rolled oats: These are great for energy. They provide whole grains and fiber. - Almond flour: This flour is low in carbs and rich in healthy fats. - Vanilla protein powder: This boosts your protein intake. It helps with muscle repair. - Honey or maple syrup: These natural sweeteners add taste and energy. - Ground cinnamon: This spice can help control blood sugar levels. - Nutmeg: This spice adds flavor and may help with digestion. - Salt: It enhances all the flavors in your snack. - Dark chocolate chips: These add a rich taste and antioxidants. - Chopped pecans: These are optional, but add crunch and healthy fats. - Look for 100% pure pumpkin puree. Avoid blends with additives. - Choose old-fashioned rolled oats for the best texture. Instant oats may not work well. - Select blanched almond flour for a finer texture. This makes rolling easier. - Pick a protein powder that fits your diet. Check for added sugars. - Use raw honey or pure maple syrup for better taste and nutrients. - Purchase fresh spices. They should smell strong and fragrant. - Select dark chocolate chips with at least 70% cocoa for health benefits. - If using pecans, buy them whole and chop them yourself for freshness. Making pumpkin chocolate chip protein balls is simple and quick. You can whip these up in just 10 minutes. You will need a mixing bowl, a spatula, and some parchment paper. This recipe makes 12 to 15 protein balls, perfect for a snack or post-workout treat. 1. Mix Wet Ingredients: In a large mixing bowl, combine 1 cup of canned pumpkin puree, 1/4 cup of honey or maple syrup, and 1/4 cup of vanilla protein powder. Stir until smooth. 2. Add Dry Ingredients: Next, add in 1/2 cup of rolled oats, 1/2 cup of almond flour, 1/2 teaspoon of ground cinnamon, 1/4 teaspoon of nutmeg, and 1/4 teaspoon of salt. Mix well until everything is blended. 3. Incorporate Chocolate and Nuts: Gently fold in 1/2 cup of dark chocolate chips and 1/4 cup of chopped pecans (if you want). Make sure they are evenly spread throughout the mixture. 4. Shape the Balls: With your hands, scoop about a tablespoon of the mixture. Roll it into a ball shape and place it on a baking sheet lined with parchment paper. 5. Repeat: Keep scooping and rolling until all the mixture is formed into balls. 6. Chill: Put the baking sheet in the refrigerator for at least 30 minutes. This helps the protein balls firm up. 7. Store: Once set, move the protein balls to an airtight container for storage. - Not Mixing Enough: Make sure to mix all wet and dry ingredients well. This ensures even flavor and texture. - Skipping the Chill: Do not skip chilling the protein balls. This step helps them hold their shape. - Ignoring Measurements: Stick to the ingredient amounts. Too much or too little can change the taste and texture. - Overmixing: When adding chocolate chips and nuts, mix just enough to distribute. Overmixing can break them down. With these steps, you will create tasty and healthy pumpkin chocolate chip protein balls that everyone will love! To boost the flavor and texture of your pumpkin chocolate chip protein balls, try adding a touch of vanilla extract. This small addition makes a big difference. You can also swap some almond flour for coconut flour for a different taste. If you love spice, add more cinnamon or a pinch of ginger. This will warm up the flavors nicely. For extra crunch, mix in sunflower seeds or chia seeds. These ingredients help create a delightful texture that keeps each bite interesting. After you shape the protein balls, chill them in the fridge for at least 30 minutes. This helps them firm up and hold their shape better. If you want them even firmer, leave them in the fridge longer. Just keep them in an airtight container to prevent drying out. If they do get too soft, you can pop them back in the fridge to reset. This way, you’ll always get a perfectly shaped snack when you need it. Serve these protein balls in a fun way to impress your friends or family. Arrange them on a decorative plate or in a cute bowl. You can sprinkle extra chocolate chips or chopped pecans on top for a nice touch. These protein balls make an excellent snack for movie night or a quick breakfast on the go. Pair them with a glass of milk or your favorite dairy-free alternative for a balanced treat. Don’t forget, they are also great for lunch boxes or as a post-workout snack! {{image_2}} You can easily swap out ingredients to fit your needs. If you're gluten-free, replace rolled oats with gluten-free oats. Almond flour is great for those avoiding wheat, but you can also use coconut flour if you prefer. For lower sugar, try agave nectar instead of honey or maple syrup. These protein balls are like a blank canvas for flavors. You can add a splash of vanilla extract for more depth. How about a dash of ginger for a spicy kick? You could also mix in dried cranberries or shredded coconut. Each twist gives a fresh taste to your snack! Making these protein balls vegan is simple! Just swap honey or maple syrup for agave nectar. Use a plant-based protein powder to keep it vegan-friendly. For gluten-free, stick with gluten-free oats and check your chocolate chips for gluten-free labeling. These options ensure everyone can enjoy this tasty treat! To keep your protein balls fresh, store them in an airtight container. This helps maintain their taste and texture. You can place a piece of parchment paper between layers to avoid sticking. Always keep them in the fridge for best results. They stay tasty and firm when chilled. These pumpkin chocolate chip protein balls last about a week in the fridge. After that, they may lose their texture and flavor. If you notice any changes in smell or appearance, it's best to toss them. Always trust your senses to ensure freshness. If you want to keep them longer, you can freeze the protein balls. Just place them in a single layer on a baking sheet. Freeze for one hour until firm. Then, transfer them to a freezer-safe bag or container. They can last up to three months in the freezer. When you're ready to eat them, thaw them in the fridge overnight. Enjoy your delicious snack anytime! Yes, you can use fresh pumpkin. First, cook the pumpkin until soft. Then, mash it to get a smooth puree. Make sure to drain any extra liquid. Canned pumpkin is often easier and saves time, but fresh can bring a great taste. You will know the protein balls are set when they feel firm to the touch. After chilling in the fridge for at least 30 minutes, they should hold their shape. If they feel too soft, give them more time to chill. You can use ground flaxseed or chia seeds as a substitute. Both add some protein and fiber. You could also use a nut butter for extra creaminess and protein. Keep in mind that these swaps may change the texture a bit. Yes, these protein balls are great for kids. They are packed with nutrients and taste yummy. The chocolate chips make them fun and appealing. Just make sure your kids are not allergic to any of the ingredients. To lower the sugar, reduce the honey or maple syrup. You can use a sugar-free sweetener that you like. You could also add more pumpkin or oats to keep the texture without adding too much sweetness. In this article, I outlined the key steps to make delicious pumpkin chocolate chip protein balls. We covered ingredients and their health benefits, providing tips for choosing quality options. I also shared step-by-step instructions and common mistakes to avoid. You can enhance flavor and texture while considering variations for dietary needs. Storing these protein balls properly will keep them fresh. Remember, they are fun and easy to make, perfect for everyone in your home. Enjoy creating your own tasty snacks!
    Pumpkin Chocolate Chip Protein Balls Tasty and Simple
  • - 8 oz (226g) rice noodles - 3 tablespoons sweet chili sauce - 2 tablespoons soy sauce - 1 tablespoon sesame oil Rice noodles form the base of this dish. They soak up the flavors well. Sweet chili sauce adds a nice kick and sweetness. Soy sauce gives it that rich, umami taste. Sesame oil brings a nutty flavor that ties everything together. - 4 cloves garlic, minced - 1 teaspoon ginger, minced - 1 red bell pepper, sliced thin Garlic and ginger are the stars here. They add a fresh, zesty taste. The red bell pepper not only adds color but also a crunchy texture. These ingredients create a delightful mix of flavors. - 1 cup snap peas - 2 green onions, chopped - 1 tablespoon sesame seeds, for garnish - Fresh cilantro, for garnish Snap peas add a pop of sweetness and crunch. Green onions lend a fresh bite. Sesame seeds provide a nice crunch and visual appeal. Fresh cilantro adds brightness and aroma to finish the dish beautifully. This dish combines simple yet bold flavors to create a meal that is quick and satisfying. Start by boiling a pot of salted water. Use enough water to cover the noodles. Once it boils, add 8 oz of rice noodles. Cook them based on the package instructions. This usually takes about 4 to 5 minutes. After cooking, drain the noodles. Rinse them under cold water to stop the cooking. Set the noodles aside for later. In a small bowl, mix together three tablespoons of sweet chili sauce, two tablespoons of soy sauce, and one tablespoon of sesame oil. Stir well to combine all the flavors. Set this sauce aside for later use. Heat a drizzle of sesame oil in a large skillet or wok over medium heat. Once the oil is hot, add four cloves of minced garlic and one teaspoon of minced ginger. Sauté these for about 30 seconds until they smell great. Next, toss in one sliced red bell pepper and one cup of snap peas. Cook this for 2 to 3 minutes until they soften but still stay crunchy. Now, add the cooked rice noodles to the skillet along with the prepared sauce. Gently toss everything together using tongs or a fork. Make sure the noodles get well coated in the sauce. Keep cooking for another 2 to 3 minutes until everything is hot. Taste the noodles and adjust the flavors. Add salt and pepper to your liking. If you want more sweetness, add a bit more sweet chili sauce. When you are happy with the taste, toss in two chopped green onions. Serve hot, garnished with one tablespoon of sesame seeds and some fresh cilantro. Enjoy your tasty meal! To cook rice noodles just right, follow these steps: - Avoiding overcooking: Boil a pot of salted water. Add the noodles and check them often. They cook fast, usually in about 5 minutes. You want them firm, not mushy. - Rinsing tips: Once done, drain the noodles right away. Rinse them under cold water. This stops the cooking and helps them stay separate. You can change the sauce to fit your taste: - Adjusting sweetness: If you like it sweeter, add more sweet chili sauce. For less sweetness, cut back on the sauce. - Adding spice: Want some heat? Add red pepper flakes or a dash of sriracha to the mix. This gives it a nice kick! Pair your noodles for a complete meal: - Pairing with proteins: Chicken, shrimp, or tofu go great with these noodles. Just cook them first and toss them in. - Creative serving ideas: Serve your noodles in bowls and top with sesame seeds and fresh cilantro. You can even add lime wedges for a zesty touch! {{image_2}} You can easily add protein to your Minute Sweet Chili Garlic Noodles. Chicken, shrimp, or tofu all work great. - Chicken: Use diced chicken breast. Cook it in the skillet before adding the veggies. Cook until it’s no longer pink. - Shrimp: Add peeled shrimp after sautéing the garlic. Cook until they turn pink, then add veggies. - Tofu: Use firm tofu. Cut it into cubes and brown it in the skillet before the garlic. Adding protein makes the dish filling and satisfying. You can mix in other veggies to add flavor and color. Here are some great choices: - Carrots: Slice them thin for a nice crunch. - Broccoli: Cut into small florets and steam them lightly. - Spinach: Toss in fresh spinach at the end for a pop of green. Feel free to get creative! Use what you have on hand for a unique twist. If you need gluten-free noodles, options are easy to find. Look for rice noodles, which are naturally gluten-free. - Zucchini Noodles: Spiralize zucchini for a fun, veggie twist. - Shirataki Noodles: These are made from konjac yam and are very low in calories. These alternatives ensure everyone can enjoy this tasty dish without gluten. To store leftover Sweet Chili Garlic Noodles, first let them cool to room temperature. This step helps prevent steam from building up in the container, which can make the noodles soggy. Once cooled, place them in an airtight container. You can keep them in the fridge for 3 to 4 days. When you're ready to eat, just remember to check for any signs of spoilage before reheating. Reheating the noodles correctly keeps them tasty. The best method is to use a skillet. Heat a small splash of water or oil in the skillet over medium heat. Add the noodles and stir frequently until they are hot. This method helps keep the noodles from sticking together. You can also use the microwave, but be sure to cover the bowl with a lid or a damp paper towel. Heat in short intervals, stirring in between, until warmed through. If you want to freeze the dish, allow it to cool completely first. Then, pack the noodles tightly in a freezer-safe container or a zip-top bag. Remove as much air as possible to prevent freezer burn. The noodles can be stored in the freezer for up to 2 months. When ready to enjoy, thaw the noodles in the fridge overnight before reheating. This will help maintain their texture and flavor. Sweet chili garlic noodles last about 3 to 5 days in the fridge. Make sure to store them in an airtight container. This keeps them fresh and tasty. You can easily reheat them when you're ready to eat. Yes, you can use other types of noodles. Some good options are spaghetti, udon, or even egg noodles. Just cook them according to their package directions. Each noodle brings a unique flavor and texture to the dish, so feel free to experiment! Yes, this recipe is vegetarian. To make it vegan, ensure that the sweet chili sauce and soy sauce do not contain any animal products. Most brands are vegan, but it’s always good to check the label. You can serve sweet chili garlic noodles with lots of side dishes. Try a fresh salad or steamed broccoli for a crunchy addition. Grilled chicken, shrimp, or tofu also pair well, adding protein to your meal. Don’t forget about spring rolls or dumplings for a fun twist! This blog post covers how to make sweet chili garlic noodles using rice noodles, sauces, and fresh veggies. We walked through step-by-step instructions, from cooking the noodles to garnishing them. I shared tips for perfecting your dish, suggested variations, and gave storage ideas for leftovers. With these simple steps, you can create a delicious meal that suits your tastes. Enjoy making this dish your own with different proteins and veggies! It’s a fun and tasty way to impress your family or friends.
    Minute Sweet Chili Garlic Noodles Quick and Tasty Meal
  • To make the perfect cranberry orange loaf, you need these simple ingredients: - 2 cups all-purpose flour - 1 cup granulated sugar - 1 tablespoon baking powder - ½ teaspoon baking soda - ½ teaspoon salt - 1 cup fresh cranberries, halved - 1 orange, zested and juiced - ½ cup unsalted butter, melted - 2 large eggs - 1 teaspoon vanilla extract - ½ cup Greek yogurt or sour cream Each ingredient plays a key role. The flour gives structure, while the sugar adds sweetness. Baking powder and baking soda help the loaf rise. Salt balances the flavors, and cranberries add a tart punch. The orange zest and juice bring bright, fresh flavor. Butter adds richness, and eggs bind everything together. Finally, Greek yogurt or sour cream adds moisture and tang. These ingredients are easy to find. You can get them at any grocery store. Using fresh cranberries and a good orange makes a big difference. Enjoy the process! Cooking with quality ingredients always pays off in flavor. - Preheat your oven to 350°F (175°C). - Grease and line a 9x5-inch loaf pan with parchment paper. Start by setting your oven. This ensures your loaf bakes evenly. Greasing and lining the pan helps the loaf come out easily. - Combine 2 cups all-purpose flour. - Add 1 cup granulated sugar. - Mix in 1 tablespoon baking powder. - Add ½ teaspoon baking soda. - Stir in ½ teaspoon salt. In a large bowl, mix all the dry ingredients together. Whisk until everything blends well. This step adds great flavor to your loaf. - Whisk ½ cup melted butter. - Add 2 large eggs. - Mix in 1 teaspoon vanilla extract. - Zest and juice 1 orange. In another bowl, combine your wet ingredients. Whisk them until smooth. The orange zest and juice add a fresh taste that makes the loaf special. - Pour the wet mix into the dry mix. - Stir gently until just combined. - Fold in 1 cup halved fresh cranberries. Carefully mix the wet and dry ingredients. Overmixing can make the loaf tough. Gently fold in the cranberries, ensuring they are spread throughout the batter. - Pour the batter into the pan and smooth the top. - Bake for 50-60 minutes. Once the batter is in the pan, smooth the top with a spatula. Bake until a toothpick comes out clean. This step is key for a perfect loaf. - Allow to cool in the pan for 10 minutes before transferring. After baking, let the loaf cool in the pan. This helps it set and makes it easier to remove. After 10 minutes, transfer it to a wire rack to cool completely. To get the best texture, avoid overmixing the batter. When you mix too much, the loaf can turn dense. Just stir until the dry and wet ingredients blend. It’s okay to see some lumps. Also, ensure your oven is at the right temperature. An oven that’s too hot can burn the outside while leaving the inside raw. Use an oven thermometer to check if needed. Once your loaf cools, you can make it look special. Drizzle a simple icing made of powdered sugar and orange juice on top. This adds sweetness and a nice shine. For a colorful touch, garnish the loaf with whole cranberries and fresh mint. This makes it pop on any table. Having the right tools makes baking easier. Use a sturdy mixing bowl and a whisk for blending. A rubber spatula helps fold ingredients without overmixing. I recommend a 9x5-inch loaf pan for the best results. It helps the loaf bake evenly and gives you a nice shape. If you line it with parchment paper, removing the loaf is a breeze. {{image_2}} You can easily swap Greek yogurt for sour cream. This change gives a nice tang and keeps the loaf moist. If you want a healthier option, try using honey or maple syrup instead of granulated sugar. Both add sweetness without refined sugar. Want to make your loaf even more exciting? Add some nuts or chocolate chips to the batter. Walnuts or pecans give a nice crunch. If you're a chocolate lover, dark chocolate chips will melt in and add richness. You can also play with spices. Try adding cinnamon for warmth or nutmeg for a cozy flavor. Just a pinch can change the whole taste! This loaf can fit any holiday. You can switch the orange for lemon or lime for a fresh twist. Adding festive ingredients like dried fruits or nuts can make it special. Think of cranberries with ginger or even festive spices like allspice. These changes make your cranberry orange loaf perfect for holiday gatherings! To keep your cranberry orange loaf fresh, store it at room temperature. Use an airtight container to avoid drying out. If you plan to eat it within a few days, this method works well. For longer storage, wrap the loaf tightly in plastic wrap. Then, place it in a freezer bag. This keeps it safe from freezer burn. If you choose to refrigerate, use a container that seals well. This will help keep moisture in and flavors intact. However, the fridge can dry out the loaf faster than room temperature. When stored correctly, your cranberry orange loaf lasts about 4 to 5 days at room temperature. In the fridge, it can last up to a week. If you freeze it, expect it to stay good for about 3 months. Look for signs of spoilage. If the loaf feels hard or dry, it may be past its prime. Mold is also a clear sign to toss it. Trust your senses; if it smells off, it's best to throw it away. When it’s time to enjoy your loaf again, reheating is easy. Place slices in a toaster oven for about 5 minutes. This method warms the loaf while keeping it moist. You can also wrap slices in foil and use a regular oven at 350°F for about 10 minutes. Avoid using a microwave, as it can make the loaf rubbery. Enjoy your perfectly warmed cranberry orange loaf! You can use dried cranberries instead of fresh ones. They add a sweet flavor. If you want to try other fruits, go for blueberries or chopped apples. These fruits work well and keep the loaf tasty. Yes, you can make this loaf gluten-free. Use almond flour or coconut flour instead of all-purpose flour. You can also try a gluten-free flour blend. These options give you a great loaf without gluten. Serve this loaf with butter or cream cheese for a rich taste. A drizzle of honey also works well. For drinks, pair it with tea or coffee. These pairings make a lovely snack or breakfast. You can make a vegan version easily. Replace eggs with flaxseed meal mixed with water. Use coconut oil instead of butter. For yogurt, try a plant-based yogurt. These swaps keep the loaf moist and delicious. This blog post guides you through making a delicious cranberry orange loaf. We covered ingredients, step-by-step instructions, and tips for perfecting the texture. You also learned about variations, storage, and helpful FAQs. Seeing how easy it is to bake this loaf, you can impress friends and family. Enjoy your baking journey and feel free to explore your own twist on the recipe!
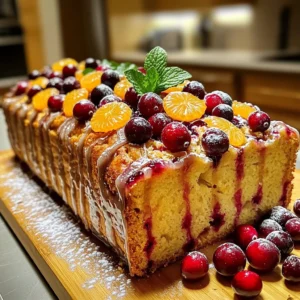
    Cranberry Orange Loaf Flavorful and Easy Recipe
  • To make a tasty Slow Cooker Moroccan Chickpea Stew, you need these simple items: - 2 cans (15 oz each) chickpeas, drained and rinsed - 1 large onion, diced - 3 cloves garlic, minced - 2 medium carrots, sliced - 1 bell pepper (red or yellow), chopped - 1 zucchini, diced - 1 can (14 oz) diced tomatoes, with juices - 1 cup vegetable broth - 1 tablespoon olive oil - 2 teaspoons ground cumin - 2 teaspoons ground coriander - 1 teaspoon ground cinnamon - 1 teaspoon smoked paprika - ½ teaspoon cayenne pepper (adjust for spice preference) - Salt and pepper to taste - Fresh cilantro, for garnish You will need a few basic tools for this recipe: - Slow cooker - Large skillet - Cutting board - Knife - Measuring spoons - Mixing spoon These tools will help you prepare your stew with ease. Using fresh ingredients can enhance the stew's taste. Fresh vegetables add crunch and flavor. However, canned ingredients save time and still taste good. - Chickpeas: Canned chickpeas are convenient. They are ready to use and save prep time. If you prefer, you can cook dried chickpeas, but this takes longer. - Vegetables: Fresh onions, carrots, and zucchini bring bright flavors. Canned tomatoes add sweetness and acidity. - Spices: Use fresh spices for the best taste. Ground spices lose flavor over time, so check their dates. By mixing fresh and canned ingredients, you create a stew that is both easy and flavorful. Start by heating olive oil in a large skillet over medium heat. Add the diced onion. Sauté the onion for about five minutes until it turns soft and clear. Then, mix in the minced garlic, cumin, coriander, cinnamon, smoked paprika, and cayenne pepper. Stir for one to two minutes. This step helps the spices release their full flavor. Next, transfer your onion and spice mix to the slow cooker. Add in the drained chickpeas, sliced carrots, chopped bell pepper, diced zucchini, and the can of diced tomatoes with their juices. Pour in the vegetable broth and stir everything well. Make sure all the ingredients are combined. Season with salt and pepper to taste. Cover your slow cooker and set it to cook. You can choose to cook on low for six to eight hours or on high for four to five hours. The stew is done when the vegetables are soft and the flavors blend well. Before you serve, taste the stew again. Adjust the seasoning if needed. This process makes sure every bite is full of flavor. To make your stew shine, use fresh spices. Ground spices lose flavor over time. Toast them lightly in the pan before adding. This step releases oils and makes them fragrant. Also, consider adding a splash of lemon juice before serving. This adds brightness and balance to the dish. Fresh herbs, like cilantro, bring a burst of flavor. They also add a lovely green color to your stew. If you love heat, add more cayenne pepper. Start with a pinch and taste. You can always add more, but you can’t take it out once it’s in. If the stew is too spicy, add more diced tomatoes or broth. This will cool it down and keep the flavor intact. Always taste as you go. Each batch can differ based on the ingredients. One mistake is not sautéing the onions and spices first. This step builds the base flavor. Another common error is overcooking the vegetables. They should be tender, not mushy. Be careful with salt; taste before you add more. Finally, don’t skip the fresh herbs. They make a big difference in taste and presentation. {{image_2}} This stew is naturally gluten-free and dairy-free. You can enjoy it without worry. Just check all labels on your broth and spices to ensure they are safe. No hidden gluten here! If you want a creamier texture, use coconut milk instead of broth. It adds a nice twist and keeps it vegan. Want to boost protein? You can add cooked quinoa or lentils to the stew. Both add great texture and flavor. If you prefer meat, try adding chicken or turkey. Simply cook it in the slow cooker alongside the veggies. This way, it stays tender and juicy. Feel free to switch up the veggies based on what you have. Sweet potatoes or butternut squash are great options. They add sweetness and pair well with spices. You can also throw in leafy greens like spinach or kale at the end. This way, they stay bright and fresh. Mix and match to suit your taste and the season! Store leftover stew in an airtight container. Let it cool to room temperature first. Keep it in the fridge for up to 4 days. Make sure to label your container with the date. This way, you will know when to use it. To freeze, use a freezer-safe container. Leave some space at the top, as the stew will expand. You can freeze it for up to 3 months. Thaw it in the fridge overnight before reheating. You can also use a microwave or a pot on the stove. Reheat the stew on the stove over medium heat. Stir it often to heat evenly. You can also use a microwave. Heat in short bursts, stirring in between. Check the temperature to ensure it is hot. If it seems too thick, add a splash of broth or water. Enjoy your warm and tasty stew! Yes, you can use dried chickpeas. Soak them overnight in water. Cook them until tender before adding to the stew. This adds a rich, nutty flavor. Dried chickpeas also hold up well in slow cooking. I love serving this stew in deep bowls. Add a sprinkle of fresh cilantro on top. Drizzle some olive oil or tahini for extra flavor. Serve with warm bread or over rice for a filling meal. You can store this stew in the fridge for up to five days. Keep it in an airtight container. Make sure it cools down before you put it in the fridge. Reheat on the stove or microwave before serving. This article covered the key elements of making a delicious stew. We discussed the necessary ingredients and tools, along with step-by-step instructions for cooking. I shared tips for boosting flavor and avoiding common mistakes. You learned about various stew variations and how to store leftovers properly. In closing, you now have all the info you need to create a tasty, healthy dish. Enjoy experimenting with your own recipes!
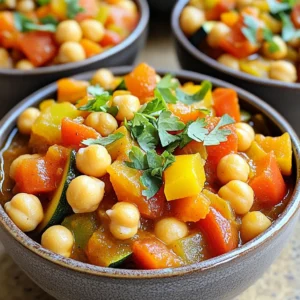
    Slow Cooker Moroccan Chickpea Stew Flavor Boost
  • - 1 ½ cups graham cracker crumbs - ½ cup unsalted butter, melted - 1 cup cream cheese, softened - 1 cup granulated sugar - 1 teaspoon vanilla extract - 2 large eggs - 2 cups finely chopped apples (like Granny Smith) - 1 teaspoon ground cinnamon - ½ teaspoon nutmeg - 1 cup caramel sauce (store-bought or homemade) - A pinch of salt To create these delicious caramel apple cheesecake bars, you need some simple yet key components. The apples give a fresh taste, while cream cheese adds creaminess. Don't forget the graham cracker crumbs for that perfect crust! - Additional caramel sauce - Thin apple slices - Sprinkle of cinnamon For a lovely finish, drizzle more caramel sauce on top. You can also add thin apple slices for color. A sprinkle of cinnamon can enhance the visual appeal and flavor. Arrange the bars on a nice plate to impress your guests! 1. Preheat your oven to 325°F (160°C). 2. Line a 9x9-inch baking dish with parchment paper. Leave some paper over the sides. 3. In a medium bowl, combine 1 ½ cups graham cracker crumbs and ½ cup melted unsalted butter. 4. Mix until well blended. Press this mixture into the bottom of your baking dish. 5. Bake for 10 minutes. Remove and let it cool slightly. 1. In a large bowl, beat 1 cup of softened cream cheese for 1-2 minutes. 2. Gradually add 1 cup of granulated sugar. Mix until smooth. 3. Add 1 teaspoon of vanilla extract. Beat in 2 large eggs, one at a time. 4. In another bowl, mix 2 cups of finely chopped apples with 1 teaspoon of ground cinnamon, ½ teaspoon of nutmeg, and a pinch of salt. 5. Gently fold the spiced apple mixture into the cream cheese batter. 1. Pour the apple cheesecake filling over the crust in the baking dish. 2. Drizzle 1 cup of caramel sauce over the filling. Use a knife to swirl it gently. 3. Bake in the preheated oven for 30-35 minutes. The edges should be set, and the center will jiggle slightly. 4. Remove from the oven and let it cool at room temperature. 5. Refrigerate for at least 3 hours until fully chilled and firm. 6. Lift the bars out of the dish using the parchment paper. Cut into squares. 7. Drizzle extra caramel sauce on top before serving. To make the crust firm, press the graham cracker mix down hard. This gives the bars a strong base. Aim for an even layer. For the cheesecake, keep the cream cheese soft. Room temperature cream cheese mixes well. A smooth batter helps create a nice texture. To get that lovely marbled look with caramel, drizzle the sauce on top. Use a knife or toothpick to swirl it gently. Don't overdo it; a little swirl makes a big impact. Always check your oven temperature. Ovens can be off by quite a bit. Use an oven thermometer for best results. Bake these bars at 325°F. This low temp helps them cook evenly. To prevent cracks in your cheesecake, do not overbeat the eggs. Mix until just combined. Also, let the bars cool slowly. After baking, leave them at room temperature before refrigerating. This helps set the texture without cracks. {{image_2}} You can change the flavor of your caramel apple cheesecake bars easily. Adding spices like nutmeg or pumpkin spice gives a warm touch. Just mix these spices into the apple mixture for a cozy taste. You can also try different apples. Fuji or Honeycrisp apples work well too. They add a sweet twist. Even other fruits like pears or berries can be great in this recipe. If you want gluten-free bars, use almond flour or gluten-free graham crackers for the crust. This keeps it tasty and safe for everyone. For a vegan option, swap out cream cheese with a plant-based cream cheese. You can use flax eggs instead of regular eggs. Just mix 1 tablespoon of flaxseed meal with 2.5 tablespoons of water for each egg. These changes make the bars great for all diets. To keep your caramel apple cheesecake bars fresh, place them in an airtight container. Use a container that fits the bars snugly to prevent movement. If you don’t have one, cover them well with plastic wrap. Store the bars in the fridge. They will stay good for about five days. This way, you can enjoy them throughout the week. If you want to freeze the bars, start by letting them cool completely. Once cool, cut the bars into squares. Wrap each square in plastic wrap and then in foil. This extra layer will help keep them fresh. Place the wrapped bars in a freezer-safe bag or container. They can last up to three months in the freezer. When you’re ready to eat, take out the bars and let them thaw in the fridge overnight. You can serve them cold or warm them slightly in the oven. Drizzle some caramel sauce on top for extra flavor. Enjoy your delicious treat! Can I use homemade caramel sauce? Yes, you can use homemade caramel sauce. It adds a rich flavor. Just ensure it cools before drizzling. Store-bought works too, but the homemade version feels special. How do I know when the cheesecake is done baking? Look for set edges and a slight jiggle in the center. The cheesecake continues to cook as it cools. If it looks too soft, bake a few more minutes. Avoid overbaking, as it can crack. Can I make these bars ahead of time? Absolutely! You can make these bars a day before serving. Just let them cool, chill in the fridge, and cut them just before serving. They taste even better after sitting! This blog post guided you in making delicious cheesecake bars with apples and caramel. We covered main ingredients, optional toppings, and detailed steps for preparation and baking. You learned tips for perfecting texture and flavor, plus storage and freezing methods for leftovers. As you create your own version, remember that it's all about enjoying the process. Explore flavors, experiment with ingredients, and have fun sharing your treats!
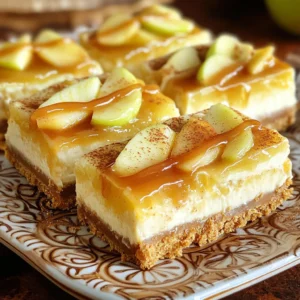
    Caramel Apple Cheesecake Bars Irresistible Dessert Treat

Posts pagination

← Newer 1 2 3 4 5 6 … 33 Older →

Footer

↑ back to top

More information

  • Dinner
  • Drinks
  • Appetizers
  • Dessert
  • About
  • Contact Us

    Our Policies

    • Privacy Policy
    • Cookie Policy
    • Copyright Policy
    • Disclaimer
    • GDPR Policy
    • Terms Of Us

    Copyright © 2024 My Saved Recipe