• Recipes
    • Dinner
    • Dessert
    • Appetizers
    • Drinks
  • About
  • Contact Us
  • Privacy Policy
menu icon
go to homepage
  • Recipes
    • Dinner
    • Dessert
    • Appetizers
    • Drinks
  • About
  • Contact Us
  • Privacy Policy

search icon
Homepage link
  • Recipes
    • Dinner
    • Dessert
    • Appetizers
    • Drinks
  • About
  • Contact Us
  • Privacy Policy

×
Savannah

Savannah

Savannah is the creative force behind My Saved Recipe, a space where food becomes both art and adventure. A passionate home chef, she delights in exploring flavors from around the world while honoring timeless classics.

Savannah’s philosophy centers on the power of food to bring people together, spark creativity, and create lasting memories. Through thoughtfully crafted recipes and practical tips, she inspires cooks of all levels to embrace fresh ingredients, experiment with confidence, and find joy in the kitchen.

  • To make a delicious Brown Sugar Cinnamon Apple Crisp, gather these items: - 4 large apples (Granny Smith or Honeycrisp), peeled, cored, and sliced - 1/2 cup brown sugar - 1 teaspoon cinnamon - 1 tablespoon lemon juice - 3/4 cup rolled oats - 1/2 cup all-purpose flour - 1/4 cup granulated sugar - 1/2 cup unsalted butter, melted - 1/4 teaspoon salt - 1/4 cup chopped walnuts or pecans (optional) - Vanilla ice cream, for serving (optional) If you want a twist, try different apples like Fuji or Braeburn. They add unique flavors. You can also swap brown sugar with coconut sugar for a lower glycemic option. For a nut-free version, leave out the nuts or use seeds like pumpkin seeds. If you need gluten-free, substitute all-purpose flour with almond flour or a gluten-free blend. Choose firm apples that are bright and fresh. Granny Smith apples give a nice tart flavor, while Honeycrisp offers sweetness and crunch. When picking apples, smell them. A sweet scent means they are ripe and tasty. Look for apples without bruises or soft spots. Start by washing and peeling the apples. You can use Granny Smith or Honeycrisp apples for this recipe. Next, core and slice the apples into thin pieces. In a large bowl, mix the sliced apples with brown sugar, cinnamon, and lemon juice. Toss them well so that every slice gets coated. This step adds flavor and helps the apples stay fresh. In another bowl, combine rolled oats, all-purpose flour, granulated sugar, and salt. Pour in the melted butter and mix everything until it looks crumbly. If you want extra crunch, add chopped walnuts or pecans. Stir these in until well combined. This topping gives your crisp that delicious crunch. Now, preheat your oven to 350°F (175°C). Spread the apple mixture evenly in a greased 9x13 inch baking dish. Next, sprinkle the oat topping over the apples. Make sure it covers them well. Bake in the oven for 30 to 35 minutes. You’ll know it's done when the apples are tender and the topping is golden brown. Let it cool for 10 minutes before serving. For a tasty treat, serve warm with a scoop of vanilla ice cream on top! To get that perfect crisp, use the right apples. I like Granny Smith or Honeycrisp. They are tart, which pairs well with the sweet topping. Slice the apples thinly for even cooking. Toss them with brown sugar, cinnamon, and lemon juice. This adds flavor and keeps the apples from browning. For the topping, mix rolled oats with flour and sugar. Use melted butter to bind it all together. The mix should be crumbly. This texture gives that ideal crisp. When you bake it, watch for a golden brown color on top. That’s when you know it’s ready. I love serving this apple crisp warm. It’s even better with a scoop of vanilla ice cream on top. The cold ice cream melts into the warm apples. The flavors mix so well. You can also try it with whipped cream or a drizzle of caramel sauce. For a fun twist, serve it with Greek yogurt. It adds a nice creaminess that complements the dish. One common mistake is using too many apples. Stick to about four large apples. Too many can make the crisp too watery. Also, don’t skip the lemon juice. It brightens the flavor and keeps apples fresh. Another mistake is overbaking. Keep an eye on your crisp. It should be bubbly and golden, but not burnt. Finally, let it cool for about ten minutes before serving. This makes it easier to scoop and enhances the flavors. {{image_2}} You can change up the crunch by using different nuts. Try almonds, pecans, or hazelnuts. Each nut adds a unique flavor and texture. I love walnuts for their rich taste. They mix well with the sweet apples and brown sugar. Chop the nuts into small pieces. This way, they blend nicely into the crisp topping. To make this dish gluten-free, swap out the all-purpose flour. Use gluten-free flour blends available in stores. You can also use almond flour or coconut flour. Both options add a nice flavor. Just check the labels to ensure they're gluten-free. This change makes the crisp safe for those with gluten allergies. Get creative with fun flavor add-ins! You can mix in dried fruits like cranberries or raisins. They add sweetness and chewiness. For a spicy kick, toss in some nutmeg or ginger. A splash of vanilla extract boosts the overall flavor. You can also add a bit of orange zest for a citrus twist. These simple changes can make your apple crisp stand out. To store your Brown Sugar Cinnamon Apple Crisp, let it cool first. Once cool, cover it tightly with plastic wrap or aluminum foil. You can also transfer it to an airtight container. This keeps the crisp fresh and tasty for up to three days in the fridge. If you want to enjoy it later, follow the next steps for freezing. When you're ready to enjoy your leftover apple crisp, preheat your oven to 350°F (175°C). Place the crisp in an oven-safe dish. Cover it with foil to prevent over-browning. Heat for about 15-20 minutes, or until warmed through. You can also microwave individual portions in a bowl for about 30-60 seconds, but the oven gives better results. If you want to freeze your apple crisp, let it cool completely. Then, cover it tightly with plastic wrap and aluminum foil. You can also use a freezer-safe container. It should stay good for about two to three months. When you want to eat it, thaw it in the fridge overnight. Bake it in the oven at 350°F (175°C) for about 30 minutes, until hot and bubbly. Enjoy the deliciousness all over again! Brown Sugar Cinnamon Apple Crisp lasts about 3 to 4 days in the fridge. Store it in an airtight container. It keeps well because of the sugar and butter. The topping may soften a bit, but it still tastes great. Yes, you can make this crisp ahead of time. Prepare it up to the baking step and cover it. Keep it in the fridge for one day. When you're ready, bake it straight from the fridge. You may need to add a few extra minutes to the baking time. You can make many tasty desserts with apples! Here are a few ideas: - Apple pie - Apple muffins - Apple cake - Baked apples with cinnamon - Apple crisp with oats and nuts Each dessert highlights the sweet and tart flavors of apples. Enjoy experimenting! This article covered the sweet world of Brown Sugar Cinnamon Apple Crisp. We explored ingredients, tips for selecting apples, and easy step-by-step instructions. I shared ways to avoid common mistakes and ensured your crisp has the best texture. Remember, you can also tweak flavors or make it gluten-free. With proper storage, your delicious crisp can last and be enjoyed later. Use these tips to impress family and friends with this warm, tasty treat. Enjoy baking, and happy eating!
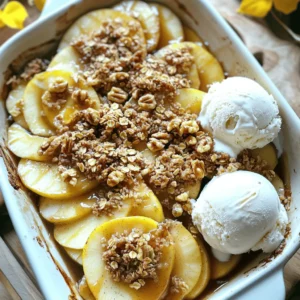
    Brown Sugar Cinnamon Apple Crisp Easy and Tasty Recipe
  • - 4 salmon fillets - 1 bunch of fresh asparagus, trimmed - 3 tablespoons olive oil - 3 cloves garlic, minced - Juice of 2 lemons - Zest of 1 lemon - Salt and pepper to taste - 1 teaspoon dried oregano - Fresh parsley, chopped (for garnish) - Additional herbs (like thyme or rosemary) - Lemon slices for garnish - Baking sheet - Mixing bowl - Measuring spoons When I prepare Lemon Garlic Salmon and Asparagus, I start with fresh ingredients. Always choose bright green asparagus and firm salmon. The olive oil adds richness, while garlic gives a punch. Fresh lemons bring nice acidity, and oregano adds warmth. Salt and pepper enhance all the flavors. Using extra herbs like thyme can elevate the dish. Lemon slices are great for extra zest at the end. For equipment, a baking sheet is a must. I like a large mixing bowl for combining flavors. Measuring spoons ensure I get the amounts just right. This simple setup makes cooking fun and easy! Preheating your oven to 400°F (200°C) is very important. A hot oven helps the salmon cook evenly. It ensures the fish and asparagus roast perfectly. This step makes a big difference in your dish. Take a bunch of fresh asparagus and trim the ends. Next, arrange the asparagus on a large baking sheet in a single layer. Drizzle 2 tablespoons of olive oil over the spears. Sprinkle salt and pepper to taste. Toss the asparagus to coat it well. This helps bring out its natural flavor. In a small bowl, mix together 3 cloves of minced garlic, the juice of 2 lemons, and the zest of 1 lemon. Add 1 tablespoon of olive oil, salt, and pepper to your mix. Then, add 1 teaspoon of dried oregano. This lemon garlic marinade will add a zesty punch to your salmon. Spoon it evenly over the salmon fillets. Place the salmon fillets next to the asparagus on the baking sheet. Make sure there is space between them. This allows for even cooking. Roast everything in your preheated oven for about 12-15 minutes. The salmon is done when it flakes easily with a fork. The asparagus should be tender but still bright green. After removing from the oven, let it rest for a minute. Garnish with fresh parsley for extra flair before serving. To check if the salmon is done, use a fork. If it flakes easily, it's ready. You want to avoid overcooking. Salmon can dry out fast, so keep an eye on it. Aim for a cooking time of 12 to 15 minutes at 400°F. You can also use a meat thermometer. The internal temperature should reach 145°F. Marinating the salmon boosts its taste. Mix the lemon juice, zest, garlic, and olive oil for a great marinade. Let the salmon sit in this mix for 15 to 30 minutes. For more flavor, add spices like smoked paprika or cumin. Fresh herbs like dill or thyme also work well. This dish pairs well with rice or quinoa. A light salad with mixed greens is a good choice, too. For a colorful plate, add cherry tomatoes or roasted bell peppers. When plating, arrange the salmon and asparagus neatly. Garnish with fresh parsley and lemon wedges for a bright touch. {{image_2}} You can cook Lemon Garlic Salmon and Asparagus in different ways. Grilling the salmon adds a smoky flavor. To grill, preheat your grill to medium-high. Place the salmon on the grill and cook for about six to eight minutes per side. Keep an eye on it to avoid overcooking. For the asparagus, you can use a skillet to pan-sear. Heat some olive oil over medium heat. Add the asparagus and cook for about five to seven minutes. Stir often for even cooking. This method gives the asparagus a nice char and keeps it crisp. You can switch up the fish if you wish. Trout or tilapia works well in this dish. They both have a mild flavor, similar to salmon. You can also choose seasonal veggies based on what is fresh. Try broccoli, green beans, or zucchini for a fun twist. Each vegetable adds its unique taste to the meal. For those who need gluten-free options, this recipe fits perfectly. All the ingredients are naturally gluten-free. If you're watching carbs, serve the salmon with a side salad instead of asparagus. You can use leafy greens like spinach or arugula. This keeps the dish light and healthy without losing flavor. To keep your lemon garlic salmon and asparagus fresh, store leftovers in the fridge. Place the food in an airtight container. This helps keep out moisture and air. Use the leftovers within three days for the best taste. - Make sure the salmon and asparagus are cool before sealing them. - Label the container with the date you made the dish. You can freeze salmon and asparagus if you want to save them longer. But note that freezing changes the texture a bit. Wrap each piece tightly in plastic wrap. Then, put them in a freezer bag. Remove as much air as possible. - Use a freezer-safe container to avoid freezer burn. - You can freeze leftovers for up to three months. When you're ready to eat, reheating is key for great flavor. The best way is to use the oven. Preheat it to 350°F (175°C). Place the salmon and asparagus on a baking sheet. Cover them with foil to keep moisture in. Heat for about 10-15 minutes until warmed through. - You can also use the microwave but watch closely to avoid drying out. - For best results, heat in small batches to keep the quality up. Yes, you can prepare this dish ahead of time. To save time, chop the garlic and zest the lemons a day before. You can also marinate the salmon in the lemon garlic mix for up to two hours before cooking. Store everything in the fridge until you are ready to cook. This dish pairs well with several sides. Consider serving it with: - Quinoa or rice for a hearty touch. - A fresh salad with mixed greens and a light vinaigrette. - Garlic bread or crusty rolls for some texture. To check if the salmon is ready, look for these signs: - The fish should flake easily with a fork. - It should change from bright pink to a pale, opaque color. - If you have a food thermometer, aim for an internal temperature of 145°F (63°C). Yes, frozen salmon works well. Thaw it overnight in the fridge before cooking. If you need to cook it from frozen, add a few extra minutes to the cooking time. Just make sure the salmon reaches the right temperature and flakes easily. This blog post has shared a simple and delicious recipe for Lemon Garlic Salmon with Asparagus. You learned about key ingredients, equipment needed, and step-by-step cooking instructions. We also explored tips for perfecting your dish and variations to try. As you cook, remember to enjoy the process. With practice, you will master this dish and impress your diners. Enjoy your healthy meal!
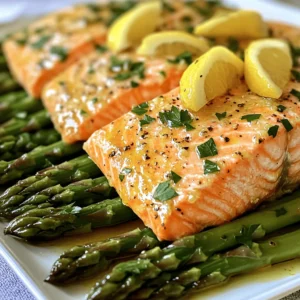
    Lemon Garlic Salmon and Asparagus Flavorful Dish
  • To make this Spicy Sausage Tomato Gnocchi Skillet, gather these fresh and flavorful ingredients: - 1 pound spicy Italian sausage, casings removed - 1 tablespoon olive oil - 1 medium onion, diced - 3 cloves garlic, minced - 1 can (14 oz) diced tomatoes with juices - 1 cup vegetable broth - 1 pound potato gnocchi (store-bought) - 1 teaspoon smoked paprika - 1 teaspoon red pepper flakes (adjust to taste) - 2 cups fresh spinach - Salt and pepper, to taste - Fresh basil leaves, for garnish - Grated Parmesan cheese, for serving Using quality ingredients makes a big difference in flavor. The spicy Italian sausage brings heat, while the diced tomatoes add sweetness. I love the smooth texture of potato gnocchi—they soak up the sauce perfectly. Don't forget the fresh spinach! It adds color and nutrients. When picking spices, smoked paprika adds depth, and red pepper flakes let you control the heat. Fresh basil and Parmesan cheese elevate the dish, making it feel gourmet. Make sure to have everything ready before you start cooking. This dish comes together quickly, and having your ingredients prepped will keep the process smooth and fun. Enjoy cooking! - First, heat 1 tablespoon of olive oil in a large skillet over medium-high heat. - Add 1 pound of spicy Italian sausage, breaking it apart with a spatula. Cook until it is browned, which takes about 5 to 7 minutes. - Once the sausage is browned, add 1 medium diced onion. Cook until it softens, about 3 to 4 minutes. - Next, stir in 3 cloves of minced garlic. Cook for just 1 more minute until you smell the garlic. - Now, pour in 1 can of diced tomatoes with their juices and 1 cup of vegetable broth. - Mix in 1 teaspoon of smoked paprika and 1 teaspoon of red pepper flakes. Bring this mixture to a simmer. - When the sauce is simmering, add 1 pound of potato gnocchi. Stir well to make sure the gnocchi are in the sauce. - Cover the skillet and let it cook for 5 to 7 minutes. This will make the gnocchi tender. - After the gnocchi are tender, stir in 2 cups of fresh spinach. Cook for another 1 to 2 minutes until wilted. - Season with salt and pepper to taste. - Finally, remove the skillet from the heat and let it sit for a couple of minutes to thicken. Serve it hot! - Adjusting spiciness with red pepper flakes: Start with one teaspoon. Taste the dish. If you want more heat, add more. You can easily control the spice level this way. - Using fresh herbs for garnish: Fresh basil adds a nice touch. It brightens the dish. Just tear the leaves and sprinkle them on top before serving. - Best practices for browning sausage: Use medium-high heat. Break the sausage into small pieces. Cook until brown, about 5-7 minutes. This gives a nice flavor and texture. - Ensuring gnocchi is tender without overcooking: Add the gnocchi to the sauce and cover the skillet. Cook for 5-7 minutes. Stir gently to avoid breaking the gnocchi. They should be soft yet firm. - Pairing with side dishes or salads: This dish goes well with a fresh green salad. A simple arugula salad adds a nice peppery bite. Garlic bread also complements the flavors well. - Recommended wine pairings: A medium-bodied red wine works best. Try a Chianti or a Grenache. These wines match the spiciness and richness of the dish. {{image_2}} If you need gluten-free options, choose gnocchi made from rice or corn flour. These work great and keep the dish tasty. For a vegetarian or vegan version, swap the sausage with plant-based sausage or mushrooms. You can also use vegetable broth to keep it vegan-friendly. Feel free to change the sausage type! Chicken or turkey sausage adds lean protein. If you want to experiment, try adding spicy chorizo for a kick. You can also toss in more veggies like bell peppers, zucchini, or mushrooms. These add color and nutrition to your dish! To keep your Spicy Sausage Tomato Gnocchi Skillet fresh, start by letting it cool. Once it’s cool, transfer it to an airtight container. Store it in the refrigerator for up to three days. If you want to save it for longer, you can freeze it. For freezing, use a freezer-safe container. This dish can last in the freezer for up to three months. When you're ready to enjoy leftovers, you have two great options. The stove method is best for keeping the texture. Just heat a skillet over medium heat, add a splash of broth or water, then add the skillet mixture. Stir until warmed through. The microwave is quick, but it can change the texture. If using the microwave, place your portion in a bowl. Heat in 30-second bursts, stirring in between, until hot. Yes, you can use frozen gnocchi. To cook frozen gnocchi, add it straight into the simmering sauce. There is no need to thaw. The cooking time may increase by a few minutes. Make sure the gnocchi floats to the top to know it's done. This method keeps your dish quick and easy. The spice level depends on your taste. This dish uses spicy Italian sausage and red pepper flakes. If you prefer less heat, reduce the red pepper flakes. You can also opt for mild sausage. The beauty of this recipe is that you can adjust it just how you like. If you want a different flavor, consider these options: - Ground turkey or chicken. - Vegan sausage for a plant-based choice. - Crumbled tempeh or mushrooms for texture. These substitutes keep the dish hearty and flavorful. This blog post covered how to make a tasty dish featuring sausage and gnocchi. We explored key ingredients, step-by-step instructions, and tips for enhancing flavor. I shared ways to modify the recipe for dietary needs and offered storage tips for leftovers. Cooking should be fun and easy. Don't hesitate to experiment and make this dish your own. Enjoy the cooking journey and share it with others!
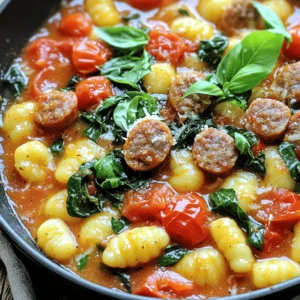
    Spicy Sausage Tomato Gnocchi Skillet Delight
  • To make Peanut Butter Cup Overnight Oats, gather these items: - 1 cup rolled oats - 2 cups almond milk (or any milk of your choice) - 2 tablespoons peanut butter - 2 tablespoons cocoa powder - 1 tablespoon maple syrup (or honey) - 1 teaspoon vanilla extract - A pinch of salt - 2 tablespoons dark chocolate chips (optional) - Sliced banana or strawberries for topping You can easily swap some ingredients for others: - Use any milk you prefer, like oat or soy milk. - Instead of peanut butter, try almond or cashew butter. - For cocoa powder, use carob powder for a different flavor. - You can replace maple syrup with agave nectar or sugar. - If you don’t have dark chocolate chips, skip them or use milk chocolate. Each ingredient adds value to your meal: - Rolled oats provide fiber and keep you full longer. - Almond milk is lower in calories than regular milk. - Peanut butter adds protein, which helps build muscle. - Cocoa powder is rich in antioxidants and may boost mood. - Maple syrup gives natural sweetness with some vitamins. - Vanilla extract adds flavor and may have calming effects. - Salt helps balance sweetness and enhance flavors. - Dark chocolate chips offer a treat with health benefits in moderation. - Bananas or strawberries add vitamins and natural sweetness to your oats. To make Peanut Butter Cup Overnight Oats, start by gathering your ingredients. You will need rolled oats, almond milk, peanut butter, cocoa powder, maple syrup, vanilla extract, and a pinch of salt. For a treat, add dark chocolate chips. 1. Take a large mixing bowl or jar. 2. Pour in 1 cup of rolled oats and 2 cups of almond milk. 3. Add 2 tablespoons of peanut butter and 2 tablespoons of cocoa powder. 4. Stir in 1 tablespoon of maple syrup and 1 teaspoon of vanilla extract. 5. Sprinkle in a pinch of salt. 6. Mix everything well until you have no clumps. Mixing is key for good texture. Use a whisk for a smooth blend. If you see lumps of cocoa or peanut butter, keep stirring. If you want a richer taste, fold in 2 tablespoons of dark chocolate chips. After mixing, divide the oats into two jars or bowls. Seal them tightly. This keeps the oats fresh and ready to eat. Refrigerate the jars overnight or for at least 6 hours. This lets the oats soak up the milk and flavors. When you’re ready to eat, stir the oats. If they seem too thick, add a splash of almond milk to loosen them up. Top your oats with sliced bananas or strawberries. For extra richness, drizzle more peanut butter on top. Enjoy your creamy, tasty Peanut Butter Cup Overnight Oats right away! You can make your Peanut Butter Cup Overnight Oats even better with tasty toppings. Some great options are: - Sliced bananas - Fresh strawberries - Chopped nuts - Drizzle of honey or maple syrup - Extra chocolate chips These toppings add texture and flavor. They can also make your breakfast look beautiful. Mix and match to find your favorite combo! For the perfect texture, follow a few simple steps. First, use rolled oats instead of instant oats. Rolled oats absorb liquid better. Second, make sure to mix all ingredients well. This avoids clumps of cocoa or peanut butter. If the oats feel too thick in the morning, just add a splash of milk. Stir until it reaches the creaminess you want. Meal prep can save you time in the morning. Make a larger batch of overnight oats for the week. Store them in separate jars. This way, you grab one and go! You can also prepare the oats the night before when you plan to have a busy day. Just remember to put them in the fridge overnight. {{image_2}} You can switch peanut butter for other nut butters. Almond butter, cashew butter, or sunflower seed butter work great. Each nut butter brings its own taste. Almond butter adds a light nutty flavor. Cashew butter is creamier and sweeter. Sunflower seed butter is a fun choice for nut allergies. Just keep the same amount as the recipe calls for. You have many milk options. Almond milk is popular, but try oat milk or coconut milk. Each type of milk changes the taste and creaminess. Oat milk adds a smooth texture. Coconut milk gives a tropical twist. If you like dairy, whole milk or skim milk works too. Use what you have on hand for a quick meal. Adding flavors makes the oats exciting. You can stir in cinnamon for warmth. Chia seeds add extra fiber and protein. For a sweeter taste, add a bit more maple syrup or honey. Want crunch? Toss in nuts or granola. You can also mix in dried fruits like raisins or cranberries. Get creative and find what you love! To keep your peanut butter cup overnight oats fresh, always use airtight containers. Glass jars work well, as they seal tightly and let you see the oats. If you make a big batch, divide the mixture into smaller jars. This way, you can grab a jar easily for breakfast. Your oats will stay good in the fridge for about 3 to 5 days. After that, they may lose flavor and texture. Always check for any odd smells or changes in color before eating them. If they look or smell off, it is best to toss them. You can freeze your overnight oats if you want to store them for longer. Just put them in freezer-safe jars. When you want to eat them, move a jar to the fridge the night before. They will thaw slowly and be ready to enjoy in the morning. Make sure to leave a little space in the jar for expansion as they freeze. Yes, you can easily make this recipe vegan. Use almond milk or any plant-based milk you like. Instead of honey, use maple syrup. This way, the recipe stays delicious and vegan-friendly. To adjust the sweetness, simply add more or less maple syrup. Start with one tablespoon. Taste the mixture and decide if you need more sweetness. You can also use ripe bananas to add natural sweetness. You can use many toppings for your oats. Here are some tasty ideas: - Chopped nuts like almonds or walnuts - Shredded coconut - Fresh berries like blueberries or raspberries - A sprinkle of cinnamon - A dollop of yogurt Feel free to mix and match toppings to suit your taste! In this article, we explored the key ingredients for delicious overnight oats and their benefits. I shared step-by-step instructions, plus tips for great texture and storage. You learned how to enhance flavors with toppings and explore variations with nut butters and milks. Remember, customizing your oats can bring fun to your breakfast. With proper storage, your oats can last long and stay fresh. Enjoy making your perfect oat creation, and don't hesitate to experiment! Your healthy breakfast adventure starts now.
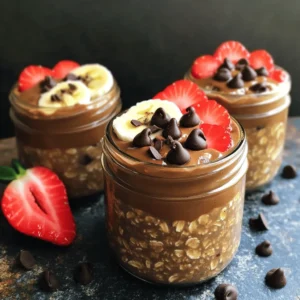
    Peanut Butter Cup Overnight Oats Easy Breakfast Delight
  • - 2 medium sweet potatoes, peeled and diced - 1 can (15 oz) black beans, drained and rinsed - 8 small corn or flour tortillas - 1 tablespoon olive oil - 1 teaspoon cumin - 1 teaspoon smoked paprika - 1/2 teaspoon chili powder - Salt and pepper to taste - Optional toppings: - 1 avocado, sliced - 1 cup fresh cilantro, chopped - 1 lime, cut into wedges - Diced red onion - Crumbled feta cheese - Hot sauce Sweet potatoes are the star here. They add a sweet flavor and creamy texture. Black beans pack protein and fiber. Tortillas hold it all together. For seasoning, olive oil helps the sweet potatoes roast well. Cumin, smoked paprika, and chili powder bring warmth and depth. Adjust salt and pepper to your taste. When it comes to toppings, get creative! Fresh avocado adds creaminess, while cilantro gives a fresh kick. Lime juice brightens each bite, and feta brings a nice salty touch. You can also add red onion for crunch and hot sauce for heat. Enjoy mixing and matching! 1. Preheat your oven to 400°F (200°C). This step is key for roasting. A hot oven gives sweet potatoes a nice, crispy edge. 2. Prepare the sweet potatoes. Peel and dice two medium sweet potatoes into bite-sized pieces. 3. Seasoning the sweet potatoes. In a large bowl, mix the diced sweet potatoes with one tablespoon of olive oil. Add one teaspoon of cumin, one teaspoon of smoked paprika, and half a teaspoon of chili powder. Sprinkle with salt and pepper. Toss to coat evenly. 1. Roasting sweet potatoes. Spread the seasoned sweet potatoes in a single layer on a baking sheet. Roast them for about 25-30 minutes. Flip them halfway for even cooking. They should be tender and slightly brown when done. 2. Heating black beans. While the sweet potatoes roast, take a small saucepan. Add one can of black beans that you drained and rinsed. Heat over medium heat, stirring occasionally. This should take about 5-7 minutes until they warm through. 1. Warming tortillas. If you're using corn tortillas, warm them in a dry skillet. Heat them for about 30 seconds on each side. If you prefer flour tortillas, toast them lightly in the skillet too. 2. Building the tacos. Once the sweet potatoes are ready, remove them from the oven. Place a generous scoop of sweet potatoes in each tortilla. Add a scoop of black beans on top. 3. Final touches. Top your tacos with sliced avocado and fresh cilantro. Feel free to add optional toppings like diced red onion, crumbled feta cheese, or hot sauce. Squeeze fresh lime juice over everything just before serving for an extra burst of flavor. To ensure even cooking, cut the sweet potatoes into small, uniform pieces. This helps them cook at the same rate. Spread them out on the baking sheet, leaving space between each piece. Avoid stacking them, as this can cause steaming instead of roasting. To test for doneness, use a fork or knife to poke a piece. If it goes in easily, the sweet potatoes are ready. They should be soft and slightly caramelized on the edges for the best flavor. For alternative spices, try adding garlic powder or onion powder. These can add depth to the taste. Fresh herbs like thyme or oregano also work well to enhance flavor. Consider extra toppings to make your tacos pop. Diced red onion adds crunch and zest. Crumbled feta cheese brings a creamy touch. Hot sauce gives a spicy kick. Each of these toppings can elevate your taco experience. {{image_2}} You can switch out sweet potatoes if you want. Butternut squash works well. It has a similar sweet flavor. You can also try regular potatoes for a different taste. For beans, black beans are my favorite. However, pinto beans or kidney beans make great swaps too. They add protein and a nice texture. You can choose between soft and crispy tacos. For soft tacos, use warmed corn or flour tortillas. For crispy tacos, bake or fry the tortillas until they are golden and crunchy. If you want a fun twist, try a taco bowl. Use a bowl instead of a tortilla. Layer sweet potatoes, beans, and toppings like avocado and cilantro. You can also make a salad. Simply toss the sweet potatoes and beans on a bed of greens. Add your favorite toppings. To keep your leftover tacos fresh, store them properly. If you have assembled tacos, wrap them tightly in foil or plastic wrap. This helps keep them from getting soggy. For unassembled tacos, keep the sweet potatoes and black beans in separate airtight containers. This way, they stay fresh longer. When you're ready to enjoy leftovers, you have a few options for reheating. - Oven: Preheat your oven to 350°F (175°C). Place the sweet potatoes and black beans on a baking sheet. Heat for about 10-15 minutes, or until warmed through. - Microwave: Place your tacos on a microwave-safe plate. Heat for about 1-2 minutes, checking halfway through. - Stovetop: Heat a skillet over medium heat. Add the sweet potatoes and black beans, stirring until warm. This method adds a nice crisp to the tacos. These methods help keep the flavors bright and delicious! Can I make these tacos vegan? Yes, these tacos are already vegan! The sweet potatoes and black beans are plant-based. You can add toppings like avocado and cilantro for more flavor. What sides pair well with these tacos? Many sides go well with these tacos. Try a simple salad with lime dressing. You can also serve tortilla chips and salsa. A side of corn or a fresh fruit salad works too. How can I make these tacos gluten-free? To make these tacos gluten-free, use corn tortillas instead of flour. Check the package to ensure they are certified gluten-free. This way, you can enjoy your tacos without worry. In this post, we explored how to make sweet potato black bean tacos. We looked at key ingredients, seasoning, cooking steps, and storage tips. You can mix flavors and make the dish your own. Remember, these tacos are easy to customize. You can swap ingredients and try new toppings. Enjoy this tasty meal any way you like!
    Savory Sweet Potato Black Bean Tacos Easy Recipe
  • - 2 cups all-purpose flour - 1 tablespoon baking powder - 1/2 teaspoon salt - 1/4 teaspoon black pepper - 1/2 cup cold unsalted butter, cubed - 1 cup shredded sharp cheddar cheese - 1/4 cup fresh chives, chopped - 3/4 cup buttermilk To make these cheddar chive biscuits, gather all your ingredients first. This helps you stay organized and makes cooking easier. Start with all-purpose flour. It gives the biscuits a nice texture. You will also need baking powder. This is the key to fluffy biscuits. Salt and black pepper add taste. Cold unsalted butter is very important. It makes the biscuits flaky and soft. Cut it into small cubes. This helps it mix better with the flour. Next, we have sharp cheddar cheese. It adds a bold flavor. Use fresh shredded cheese for the best results. Then, chop fresh chives. They give a nice green color and a fresh taste. Finally, you will need buttermilk. It adds moisture and makes the biscuits tender. If you don’t have buttermilk, you can make a quick substitute. Mix regular milk with a little vinegar or lemon juice. Having these ingredients ready will set you up for success. You will be one step closer to making delicious cheddar chive biscuits! 1. Preheat your oven to 425°F (220°C). Line a baking sheet with parchment paper. This helps the biscuits bake evenly and not stick. 2. In a large bowl, whisk together 2 cups of all-purpose flour, 1 tablespoon of baking powder, 1/2 teaspoon of salt, and 1/4 teaspoon of black pepper. Mixing these dry ingredients is key for a good rise. 3. Next, add 1/2 cup of cold, cubed unsalted butter to the flour mix. Use a pastry cutter or your fingers. Blend until the mixture looks like coarse crumbs. Cold butter makes the biscuits fluffy. 4. Stir in 1 cup of shredded sharp cheddar cheese and 1/4 cup of chopped fresh chives. Make sure they mix evenly. The cheese and chives add great flavor. 5. Gradually pour in 3/4 cup of buttermilk. Stir gently until the dough starts to come together. Avoid overmixing to keep your biscuits light and airy. 6. Turn the dough onto a floured surface. Knead it gently a few times until it's smooth. Pat it into a rectangle about 1-inch thick. 7. Use a biscuit cutter or a glass to cut out round biscuits. Place them on the prepared baking sheet. Gather any scraps and cut out more biscuits. 8. Bake in the preheated oven for 12-15 minutes. They should be golden brown on top. 9. Once done, take them out and let them cool slightly. Enjoy them warm for the best taste! - Importance of cold butter: Cold butter is key for fluffy biscuits. It helps create steam during baking, which makes the biscuits rise. When you mix cold butter into the flour, it stays in small chunks. This gives your biscuits a light and airy texture. Always keep your butter cold until you are ready to use it. - Don't overmix the dough: Mixing should be gentle. Overmixing the dough can make your biscuits tough. When adding buttermilk, stir just until the mixture comes together. A few lumps are okay. This keeps your biscuits soft and fluffy. - Suggestions for cheese alternatives: While sharp cheddar adds a great taste, you can try other cheeses too. Gruyère or fontina will give a creamy texture. If you want a bite, use pepper jack for a spicy kick. - Adding spices or herbs: Experiment with flavors! Garlic powder or smoked paprika can add depth. You can also try adding fresh herbs like parsley or dill for a unique twist. Each choice can change the whole taste of your biscuits. - Serving suggestions for best presentation: Serve your biscuits warm for the best taste. Place them in a basket lined with a cloth or parchment paper. This keeps them warm and looks inviting. Add a sprinkle of chopped chives on top for color. It makes your biscuits not only taste great but look beautiful too! {{image_2}} You can easily mix up this recipe to suit your taste. Try using different herbs. For example, parsley or dill can add fresh flavors. You can also add cooked bacon or ham for a meaty twist. Just chop the bacon or ham into small pieces and mix them into the dough. This adds a savory depth to each bite. If you want a gluten-free version, you can swap out the all-purpose flour. Use a gluten-free flour blend instead. Look for one that has xanthan gum. This helps mimic the texture of regular flour. You might also need to adjust the liquid slightly, as gluten-free flour can absorb more moisture. For a vegan twist, replace the butter and buttermilk. Use vegan butter instead of regular butter. For the buttermilk, mix plant-based milk with a little vinegar or lemon juice. Let it sit for a few minutes to curdle. This gives you a nice dairy-free alternative that works well in this recipe. To keep your leftover biscuits fresh, store them in an airtight container. You can use a plastic container or a resealable bag. This helps prevent them from drying out. You can store the biscuits in the fridge for up to four days. If you want to keep them longer, freezing is the best option. Wrap each biscuit in plastic wrap and place them in a freezer bag. They can last up to three months in the freezer. When you're ready to enjoy your biscuits again, reheating is easy. The best method is to use an oven. Preheat your oven to 350°F (175°C). Place the biscuits on a baking sheet and warm them for about 10 minutes. This keeps them fluffy and tasty. You can also use a microwave if you're in a hurry. Just heat them for about 15-20 seconds. But, be careful. Microwaving too long can make them tough. Enjoy your biscuits warm for the best flavor! Can I make the dough ahead of time? Yes, you can make the dough ahead of time. After mixing it, wrap the dough in plastic wrap. Store it in the fridge for up to 24 hours. This way, you can bake fresh biscuits when you want. How do I know when the biscuits are done? Look for a golden-brown top. The biscuits should also feel firm to the touch. You can poke one with a toothpick. If it comes out clean, they are ready. Can I use milk instead of buttermilk? Yes, you can use milk instead of buttermilk. To make it similar, add a teaspoon of vinegar or lemon juice to the milk. Let it sit for five minutes before using. This will give you a similar tangy taste. You now have all you need to make perfect cheddar chive biscuits. We covered the ingredients, step-by-step instructions, and useful tips to ensure your biscuits turn out fluffy and delicious. You can also explore variations to suit your tastes and choose how to store them. Remember, using cold butter and not overmixing is key. With these guidelines, you can enjoy warm biscuits anytime. Try out these recipes, and make them your own!
    Cheddar Chive Biscuits Simple and Fluffy Recipe
  • - 1 medium head of cauliflower - 1/2 cup all-purpose flour - 1/2 cup milk (dairy or plant-based) - 1 cup breadcrumbs - 1/2 cup buffalo sauce - Salt and pepper - 1 teaspoon garlic powder - 1 teaspoon onion powder - 1 teaspoon smoked paprika - 8 small corn or flour tortillas - 1 cup shredded lettuce - 1 ripe avocado - Crumbled blue cheese or goat cheese (optional) - Fresh cilantro or green onions To make these buffalo cauliflower tacos, you need simple ingredients. Start with a medium head of cauliflower. Cut it into florets for even cooking. The batter for the cauliflower uses flour and milk. You can choose dairy or plant-based milk. Add garlic powder, onion powder, smoked paprika, salt, and pepper to the mix. Coat each floret in the batter before rolling them in breadcrumbs. This gives your tacos a crunchy texture. The buffalo sauce adds a spicy kick, so adjust it to your taste. For serving, warm your tortillas in a skillet. Then, fill them with the crispy cauliflower. Top with crunchy lettuce and creamy avocado slices. If you like, sprinkle some cheese on top. Fresh cilantro or green onions make great garnishes too. These ingredients blend well for a tasty meal. Enjoy making these simple yet delicious tacos! - Whisk together the flour, milk, garlic powder, onion powder, smoked paprika, salt, and pepper. Mix until smooth. - Cut the cauliflower into bite-sized florets. This helps them cook evenly. - Dip each floret into the batter. Let the excess batter drip off. - Coat the florets with breadcrumbs. Press lightly to ensure they stick well. - Preheat your air fryer to 375°F (190°C). This step is key for crispiness. - Place the coated cauliflower in a single layer in the air fryer basket. Cook for 10-12 minutes. Shake the basket halfway through for even cooking. - Once cooked, transfer the cauliflower to a large bowl. - Toss the cauliflower with buffalo sauce until each piece is well coated. - While the cauliflower cooks, heat the tortillas in a dry skillet over medium heat. Cook for about 30 seconds on each side until warm and pliable. - Place a generous amount of buffalo cauliflower in the center of each tortilla. - Top with shredded lettuce, avocado slices, and crumbled cheese if you like. - Finish with fresh cilantro or green onions to add flavor. Serve immediately! - Adjust buffalo sauce to taste. Start with half a cup and add more if needed. - Use panko for extra crunch. It gives a nice texture you will love. - Ensure even cooking with single-layer placement. This lets hot air circulate well. - Shake the basket halfway for best results. It helps cook all sides evenly. - Pair with sides like quinoa or salad. They balance the heat of the tacos. - Recommended dips for added flavor include ranch or blue cheese dressing. These can complement the spicy buffalo sauce nicely. {{image_2}} You can easily make these tacos dairy-free. Just swap regular milk for plant-based milk. Almond or oat milk works great. If you want cheese, try a dairy-free cheese. This keeps the creamy taste without the dairy. Do you like it mild or fiery? For less heat, use a milder buffalo sauce. You can also mix in a bit of ranch for creaminess. If you love spice, add more hot sauce or cayenne pepper. This step lets you control the kick in your meal. Toppings can change your taco game! Add fresh tomatoes, chopped onions, or spicy jalapeños. Each brings a new taste and texture. You can also use fresh herbs like cilantro or parsley. This adds flavor and color to your dish. To store leftovers, place your tacos in an airtight container. You can keep them in the fridge for up to three days. To maintain flavor, avoid adding toppings like avocado and cheese until you are ready to eat. This keeps everything fresh and tasty. Can you freeze buffalo cauliflower? Yes, you can freeze the buffalo cauliflower without the tortillas. Place it in a freezer-safe container. When you want to eat it, thaw it overnight in the fridge. To reheat after freezing, simply pop it back in the air fryer at 375°F (190°C) for about 5 to 7 minutes. This brings back the crunch. How long do the tacos last in the fridge? They last about three days. Look for signs of spoilage like a sour smell or discoloration. If anything seems off, it’s best to throw it away. Enjoy your tacos while they are fresh for the best flavor! You can easily add heat to your tacos. Here are some options: - Use a hotter buffalo sauce. - Add cayenne pepper to the batter. - Mix in diced jalapeños with the cauliflower. - Top with spicy salsa or hot sauce. These changes will boost the flavor and spice level. Just be careful not to go overboard. Yes, you can make these tacos gluten-free with some easy swaps: - Replace all-purpose flour with gluten-free flour. - Use gluten-free breadcrumbs, like crushed rice or corn flakes. - Check that your buffalo sauce is gluten-free. These swaps keep the flavor while making the dish safe for gluten-free eaters. The prep time for these tacos is about 15 minutes. Cooking them takes around 10 to 12 minutes. In total, you can make these tasty tacos in about 30 minutes. This makes them a quick meal option for any night! This blog post shared a simple and tasty recipe for Air Fryer Buffalo Cauliflower Tacos. We covered the main and extra ingredients you need and walked through the step-by-step process. I also offered tips to enhance flavor and storage advice to keep leftovers fresh. These tacos are easy to make and can cater to different diets. Enjoy your cooking adventure with this flavorful dish that's sure to please!
    Air Fryer Buffalo Cauliflower Tacos Tasty and Simple
  • - 2 cups cooked brown rice - 4 cups fresh broccoli florets - 1 cup shredded sharp cheddar cheese - 1 cup cream of mushroom soup (or homemade) - 1/2 cup sour cream - 1/2 cup milk - 1/2 teaspoon garlic powder - 1/2 teaspoon onion powder - 1/4 teaspoon black pepper - 1/4 teaspoon salt - 1/2 cup breadcrumbs (optional) - 2 tablespoons olive oil Gather these simple ingredients to create a warm and cheesy dish. Brown rice adds a hearty base, while broccoli brings color and nutrition. Sharp cheddar cheese melts beautifully, making every bite creamy and rich. Cream of mushroom soup enhances the flavor, adding a savory depth. Sour cream and milk keep the mixture moist and smooth. For seasoning, garlic and onion powder add a hint of zest, while salt and black pepper balance the flavors. The optional breadcrumbs can create a crunchy topping. When combined, these ingredients make a comforting meal that the whole family will love. - Preheat the oven to 350°F (175°C). - In a large mixing bowl, combine: - 2 cups cooked brown rice - 4 cups fresh broccoli florets - 1 cup shredded sharp cheddar cheese - 1 cup cream of mushroom soup - 1/2 cup sour cream - 1/2 cup milk - 1/2 teaspoon garlic powder - 1/2 teaspoon onion powder - 1/4 teaspoon black pepper - 1/4 teaspoon salt Mix these well until everything blends nicely. This mix creates a creamy base with great flavor. - Lightly grease a 9x13-inch baking dish with olive oil. - Pour the mixture into the dish. Spread it out evenly. - If you want a crunchy topping, mix 1/2 cup breadcrumbs with a tablespoon of olive oil. Sprinkle this over the casserole. - Cover the dish with aluminum foil. This keeps it moist while baking. - Bake for 25 minutes. - After 25 minutes, remove the foil. Bake for another 15 minutes. Look for a golden brown top. You want it bubbly and inviting. Once done, let it cool for 5 minutes before serving. Enjoy every bite! To cook rice perfectly, use the right water ratio. For brown rice, use 2.5 cups of water for every cup of rice. Bring it to a boil, then cover and simmer. For about 45 minutes, let it cook. Steaming broccoli is easy. Cut it into small florets. Boil water and place the florets in a steamer. Steam for three to five minutes. The broccoli should be bright green and tender but still crisp. Spice up your casserole! Add a pinch of thyme or oregano. A dash of paprika can also enhance the taste. You can even try a little red pepper for heat. If you want different cheese flavors, try mozzarella or gouda. Cream cheese can add a rich touch. Mix cheeses for depth and fun flavors. Pair this casserole with a fresh side salad. A light vinaigrette will balance the rich cheese. Serve it with grilled chicken or fish for protein. For presentation, garnish with chives or parsley. A sprinkle of paprika can add color. Serve hot in individual bowls for a cozy meal. {{image_2}} If you want to make a gluten-free version of the casserole, it's easy. First, use gluten-free cream of mushroom soup. Many brands offer this option. It keeps the same creamy taste without gluten. Next, you can substitute the breadcrumbs. Use gluten-free alternatives like crushed rice cereal or almond flour. This gives your casserole a nice crunch without any gluten. For a vegetarian twist, you can add other vegetables. Carrots and bell peppers fit well in this dish. Just chop them small and mix them in. They add color and extra nutrients. You can also swap regular cheese for plant-based cheese. This makes it dairy-free while still giving you that cheesy flavor. Many brands now make great-tasting vegan cheese. Prep time is key if you want to enjoy this dish on busy days. You can make it ahead of time. Just mix all the ingredients as directed. Then, cover it and place it in the fridge. It will stay fresh for a few days. If you want to store it longer, freeze it! After mixing, put it in a freezer-safe dish. When you're ready to eat, let it thaw overnight in the fridge. Then, bake it as usual. This way, you'll always have a comforting meal ready to go. To store leftovers, let the casserole cool first. Then, cover it tightly with plastic wrap or foil. You can also use an airtight container. This keeps the casserole fresh. In the fridge, it lasts for about 3 to 5 days. Always check for any signs of spoilage before eating. For freezing, cool the casserole completely. Cut it into portions for easy use later. Wrap each portion tightly in plastic wrap, then foil. This helps prevent freezer burn. You can also use freezer-safe containers. The casserole stays good for about 2 to 3 months. When you're ready to eat, thaw the casserole in the fridge overnight. You can reheat it in the oven at 350°F (175°C) until hot. Stir it halfway through to heat evenly. If using the microwave, cover it to keep moisture in. Enjoy your tasty meal! The best cheese for this dish is sharp cheddar. It adds a great flavor. You can also use mild cheddar for a creamier taste. If you want a mix, combine both types. Mixing cheeses gives depth to your casserole. Try adding mozzarella for extra stretch or gouda for a smoky twist. Yes, you can use different types of rice. While I love brown rice for its nutty flavor, white rice works well too. White rice cooks faster and has a softer texture. Wild rice is another option. It has a unique taste and chewy texture. Just remember to adjust cooking times based on the type of rice you choose. You’ll know the casserole is done when it is golden brown on top. The edges should be bubbly and the center hot. You can use a fork to check the texture. It should be creamy and not runny. Let it cool for a few minutes before serving. This helps the flavors meld together and makes it easier to serve. This blog post covered how to make a delicious broccoli rice casserole. You learned about the key ingredients, step-by-step instructions, and helpful tips. We discussed variations for dietary needs and storage methods. Remember, cooking can be fun and rewarding. Feel free to experiment with flavors and ingredients. Enjoy making the casserole and sharing it with friends and family. It's a great dish for any occasion!
    Cheesy Broccoli Rice Casserole Comforting Family Meal
  • For a tasty beef stroganoff, you'll need: - 1.5 pounds beef chuck roast, cut into bite-sized pieces - 1 onion, finely chopped - 3 cloves garlic, minced - 8 ounces mushrooms, sliced - 2 cups beef broth - 1 tablespoon Worcestershire sauce - 1 teaspoon dried thyme - Salt and pepper to taste - 1 cup sour cream These ingredients create a rich and hearty dish. The beef chuck roast gives a tender texture. The onion and garlic add a sweet flavor, while mushrooms bring an earthy taste. Worcestershire sauce adds depth, and thyme gives a hint of freshness. For the egg noodles, gather: - 12 ounces egg noodles Egg noodles cook quickly and soak up the rich sauce well. They provide a soft base for the beef stroganoff and create a cozy meal. If you want a thicker sauce, consider using: - 2 tablespoons cornstarch (optional, for thickening) Using cornstarch helps to create a creamy and satisfying texture. You can mix it with a bit of water before adding it to the sauce. This step is optional, but it can enhance the dish's richness. Start by cutting the beef chuck roast into small, bite-sized pieces. You want them easy to eat. Next, finely chop the onion and mince the garlic cloves. Slice the mushrooms into thin pieces. These steps make the dish more flavorful. Now, in a large bowl, season the beef with salt and pepper. This adds taste to the meat. You can also prepare the beef broth and Worcestershire sauce now. Measure them out so you can add them quickly later. Begin layering in your crockpot. Place the chopped onion, minced garlic, and sliced mushrooms at the bottom. This forms a tasty base. Next, add the seasoned beef on top of the veggies. Pour the beef broth over everything. Add the Worcestershire sauce and sprinkle dried thyme on top. This combination will create a rich flavor as it cooks. Make sure all the ingredients are evenly distributed. Cover the crockpot with its lid. Cook on low for 6 to 8 hours or on high for 4 hours. The beef should be tender when done. If you want a thicker sauce, mix cornstarch with water about 30 minutes before serving. Stir it into the mixture to thicken. About 30 minutes before serving, mix in the sour cream. This adds creaminess to the dish. During the last 10 to 15 minutes, cook the egg noodles according to the package instructions. Drain and set them aside. When everything is ready, combine the noodles with the beef stroganoff or serve the sauce on top. Don’t forget to garnish with chopped parsley for a fresh touch! To get tender beef in your stroganoff, you need the right cut. I use beef chuck roast. It cooks well low and slow. Cut it into small, bite-sized pieces. Season with salt and pepper before cooking. This helps to enhance the beef’s flavor. Cook it for six to eight hours on low. This long cook time makes the beef melt in your mouth. The sauce should be creamy and rich. To get this, add sour cream about 30 minutes before serving. Stir it in well to mix. If you like a thicker sauce, use cornstarch. Mix it with a little water and add it in the last 30 minutes of cooking. This will make your sauce nice and thick. It coats the noodles perfectly. Egg noodles are a great match for beef stroganoff. Cook them just before serving. Drain them and toss them with the sauce. You can also serve the sauce on top of the noodles. For a nice touch, sprinkle fresh parsley on top. It adds color and flavor. Enjoy this cozy meal with a side salad or some crusty bread. {{image_2}} You can swap beef for other meats. Chicken works great in stroganoff. Just use boneless chicken thighs or breasts. Cook them the same way as beef. Pork is another tasty option. Use pork shoulder for a rich flavor. You can even try turkey for a lighter dish. Each protein gives a unique twist to the classic recipe. If you want a meatless meal, there are many tasty swaps. Try using mushrooms as the main ingredient. Portobello mushrooms have a great texture and flavor. You can also add lentils or chickpeas for protein. Use vegetable broth instead of beef broth. This keeps the dish hearty and satisfying. Don’t forget to stir in some sour cream or plain yogurt for creaminess. Egg noodles are a classic, but other options exist. You can use wide pasta like fettuccine or tagliatelle. They hold the sauce well and taste great. If you want a gluten-free option, try rice noodles or zucchini noodles. They add a fresh touch and are fun to eat. Choose your noodles based on your taste and dietary needs. Store leftover beef stroganoff in an airtight container. It keeps well in the fridge for 3-4 days. Make sure to let it cool to room temperature before sealing. This helps prevent moisture build-up. If you need more time, consider freezing it. Reheat beef stroganoff on the stove for best results. Use low heat and stir often. You can also microwave it in short bursts. Just cover the bowl to keep it moist. Add a splash of beef broth if it seems dry. To freeze beef stroganoff, let it cool first. Portion it into freezer-safe containers. Label each container with the date. It will last up to 3 months in the freezer. Thaw it overnight in the fridge before reheating. This keeps the flavors fresh and tasty. Yes, you can make this beef stroganoff ahead of time. Just follow the recipe as usual. Once you finish cooking, let it cool. Then, store it in the fridge. This dish tastes even better the next day as the flavors blend. Just reheat it on the stove or in the microwave before serving. If you need a substitute for sour cream, try Greek yogurt. It has a similar texture and tangy flavor. You can also use cream cheese or buttermilk. Adjust the amount to your liking. Each will give a nice creaminess to the dish. To make this beef stroganoff gluten-free, use gluten-free egg noodles. Check the labels to ensure they are truly gluten-free. For thickening, replace cornstarch with a gluten-free flour mix. The rest of the recipe stays the same, and you will still enjoy a cozy meal! Beef Stroganoff is a tasty dish made with beef and creamy sauce over noodles. You learned about the main ingredients, how to prep them, and cooking tips for the best flavor. I shared variations, storage tips, and answers to common questions. Enjoy experimenting with this dish and find what you love. Cooking can be fun and simple. Try new things, and make it your own! Your kitchen is a place of joy.
    Crockpot Beef Stroganoff Egg Noodles Cozy Comfort Meal
  • To make the Apple Cider Cinnamon Stick Sangria, gather these items: - 4 cups apple cider - 1 cup sparkling water - 1/2 cup orange juice - 1/2 cup pomegranate juice - 1 apple, thinly sliced - 1 orange, thinly sliced - 1/2 cup pomegranate seeds - 4-5 cinnamon sticks You can make your sangria pop with these garnishes: - Star anise - Fresh mint leaves To keep your sangria fresh, follow these tips: - Chill the sangria for at least 1 hour. - For best flavor, let it sit for 4-6 hours. - Serve over ice to keep it cool. - Add fresh fruit just before serving for a vibrant look. Start with a large pitcher. Pour in the apple cider, sparkling water, orange juice, and pomegranate juice. Stir gently to mix everything well. The apple cider adds sweetness, while the sparkling water brings a nice fizz. This base sets the stage for our sangria. Now, it’s time to add some fun! Slice the apple and orange thinly. Toss them into the pitcher. Next, add the pomegranate seeds. These fruits brighten the drink and add color. Don’t forget to add the cinnamon sticks. They give a warm flavor. Make sure they are submerged in the liquid. Refrigerate your sangria for at least 1 hour. If you can wait, let it sit for 4-6 hours. This waiting time helps the flavors mix well. When you are ready to serve, give the sangria a gentle stir. Pour it over ice in glasses. Garnish with fresh mint leaves and a star anise if you like. Enjoy your refreshing drink! To get the best flavor, let your sangria chill. I recommend at least one hour. For deeper flavor, let it sit for 4-6 hours. This time allows the spices and fruits to blend well. Stir gently after chilling to mix everything. Remember to keep the cinnamon sticks submerged. They add a warm taste that makes the drink special. Serve your sangria cold. Pour it over ice in each glass. The ice keeps your drink refreshing. If you want it extra cold, chill your glasses too. This small step makes a big difference. Plus, it keeps the drink crisp longer. To make your sangria look amazing, use fresh mint leaves for garnish. They add a pop of green. You can also add a star anise for a touch of elegance. Slice your fruits thinly. This way, they sit nicely in the glass. Arrange them well for a beautiful look. A well-presented drink is always more inviting! {{image_2}} You can change the fruit in your sangria. Try adding berries, pears, or even kiwi. These fruits add fun colors and unique flavors. For a tropical twist, use pineapple or mango. Mixing fruits keeps it fresh and exciting. If you like it sweeter, add more orange juice or a splash of honey. For more tartness, use more pomegranate juice or a squeeze of lemon. Taste as you mix. This way, you can find the perfect balance just for you. You can enjoy this drink with or without alcohol. For an alcoholic version, add white wine or vodka. This makes it a bit more festive. If you want a non-alcoholic drink, just skip the alcohol. The flavors still shine through with the juices and spices. Store any leftover sangria in a pitcher or jar. Make sure the container has a tight lid. This keeps the flavors fresh. If you have cut fruit in it, consume it within two days. Otherwise, the fruit can get mushy. The sangria stays good for up to three days when stored well. Keep it in the fridge. The cold helps maintain its taste and freshness. If you notice a change in smell or flavor, it’s best to toss it. You can reuse some ingredients for a new batch. If you have leftover apple cider or juices, use them again. Just add fresh fruit and new cinnamon sticks. This saves waste and makes a tasty drink again. Yes, you can swap out juices in this sangria. Try using apple juice or cranberry juice. Each juice brings its own taste. This can change the drink's flavor a lot. Mix and match to find your favorite blend. Just keep the main apple cider base. I suggest letting the sangria chill for at least one hour. This gives the flavors time to mix well. For the best taste, aim for four to six hours. The longer it sits, the better it tastes. This waiting time really lets the spices shine. Yes, you can make this sangria ahead of time. Just prepare it and keep it in the fridge. This drink tastes even better after sitting. Make it the day before for the best flavor. Just remember to add the sparkling water right before serving. This keeps the bubbles fresh and lively. You’ve learned how to make delicious sangria. We covered ingredients, tips, and storage. Fresh fruits and spices are key for flavor. Remember to chill your sangria before serving. You can try many variations to suit your taste. Experiment with different fruits and juices. Lastly, store any leftovers properly for next time. Enjoy your sangria-making journey and impress your friends with your new skills!
    Apple Cider Cinnamon Stick Sangria Refreshing Drink
  • - 1 cup cottage cheese (low-fat or full-fat) - 1 cup oat flour (or blend oats into flour) - 2 large eggs - 2 tablespoons honey or maple syrup - 1 teaspoon baking powder - 1 teaspoon salt These main ingredients give the bagels their base. Cottage cheese adds protein and moisture. Oat flour helps bind everything together. Eggs provide structure. Honey or maple syrup adds sweetness. Baking powder helps them rise, while salt enhances flavor. - 1 tablespoon chia seeds Chia seeds are a great option. They boost fiber and omega-3 fatty acids. Adding them makes your bagels even healthier. You can mix them into the dough easily. - Sesame seeds - Everything bagel seasoning These toppings add flavor and crunch. Sesame seeds give a nice nutty taste. Everything bagel seasoning offers a mix of herbs and spices. You can get creative with toppings, too! Consider cream cheese, avocado, or smoked salmon for extra flavor and nutrition. First, you need to preheat your oven to 375°F (190°C). This temperature helps the bagels cook evenly. While the oven heats, line a baking sheet with parchment paper. This step prevents the bagels from sticking. It also makes cleanup easier. Next, grab a mixing bowl. Combine the cottage cheese, oat flour, eggs, honey, baking powder, and salt. Use a spatula to mix well until a dough forms. If you want, fold in the chia seeds for extra nutrition. They add fiber and a nice crunch. Make sure the mixture is smooth and well blended. Now, divide your dough into four equal parts. Shape each part into a ball. Then, make a hole in the center with your fingers. Be sure the hole is wide enough. It will shrink while baking. Place your bagels on the lined baking sheet. Brush the tops lightly with water. Sprinkle sesame seeds or your favorite seasoning on top. Bake them in your preheated oven for 20–25 minutes. They are ready when they turn golden brown and are firm to touch. Once done, let them cool on a wire rack for a few minutes before slicing. Enjoy your healthy bagels! To get the best bagel texture, focus on your dough. Make sure you mix the ingredients well. The dough should be soft but not sticky. If it feels too wet, add a bit more oat flour. When shaping the bagels, ensure the hole in the center is wide. This prevents them from closing up while baking. Once your bagels cool, store them in an airtight container. They can stay fresh for up to three days. If you want to keep them longer, freeze them. To reheat, pop them in the toaster or oven. This brings back their warm and chewy texture. You can also microwave them for a quick fix, but they may get soft. One common mistake is not measuring ingredients properly. Use measuring cups and spoons for accuracy. Another pitfall is shaping the bagels too small. They will shrink while baking, so make the holes larger. Lastly, avoid overbaking. Keep an eye on them to achieve that golden brown color. {{image_2}} You can make these bagels gluten-free. Just swap oat flour for almond flour or gluten-free flour. Almond flour adds a nutty taste. Gluten-free flour blends also work well. Always check the labels to ensure they are gluten-free. This way, you enjoy protein cottage cheese bagels without gluten. You can jazz up your bagels with different flavors. Add herbs like rosemary or thyme for a savory twist. Try garlic powder for a punch of flavor. For sweet options, mix in cinnamon or vanilla extract. You can also use different sweeteners, like agave nectar, instead of honey. Get creative and find what you like best! To make these bagels vegan, you can replace the eggs with flax eggs. Mix one tablespoon of flaxseed meal with two tablespoons of water. Let it sit for five minutes. This mix will act like eggs. Use plant-based yogurt instead of cottage cheese. These swaps keep your bagels tasty and healthy. To keep your protein cottage cheese bagels fresh, store them in an airtight container. You can leave them at room temperature for one day. After that, put them in the fridge for up to a week. This keeps them soft and tasty. If you want to enjoy them later, freezing works great. To freeze your bagels, let them cool completely first. Then, wrap each bagel tightly in plastic wrap. Place the wrapped bagels in a freezer bag or container. They last in the freezer for up to three months. When you're ready to eat, let them thaw at room temperature or pop them in the toaster. These bagels are best when fresh. If stored properly, they last about four days in the fridge. After freezing, they maintain quality for three months. However, for the best taste, eat them within a month. Enjoy these healthy bagels while they are fresh for the best flavor and texture! Protein cottage cheese bagels pack a punch! Each bagel contains about 10 grams of protein. Cottage cheese is rich in protein, making these bagels a great choice. Eggs add even more protein to the mix. If you want more protein, you can add protein powder to the dough. Just remember to adjust the liquid if needed. Yes, you can use different types of flour! If you want a gluten-free option, almond flour works well. You can also use whole wheat flour for a nuttier flavor. Just keep in mind that different flours can change the texture. Experiment to find the one you like best! To sweeten your bagels, add more honey or maple syrup. You can also mix in ingredients like cinnamon or vanilla extract for extra flavor. Want something savory? Try adding garlic powder or herbs like rosemary. Toppings like everything bagel seasoning add a fun twist too! You learned how to make tasty Protein Cottage Cheese Bagels today. We covered all key parts: ingredients, steps, tips, variations, and storage. Each section helps you bake perfect bagels at home. Remember, practice improves your skills. Don't be afraid to try new flavors or ingredients. Each bagel you make will be better than the last. Enjoy your bagels fresh or reheated, and share them with friends. Happy baking!
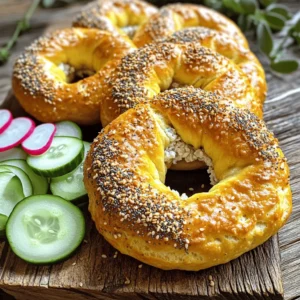
    Protein Cottage Cheese Bagels for Healthy Eating
  • To make these Chocolate Pumpkin No-Bake Truffles, you will need: - 1 cup pumpkin puree - 1 cup almond flour - 1/2 cup cocoa powder - 1/4 cup maple syrup - 1 teaspoon vanilla extract - 1 teaspoon pumpkin pie spice - 1/4 teaspoon salt - 1/2 cup dark chocolate chips (dairy-free if preferred) - 1 tablespoon coconut oil You can change up the flavors with these options: - Add a pinch of cinnamon for extra warmth. - Use white chocolate chips for a different coating. - Mix in chopped nuts for added crunch. If you need to swap ingredients, here are some ideas: - Use sunflower seed flour instead of almond flour for nut-free truffles. - Maple syrup can be replaced with honey or agave syrup. - Coconut oil can be swapped with vegetable oil if needed. These ingredients create a rich and delightful treat. Feel free to adjust them to fit your taste! To start, grab a mixing bowl. Add 1 cup of pumpkin puree. Next, mix in 1 cup of almond flour. Then, add 1/2 cup of cocoa powder. Pour in 1/4 cup of maple syrup. Don't forget 1 teaspoon of vanilla extract. Sprinkle in 1 teaspoon of pumpkin pie spice and 1/4 teaspoon of salt. Stir everything until it looks even and smooth. Now comes the fun part! Use your hands to scoop out the mixture. Roll it into small balls, about 1 inch wide. Place each ball on a baking sheet lined with parchment paper. This keeps them from sticking. You should be able to make about 12 to 15 truffles. For the chocolate coating, take a microwave-safe bowl. Add 1/2 cup of dark chocolate chips and 1 tablespoon of coconut oil. Heat it in the microwave. Do this in 30-second bursts. Stir in between each burst until the chocolate is smooth. Once melted, dip each truffle into the chocolate. Make sure it’s fully coated. Use a fork to lift it out, tapping off any extra chocolate. Place them back on the parchment paper. If you like, add a pinch of sea salt or cocoa powder on top. Finally, pop the baking sheet in the fridge for at least 30 minutes. This helps the chocolate harden. To get the right texture, make sure the pumpkin puree is thick. If it's too watery, your truffles may fall apart. Use almond flour and cocoa powder for a smooth base. Mix well until everything is even. If your mixture feels too dry, add a little maple syrup. If it's too wet, add more almond flour. When melting chocolate, use a microwave-safe bowl. Heat the chocolate chips and coconut oil in short bursts. Start with 30 seconds, then stir. Repeat until the chocolate is smooth. This method helps prevent burning. If you prefer, use a double boiler for more control. Always stir to keep the chocolate silky. For a pretty display, arrange the truffles on a nice plate. Dust them with cocoa powder or shredded coconut for flair. You can also use mini cupcake liners to hold each truffle. This makes them look festive and fun. Add a sprinkle of sea salt on top for a gourmet touch. {{image_2}} You can twist the classic chocolate pumpkin truffles with new flavors. Add a dash of cinnamon for warmth. A splash of orange juice can brighten the taste. For a richer flavor, mix in a spoonful of peanut butter or almond butter. You can also add crushed nuts for crunch and texture. Try replacing cocoa powder with carob powder for a unique taste. These simple changes can make your truffles exciting and fun. These truffles are easy to adapt. To make them vegan, ensure you use dairy-free dark chocolate. Almond flour is already gluten-free, so you're safe there. For nut-free options, try sunflower seed flour instead of almond flour. Maple syrup works well as a sweetener, keeping it vegan and gluten-free. You can enjoy these truffles without worry, even with dietary needs. Toppings can add character to your truffles. You can roll them in crushed nuts for a nice crunch. Shredded coconut gives a tropical twist. For a sweet touch, use mini chocolate chips or sprinkles. If you like a salty contrast, sprinkle sea salt on top. You can also dust them with cocoa powder for a classic finish. These toppings make your truffles not just tasty but also beautiful. To keep your Chocolate Pumpkin No-Bake Truffles fresh, store them in the fridge. Place them in a single layer inside an airtight container. This will help prevent them from sticking together. If you don't eat them right away, they can stay fresh for up to a week. For the best results, use glass or plastic containers with tight-fitting lids. These containers help keep moisture out. Avoid using paper or cardboard, as they can absorb moisture and make the truffles soggy. If you have a lot of truffles, stack them carefully to save space. You can freeze these truffles for later use. First, place them on a baking sheet lined with parchment paper. Freeze them until solid, about one hour. Then, transfer the frozen truffles to a freezer-safe bag or container. They can last for about three months in the freezer. When ready to enjoy, let them thaw in the fridge overnight. Chocolate Pumpkin No-Bake Truffles can last up to a week in the fridge. Store them in an airtight container. They stay fresh and tasty for the best flavor. If you freeze them, they can last up to three months. Just remember to let them thaw in the fridge before you enjoy them! Yes, you can make these truffles ahead of time. I often prepare them a day or two before serving. This allows the flavors to develop fully. Just keep them stored in the fridge until you're ready to serve. They make a great treat for parties or gatherings! If you need a substitute for almond flour, try using oat flour or coconut flour. Both work well in this recipe. If you use coconut flour, start with less, as it absorbs more moisture. You can also use all-purpose flour, but this will change the texture and flavor slightly. This blog covered all the needed steps for making Chocolate Pumpkin No-Bake Truffles. You learned about key ingredients, which variations to try, and smart tips for perfecting your truffles. With proper storage, you can enjoy them longer. Remember, you can make these truffles fit your taste and diet. Get creative and have fun! Make these tasty treats at your next event, and they will surely impress. Happy truffle making!
    Chocolate Pumpkin No-Bake Truffles Delightful Treat
  • - 1 lb boneless chicken thighs, cut into bite-sized pieces - 1 cup orzo pasta - 2 cups fresh spinach Chicken thighs are the star of this dish. They are juicy and tender. Orzo pasta adds a fun twist. It cooks quickly and soaks up flavors well. Fresh spinach adds a pop of color and nutrition. - 1 tablespoon olive oil - 4 cloves garlic, minced - 1 lemon, zested and juiced Olive oil brings richness to the dish. Garlic adds a warm, inviting flavor. Lemon brings brightness and acidity, balancing the meal. - ¼ cup grated Parmesan cheese - Fresh parsley, chopped - Zest of 1 lemon Parmesan cheese adds a creamy texture and salty flavor. Fresh parsley gives a fresh touch to the dish. Lemon zest enhances the lemon flavor and adds a nice aroma. Start by heating one tablespoon of olive oil in a large pot over medium heat. Once the oil shimmers, add one pound of boneless chicken thighs cut into bite-sized pieces. Season the chicken with salt and pepper to your taste. Cook the chicken for about 5-7 minutes. You want it browned on all sides. This step adds flavor and texture to your dish. Next, stir in four cloves of minced garlic. Cook it for about one minute until it becomes fragrant. This smell will make your kitchen come alive! Then, add one cup of uncooked orzo pasta to the pot. Stir it in to mix well with the chicken and garlic. Now, carefully pour in four cups of chicken broth. Add the juice and zest of one lemon. This adds a fresh, zesty flavor that brightens the dish. Sprinkle in one teaspoon of dried oregano for extra flavor. Bring everything to a boil, then reduce the heat to low. Cover the pot and let it simmer for about 10-12 minutes. The orzo should be tender and most of the liquid will be absorbed. After the orzo is cooked, stir in two cups of fresh spinach. Cook for another 2-3 minutes until the spinach wilts. This adds a nice pop of color and nutrition. Next, remove the pot from heat and mix in ¼ cup of grated Parmesan cheese. Taste and adjust the seasoning with more salt and pepper if you prefer. To serve, spoon the dish into bowls. Garnish each bowl with a sprinkle of lemon zest and some chopped parsley. This final touch makes your meal look and taste special. Enjoy every bite of this easy weeknight meal! To achieve the best orzo texture, avoid overcooking it. Orzo cooks quickly, so watch it closely. When it absorbs the broth, it becomes creamy and tender. If it cooks too long, it can turn mushy. Keep an eye on the pot during the last few minutes. Adjusting the liquid levels is key. The recipe calls for four cups of chicken broth. This amount ensures the orzo cooks well while soaking up all the flavors. If you like your dish a bit saucier, feel free to add more broth. Just remember to adjust the seasonings to match. You can easily enhance the flavors in this dish. Try using fresh herbs instead of dried ones. Fresh parsley, basil, or thyme can add a nice touch. Just chop them finely and stir them in at the end. This small change can make a big difference in taste. If you want to switch up the spices, consider using smoked paprika or cumin. These spices can bring a new depth to the dish without overpowering it. Experiment and find what you like best! Prep your ingredients ahead of time to save precious minutes. Chop the chicken and garlic in advance. You can also measure out the orzo and spices. This prep can make cooking feel less stressful on a busy weeknight. Choose quicker cooking methods when possible. For example, you can use a pressure cooker instead of a stovetop. This method can cut down cooking time significantly. Just adjust the liquid levels and cooking time accordingly. {{image_2}} You can swap chicken thighs for chicken breast. Chicken breast is leaner, which makes it a good choice. It will still absorb the lemon and garlic flavors well. Cook it just until it’s no longer pink for the best taste. If you want a vegetarian option, try chickpeas. They add protein and a nice texture. Simply drain and rinse a can of chickpeas. Stir them in when you add the spinach. This keeps the dish hearty and satisfying. While orzo is a star in this dish, you can use other pasta types. Small pastas like ditalini or couscous work great too. Just adjust the cooking time as needed. For gluten-free options, use gluten-free orzo or rice. Both will give you a similar texture. Be sure to check the cooking instructions on the package for best results. Adding seasonal veggies boosts nutrition and flavor. Try diced zucchini, bell peppers, or cherry tomatoes. They add color and taste that complements the lemon and garlic. Frozen greens are a great shortcut too. Spinach, kale, or peas can be added right from the bag. Just stir them in during the last few minutes of cooking. This makes the dish quick and easy! To store your One-Pot Lemon Garlic Chicken Orzo, let it cool first. Then, place it in a tight container. This keeps air out and helps maintain freshness. You can store it in the fridge for up to three days. If you want to enjoy it later, freezing is a good option. To reheat on the stovetop, add a splash of broth or water. Heat over low until warm, stirring often. This keeps the orzo from sticking. For the microwave, place a portion in a bowl. Add a little liquid and cover it with a microwave-safe lid. Heat for 1-2 minutes, stirring halfway through. To freeze, scoop portions into freezer-safe bags. Be sure to remove as much air as possible. Label each bag with the date. This dish can last up to three months in the freezer. When you’re ready to eat, thaw it in the fridge overnight. Reheat using the stovetop or microwave methods mentioned above. To check if the chicken is cooked, use a meat thermometer. The internal temperature should reach 165°F (75°C). This ensures the chicken is safe to eat. You can also look for visual cues. The chicken should be golden brown on the outside. The juices should run clear, not pink. If you cut into the chicken, it should be opaque throughout. Yes, you can prepare parts of this dish in advance. You can chop the chicken and garlic a day before. Store them in the fridge, sealed tightly. This saves time on busy weeknights. When it comes to storing the whole dish, let it cool first. Place it in an airtight container in the fridge. It will last up to three days. Reheat it on the stove over low heat. You may need to add a splash of broth to keep it moist. This dish pairs well with many sides. A simple green salad adds freshness. You can also serve crusty bread for dipping. For a heartier meal, try roasted vegetables. They add color and flavor to your plate. You can also serve a side of steamed broccoli or green beans for more nutrients. In this blog post, we explored making a delicious One-Pot Lemon Garlic Chicken Orzo. We covered key ingredients like chicken thighs, orzo pasta, and fresh spinach. You learned how to sauté and cook the dish step-by-step, plus tips for the perfect texture and flavor. Remember, you can customize it with different proteins and veggies. Enjoy storing leftovers for later meals, and use our reheating tips for best results. This dish is easy, tasty, and sure to be a family favorite. Happy cooking!
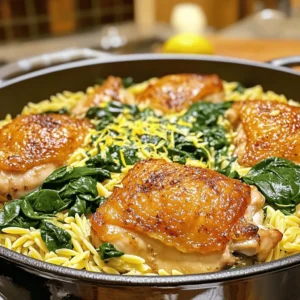
    One-Pot Lemon Garlic Chicken Orzo Easy Weeknight Meal
  • - Apples: For this recipe, I recommend using two large apples. Granny Smith or Honeycrisp are my top choices. Granny Smith gives a nice tart flavor, while Honeycrisp adds sweetness. Both create a great balance. - Sugar and Spices: Granulated sugar is key in this recipe. It helps the cinnamon stick to the apples. Cinnamon adds a warm, sweet flavor that makes these chips so tasty. Together, they create a delightful treat. - Lemon Juice: You will need one tablespoon of lemon juice. Its role is important. It helps keep the apples from browning and adds a hint of tang. This contrast makes the chips more interesting. - Salt: A pinch of salt enhances the flavor. It balances the sweetness of the sugar and the warmth of the cinnamon. Just a little can make a big difference in taste. By carefully selecting these ingredients, you ensure crispy, tasty apple chips. Each one works together to create a delicious snack that is easy to make. Enjoy the process and savor the flavors! To start, wash your apples under cold water. This removes dirt and wax. Next, use a sharp knife or a mandoline to core the apples. Cut them into very thin slices, about 1/8 inch thick. Thin slices help them crisp up nicely. If you have a mandoline, it makes this step quick and easy. If using a knife, take your time to keep slices even. In a small bowl, mix your granulated sugar, ground cinnamon, and a pinch of salt. This mix gives your apple chips a sweet and spicy flavor. Stir it well, so the spices and sugar blend evenly. An even coating ensures every chip gets that delicious cinnamon sugar taste. Now, preheat your oven to 225°F (110°C). Line two baking sheets with parchment paper for easy cleanup. Place your apple slices in a single layer on the sheets. Make sure they do not overlap. Bake them for about 1.5 to 2 hours. Halfway through, flip the apple slices. This helps them crisp evenly. Watch them closely toward the end to avoid burning. Once they look dry and crisp, take them out. Let the chips cool for a few minutes, as they will get crisper as they cool. To get those apple chips nice and crispy, you need to dry them out well. Thin slices help a lot. Aim for about 1/8 inch thick. The thinner, the better! After slicing, sprinkle lemon juice on the apples. This helps keep them fresh. When baking, flip the slices halfway through to avoid sogginess. It also stops them from burning. Keep an eye on them. If they start to brown too fast, lower the oven temperature a little. Using the right tools makes a big difference. A mandoline works great for slicing apples evenly. If you don’t have one, a sharp knife will do. Make sure your baking sheets are lined with parchment paper. This helps prevent sticking and makes cleanup easy. Good tools help you bake better chips. When it comes to serving, creativity shines! Use a decorative bowl or a wooden platter to display your chips. Add a few cinnamon sticks for a nice touch. This makes your snack look fancy and fun. You can also serve them at parties. They are a hit with both kids and adults. Enjoy these chips as a healthy snack or a tasty dessert! {{image_2}} You can mix it up with flavors. Adding nutmeg gives a warm spice. A drop of vanilla adds sweetness. You can create your own special blend. Try both for a fun twist! Each adds a unique taste to your baked apple chips. Different apples change the taste. Granny Smith adds tartness, while Honeycrisp is sweet and crisp. You can also try Fuji or Gala apples. Each type brings its own flavor. Experiment to find your favorite! Want to jazz up your chips? Try adding nuts for crunch. Chopped almonds or walnuts work great. You can also sprinkle on coconut flakes for a tropical touch. These toppings make your apple chips even more exciting! To keep your cinnamon sugar baked apple chips fresh, use an airtight container. Glass jars or sturdy plastic containers work well. Make sure they are completely cool before sealing. This step helps prevent moisture from making them soft. These tasty apple chips last about a week when stored properly. If they feel soft or chewy, they may not be fresh. Look for signs of moisture or off smells. If you find these signs, it's best to toss them. If your apple chips become soft, don’t worry! You can re-crisp them easily. Preheat your oven to 200°F (95°C). Spread the chips on a baking sheet in a single layer. Bake for about 10-15 minutes. Keep an eye on them to avoid burning. Let them cool again, and they should be crispy once more! You need 2 large apples for a batch of apple chips. I like to use Granny Smith or Honeycrisp apples. These types give a great balance of sweet and tart flavors. Each apple will yield about 20 to 30 slices, depending on how thin you cut them. This amount is perfect for snacking or sharing with friends. Yes, you can use a dehydrator instead of an oven. A dehydrator will work well for making cinnamon sugar baked apple chips. It allows for lower temperatures and longer drying times. Set your dehydrator to 135°F (57°C) and dry the apple slices for 6 to 8 hours. This method may give you an even crispier chip, and it uses less energy than an oven. Cinnamon sugar baked apple chips are great on their own, but you can pair them with other foods. Try serving them with yogurt for a tasty dip. They also go well with cheese, like sharp cheddar or creamy goat cheese. If you want a little extra flavor, sprinkle some nuts or granola on top. These pairings elevate your snack to a whole new level! In this article, we covered how to make tasty apple chips from scratch. We discussed ingredients like apples, sugar, and spices, along with step-by-step instructions for preparation, baking, and tips for success. Remember to choose the right apples and experiment with flavors for fun variations. Store your chips well to keep them fresh, and don’t forget to use helpful tools for the best results. Enjoy your homemade apple chips as a snack or at parties!
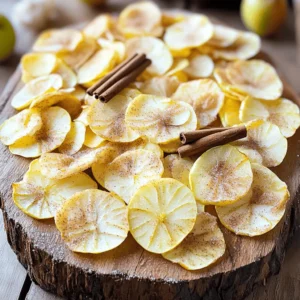
    Cinnamon Sugar Baked Apple Chips Crispy and Easy Snack
  • - 4 large bell peppers (red, yellow, green, or orange) - 1 cup quinoa, rinsed and drained - 2 cups vegetable broth - 1 can (15 oz) black beans, rinsed and drained - 1 cup corn kernels (fresh or frozen) - 1 cup diced tomatoes (canned or fresh) To make classic stuffed peppers, start with the bell peppers. They are the star of this dish. Choose any color you like. Each color brings its own taste and charm. Next, you need quinoa. This grain adds a nutty flavor and good texture. Rinse it well before cooking. Using vegetable broth instead of water gives the quinoa extra taste. Black beans add protein and creaminess. Make sure to rinse them to remove excess sodium. Corn kernels add a sweet crunch. You can use fresh or frozen corn. Diced tomatoes bring juiciness and flavor to the mix. They also add a nice pop of color. - 1 teaspoon ground cumin - 1 teaspoon smoked paprika - 1 teaspoon garlic powder - Salt and pepper to taste - 1 cup shredded cheese (cheddar or mozzarella) - Fresh cilantro for garnish (optional) Now, let's talk about flavor. Ground cumin adds warmth and earthiness. Smoked paprika brings a hint of smokiness. Garlic powder enhances the dish with its strong taste. Don't forget salt and pepper! They balance all the flavors. For toppings, shredded cheese is a must. Cheddar or mozzarella works well. It melts beautifully and adds richness. If you want a fresh touch, sprinkle cilantro on top after baking. It adds a burst of color and freshness. With these ingredients, you create a dish that is tasty, colorful, and full of good stuff. Enjoy the process of making these classic stuffed peppers. They will impress your family and friends! {{ingredient_image_1}} First, we need to get the oven ready. Preheat your oven to 375°F (190°C). Next, grab four large bell peppers in any color you like. Slice off the tops and remove the seeds and membranes. Set the tops aside for later. This step helps make room for our tasty filling. Now, let’s cook the quinoa. In a medium saucepan, bring 2 cups of vegetable broth to a boil. Once boiling, stir in 1 cup of rinsed and drained quinoa. Lower the heat, cover the pot, and let it simmer. In about 15 minutes, the quinoa will become fluffy, and the liquid will be gone. While the quinoa cooks, let’s mix our filling. In a large bowl, add 1 can of rinsed and drained black beans, 1 cup of corn, and 1 cup of diced tomatoes. You can use fresh or canned tomatoes based on what you have. For added flavor, sprinkle in 1 teaspoon of ground cumin, 1 teaspoon of smoked paprika, and 1 teaspoon of garlic powder. Season with salt and pepper to taste. Once the quinoa is cooked, combine it with the bean and veggie mix. Stir well until everything is mixed evenly. This blend is what makes the peppers so tasty. Now comes the fun part. Stuff each bell pepper with your filling mixture. Make sure to fill them generously. Place the peppers upright in a baking dish. If you have any leftover filling, pour it around the peppers for extra flavor. To finish, sprinkle 1 cup of shredded cheese on top of each pepper. This will melt beautifully while baking. Cover the dish with aluminum foil so the cheese doesn’t brown too soon. Bake the stuffed peppers in the preheated oven for 30 minutes. After that, carefully remove the foil. Bake them uncovered for another 10-15 minutes, until the cheese is bubbly and golden. Once they’re done, let the peppers cool for a few minutes. If you like, you can garnish them with fresh cilantro before serving. Enjoy your delicious, colorful stuffed peppers! To make great stuffed peppers, pick large bell peppers. Red, yellow, green, or orange all work well. They should be firm and heavy for their size. Look for smooth skin with no soft spots. Fresh peppers stay crisp after cooking. Make the filling tasty! Use enough salt and spices. Ground cumin, smoked paprika, and garlic powder give a nice kick. Mix everything well to spread the flavors. For gooey cheese on top, sprinkle it generously. Cheese melts best when it covers the filling fully. Soggy peppers can ruin your dish. To avoid this, bake them uncovered at the end. This lets excess moisture escape. If you overcook quinoa, it can get mushy. Keep an eye on it while it cooks. Follow the cooking time closely for the best texture. Pro Tips Choose Colorful Peppers: Using a mix of bell pepper colors not only makes the dish visually appealing but also adds different flavors and nutrients. Flavorful Quinoa: Cook the quinoa in vegetable broth instead of water for an extra layer of flavor that enhances the overall taste of your stuffed peppers. Experiment with Fillings: Feel free to customize the filling by adding cooked meat, different beans, or even vegetables like zucchini or spinach for added nutrition. Cheese Variations: Try different types of cheese, such as feta or pepper jack, to add unique flavors to your stuffed peppers. {{image_2}} Stuffed peppers offer fun ways to mix flavors. I love playing with different ingredients. Here are three tasty variations you can try. For a twist, use rice, tofu, and soy sauce. Start with cooked rice. You can use jasmine or brown rice. Mix in crumbled tofu for protein. Add soy sauce for flavor. Throw in some chopped green onions and carrots too. This gives the dish crunch and color. Stuff the bell peppers as usual. Bake them like the classic recipe. This version has a spicy kick! Use salsa, spices, and jalapeños. Start with your cooked quinoa. Add salsa to it for a zesty taste. Then mix in chopped jalapeños for heat. Don’t forget to sprinkle in cumin and chili powder. This adds the right spice. Fill the peppers and top with cheese. Bake as you normally would, and enjoy the fiesta! For the meat lovers, add ground beef or turkey. Begin with sautéing the meat until it's brown. Drain any extra fat. Mix the cooked meat with your quinoa and other ingredients. You can still use black beans and corn. This keeps the dish hearty and filling. Stuff the peppers and add cheese on top. Bake until the cheese is melty and delicious. To store your leftover stuffed peppers, let them cool first. Place them in an airtight container. This keeps them fresh and safe. You can keep them in the fridge for up to 3 to 4 days. If you want to enjoy them later, freezing is a great option. You can freeze stuffed peppers before or after baking. If you freeze them before, prepare and stuff the peppers, then wrap them tightly in plastic wrap. Place them in a freezer-safe bag. If you bake the peppers first, let them cool completely. Then, follow the same wrapping method. To reheat frozen stuffed peppers, take them out and let them thaw in the fridge overnight. Preheat your oven to 375°F (190°C). Place the peppers in a baking dish and cover with foil. Bake for about 25 to 30 minutes until heated through. Enjoy them just as if they were fresh! Yes, you can make stuffed peppers ahead of time. This saves time on busy days. To prep, cook the filling first. Stuff the peppers, then cover them and place them in the fridge. You can do this a day before baking. When ready, just pop them in the oven. They will taste fresh and delicious. Stuffed peppers pair well with many sides. Here are some ideas: - A simple green salad with vinaigrette - Rice or quinoa for extra carbs - Roasted vegetables for added flavor - Garlic bread for some crunch These sides enhance the meal and keep it balanced. Making stuffed peppers healthier is easy. Here are some tips: - Use less cheese or choose a low-fat option. - Add more veggies like spinach or zucchini to the filling. - Swap quinoa for brown rice for more fiber. - Try using turkey or chicken instead of beans for protein. These changes keep the dish tasty while reducing calories. Classic stuffed peppers are fun and tasty. You learned about main ingredients like peppers, quinoa, black beans, and seasoning. I shared step-by-step instructions for preparation, filling, and baking. We covered tips for choosing fresh peppers and ensuring every bite is full of flavor. You can also explore variations to suit any diet. Don't forget about storing tips for leftovers and freezing. With these ideas, you can create a delicious meal every time. Enjoy making your stuffed peppers just the way you like!
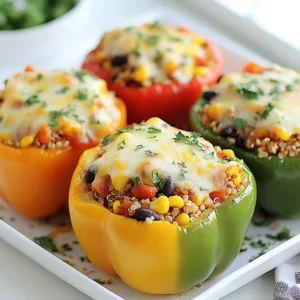
    Classic Stuffed Peppers Flavorful and Easy Recipe
  • - Firm Tofu (14 oz) - Assorted Mushrooms (2 cups: shiitake, button, oyster) - Vegetable Additions (bell pepper, onion) - Garlic (2 cloves) - Ginger (1 inch) - Soy Sauce (2 tablespoons) - Sesame Oil (1 tablespoon) - Olive Oil (1 tablespoon) - Cornstarch (1 teaspoon, optional) - Sesame Seeds & Fresh Cilantro for Garnish - Salt and Pepper to taste The heart of this Mushroom and Tofu Stir Fry lies in its fresh and vibrant ingredients. Firm tofu gives you a great base. It holds up well during cooking. Use 14 ounces, and don’t forget to drain and press it. This step helps remove excess water and makes it crispier. Next, you need assorted mushrooms. I love using shiitake, button, and oyster mushrooms. They bring different textures and flavors. Two cups is perfect for this dish. Add a sliced bell pepper and a medium onion. These vegetables add color and sweetness to the stir fry. They also provide a nice crunch that you will enjoy in every bite. For flavor, you will need garlic and ginger. Two cloves of minced garlic and a one-inch piece of grated ginger create wonderful aromas. They are essential for that authentic stir fry taste. Soy sauce adds umami, while sesame oil gives a nutty flavor. Use two tablespoons of soy sauce and one tablespoon of sesame oil. Olive oil is also needed to sauté the tofu and vegetables. One tablespoon of olive oil does the trick. If you want a thicker sauce, mix in cornstarch. One teaspoon is enough for a great texture. Finally, sprinkle sesame seeds and fresh cilantro on top for garnish. These add a nice touch and elevate the dish's look. Make sure to season with salt and pepper to taste. This will enhance all the flavors. Enjoy cooking your Mushroom and Tofu Stir Fry! {{ingredient_image_1}} - Start by draining the tofu. Wrap it in a clean towel. Place a heavy object on top to press out moisture. Let it sit for about 15 minutes. This helps the tofu absorb flavors better. - Next, slice the mushrooms and bell pepper. Use a sharp knife for clean cuts. Cut the onion into thin slices. Keep everything ready for quick cooking. - Heat olive oil in a large non-stick skillet or wok. Use medium-high heat for best results. - Add the cubed tofu. Sauté the tofu until it turns golden brown on all sides. This should take about 8 to 10 minutes. Remove the tofu from the skillet and set it aside. - In the same skillet, add the sliced onions. Sauté them until they become translucent, which takes about 3 to 4 minutes. - Add minced garlic and grated ginger. Cook for one more minute, letting the fragrant aroma fill the kitchen. - Toss in the assorted mushrooms and sliced bell pepper. Stir-fry for about 5 to 7 minutes. You want the mushrooms to release their moisture and the veggies to become tender. - Return the sautéed tofu to the skillet. Pour in the soy sauce and sesame oil. Gently toss everything together until well mixed. - If you want a thicker sauce, mix 1 teaspoon of cornstarch with a tablespoon of water to create a slurry. Add the slurry to the stir fry. Stir continuously for 1 to 2 minutes until it thickens. - Season with salt and pepper to taste. Sprinkle sesame seeds on top for extra crunch. - Before serving, garnish the dish with fresh cilantro. This adds a nice pop of color and flavor. Serve it over rice or noodles for a complete meal. Tofu can be tricky, but you want it golden-brown. Start with firm tofu, cut into cubes. Press it well to remove water. Heat olive oil in a skillet. Cook the tofu for about 8-10 minutes. Toss it gently to brown all sides. For extra crispy tofu, try coating it lightly with cornstarch before cooking. This gives it a nice crunch. If you want a gluten-free option, use tamari instead of soy sauce. Tamari has a rich taste that works well in this dish. You can also customize the spice levels. If you love heat, add some chili flakes or sriracha. This will give your stir fry a nice kick and make it exciting. When serving, think about how it looks. You can serve the stir fry over rice or noodles for a hearty meal. For a pop of color, garnish with fresh cilantro and a sprinkle of sesame seeds. Arrange it nicely in a bowl. This not only makes it appetizing but also fun to eat! Pro Tips Press Tofu Well: Ensure the tofu is thoroughly pressed to remove excess moisture, allowing it to absorb flavors better and achieve a crispier texture when sautéed. Variety of Mushrooms: Use a mix of mushrooms for depth of flavor and texture. Shiitake, button, and oyster mushrooms each bring unique tastes that enhance the stir fry. High Heat Cooking: Stir frying requires high heat to cook quickly and evenly. Make sure your skillet or wok is hot before adding ingredients to achieve that signature stir fry sear. Garnish for Freshness: Fresh herbs like cilantro or green onions not only add a pop of color but also brighten the dish's flavors. Add them just before serving for maximum freshness. {{image_2}} You can swap tofu for other proteins. Tempeh offers a nutty taste and firm texture. Seitan is another great choice, with a chewy bite that mimics meat. If you want a legume option, add chickpeas or lentils. They provide a hearty base and boost the dish's fiber. Feel free to get creative with your veggies. Seasonal produce like zucchini, snap peas, or bok choy can add freshness. Mixing different mushroom varieties, like portobello or enoki, can enhance the flavor and texture. Each mushroom brings its unique taste, making your stir fry even more exciting. Want to spice things up? Try adding chili flakes for a kick. Start with a small amount, then increase as needed. For a refreshing twist, incorporate some citrus juice or zest. Lemon or lime can brighten the flavors and balance the richness of the dish. To keep your mushroom and tofu stir fry fresh, store leftovers in the fridge. Use airtight containers for the best results. This dish stays tasty for up to four days. Make sure to let it cool before sealing the container. This helps keep moisture out and flavors in. When reheating, aim to keep the texture just right. I recommend using a skillet over medium heat. Just add a splash of water or broth to keep it moist. Stir gently until warmed through, about five minutes. This method helps the tofu stay soft while the veggies stay crisp. You can freeze your stir fry if you want to save it for later. Divide it into portions and place it in freezer-safe bags. Remove as much air as possible to avoid freezer burn. When you’re ready to eat, thaw it in the fridge overnight. Heat it up in a skillet, and it will taste great! Tofu can get soggy if not prepared well. Here are some tips to keep it firm: - Press the tofu: Wrap it in a clean towel and place something heavy on top. Let it sit for 30 minutes to remove excess water. - Use firm tofu: Firm or extra-firm tofu holds up better in stir fry. - Sauté in hot oil: Heat olive oil first in your skillet. Add cubed tofu and cook until golden brown, about 8-10 minutes. This step adds a nice texture and flavor. Yes, you can easily make this dish gluten-free. Here’s how: - Use tamari: Tamari is a gluten-free soy sauce and works well in this recipe. - Check labels: Always check that your other ingredients are gluten-free. Some sauces and oils may contain gluten. Cooking this dish is quick and easy. Here’s a breakdown: - Prep time: About 15 minutes to chop veggies and press tofu. - Cook time: Around 15 minutes to sauté and stir fry. - Total time: You can have this meal ready in about 30 minutes. Perfect for a busy night! In this post, we explored how to create a tasty tofu and mushroom stir fry. We covered essential ingredients, flavor enhancers, and the step-by-step cooking process. You learned tips for perfect tofu, variations for proteins and veggies, and storage advice. Now, you can make a delicious dish that suits your taste. Get creative with flavors and have fun in the kitchen! Enjoy every bite of your stir fry.
    Mushroom and Tofu Stir Fry Flavorful Vegetable Dish
  • For the best pumpkin cream cheese muffins, you need these key items: - 1 cup canned pumpkin puree - 1/2 cup cream cheese, softened - 1/2 cup granulated sugar - 1/2 cup brown sugar - 1/2 cup vegetable oil - 2 large eggs - 1 teaspoon vanilla extract - 2 cups all-purpose flour - 1 teaspoon baking powder - 1 teaspoon baking soda - 1 teaspoon ground cinnamon - 1/2 teaspoon ground nutmeg - 1/2 teaspoon ginger powder - 1/4 teaspoon salt These ingredients work together to create a moist and flavorful muffin. The pumpkin puree gives a rich taste, while the cream cheese adds a nice creaminess. You can add these items to make your muffins even better: - 1/2 cup chopped walnuts or pecans - 1/4 cup powdered sugar (for dusting) Adding nuts gives a nice crunch. Dusting with powdered sugar adds a sweet touch. Both options are tasty but not required. If you don't have some ingredients, here are some swaps: - Substitute vegetable oil with melted coconut oil for a different flavor. - Use maple syrup instead of granulated sugar for a natural sweetener. - If you need a dairy-free option, try using a dairy-free cream cheese. These substitutions can help you customize the recipe. Feel free to experiment and find what works best for you! First, set your oven to 350°F (175°C). This step is key for even baking. Next, grab a muffin tin. You can line it with paper liners or spray it lightly with non-stick spray. This helps the muffins come out easily after baking. In a mixing bowl, add 1/2 cup of softened cream cheese. Then, pour in 1/2 cup of granulated sugar and 1/2 cup of brown sugar. Beat these together until they are smooth and creamy. This mixture adds a sweet touch to your muffins. In another bowl, whisk together 2 cups of all-purpose flour, 1 teaspoon of baking powder, and 1 teaspoon of baking soda. Also, add 1 teaspoon of ground cinnamon, 1/2 teaspoon of ground nutmeg, 1/2 teaspoon of ginger powder, and 1/4 teaspoon of salt. Mixing these dry ingredients first helps them blend better into the batter later. Now, slowly add the dry mix to the cream cheese mixture. Stir until just combined. Remember, it’s okay to have some lumps! If you like nuts, fold in 1/2 cup of chopped walnuts or pecans. These add a nice crunch. Next, fill each muffin cup about 2/3 full with the batter. This gives them room to rise. Place the muffin tin in the oven and bake for 18-20 minutes. To check if they are done, insert a toothpick into the center of a muffin. If it comes out clean, they are ready. After baking, let the muffins cool in the pan for 5 minutes. Then, move them to a wire rack to cool completely. If you want, dust them with 1/4 cup of powdered sugar for a sweet finish. To get the best texture in your muffins, mix gently. After combining wet and dry ingredients, stop mixing when just combined. Overmixing leads to dense muffins. Use room temperature ingredients to help them blend better. This includes the cream cheese and eggs. If you want a lighter muffin, add a bit more baking powder. Store muffins in an airtight container. This keeps them soft and fresh. You can also wrap them in plastic wrap. If you plan to eat them later, freeze them. Just place them in a freezer-safe bag. They stay good for up to three months. When you want one, let it thaw at room temperature. To reheat muffins, use an oven or microwave. For the oven, set it to 350°F (175°C). Heat muffins for about 5-10 minutes. This warms them through and keeps the texture nice. In the microwave, heat for 10-15 seconds. This makes them warm but can change the texture slightly. Enjoy your warm muffin with coffee or tea! {{image_2}} You can make a fun twist on the classic muffins. To create pumpkin cream cheese swirl muffins, prepare the cream cheese mixture as the recipe states. Then, after mixing the batter, spoon some of the cream cheese mixture into each muffin cup. Use a toothpick to swirl it around gently, creating a beautiful pattern. This adds a creamy layer inside each muffin, enhancing the flavor. If you want a dairy-free option, swap the cream cheese for a vegan cream cheese. You can also use almond milk or oat milk instead of regular milk. For the eggs, consider using flax eggs or applesauce. This keeps the muffins moist and tasty while being friendly for those avoiding dairy. To spice things up, you can add extra flavors. Try adding chocolate chips or dried fruits like cranberries or raisins. These additions bring different textures and tastes, making your muffins more exciting. You can even use spices like cardamom or allspice for a unique twist. Each variation can give your muffins a fresh vibe, perfect for any season. Each muffin has about 200 calories. The calories come from the sugars, oils, and flour. Here’s a quick look at the breakdown: - Granulated sugar: 50 calories per muffin - Brown sugar: 50 calories per muffin - Vegetable oil: 40 calories per muffin - Cream cheese: 30 calories per muffin - All-purpose flour: 30 calories per muffin This means these muffins are tasty but also a bit rich. Enjoy them as a treat! Let’s look at some star ingredients: - Pumpkin puree: Full of fiber and vitamins A and C. Great for your eyes and skin! - Cream cheese: Adds protein and calcium, making it creamy and satisfying. - Nuts (if added): Provide healthy fats, protein, and a nice crunch. They may help keep you full longer. These muffins can be a fun way to get some nutrients! Want to make these muffins a bit lighter? Here are some tips: - Reduce granulated sugar: Use only a quarter cup instead of half. - Use less brown sugar: Cut it down to a quarter cup. - Substitute applesauce for oil: Use the same amount of applesauce as oil for fewer calories. - Skip the powdered sugar: Dusting is nice, but not needed for flavor. These changes can help you enjoy muffins while cutting back on sugar and calories. Yes, you can freeze these muffins. Let them cool completely first. Wrap each muffin in plastic wrap. Place them in a freezer bag. They will last up to three months. When you're ready to eat, thaw them in the fridge overnight. You can also warm them in the microwave for a quick snack. To check if your muffins are done, insert a toothpick into the center. If it comes out clean or with a few crumbs, they are ready. Bake them for 18-20 minutes at 350°F (175°C). Keep an eye on them as baking times can vary. Cream cheese adds a rich, creamy texture. It makes the muffins moist and flavorful. If you want to skip it, use sour cream or Greek yogurt instead. This will change the taste but still yield tasty muffins. Yes, you can use fresh pumpkin. Cook it until soft and blend it into a puree. Make sure it is smooth and not too watery. Canned pumpkin is convenient, but fresh can add a unique taste. To make your muffins moist, use more pumpkin puree or add an extra egg. You can also add a bit of applesauce. Ensure you do not overmix the batter. This keeps the muffins light and fluffy. In this post, I shared how to make tasty pumpkin cream cheese muffins. We discussed key ingredients, from basics to fun flavors. I gave step-by-step baking instructions and tips for perfect texture. We also covered storage and variations, like dairy-free options and seasonal twists. Remember, these muffins are not just delicious; they can be made to fit your needs. Enjoy baking and sharing this tasty treat!
    Pumpkin Cream Cheese Muffins Flavorful and Easy Recipe
  • - 4 boneless, skinless chicken thighs - 1 cup fresh pineapple chunks - 1/2 cup teriyaki sauce - 1/4 cup soy sauce (low sodium preferred) - 2 tablespoons honey - 1 tablespoon sesame oil - 2 cloves garlic, minced - 1 teaspoon grated fresh ginger - 1 red bell pepper, sliced - 1 cup broccoli florets - 2 green onions, sliced (for garnish) - Sesame seeds (for garnish) This dish is all about balance. Chicken thighs give you rich flavor and tenderness. Fresh pineapple adds a sweet touch. Teriyaki sauce ties it all together with savory goodness. In the additional ingredients, low-sodium soy sauce helps keep the dish healthier. Honey adds a nice sweetness that blends with the teriyaki sauce. Sesame oil gives a lovely nutty flavor. For veggies, garlic and ginger add aroma and spice. Red bell pepper brings crunch and color. Broccoli florets add health and texture. Green onions and sesame seeds are perfect for garnishing. They make the dish look and taste great. When you gather these ingredients, you set the stage for a delightful meal. Each one plays a role in creating a sweet and savory experience. Enjoy the process of putting this dish together! To start, grab your slow cooker. Place the four chicken thighs directly in the bottom. Make sure they are spread out evenly. This helps them cook well. Next, let’s make the sauce. In a mixing bowl, combine the teriyaki sauce, low-sodium soy sauce, and honey. Then, add sesame oil, minced garlic, and grated ginger. Use a whisk to mix everything well. This sauce gives the chicken a sweet and tangy kick. Now, pour the sauce over the chicken thighs. It should cover them nicely. Next, add the fresh pineapple chunks, sliced red bell pepper, and broccoli florets on top. This adds color and nutrients to your dish. You have two cooking options. If you cook on low, set the timer for 6 to 7 hours. For a quicker meal, use high heat for 3 to 4 hours. Check the chicken for doneness by ensuring it is no longer pink inside. Once the cooking time is up, take two forks and shred the chicken while it’s still in the slow cooker. Mix it well with the veggies and sauce. Let it sit for 10 minutes. This allows the flavors to meld together and the sauce to thicken. Enjoy your meal over rice or quinoa! To get the best taste from your chicken, marinate it for at least one hour. I like to let it sit overnight in the fridge. This lets the flavors soak in well. Use fresh pineapple chunks for a sweet kick. They add a nice tang too! When cooking, set your slow cooker on low for tender chicken. Cooking on low for 6-7 hours gives the best results. If you’re in a hurry, you can cook it on high for 3-4 hours. Just check that the chicken is fully cooked. Serve your pineapple teriyaki chicken with steamed jasmine rice. It absorbs the sauce and tastes great. You can also try it with fluffy quinoa for a healthy twist. Add a side of sautéed green beans or a simple salad for color and crunch. One common mistake is overcooking the chicken. This can make it dry. Always check the doneness at the end of cooking. Another mistake is not using fresh ingredients. Fresh garlic and ginger make a big difference in flavor. So, always choose fresh over dried when you can! {{image_2}} You can easily change the protein in this dish. Try tofu for a plant-based option. Pork works well too, adding a different flavor. For vegetables, use snap peas or carrots instead of broccoli. This keeps the meal fresh and fun. Want some heat? Add chili paste to the sauce. Just a little can make it spicy. If you like sweet, use maple syrup instead of honey. This gives a rich flavor and works great with pineapple. If you're gluten-free, use tamari instead of soy sauce. It tastes great and keeps the dish safe. For low-carb meals, skip the rice and serve it over cauliflower rice. This keeps it light while still being tasty. To keep your slow cooker pineapple teriyaki chicken fresh, cool it quickly. Place it in a shallow dish. This helps it cool down fast. Use airtight containers for storage. Glass or plastic containers work well. Remember to leave some space for expansion if you freeze it. When reheating, use the microwave or the stove. If using the microwave, place the chicken in a bowl. Cover it with a damp paper towel to keep moisture. Heat in short bursts, stirring in between. On the stove, use a pan over low heat. Stir gently to keep it juicy. Yes, you can freeze slow cooker teriyaki chicken! Freeze it in an airtight container or freezer bag. Remove as much air as you can. For thawing, place it in the fridge overnight. You can also use the microwave. Reheat it slowly to keep the taste and texture great. You can store leftover Slow Cooker Pineapple Teriyaki Chicken in the fridge for up to four days. Make sure to keep it in an airtight container. This helps keep the flavors fresh. If you want to store it longer, you can freeze it for up to three months. Just remember to use freezer-safe containers. Yes, you can cook this dish without a slow cooker. One option is to use a stovetop pot. Simply follow the same steps for the sauce and add everything to the pot. Cook over medium heat for about 30 minutes. Stir often to prevent burning. You can also use an Instant Pot. Cook on high pressure for about 10 minutes, then let it release naturally. Slow Cooker Pineapple Teriyaki Chicken pairs well with many sides. Here are a few ideas: - Steamed rice or quinoa - Stir-fried vegetables - A fresh green salad - Noodles tossed in soy sauce - Coconut rice for a tropical twist These sides enhance the sweet and tangy flavors of the dish. Enjoy! This blog post covered delicious pineapple teriyaki chicken. We looked at key ingredients like chicken thighs, fresh pineapple, and teriyaki sauce. I shared steps to prepare and cook the dish in a slow cooker. You learned tips for flavor and common mistakes to avoid. In conclusion, enjoy experimenting with variations and serving suggestions. This dish is easy to store and reheat. With its bright flavors, it's sure to delight. Happy cooking!
    Slow Cooker Pineapple Teriyaki Chicken Delight
  • - 3 medium apples, peeled, cored, and sliced - 1 cup brown sugar, packed - 1/2 cup unsalted butter, plus extra for greasing - 1 teaspoon cinnamon - 1 1/2 cups all-purpose flour - 1 teaspoon baking powder - 1/2 teaspoon baking soda - 1/4 teaspoon salt - 3/4 cup granulated sugar - 2 large eggs - 1 teaspoon vanilla extract - 1/2 cup buttermilk - Optional: Chopped pecans or walnuts for garnish When measuring flour, spoon it into the cup and level it off. This method keeps the flour light and avoids packing it down. For brown sugar, pack it tightly into the cup for accurate measurement. Use room-temperature butter for easy mixing and a smooth batter. I love using Granny Smith apples for their tartness. They balance the sweet caramel nicely. Honeycrisp apples work great too, adding a sweet crunch. You can also try Fuji or Braeburn apples. Each variety brings its own flavor and texture to the cake. 1. First, preheat your oven to 350°F (175°C). This step is key for even baking. 2. Next, grease a 9-inch round cake pan with butter. This helps the cake come out easily. 3. In a small saucepan, melt 1/2 cup of butter over medium heat. Stir in 1 cup of brown sugar and 1 teaspoon of cinnamon. Cook this mixture until it is smooth and bubbly, about 2-3 minutes. 4. Pour this caramel mixture into the prepared cake pan. Make sure it covers the bottom well. 5. Now, take 3 medium apples, peel, core, and slice them. Arrange the slices in a circular pattern over the caramel. If you like, sprinkle some chopped pecans or walnuts on top. 1. In a mixing bowl, whisk together 1 1/2 cups of all-purpose flour, 1 teaspoon of baking powder, 1/2 teaspoon of baking soda, and 1/4 teaspoon of salt. This mix gives the cake its structure. 2. In another bowl, beat together 3/4 cup of granulated sugar and the remaining 1/2 cup of softened butter until creamy. Add 2 large eggs, one at a time, mixing well after each. 3. Stir in 1 teaspoon of vanilla extract. This adds a nice flavor to the cake. 4. Gradually add the flour mixture to the butter mixture, alternating with 1/2 cup of buttermilk. Start and end with the flour mix. Stir until just combined. Don’t overmix. 5. Pour the cake batter over the arranged apples in the pan. Smooth the top with a spatula. 1. Bake in the preheated oven for 40-45 minutes. Check with a toothpick; it should come out clean when the cake is done. 2. Once baked, remove the cake from the oven. Let it cool in the pan for about 10 minutes. 3. Carefully invert the cake onto a serving plate while it is still warm. This lets the caramel flow over the apples and makes it look great. Enjoy your delicious creation! One big mistake is not using enough butter. The butter helps the caramel mix well with the apples. Without it, the cake may stick to the pan. Another mistake is overmixing the batter. This can make your cake tough. Mix just until the ingredients blend. Lastly, don’t skip the cooling step. Let the cake cool for about 10 minutes before inverting. This keeps the caramel from running everywhere. Baking time can vary by oven. If your oven runs hot, check the cake at 35 minutes. If it’s still wet, bake a bit longer. Use a toothpick to test doneness. If it comes out clean, your cake is ready. For a darker top, bake a couple of minutes more. Just watch it closely to avoid burning. Serve this cake warm for the best taste. Drizzle any leftover caramel sauce over each slice. Add whipped cream or vanilla ice cream for an extra treat. For a crunch, sprinkle some chopped pecans or walnuts on top. This adds texture and flavor. Enjoy it as a dessert or with coffee for a cozy treat! {{image_2}} You can add nuts to the cake for a nice crunch. Chopped pecans or walnuts work well. They add flavor and texture. To do this, sprinkle them on top of the apples before adding the batter. You can also mix them into the batter for a richer taste. Almonds are another tasty option if you want something different. While apples shine in this recipe, you can switch things up with other fruits. Pears make a great choice in fall. They have a soft texture and sweet taste. In summer, try using peaches or berries. These fruits add a fresh twist to the cake. Just be sure to adjust the cooking time as needed. Softer fruits may need less time in the oven. To make this cake gluten-free, swap the all-purpose flour for gluten-free flour. Look for a blend that works well in baking. Also, check that your baking powder and other ingredients are gluten-free. This way, everyone can enjoy this tasty dessert, even those with gluten sensitivities. The flavor remains delicious, and the cake stays moist with this swap. To store leftovers, first, let the cake cool completely. Place slices in an airtight container. This keeps the cake moist and fresh. You can store it at room temperature for up to two days. If you want to keep it longer, the fridge is a good option. To freeze the cake, slice it first. Wrap each slice tightly in plastic wrap. Then, place the slices in a freezer bag. Make sure to remove as much air as possible. This helps prevent freezer burn. The cake can last in the freezer for up to three months. When ready to enjoy, you can reheat the cake. For the best results, use an oven. Preheat it to 350°F (175°C). Place the slice on a baking sheet and heat for about 10 minutes. This warms the cake and revives the caramel. You can also use a microwave if you’re in a hurry. Heat each slice for about 15-20 seconds. Just be careful not to overheat it, or it may dry out. Enjoy your delicious treat! Yes, you can use different apples. Granny Smith and Honeycrisp work best. Other options include Fuji or Gala apples. Each type gives a unique taste and texture. Fuji apples will be sweeter, while Granny Smith adds a nice tartness. Feel free to mix them for more flavor! Check the cake at 40 minutes. Insert a toothpick into the center. If it comes out clean, the cake is done. If not, bake for another 5 minutes. Keep checking until the toothpick is clean. The top should be golden brown, and the edges will pull away from the pan. Yes, you can make this cake ahead of time. Bake it, then let it cool completely. Cover it tightly and store it at room temperature for up to 2 days. For longer storage, refrigerate it for up to a week. Reheat slices in the microwave for a warm treat! This article covered all you need to know about baking a great apple cake. We explored the key ingredients, measurement tips, and the best apple varieties. Then, we went through easy, step-by-step baking instructions and helpful tips to avoid common mistakes. I also shared fun variations and smart storage tips. Remember, baking should be fun, and your cake can be a hit! Enjoy experimenting with flavors and techniques. Happy baking!
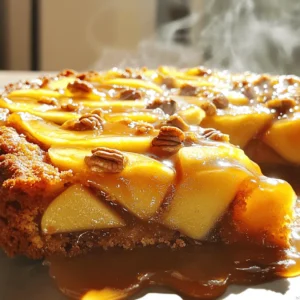
    Caramel Apple Upside Down Cake Irresistible Recipe
  • - 1.5 lbs baby potatoes - 4 tablespoons olive oil - 4 cloves garlic, minced - 1 teaspoon onion powder - 1 teaspoon dried oregano - 1 teaspoon paprika - Salt and pepper to taste - ½ cup grated Parmesan cheese - Fresh parsley, chopped for garnish The star of this dish is the baby potatoes. They cook quickly and get crispy. Their small size makes them great for air frying. I use 1.5 lbs, halved for even cooking. The olive oil adds flavor and helps crisp the skin. Four tablespoons is the perfect amount for a nice coat. Garlic is a must for this recipe. I use four cloves, minced. Garlic gives these potatoes a wonderful aroma and taste. For seasonings, I mix in onion powder, dried oregano, and paprika. These add depth and warmth to the dish. Don’t forget salt and pepper to bring all the flavors together. The finishing touch is half a cup of grated Parmesan cheese. This cheese melts beautifully and creates a savory crust. I also sprinkle fresh parsley on top for color and a hint of freshness. It looks great when served! - Preheat air fryer to 400°F (200°C). - Halve 1.5 lbs of baby potatoes and place them in a large bowl. - In a bowl, combine 4 tablespoons of olive oil, 4 cloves of minced garlic, 1 teaspoon of onion powder, 1 teaspoon of dried oregano, 1 teaspoon of paprika, and salt and pepper to taste. - Toss the halved potatoes in this mix until they are evenly coated. - Add ½ cup of grated Parmesan cheese to the bowl and toss again. - Place the potatoes in the air fryer basket in a single layer. If needed, work in batches to avoid overcrowding. - Air fry the potatoes for 20-25 minutes, shaking the basket halfway through. This helps them crisp up evenly. - When the potatoes are golden and crispy, sprinkle the remaining Parmesan on top. Air fry for an additional 2-3 minutes until the cheese melts and bubbles. - Carefully remove the potatoes from the air fryer, garnish with fresh chopped parsley, and serve hot. To get the best crispiness from your Air Fryer Garlic Parmesan Potatoes, preheat the air fryer. Preheating lets the potatoes cook evenly and helps them crisp up nicely. Set your air fryer to 400°F (200°C) and let it warm up for about 5 minutes. Avoid overcrowding the basket. If the potatoes are packed too tightly, they won’t get the air they need to crisp up. Cook in batches if necessary. This simple step makes a big difference in texture. Want to boost the flavor? Try adding spices like cayenne pepper for heat or Italian seasoning for herbiness. You can also use garlic powder instead of fresh garlic for a different taste. If you want to switch up the cheese, try using cheddar or feta. Each cheese brings a unique taste and texture. Experiment to find your favorite combo! For a beautiful presentation, serve the Garlic Parmesan Potatoes in a nice bowl. You can sprinkle extra parsley on top for color. It makes the dish look fresh and inviting. Think about what to serve alongside the potatoes. A small bowl of marinara sauce or aioli for dipping adds fun and flavor. These simple touches can elevate your meal. {{image_2}} You can switch up the type of potatoes you use. Try Yukon Gold, red potatoes, or even sweet potatoes. Each type gives a different taste and texture. For seasonings, mix it up! Add some Italian seasoning or chili powder for a spicy kick. You could also use fresh herbs like thyme or rosemary instead of dried ones. This adds a fresh flavor. If you don’t have an air fryer, you can bake these potatoes in the oven. Preheat your oven to 425°F (220°C). Spread the seasoned potatoes on a baking sheet. Bake for 30-35 minutes. Check for crispiness and golden color. Grilling is another fun method. Use a grill basket or wrap the seasoned potatoes in foil. Grill over medium heat for about 20 minutes. Shake or stir them to cook evenly. For a vegetarian option, this recipe is perfect as is. Just check the Parmesan cheese for animal rennet. If you want a vegan dish, replace Parmesan with nutritional yeast. It gives a cheesy flavor without the dairy. For gluten-free eaters, this recipe works great! Just ensure that your seasonings and any added sauces are gluten-free. To store your Air Fryer Garlic Parmesan Potatoes in the fridge, place them in an airtight container. Make sure to cool them completely before sealing. They will stay fresh for about 3 to 5 days. For reheating, I suggest using the air fryer again. Set it to 350°F (175°C) and heat for 5 to 7 minutes. This method keeps them crispy and delicious. Yes, you can freeze cooked potatoes! First, let them cool completely. Then, pack them in a freezer-safe bag or container. Remove as much air as possible to prevent freezer burn. They can last for up to 2 months in the freezer. In the fridge, these potatoes are best eaten within 3 to 5 days. If they start to smell off or have a slimy texture, it’s time to toss them. Always trust your senses when checking for spoilage. Yes, you can use other potatoes. Yukon Gold or red potatoes work well. Just ensure they are similar in size. Cut them into halves to keep cooking times consistent. To spice things up, add cayenne pepper or red pepper flakes. You can mix these spices with the other seasonings before tossing them with the potatoes. Start with a little and adjust to your taste. These crispy potatoes go great with marinara sauce or garlic aioli. You can also try ranch dressing or a spicy sriracha mayo for a fun twist. Choose a sauce that matches your flavor mood. Yes, you can prep the potatoes ahead of time. Toss them in oil and seasonings, then store in the fridge for up to 24 hours. Just air fry them when you're ready to eat! If you don't have an air fryer, you can bake the potatoes in the oven. Preheat the oven to 425°F (220°C). Spread the seasoned potatoes on a baking sheet and cook for about 30-35 minutes. Be sure to flip them halfway for even crispiness. In this post, I covered how to make Air Fryer Garlic Parmesan Potatoes. We explored the ingredients, steps for cooking, and tips for perfect results. You learned about variations and storage options too. These potatoes are easy to make and full of flavor. Feel free to get creative with spices and cooking methods. No matter how you prepare them, you’ll enjoy a delicious side dish that everyone loves. Go ahead and try this recipe, and make it your own!
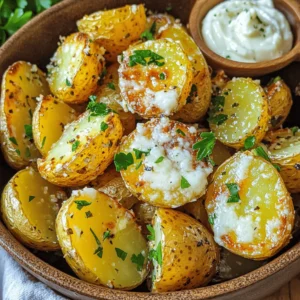
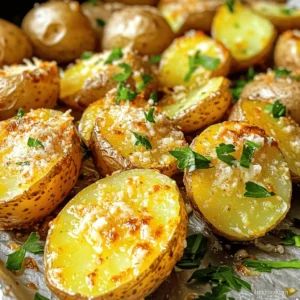
    Air Fryer Garlic Parmesan Potatoes Crispy and Delicious
  • - 12 oz pasta of your choice - 2 large red bell peppers - 1 tablespoon olive oil - 3 cloves garlic, minced - 1 cup vegetable broth - ½ teaspoon red pepper flakes - Salt and pepper to taste - 8 oz burrata cheese - Fresh basil leaves for garnish - Grated parmesan cheese for serving Each ingredient plays a key role in this dish. The pasta forms the base, while the roasted red peppers add a rich, sweet flavor. Olive oil helps in roasting, and garlic brings depth. Vegetable broth makes the sauce creamy and smooth. Red pepper flakes give a gentle heat, while salt and pepper enhance all the flavors. Burrata cheese adds a creamy texture that you will love. Fresh basil adds a hint of freshness, and parmesan cheese adds a savory finish. Using high-quality ingredients can make a big difference. Look for fresh peppers and good olive oil. The seasonings should be fresh, too. This attention to detail will elevate your dish. Enjoy the process of gathering these ingredients. It sets the stage for a great meal. Preheat your oven to 450°F (230°C). Cut the red bell peppers in half and remove the seeds and stems. Place them skin-side up on a baking sheet. Drizzle with olive oil for flavor. Roast the peppers for about 25-30 minutes. Look for charred and blistered skins. Once done, remove them from the oven. Cover with foil for 10 minutes to steam. This makes peeling easier. After steaming, let them cool slightly. Peel off the skins, and you will have tender roasted peppers. In a large pot, bring salted water to a boil. Add the pasta of your choice. Cook it according to the package instructions until it’s al dente. This usually takes around 8-10 minutes. Al dente means the pasta is firm but cooked. Before draining, reserve ½ cup of the pasta water. This water helps to adjust the sauce later. Drain the pasta and set it aside while you make the sauce. In a blender, combine the roasted red peppers, minced garlic, vegetable broth, and red pepper flakes. Blend until the mixture is smooth and creamy. This is the base of your sauce. Transfer the sauce to a saucepan over medium heat. Bring the sauce to a simmer. Season with salt and pepper to taste. This simple sauce packs a lot of flavor and is easy to make. Add the drained pasta to the saucepan with the roasted red pepper sauce. Toss everything together gently. If the sauce feels too thick, add reserved pasta water a little at a time. This will help reach your desired consistency. Mix until the pasta is well-coated in the sauce. Divide the pasta into bowls. Top each serving with a portion of burrata cheese. You can gently tear the burrata or leave it whole for a nice look. Lastly, garnish with fresh basil leaves and a sprinkle of grated parmesan cheese. This adds color and flavor to your dish. Serve hot and enjoy the wonderful blend of tastes! To get great charred skin on your red peppers, follow these steps: - Use high heat: Set your oven to 450°F (230°C). This helps the skin blister and char nicely. - Prep the peppers: Cut the peppers in half, remove the seeds, and place them skin-side up on a baking sheet. Drizzle with olive oil for flavor. - Watch the time: Roast for about 25-30 minutes. The skin should be dark and blistered. If you want to try other methods, grilling is a fun option. Just place whole peppers on the grill and turn until the skin chars. You can also use a broiler for quick results. Keep a close eye so they don’t burn! Cooking pasta can be tricky, but here are my tips: - Don’t overcook: Boil the pasta until it’s al dente. This means it should still have a slight bite. Check the package for timing. - Salt the water: Always add salt to your boiling water. This boosts the pasta's flavor. Use about 1-2 tablespoons for a big pot. Remember, you can reserve some pasta water. It helps adjust the sauce’s thickness later! To make your dish even tastier, consider adding extra herbs or spices: - Basil and parsley: These fresh herbs add brightness. - Oregano or thyme: A pinch of these can deepen the flavor. If you want to switch up the cheese, burrata is creamy and rich, but you can also try: - Ricotta: For a lighter option. - Goat cheese: This adds a tangy flavor. - Cream cheese: For extra creaminess. Mix and match to find your perfect flavor! {{image_2}} You can switch burrata for other cheeses. Ricotta adds a smooth texture. Goat cheese gives a tangy taste. Cream cheese can make the sauce creamier. Each choice brings a new spin to the dish. Want to make it heartier? Add grilled chicken, shrimp, or sausage. Chicken works well with the red pepper flavor. Shrimp adds a nice touch of sweetness. Sausage brings a bit of spice. Cook proteins separately and mix them in before serving. To make this dish vegan-friendly, swap burrata for vegan cheese. You can use cashew cheese or tofu for creaminess. Use vegetable broth and skip any animal products. This way, you keep the flavors while meeting dietary needs. To keep your Roasted Red Pepper Burrata Pasta fresh, store it in a sealed container. Make sure to let the pasta cool down to room temperature before putting it away. This helps prevent condensation and keeps the dish from getting soggy. Cooked pasta and sauce can last in the fridge for about three to four days. If you want to enjoy it later, make sure it is stored properly. When you’re ready to eat your leftovers, reheating is key. Place the pasta in a pot over low heat. Add a splash of water or broth to keep it moist. Stir gently to avoid overcooking the pasta. You can also use the microwave, but heat it in short bursts and stir in between. This helps heat it evenly and keeps it tasty. If you want to save your Roasted Red Pepper Burrata Pasta for longer, freezing is a great option. First, let the dish cool completely. Then, divide the pasta into portions and place them in freezer-safe bags or containers. Remove as much air as possible to prevent freezer burn. When you’re ready to enjoy it again, take the pasta out of the freezer and let it thaw in the fridge overnight. To reheat, use the same method as before. Heat it gently on the stove or microwave until it is warm throughout. You can use many types of pasta for this dish. I recommend: - Fettuccine: It holds the sauce well. - Penne: Its shape captures the sauce inside. - Spaghetti: A classic choice that twirls nicely. Choose any pasta you love. The key is to cook it until al dente for the best texture. Yes, you can use different bell peppers. Each type adds unique flavors. For instance: - Yellow bell peppers: Sweeter and milder than red. - Green bell peppers: A bit more bitter and earthy. - Orange bell peppers: Similar to red but slightly sweeter. These peppers will change the taste, so pick what you enjoy best. If you can’t find burrata, don’t worry. Try these options: - Fresh mozzarella: It has a similar creamy texture. - Ricotta cheese: Creamy and slightly sweet, it works well. - Goat cheese: Adds a tangy flavor that pairs nicely. These alternatives will still give you a delicious finish to your pasta. Adjusting spice is easy! Here are some tips: - For milder pasta: Reduce or omit red pepper flakes. - For more heat: Add more red pepper flakes or a pinch of cayenne. Taste as you go to get it just right for you. Yes, you can make the sauce ahead of time. Here’s how: - Prepare the sauce and let it cool. - Store it in an airtight container in the fridge for up to 3 days. When you're ready to serve, just reheat it on the stove. This makes meal prep easy and quick! This recipe uses simple ingredients and clear steps to create a tasty dish. Roasting red peppers gives the sauce a great flavor. Cooking the pasta just right keeps it perfect. You can customize it with different cheeses or proteins to fit your taste. Also, storing leftovers and reheating them properly is easy. Whether for dinner or lunch, this meal is sure to please. Enjoy the fun of making your dish unique!
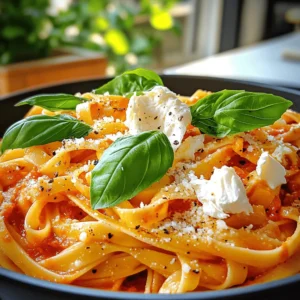
    Roasted Red Pepper Burrata Pasta Simple Flavor Boost
  • To make No Bake Pumpkin Spice Energy Bites, gather these key ingredients: - 1 cup rolled oats - 1/2 cup almond butter (or peanut butter) - 1/2 cup canned pumpkin puree - 1/4 cup honey or maple syrup - 1 teaspoon pumpkin spice - 1/2 teaspoon vanilla extract - Pinch of salt These ingredients blend to create a tasty and filling snack. The oats give you fiber, and the nut butter adds protein. The pumpkin puree offers moisture and flavor. If you want to mix things up, consider these optional add-ins: - 1/4 cup mini dark chocolate chips - 1/4 cup chopped nuts (like walnuts or pecans) - 1/4 cup dried fruit (like raisins or cranberries) These add-ins can enhance flavor and texture. Chocolate chips add sweetness, while nuts give a nice crunch. Dried fruit can bring a chewy element. You can make these energy bites fit different diets. Here are some easy swaps: - Use sunflower seed butter instead of nut butter for nut-free diets. - Swap honey for agave syrup for a vegan option. - Choose gluten-free oats if you need a gluten-free snack. These substitutions ensure everyone can enjoy these tasty bites. Adjusting the ingredients helps meet dietary needs without losing flavor. First, gather all your ingredients. You will need rolled oats, almond butter, pumpkin puree, honey or maple syrup, pumpkin spice, vanilla extract, and a pinch of salt. If you want a chocolate kick, grab some mini dark chocolate chips too. In a large mixing bowl, combine the rolled oats, almond butter, pumpkin puree, and honey. Add the pumpkin spice, vanilla extract, and salt. Mix these ingredients well. Use a spatula or your hands to blend them. The mix should feel thick and sticky. This texture is key for forming your energy bites. When mixing, ensure there are no dry spots in the bowl. If the mixture feels too dry, add a little more almond butter or a splash of milk. If it's too wet, sprinkle in more oats. The goal is to achieve a thick, moldable mix. If you choose to add chocolate chips, fold them in gently after the main mix is well combined. This way, you distribute them evenly without breaking them apart. After mixing, chill the mixture in the fridge for about 15 to 20 minutes. This helps it firm up. Once chilled, use your hands to shape the mixture into small balls, about one inch in diameter. If the mix sticks to your hands, dampen them slightly. This will make shaping easier. Place the formed bites on a parchment-lined baking sheet. Remember, you can store them in an airtight container in your fridge for up to a week. To bring out the warm flavors in your No Bake Pumpkin Spice Energy Bites, use fresh pumpkin spice. You can make your own blend with cinnamon, nutmeg, and ginger. Adding a pinch of cloves can also kick up the flavor. If you love nuts, try mixing in chopped walnuts or pecans for crunch. You can also swap the mini dark chocolate chips for white chocolate or dried cranberries. Each change will give your bites a new twist. Finding the right sweetness is key. If you want a sweeter bite, add more honey or maple syrup. Start with a tablespoon at a time. Taste the mixture after each addition. If you prefer less sweetness, reduce the honey or syrup by a tablespoon. You can also use unsweetened nut butter to balance flavors. Remember, the sweetness can change once the bites chill. Chill your mixture for about 15-20 minutes before forming balls. This helps the mixture firm up and makes it easier to shape. Store your energy bites in an airtight container in the fridge. They stay fresh for up to a week. For longer storage, freeze them in a single layer on a baking sheet first. Once frozen, transfer them to a freezer bag. You can pull them out easily when you need a quick snack. Always check for signs of spoilage, like changes in smell or texture, before eating. {{image_2}} You can change the flavor of your energy bites. Try adding cocoa powder for a chocolate twist. Use 1/4 cup of cocoa powder when mixing. This will give you a rich, chocolate flavor. If you love coconut, add 1/4 cup of shredded coconut. This adds a tropical taste and texture. You can also mix in spices like cinnamon or nutmeg for extra warmth. These energy bites fit many diets. To make them vegan, swap honey for maple syrup. Use almond butter or peanut butter based on your choice. They are naturally gluten-free since they use rolled oats. Just ensure your oats are labeled gluten-free. This way, everyone can enjoy them without worry. Seasonal additions can make these bites extra special. In fall, you might add chopped nuts like walnuts or pecans. They add crunch and flavor. Try adding dried fruits such as cranberries or raisins. This gives a sweet and chewy texture. You can also experiment with pumpkin seeds for a boost of nutrition and crunch. You can store your No Bake Pumpkin Spice Energy Bites in the fridge. Keep them in an airtight container. They stay fresh for up to one week. This way, you can grab a quick snack anytime. For longer storage, freeze these energy bites. Place them in a freezer-safe bag or container. They can last for up to three months in the freezer. Just remember to label the bags with the date. When you're ready to eat, thaw them in the fridge overnight. Check for changes in smell or texture. If the bites smell sour or feel slimy, it's time to toss them. Look for any signs of mold. Always trust your senses; they help you stay safe. Yes, you can use different nut butters. Almond butter works great, but peanut butter is also tasty. Cashew butter or sunflower seed butter are good choices too. Each nut butter gives a unique flavor and texture. Just keep the same amount as in the recipe. To reduce stickiness, chill the mixture for a bit longer. Adding a little more oats can help too. You could also wet your hands slightly when rolling the bites. This method makes it easier to form the balls without sticking to your fingers. These energy bites are packed with healthy ingredients. Rolled oats provide fiber, which is great for digestion. The pumpkin puree is rich in vitamins A and C. Almond butter adds protein and healthy fats. Honey or maple syrup gives a natural sweetness. Overall, these bites offer energy and nutrients without added sugars. In this post, we've covered all you need to know about making energy bites. You learned the key ingredients, step-by-step instructions, and handy tips to enhance flavor. We explored variations to suit dietary needs and shared storage advice to keep them fresh. Energy bites are fun and easy to make. You can create a version for any taste. With a little creativity, you can enjoy healthy snacks that fit your lifestyle. Now, get in the kitchen and make your own batch!
    No Bake Pumpkin Spice Energy Bites Healthy Snack
  • - 3 to 4 pounds beef chuck roast - 3 large onions, thinly sliced - 4 cloves of garlic, minced - 4 cups beef broth - 2 tablespoons olive oil - 1 tablespoon fresh thyme leaves (or 1 teaspoon dried thyme) - 2 bay leaves - Salt and pepper to taste - 1 cup Gruyère cheese, grated - 1 French baguette, sliced When it comes to beef, look for a chuck roast with good marbling. Marbling adds flavor and makes the roast tender. Choose onions that feel heavy for their size. They should have smooth, shiny skin. For the broth, use low-sodium beef broth for better control of salt. Fresh thyme gives the best taste, but dried works too. Always check the expiration date on packaged items. Fresh garlic adds a punch to the dish, so pick firm cloves that are not sprouted. Start by seasoning the beef chuck roast. Use salt and pepper to coat all sides well. This step adds flavor and helps the meat taste great. Set the seasoned roast aside for now. Heat olive oil in a large skillet over medium-high heat. When the oil is hot, add the roast. Sear it for 4-5 minutes on each side. You want it to be nicely browned. This helps lock in juices. Once browned, remove the roast and set it aside. In the same skillet, add the thinly sliced onions. Sauté them for about 10-12 minutes. You want the onions to become soft and lightly browned. This adds sweetness to your dish. After that, add the minced garlic and sauté for 2 more minutes. This gives your meal a nice aroma. Pour in the beef broth while scraping the skillet’s bottom. This adds extra flavor from the browned bits. Now, transfer the caramelized onions into the slow cooker. Place the seared roast on top. Add thyme and bay leaves for more flavor. Then, pour the beef broth mixture over the meat. Cover the slow cooker and set it to low. Cook for 8-10 hours. The roast should be fork-tender when done. After cooking, remove the roast and let it rest for about 10 minutes before slicing. Discard the bay leaves from the broth. For an extra treat, serve slices of the roast on toasted baguette slices. Top them with Gruyère cheese if you like. Broil them for 1-2 minutes until the cheese is melted and bubbly. Enjoy your meal! To get the best flavor in your Slow Cooker French Onion Pot Roast, start with high-quality beef. I recommend a beef chuck roast for its rich taste. Season the roast well with salt and pepper. Searing the meat in olive oil adds depth. Don’t skip the step of caramelizing onions. They bring sweetness and umami to the dish. Use fresh thyme for a bright flavor, or dried thyme if fresh isn’t available. To ensure your meat is tender, cook it low and slow. Set your slow cooker on low for 8 to 10 hours. This slow cooking breaks down tough fibers in the meat. If you want to speed things up, you can cook it on high for 4 to 5 hours, but I recommend going low for the best results. Rest the roast for 10 minutes after cooking before slicing. This helps keep the juices in. For serving, slice the roast and place it on toasted baguette slices. Top with melted Gruyère cheese for that French onion flair. You can also serve it with a bowl of the rich onion broth. A sprinkle of fresh thyme leaves adds a nice touch. Pair this dish with a simple green salad or roasted vegetables for a balanced meal. Enjoy this comforting dish with family or friends on a cozy night! {{image_2}} You can switch up the meat in this recipe. While beef chuck roast is a classic, you might try a brisket or even pork shoulder. Each type gives a different taste and texture. A brisket can be more tender, while pork shoulder adds a hint of sweetness. If you prefer leaner meat, use a round roast. Just remember, the cooking time may change based on the cut you choose. To boost the flavors, consider adding a splash of red wine. It adds depth and richness. You can also toss in sliced mushrooms for an earthy tone. Some fresh herbs, like rosemary or parsley, can brighten the dish. For a spicy kick, add a pinch of red pepper flakes. If you want a hint of sweetness, a tablespoon of balsamic vinegar works wonders. If you don’t have a slow cooker, you can still make this dish. Use a Dutch oven on the stovetop. Start by searing the meat like in the slow cooker method. Then, add your onions and broth. Cover and let it simmer on low heat for about 3-4 hours. You can also use an oven. Set it to 325°F and let it cook for 3-4 hours. Both methods yield a deliciously tender pot roast. After enjoying your Slow Cooker French Onion Pot Roast, store leftovers right away. Place the pot roast in an airtight container. Make sure to include some broth with the meat. This keeps the roast moist. You can keep it in the fridge for up to three days. To reheat, use a microwave or stove. If using a microwave, place the roast on a plate. Pour some broth over it to keep it juicy. Heat it for about 2-3 minutes, checking to see if it’s warm. If using a stove, place the roast in a pot with some broth. Warm it on low heat until it is hot throughout. You can freeze the pot roast for longer storage. Allow the roast to cool completely. Then, slice it and place it in a freezer-safe bag or container. Make sure to add some broth again. Label the bag with the date. The roast can stay in the freezer for up to three months. When you’re ready to eat, thaw it in the fridge overnight and reheat as mentioned above. Cooking a pot roast in a slow cooker takes about 8 to 10 hours on low heat. This long cooking time helps the meat become tender and flavorful. If you're short on time, you can cook it on high for about 4 to 5 hours, but the meat may not be as tender. Yes, you can use different cheeses for your pot roast. While Gruyère cheese adds a nice flavor, you can also try Swiss or mozzarella. If you want a sharp taste, cheddar works well too. Feel free to experiment with cheeses you enjoy. You can serve the French onion pot roast with a few tasty sides. Here are some ideas: - Garlic bread or toasted baguette - Mashed potatoes or creamy polenta - Steamed vegetables like green beans or carrots - A fresh side salad with vinaigrette These sides balance the rich flavors of the pot roast nicely. You will know the pot roast is done when it is fork-tender. This means you can easily pull it apart with a fork. If you have a meat thermometer, the internal temperature should be at least 195°F to 205°F for ideal tenderness. Always let the roast rest for 10 minutes before slicing. We covered all the steps to make a great pot roast. First, we looked at ingredients, both required and optional. Then, we detailed preparation, cooking, and tips for great flavor. I shared variations you can try and how to store leftovers well. With this guide, you can create delicious meals every time. Now, get cooking and enjoy your rich, tender pot roast with family and friends!
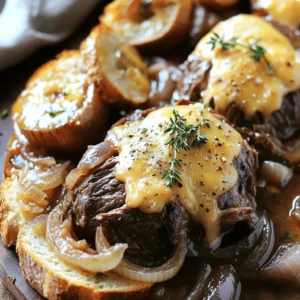
    Slow Cooker French Onion Pot Roast Simple Recipe
  • To make Air Fryer Honey Butter Corn Ribs, you need just a few key items: - 2 large ears of corn, husked and cut into quarters - 4 tablespoons unsalted butter, melted - 2 tablespoons honey - 1 teaspoon garlic powder - 1 teaspoon smoked paprika - Salt and pepper to taste - Chopped fresh parsley for garnish (optional) These ingredients create a sweet and savory flavor that really shines. Fresh corn is best for this dish. Look for corn with bright green husks and plump kernels. The butter should be unsalted for a balanced taste. Honey adds the perfect sweetness, while fresh parsley gives a nice touch. If you don’t have honey, maple syrup works well. For garlic powder, fresh minced garlic can be used. If you want a little heat, try adding cayenne pepper instead of smoked paprika. You can also replace unsalted butter with olive oil for a lighter option. Start by husking two large ears of corn. Cut each ear into quarters. This gives you the corn ribs. Make sure your pieces are even. This helps them cook well. Place the corn ribs in a large mixing bowl. You want them ready for the honey butter sauce. In a small bowl, combine four tablespoons of melted unsalted butter with two tablespoons of honey. Add one teaspoon of garlic powder and one teaspoon of smoked paprika. Season with salt and pepper to your taste. Mix this well. The blend should be smooth and creamy. This sauce will coat the corn ribs and add a lot of flavor. Preheat your air fryer to 375°F (190°C). Let it warm up for about five minutes. Once ready, pour the honey butter sauce over the corn ribs. Toss them gently to make sure every piece is coated. Place the corn ribs in a single layer in the air fryer basket. Do not overcrowd them; they need space to cook evenly. Air fry the corn ribs for 10 to 12 minutes. Flip them halfway through cooking. This makes sure they get golden brown and crispy on the edges. After they cook, carefully take them out. Drizzle any leftover honey butter sauce over the corn. If you like, add chopped fresh parsley for a nice touch. Enjoy your tasty corn ribs right away! To get that perfect crispiness, start by cutting the corn into quarters. This helps them cook evenly. Make sure your air fryer is preheated to 375°F (190°C) before you add the corn. This step is key. Arrange the corn ribs in a single layer in the basket. Avoid overcrowding them. If the basket is too full, they will steam instead of crisp. You can boost the flavor in many ways. First, try adding more spices. A pinch of cayenne pepper can give a nice kick. For a fresh twist, mix in some lime juice. You can also switch up the herbs. Chopped cilantro or chives can replace parsley for a different taste. Drizzling extra honey butter right before serving adds sweetness and shine. One common mistake is not preheating the air fryer. This can lead to soggy corn. Another mistake is not flipping the corn while cooking. Flipping ensures even browning. Also, be careful with the honey. Too much can make the sauce too sticky. Stick to the recipe for the best results. {{image_2}} To spice up your corn ribs, add heat! Mix in 1 teaspoon of cayenne pepper or chili powder to the honey butter sauce. This adds a kick to each bite. You can also drizzle a bit of hot sauce over the cooked ribs for extra flavor. This version is perfect for those who love bold tastes. Want to make this dish vegan? No problem! Swap out the butter for plant-based butter or coconut oil. Use agave syrup instead of honey. This keeps the sweet taste while keeping it plant-based. Your guests will love this version too! For a fresh twist, try adding herbs and cheese. After air frying, sprinkle the corn ribs with crumbled feta or shredded parmesan. Fresh herbs like cilantro or chives also work great. These toppings will give your dish a savory finish that is hard to resist. To keep your leftover corn ribs fresh, place them in an airtight container. Make sure they are cooled down to room temperature before sealing. Store them in the refrigerator. They will last for about 3-4 days. If you want to keep them longer, consider freezing. When you are ready to enjoy your leftover corn ribs, reheating them right is key. For the best taste, use the air fryer. Set it to 350°F (175°C). Place the corn ribs in a single layer. Heat them for about 5-7 minutes. This will help restore their crispness. You can also use a microwave, but the texture may not be as good. If you want to freeze your corn ribs, follow these steps. First, let them cool completely. Next, wrap each piece tightly in plastic wrap. Place them in a freezer-safe bag or container. Make sure to remove as much air as possible. These corn ribs can be frozen for up to 2 months. When you are ready to eat them, thaw them in the fridge overnight before reheating. Yes, you can use frozen corn. Just make sure to thaw it first. Cut the thawed corn into quarters. The honey butter sauce will still coat the corn well. The cooking time may be a bit different. Check for doneness to ensure they are crispy and heated. Corn ribs last about 3-4 days in the refrigerator. Store them in an airtight container. Make sure they cool completely before sealing. This keeps them fresh and safe to eat. Enjoy them cold or reheat for a tasty snack. Absolutely! You can prepare the honey butter sauce in advance. Mix all the ingredients and store them in the fridge. Just give it a good stir before using. This saves time on busy cooking days and adds flavor to your corn ribs. Air fryer honey butter corn ribs are fun and easy to make. We covered key ingredients, like fresh corn and honey butter sauce. I shared step-by-step instructions for perfect prep and cooking. You learned tips for crispiness and flavor boosts, plus fun variations, including spicy and vegan options. Remember, storing leftovers correctly keeps them tasty. Always reheat for the best results. With these insights, you'll create delicious corn ribs that impress anyone. Enjoy your cooking adventure!
    Air Fryer Honey Butter Corn Ribs Tasty and Easy Recipe
  • - 2 cups all-purpose flour - 1 cup fresh or frozen blueberries - 1/2 cup granulated sugar - 1/4 cup brown sugar, packed - 1 teaspoon baking powder - 1/2 teaspoon baking soda - 1/2 teaspoon salt - 1/2 cup unsalted butter, melted - 2 large eggs - 1 teaspoon vanilla extract - 1/2 cup buttermilk or milk with lemon juice - Optional: Zest and juice of 1 lemon The ingredients for this blueberry muffin loaf are simple and easy to find. You start with two cups of all-purpose flour. This gives your loaf a nice structure. Next, you need one cup of fresh or frozen blueberries. These little gems add sweetness and a burst of flavor. When using frozen blueberries, make sure to thaw and drain them to avoid extra moisture. For sweetness, use half a cup of granulated sugar and a quarter cup of packed brown sugar. The brown sugar gives depth and a hint of caramel flavor. In the baking essentials, you have one teaspoon of baking powder. This helps your loaf rise and become fluffy. A half teaspoon of baking soda and a half teaspoon of salt balance the flavors. You also need half a cup of unsalted butter. Melt it and let it cool slightly before adding. This will keep your loaf moist and rich. For the liquid ingredients, you will use two large eggs. They bind everything together. One teaspoon of vanilla extract adds a warm, inviting aroma. You can use half a cup of buttermilk or milk with a little lemon juice to create a tangy flavor. Lastly, if you want a fresh twist, add the zest and juice of one lemon. It brightens up the loaf and complements the blueberries perfectly. - Preheat the oven to 350°F (175°C). - Grease or line a 9x5-inch loaf pan. First, you need to set your oven. A hot oven helps the loaf rise well. Greasing the pan or using parchment paper makes it easy to remove later. - Combine flour, sugars, baking powder, baking soda, and salt in a bowl. In a big bowl, mix the flour, both sugars, baking powder, baking soda, and salt. This step is key. It makes sure all dry parts blend well. - Mix melted butter, eggs, vanilla extract, buttermilk, and optional lemon ingredients. In another bowl, whisk together melted butter, eggs, vanilla extract, buttermilk, lemon zest, and lemon juice if you like. This mix adds moisture and flavor to your loaf. - Mix wet and dry ingredients; fold in blueberries. Now, pour the wet mix into the dry mix. Stir gently until just combined. Be careful not to overmix. Then, fold in the blueberries. This step adds bursts of flavor throughout the loaf. - Pour batter into the pan, decorate with blueberries. - Bake for 50-60 minutes; check doneness with a toothpick. Pour the batter into your prepared pan. You can sprinkle a few blueberries on top for a nice look. Bake for 50-60 minutes. Use a toothpick to check. If it comes out clean, the loaf is done. - Cool in the pan, then transfer to a wire rack. Once baked, let the loaf cool in the pan for about 10 minutes. Then, move it to a wire rack to cool completely before slicing. This helps keep the loaf from getting soggy. To make your loaf shine, avoid overmixing the batter. Mixing too much can make it tough. Stir just until you see no dry flour. This keeps the loaf soft and light. Next, ensure even distribution of blueberries. Gently fold them into the batter. This helps each slice have its share of fruit without breaking them. For a pretty finish, dust the loaf with powdered sugar. You can also drizzle it with a lemon glaze. This adds flavor and makes it look special. Pair your slice with tea or coffee. The warm drink brings out the flavors in the loaf. Using old baking powder or baking soda can ruin your loaf. Check the dates on your baking supplies. Fresh ingredients rise better and give a nice texture. If you use frozen blueberries, adjust your baking time. Thaw and drain them to avoid extra moisture. This keeps your loaf from becoming soggy. {{image_2}} You can make your blueberry muffin loaf more exciting. Adding nuts like walnuts or pecans gives a nice crunch. These nuts add protein and healthy fats. They also bring a rich flavor that pairs well with blueberries. You might also try spices like cinnamon or nutmeg. A pinch of cinnamon can warm the loaf. Nutmeg adds a sweet, earthy taste. Both spices complement the blueberries perfectly. If you need a gluten-free option, use gluten-free flour. Many brands work well in this recipe. They can give you a soft and tasty loaf without the gluten. For a dairy-free option, try using almond milk or coconut milk. Simply mix it with a bit of lemon juice. This creates a buttermilk substitute. It keeps the loaf moist while meeting dietary needs. Seasonal fruits can change the loaf's flavor. Swap out blueberries for strawberries or raspberries. Both fruits are sweet and juicy. They bring a fresh taste to your loaf. You can enjoy different flavors all year round! After baking, let your blueberry muffin loaf cool completely. You can store it at room temperature for up to three days. Use an airtight container to keep it fresh. If you live in a warm area, consider putting it in the fridge. This helps avoid mold. Just remember that the loaf may dry out faster in the fridge. To freeze your loaf, first wrap it tightly in plastic wrap. Then, place it in a freezer bag or an airtight container. This keeps out air and prevents freezer burn. When you want to enjoy it, thaw the loaf in the fridge overnight. You can also leave it out on the counter for a few hours. Warm it up in the oven for a few minutes for a fresh taste. For the best taste and texture, eat your blueberry muffin loaf within a week. If stored properly, it can last longer, but the flavor may fade. If you notice any off smells or mold, it’s best to throw it away. Enjoying the loaf fresh will always give you the best experience. Baking the blueberry muffin loaf takes about 50 to 60 minutes. To check if it is done, insert a toothpick into the center. If it comes out clean, your loaf is ready. The top should be golden brown, and the loaf should spring back when lightly touched. Yes, you can use frozen blueberries. Just thaw and drain them before adding to the batter. This helps to avoid excess moisture. Frozen blueberries may burst more during baking, which can add a nice color to your loaf. You can make a quick substitute by mixing regular milk with lemon juice. For every half cup of buttermilk, use half a cup of milk and add half a tablespoon of lemon juice. Let it sit for five minutes to thicken. You can also use plain yogurt or plant-based milk for non-dairy options. A soggy loaf may feel heavy or dense. Check for a wet or gummy center with a toothpick. If you mix the batter too much, it can also lead to a soggy texture. Make sure to mix until just combined for the best results. In this article, we explored how to make a delicious blueberry muffin loaf. We covered key ingredients, step-by-step instructions, tips to perfect your loaf, and fun variations to try. Remember, avoid overmixing and choose fresh ingredients for the best flavor. Whether you enjoy it warm with tea or save some for later, this loaf is sure to please. Baking can be simple and fun, so get creative!
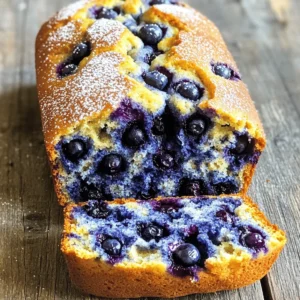
    Blueberry Muffin Loaf Simple and Tasty Recipe
  • - 1 pound boneless, skinless chicken thighs - 1 tablespoon olive oil - 1 small onion, finely chopped - 2 cloves garlic, minced - 1-inch piece ginger, grated The main part of this dish is the chicken. I prefer boneless, skinless chicken thighs for their juicy texture. They soak up flavor well and cook nicely. You will also need some olive oil to sauté the onion. The onion adds sweetness and depth. Garlic and ginger give this dish a nice kick. - 1/4 cup low-sodium soy sauce - 2 tablespoons honey - 2 tablespoons rice vinegar - 1 teaspoon sesame oil For the sauce, low-sodium soy sauce is key. It brings saltiness without being overpowering. Honey adds sweetness and balances the flavors. Rice vinegar gives a hint of tang. Finally, sesame oil adds a nutty aroma that enhances the dish. - 1/2 teaspoon red pepper flakes (optional, for heat) - 1 large head of butter or iceberg lettuce, leaves separated - 1/4 cup green onions, chopped (for garnish) - 1 tablespoon sesame seeds (for garnish) Red pepper flakes add a touch of heat, but you can skip them if you prefer. For wrapping, butter or iceberg lettuce works great. They are sturdy and crisp. Green onions and sesame seeds make perfect garnishes. They add color and extra flavor. First, you need to make the marinade. In a medium bowl, combine the diced chicken thighs with 1/4 cup of low-sodium soy sauce, 2 tablespoons of honey, 2 tablespoons of rice vinegar, and 1 teaspoon of sesame oil. If you like heat, add 1/2 teaspoon of red pepper flakes. Mix all the ingredients well to coat the chicken. Let it marinate for about 15 to 20 minutes. This helps the chicken soak up all the tasty flavors. While the chicken marinates, heat 1 tablespoon of olive oil in a large skillet over medium heat. Add 1 small finely chopped onion to the skillet and sauté it for about 3 to 4 minutes until it becomes translucent. Then, add 2 cloves of minced garlic and a 1-inch piece of grated ginger. Stir these for 1 minute until they release their fragrant smell. This step creates a delicious base for your dish. Now it's time to cook the chicken. Increase the heat to medium-high and add the marinated chicken to the skillet. Cook for 6 to 8 minutes, stirring occasionally. You want the chicken to be cooked through and slightly caramelized. Make sure there’s no pink left in the center. This adds a nice flavor and texture to the wraps. Once the chicken is ready, remove the skillet from heat and allow the mixture to cool slightly. To serve, take a lettuce leaf from a large head of butter or iceberg lettuce. Spoon a generous amount of the teriyaki chicken mixture onto the leaf. Garnish with 1/4 cup of chopped green onions and sprinkle 1 tablespoon of sesame seeds on top. Now, wrap the lettuce around the filling. Hold it like a taco and enjoy this tasty hand-held delight! For the best flavor, marinate the chicken for 15-20 minutes. This time allows the chicken to soak in the teriyaki sauce. You can adjust the soy sauce and honey based on your taste. If you prefer it sweeter, add more honey. For saltiness, increase the soy sauce slightly. To get that nice caramelized finish, heat your skillet well before adding the chicken. The high heat helps the sugars in the sauce brown. Stir the chicken often to prevent burning. Cook it until it is just done, about 6-8 minutes. If the chicken cooks too long, it can become dry. Serve these wraps with a side of rice or steamed veggies. They balance well with the fresh flavors of the wraps. For a fun touch, lay the wraps out on a platter. Garnish with green onions and sesame seeds for a colorful look. Enjoy the crunch of the lettuce against the savory chicken! {{image_2}} You can switch up the chicken for other proteins. Chicken breasts work great too. They have less fat and cook quickly. You can also try beef or pork if you want something different. For a vegetarian option, tofu and tempeh are excellent choices. They soak up flavors well and add protein. Cut them into small cubes and marinate like the chicken. Then, sauté until golden. Adding fresh vegetables to the filling makes it more colorful. Try bell peppers, carrots, or mushrooms. Chop them up small and mix them in while cooking. This adds crunch and nutrients. You can also experiment with different sauces or spices. Try adding hoisin sauce for a sweet twist. A dash of sriracha can kick up the heat. Mix and match flavors to find your favorite. While butter or iceberg lettuce works well, you can use other greens. Romaine is sturdy and has a nice crunch. You can even use cabbage leaves for a fun twist. For a low-carb option, consider using leafy greens like kale or collard greens. They are nutrient-dense and hold up well. Just remove the thick stems to make wrapping easier. To keep your teriyaki chicken fresh, place it in the fridge. Use an airtight container to avoid any odors. You can store it for up to three days. If you want to keep it longer, consider freezing it. Use freezer-safe bags or containers for best results. The best methods to reheat your chicken are the stovetop or microwave. When using the stovetop, add a splash of water to keep it moist. Heat over low until it's warm throughout. If using the microwave, cover the dish with a damp paper towel. This keeps the chicken from drying out. Aim for one to two minutes of heating, checking often. To save time, you can prepare components in advance. Chop your veggies and marinate the chicken the night before. However, assemble wraps fresh for the best texture. Pre-made wraps can become soggy. If you need to make them ahead, store the chicken and lettuce separately until you are ready to eat. You can easily make these wraps gluten-free by using tamari instead of soy sauce. Tamari is a gluten-free soy sauce alternative. It has a similar taste and works well in marinades. Look for a brand that is labeled gluten-free to be safe. Yes, you can prep the chicken in advance. Marinate the chicken thighs for up to 24 hours. This helps the flavors soak in. Cook the chicken just before serving. This keeps it fresh and tasty. For quick and healthy sides, try steamed broccoli or a simple cucumber salad. You can also serve brown rice or quinoa for a filling meal. These sides complement the wraps well and add color to your plate. In this post, we explored how to make delicious teriyaki chicken lettuce wraps. We covered the key ingredients and step-by-step instructions, from marinating the chicken to assembling the wraps. I included tips for cooking, variations for protein options, and storage advice for leftovers. These wraps are easy to prepare and great for any meal. Try them out for your next dinner! Enjoy making these tasty treats and sharing them with friends and family.
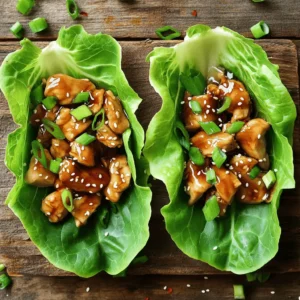
    Teriyaki Chicken Lettuce Wraps Flavorful and Easy Meal
  • For my parfaits, I use 2 cups of fresh strawberries. I hull and slice them to bring out their sweetness. If your strawberries taste tart, you can add 1 tablespoon of sugar. Let them sit for about 10-15 minutes. This helps release their juices and makes them extra tasty. I choose 1 cup of softened cream cheese for a smooth base. Mixing it with 1 cup of heavy whipping cream adds a light texture. To sweeten this mixture, I use ½ cup of powdered sugar. A teaspoon of vanilla extract gives it a warm flavor. I whip everything until soft peaks form. This step is key for a fluffy cheesecake layer. For the crust, I crush 1 cup of graham crackers. I mix these crumbs with 2 tablespoons of melted butter. This creates a rich, sandy texture. It acts as a perfect base for the parfait. The crunch pairs well with the creamy layers above. With these simple ingredients, you can create a delightful no-bake dessert. Each element plays a role in making the parfaits delicious and fun to eat! Start with fresh strawberries. Wash them well and remove the green tops. Slice the berries into small pieces. Place them in a bowl. If the strawberries are not very sweet, add one tablespoon of sugar. Mix gently. Let the berries sit for ten to fifteen minutes. This helps them release their sweet juices. Next, you’ll make the cheesecake filling. In a large bowl, beat one cup of softened cream cheese. Mix until it is smooth and creamy. Now, add one cup of heavy whipping cream. Then, add half a cup of powdered sugar and one teaspoon of vanilla extract. Use an electric mixer to whip this mixture. Keep mixing until it forms soft peaks. This step is key to a light cheesecake texture. Now, it's time to put it all together. Grab your serving glasses or bowls. Start with a layer of the graham cracker mixture at the bottom. To make this mixture, combine one cup of crushed graham crackers with two tablespoons of melted butter. Mix until it looks like wet sand. Next, add a layer of the cream cheese mixture. Then, add a layer of your sweetened strawberries. Repeat these layers until the glasses are full. End with a layer of the cream cheese mixture on top. Chill the parfaits in the fridge for at least thirty minutes. This helps the flavors blend and the parfaits firm up. Before serving, garnish with fresh mint and a few strawberry slices for a nice touch. When picking strawberries, look for bright red ones. They should feel firm, not mushy. Check for a sweet smell; that’s a good sign. Avoid any with green or white spots. Fresh strawberries taste better and add more flavor to your parfaits. To get a creamy texture, use softened cream cheese. Beat it until smooth before adding other ingredients. Mixing in heavy whipping cream helps make it light and fluffy. Whip until soft peaks form, but don’t overmix. This keeps your cheesecake rich yet airy. Layering adds fun and style to your parfaits. Start with graham cracker crumbs at the bottom. Then add a layer of the cream cheese mix. Follow that with the sugared strawberries. Repeat these layers until you reach the top. Finish with cream cheese mix for a pretty look. Adding fresh mint gives a nice touch, too. {{image_2}} You can add fun flavors to your cheesecake. Instead of plain cream cheese, try lemon or chocolate. Just mix in the flavor you choose with the cream cheese. This adds a nice twist. You can use 1 tablespoon of lemon zest for a citrus kick. If you want chocolate, add ¼ cup of cocoa powder. Each flavor gives a new taste to your parfaits. While strawberries are great, many other fruits work well. Blueberries, raspberries, or peaches can give fresh tastes. You can mix fruits for a colorful treat. For a berry mix, use 1 cup of your favorite berries. For peaches, slice them thinly and layer them like the strawberries. Each fruit changes the flavor, making it fun to try new things. If you need gluten-free options, swap regular graham crackers for gluten-free ones. You can find these in most stores. Almond flour or gluten-free oats also work as a base. Just mix them with melted butter like you do with graham crackers. This way, you can enjoy the parfait without worries. Always check labels to ensure your ingredients fit your needs. You can store leftover parfaits in the fridge. Place them in an airtight container. This keeps them fresh for up to three days. If you used mint leaves, remove them before storing. This way, they won’t wilt and affect the taste. To make parfaits ahead of time, prepare them the night before. Layer the ingredients in the serving glasses. Cover them with plastic wrap and chill in the fridge. This lets the flavors blend well. Just add mint leaves right before you serve them. Check for signs of spoilage before eating. If you notice any off smell or change in color, discard the parfaits. The strawberries may become mushy or discolored, which means they are no longer fresh. Always trust your senses to ensure you enjoy safe and tasty treats. Yes, you can use frozen strawberries. Just thaw them first. This helps bring out their flavor. You may want to drain some extra juice. Frozen strawberries can be softer than fresh ones. They still taste great in parfaits. You can store the parfaits in the fridge for about three days. Keep them covered to stay fresh. The longer they sit, the softer the layers may become. But they still taste yummy! Yes, you can make these parfaits vegan. Use vegan cream cheese and coconut cream instead of heavy cream. Swap graham crackers for a vegan option. This way, everyone can enjoy the treat! This post covered how to make amazing strawberry cheesecake parfaits. We discussed choosing fresh strawberries, mixing cream cheese, and layering your parfaits perfectly. You learned tips for texture and ideas for variations. Storing your treats correctly keeps them fresh, and I answered your main questions, like using frozen strawberries. Enjoy crafting these tasty desserts for any occasion. Your friends and family will love them!
    Strawberry Cheesecake Parfaits No Bake Delightful Treat
  • For this dish, you need: - 1 lb flank steak, trimmed - 1 lb baby potatoes, halved - 4 cloves garlic, minced To make the flavors pop, grab: - 1 tablespoon fresh rosemary, chopped - 1 tablespoon fresh thyme, chopped - 1 teaspoon smoked paprika - 3 tablespoons olive oil - Salt and pepper to taste - Fresh parsley, chopped (for garnish) You will need a few key tools: - Large baking sheet - Parchment paper or cooking spray - Small mixing bowl - Resealable plastic bag or shallow dish - Large bowl for potatoes - Knife for slicing the steak To start, gather your ingredients. You need garlic, rosemary, thyme, smoked paprika, olive oil, salt, and pepper. In a small bowl, mix these together. This blend creates a rich flavor for your steak. The garlic adds zest, while the herbs bring freshness. The smoked paprika gives a warm, earthy taste. This marinade will make your steak shine. Next, take your flank steak. It should be trimmed and ready. Place it in a resealable bag or a shallow dish. Pour half the marinade over the steak. Make sure it is well coated. Seal the bag or cover the dish tightly. Now, let it chill in the fridge for at least 30 minutes. This wait lets the flavors soak in. If you have time, marinate for up to 2 hours for more taste. While the steak is marinating, it's time for the potatoes. Grab your baby potatoes and cut them in half. In a large bowl, add the remaining marinade to the halved potatoes. Toss them well until they are all coated. This step ensures each potato is flavorful. Spread the potatoes out on one side of your baking sheet. Make sure they have space to roast evenly. Once your steak has marinated, take it out of the fridge. Place it on the other side of the baking sheet, next to the potatoes. Preheat your oven to 425°F (220°C) if you haven't already. Roast everything for about 20-25 minutes. The steak should reach 135°F for medium-rare. The potatoes will turn golden and tender. After cooking, let the steak rest for 5 minutes. Slice it against the grain for the best texture. Serve with the roasted potatoes and garnish with parsley for a fresh touch. To marinate steak well, you need time and the right mix of flavors. Start by mixing minced garlic, chopped rosemary, thyme, smoked paprika, olive oil, salt, and pepper. This blend adds deep flavor. Place your flank steak in a bag or dish, then pour half the marinade over it. Seal it up and let it sit in the fridge for at least 30 minutes. For a richer taste, let it marinate for up to 2 hours. The longer it sits, the better it tastes. For the best roasted potatoes, cut them in half to help them cook evenly. Use the remaining marinade to coat them well. This adds flavor and helps them crisp up. Spread the potatoes on one side of your baking sheet. This gives them enough space to roast without steaming. Roast them at 425°F for 20-25 minutes. You want them golden brown and tender. Give them a little toss halfway through for even cooking. Steak doneness is key for the best taste. For medium-rare, aim for an internal temperature of 135°F. This gives you a juicy and tender steak. You can use a meat thermometer to check. If you prefer it more cooked, medium is 145°F, and medium-well is 150°F. Always let the steak rest for about 5 minutes before slicing. This keeps the juices inside, making every bite delicious. {{image_2}} You can mix up the flavors with different seasonings. Try using oregano or basil for a fresh twist. If you like heat, add a pinch of red pepper flakes. You can also swap smoked paprika for regular paprika for a milder taste. Each herb or spice can bring a new vibe to your dish. Experimenting allows you to find your favorite flavor. Flank steak is great, but other cuts work well too. Consider using sirloin, ribeye, or even skirt steak. Each cut has a unique taste and texture. Sirloin is lean and tender, while ribeye is rich and juicy. Skirt steak offers a deep beef flavor. Choose what you enjoy most or what you have on hand. Adding veggies boosts flavor and nutrition. Carrots, bell peppers, or zucchini make great choices. Just cut them to match the size of your potatoes. Toss them in the same marinade to soak up those tasty flavors. This way, you create a colorful, healthy meal all on one pan. Plus, it makes for an easy cleanup! After your meal, let the steak and potatoes cool. Place them in an airtight container. This keeps them fresh. Store in the fridge for up to three days. If you want to keep them longer, consider freezing. When you're ready to eat again, take the leftovers out. Preheat your oven to 350°F (175°C). Place the steak and potatoes in a baking dish. Cover them with foil to keep moisture in. Heat for about 15-20 minutes, or until warm. You can also use a microwave, but the oven keeps the food crispy. To freeze, wrap each piece of steak and potatoes tightly in plastic wrap. Then, place them in a freezer bag. Label the bag with the date. They can last up to three months in the freezer. When ready to eat, thaw overnight in the fridge. Then, reheat as mentioned above. Yes, you can use other potatoes. Red potatoes, Yukon Gold, or fingerlings work well. Each type has a unique taste and texture. Just make sure to cut them into similar sizes for even cooking. A nice red wine pairs well with garlic herb steak. Try a Cabernet Sauvignon or a Merlot. These wines enhance the savory flavors of the steak. The fruity notes balance the spices too. To serve more people, simply double or triple the ingredients. Use two baking sheets if needed. Keep the cooking time the same but check for doneness. This way, everyone enjoys a delicious meal. Yes, grilling is a great option! Preheat your grill to medium-high heat. Cook the marinated steak for about 6-8 minutes per side. For the potatoes, use a grill basket for even cooking. This method adds a smoky flavor. In this article, we covered how to make a delicious garlic herb steak and roasted potatoes. We explored key ingredients and kitchen tools, followed by step-by-step cooking instructions. Useful tips helped you understand marinating and cooking to the right doneness. We also discussed variations for different tastes and how to store leftovers. With these techniques, you can make a meal that impresses. Enjoy your cooking!
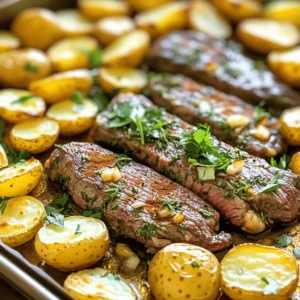
    Garlic Herb Steak Potato Sheet Pan Simple Meal Idea
  • - 8 oz penne pasta - 2 cups fresh spinach, chopped - 1 can (14 oz) artichoke hearts, drained and quartered - 3 cloves garlic, minced - 1 small onion, diced - 4 cups vegetable broth - 1 cup heavy cream - 1 cup grated Parmesan cheese - 1 teaspoon dried oregano - 1 teaspoon red pepper flakes (optional) - Salt and pepper to taste - 2 tablespoons olive oil - Fresh basil leaves for garnish To create this One Pot Spinach Artichoke Pasta, you need both main and additional ingredients. First, the penne pasta serves as the base. It holds the creamy sauce and flavors well. Fresh spinach adds a bright green touch and nutrients. Artichoke hearts bring a tasty, unique flavor. Garlic and onion provide a strong aroma and depth to the dish. Next, you need vegetable broth for the cooking liquid. Heavy cream makes the dish rich and creamy. Parmesan cheese adds a salty, nutty taste that blends beautifully. Dried oregano gives warmth, while red pepper flakes add a hint of heat, if you like. Don’t forget salt and pepper for seasoning. Olive oil helps sauté the onion and garlic, creating a flavorful start. Finally, fresh basil leaves brighten up the dish when sprinkled on top. Gather these ingredients to make a delightful pasta dish that you can enjoy with family and friends. Start by heating olive oil in a large pot over medium heat. Once hot, add the diced onion. Sauté it for 3 to 4 minutes. You want the onion to turn translucent. Next, add minced garlic and red pepper flakes. Cook this mix for about one minute. The goal is to wake up those flavors. Now it's time to add the penne pasta. Stir it into the pot with the vegetable broth and dried oregano. Bring this mixture to a boil. Once boiling, lower the heat to a simmer. Cover and let it cook for about 10 minutes. Stir occasionally. You want the pasta to be just al dente and most of the broth absorbed. After the pasta cooks, stir in the heavy cream, chopped spinach, and quartered artichoke hearts. Keep cooking for another 2 to 3 minutes. You want the spinach to wilt and everything heated through. Remove the pot from heat and stir in grated Parmesan cheese. Mix until it melts and becomes creamy. Finally, season with salt and pepper to taste. To make the best pasta, cook it al dente. This means it should be firm to the bite. To achieve this, follow these steps: - Start cooking the penne pasta as soon as the broth boils. - Stir it gently to prevent sticking. - Check for doneness around 10 minutes, or when most broth is absorbed. Timing is key when adding ingredients. Add the spinach and artichokes near the end. This keeps them fresh and vibrant. Fresh herbs boost flavor in any dish. I love using basil and oregano. They add a fragrant touch. You can chop fresh basil and sprinkle it before serving. Adding protein can make this dish heartier. Grilled chicken or shrimp pairs well with the pasta. You can add them in during the last few minutes of cooking. Presentation matters when serving food. A simple garnish can elevate your dish. I suggest using fresh basil leaves on top. They add color and look inviting. Serve the pasta in a large bowl. This makes it easy for guests to help themselves. Top each serving with extra Parmesan for a rich finish. {{image_2}} You can change the pasta shape to fit your taste. Try using fusilli or farfalle. These shapes hold sauce well and add fun to the dish. If you want a lighter meal, swap heavy cream for Greek yogurt or a plant-based cream. This keeps the dish creamy and cuts calories. If you follow a vegan diet, you can make this dish without dairy. Replace the heavy cream with coconut cream or cashew cream. You can also use nutritional yeast instead of Parmesan for a cheesy flavor. For those who need gluten-free options, choose gluten-free pasta. The recipe will still taste great and be safe for everyone. You can add seasonal vegetables to make the dish pop. In spring, toss in fresh peas or asparagus. In fall, try adding roasted pumpkin or butternut squash. Adjust the flavors with spices to match the season. A pinch of nutmeg in winter or fresh herbs in summer can elevate the taste. To store your One Pot Spinach Artichoke Pasta, let it cool first. Place it in an airtight container. This keeps it fresh and tasty. You can store leftovers in the fridge for up to three days. If you want to keep it longer, freeze it in a freezer-safe container. In the freezer, it lasts up to three months. When you are ready to eat, reheating is simple. You can use the microwave or the stove. If using the microwave, heat it in short bursts. Stir between intervals to warm evenly. On the stove, add a splash of broth or cream to the pot. This helps keep the dish creamy. Heat over low heat while stirring gently. Enjoy your delicious pasta just like fresh! You can use extra vegetable broth or lemon juice. Both options add flavor without alcohol. For a richer taste, try a splash of apple cider vinegar. The goal is to add acidity and depth to the dish. Yes, you can prepare this dish in advance. Cook it as usual, then let it cool before storing. Keep it in an airtight container in the fridge for up to three days. When you’re ready to serve, reheat on low heat, adding a splash of broth if needed. You can add many vegetables to enhance this dish. Try bell peppers, cherry tomatoes, or mushrooms. Zucchini and asparagus also work well. Just make sure to chop them small so they cook evenly and blend nicely with the pasta. If you like heat, add more red pepper flakes. You can also use diced jalapeños or spicy sausage. For a milder spice, try adding black pepper or a dash of hot sauce to your serving. Yes, frozen spinach works great in this recipe. Just make sure to thaw and drain it well. Frozen spinach has a similar taste and texture when cooked, making it a good substitute. To make this dish dairy-free, use coconut cream instead of heavy cream. For cheese, try a dairy-free Parmesan or nutritional yeast. This will keep the flavors rich while catering to dietary needs. Store leftovers in an airtight container in the fridge. They will last for up to three days. For longer storage, freeze it in portions. Just remember, reheated pasta may not be as creamy, so add a little broth while reheating. This pasta pairs well with a fresh salad or garlic bread. You could also serve it with roasted vegetables for a complete meal. For protein, consider grilled chicken or shrimp on the side. This article shared a simple and tasty pasta recipe. We explored the main and extra ingredients, along with step-by-step cooking instructions. You learned tips to enhance flavor and presentation. Variations cater to different diets and seasons. Finally, proper storage and reheating ensure tasty leftovers. With these insights, you can create a delightful meal that suits your needs. Enjoy your cooking adventures and impress your guests!
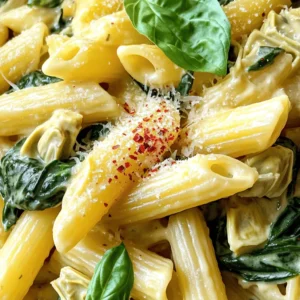
    One Pot Spinach Artichoke Pasta Flavorful Delight
  • Here are the ingredients you need for brown butter maple blondies: - 1 cup unsalted butter (2 sticks) - 1 cup brown sugar, packed - 1/2 cup granulated sugar - 2 large eggs - 2 teaspoons vanilla extract - 1 3/4 cups all-purpose flour - 1 teaspoon baking powder - 1/2 teaspoon salt - 1/2 cup maple syrup - 1/2 cup chopped pecans or walnuts (optional) Each ingredient plays a key role in making these blondies rich and sweet. The unsalted butter provides a smooth base, while brown sugar gives depth. Granulated sugar adds a touch of sweetness. Eggs bind everything together and create a soft texture. Vanilla extract enhances the flavor, making each bite delicious. All-purpose flour forms the structure of the blondies. Baking powder helps them rise just right. Salt balances the sweetness and brings out all the flavors. Maple syrup adds a lovely, natural sweetness that pairs beautifully with the brown butter. If you like, add optional chopped nuts for crunch and extra flavor. To start, you need to melt the butter. Place it in a medium saucepan over medium heat. Watch the butter closely. Swirl the pan from time to time. After about 5-7 minutes, the butter will turn a golden brown. This is when you will notice a nutty aroma wafting through the air. That scent is a sign that your butter is ready. Remove it from the heat and let it cool slightly. This step adds a rich flavor to your blondies. In a large mixing bowl, combine the browned butter with the brown sugar and granulated sugar. Stir until the mixture is smooth and well blended. Now, while the mixture is still warm, it's time to add the eggs. Crack them in one at a time. Beat well after each addition. Then, stir in the vanilla extract. This will add a sweet flavor to the batter. Preheat your oven to 350°F (175°C). Line a 9x13 inch baking pan with parchment paper. Make sure to leave some overhang. This will help you lift the blondies out later. Pour the blondie batter into the prepared pan. Spread it evenly across the bottom. Bake for 20-25 minutes. To check for doneness, insert a toothpick into the center. It should come out with some moist crumbs, not wet batter. This step ensures your blondies are perfectly baked and delicious. To get the right texture in your blondies, avoid overmixing the batter. When you mix too much, the blondies can become tough. Mix just until the dry ingredients blend in. Bake your blondies at 350°F (175°C) for 20-25 minutes. Check for doneness by inserting a toothpick. It should come out with moist crumbs, not wet batter. Spices like cinnamon or nutmeg can add a warm touch. Just a pinch can make a big difference. Using high-quality maple syrup is key. It boosts the flavor and sweetness. Look for pure maple syrup for the best taste. Overbaking can dry out your blondies. Keep an eye on them as they bake. Underbaking is better than overbaking, but be careful not to serve them gooey. Choosing the right pan size matters too. A 9x13 inch pan works well. If your pan is too small, the blondies may bake unevenly and overflow. {{image_2}} You can make your blondies even better with nuts. Pecans add a rich, buttery flavor. Walnuts offer a more earthy taste. Both work well, but I love pecans for their crunch. If you want to try something new, consider almonds or hazelnuts. They give a nice twist to the flavor and texture. Just chop them up and fold them in with the maple syrup. Chocolate makes everything better, right? Adding chocolate chips or chunks brings a sweet touch. You can use dark, milk, or even white chocolate. Each type changes the taste. If you like nuts, mix chocolate with your chosen nuts. The combo of chocolate and nuts in your blondies is pure bliss. Aim for half a cup of chocolate for a nice balance. Need to swap ingredients? You can use gluten-free flour if you want. Almond flour or a gluten-free mix works well. For a vegan version, replace eggs with flax eggs. Just mix one tablespoon of ground flaxseed with three tablespoons of water. Let it sit until it thickens. You can also use coconut oil instead of butter for a dairy-free option. These changes keep the blondies delicious and friendly for many diets. You can store your blondies at room temperature or in the fridge. If you plan to eat them soon, keep them at room temperature. Use an airtight container to keep them fresh. They will stay good for about four days. If you want to keep them longer, the fridge is a good choice. The cold will help them last up to a week. Just remember to wrap them well! Freezing blondies is easy and great for later. To freeze, cut them into squares first. Place them in a single layer on a baking sheet. Freeze for about an hour. Then, pack them in an airtight container or freezer bag. Make sure to label it with the date. They can last up to three months in the freezer. To thaw, take them out and leave them at room temperature. You can also warm them in the oven for a few minutes for that fresh taste! Blondies are sweet bars made with brown sugar. They are similar to brownies but lack cocoa. Blondies have a rich, buttery flavor. They often include vanilla and nuts for added taste. To make chewier blondies, use more brown sugar. This adds moisture and a soft texture. You can also reduce the flour slightly. Another tip is to bake them for a shorter time. Yes, you can use light brown sugar. It will change the flavor slightly but still taste great. Dark brown sugar has more molasses, giving a deeper flavor. Light brown sugar will keep your blondies sweet and soft. If you forget baking powder, your blondies may be denser. They won’t rise as much, leading to a fudgy texture. While still tasty, they might not be as light and fluffy. You can check if blondies are done by inserting a toothpick. It should come out with a few moist crumbs. If it comes out wet with batter, they need more time. Look for a golden edge and a slightly soft center. You now know how to make delicious brown butter maple blondies. We covered the ingredients, step-by-step instructions, and tips for baking. Remember to avoid overmixing and adjust for your taste with variations. Store your blondies properly to keep them fresh. By following these steps, you can enjoy chewy, flavorful blondies every time. Get ready to wow your friends and family with your baking skills!
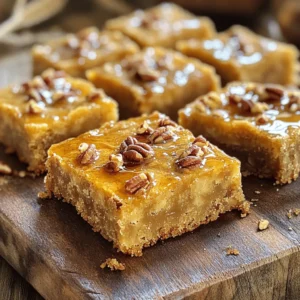
    Brown Butter Maple Blondies Irresistible Sweet Treat
  • - 4 cups whole milk - 1 cup pumpkin puree - 1 cup semi-sweet chocolate chips - 1/2 cup heavy cream - 1/2 cup sugar (adjust to taste) - 1 tablespoon vanilla extract - 1 teaspoon pumpkin pie spice - 1/4 teaspoon salt To create the perfect Slow Cooker Pumpkin Spice Hot Chocolate, you need key ingredients. Whole milk makes the drink rich and creamy. Pumpkin puree adds a smooth texture and fall flavor. Semi-sweet chocolate chips give the drink its sweet chocolate taste. Heavy cream boosts the creaminess. Sugar sweetens the mix, but you can adjust this to your liking. Vanilla extract adds warmth. Pumpkin pie spice gives that cozy fall vibe, while a touch of salt balances the sweetness. - Whipped cream - Ground cinnamon Toppings enhance the drink's look and taste. Whipped cream adds a fluffy layer on top. A sprinkle of ground cinnamon brings warmth and spice. You can also add an extra dash of pumpkin pie spice for more flavor. These simple touches make your hot chocolate feel festive! - Almond milk for whole milk - Coconut cream for heavy cream - Dark chocolate chips instead of semi-sweet You can change some ingredients if needed. Almond milk works well for a lighter option. Coconut cream gives a rich, dairy-free twist. If you prefer dark chocolate, swap the semi-sweet chips for a deeper chocolate flavor. These swaps keep the drink delicious while meeting your dietary needs. Start by gathering all your ingredients. You need: - 4 cups whole milk - 1 cup pumpkin puree - 1 cup semi-sweet chocolate chips - 1/2 cup heavy cream - 1/2 cup sugar (adjust to taste) - 1 tablespoon vanilla extract - 1 teaspoon pumpkin pie spice - 1/4 teaspoon salt - Whipped cream and ground cinnamon for serving Make sure your slow cooker is clean and ready to use. This recipe is quick to prep, taking about 10 minutes. Pour the whole milk, pumpkin puree, heavy cream, and sugar into the slow cooker. Stir well to mix everything. Next, add the chocolate chips, vanilla extract, pumpkin pie spice, and salt. Cover the slow cooker and set it on low for 2 hours. Stir occasionally. This helps the chocolate melt and the flavors mix well. When the time is up, use a whisk to blend the hot chocolate until it is smooth and creamy. To keep your hot chocolate smooth, stir often while it cooks. If you notice lumps, whisking will help. You can also use a hand blender for an ultra-smooth texture. For a richer taste, add more chocolate chips. If it’s too sweet, balance it with a pinch of salt. Adjust the sugar until it fits your taste. Enjoy this cozy drink topped with whipped cream and a dash of cinnamon! To make your Slow Cooker Pumpkin Spice Hot Chocolate shine, use high-quality chocolate chips. Semi-sweet chocolate gives a rich taste. You can also add a pinch of nutmeg or ginger for extra warmth. Stir in a splash of coffee for depth. A dash of orange zest can brighten the flavor, too. Start with half a cup of sugar, then taste. If you want it sweeter, add more sugar slowly. Remember, toppings like whipped cream can add sweetness. Consider using maple syrup for a more natural sweetener. This helps balance the pumpkin spice flavor without overpowering it. For a smooth texture, whisk the hot chocolate after it cooks. This blends all the ingredients well. If it seems too thick, add a little more milk. If it’s too thin, let it cook longer. The slow cooker helps meld flavors, so patience is key. Enjoy each sip with a creamy finish! {{image_2}} You can switch up the flavors in your hot chocolate. Try adding a splash of peppermint extract for a minty twist. A dash of caramel sauce gives it a sweet depth. You could also use white chocolate chips instead of semi-sweet ones for a creamier drink. Experiment with different spices like nutmeg or even ginger for a unique touch. If you prefer a dairy-free version, use almond milk or oat milk. Both work well and keep the drink creamy. Replace the heavy cream with coconut cream for richness. Use dairy-free chocolate chips to keep it vegan. Adjust the sugar to your taste, since some plant-based milks can be sweeter. For holiday fun, think about adding eggnog instead of milk. This gives your drink a festive flair. You can also mix in a bit of apple cider for a fall twist. Serve it in holiday mugs and sprinkle some extra spices on top. Don’t forget to add a cinnamon stick for stirring! To store leftover pumpkin spice hot chocolate, let it cool first. Pour it into a clean, airtight container. Make sure to seal it well. You can keep it in the fridge for up to three days. When you want to enjoy your hot chocolate again, pour it into a pot. Heat it on the stove over low heat. Stir it gently as it warms. You can also use a microwave-safe mug. Heat it in the microwave for about 30 seconds. Stir and check the temperature before drinking. If you want to save it longer, freeze the hot chocolate. Use ice cube trays for easy portions. Once frozen, transfer the cubes into a freezer bag. They can last up to three months in the freezer. To use, thaw the cubes in the fridge overnight. Then, reheat them as needed. Yes, you can use almond milk. It will change the taste and texture. Almond milk is lighter and may not be as creamy. For the best flavor, choose unsweetened almond milk. This keeps the pumpkin spice flavor strong. You can store the hot chocolate for up to three days in the fridge. Make sure to keep it in an airtight container. Reheat it on low heat on the stove. Stir well before serving to mix any settled ingredients. Yes, you can make it on the stovetop. Simply combine all ingredients in a pot. Heat on low and stir often. This method takes about 20-30 minutes. Watch it closely so it does not burn. You can serve it with cookies or muffins. Shortbread cookies and pumpkin muffins pair well. For a fun twist, add marshmallows or candy canes. They make great toppings and add sweetness. We covered the full list of ingredients, optional toppings, and even substitutions. The step-by-step guide helps you make this drink in a slow cooker. I shared tips for flavor and perfect texture. You can try different variations, from vegan options to seasonal twists. Remember to store and reheat leftovers for later. This recipe is easy and fun. Enjoy the warm, cozy flavors any time of year!
    Slow Cooker Pumpkin Spice Hot Chocolate Delight
  • - 2 cups cooked chicken breast - 1 can black beans - 1 cup corn kernels - 1 red bell pepper - 1/2 cup red onion - 1 avocado - 1/2 cup cherry tomatoes - 1/4 cup fresh cilantro - 1 tablespoon olive oil - 2 tablespoons lime juice - 1 teaspoon cumin - 1 teaspoon smoked paprika - Salt and pepper to taste - 1 jalapeño - Tortilla chips for garnish The main ingredients give this salad its heart and soul. I love using cooked chicken breast because it adds protein and flavor. Black beans bring a creamy texture and extra fiber. Corn kernels add sweetness, and red bell pepper brightens the dish with color and crunch. Red onion offers a sharp taste, while avocado provides creaminess. Cherry tomatoes burst with juice, and cilantro rounds it all off with fresh notes. For the dressing, I use olive oil and lime juice for zest. Cumin and smoked paprika give it a warm, smoky flavor. A pinch of salt and pepper finishes the mix. You can spice it up with a jalapeño if you like heat. Tortilla chips make a fun garnish, adding crunch. This combination creates a fresh and flavorful meal you can enjoy any time! {{ingredient_image_1}} Start by shredding the cooked chicken breast. Use a fork for easy shredding. Next, rinse and drain the black beans. This removes excess salt and helps with flavor. Then, dice the red bell pepper and avocado into small pieces. Finally, halve the cherry tomatoes. This adds freshness and color to the dish. In a small bowl, whisk together the olive oil and lime juice. Add cumin and smoked paprika for a kick. Season with salt and pepper to taste. This dressing brings all the flavors together. Mix all the salad ingredients in a large bowl. Add your shredded chicken, black beans, corn, diced red bell pepper, red onion, avocado, cherry tomatoes, and cilantro. Pour the dressing over the salad and toss gently. Be careful not to mash the avocado. If you want more heat, add the sliced jalapeño and mix again. Let the salad sit for about 10 minutes. This allows the flavors to meld together nicely. Serve in bowls or on a platter, garnished with tortilla chips for a crunchy finish. Letting the salad sit for about 10 minutes is key. This time helps the flavors mix well. I often adjust the seasoning to fit my taste. A little more salt or lime juice can make a big difference. You can add more veggies or proteins to make it your own. Consider adding bell peppers or cucumbers for crunch. You can also swap in different beans or greens. Chickpeas or spinach are great choices. This salad pairs well with tortilla chips for added crunch. You might also enjoy it with avocado toast or grilled meats. Each option enhances the flavors and makes for a complete meal. Pro Tips Use Rotisserie Chicken: For a quicker prep time, consider using store-bought rotisserie chicken. It’s flavorful and saves you time on cooking and shredding. Add More Veggies: Feel free to add other vegetables like cucumbers or zucchini for extra crunch and nutrition. The more colorful, the better! Customize the Heat: Adjust the spiciness by adding more or fewer jalapeños, or try using a different pepper, such as serrano or poblano, for a unique flavor. Make It Ahead: This salad can be made a few hours in advance. Just wait to add the avocado and tortilla chips until serving to keep them fresh. {{image_2}} You can easily make this salad vegetarian. Just swap the chicken for grilled tofu or chickpeas. Tofu provides a nice texture and absorbs flavors well. Chickpeas add protein and a hearty bite. Both options keep the salad filling and delicious. If you love heat, this salad can get even spicier. Add more jalapeños or some hot sauce for a kick. The extra spice brightens the flavors and makes each bite exciting. Adjust the heat level to match your taste. For a different twist, try a Southwest bean salad. Replace the chicken with quinoa or add extra beans. This keeps the salad light while still being packed with protein. Quinoa brings a nutty flavor, and extra beans give a great texture. To keep your Spicy Southwest Chicken Salad fresh, store leftovers in an airtight container. Make sure the container seals tightly to prevent air from getting in. This helps to keep the flavors and textures intact. You can store the salad in the fridge for up to three days. Can you freeze this salad? While I don’t recommend freezing the entire salad, you can freeze the chicken and beans separately. This keeps them fresh for later use. Just remember that fresh veggies like avocado and tomatoes don’t freeze well. They can become mushy when thawed. How long does the salad last in the fridge? If stored properly, the salad lasts up to three days in the fridge. After that, the ingredients may spoil or lose their taste. Always check for any signs of spoilage before eating. Yes, you can make this salad ahead. I suggest prepping the ingredients a day before. Chop the veggies, shred the chicken, and mix the dressing. Store them separately in the fridge. Combine everything just before serving. This keeps the salad fresh and crunchy. If you don’t have lime juice, try lemon juice. It adds a nice tang. You can also use apple cider vinegar for a different flavor. Both options work well and keep the salad bright and zesty. To make your Spicy Southwest Chicken Salad gluten-free, use gluten-free tortilla chips for garnish. Check the labels for canned beans and corn to ensure they are gluten-free. Most brands are safe, but it’s always good to double-check. Enjoy this tasty salad without worry! This spicy Southwest chicken salad combines fun flavors and simple steps. You start with fresh ingredients, such as chicken, black beans, and corn. The dressing adds a zesty kick with lime and spices. You can customize it with your favorite veggies or proteins for more variety. Leftovers are easy to store, and the salad stays tasty for a few days. Enjoy it with chips or on its own. Try making this salad today for a healthy, flavorful meal that everyone will love.
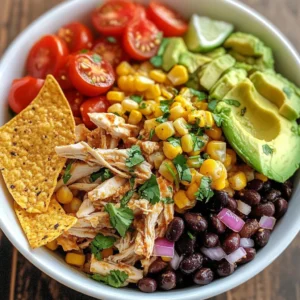
    Spicy Southwest Chicken Salad Fresh and Flavorful Meal
  • - 1 lb ground beef - 1 medium onion, chopped - 2 cloves garlic, minced - 1 small red bell pepper, diced - 1 small green bell pepper, diced - 1 cup diced potatoes - 1 cup diced carrots - 1 cup peas (fresh or frozen) - 1 tomato, diced - 1 tsp cumin - 1 tsp oregano - 1/2 tsp cinnamon - Salt and pepper to taste - 2 tbsp tomato paste - 2 cups beef broth - Olive oil for sautéing To make great Mexican Picadillo, you need some key ingredients. The ground beef gives it flavor and protein. Onions and garlic add depth. The bell peppers bring color and sweetness. Potatoes and carrots add texture. Peas give a nice pop of green. Spices are essential too. Cumin and oregano provide warmth. A hint of cinnamon adds a unique kick. Salt and pepper enhance all the flavors. Tomato paste and beef broth help create a thick, rich sauce. - 1/4 cup raisins (optional, for sweetness) - 1/4 cup slivered almonds (optional, for crunch) You can add raisins for a touch of sweetness. Slivered almonds give a nice crunch to the dish. These ingredients are not needed, but they can add fun flavors. - Rice or tortillas - Fresh cilantro and lime wedges for garnish Serve your Picadillo with rice or tortillas for a complete meal. Fresh cilantro adds brightness, while lime wedges bring a zesty kick. These accompaniments make every bite more enjoyable! {{ingredient_image_1}} - Heat 1 tablespoon of olive oil in a large skillet over medium heat. - Add 1 chopped onion, 2 minced garlic cloves, and 1 small diced red bell pepper and 1 small diced green bell pepper. Sauté for 5 minutes until soft. - Increase the heat to medium-high and add 1 pound of ground beef. Cook until it is browned, breaking it up with a spatula. Drain any excess fat if needed. - Stir in 1 cup of diced potatoes, 1 cup of diced carrots, and 1 cup of peas. Sauté for another 5 minutes. - Add 1 diced tomato, and if you like, 1/4 cup of raisins and 1/4 cup of slivered almonds. Mix well. - Sprinkle in 1 teaspoon of cumin, 1 teaspoon of oregano, and 1/2 teaspoon of cinnamon. Stir to coat the mixture evenly with spices. - Add 2 tablespoons of tomato paste and pour in 2 cups of beef broth. Bring everything to a simmer. - Cover the skillet, lower the heat, and let it cook for 30 minutes. Stir occasionally. The mixture will thicken and the flavors will mix well. - Taste the Picadillo and adjust the seasoning with salt and pepper as needed. - Serve warm with rice or tortillas. Garnish with fresh cilantro and lime wedges for extra flavor. To ensure even cooking of vegetables, start with small, uniform pieces. This helps them cook at the same rate. Sauté the onions and garlic first, letting their flavors bloom before adding bell peppers. Stir often, so nothing burns. For properly browning ground beef, use a hot skillet. Break it into small pieces as it cooks. Let it sit without stirring for a bit to get a nice brown color. Drain excess fat only if needed. This keeps the meat juicy. To enhance the flavors, consider adjusting spices. If you like more heat, add cayenne pepper or chili powder. For a deeper flavor, try smoked paprika. You can also play with the amount of cumin and oregano based on your taste. If fresh ingredients are hard to find, use frozen or canned. Frozen peas work well and save prep time. Canned tomatoes can replace fresh ones. Just drain them to avoid too much liquid in the dish. The best serving style for Picadillo is in deep bowls. This helps keep the dish warm and adds a nice touch. Serve it with a scoop of rice or warm tortillas on the side. For garnishing, fresh cilantro and lime wedges add color and brightness. Sprinkle cilantro on top before serving. A few lime wedges on the side give your guests a choice for extra zing. Pro Tips Use Fresh Herbs: Fresh cilantro adds a vibrant flavor and freshness that elevates the dish. Add it just before serving for the best taste. Adjust the Sweetness: If you prefer a sweeter picadillo, increase the amount of raisins or add a pinch of sugar to balance the flavors. Experiment with Proteins: Ground turkey or chicken can be used as a lighter alternative to beef, while still maintaining the essence of the dish. Perfect Cooking Time: Allowing the dish to simmer longer can enhance the flavor profile, as it allows the spices to meld beautifully. {{image_2}} Picadillo changes from one region in Mexico to another. In the north, cooks may use beef or even goat. In the south, you might find pork or chicken blends. Each area adds its flair. For example, some regions like to add olives or capers. Others prefer a sweeter touch with pineapple or plantains. These local flavors make each picadillo unique. Not everyone eats meat, and that's okay! You can make a tasty vegetarian or vegan picadillo. Instead of ground beef, try lentils or black beans. They give you protein and a nice texture. You can also use mushrooms for a meaty feel. For gluten-free options, make sure to use gluten-free broth and skip any sauces with gluten. If you want to switch things up, you have options! Ground turkey or chicken works well in place of beef. They are lighter but still delicious. You can also swap out veggies for what's in season. Try using zucchini or squash instead of potatoes. This not only enhances flavor but also adds nutrients. Don’t hesitate to get creative with your picadillo! After making Mexican Picadillo, store leftovers in an airtight container. Place it in the fridge within two hours of cooking. This keeps it safe and tasty. It will last up to four days in the fridge. When reheating, use a skillet or microwave. Stir the mix often to heat it evenly. Add a splash of broth if it seems dry. For longer storage, freeze Picadillo in a freezer-safe container. Make sure to leave some space at the top for it to expand. It can stay fresh for up to three months in the freezer. When you're ready to eat, thaw it overnight in the fridge. Reheat it on the stove or in the microwave. Stir well to ensure even heating. Picadillo lasts about four days in the fridge. Look for signs of spoilage, such as off smells or changes in color. If you see any mold, throw it away. Always trust your senses when checking food. Enjoy your Picadillo safely! Mexican Picadillo is a savory ground beef dish. It has roots in traditional Mexican cooking. This dish combines meat with vegetables, spices, and sometimes fruit. You can find it in many Mexican households. Each family may have their own twist on the recipe. The blend of flavors makes it comforting and hearty. You can serve Mexican Picadillo in many ways. Here are some great ideas: - Serve it warm with fluffy rice. - Pair it with soft tortillas for easy wrapping. - Garnish with fresh cilantro and lime wedges for extra flavor. - Add a side of refried beans for a complete meal. These accompaniments enhance the dish's taste and make it more filling. Yes, you can make Picadillo ahead of time. It actually tastes better the next day. Here are some tips for meal prep: - Cook the dish and let it cool completely. - Store it in an airtight container in the fridge. - It can last up to four days in the fridge. - Reheat it in a pot on the stove for even heating. Making it ahead saves you time on busy days. Enjoy this tasty dish whenever you want! To make a great Mexican Picadillo, key ingredients include ground beef, fresh vegetables, and spices. You learn how to prepare, cook, and present the dish. Tips and variations help you add your twist. Storage advice ensures leftovers last longer. Overall, Picadillo is a versatile meal, perfect for customizing to your taste. I hope this guide inspires you to create your own delicious version of this classic dish. Enjoy cooking and sharing with friends and family!
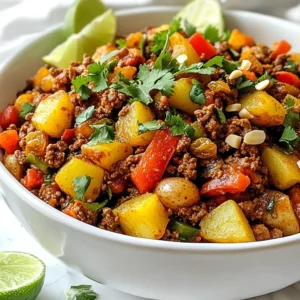
    Mexican Picadillo Flavorful and Simple Recipe Guide
  • - 2 cups cooked chicken, shredded - 1 can (15 oz) black beans, drained and rinsed - 1 cup corn kernels (fresh, frozen, or canned) - 1 can (10 oz) diced tomatoes with green chilies - 1 cup cooked rice (white or brown) - 1 teaspoon taco seasoning - 1 cup shredded cheddar cheese - 1 cup salsa - 6 whole wheat tortillas - 1/2 cup sour cream - 1/4 cup chopped cilantro (optional for garnish) This casserole bursts with flavor and is easy to make. The shredded chicken gives it a hearty base. Black beans add protein and fiber, while corn brings a sweet crunch. Diced tomatoes with chilies give it a nice kick. You can use any rice you prefer, white or brown. Taco seasoning ties all the flavors together perfectly. Cheddar cheese makes this dish creamy and rich. Salsa adds more depth and moisture. Whole wheat tortillas hold everything together. Sour cream on top cools the dish down and adds creaminess. Chopped cilantro brightens up the flavors, making it fresh and vibrant. - Additional vegetables (bell peppers, onions) - Different cheese varieties (Monterey Jack, Pepper Jack) - Spices for extra flavor You can make this dish your own by adding more veggies. Bell peppers and onions add color and taste. Different cheeses like Monterey Jack or Pepper Jack can change the flavor. Adding spices like cumin or paprika can also enhance the dish. - Mixing bowl - Casserole dish - Measuring cups and spoons - Oven Having the right equipment makes cooking easier. A mixing bowl is needed to combine all the yummy ingredients. A casserole dish holds everything together while it bakes. Measuring cups and spoons help you get the right amounts. Finally, your oven is essential for cooking this delicious meal. {{ingredient_image_1}} 1. Preheat your oven to 350°F (175°C). This step warms the oven for baking. 2. In a large mixing bowl, combine: - 2 cups cooked chicken, shredded - 1 can (15 oz) black beans, drained and rinsed - 1 cup corn kernels (fresh, frozen, or canned) - 1 can (10 oz) diced tomatoes with green chilies - 1 cup cooked rice (white or brown) - 1 teaspoon taco seasoning - 1 cup shredded cheddar cheese (reserve half for later) Mix until everything is well combined. 3. Season the mixture with salt and pepper to taste. This adds flavor to your dish. 1. In a 9x13 inch casserole dish, spread a thin layer of salsa on the bottom. This layer prevents sticking. 2. Lay three whole wheat tortillas over the salsa. Let them overlap a bit. 3. Spoon half of the chicken and bean mixture evenly over the tortillas. 4. Add another layer by placing three more tortillas on top of the filling. 5. Spread the remaining chicken and bean mixture over the second layer of tortillas. 6. Top with more salsa and sprinkle the remaining shredded cheddar cheese over everything. 1. Cover the casserole with aluminum foil. This keeps moisture inside while baking. 2. Bake in the preheated oven for 25 minutes. This helps cook the layers. 3. Remove the foil and bake for an additional 10-15 minutes. You want the cheese to become bubbly and golden. 4. Allow the casserole to cool for a few minutes before serving. This makes it easier to cut and serve. 5. Drizzle sour cream over each portion. You can also garnish with chopped cilantro if you like. - How to shred chicken efficiently: Use two forks to pull apart the cooked chicken. This method works well to create fine shreds quickly. You can also use a stand mixer with a paddle attachment for an even faster option. - Importance of seasoning to taste: Always taste your mixture before baking. You may want to add more salt, pepper, or taco seasoning. Each ingredient brings its own flavor, so adjust to your liking. - Alternate methods for layering: You can layer the tortillas in a circular pattern if you prefer a different look. This method adds a fun twist and makes cutting easier. - Best sides to complement the casserole: Serve with a simple green salad, guacamole, or tortilla chips. These sides add freshness and crunch to your meal. - Presentation tips for garnishing: Drizzle sour cream over each serving for a creamy touch. Sprinkle chopped cilantro on top for color and added flavor. - Precooking rice instructions: Rinse the rice before cooking to remove excess starch. This helps the rice stay fluffy. Cook according to the package instructions, usually about 15-20 minutes. - Options for using leftover chicken: If you have leftover chicken, simply shred it and use it in this recipe. This saves time and reduces waste, making your meal even more convenient. Pro Tips Use Rotisserie Chicken: Save time by using store-bought rotisserie chicken; it's already cooked and seasoned, making prep a breeze. Layer Wisely: For even cooking and flavor distribution, ensure that you layer the tortillas and filling evenly throughout the casserole. Customize Your Ingredients: Feel free to add other vegetables like bell peppers or zucchini for extra nutrition and flavor. Make Ahead: Prepare the casserole a day in advance and store it in the refrigerator. Just bake it when you're ready to serve! {{image_2}} You can easily switch up some ingredients in this casserole. - Using ground turkey or beef instead of chicken: This swap gives you a different flavor. Ground turkey is leaner, while ground beef adds richness. - Substituting quinoa for rice: Quinoa is a great option. It adds protein and fiber, making your meal even more filling. - Gluten-free tortilla options: If you need gluten-free, use corn tortillas. They hold up well and taste great. Adding new spices or ingredients can change the taste of your casserole. - Adding spices like cumin or paprika: A teaspoon of cumin adds warmth. Paprika gives a smoky taste, making each bite exciting. - Incorporating different salsa varieties: Try mango salsa for sweetness or a spicy salsa for heat. Each type brings its own flair. You can modify this recipe to fit different diets. - Make it vegetarian by omitting chicken: Replace chicken with extra beans or veggies. This change keeps the dish hearty and satisfying. - Low-carb options available: Use cauliflower rice instead of regular rice. This will cut carbs but still keep it filling and tasty. To store your leftover chicken burrito casserole, let it cool first. Then, place it in an airtight container. This helps keep the flavors fresh. In the fridge, your casserole will last for about 3 to 4 days. If you want to enjoy it later, make sure to check for any signs of spoilage before eating. Freezing the casserole is a great way to save it for later. First, cut the casserole into portions. Wrap each piece tightly in plastic wrap, then place them in a freezer-safe bag. This helps prevent freezer burn. When you’re ready to eat, remove the wrapping and reheat it in the oven at 350°F (175°C) for about 30 minutes. You can also heat it in the microwave if you're in a hurry. Meal prep makes busy days easier. You can prepare the chicken burrito casserole in advance. Just follow the recipe, but don’t bake it right away. Instead, cover it and store it in the fridge for up to 24 hours. Portioning it out into containers allows for quick meals. You can grab a serving whenever you're hungry. This way, you enjoy delicious homemade food all week long. You can use several proteins in place of chicken. Ground turkey or beef works well. For a meatless option, try black beans or lentils. These alternatives will keep the meal hearty and flavorful. You can also use shredded pork or tofu for a different twist. Each option adds its own taste to the casserole. Yes, you can prepare this casserole a day before. Follow the recipe but stop before baking. Cover the dish with foil and put it in the fridge. When you are ready to bake, just add a few extra minutes to the cooking time. This way, the flavors will blend and make it even better. To store leftovers, let the casserole cool down first. Then, place it in an airtight container. It will last in the fridge for about 3 to 4 days. If you want to keep it longer, consider freezing it. Use a freezer-safe container and label it with the date. Frozen casserole can last for up to 3 months. When ready to eat, thaw it overnight in the fridge and reheat in the oven. This casserole is easy to make with simple ingredients like chicken, beans, and cheese. I shared tips for prep, cooking time, and serving to help you succeed. You can change up ingredients or add different flavors to fit your taste. Use my storage tips to keep leftovers fresh. Enjoy creating a tasty meal that’s family-friendly and customizable. Get cooking and have fun experimenting with your own variations!
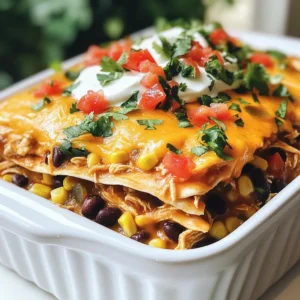
    Hearty Chicken Burrito Casserole Cozy Family Meal
  • To make crispy air fryer garlic Parmesan potatoes, gather the following ingredients: - 1.5 lbs baby potatoes, halved - 3 tablespoons olive oil - 4 cloves garlic, minced - 1/2 cup grated Parmesan cheese - 1 teaspoon dried oregano - 1 teaspoon paprika - Salt and freshly ground black pepper to taste - Fresh parsley, chopped (for garnish) These simple ingredients create an amazing flavor. Baby potatoes give a nice texture when cooked. Using fresh garlic adds a robust taste. Grated Parmesan cheese melts and creates a crispy coating. Dried herbs like oregano and paprika enhance the dish's depth. Remember to season with salt and pepper to suit your taste. With these ingredients, you can whip up a delightful side dish in no time. Enjoy the process and the delicious results! Start by preheating your air fryer to 400°F (200°C). This step is key for getting crispy potatoes. Preheating for 5 minutes helps the air fryer reach the right temperature. This ensures even cooking and nice browning. Next, grab 1.5 pounds of baby potatoes and cut them in half. Place them in a large bowl. Pour in 3 tablespoons of olive oil and toss well. This coats the potatoes and helps the seasonings stick. Now, add 4 cloves of minced garlic. Follow this with 1/2 cup of grated Parmesan cheese, 1 teaspoon of dried oregano, and 1 teaspoon of paprika. Season with salt and pepper to taste. Mix until all the potatoes are well coated. The combination of garlic and cheese adds great flavor. Place the seasoned potatoes in the air fryer basket. Make sure to lay them in a single layer. Avoid overcrowding to ensure they cook evenly. Cook the potatoes at 400°F (200°C) for 15 to 20 minutes. Shake the basket halfway through cooking. This helps them crisp up all around. When they are golden and crispy, they are ready. Remove them gently and place them into a serving bowl. Garnish with fresh parsley before serving. Enjoy your crispy garlic Parmesan potatoes! To get crispy potatoes, choose small, even-sized baby potatoes. Halve them to maximize the surface area. Coat them well with olive oil. This helps them crisp up nicely. Make sure to season the potatoes with salt and pepper. These simple steps boost both flavor and texture. Don’t crowd the air fryer basket. This allows hot air to circulate. If needed, cook in batches. Shake the basket halfway through cooking. This lets all sides get golden brown. For even more crunch, try cooking them a bit longer. Just keep an eye on them to avoid burning. You can add a twist to the basic recipe. Try mixing in some herbs like rosemary or thyme. Fresh herbs can add a bright taste. You can also experiment with spices like cayenne for heat. Just a pinch can make a big difference! For a cheesy kick, sprinkle more Parmesan on top after cooking. You could even toss in some lemon zest for a fresh zing. Each addition can turn this dish into your new favorite side. Feel free to get creative and make it your own! {{image_2}} You can change the flavors of these potatoes easily. If you want something different, try these ideas: - Herbs: Use fresh rosemary or thyme instead of oregano. Both add a nice taste. - Spices: Add cayenne for heat or cumin for a warm flavor. - Cheese: Swap Parmesan for cheddar or feta for a new twist. Feel free to mix and match! You can even make a sweet version with cinnamon and brown sugar. Just remember to keep the olive oil for crispiness. Pair these crispy potatoes with many meals. Here are some great ideas: - Main dishes: Serve them with grilled chicken, steak, or fish. They add a nice crunch. - Salads: Toss them into a salad for extra texture. They work well in a Caesar or garden salad. - Dips: Enjoy them with ranch or garlic dip. They are great for snacking too. These potatoes are perfect for any meal. Have fun experimenting with different pairings and flavors! After you enjoy your crispy air fryer garlic Parmesan potatoes, you may have some left. To store them, let the potatoes cool completely. Place them in an airtight container. You can keep them in the fridge for up to three days. If you want to save them longer, put the container in the freezer. They last up to three months in the freezer. When you're ready to eat them again, you can thaw them in the fridge overnight. To keep your potatoes crispy when reheating, use the air fryer. Preheat your air fryer to 350°F (175°C). Place the leftover potatoes in the basket in a single layer. Heat them for about 5 to 7 minutes. Shake the basket halfway through to make sure they heat evenly. If you don’t have an air fryer, you can use an oven. Just spread the potatoes on a baking sheet. Bake them at 350°F (175°C) for around 10 to 15 minutes. Enjoy tasty, crispy potatoes every time! Baby potatoes are the best option for air frying. They cook quickly and turn crispy outside. Their small size means even cooking. Other options include Yukon Gold or red potatoes. These varieties have good flavor and texture. Cut them into halves for even cooking. This helps them brown nicely. Yes, you can make this recipe without cheese. Simply leave out the Parmesan. The garlic and spices still add great flavor. You can also try adding other toppings. Consider nutritional yeast for a cheesy flavor. Or use a sprinkle of lemon juice for brightness. This keeps the dish tasty and fresh. Check the potatoes after 15 minutes of cooking. They should be golden brown and crispy. You can test them with a fork. If it goes in easily, they are done. If not, cook for a few more minutes. Shake the basket halfway through for even cooking. Enjoy your crispy potatoes when they look perfect! You can now make perfect air-fried baby potatoes with the simple steps I provided. We covered essential ingredients, prepping your air fryer, and cooking tips to ensure crispy results. Remember, feel free to mix flavors and try new seasonings. Store your leftovers properly to keep them tasty. I hope you enjoy this easy and fun recipe. Happy cooking!
    Air Fryer Garlic Parmesan Potatoes Crispy and Tasty
  • To make Brown Butter Apple Blondies, gather these ingredients: - 1/2 cup unsalted butter - 1 cup brown sugar, packed - 1/2 cup granulated sugar - 2 large eggs - 1 teaspoon vanilla extract - 1 3/4 cups all-purpose flour - 1 teaspoon baking powder - 1/2 teaspoon baking soda - 1/2 teaspoon salt - 1 teaspoon ground cinnamon - 1 medium sweet apple, like Honeycrisp or Fuji, peeled, cored, and diced - 1/2 cup chopped walnuts (optional) You can swap out some ingredients if needed: - For butter, use ghee or coconut oil for a dairy-free option. - Instead of brown sugar, try coconut sugar or honey for a different sweetness. Want to mix things up? Here are some fun add-ins: - Use different nuts, like pecans or almonds, for crunch. - Add chocolate chips for a sweet twist. - Try dried fruits, such as cranberries or raisins, for extra flavor. Start by prepping your apple and nuts. Choose a sweet apple like Honeycrisp or Fuji. Peel, core, and dice it into small pieces. If you like nuts, chop your walnuts now. This adds a nice crunch. Next, melt your butter in a medium saucepan over medium heat. Watch it closely. Stir often until the butter turns a golden brown color and smells nutty. This takes about 5 to 7 minutes. Be careful not to burn it; burnt butter can ruin the flavor. In a mixing bowl, pour the brown butter. Whisk in the brown sugar and granulated sugar until smooth. Then, add the eggs one at a time. Mix well after each egg. Stir in the vanilla extract for a nice flavor boost. In another bowl, mix the flour, baking powder, baking soda, salt, and ground cinnamon. Gradually add this dry mix to the wet ingredients. Stir until just combined. Do not overmix, or your blondies may turn out dense. Fold in your diced apple and chopped walnuts if you're using them. Make sure they are evenly spread throughout the batter. Prepare your baking pan by lining it with parchment paper. Leave some paper hanging over the edges. This helps you lift out the blondies later. Preheat your oven to 350°F (175°C). Pour the batter into the prepared pan. Smooth the top with a spatula. Bake for 25 to 30 minutes. You will know they are done when a toothpick inserted in the center comes out clean, with a few moist crumbs. Let the blondies cool in the pan for about 10 minutes. Use the parchment to lift them out. Transfer them to a wire rack to cool completely. Then, cut into squares and enjoy! To make brown butter, heat unsalted butter in a medium pan. Stir it often and watch closely. The butter should turn a deep golden brown. It will smell nutty and fragrant. This takes about 5-7 minutes. If it burns, start over. Look for small brown bits at the bottom. This shows the butter is ready. To check if the blondies are done, use a toothpick. Stick it into the center. If it comes out clean or with a few moist crumbs, they are ready. Let them cool in the pan for ten minutes. This helps them set better. Cutting them too soon can make them fall apart. For a fun touch, dust cooled blondies with powdered sugar. You can also serve them with vanilla ice cream or drizzle caramel sauce on top. This adds extra flavor and makes them look pretty! Serve them warm for a cozy treat, or at room temperature for a nice snack. {{image_2}} You can make your Brown Butter Apple Blondies even more tasty! Adding spices like nutmeg or maple extract can boost the flavor. These small changes will make a big difference. Try different apples too. A tart Granny Smith can give a nice contrast to the sweet batter. Honeycrisp apples add a juicy sweetness that blends well with brown butter. If you need gluten-free blondies, swap all-purpose flour for a gluten-free blend. Just check that the blend works well in baking. For a vegan version, use coconut oil instead of butter and flax eggs in place of regular eggs. A flax egg is one tablespoon of flaxseed meal mixed with three tablespoons of water. Let it sit for a few minutes to thicken. Serve your blondies warm for a cozy treat. They go great with vanilla ice cream melting on top. For a chilled option, let them cool completely. Dust them with powdered sugar for an elegant touch. If you're hosting a party, cut them into smaller squares. You can even drizzle caramel sauce over them for a sweet twist! To keep your Brown Butter Apple Blondies fresh, use an airtight container. Store them at room temperature if you plan to eat them in a few days. For longer storage, the fridge works well too. Just make sure they are completely cool before sealing them up. If you want to save some blondies for later, freezing is a great option. Wrap each blondie in plastic wrap and then place them in a freezer bag. This keeps them fresh and prevents freezer burn. When you're ready to enjoy them, take them out and let them thaw in the fridge overnight. You can also warm them in the microwave for a few seconds to restore that fresh-baked taste. At room temperature, your blondies will stay good for about three days. If you store them in the fridge, they can last up to a week. Just remember, the longer they sit, the less fresh they may taste. Always check for any changes in texture or smell before enjoying your treats! Yes, you can use other apples. I recommend Honeycrisp or Fuji for their sweetness. Granny Smith adds tartness, which can balance the sugar. Braeburn apples offer a nice blend of sweet and tart flavors. Each apple type gives a unique taste and texture to the blondies. To check for doneness, look for a golden brown top. Insert a toothpick in the center; it should come out clean or with a few moist crumbs. If the toothpick has wet batter on it, the blondies need more time. The edges should pull away from the pan slightly. You can make these blondies ahead of time. Bake and cool them, then store in an airtight container. They stay fresh for up to three days at room temperature. For longer storage, wrap them well and freeze. Thaw at room temperature when ready to enjoy. These Brown Butter Apple Blondies blend rich flavors and textures. We covered all key ingredients, including varieties of apples and sugar. I showed you how to prep and mix the batter for perfect results. Remember to experiment with add-ins and flavors that excite you. Store your blondies properly, and they’ll last longer. The tips provided ensure a successful bake every time. Enjoy making your delicious blondies, whether warm or chilled. Happy baking!
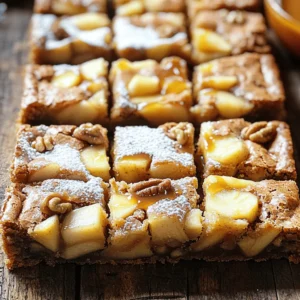
    Brown Butter Apple Blondies Rich and Flavorful Treat
  • For Garlic Chili Crisp Noodles, you need the following: - 200g egg noodles - 3 tablespoons garlic chili crisp - 2 tablespoons vegetable oil - 2 garlic cloves, thinly sliced - 1 inch piece of ginger, grated - 1 bell pepper, sliced (any color) - 1 cup baby spinach - 2 green onions, chopped - 1 tablespoon soy sauce - 1 tablespoon sesame oil - Salt and pepper to taste These ingredients create a rich mix of flavors. The egg noodles provide a soft base. Garlic chili crisp adds heat and depth. The veggies bring color and nutrients. You can enhance your dish with these optional garnishes: - Chopped cilantro - Sesame seeds These add a fresh touch and a bit of crunch. They make the dish pop visually and taste-wise. Garlic chili crisp is a star in this recipe. It combines spicy and savory flavors. The crispiness adds texture that you can’t resist. You can buy it or make it at home. It often contains garlic, chili oil, and crispy bits. This ingredient elevates your noodles to a new level. It’s great on many dishes too, not just noodles! To start, you need to cook the egg noodles. Boil water in a pot. Add the noodles and cook them as per the package guide. This usually takes about 5-7 minutes. Once they are soft, drain them well. Toss the noodles with a bit of oil to stop them from sticking. Next, grab a large skillet or wok. Heat the vegetable oil over medium heat. Add the thinly sliced garlic and grated ginger. Fry them for 1-2 minutes. You want them to smell great and turn golden. Be careful not to burn them! Now, add the sliced bell pepper to your skillet. Stir-fry the peppers for about 2-3 minutes. They should be slightly soft but still crunchy. This adds color and flavor to your dish. Once the bell peppers are ready, it’s time to bring everything together. Toss in the cooked noodles. Add the garlic chili crisp, soy sauce, and sesame oil. Mix all of this well. Make sure every noodle is coated with the sauce. Finally, stir in the baby spinach and chopped green onions. Cook for another 1-2 minutes. The spinach will wilt down nicely. Taste your noodles and add salt and pepper as needed. Serve hot, and if you want, top with cilantro and sesame seeds for extra flair! To cook perfect egg noodles, follow these steps: - Boil salted water in a large pot. - Add the noodles and stir for even cooking. - Cook according to the package time, usually about 3-5 minutes. - Test them for doneness; they should be tender but firm. - Drain and rinse briefly under cold water to stop cooking. - Toss noodles with a little oil to prevent sticking. Want more heat? Add extra garlic chili crisp. You can start with one tablespoon. Taste and adjust as needed. If you prefer milder noodles, use less crisp. You can also add a splash of soy sauce to balance the spice. To store leftovers, let them cool completely. Place them in an airtight container. Use them within three days for the best taste. When reheating, add a splash of water. This keeps the noodles moist and flavorful. Heat on low in a pan, stirring often. {{image_2}} You can easily make Garlic Chili Crisp Noodles vegetarian or vegan. Just swap the egg noodles for rice noodles or whole wheat noodles. Many brands offer vegan noodles that work great. For the sauce, check if your garlic chili crisp is vegan-friendly. Most are, but always read the label. Add more veggies for flavor and nutrients. Try mushrooms, broccoli, or snap peas. These additions boost taste and color. You can also use vegetable broth instead of water when cooking the noodles for a richer flavor. If you want protein, chicken, tofu, or beef are great choices. For chicken, slice it into thin strips. Cook it first in the skillet until it's golden and cooked through. Then, set it aside and follow the recipe as normal. For tofu, choose firm tofu. Dice it and sauté it until golden on all sides. You can add it with the garlic and ginger. For beef, thinly slice flank steak or sirloin. Cook it first, and then add it back with the noodles. Each protein adds a different taste and texture to the dish. If you have allergies, there are easy swaps. For soy sauce, use tamari or coconut aminos for a gluten-free option. If you're allergic to garlic, try shallots or chives for a milder taste. If you can't have chili, look for a milder sauce or skip it altogether. You can still add flavor with spices like cumin or coriander. Always check ingredient labels to avoid allergens. These swaps keep your dish safe while still tasting great! Store leftover noodles in an airtight container. Make sure they cool down first. This keeps the noodles fresh and safe. Place them in the fridge for up to three days. If you notice any moisture, use a paper towel to absorb it. This prevents the noodles from getting soggy. To reheat, use a skillet over medium heat. Add a splash of water or oil to help steam them. Stir often until heated through. This method keeps the noodles tasty and prevents sticking. You can also use the microwave. Heat for 30 seconds at a time, stirring in between. This way, they warm evenly. You can freeze the noodles too! Place them in a freezer-safe bag. Remove as much air as you can before sealing. They can last up to three months in the freezer. When ready to eat, thaw them in the fridge overnight. For quick meals, you can cook them straight from frozen. Just add extra time to your cooking. Garlic chili crisp is a spicy oil made with garlic, chilies, and oil. It adds heat and flavor to dishes. You can find it in many Asian markets or online. It has crunchy bits and a bold taste that makes food exciting. Yes, you can make garlic chili crisp noodles ahead of time. Just cook the noodles and mix them with the sauce and veggies. Store them in the fridge for up to three days. When you’re ready to eat, just reheat in a pan or microwave. You can buy garlic chili crisp at grocery stores or online. Look in the Asian food aisle for popular brands. Many people love to shop at local Asian markets for special finds. You might also find homemade versions at farmer’s markets. Making homemade garlic chili crisp is easy! Here’s a quick recipe: - 1 cup vegetable oil - 1/2 cup garlic, thinly sliced - 1/4 cup red pepper flakes - 1 teaspoon salt 1. Heat the oil in a pan over low heat. 2. Add garlic and cook until golden. 3. Stir in red pepper flakes and salt. 4. Cook for another minute, then cool. 5. Store in a jar. These noodles pair well with many side dishes. Here are some tasty ideas: - Steamed broccoli - Stir-fried bok choy - Cucumber salad - Egg rolls - Fried rice These sides add more flavor and texture to your meal! This blog post detailed how to create delicious Garlic Chili Crisp Noodles. You learned about essential ingredients like garlic chili crisp and how to cook noodles perfectly. We covered tips to customize your dish and store leftovers well. You can explore variations for different diets and needs. In conclusion, this dish is full of flavor and easy to make. Experiment with your favorite ingredients. Have fun cooking! Enjoy your tasty creation!
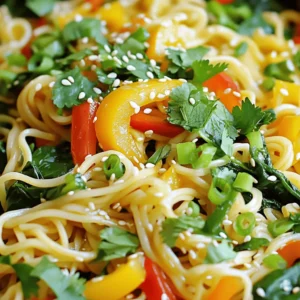
    Garlic Chili Crisp Noodles Flavorful and Easy Recipe
  • - 1 cup brewed coffee, chilled - 1/2 cup milk of choice (almond, oat, or whole) - 1/4 cup heavy cream - 2 tablespoons pumpkin puree To make this drink, you need a strong cup of brewed coffee. Any method works, but I prefer using a French press for rich flavor. Chilling the coffee is key, so let it sit in the fridge while you make the foam. The milk adds creaminess, and you can choose almond, oat, or whole milk based on your taste. Heavy cream gives the foam its rich texture, while pumpkin puree adds that lovely fall flavor. - 1 tablespoon maple syrup (or sweetener of choice) - 1/2 teaspoon vanilla extract - 1/2 teaspoon pumpkin pie spice For sweetness, I like using maple syrup. It pairs well with pumpkin. You can swap it with any sweetener you like. Vanilla extract adds depth to the flavor. The pumpkin pie spice brings warmth and holiday vibes, making each sip feel cozy. - Whipped cream - Additional spices for garnish Whipped cream is a fun topping. It adds more creaminess and looks nice. You can also sprinkle extra pumpkin pie spice on top for a perfect finish. To start, brew a strong cup of coffee. You can use a drip coffee maker, French press, or pour-over method. A strong coffee base works best for this drink. After brewing, let it chill in the refrigerator for about 10 minutes. This helps the coffee become refreshing and cold. In a mixing bowl, combine these ingredients: - 1/2 cup milk of choice - 1/4 cup heavy cream - 2 tablespoons pumpkin puree - 1 tablespoon maple syrup - 1/2 teaspoon vanilla extract - 1/2 teaspoon pumpkin pie spice Mix these well until they are smooth. Use a hand mixer or whisk to whip the mixture. Whip it for about 2-3 minutes until it thickens and forms soft peaks. Be careful not to overwhip; it should stay pourable and light. Take a tall glass and fill it with ice cubes. Pour the chilled coffee over the ice, leaving some space at the top for the foam. Now, gently spoon the pumpkin cream cold foam over the coffee. Let it float on top for a lovely look. If you want, add a swirl of whipped cream on top and sprinkle some pumpkin pie spice for extra flavor. Enjoy your drink right away! To make great cold foam, whip the mixture gently. Use a hand mixer or whisk. Stop when you see soft peaks. Over-whipping can make foam too stiff. You want it pourable, not a solid mass. This keeps the foam light and fluffy. For the best texture, use heavy cream along with milk. The cream adds richness. Milk can be almond, oat, or whole, based on your taste. A mix of both also works well. This gives a smooth, creamy finish. Sweeteners can change the taste of your cold foam. Maple syrup adds a nice touch. You can also try honey or agave for sweetness. For extra spice, cinnamon or nutmeg can enhance flavor. Mixing pumpkin puree with caramel syrup can create a unique twist. A dash of chocolate syrup could also add an interesting flavor. Be creative with your choices! A beautiful drink makes it more enjoyable. Consider garnishing with whipped cream on top. A sprinkle of pumpkin pie spice adds a lovely touch. You can also add a cinnamon stick for a rustic look. Serve your iced coffee in clear glasses. This shows off the layers of coffee and foam. Enjoy it with a straw for easy sipping. Sharing this drink can bring joy to friends or family. {{image_2}} You can make this drink dairy-free and vegan. To do this, choose plant-based milk. Almond, oat, and coconut milk work well. These milks add nice flavors and keep the drink light. For heavy cream, use coconut cream instead. It whips up nicely and has a rich taste. Just scoop it from the top of a can of full-fat coconut milk. You can have fun with spices! Try adding cinnamon or nutmeg for extra warmth. A pinch of cardamom can add a unique twist, too. Flavored syrups are another great idea. Use caramel or hazelnut syrup to change up the taste. Just stir in a tablespoon or two, and enjoy your new creation! If you love cold brew, you can use it instead of regular coffee. Cold brew gives a smooth taste that pairs well with pumpkin flavors. Just brew your coffee the night before and chill it overnight. You can also explore other coffee drinks. Try adding pumpkin cream foam to iced lattes or frappes. The creamy foam works magic on all kinds of cold coffee drinks! To store leftover pumpkin cream cold foam, place it in an airtight container. This keeps it fresh and tasty. You can refrigerate the foam for up to three days. However, the texture may change, so I suggest using it sooner. Brewed coffee can last in the fridge for about a week if stored well. Use a sealed container to keep it fresh. If you want to use chilled coffee in other recipes, it works great for smoothies or desserts. Just remember, coffee can lose flavor over time. You can make the pumpkin cream cold foam ahead of time. Whip the cream, milk, pumpkin puree, and spices together and store it in the fridge. This way, you can enjoy your iced coffee quickly. For meal prep, brew a big batch of coffee on the weekend. Store it chilled and ready for your daily delight. You can change the sweetness and flavors in your drink. Try using different sweeteners like honey or agave instead of maple syrup. If you want it sweeter, add more syrup. You can also use any milk you like. Almond milk gives a nutty taste, while oat milk is creamier. Want more spice? Add extra pumpkin pie spice or cinnamon for a warm kick. Yes, leftover cold foam is great in different drinks. You can top your hot coffee or even hot chocolate with it. It adds a fun twist to any drink. If you have some left, try using it in smoothies too. Just blend it with your favorite fruits for a creamy treat. Many coffee chains offer their own versions. Starbucks has a popular Pumpkin Cream Cold Brew that you might enjoy. Check local cafes too; they often create unique spins on this drink. Ask for recommendations from friends or look online for the best spots in your area. You now have everything you need to make a delicious Pumpkin Cream Cold Foam Iced Coffee. We covered the key ingredients, flavor enhancers, and optional toppings. The step-by-step guide helps you brew strong coffee and whip up that perfect cold foam. Remember, tips for texture and flavor can take your drink to the next level. Lastly, explore variations to find your favorite blend. With practice, you can enjoy this treat any season. Dive in and make your own unique creation!
    Pumpkin Cream Cold Foam Iced Coffee Delightful Recipe
  • - 2 pounds beef chuck roast, cut into 1-inch cubes - 1 teaspoon salt - 1 teaspoon black pepper - 2 tablespoons olive oil - 1 medium onion, chopped - 4 cloves garlic, minced - 2 cups mushrooms, sliced (cremini or button) - 3 cups beef broth (low sodium) - 2 teaspoons Worcestershire sauce - 2 tablespoons Dijon mustard - 1 teaspoon dried thyme - 1 cup sour cream - 1 tablespoon cornstarch (optional for thickening) - 2 tablespoons chopped fresh parsley (for garnish) - Cooked egg noodles or rice, for serving When making slow cooker beef stroganoff, you need a few key ingredients. The beef chuck roast is the star. It has great flavor and becomes so tender. Season it with salt and pepper to start. Next, olive oil helps to sear the meat. Searing adds depth to the flavor. The aromatics, like onion, garlic, and mushrooms, bring a nice aroma. They create a rich base for the dish. You also need beef broth. It keeps the beef moist and adds taste. Worcestershire sauce and Dijon mustard give a tasty kick. Thyme adds a nice earthy flavor. For creaminess, you will stir in sour cream at the end. If you want a thicker sauce, add cornstarch. This step is optional, but it can really enhance the dish. Don't forget fresh parsley for garnish! It adds color and freshness to your plate. These ingredients come together to create a warm and comforting meal. First, you need to season the beef. Take 2 pounds of beef chuck roast and cut it into 1-inch cubes. Sprinkle 1 teaspoon of salt and 1 teaspoon of black pepper evenly over the meat. This step adds great flavor. Next, we’ll sear the beef in olive oil. Heat 2 tablespoons of olive oil in a skillet over medium-high heat. Once hot, add the beef cubes. Sear them for about 3-4 minutes on each side until they are browned. This adds a nice crust. After browning, transfer the beef to the slow cooker. Now, let’s sauté the aromatics. In the same skillet, add the chopped onion. Cook it for about 3-4 minutes until it turns translucent. This brings out the sweet flavor of the onion. After the onion is ready, add 4 cloves of minced garlic and 2 cups of sliced mushrooms. Cook for another 5 minutes until the mushrooms soften. This mix will add depth to your stroganoff. Next, it’s time to combine everything. Add the sautéed onion, garlic, and mushrooms to the slow cooker with the beef. Pour in 3 cups of low-sodium beef broth, 2 teaspoons of Worcestershire sauce, 2 tablespoons of Dijon mustard, and 1 teaspoon of dried thyme. Stir gently to mix all the ingredients well. Now, set the slow cooker. Cover it and choose the heat setting. You can set it on low for 6-8 hours or high for 3-4 hours. Cooking slowly makes the beef tender and full of flavor. Once the beef is tender, it’s time for the finishing touches. Stir in 1 cup of sour cream until it blends well. This gives a creamy texture to the sauce. If you like a thicker sauce, mix 1 tablespoon of cornstarch with a little water to make a slurry. Stir it in and let it cook for another 15-30 minutes. For serving, present the beef stroganoff in deep bowls. A sprinkle of chopped fresh parsley on top adds color and freshness. Serve it over cooked egg noodles or rice. Crusty bread on the side is great to soak up the delicious sauce. Enjoy your meal! To make your beef stroganoff taste great, adjust the seasoning to fit your taste. You can add extra salt or pepper based on your preference. Sometimes, I like to toss in a splash more Worcestershire sauce for a richer flavor. You can also enhance the dish by adding a splash of red wine or some fresh herbs like thyme or parsley while cooking. These tweaks can really boost the taste! Preparing ingredients in advance saves time. You can cut the beef, chop the onions, and slice the mushrooms the night before. Store them in the fridge until you're ready to cook. If your day is busy, remember that the slow cooker can handle it. Set it on low in the morning, and you’ll have a warm meal ready by dinner! Choosing the right slow cooker is key. A 6-quart slow cooker is perfect for this recipe. Make sure it has a good seal to keep in moisture. Useful kitchen tools include a sharp knife for cutting, a sturdy cutting board, and measuring cups for accuracy. These tools help ensure your stroganoff turns out tasty and satisfying every time. {{image_2}} You can swap beef for other proteins. Chicken or turkey works well in this dish. They cook nicely and soak up the flavors. If you want a dairy-free option, try using cashew cream instead of sour cream. This keeps the dish creamy without dairy. To give your stroganoff a twist, add veggies like carrots or bell peppers. They add color and nutrients. You can also mix in different herbs and spices. Try rosemary or paprika for a new taste. These small changes can make a big difference. You don't have to stick to just egg noodles or rice. Serve the stroganoff over polenta for a creamy base. You can also try it with mashed potatoes. For garnishing, sprinkle fresh parsley or even chives on top. This adds a nice pop of color and fresh taste. After enjoying your beef stroganoff, let it cool first. Store leftovers in an airtight container. Keep it in the fridge. I recommend eating it within three to four days to keep it fresh. If you wait too long, the flavors may fade. You can freeze beef stroganoff too. Just make sure it cools completely. Use a freezer-safe container or a heavy-duty bag. Label the container with the date. It can stay in the freezer for up to three months. When you're ready to eat, move it to the fridge to thaw overnight. For reheating, the stove is best. Put stroganoff in a pot over low heat. Stir frequently to warm it evenly. You can also use the microwave. Heat in short bursts and stir in between. This helps keep the sauce from separating. If you notice separation, stir in a bit of sour cream or broth to bring it back together. Slow cooker beef stroganoff takes 6-8 hours on low or 3-4 hours on high. The longer cooking time helps the beef become tender. I prefer the low setting. It allows the flavors to blend slowly, making the dish rich and savory. Yes, you can use frozen beef. Just add extra time. If you start with frozen beef, cook it on high for about 4-5 hours. Make sure to check for tenderness. If it’s not tender yet, keep cooking until it is. Beef stroganoff goes well with several sides. Here are some great options: - Cooked egg noodles - Steamed rice - Mashed potatoes - Crusty bread These sides soak up the sauce nicely and add flavor. Yes, you can make beef stroganoff on the stove. Here’s how: 1. Sear the beef in a large pot. 2. Add the onions, garlic, and mushrooms. 3. Pour in the broth and sauces and let it simmer. 4. Cook until the beef is tender, about 1-2 hours. This method is faster but requires more attention. Absolutely! To make beef stroganoff gluten-free, use gluten-free Worcestershire sauce and gluten-free noodles. You can find many brands of gluten-free pasta at your local store. This way, you can still enjoy the same great taste without gluten. This beef stroganoff recipe showcases rich flavors and simple steps. You learned how to combine main ingredients, cook them perfectly, and present the dish beautifully. With a few tips, you can adjust the flavor and even make this meal ahead of time. Remember, variations exist to fit your needs, like using different proteins or adding veggies. Storing leftovers is easy if you follow the proper methods. Enjoy your delicious creation, and share with others how to make this comforting dish. Your cooking skills will surely impress!
    Slow Cooker Beef Stroganoff Deliciously Simple Recipe
  • This dish shines with a mix of fall veggies. You will need: - 2 cups butternut squash, diced - 2 cups Brussels sprouts, halved - 2 cups carrots, sliced - 1 red onion, cut into wedges - 1 cup baby kale These vegetables bring color and flavor to your plate. The butternut squash gives sweetness. Brussels sprouts add a nice crunch. Carrots provide earthiness, while red onion adds zest. The baby kale will wilt just right when you mix it in at the end. To make your veggies pop, you need the right seasonings. Use: - 3 tablespoons olive oil - 2 teaspoons dried thyme - 2 teaspoons smoked paprika - Salt and pepper to taste - 1/4 cup pomegranate seeds (for garnish) - 1/4 cup feta cheese, crumbled (optional) The olive oil helps the veggies roast well. Thyme and smoked paprika add depth and warmth. Salt and pepper enhance every flavor. The pomegranate seeds give a lovely burst of sweetness and color. Feta cheese, if you choose to add it, brings creaminess. I recommend using olive oil for this recipe. It works well with all the flavors. You can also try avocado oil for a different taste. Both oils will help your veggies roast perfectly. Just remember, a good oil makes a big difference in taste! Start by washing all the vegetables. Clean the butternut squash, Brussels sprouts, carrots, and red onion. Cut the squash into small cubes. Halve the Brussels sprouts. Slice the carrots into thin rounds. Cut the red onion into wedges. Make sure all pieces are about the same size. This helps them cook evenly. In a large bowl, add the diced butternut squash, halved Brussels sprouts, sliced carrots, and onion wedges. Pour in three tablespoons of olive oil. Then, sprinkle on two teaspoons of dried thyme and two teaspoons of smoked paprika. Add salt and pepper to taste. Mix everything well with your hands or a spoon. You want each piece to be coated with oil and spices. Preheat your oven to 425°F (220°C). Spread the veggie mix in a single layer on a baking sheet lined with parchment paper. Make sure there is space between the veggies. This helps them roast better. Place the baking sheet in the oven. Roast for 25 to 30 minutes. Stir the veggies halfway through to ensure even cooking. When the veggies are golden brown and tender, take them out. Add one cup of baby kale and fold it in gently. The heat will wilt the kale. Plate the veggies and top with pomegranate seeds and feta cheese if you like. Enjoy your colorful and tasty dish! To get the best flavor, cut your veggies into even sizes. This helps them cook at the same rate. Use a large baking sheet. This gives the veggies room to roast without steaming. Always preheat your oven to 425°F (220°C). A hot oven gives that nice, crispy texture. Stir the veggies halfway through cooking. This helps them brown evenly. Add a splash of balsamic vinegar for a sweet touch. You can mix in garlic for extra aroma. Fresh herbs like rosemary or sage can boost the flavor. If you like heat, sprinkle some red pepper flakes. For a sweet contrast, pomegranate seeds add a nice pop. If you enjoy cheese, crumbled feta brings creaminess to the dish. Serve the veggies in a shallow bowl for a nice look. You can arrange them by color for a vibrant display. Drizzle a little olive oil on top for shine. A sprinkle of extra salt just before serving adds flavor. Garnish with fresh pomegranate seeds for a festive touch. This will make your dish eye-catching and tasty. {{image_2}} You can swap out the butternut squash for sweet potatoes. They add a nice sweetness. If you don’t like Brussels sprouts, try green beans or broccoli. Carrots can be replaced with parsnips for a different taste. A yellow onion works well if you can’t find red onions. This dish is easy to make vegan. Just skip the feta cheese, and you’re set. For gluten-free, this recipe is already safe. You won’t need to change any ingredients. If you want to add protein, try chickpeas or lentils. They mix well with the veggies and add fiber. For a meaty option, add diced chicken or turkey. You can also sprinkle some nuts or seeds for crunch. A splash of balsamic vinegar can bring extra flavor to the mix. To store leftovers, let the veggies cool first. Place them in an airtight container. Keep them in the fridge for up to four days. Make sure to label the container with the date. This helps you remember when you made them. To reheat, use an oven for best results. Preheat it to 350°F (175°C). Spread the veggies on a baking sheet. Heat for about 10 to 15 minutes. Stir them halfway through for even heating. You can also use a microwave. Heat in short bursts until warm. Add a little olive oil for extra flavor. You can freeze the veggie medley too. First, let it cool completely. Then, pack it in freezer-safe bags. Remove as much air as possible. This helps prevent freezer burn. Store in the freezer for up to three months. When you're ready to eat, thaw in the fridge overnight. Then, reheat as mentioned above. Enjoy your tasty medley later! Roast the veggies for 25-30 minutes. Check them halfway through. Stirring helps them cook evenly. Look for a golden brown color and tender texture. This timing works best at 425°F. Yes, you can use different vegetables. Try sweet potatoes, peppers, or zucchini. Just cut them into similar sizes. Make sure they have about the same cooking time. This way, they all cook evenly and taste great. This veggie medley goes well with many dishes. You can serve it with grilled chicken or fish. It also pairs nicely with quinoa or rice. Consider adding it to a salad for extra flavor. A nice crusty bread on the side is also a good choice. This blog post covered how to make a delicious sheet pan fall veggie medley. We talked about choosing fresh vegetables and the right seasonings. You learned the steps to prep, season, and roast the veggies perfectly. I shared tips for great flavor and stunning presentation. I also included variations for dietary needs and how to store leftovers. Roasting veggies can be easy and fun. Enjoy your cooking and experimenting with these ideas!
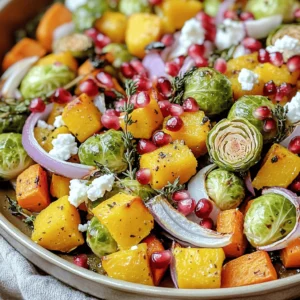
    Sheet Pan Fall Veggie Medley Easy and Tasty Recipe
  • - 2 lbs chicken wings - Teriyaki marinade components - 1/4 cup soy sauce - 1/4 cup honey - 2 tablespoons rice vinegar - 1 tablespoon grated ginger - 2 cloves garlic, minced - 1 tablespoon sesame oil - 0.5 teaspoon black pepper - Optional: 1 teaspoon cornstarch For the marinade, I use a mix of flavors. Soy sauce gives it saltiness. Honey adds sweetness. Rice vinegar brings a nice tang. Grated ginger and minced garlic add depth. Sesame oil gives a warm, nutty taste. Black pepper adds a little kick. If you want a thicker sauce, cornstarch helps. - 2 green onions, chopped - Sesame seeds I love garnishing with green onions. They add color and freshness. Sesame seeds give a nice crunch. Together, they make the dish look and taste amazing. These simple touches elevate the wings. You can easily impress family and friends with this flavorful dish. Start by making the teriyaki sauce. In a medium bowl, whisk together: - 1/4 cup soy sauce - 1/4 cup honey - 2 tablespoons rice vinegar - 1 tablespoon grated ginger - 2 cloves garlic, minced - 1 tablespoon sesame oil - 0.5 teaspoon black pepper If you like a thicker sauce, mix 1 teaspoon cornstarch with a little water. Add this to the sauce. This step makes it nice and smooth. Take 2 lbs of chicken wings and put them in a large zip-lock bag or bowl. Pour the teriyaki marinade over the wings. Seal the bag or cover the bowl tightly. Then, massage the wings gently to coat them well. For best flavor, let them marinate in the fridge for at least 30 minutes. For the best taste, I suggest leaving them overnight. Next, preheat your air fryer to 375°F (190°C) for about 5 minutes. This helps the wings cook evenly. Remove the wings from the marinade. Let any extra marinade drip off. Place the wings in a single layer in the air fryer basket. If your air fryer is small, cook them in batches. Cook the wings for 25-30 minutes. Shake the basket halfway through cooking. This step helps them get crispy all around. When done, the wings should be golden brown and crispy. Enjoy the wonderful smell! - For best flavor, marinate the chicken wings for at least 30 minutes. - If you have time, let them sit overnight. This makes them even tastier. - Keep the wings in the fridge while they marinate. This helps keep them safe. - Preheat your air fryer to 375°F (190°C) for even cooking. - Place the wings in a single layer in the basket. This helps them crisp up well. - Avoid overcrowding. If needed, cook in batches to ensure they cook evenly. - Serve teriyaki wings with a side of rice or steamed veggies. - Pair with dips like ranch or blue cheese for extra flavor. - Try adding fresh veggies like carrots and celery for a crunchy side. {{image_2}} You can easily change the taste of your teriyaki chicken wings. Want some heat? Add chili paste to the marinade. This gives a spicy kick. It pairs well with the sweet teriyaki sauce. You can also try sweet and sour variations. Mix in some pineapple juice or vinegar. This adds a fresh twist. If you don’t have an air fryer, no worries! You can bake your wings in the oven. Preheat the oven to 400°F (200°C). Spread the wings on a baking sheet. Bake them for about 40-45 minutes. Turn them halfway for even cooking. Grilling is another option. Cook on medium heat for about 15-20 minutes. This adds a nice, smoky flavor. Need a gluten-free option? Use tamari instead of soy sauce. It tastes just as good. For a vegan twist, swap honey for maple syrup. You can also find vegan teriyaki sauces at the store. These options keep the dish tasty and cater to different diets. To store leftover wings, let them cool first. Place them in an airtight container. You can also use a zip-lock bag. Make sure to squeeze out any air. This keeps the wings fresh. They will last about three to four days in the fridge. Use them in salads or wraps for easy meals! To freeze cooked chicken wings, let them cool completely. Lay them in a single layer on a baking sheet. Freeze them for about one hour. After that, put them in a freezer bag. Squeeze out the air and seal the bag. Frozen wings can last up to three months. Just label the bag with the date! To reheat, the air fryer is best. Set it to 375°F (190°C). Heat the wings for about 10 minutes. This keeps them crispy. You can also use the oven. Preheat it to 350°F (175°C). Place the wings on a baking sheet and heat for about 15 minutes. Enjoy your tasty wings again! You can pair these tasty wings with several sides. Here are my favorites: - Steamed rice: White or brown rice soaks up the sauce well. - Vegetable stir-fry: Colorful veggies add crunch and nutrition. - Coleslaw: The crunch from coleslaw balances the wings' flavor. - Cucumber salad: A light salad cools down the spiciness. - Drinks: Serve with cold beer, soda, or green tea. Yes, you can use frozen chicken wings! Here’s how to do it: - Cooking time: Increase the cooking time by 5-10 minutes. - Marination: Thaw wings first for better flavor. Use the fridge overnight. - Air fryer: Cook them in batches if your air fryer is small. For the best flavor, marinate the wings for at least: - 30 minutes: This gives some flavor. - 2 hours: Ideal for deeper taste. - Overnight: Recommended for maximum flavor. Make sure they are coated well in the marinade. Yes, you can adjust the sweetness! Here’s how to do it: - Less sweet: Reduce the honey or use soy sauce. - More sweet: Add extra honey or use brown sugar. - Flavor balance: Mix in a bit of lime juice for zest. Feel free to experiment based on your taste! We covered how to make delicious air fryer teriyaki chicken wings. First, we discussed the important ingredients and how to make a tasty marinade. Then, I shared clear steps for marinating and cooking the wings for crispy results. Finally, we explored tips, variations, and storage options. Making teriyaki wings at home is fun and easy. Enjoy your tasty wings, and don’t forget to try different flavors!
    Air Fryer Teriyaki Chicken Wings Simple and Tasty Dish
  • To make these tasty pancakes, you will need: - 1 cup cottage cheese - 1/2 cup rolled oats - 2 large eggs - 1 banana, mashed - 1 teaspoon vanilla extract - 1 teaspoon baking powder - A pinch of salt - Cooking spray or butter for the pan These ingredients create a simple mix that packs a protein punch. The cottage cheese adds creaminess and helps bind the mixture. Oats contribute fiber, making your pancakes healthy and filling. The banana adds natural sweetness, so you won’t need much sugar. You can customize your pancakes with fun toppings. Here are some great options: - Fresh berries - Honey - Greek yogurt - Nut butter Adding these toppings not only boosts flavor but also adds nutrients. Fresh berries bring vitamins, while nut butter adds healthy fats. You can mix and match these toppings to find your favorite combination. Cottage cheese is a superfood for many reasons: - It is high in protein. This helps you feel full and supports muscle growth. - It contains calcium, which is important for strong bones. - It has probiotics, which are good for gut health. Using cottage cheese in pancakes makes them not only tasty but also nutritious. You can enjoy these pancakes for breakfast or a snack, knowing they help fuel your day! To make the batter, grab a blender. You will need 1 cup of cottage cheese, 1/2 cup of rolled oats, and 2 large eggs. Next, add 1 mashed banana, 1 teaspoon of vanilla extract, 1 teaspoon of baking powder, and a pinch of salt. Blend all these ingredients until smooth. Make sure to scrape down the sides if needed. This step ensures a creamy and well-mixed batter for your pancakes. Now, heat a non-stick skillet or frying pan over medium heat. Lightly grease it with cooking spray or butter. Pour about 1/4 cup of the pancake batter onto the skillet for each pancake. Cook for about 3 to 4 minutes. Watch for small bubbles to form on the surface and the edges to look set. These signs mean your pancakes are ready to flip. Gently flip the pancakes with a spatula. Cook for another 2 to 3 minutes. Look for a golden-brown color. This means they are cooked through and ready to eat. You can tell the pancakes are done when they are golden brown and spring back when you touch them. If they feel soft, they may need more time. Keep an eye on the color and texture. Once done, remove them from the skillet and keep warm while cooking the rest of the batter. Enjoy your fluffy and tasty pancakes! To make your pancakes fluffy, use fresh cottage cheese. This keeps the batter light. Blend the cottage cheese until smooth, but don’t over-mix. A few lumps are okay. They add texture and help with fluffiness. The baking powder is key too. It creates bubbles, making the pancakes rise. For even cooking, heat your skillet on medium. If it’s too hot, the outside burns before the inside cooks. Use a non-stick pan for best results. Lightly grease the pan with cooking spray or butter. Pour the batter in one spot for each pancake. This helps them spread evenly. Cook until you see bubbles, then flip gently. You can customize these pancakes easily. Add spices like cinnamon for warmth. Mix in chocolate chips or blueberries for a sweet twist. For a protein boost, try adding a scoop of protein powder. You can even swap the banana for applesauce if you like. The toppings also let you change things up. Fresh berries, honey, or nut butter can all add flavor. {{image_2}} You can switch up the taste of your pancakes easily. Here are some fun ideas: - Chocolate Chip: Add 1/4 cup of mini chocolate chips to the batter. This gives a sweet twist. - Blueberry: Stir in 1/2 cup of fresh or frozen blueberries. They burst with flavor as they cook. - Banana Nut: Mix in chopped walnuts and an extra banana for a nutty taste. - Cinnamon Apple: Add diced apples and a sprinkle of cinnamon. This gives a warm, cozy vibe. You can adapt this recipe for different diets very easily. Here’s how: - Gluten-Free: Use gluten-free rolled oats instead of regular oats. This keeps the pancakes fluffy. - Vegan: Replace eggs with flax eggs. Mix 1 tablespoon of ground flaxseed with 2.5 tablespoons of water. Let it sit for a few minutes to thicken. - Dairy-Free: Use dairy-free cottage cheese made from nuts or soy. This keeps the protein punch. Toppings can make your pancakes even more fun. Here are some tasty ideas: - Fresh Berries: Strawberries, raspberries, or blackberries add a burst of freshness. - Honey or Maple Syrup: Drizzle some honey or syrup for natural sweetness. - Greek Yogurt: A dollop adds creaminess and extra protein. - Nut Butter: Spread almond or peanut butter for a rich, nutty taste. Feel free to mix and match these ideas to make your perfect pancake! To keep your leftover pancakes fresh, store them in an airtight container. Allow them to cool to room temperature first. This helps prevent moisture build-up. You can keep them in the fridge for up to three days. If you want to keep them longer, freezing is a great option. To reheat your pancakes, use a microwave or skillet. If using a microwave, place a damp paper towel over the pancakes. This keeps them moist. Heat for about 30 seconds. If you prefer a skillet, warm it over low heat. Add a little butter or cooking spray for flavor. Heat each side for about one minute. Freezing pancakes is simple and smart. Stack the cooled pancakes with parchment paper between each one. This prevents them from sticking together. Place the stack in a freezer bag or airtight container. They can last up to two months in the freezer. To enjoy, just reheat them directly from the freezer using your preferred method. Yes, you can use non-dairy options. Look for products made from soy or almonds. These can work well in this recipe. Just ensure they have a similar texture to regular cottage cheese. You may need to adjust the liquid in the recipe to get the right batter thickness. You can replace eggs with mashed banana or applesauce. Use 1/4 cup of mashed banana or applesauce for each egg. This keeps the pancakes moist and adds a bit of sweetness. Blend it in with the other ingredients as you prepare the batter. Serve these pancakes warm with fresh toppings. I love adding berries for a burst of flavor. Drizzle some honey or maple syrup on top for sweetness. Greek yogurt also makes a great addition for creaminess. Nut butter is another tasty option for added protein. The choice is yours! Protein cottage cheese pancakes are tasty and healthy. You learned the main ingredients, cooking steps, and ways to customize. I shared tips for fluffiness and even cooking. Plus, you can vary flavors or diets based on your needs. Store leftovers and reheat easily for future meals. These pancakes fit many styles and tastes. Enjoy making them your way! They can be your go-to breakfast for nutrition and fun.
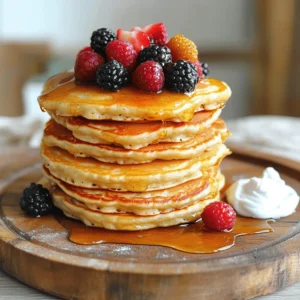
    Protein Cottage Cheese Pancakes Easy and Tasty Recipe

Posts pagination

← Newer 1 … 4 5 6 7 8 … 33 Older →

Footer

↑ back to top

More information

  • Dinner
  • Drinks
  • Appetizers
  • Dessert
  • About
  • Contact Us

    Our Policies

    • Privacy Policy
    • Cookie Policy
    • Copyright Policy
    • Disclaimer
    • GDPR Policy
    • Terms Of Us

    Copyright © 2024 My Saved Recipe