• Recipes
    • Dinner
    • Dessert
    • Appetizers
    • Drinks
  • About
  • Contact Us
  • Privacy Policy
menu icon
go to homepage
  • Recipes
    • Dinner
    • Dessert
    • Appetizers
    • Drinks
  • About
  • Contact Us
  • Privacy Policy

search icon
Homepage link
  • Recipes
    • Dinner
    • Dessert
    • Appetizers
    • Drinks
  • About
  • Contact Us
  • Privacy Policy

×
Savannah

Savannah

Savannah is the creative force behind My Saved Recipe, a space where food becomes both art and adventure. A passionate home chef, she delights in exploring flavors from around the world while honoring timeless classics.

Savannah’s philosophy centers on the power of food to bring people together, spark creativity, and create lasting memories. Through thoughtfully crafted recipes and practical tips, she inspires cooks of all levels to embrace fresh ingredients, experiment with confidence, and find joy in the kitchen.

  • To make this Moroccan chickpea stew, you need a few key items: - 2 cups canned chickpeas, drained and rinsed - 1 large onion, diced - 2 cloves garlic, minced - 1 can (14 oz) diced tomatoes, with juices - 1 medium zucchini, diced - 1 cup carrots, sliced - 1 red bell pepper, diced - 2 cups vegetable broth - 2 tablespoons olive oil - 2 teaspoons ground cumin - 1 teaspoon ground coriander - 1 teaspoon ground cinnamon - 1 teaspoon turmeric - 1/2 teaspoon cayenne pepper (adjust to taste) - Salt and pepper to taste - Fresh cilantro or parsley, for garnish - Lemon wedges, for serving For added taste, consider these optional ingredients: - 1 cup spinach or kale, for extra greens - 1 cup sweet potato, diced, for sweetness - 1 tablespoon fresh ginger, grated, for warmth - 1/4 cup raisins or dried apricots, for sweetness - A dash of smoked paprika, for smokiness You can swap several ingredients based on what you have: - Use dried chickpeas instead of canned; just soak and cook them first. - Swap vegetable broth with chicken broth for more flavor. - Replace zucchini with eggplant for a different texture. - Use any bell pepper color you prefer. - If you're out of cayenne, try red pepper flakes for spice. Start by gathering all your ingredients. You need: - 2 cups canned chickpeas, drained and rinsed - 1 large onion, diced - 2 cloves garlic, minced - 1 can (14 oz) diced tomatoes, with juices - 1 medium zucchini, diced - 1 cup carrots, sliced - 1 red bell pepper, diced - 2 cups vegetable broth - 2 tablespoons olive oil - 2 teaspoons ground cumin - 1 teaspoon ground coriander - 1 teaspoon ground cinnamon - 1 teaspoon turmeric - 1/2 teaspoon cayenne pepper (adjust to taste) - Salt and pepper to taste - Fresh cilantro or parsley, for garnish - Lemon wedges, for serving Once you have everything, chop your veggies into small pieces. This helps them cook evenly. In a skillet, heat the olive oil over medium heat. Add the diced onion and sauté it until soft, about 5 minutes. Next, stir in the minced garlic and cook for one more minute. This step adds a rich aroma. Transfer this mixture to your slow cooker. Now, add the chickpeas, diced tomatoes, zucchini, carrots, and red bell pepper to the slow cooker. Pour in the vegetable broth. Add all the spices: cumin, coriander, cinnamon, turmeric, and cayenne pepper. Stir well to combine. Season with salt and pepper to your taste. Cover the slow cooker and set it to cook on low for 6-8 hours or on high for 3-4 hours. The goal is to make the vegetables tender and let the flavors blend. When the cooking time is done, taste the stew. Adjust the seasoning if needed. Serve it hot, garnished with fresh cilantro or parsley. Add lemon wedges on the side for a zesty finish. This adds a bright note to your rich stew! To boost the flavor of your stew, try these tips: - Fresh Herbs: Add fresh cilantro or parsley at the end. This brightens the dish. - Citrus Zest: Grate lemon zest into the stew. It adds a nice kick. - Adjust Spices: Taste the stew before serving. Add more cayenne if you like heat. - Umami Boost: Stir in a tablespoon of soy sauce or miso for depth. These simple changes make a big difference! Every slow cooker cooks differently. Here are my tips: - Low Setting: Cook for 6-8 hours. This gives the best flavor and texture. - High Setting: If short on time, cook for 3-4 hours. The stew will still be good. - Check Early: If you use a new slow cooker, check the stew an hour early. Some models cook faster. Adjust based on your cooker to ensure perfect results. Pair this stew with easy sides to complete your meal: - Couscous: Fluffy couscous soaks up the stew's sauce well. - Rice: Serve over brown or white rice for a hearty dish. - Flatbread: Offer warm flatbread for dipping and scooping. - Salad: A fresh salad adds crunch and brightness. These pairings make your meal even more delightful! {{image_2}} If you want to add protein, you can easily do so. Chicken or turkey works well. Just add bite-sized pieces to the slow cooker. You can also use tofu for a plant-based option. Cook it until it’s hot and tender. These options will make the stew heartier and more filling. This stew is already vegetarian. To make it vegan, ensure you use vegetable broth. You can also add more veggies, like spinach or kale. This adds nutrients and color to the dish. Both versions taste great and are healthy too. You can change ingredients based on the season. In spring, use fresh peas or asparagus. In fall, add sweet potatoes or butternut squash. Using seasonal veggies keeps the stew fresh and exciting. It also helps you enjoy what’s local and in season. Store your leftover Moroccan chickpea stew in an airtight container. Let it cool first. Once cooled, place it in the fridge. It stays fresh for several days. If you want to keep it longer, you can freeze it. To reheat the stew, use a pot on the stove. Heat it over medium heat until warm. Stir often to prevent sticking. You can also use the microwave. Heat in short bursts and stir in between. The stew lasts up to five days in the fridge. If you freeze it, it can last up to three months. Make sure to label your containers with the date. This way, you know when to use them! Yes, you can freeze this stew. Let it cool first. Then, place it in a freezer-safe container. It keeps well for up to three months. When ready to eat, thaw it in the fridge overnight. Reheat it on the stove or in the microwave. To add heat, increase the cayenne pepper. Start with an extra 1/4 teaspoon. You can also add sliced jalapeños for more spice. If you want a deeper heat, try smoked paprika. Remember to taste as you go to find your perfect level of heat. This stew pairs well with warm bread like pita or crusty rolls. You can also serve it over fluffy couscous or rice for a filling meal. A fresh salad with lemon dressing adds a nice crunch. For a complete meal, offer yogurt or a dollop of sour cream on the side. We explored the key ingredients, cooking steps, and tips for your Slow Cooker Moroccan Chickpea Stew. You can use essential and optional items for the best flavor. Adjust cooking times based on your slow cooker. We also discussed how to store leftovers and answered common questions. Embrace your creativity with variations like adding protein or seasonal swaps. Your stew will shine and warm any table. Enjoy discovering new flavors and impressing everyone with your skills!
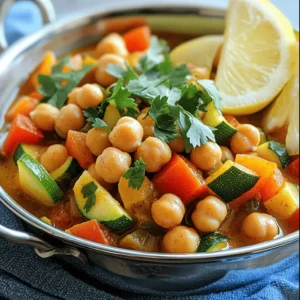
    Savory Slow Cooker Moroccan Chickpea Stew Delight
  • - 2 large sweet potatoes - 2 tablespoons olive oil - 1 teaspoon garlic powder - 1 teaspoon smoked paprika - 1/2 teaspoon salt - 1/2 teaspoon black pepper - 1 tablespoon fresh rosemary, chopped (optional) - 1 tablespoon honey or maple syrup (optional for sweetness) The key to crispy air fryer sweet potato wedges starts with the right ingredients. First, I choose 2 large sweet potatoes. They give a nice balance of sweetness and texture. Next, I use 2 tablespoons of olive oil. This oil helps the wedges crisp up nicely. Then, I add 1 teaspoon of garlic powder and 1 teaspoon of smoked paprika. These spices bring out great flavor. A pinch of salt (1/2 teaspoon) and black pepper (1/2 teaspoon) enhance the taste further. For an extra touch, I might add 1 tablespoon of fresh rosemary, chopped. It gives a lovely herb flavor. If you enjoy a bit of sweetness, consider adding 1 tablespoon of honey or maple syrup. It can elevate the dish even more. With these simple ingredients, you can create a dish that is both crispy and flavorful. First, set your air fryer to 400°F (200°C). This helps the sweet potatoes cook evenly. Preheat it for about 5 minutes. You want it hot and ready for the wedges. Next, wash and scrub 2 large sweet potatoes. This removes dirt and makes them clean. After that, cut each sweet potato into wedges. Aim for pieces about 1/2 inch thick. This size cooks well and gets crispy. In a large bowl, toss the sweet potato wedges with 2 tablespoons of olive oil. Add 1 teaspoon of garlic powder, 1 teaspoon of smoked paprika, 1/2 teaspoon of salt, and 1/2 teaspoon of black pepper. If you like, add 1 tablespoon of fresh rosemary, chopped. For a hint of sweetness, drizzle in 1 tablespoon of honey or maple syrup. Mix everything well until the wedges are coated. Place the sweet potato wedges in the air fryer basket. Make sure to lay them in a single layer. Do not crowd them. You may need to cook in batches. Cook for 15 to 20 minutes. Halfway through, give the basket a shake. This helps them cook evenly and get extra crispy. Once the wedges are golden brown and crispy, take them out of the air fryer. Let them cool slightly. Serve warm with your favorite dipping sauce. They also taste great on their own! To make your sweet potato wedges crispy, start by preheating your air fryer to 400°F (200°C) for about 5 minutes. This step helps get that nice crunch. Cut the sweet potatoes into wedges, about 1/2 inch thick. Thinner wedges cook faster and get crispier. When you cook, make sure to place the wedges in a single layer in the basket. If you overcrowd them, they won’t crisp up well. Shake the basket halfway through cooking, about 10 minutes in. This helps them cook evenly. Cook for 15-20 minutes total, until they are golden brown. To boost the flavor of your sweet potato wedges, try adding extra spices. You can mix in a pinch of cayenne pepper for heat or a sprinkle of cinnamon for warmth. Fresh herbs like thyme or oregano work well too. If you want a smoky taste, smoked paprika is perfect. You can also drizzle honey or maple syrup for a touch of sweetness. Experiment with these flavors to find your favorite mix! Dipping sauces can elevate your sweet potato wedges. Here are some tasty ideas: - Sour Cream: A classic choice that adds creaminess. - Ranch Dressing: This tangy sauce pairs nicely with the sweet flavor. - Chipotle Mayo: For a spicy kick, mix mayo with chipotle sauce. - Honey Mustard: A sweet and tangy option that complements the wedges well. Feel free to mix and match these sauces. They can add a whole new layer of flavor to your delicious wedges! {{image_2}} You can change the flavor of your sweet potato wedges easily. Here are some spice blends to try: - Cajun Seasoning: Adds a kick with herbs and spices. - Italian Herbs: Mix dried oregano, basil, and thyme for a fresh taste. - Cinnamon and Nutmeg: These spices give a warm, sweet flavor. Each blend can make your wedges unique and exciting. You can add sweetness or savory flavors to your wedges. Here are some ideas: - Sweet Options: Drizzle honey or maple syrup for a sweet touch. You can also sprinkle brown sugar on top. - Savory Options: Add grated Parmesan cheese or a sprinkle of chili powder for heat. These options let you play with different flavors and make every batch special. If you don’t have an air fryer, you can still enjoy sweet potato wedges. Here are some other cooking methods: - Oven Baking: Preheat your oven to 425°F (220°C). Spread wedges on a baking sheet and cook for 25-30 minutes. Flip halfway for even cooking. - Roasting: Use a cast-iron skillet. Preheat it, then add the wedges. Cook on medium heat until crispy, turning often. These methods give you tasty wedges even without an air fryer. To keep your leftover sweet potato wedges fresh, place them in an airtight container. Refrigerate them within two hours of cooking. They last up to three days in the fridge. Make sure to separate layers with parchment paper if you stack them. This helps prevent sogginess. To reheat your wedges and keep them crispy, use the air fryer again. Preheat it to 350°F (175°C). Place the wedges in a single layer. Heat for about 5 to 7 minutes. Shake the basket halfway through. This method keeps them crunchy and warm. You can also use an oven for reheating. If you want to freeze sweet potato wedges, first let them cool completely. Spread them in a single layer on a baking sheet. Freeze them for about one hour. Once frozen, transfer them to a freezer bag. Remove as much air as possible. They can last up to three months in the freezer. To thaw, place them in the fridge overnight before reheating. To make sweet potato wedges crispy, start by cutting them into even pieces, about 1/2 inch thick. This helps them cook evenly. Toss the wedges in olive oil and spices for flavor. A key tip is to not overcrowd the air fryer basket. Leave some space between the wedges. This allows hot air to flow and crisp them up. Shake the basket halfway through cooking to ensure all sides get nice and crispy. Yes, you can use other potatoes! Regular potatoes like russets or Yukon golds work well. They have a similar texture and will still taste great. Just keep in mind that cooking times may vary. You might need to adjust the time based on the type of potato you use. Experiment with different varieties for fun flavors. Sweet potato wedges can last about 3 to 5 days in the fridge. Store them in an airtight container to keep them fresh. If they start to lose their crispness, you can reheat them in the air fryer. This helps restore their texture. Just heat them for a few minutes until they warm up and crisp up again. Many tasty sauces go well with sweet potato wedges. Here are some popular options: - Ketchup - Honey mustard - Ranch dressing - Sriracha mayo - Chipotle aioli Try different sauces to find your favorite! These dips add extra flavor and make your meal even more enjoyable. Sweet potato wedges are easy and fun to make. You need simple ingredients and a few steps. First, prepare the sweet potatoes and mix in spices. Then, cook them in the air fryer for crispy goodness. You can add your favorite dips or sauces too. In short, this dish is versatile and delicious. You can change up flavors and try new spices. Enjoy these tasty wedges any time, knowing they are good for you. Happy cooking!
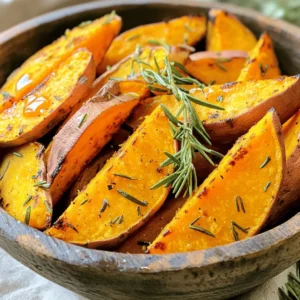
    Air Fryer Sweet Potato Wedges Crispy and Flavorful
  • - 4 cod fillets (about 6 ounces each) - 3 tablespoons unsalted butter - 2 tablespoons fresh lemon juice - Zest of 1 lemon - 2 cloves garlic, minced - 1 teaspoon dried thyme - Salt and pepper to taste - 1 tablespoon fresh parsley, chopped When it comes to this Minute Lemon Butter Cod, the ingredients shine bright. The cod fillets are the stars. They should be fresh and firm. You want fish that flakes easily. Unsalted butter brings richness. It melts beautifully, creating a flavorful base. Fresh lemon juice adds a zesty kick. The zest from the lemon enhances the bright taste. Garlic gives depth, while dried thyme adds an earthy note. Salt and pepper round out the flavors, making each bite delightful. Finishing with chopped fresh parsley adds color and freshness. It makes the dish pop visually. Use the best ingredients you can find. Quality matters in this simple meal. Start with the cod fillets. Pat them dry with paper towels. This step removes excess moisture. A dry fillet helps achieve a nice sear. Next, season both sides with salt, pepper, and dried thyme. This adds great flavor to the fish. Now it's time to heat the butter. In a large skillet, melt 3 tablespoons of unsalted butter over medium heat. Watch it closely so it doesn’t burn. Once melted, add the minced garlic. Sauté the garlic for about 1 minute. You want it fragrant but not browned. Next, gently place the seasoned cod fillets in the skillet. Cook them for about 3 to 4 minutes per side. The fish should turn opaque and flake easily with a fork when done. This step is key for a perfect texture. In the last minute of cooking, drizzle the fresh lemon juice over the cod. Sprinkle the lemon zest on top as well. This step brightens the dish and adds a zesty kick. Allow it to simmer for about a minute. This way, the flavors blend beautifully. Once done, remove the skillet from heat. Transfer the cod to a serving platter. Drizzle any remaining lemon butter sauce over the top. Finish by sprinkling chopped parsley for a touch of color. Enjoy your meal! How do I check for doneness? To check if your cod is done, look for the fish to turn opaque. The flesh should flake easily when you poke it with a fork. This usually takes about 3-4 minutes on each side in the skillet. How can I avoid overcooking? To avoid overcooking, cook on medium heat. If you see the edges of the fish start to brown, it's a sign to remove it from the heat. Remember, the cod will continue to cook even after you take it off the stove. What herbs and spices can I add? You can try adding fresh dill or basil for a fresh twist. A pinch of paprika can add a nice kick too. Feel free to experiment with your favorite herbs to make it your own. What are some alternative cooking methods? You can bake or grill the cod for a different flavor. Baking at 350°F for about 15 minutes works well. Grilling adds a smoky taste that pairs nicely with lemon butter. How can I plate the cod? For a beautiful plate, place the cod on a bed of sautéed spinach or alongside steamed asparagus. This adds color and texture to your meal. What are some garnishing tips? Sprinkle chopped parsley on top for a fresh look. Adding lemon wedges on the side not only looks pretty but also gives a zesty touch when served. {{image_2}} You can easily change the fish in this recipe. Try using salmon or tilapia instead of cod. Both have great taste and cook well with lemon butter. If you want a firmer fish, use swordfish or halibut. For butter, you can use olive oil or coconut oil. These oils add unique flavors. If you choose olive oil, pick a good quality one. This swap makes the dish a bit lighter. To brighten the taste, try adding spices or marinades. A touch of paprika gives a nice kick. You can also use a mix of herbs like dill or basil. This adds aroma and depth. Incorporate vegetables for added nutrition. Sautéed spinach or cherry tomatoes pair well. You can also roast zucchini or bell peppers on the side. These veggies bring color and freshness to the plate. Pair your cod with sides for a full meal. Steamed asparagus or a light salad works great. You can also serve it over rice or quinoa for a hearty option. For an international twist, add a dollop of chimichurri or mango salsa. These toppings can change the flavor profile. They bring a vibrant touch to your dish, making it even more enjoyable. After enjoying Minute Lemon Butter Cod, store any leftovers in the fridge. Place the cod in an airtight container. This helps keep it fresh and tasty. Use the cod within two days for the best flavor. Label the container with the date to track freshness. If you want to save your cod for later, freezing is a great option. Wrap each cod fillet tightly in plastic wrap. Then, place the wrapped fillets in a freezer bag. Squeeze out the air to prevent freezer burn. Cod can stay fresh in the freezer for up to three months. When it's time to eat your frozen cod, make sure to thaw it in the fridge overnight. This helps keep the fish moist. Reheat cod in a skillet over low heat. Add a little butter or oil to keep it juicy. You can also microwave it, but do it in short bursts. Check often to avoid drying it out. Enjoy your cod just as delicious as the first time! Minute Lemon Butter Cod is a quick and tasty fish dish. It features soft cod fillets cooked in a rich lemon butter sauce. The garlic and thyme add a nice touch of flavor. The dish is bright and fresh, perfect for any meal. You can serve it in under 15 minutes, making it great for busy nights. Yes, you can use frozen cod fillets! Just make sure to thaw them first. To thaw, place the fillets in the fridge overnight or run them under cold water for about 30 minutes. Once thawed, pat them dry and follow the recipe as usual. Cooking time may vary, so check for doneness. This cod pairs well with many sides. Try serving it with sautéed spinach for a healthy option. Steamed asparagus also works great, adding a nice pop of color. You can also serve it with rice or quinoa to soak up the tasty sauce. Don't forget some lemon wedges for extra zing! In this blog post, I covered how to make Minute Lemon Butter Cod. We explored the key ingredients, including fresh cod, butter, and lemon. I shared step-by-step instructions to prepare and cook your dish while giving tips for perfecting your technique. For a delicious twist, consider ingredient swaps or different flavor profiles. Don’t forget the importance of proper storage and reheating. With these tips, you can enjoy this simple yet tasty meal anytime. Cook confidently and enjoy your culinary adventure!
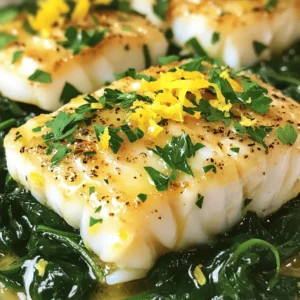
    Minute Lemon Butter Cod Delightful and Simple Meal
  • - Flatbread options: You can use store-bought or homemade flatbread. Store-bought saves time, while homemade offers more control over texture and flavor. If you make it yourself, you can choose the thickness you like best. - Types of onions: I recommend using yellow or sweet onions. Yellow onions are great for caramelizing. They become sweet and rich when cooked. Sweet onions, like Vidalia, add a nice touch if you prefer a milder taste. - Goat cheese specifics: Choose soft goat cheese for a creamy texture. It melts beautifully and blends with the onions. Aged goat cheese gives a stronger flavor, which can add depth to the dish. - Balsamic vinegar variations: You can use regular balsamic vinegar or try flavored options. A dark balsamic adds sweetness, while white balsamic gives a lighter taste. - Spices and seasonings: Add red pepper flakes if you want some heat. Fresh herbs like thyme elevate the flavor. Feel free to mix in other herbs, like rosemary or oregano, for a twist. - Dietary alternatives: If you want a vegan option, use plant-based cheese. Many brands make great substitutes that melt nicely. You can also skip the cheese and add more veggies for flavor. To start, heat olive oil in a large skillet over medium heat. Add your sliced onions and a pinch of salt. Stir them often to ensure even cooking. This step takes about 15-20 minutes. You'll know they are done when they turn soft and golden brown. Add balsamic vinegar and cook for another 2-3 minutes. This gives a sweet and tangy flavor. Make sure to watch the heat; too high, and they can burn. Keep it steady for perfect caramelization. Next, preheat your oven to 400°F (200°C). Take a baking sheet and line it with parchment paper. This helps the flatbread cook evenly and prevents sticking. Place the flatbread on the sheet. You can use store-bought or homemade. For shape, feel free to make it round or rectangular. Just make sure it's about ¼ inch thick for the best texture. Now comes the fun part: assembling! Spread the caramelized onions evenly across the flatbread. Then, sprinkle the crumbled goat cheese on top. Add fresh thyme leaves, salt, and pepper. If you like a little heat, toss in some red pepper flakes. Once it's all layered, put the flatbread in the oven. Bake for 10-12 minutes. Look for crispy edges and warm cheese. When done, take it out and let it cool for a minute. Enjoy your delicious flatbread! To get sweet, golden onions, choose good oils. I like olive oil for its flavor. It adds richness to the onions. You can also try butter for a creamier taste. Avoid common mistakes while caramelizing. Don’t rush the heat. Keep it medium to low. High heat burns the onions. Stir them often, but not too much. You want them to stick just a little. This helps build flavor. Pair this flatbread with a fresh salad. A simple arugula or mixed greens salad works well. Add a light vinaigrette to balance the rich cheese. For drinks, a crisp white wine like Sauvignon Blanc is great. It cuts through the creamy goat cheese. For fun presentation, serve on a wooden board. Add a sprig of thyme on top. Drizzle with olive oil for a rustic look. This makes it pop on your table. {{image_2}} You can easily change up the flavors of your flatbread. Try using different cheeses. If you want a sharper taste, use feta cheese. For a creamier texture, go with ricotta. Both can work well with caramelized onions. You can also add other vegetables. Try roasted red peppers for sweetness. Spinach can add a fresh touch. Mushrooms will bring an earthy flavor. These swaps let you make the dish your own. Adding proteins can make your flatbread heartier. Grilled chicken brings a nice flavor. Crispy bacon gives a smoky touch. Both pair well with the goat cheese and onions. Herbs and spices can boost the taste too. Fresh basil or oregano can add depth. A sprinkle of garlic powder can give it a kick. If you like heat, red pepper flakes are a great option. These enhancements will take your flatbread to the next level. To keep your flatbread fresh, seal it well. Use plastic wrap or an airtight container. Store it in the fridge for up to three days. When you want to enjoy it again, reheat it in the oven. Set the oven to 350°F (175°C) and bake for about 5-7 minutes. This keeps the flatbread crispy. You can also use a toaster oven for this step. If you want to save your flatbread for later, freezing is a great choice. First, let the cooked flatbread cool completely. Wrap it tightly in plastic wrap and then in aluminum foil. This prevents freezer burn. It can last in the freezer for up to three months. When you're ready to eat it, take it out and thaw it in the fridge overnight. Reheat it in the oven at 350°F (175°C) for about 10-15 minutes. This method ensures it stays delicious. To caramelize onions fast, use a wide skillet. Heat the skillet on medium heat and add olive oil. Thinly slice your onions and add them to the pan. Stir in a pinch of salt. This helps draw out moisture. Cook for about 10-15 minutes, stirring often. If they start to brown too fast, lower the heat. You can add a splash of water to help soften them. This method makes sweet, soft onions in less time. Yes, you can prepare flatbread ahead. If you use store-bought flatbread, keep it in its package until you need it. If you make homemade flatbread, let it cool completely. Then, wrap it tightly in plastic wrap or foil. Store it in the fridge for up to three days. You can also freeze it for longer storage. Just thaw it in the fridge before baking. Many side dishes pair well with caramelized onion goat cheese flatbread. You can serve a fresh arugula salad with lemon vinaigrette. A light tomato salad adds color and flavor too. Roasted vegetables bring a nice contrast. For a heartier option, try a warm soup like tomato or butternut squash. These sides balance the rich flavors of the flatbread. To sum up, we explored the key ingredients for flatbread, including onions and goat cheese. I shared step-by-step tips for caramelizing onions and preparing flatbread. We discussed various flavor enhancements, optional ingredients, and how to serve your dish. Remember, perfecting each step makes your meal even tastier. Don't forget those simple storage tips for leftovers. Enjoy your tasty flatbread adventures, and let your creativity shine with every bite!
    Caramelized Onion Goat Cheese Flatbread Delight
  • To make Cottage Cheese Chocolate Chip Cookie Dough, gather these simple ingredients: - 1 cup cottage cheese, drained - 1/2 cup brown sugar - 1/4 cup granulated sugar - 1/3 cup unsalted butter, softened - 1 teaspoon vanilla extract - 1 cup all-purpose flour - 1/2 teaspoon baking soda - 1/4 teaspoon salt - 1 cup chocolate chips - Optional: 1/2 cup chopped nuts (walnuts or pecans) Cottage cheese is a great choice for this dough. It adds protein and calcium. Protein helps your body grow and repair. Calcium is vital for strong bones. Cottage cheese is low in fat, which makes it a smart pick for a treat. It also keeps the dough moist and rich in flavor. Plus, it gives a unique twist to the classic cookie dough. You can get creative with this dough. If you want a crunch, add chopped nuts like walnuts or pecans. If you don’t have cottage cheese, Greek yogurt works well too. You can swap out white sugar for coconut sugar for a richer taste. Use gluten-free flour if you need a gluten-free option. Get fun with flavors! Start by gathering your ingredients. You need cottage cheese, sugars, butter, and vanilla. In a mixing bowl, combine the drained cottage cheese, brown sugar, granulated sugar, softened butter, and vanilla extract. Beat these together until smooth and creamy. This step is key to a rich flavor. In another bowl, whisk together the all-purpose flour, baking soda, and salt. This mix gives your cookies structure. Gradually add the dry mix to the wet mix. Stir until just combined. Avoid overmixing to keep cookies soft and chewy. Finally, fold in the chocolate chips and any nuts if you want extra crunch. Cover the bowl with plastic wrap and chill the dough for about 30 minutes. This step firms it up, making it easier to scoop. Once chilled, you can enjoy the dough raw or bake it. To bake, preheat your oven to 350°F (175°C). Drop tablespoons of dough onto a lined baking sheet. Bake for 10-12 minutes until lightly golden at the edges. Let them cool a bit before moving them to a wire rack. Enjoy your Cottage Cheese Chocolate Chip Cookie Dough! To get soft and chewy cookies, start with room-temperature butter. Mix the butter well with sugars until creamy. This creates air pockets that help cookies rise. Use cottage cheese to keep the dough moist. Don't overmix when adding flour. This keeps the cookies light and fluffy. One big mistake is using too much flour. Always measure flour correctly. Scoop it lightly into the measuring cup and level it off. Another mistake is not chilling the dough. Chilling helps the dough firm up, which stops cookies from spreading too much. Lastly, avoid baking them too long. Watch for light golden edges. You can change this cookie recipe to fit your taste. Try adding spices like cinnamon or nutmeg for warmth. Swap chocolate chips for white chocolate or butterscotch chips for a fun twist. For extra crunch, add nuts like walnuts or pecans. You can even mix in dried fruits like cranberries or raisins for a chewy surprise. {{image_2}} You can make your cookie dough more fun by adding mix-ins. Here are some great ideas: - Chopped nuts: Walnuts or pecans add a nice crunch. - Dried fruit: Raisins or cranberries give a sweet twist. - Peanut butter chips: This adds rich flavor and creaminess. - Coconut flakes: These add a chewy texture and tropical taste. These additions can change the taste and texture, making each batch unique. If you want a healthier cookie dough, you can swap some ingredients. Consider these options: - Sugar substitutes: Use stevia or monk fruit sweetener. - Whole wheat flour: This adds more fiber than all-purpose flour. - Greek yogurt: You can replace some cottage cheese for extra protein. These swaps help make your cookie dough lighter while still tasty. For a vegan or dairy-free version, you'll need to change a few ingredients. Try these ideas: - Cottage cheese substitute: Use silken tofu or cashew cream. - Butter alternative: Coconut oil or vegan butter works well. - Egg replacement: Use a flaxseed or chia seed mixture if needed. These changes let you enjoy cookie dough without dairy while keeping it delicious. To keep your cottage cheese chocolate chip cookie dough fresh, place it in an airtight container. You can also cover the bowl tightly with plastic wrap. This helps keep moisture in and prevents your dough from drying out. Make sure to store it in the fridge if you plan to use it within a few days. If you want to save some dough for later, freezing is a great option. Scoop the dough into small balls and place them on a baking sheet. Freeze them until solid, then transfer the balls to a freezer bag. This helps prevent them from sticking together. When you're ready to bake, simply take out the dough and let it thaw in the fridge for a few hours. Bake them straight from the fridge for the best results. Baked cookies can last in an airtight container at room temperature for about a week. If you want them to stay fresh longer, store them in the fridge. For even longer storage, you can freeze the baked cookies too. Just wrap them tightly in plastic wrap or foil. When you're ready to enjoy them, thaw them at room temperature. This way, you can have your delicious cookies whenever you crave them! Yes, you can eat the cookie dough raw. The cottage cheese makes it safe. It adds creaminess and protein. Just remember that it may not taste like traditional dough. To make the cookies softer, use more butter. Try adding an extra tablespoon. You can also reduce the baking time. Bake until just golden at the edges. You can use Greek yogurt instead of cottage cheese. It gives similar creaminess and protein. Cream cheese is another option, but it will change the taste slightly. These cookies are lower in calories than traditional cookies. Cottage cheese adds protein without too many calories. Each cookie has a good balance of taste and nutrition. Store leftover cookie dough in an airtight container. You can keep it in the fridge for up to a week. If you want to save it longer, freeze it for up to three months. Just thaw before use. This blog covered the ingredients, steps, and tips for making cookie dough with cottage cheese. You learned about nutrition and how to customize flavors. We discussed storage and common mistakes too. Now you have the tools to bake perfect cookies. Experiment with the tips given. Enjoy the process and share your results! Happy baking!
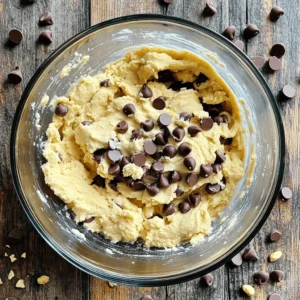
    Cottage Cheese Chocolate Chip Cookie Dough Delight
  • To make No-Bake Pumpkin Spice Energy Balls, you will need the following ingredients: - 1 cup rolled oats - 1/2 cup canned pumpkin puree - 1/3 cup almond butter or peanut butter - 1/4 cup honey or maple syrup - 1 teaspoon pumpkin spice (or a mix of cinnamon, nutmeg, and ginger) - 1/4 teaspoon salt - 1/4 cup flaxseeds or chia seeds (optional for added texture) - 1/2 cup mini chocolate chips or dried cranberries (for sweetness) These simple ingredients come together to create a tasty and healthy snack. You can easily swap some ingredients to fit your taste or needs: - Nut Butters: If you have allergies, try sunflower seed butter instead of almond or peanut butter. - Sweeteners: Maple syrup works well if you want a vegan option instead of honey. - Pumpkin Spice: If you don’t have pumpkin spice, mix equal parts of cinnamon, nutmeg, and ginger. - Seeds: If you don't have flaxseeds or chia seeds, you can skip them. They only add texture. - Mix-ins: Instead of mini chocolate chips, use nuts or seeds for a crunchier texture. These energy balls are not only tasty but also packed with nutrients. Here’s what you get per ball, assuming you make 15 balls: - Calories: About 100 - Protein: 3g - Fat: 4g - Carbohydrates: 13g - Fiber: 2g - Sugar: 5g This makes for a great snack option! You get energy and nutrition without too much sugar. Enjoy these as a post-workout treat or a quick snack. To start, grab a large mixing bowl. Add 1 cup of rolled oats, 1/2 cup of canned pumpkin puree, and 1/3 cup of almond or peanut butter. Next, pour in 1/4 cup of honey or maple syrup. Mix these ingredients well until they become one smooth blend. This base is where the magic happens. It’s full of fiber and flavor. Then, add 1 teaspoon of pumpkin spice and 1/4 teaspoon of salt to the bowl. Stir again to make sure the spices mix evenly. If you want extra texture, fold in 1/4 cup of flaxseeds or chia seeds. These seeds boost nutrition and add crunch. Now it’s time to shape your energy balls. Use your hands to scoop out portions of the mixture. Aim for about 1 inch in diameter for each ball. If the mix sticks to your hands, wet them slightly. This trick makes rolling easier. As you form the balls, think about adding some fun. Mix in 1/2 cup of mini chocolate chips or dried cranberries. These sweet bites bring joy and contrast to the pumpkin flavor. Make sure they are spread throughout the mixture for a delightful surprise in every bite. Once you’ve rolled out all the balls, place them on a parchment-lined baking sheet or plate. This step keeps them from sticking. Now, it’s time to chill. Pop the energy balls in the fridge for at least 30 minutes. This cooling time helps them firm up nicely. After they chill, store your energy balls in an airtight container. They can last in the fridge for up to one week. Enjoy these tasty treats as a healthy snack or after a workout. They’re perfect for energy on the go! If your mixture is too sticky, don’t worry! You can easily fix this. First, dampen your hands with a little water. This helps you roll the balls without them sticking to your fingers. You can also add a bit more oats or flaxseeds if needed. This will help absorb some moisture and make it easier to handle. To boost flavor, try adding a pinch of salt or a splash of vanilla extract. You can also mix in chopped nuts for crunch or extra seeds for nutrition. If you want a sweeter treat, swap in dried fruit for some of the chocolate chips. This will add a fun twist to the taste and texture. Serve these energy balls as a healthy snack on their own. They pair well with a cup of hot tea or coffee. For a fun treat, try serving them on a decorative plate. Sprinkle a bit of pumpkin spice on top for a festive touch. These little bites are great for sharing at parties or as an after-school snack. Enjoy them any time you need a boost! {{image_2}} You can change the flavor of your energy balls quite easily. If you love chocolate, add some cocoa powder to the mix. Just two tablespoons will give a nice chocolate taste. You can also swap the pumpkin spice for vanilla extract for a lighter flavor. A teaspoon of vanilla can make a big difference. Feel free to play with the add-ins! Nuts and seeds are great choices. Chopped walnuts or almonds add crunch and healthy fats. You can also try sunflower seeds or pumpkin seeds for a fun twist. If you want more nutrition, add flaxseeds or chia seeds. They help add texture and fiber. Seasonal changes can inspire new flavors. In fall, consider adding dried cranberries for a festive touch. These add a tartness that balances the sweetness. During the winter holidays, you can mix in some chopped pecans and a bit of orange zest. This small change can brighten the energy balls and give them a holiday vibe. To keep your No-Bake Pumpkin Spice Energy Balls fresh, store them in an airtight container. This prevents air from getting in and keeps them from drying out. Place the container in the fridge. They stay cool and tasty this way. Make sure to separate layers with parchment paper if you stack them. This keeps them from sticking together. You can freeze these energy balls for longer storage. First, arrange them on a baking sheet. Make sure they don’t touch each other. Freeze them for about an hour. Once firm, transfer them to a freezer-safe bag. This method prevents them from sticking. They can last in the freezer for up to three months. In the fridge, these energy balls last up to one week. Check for signs of spoilage, like an off smell or strange texture. If you notice these changes, it’s best to toss them. If you freeze them, thaw them in the fridge before eating. This keeps their taste and texture great. Enjoy your energy balls as a safe and healthy snack! Yes, you can easily make these energy balls vegan. To do this, simply replace honey with maple syrup. Both work great in this recipe and keep the sweet flavor. Use almond butter or peanut butter, as both are vegan-friendly. This way, you can enjoy a tasty snack that fits your diet. These energy balls last up to one week if you store them correctly. Keep them in an airtight container in the fridge. This helps maintain their texture and flavor. If you want to keep them longer, consider freezing them. They freeze well and can last up to three months. Absolutely! You can swap out the almond butter or peanut butter for your favorite nut butter. Options like cashew butter or sunflower seed butter work nicely too. Each will add its own flavor and texture to the energy balls. Just make sure the consistency is similar for the best results. In this post, we explored how to make tasty energy balls. We covered key ingredients, helpful tips, and easy steps. I shared flavor variations and storage tips to keep your snacks fresh. Energy balls are quick, healthy, and fun to make. Try different flavors and ingredients to suit your taste. Enjoy these bites of goodness, knowing they are great for you!
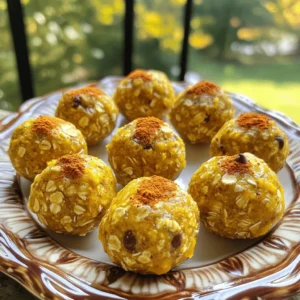
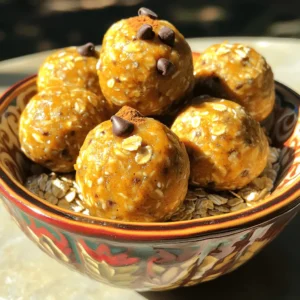
    No-Bake Pumpkin Spice Energy Balls Simple Treat Recipe
  • - 3 cups all-purpose flour - 1/4 cup granulated sugar - 1 packet (2 1/4 tsp) active dry yeast - 1/2 teaspoon salt - 1/2 cup milk, warmed - 1/4 cup unsalted butter, melted - 2 large eggs - 1 teaspoon vanilla extract - 1/2 cup packed brown sugar - 1/4 cup light corn syrup - 1/4 cup unsalted butter - 1 cup pecan halves - 1 tablespoon ground cinnamon If you need alternatives for flour, sugar, or milk, here are some ideas: - Use whole wheat flour instead of all-purpose flour. - Replace granulated sugar with coconut sugar or honey. - Almond milk or oat milk can work well as milk substitutes. For vegan options: - Use vegan butter in place of unsalted butter. - Replace eggs with flax eggs or applesauce. Fresh yeast is key for great sticky buns. It helps the dough rise well and gives a nice texture. Always check the expiration date on your yeast packets. When picking pecans, choose halves that are fresh and crunchy. Fresh nuts add a rich flavor and a delightful crunch. They make your sticky buns taste even better. - Activating the yeast: Start with a small bowl. Mix the warmed milk and sugar. Add the yeast and let it sit for about 5 minutes. You want it to get frothy. This shows the yeast is alive. - Mixing dry ingredients and combining: In a large bowl, whisk together the flour and salt. Make a well in the center. Pour in the yeast mixture, melted butter, eggs, and vanilla extract. Stir until combined. - Kneading technique: Lightly flour your surface. Knead the dough for 6 to 8 minutes. It should feel smooth and elastic. This step builds the dough's structure. - Instructions for melting butter: In a saucepan, melt 1/4 cup of butter over medium heat. Keep an eye on it to avoid burning. - Mixing in the sugar and syrup: Stir in the brown sugar and corn syrup. Bring this to a simmer for about 2 minutes. This is when the flavors blend. Remove it from heat and mix in the pecan halves. - Shaping and rolling the dough: After the dough has risen, punch it down. Roll it out on a floured surface into a rectangle, about 1/4 inch thick. - Cutting and placing in the pan: Brush the surface with melted butter. Sprinkle sugar, cinnamon, and chopped pecans on top. Roll the dough tightly from the long side into a log shape. Cut the log into 12 equal pieces. Place these cut side up in your caramel mixture in the baking pan. - Final rise before baking: Cover the pan and let the buns rise for another 30 minutes. This helps them become fluffy. - Oven temperature and timing: Preheat your oven to 350°F (175°C). Bake the sticky buns for 25 to 30 minutes. Look for a golden brown color on top. - Cooling and inverting tips: Once baked, let them cool for 5 minutes. To serve, invert the pan onto a platter. This lets the caramel drizzle over the buns. Enjoy the sweet aroma! To get the dough just right, focus on texture. You want it to feel smooth and elastic. Knead the dough for 6-8 minutes. This builds strength. If the dough feels too sticky, add a little flour. If it’s too dry, add a bit of warm milk. For rising, warmth is key. Find a cozy spot in your kitchen. Cover the dough with a damp cloth. This keeps it moist. Let it rise until it doubles in size, about one hour. If your kitchen is cool, try placing the bowl near a warm oven. Spices can take these sticky buns to another level. Try adding nutmeg or ginger for a warm kick. Vanilla extract adds richness. You can even mix in orange zest for a fresh twist. To add texture, consider adding chopped pecans to the filling. This gives a nice crunch. You can also sprinkle a little sea salt on top after baking. This contrast makes each bite more interesting. For serving, warm sticky buns are best. Place them on a large platter. Drizzle the caramel sauce over them for a beautiful look. You can also cut them in half to show off the gooey center. Garnishing adds flair. A sprinkle of sea salt enhances flavor. Consider adding a dollop of whipped cream or a scoop of vanilla ice cream on the side. This makes your sticky buns look fancy and inviting. {{image_2}} You can make your caramel pecan sticky buns even more fun. Try adding chocolate chips for a sweet twist. The chocolate melts and mixes with the caramel, making each bite special. Dried fruits like raisins or cranberries can add a tart flavor that balances the sweetness. You can also switch up the nuts. Walnuts or hazelnuts bring a new taste. Each nut gives a different crunch and flavor, so feel free to experiment. If you need gluten-free options, use gluten-free flour blends. They work well and keep the dough soft. You can also swap sugar for a natural sweetener like honey or maple syrup. This change cuts sugar without losing the good taste. If you want to cut sugar more, try using less brown sugar in the caramel. You can add more cinnamon for flavor, so it stays tasty. Make your sticky buns festive with seasonal flavors. For fall, add pumpkin spice or nutmeg to the dough. In winter, you can mix in some peppermint extract for a holiday vibe. For special occasions, top your buns with a sprinkle of holiday sprinkles or edible glitter. These small touches make your sticky buns stand out during celebrations. To keep your caramel pecan sticky buns fresh, use an airtight container. A glass or plastic container works well. Make sure to store them in the fridge. They last about 3 to 5 days. After that, they may start to lose their softness and flavor. You can freeze sticky buns for longer storage. Wrap each bun tightly in plastic wrap. Then, place them in a freezer bag. Make sure to remove as much air as possible. They can stay in the freezer for up to 3 months. To reheat, let them thaw in the fridge overnight. Then, warm them in the oven at 350°F for about 10-15 minutes. This will restore their gooey goodness. If your buns go stale, don’t throw them away! You can revive them. Wrap them in a damp paper towel and microwave for 10-15 seconds. This method adds moisture back into the buns. You can also use stale buns to make French toast. Just dip them in an egg mixture and cook them on a skillet. Enjoy a new treat from your leftovers! Yes, you can prepare sticky buns the night before. Follow these steps for overnight prep: - Make the dough and let it rise as directed. - After shaping the buns, place them in the pan with the caramel. - Cover the pan tightly and store it in the fridge. - The next morning, let the buns sit at room temperature for 30 minutes. - Preheat the oven and bake as directed. If your dough does not rise, check these common issues: - Old yeast: Ensure your yeast is fresh. Check the expiration date. - Temperature: The dough needs warmth. If your kitchen is cold, find a warm spot. - Moisture: Add a little water to the dough if it feels dry. This helps it rise better. Kneading well also helps create the right texture for rising. Yes, you can change nuts in your sticky buns. Here are some great options: - Walnuts: They add a nice crunch and flavor. - Almonds: Sliced almonds give a different taste. - Pecans: You can use chopped pecans instead of whole ones for a varied texture. Feel free to mix nuts for fun flavors! To check if your sticky buns are ready, look for these signs: - Color: They should be golden brown on top. - Touch: Press gently on the top; it should spring back. - Internal temperature: Use a thermometer; they should reach about 190°F (88°C). Let them cool slightly before serving. Enjoy your warm sticky buns! You now have all you need to make delicious sticky buns. We covered ingredients, steps, and variations. Remember to choose fresh ingredients for the best taste. Try out different nuts and flavors for fun twists. Store any extras well, and don’t hesitate to get creative with leftovers. Enjoy the process, and share these treats with family and friends. Baking should be fun, so dive in and make your kitchen smell amazing!
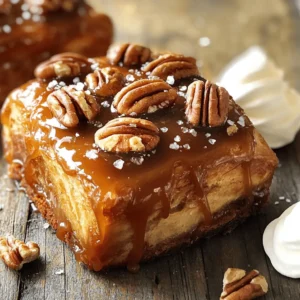
    Caramel Pecan Sticky Buns Irresistible Treats to Bake
  • - 2 lbs beef short ribs - 1 cup balsamic vinegar - 1/4 cup brown sugar - 4 cloves garlic, minced - 1 medium onion, sliced - 1 tablespoon Dijon mustard - 1 tablespoon Worcestershire sauce - 1 teaspoon dried thyme - Salt and pepper to taste - 2 tablespoons olive oil - Fresh parsley, chopped (for garnish) Gather these ingredients for a rich and tasty dish. The beef short ribs are the star here. They are juicy and perfect for slow cooking. The balsamic vinegar adds a sweet and tangy flavor. Brown sugar helps balance the acidity. Using fresh garlic and onion gives a warm, savory taste. Dijon mustard adds a nice kick. Worcestershire sauce enhances the umami flavor. Dried thyme brings in a hint of earthiness. Don't forget to season with salt and pepper. This will bring out all the flavors. Olive oil is key for searing the ribs. Finally, fresh parsley not only adds color but also freshness to your dish. With these ingredients, you set the stage for a meal that melts in your mouth. Now, let's get ready to cook! First, you need to season the beef short ribs. Sprinkle salt and pepper on all sides. This step adds flavor. Next, heat olive oil in a skillet over medium-high heat. Sear the ribs for about 3-4 minutes on each side until they turn brown. This browning step locks in the juices and builds a great flavor. Once done, transfer the ribs to the slow cooker. In the same skillet, add your sliced onions. Cook them until they become translucent, which takes about 3 minutes. Then, add minced garlic and sauté for another minute. This makes the kitchen smell amazing! Now it’s time to mix the sauce ingredients. In a bowl, whisk together balsamic vinegar, brown sugar, Dijon mustard, Worcestershire sauce, and dried thyme. Pour this mixture into the skillet with onions and garlic, stirring to combine everything well. Now pour the sauce over the ribs in the slow cooker. Make sure the ribs are well-covered by the sauce. This helps the flavors soak in as they cook. Set your slow cooker on low. Cook for 6-8 hours, or until the ribs are fork-tender and falling off the bone. Enjoy the anticipation as the delicious smell fills your home! Searing is key for great flavor. This step locks in juices and adds depth. Heat two tablespoons of olive oil in a skillet over medium-high heat. Sear the ribs for about 3-4 minutes on each side. Look for a nice brown color. This browning gives your ribs a rich taste. After searing, transfer the ribs to the slow cooker. You want your ribs to be truly tender. Signs they are done include the meat pulling away from the bone. A fork should easily slide into the meat without resistance. To test, gently poke a rib with a fork. If it falls apart easily, it's ready. This slow cooking method ensures a melt-in-your-mouth experience. Presentation matters, even for comfort food. Fresh parsley adds a pop of color and freshness. Sprinkle chopped parsley over the ribs before serving. You might also try adding crumbled feta or shredded cheese for a savory kick. These toppings enhance the overall flavor and make your dish look beautiful. {{image_2}} You can mix things up with different sauces. Try using red wine vinegar instead of balsamic vinegar. This gives the ribs a unique taste. You can also add fruits like chopped peaches or apples for a sweet twist. Spices like smoked paprika or chili powder can add some heat. Experimenting with flavors makes cooking fun. If you want to switch meats, pork ribs or chicken work well too. For pork ribs, keep an eye on cooking times; they may need a little less time than beef. Chicken, especially thighs, can also absorb the flavors well. Adjust the cooking time to about 4-6 hours on low for chicken to stay juicy. You don’t always have to use a slow cooker. Oven-baked ribs can be just as tasty. Wrap them in foil and bake at 300°F for 3-4 hours. If you have an Instant Pot, you can cook the ribs much faster. Set it to high pressure for about 45 minutes, and you’ll have tender ribs in no time. Each method offers a unique flavor and texture. To keep your leftover ribs tasty, let them cool first. Place the ribs in a container. Cover them well to keep air out. You can store them in the fridge for up to three days. If you want to save them longer, freezing is a great option. For best results, reheat your ribs in the oven. Set it to 300°F (150°C) and place the ribs in a baking dish. Cover the dish with foil to keep moisture in. Heat for about 20 minutes. If you use a microwave, add a splash of water to keep the meat moist. Heat on medium power for 2-3 minutes. Avoid overcooking to prevent the meat from drying out. To freeze, wrap the ribs tightly in plastic wrap. Then place them in a freezer-safe bag or container. This helps prevent freezer burn. You can freeze them for up to three months. When ready to eat, thaw in the fridge overnight. Reheat as mentioned before to enjoy their full flavor. Cook beef ribs in the slow cooker for 6-8 hours on low. This time works well for 2 lbs of beef short ribs. If you use more meat, increase cooking time. For 3 lbs, you may need 8-10 hours. Always check if the meat is tender and falls off the bone. Yes, you can skip searing, but it affects flavor. Searing adds a rich, deep taste. It also gives a nice texture on the outside. Without it, the ribs may taste less complex. I always recommend searing for the best results. Balsamic beef ribs pair well with many sides. Here are some great options: - Mashed potatoes - Creamy polenta - Roasted vegetables - Garlic bread - Fresh salad These sides soak up the tasty sauce and make the meal complete. This blog post covered a simple recipe for balsamic beef short ribs. We explored the ingredients, cooking instructions, and helpful tips to ensure tender, flavorful ribs. I hope you found the variations and storage tips useful. Cooking should be fun, not stressful. With these steps, your ribs can impress everyone. Enjoy your meal and happy cooking!
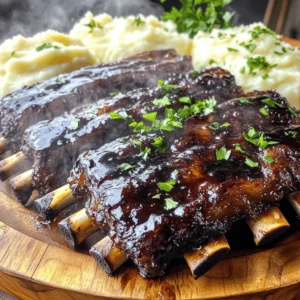
    Slow Cooker Balsamic Beef Ribs Tender and Flavorful
  • - 1 lb large shrimp, peeled and deveined - 1 cup shredded coconut (sweetened or unsweetened) - 1 cup panko breadcrumbs - 1/2 cup all-purpose flour - 2 large eggs - 1 teaspoon garlic powder - 1 teaspoon onion powder - 1/2 teaspoon salt - 1/4 teaspoon black pepper - Cooking spray Gather these ingredients before you start. Using fresh shrimp makes a big difference. Sweetened coconut adds a nice taste, but unsweetened works well too. Panko breadcrumbs give a great crunch. All-purpose flour helps the coating stick. The eggs bind everything together with flavor from garlic and onion powders. Salt and pepper bring out the best in the shrimp. Cooking spray helps achieve that perfect crispiness in the air fryer. This simple list makes it easy to prepare crispy coconut shrimp. Don’t forget to check your pantry for these items before cooking! Start by setting up your breading station. You need three shallow bowls. - In the first bowl, add 1/2 cup of all-purpose flour. - In the second bowl, crack two large eggs and whisk them until smooth. - In the third bowl, mix 1 cup of shredded coconut, 1 cup of panko breadcrumbs, 1 teaspoon of garlic powder, 1 teaspoon of onion powder, 1/2 teaspoon of salt, and 1/4 teaspoon of black pepper. This setup makes it easy to coat the shrimp nicely. Now, it’s time to coat the shrimp. Grab a large shrimp, peeled and deveined. - First, dip the shrimp in the flour. Make sure to coat it well and shake off any extra flour. - Next, dip the floured shrimp into the egg mixture. Let any extra drip off. - Finally, roll the shrimp in the coconut and panko mix. Press gently so it sticks well. Repeat this with all the shrimp. Before cooking, preheat your air fryer to 400°F (200°C) for about 5 minutes. - Lightly spray the air fryer basket with cooking spray to prevent sticking. - Place the breaded shrimp in a single layer in the basket. Don’t overcrowd them; this helps them cook evenly. - Lightly spray the tops of the shrimp with cooking spray. This step helps them become crispy. Cook the shrimp for about 8-10 minutes. Flip them halfway through for even cooking. They should turn golden brown and crispy. Once done, take the shrimp out and let them cool for a bit. Enjoy the crunchy delight! Using cooking spray is key for crispy coconut shrimp. It helps the coating brown nicely. Lightly spray the basket before adding shrimp. Then, spray the tops of the shrimp too. This small step makes a big difference. Do not overcrowd the air fryer. If you fit too many shrimp in at once, they will steam instead of crisp. Work in batches to give each shrimp space. This will ensure they cook evenly and turn out golden. Flipping shrimp is important for even cooking. Halfway through, gently turn each shrimp. Use tongs or a spatula to avoid breaking the coating. This helps both sides get that nice, crisp texture. {{image_2}} To boost the taste of your crispy coconut shrimp, try adding spices to the coating. Here are some great options: - Cayenne pepper: A pinch adds heat and depth. - Paprika: Adds a smoky flavor and bright color. - Cumin: Brings a warm, earthy tone. - Lemon zest: Freshens the mix and adds brightness. Mix these spices into the coconut-panko blend. Adjust the amounts based on your taste. If you want a twist on the classic coating, consider these alternatives: - Almond flour: A gluten-free option with a nutty flavor. - Crushed cornflakes: Adds crunch and a fun texture. - Pretzel crumbs: For a salty, savory kick. - Oats: Provides a wholesome, chewy texture. Each option gives a unique flair to your shrimp. Experiment to find your favorite! Pair your crispy coconut shrimp with tasty dips and sides for a full meal. Here are some ideas: - Sweet chili sauce: A perfect balance of sweet and spicy. - Coconut curry sauce: Adds a rich, creamy element. - Mango salsa: Fresh and fruity, it brightens the dish. - Coleslaw: A crunchy side that complements the shrimp's crispiness. Serve these alongside your shrimp for a delightful dining experience. Enjoy the flavors together! To store your cooked crispy coconut shrimp, let them cool first. Place them in an airtight container. This keeps them fresh for up to three days in the fridge. Make sure to separate layers with parchment paper to avoid sticking. The best way to reheat your shrimp is in the air fryer. Set it to 350°F (175°C). Place the shrimp in a single layer for about 5 minutes. This method keeps them crispy and delicious, so you enjoy them just like before. For freezing, you can freeze both uncooked and cooked shrimp. If uncooked, freeze them on a tray first, then transfer to a bag. This prevents them from sticking together. For cooked shrimp, let them cool, then put them in a freezer-safe bag. They last for about two months in the freezer. When ready to eat, thaw overnight in the fridge before reheating. Yes, you can use frozen shrimp. Just make sure to thaw them first. Place frozen shrimp in cold water for about 10-15 minutes. This helps them defrost quickly. After thawing, pat them dry with paper towels. Dry shrimp will hold the coating better. Cook shrimp in the air fryer for 8 to 10 minutes. Preheat the air fryer to 400°F (200°C) before adding the shrimp. Flip them halfway through cooking for even crispiness. Check for a golden brown color to know they are done. Coconut shrimp pairs well with many sides. Try serving it with sweet chili sauce for dipping. A fresh salad can bring a nice crunch. You can also add rice or coleslaw for a full meal. Lime wedges brighten the dish and enhance the flavor. In this blog post, we explored how to make delicious coconut shrimp. You learned about the key ingredients, including shrimp, coconut, and panko breadcrumbs. I shared easy step-by-step instructions for breading and air frying your shrimp until crispy. Remember, using cooking spray is essential for that perfect crunch. Explore the variations I suggested to customize your dish. Lastly, I provided tips on storage and reheating to keep your leftovers tasty. Enjoy making this dish and share it with friends and family!
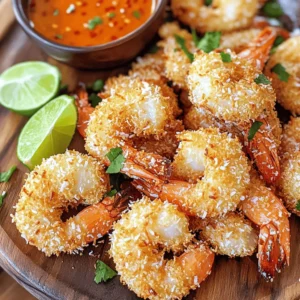
    Crispy Coconut Shrimp Air Fryer Simple Recipe Delight
  • To make Roasted Red Pepper One Pot Pasta, you will need: - 12 oz penne pasta - 3 large roasted red peppers (jarred or homemade) - 4 cloves garlic, minced - 1 medium onion, diced - 2 cups vegetable broth - 1 cup heavy cream - 1 teaspoon dried basil - 1 teaspoon dried oregano - Salt and pepper to taste - 1 cup cherry tomatoes, halved - 1 cup fresh spinach - 1/2 cup grated Parmesan cheese (optional) - Olive oil for drizzling You can add more flavor and fun with these: - Fresh basil leaves for garnish - Red pepper flakes for a spicy kick - Cooked chicken or shrimp for protein - Other veggies, like zucchini or bell peppers If you need to change things up, here are some swaps: - Use whole wheat pasta for added fiber. - Almond milk or coconut cream can replace heavy cream for a lighter option. - Any broth works; chicken or beef can replace vegetable broth. - Use nutritional yeast instead of Parmesan for a vegan option. Start by making the roasted red pepper sauce. Take your roasted red peppers, garlic, and vegetable broth. Add them to a blender. Blend until smooth. This creates a creamy, rich sauce that will coat your pasta. Use jarred peppers for ease or roast your own for extra flavor. Next, grab a large pot or Dutch oven. Heat a drizzle of olive oil over medium heat. Add the diced onion. Sauté until it turns translucent, about 3 to 4 minutes. This step builds a great flavor base for your dish. The smell will be amazing! Now, it's time to add the sauce. Pour in your blended roasted red pepper sauce. Stir in the heavy cream, dried basil, oregano, salt, and pepper. Mix well. Then, add the penne pasta. Stir to coat it evenly. Bring the mixture to a gentle simmer. Cover the pot and cook for about 10 to 12 minutes. Stir occasionally until the pasta is al dente. Once done, mix in the cherry tomatoes and fresh spinach. Cook for another 2 minutes, just until the spinach wilts. If you want, add grated Parmesan cheese and stir until it melts. Enjoy the creamy goodness! To get the best flavor in your Roasted Red Pepper One Pot Pasta, use fresh ingredients. Fresh garlic and onions bring out the best taste. If you can, roast your own peppers. It adds a deep, sweet flavor that jarred ones can't match. Blend the roasted peppers well for a smooth sauce. This helps the flavors mix well with the pasta. Cook the penne pasta in the sauce. This way, it absorbs all the flavor. Stir the pasta often while cooking. This helps prevent it from sticking to the pot. When cooking, taste the pasta a minute or two before the time is up. You want it al dente, which means it should be firm but not hard. This keeps your pasta from getting mushy. When serving, use deep bowls to hold the creamy pasta. Sprinkle extra Parmesan cheese on top for a nice touch. A drizzle of olive oil adds shine and flavor. For a pop of color, add fresh basil leaves as a garnish. You can also add some halved cherry tomatoes on top for extra flair. Serve it hot for the best experience! {{image_2}} You can add protein to your Roasted Red Pepper One Pot Pasta for extra flavor. Chicken, shrimp, or sausage works well. Cook the protein before adding it to the pot. For chicken, cook diced pieces until golden brown. For shrimp, sauté until pink. Stir it in at the end for a hearty meal. You can also use canned chickpeas for a plant-based option. To make this dish vegan or dairy-free, swap the heavy cream. Use coconut cream or cashew cream instead. Both options give a rich taste, just like heavy cream. Replace the Parmesan cheese with nutritional yeast for a cheesy flavor. This keeps your dish creamy and tasty without dairy. You can boost flavor by adding seasonal veggies. In spring, toss in fresh asparagus or peas. In summer, try zucchini or bell peppers. In fall, add roasted butternut squash or kale. Just chop the veggies and add them when the pasta is almost done. They will cook quickly and stay vibrant. This keeps your meal fresh and colorful. To keep your Roasted Red Pepper One Pot Pasta fresh, let it cool first. Use an airtight container to store the leftovers. Place the pasta in the fridge for up to 3 days. If you want to keep it longer, consider freezing it. When you're ready to enjoy your leftovers, heat them gently. You can use a microwave or a pot on the stove. For the microwave, place the pasta in a bowl and cover it. Heat for 1-2 minutes, stirring halfway. If using the stove, add a splash of water or broth. Stir as it warms to keep it creamy. If you choose to freeze your pasta, pack it in a freezer-safe container. Leave some space for expansion. It can last up to 3 months in the freezer. To reheat, thaw in the fridge overnight. Then, follow the reheating instructions. This way, you’ll have a quick meal ready to go! Yes, you can use different pasta shapes. Fusilli, farfalle, or even spaghetti work well. Each type gives a unique texture. Just keep an eye on cooking times, as they may vary. Choose a pasta shape that you enjoy most! To add heat, use red pepper flakes or diced jalapeños. Stir them in when you sauté the onions. You can also add hot sauce to the sauce blend for more kick. Adjust to your taste, and feel free to experiment! Yes, you can use gluten-free pasta. Many brands offer great options that cook well. Substitute vegetable broth with a gluten-free version too. Just check labels to ensure all ingredients are gluten-free. Enjoy your creamy pasta without worry! This article covered how to make a delicious pasta dish with a roasted red pepper sauce. You learned about key ingredients, options for customization, and how to swap items based on what you have. The step-by-step guide walked you through each stage, from preparing the sauce to cooking the pasta. I shared tips for great flavor and perfect presentations. At the end, you learned ways to store leftovers and heat them up. Explore different variations for protein, vegan options, and seasonal veggies. Enjoy your cooking!
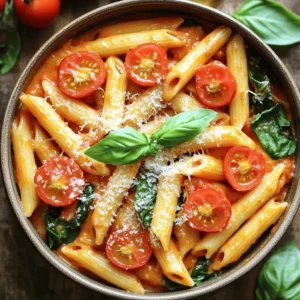
    Roasted Red Pepper One Pot Pasta Creamy and Simple Recipe
  • - 8 oz cream cheese, softened - 1/2 cup powdered sugar - 1/2 tsp vanilla extract - 1 cup whipped cream (store-bought or homemade) - 10 Oreo cookies, crushed (plus extra for topping) - 1/2 cup sour cream - 1/4 cup milk - 1 tbsp unsweetened cocoa powder (for extra chocolate flavor) - Mini chocolate chips (for extra sweetness) - Extra crushed Oreo cookies (for a crunchy finish) In this recipe, I focus on simple, tasty ingredients. Cream cheese gives a rich base. Powdered sugar adds sweetness, while vanilla extract lifts the flavor. Whipped cream brings a light, airy texture. Crushed Oreos add a delicious crunch. Sour cream makes the mixture creamy, and milk helps achieve the right consistency. For those who love chocolate, adding cocoa powder is a great choice. It boosts the chocolate taste and makes these cups even more decadent. When it comes to garnishes, mini chocolate chips offer an extra treat on top. Crushed Oreos not only look great but also add texture. These toppings make each bite fun and exciting. Gather these ingredients, and you're ready to create a dessert that impresses everyone! Start by taking 8 oz of softened cream cheese. Place it in a large mixing bowl. Beat it with an electric mixer until smooth and creamy. This step is key for a fluffy texture. Next, add 1/2 cup of powdered sugar and 1/2 tsp of vanilla extract. Mix until everything is well blended. Now, gently fold in 1 cup of whipped cream. Be careful not to deflate it. The whipped cream adds a lightness that makes the cheesecake delicious. In a separate bowl, take 10 crushed Oreo cookies. Combine them with 1/2 cup of sour cream and 1/4 cup of milk. Mix until the cookies are fully coated. This will give your base a rich, creamy flavor. If you want a chocolate kick, add 1 tbsp of unsweetened cocoa powder. Mix again until it’s smooth. This step makes the flavor pop and adds depth to your dessert. Now, it’s time to layer your dessert. Take small cups or mini jars and spoon the cheesecake mixture into them. Fill each cup about 3/4 full. This gives enough space for garnishes and keeps it from overflowing. Next, take some crushed Oreo cookies and sprinkle them on top of each cup. This adds a crunchy texture and a nice look. You can also add mini chocolate chips for an extra treat if you like. Once assembled, refrigerate the cheesecake cups for at least 2 hours. This time allows the flavors to meld and the cheesecake to set. Before serving, feel free to add more crushed Oreos or chocolate chips on top. For a special touch, drizzle some chocolate syrup around the base of the cups. This makes the dessert even more appealing. Enjoy the process, and get ready for smiles when you serve these delicious treats! To get the best texture, use softened cream cheese. This makes it easy to mix. Beat it until smooth and creamy. When you add the whipped cream, fold it in gently. This keeps the mixture light and fluffy. If you want a richer taste, use full-fat cream cheese. It adds more creaminess. One common mistake is over-mixing the whipped cream. This can make your cheesecake dense. Be careful when folding it into the cream cheese mix. Another mistake is not chilling the cups long enough. They need at least 2 hours to set. If you skip this step, they may not hold their shape. Serve your cheesecake cups chilled for the best taste. You can place them on a nice tray. Drizzle some chocolate syrup around the base for a fancy touch. For added flair, sprinkle mini chocolate chips or crushed Oreos on top. This makes your dessert look as good as it tastes! {{image_2}} You can mix things up with different flavors. Try using peanut butter cookies instead of Oreos. This gives a rich nutty taste. You could also use chocolate sandwich cookies for an extra chocolatey treat. Imagine using mint cookies for a fresh twist! Vanilla wafers can make a delightful change too. Each cookie adds a unique flavor to your cheesecake cups. To make these cheesecake cups gluten-free, swap Oreos for gluten-free cookies. Many brands offer great options. For a vegan version, use dairy-free cream cheese and whipped cream. Make sure to check labels for hidden dairy. You can also use coconut cream as a tasty alternative. These swaps keep the dessert tasty and friendly for everyone. You can serve these cups in many fun ways. Use small mason jars for a cute twist. They look great and are easy to grab. If you want a more elegant look, use clear glass cups. Layer the cheesecake and cookie mix for a beautiful effect. You can also create mini parfaits by adding fruit between the layers. This adds freshness and color to your dessert! To keep your cookies and cream cheesecake cups fresh, store them in the fridge. Use an airtight container. This helps prevent any unwanted smells from getting in. Make sure to keep them covered, so they stay moist. You can also place plastic wrap directly on top of each cup. This extra step helps maintain their texture and flavor. If you want to save some for later, you can freeze these cheesecake cups. First, let them cool completely in the fridge. Then, place them in a freezer-safe container. You can also wrap each cup in plastic wrap before placing them in a container. When you're ready to enjoy them, let them thaw in the fridge overnight. Avoid thawing them at room temperature, as this can make them too soft. The cheesecake cups last about 4-5 days in the fridge. After this time, they can lose their creamy texture. If frozen, they can last for about 2-3 months. However, for the best taste, eat them within a month. Always check for any changes in smell or texture before eating. If they seem off, it's best to throw them away. Yes, you can make these cheesecake cups a day in advance. Just store them in the fridge. They taste even better after chilling overnight. This gives the flavors time to blend. If you want a dairy-free option, use cashew cream or silken tofu. They create a smooth texture. For a lighter taste, consider ricotta cheese. Just blend it well. To avoid cracks, mix gently and don’t overbeat the cream cheese. Chilling the cups slowly helps, too. Also, don’t open the fridge while they set. This keeps the temperature steady. Serve them chilled for the best taste. Add a drizzle of chocolate syrup or fresh berries on top. For extra flair, use a decorative tray. It makes your dessert look fancy. Absolutely! You can use any chocolate cookie, like chocolate wafers or even graham crackers. Just crush them well. This gives you a fun twist on the flavor. We explored how to make delicious cheesecake cups and enhance their flavor. I shared key ingredients and easy steps for the perfect treat. Remember to avoid common pitfalls and consider fun variations. Store them right to keep them fresh. Enjoy your cheesecake cups, and let your creativity shine with them. Happy baking!
    Cookies and Cream Cheesecake Cups Easy Dessert Recipe
  • - 2 medium sweet potatoes, peeled and diced - 1 can (15 oz) black beans, drained and rinsed - 1 can (14 oz) diced tomatoes (with juice) - 1 medium onion, chopped - 2 cloves garlic, minced - 1 bell pepper, chopped (any color) - 1-2 jalapeños, minced (adjust based on heat preference) - 2 teaspoons ground cumin - 1 tablespoon chili powder - 1 teaspoon smoked paprika - 4 cups vegetable broth - 2 tablespoons olive oil - Salt and pepper to taste - 1 cup corn (frozen or canned) - Fresh cilantro for garnish (optional) - Avocado slices for serving (optional) Sweet potato black bean chili is a hearty dish. You need simple, fresh ingredients to make it great. Start with sweet potatoes. They add a nice sweetness and texture. Black beans give protein and fiber. Diced tomatoes bring moisture and flavor. You can use any color bell pepper. They add crunch and sweetness. Jalapeños give heat, but adjust to your taste. Onions and garlic are key. They build a strong base for the chili. The spices, like cumin, chili powder, and smoked paprika, create depth. Vegetable broth makes everything come together. Olive oil helps cook the veggies and adds richness. Finally, corn adds a pop of sweetness. Think about garnishes. Fresh cilantro and avocado slices make each bowl look and taste better. Gather all these ingredients and get ready to cook! Sautéing the aromatics Start by heating 2 tablespoons of olive oil in a large pot over medium heat. Add 1 chopped onion and cook it for about 3-4 minutes. You want it to turn translucent. Next, add 2 minced garlic cloves, 1 chopped bell pepper, and 1-2 minced jalapeños. Stir and cook for another 2-3 minutes until the veggies soften. Cooking the sweet potatoes Now, it’s time to add the star of the show: 2 medium sweet potatoes, peeled and diced. Sauté them for about 5 minutes. This helps to kickstart their cooking and adds flavor to the mix. Adding spices and simmering Sprinkle in 2 teaspoons of ground cumin, 1 tablespoon of chili powder, and 1 teaspoon of smoked paprika. Don’t forget to season with salt and pepper. Stir everything well to coat the vegetables. This is where the magic begins, as the spices make the dish fragrant and tasty. Including black beans and broth Pour in 4 cups of vegetable broth and add 1 can (14 oz) of diced tomatoes with their juice. Then, mix in 1 can (15 oz) of drained and rinsed black beans. Bring the whole pot to a boil. After it boils, reduce the heat and let it simmer for 25-30 minutes. You want the sweet potatoes to be tender. Final simmer and seasoning adjustments After the sweet potatoes are soft, add 1 cup of corn, whether frozen or canned. Stir it all together and let it simmer for another 5 minutes. Before serving, taste the chili and adjust the seasoning if needed. Serving suggestions Serve the chili in bowls. Top with fresh cilantro and avocado slices for a colorful and creamy finish. A squeeze of lime juice on top can brighten the flavors even more. Enjoy your savory sweet potato black bean chili! To make your chili pop, adjust the spice levels. You can add jalapeños for heat. If you like it milder, use less or omit them. Chili powder brings warmth too. Don’t shy away from using herbs like oregano or thyme. They add depth to your dish. A dash of lime juice before serving can brighten all the flavors. For the best chili, use a heavy pot. A Dutch oven works great. It holds heat well and cooks evenly. To ensure sweet potatoes are tender, cut them into even pieces. This helps them cook at the same rate. Stir occasionally while simmering. This helps them stay soft but not mushy. If you notice them breaking apart, reduce the cooking time. {{image_2}} You can easily change up your chili with different beans. Kidney beans or pinto beans work great. They add their own taste and texture. If you want to mix it up, try different veggies too. Zucchini adds a nice crunch, while carrots bring a touch of sweetness. Both options make your chili even more colorful and fun. If you need a gluten-free dish, this chili is perfect. All the ingredients are naturally gluten-free. Just ensure your broth and canned items are certified gluten-free. For a vegan option, this recipe is already meat-free. You can use vegetable broth and skip any animal products. Enjoy a bowl that fits your dietary needs without losing flavor! To keep your sweet potato black bean chili fresh, follow these simple steps. Store it in an airtight container. This keeps moisture out and flavors in. You can refrigerate it for up to five days. Make sure it cools to room temperature before sealing it. If you want to save some for later, freezing is a great option. Pour the chili into freezer-safe bags or containers. Leave some space at the top, as it will expand when frozen. Label the bags with the date. You can freeze it for up to three months. When it comes to reheating, the stove is the best choice. Pour the chili into a pot and heat over low to medium heat. Stir it often to avoid burning. It should take about 10 minutes to warm through. If you want to use a microwave, place the chili in a bowl. Cover it with a microwave-safe lid or wrap. Heat it in short bursts, stirring in between. This helps heat evenly. To refresh the flavors, add a splash of vegetable broth or a squeeze of lime juice when reheating. This can brighten up the taste and keep it delicious. What to serve with Sweet Potato Black Bean Chili? You can serve this chili with cornbread, rice, or tortilla chips. It pairs well with a fresh salad or avocado slices on top. I love adding a dollop of sour cream or yogurt for creaminess. Can I make this chili in a slow cooker? Yes, you can! Just sauté the onion, garlic, and peppers first. Then add all the ingredients to the slow cooker. Cook on low for 6-8 hours or on high for 3-4 hours. How do I adjust the recipe for more servings? To make more servings, simply double the ingredients. Keep the same cooking time, but check for doneness. You want the sweet potatoes to be tender and the flavors to meld together. Caloric content per serving Each serving of this chili has about 250 calories. This can vary based on your toppings and sides. Health benefits of key ingredients - Sweet Potatoes: Rich in fiber and vitamins A and C. They help boost your immune system. - Black Beans: Full of protein and iron. They support muscle health and energy. - Bell Peppers: High in antioxidants and vitamins. They help fight inflammation. - Corn: Provides fiber and carbs for energy. It adds sweetness and texture to the chili. This dish is healthy and packed with goodness! Sweet Potato Black Bean Chili is full of flavor and nutrition. We covered the key ingredients like sweet potatoes, black beans, and spices. You learned easy steps to prepare and cook this dish. I shared tips on enhancing flavors and options for variations to fit your needs. Remember, storing leftovers correctly keeps your chili fresh. Whether you decide to adjust the recipe or serve it differently, this chili is sure to please. Enjoy making it and share with friends!
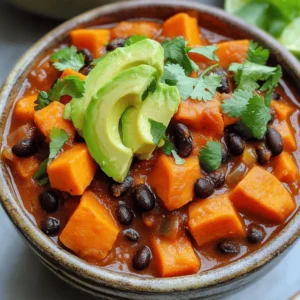
    Savory Sweet Potato Black Bean Chili Recipe Today
  • - 1/2 cup canned pumpkin puree - 1 frozen banana - 1 cup unsweetened almond milk - 1 scoop vanilla or pumpkin spice protein powder - 1/2 teaspoon ground cinnamon - 1/4 teaspoon ground nutmeg - 1/4 teaspoon ground ginger - 1 teaspoon maple syrup for sweetness - 1 tablespoon chia seeds - Ice cubes for thickness Using canned pumpkin puree makes this smoothie easy and quick. It gives a rich, creamy texture. The frozen banana adds natural sweetness and makes it cold. Unsweetened almond milk serves as a great base. For flavor, I always add protein powder. You can choose vanilla or pumpkin spice. Ground spices like cinnamon, nutmeg, and ginger give that warm, cozy taste. You can adjust these spices based on your own taste. If you like it sweeter, add maple syrup. Chia seeds add a healthy boost and texture. They also help keep you full. Ice cubes are a fun option if you want a thicker drink. With these ingredients, you can whip up a tasty and healthy drink in just minutes! First, grab your blender. Add 1/2 cup of canned pumpkin puree. Next, toss in one frozen banana. Pour in 1 cup of unsweetened almond milk. Then, add 1 scoop of your favorite protein powder. Finally, sprinkle in your spices: 1/2 teaspoon of ground cinnamon, 1/4 teaspoon of ground nutmeg, and 1/4 teaspoon of ground ginger. Don’t forget 1 tablespoon of chia seeds for extra nutrition. Now, blend everything on high. You want it to be smooth and creamy. If you like a thicker drink, toss in some ice cubes and blend again. This makes it super refreshing! After blending, taste your smoothie. If it needs more sweetness, add a teaspoon of maple syrup. Pour it into your favorite glass or bowl. For a fun touch, garnish with a sprinkle of cinnamon or some pumpkin seeds on top. Enjoy your drink! To make a great pumpkin pie protein smoothie, start with the right pumpkin puree. Look for pure pumpkin, not pumpkin pie filling. Pure pumpkin has no added sugar or spices. Check labels when shopping. For protein powder, I recommend vanilla or pumpkin spice. Both flavors blend well with pumpkin. If you prefer plant-based options, choose a pea or rice protein. These options add protein without extra sugar. Getting the right texture is key. Start by blending the pumpkin puree, frozen banana, and almond milk. Blend on high until smooth. If you want it thicker, add ice cubes. Blend again until you reach your desired thickness. Frozen fruits help create a creamy texture. They chill the smoothie and make it refreshing. Always keep some frozen bananas on hand for this reason. To make your smoothie shine, add more spices. A pinch of extra cinnamon or nutmeg can enhance the flavor. For sweetness, you might consider more maple syrup if you like it sweeter. Garnishing can also boost presentation. A sprinkle of cinnamon or a few pumpkin seeds on top adds color and texture. It makes the smoothie look even more appetizing. {{image_2}} You can switch up the milk in this smoothie. Almond milk works great, but you can try oat or coconut milk too. Each milk brings a new flavor. Oat milk adds a creamy touch. Coconut milk gives a tropical vibe. Choose what you like best! Want to mix things up? Add other fruits like apples or pears. These fruits pair well with pumpkin. They bring sweetness and freshness. You can also change the spices. If you like more heat, add extra ginger. If you prefer a sweeter taste, add more cinnamon or nutmeg. Adjust the spices to match your taste! For an extra protein kick, try adding nut butter or Greek yogurt. Almond or peanut butter can enhance the flavor. They also make the smoothie richer. Greek yogurt adds creaminess and protein. Both options will keep you full longer. Feel free to experiment with different boosts! You can store leftover pumpkin pie protein smoothie in the fridge. Use an airtight container. This keeps it fresh for up to 24 hours. After that, the taste and texture may change. If you want to save your smoothie longer, freeze it. Pour it into ice cube trays or freezer bags. This makes it easy to use later. When you want a smoothie, take it out. Blend the frozen cubes with a little almond milk until smooth. Enjoy your pumpkin pie protein smoothie as a meal or snack. It works great for breakfast. You can also have it after a workout. For a fun twist, top it with pumpkin seeds or extra cinnamon. Yes, you can use fresh pumpkin. First, cook the pumpkin until soft. Then, blend it until smooth. Fresh pumpkin gives a great taste, but it takes more time. This smoothie has about 300 calories. The exact amount can change based on your choices. Using sweeteners or different milk can change the count. Absolutely! This smoothie is great for recovery. It has protein from the powder and chia seeds. The carbs from the banana and pumpkin help refuel your energy. You can make this smoothie ahead of time. Store it in the fridge for up to 24 hours. Just give it a good shake or stir before drinking. You can use avocado instead of banana. It adds creaminess without the carbs. Another option is unsweetened applesauce for a different taste. You now know how to make a delicious pumpkin pie protein smoothie. We discussed the main ingredients, flavor enhancers, and optional add-ins that elevate your drink. I shared tips for blending and adjusting flavors to suit your taste. You also learned about storage and serving suggestions. Incorporate variations to keep it fresh. This smoothie is not only tasty but also nutritious. Enjoy it as a meal or snack, knowing you can easily customize it to fit your needs. Start blending today for a healthy treat!
    Pumpkin Pie Protein Smoothie Healthy and Tasty Drink
  • To make a delicious Maple Walnut Coffee Cake, you need the following ingredients: - 2 cups all-purpose flour - 1 cup granulated sugar - 1/2 cup unsalted butter, softened - 1 cup sour cream - 2 large eggs - 1/4 cup pure maple syrup - 1 teaspoon vanilla extract - 1 teaspoon baking powder - 1/2 teaspoon baking soda - 1/2 teaspoon salt - 1 cup walnuts, chopped - 1 tablespoon brown sugar - 1 teaspoon cinnamon This list gives you everything required to create a rich and flavorful cake. This recipe includes gluten and dairy. If you have allergies, you may need to adjust. The cake has eggs and butter, which are not suitable for vegans. You can swap ingredients for a better fit. Here are a few ideas: - Use gluten-free flour for a gluten-free version. - Substitute coconut cream for sour cream. - Maple syrup can be replaced with honey or agave syrup. - If you do not like walnuts, use pecans or almonds instead. These swaps keep the cake tasty while matching your dietary needs. Start by preheating your oven to 350°F (175°C). Grease a 9x13 inch baking pan to ensure the cake doesn’t stick. In a large bowl, cream together the softened butter and granulated sugar. Use a mixer to make it light and fluffy. Next, add the eggs, one at a time. Mix well after each egg. Then, stir in the sour cream, maple syrup, and vanilla extract. Make sure everything is mixed together well. In a separate bowl, whisk the flour, baking powder, baking soda, and salt. Gradually add this dry mix to the wet ingredients. Mix until just combined; don’t overmix. Finally, fold in the chopped walnuts. This adds a nice crunch to your cake. Now it's time to pour half of the batter into the prepared pan. Smooth it out with a spatula. In a small bowl, mix the brown sugar and cinnamon. Sprinkle half of this mixture over the batter in the pan. Pour the rest of the batter on top, smoothing it out again. Sprinkle the remaining cinnamon sugar mixture evenly over this top layer. Bake in your preheated oven for 35-40 minutes. To check if it’s done, insert a toothpick in the center. If it comes out clean, your cake is ready! After baking, let the coffee cake cool in the pan for about 10 minutes. This helps it set and makes slicing easier. Use a sharp knife to cut into squares. Serve warm or at room temperature. Enjoy this delightful treat with a cup of coffee or tea! To get the best texture in your maple walnut coffee cake, focus on your mixing. Cream the butter and sugar until light. This step adds air, making your cake fluffy. When you add the dry ingredients, mix just until combined. Over-mixing can make your cake dense. One common mistake is not measuring ingredients correctly. Use dry measuring cups for flour and sugar. Scooping flour directly from the bag can pack it down and add too much. Another mistake is skipping the cooling time. Letting it cool for a bit helps flavors blend and makes slicing easier. For the best walnut flavor, chop them coarsely. This allows for a nice crunch in every bite. Toasting the walnuts before adding them enhances their flavor. Just put them in a dry pan on low heat for a few minutes. Make sure to fold them in gently so they spread evenly in the batter. {{image_2}} You can have fun with this recipe. Adding chocolate or fruits makes it unique. Try mixing in chocolate chips for a sweet touch. Dark or milk chocolate works well. You can also use fresh fruits like blueberries or raspberries. Just fold them in gently before baking. This adds a tart flavor that complements the maple. If you need a gluten-free version, swap the flour. Use a gluten-free all-purpose blend instead. Make sure it contains xanthan gum for structure. This keeps the cake light and fluffy. You can also try almond flour for a nutty taste. Experiment a bit to find your favorite mix. For a nut-free coffee cake, skip the walnuts. You can use sunflower seeds instead. These seeds add a nice crunch without the allergens. Another option is to add more fruits or chocolate chips. This keeps the cake delicious and safe for everyone. To keep your Maple Walnut Coffee Cake fresh, store it in an airtight container. This keeps moisture in and air out. You can also wrap it tightly with plastic wrap. Place it in a cool, dry place. If you plan to enjoy it within a few days, this method works well. You can freeze this coffee cake for longer storage. First, let it cool completely. Then, cut it into pieces. Wrap each piece in plastic wrap or foil. Place the wrapped slices in a freezer bag. Be sure to remove as much air as possible. The cake can stay in the freezer for up to three months. When you’re ready to enjoy your cake, take it out of the freezer. Let it thaw in the fridge overnight. For a warm slice, preheat your oven to 350°F (175°C). Place the cake on a baking sheet and heat for about 10-15 minutes. You can also microwave a slice for about 20-30 seconds. Enjoy your warm and delicious coffee cake! Yes, you can use other nuts in this coffee cake. Almonds, pecans, or hazelnuts work well. Just chop them into small pieces. They add a nice crunch and flavor. You can mix nuts too. Just keep the amount the same. You’ll still enjoy that rich taste. To check if your coffee cake is done, use a toothpick. Stick it in the center. If it comes out clean, the cake is ready. You can also look for a golden-brown top. It should spring back when you touch it lightly. If it feels wet or mushy, bake it a bit more. Yes, you can prepare this coffee cake in advance. Bake it, then cool it completely. Wrap it tightly in plastic wrap and store it in the fridge. It stays fresh for about three days. You can also freeze it. Just slice it first, then wrap the slices. This way, you can enjoy it later without any hassle. This blog post shared a complete guide to making delicious coffee cake. You learned about a full ingredient list, dietary options, and substitutions. I provided clear steps for preparation and baking. You found useful tips to avoid common mistakes. Various flavor twists and storage tips were also included. Now, you can bake your perfect coffee cake with confidence. Enjoy the process and share your results!
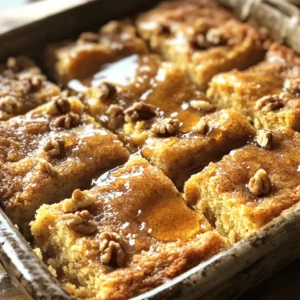
    Maple Walnut Coffee Cake Delightful and Easy Recipe
  • To make Chocolate Pretzel Bark, you need a few key ingredients: - 8 ounces dark chocolate, chopped - 8 ounces milk chocolate, chopped - 2 cups pretzel sticks - 1/2 cup mini marshmallows - Sea salt, for sprinkling These ingredients mix sweet and salty flavors. The dark and milk chocolate gives you a rich taste. The pretzel sticks add crunch and texture. The mini marshmallows bring a fun, chewy element. I suggest using high-quality chocolate for the best flavor. You can choose: - Semi-sweet chocolate - Dark chocolate - Milk chocolate Each type offers a different taste. Dark chocolate gives a deep, rich flavor. Milk chocolate is sweeter and creamier. You can even mix them for a balanced taste. Add more fun with these optional toppings: - 1/4 cup crushed peppermint candies - Chopped nuts - Dried fruit Crushed peppermint adds a fresh flavor. Nuts give more crunch, and dried fruit adds sweetness. You can customize this treat to fit your taste! First, grab a 9x13 inch baking pan. Line it with parchment paper. Make sure to leave some paper hanging over the sides. This helps you lift the bark out later. It is a simple trick that makes things easy. Take a microwave-safe bowl. Add the dark and milk chocolate to it. Heat the bowl in the microwave for 30 seconds. Then, take it out and stir. Repeat this until the chocolate is smooth. This should take about 1-2 minutes. Be careful not to burn the chocolate. Stirring helps it melt evenly. Once your chocolate is melted, pour it into the pan. Spread it evenly using a spatula. Next, take your pretzel sticks. Sprinkle them over the melted chocolate. Press them down gently. You want them to stick well. Now, add mini marshmallows on top. If you like, you can sprinkle crushed peppermint candies too. Let the bark cool at room temperature for 20-30 minutes. Then, place it in the fridge for 1 hour. This helps it set. After it’s set, use the parchment paper to lift it out. Break it into pieces and sprinkle sea salt for extra flavor. To get the best chocolate texture, use good quality chocolate. I prefer dark and milk chocolate for a rich taste. Chop the chocolate into small pieces for even melting. Microwave in short bursts of 30 seconds. Stir often to avoid burning. Once melted, it should be smooth and glossy. If you see lumps, continue to stir. This will give you a nice, creamy base for your bark. Evenly spreading the pretzel sticks is key. After pouring the melted chocolate, sprinkle the pretzels right away. Press them down gently into the chocolate. This helps them stick better and makes each bite crunchy. Try to cover the chocolate surface well with pretzels. This way, each piece of bark has a good mix of chocolate and pretzel. When it’s time to break the bark, be patient. Once it’s set, lift it out using the parchment paper. Place it on a cutting board. Use a sharp knife or your hands to break it. For fun shapes, twist and pull apart the bark. This will give you irregular pieces that are fun to eat. If you want smaller chunks, you can use the knife to cut them. Just remember, the goal is to keep the pieces a bit rough and rustic. {{image_2}} You can mix and match chocolate types for your bark. Try using all dark chocolate or all milk chocolate for a richer taste. White chocolate adds a sweet touch and looks great too. You can also combine dark and white chocolate for a lovely contrast. Each type gives a unique flavor, so feel free to experiment! You can make your bark festive for any holiday. For Halloween, add candy corn on top. For Christmas, use red and green sprinkles or crushed candy canes. During Easter, pastel-colored candies are a fun choice. Make your bark match the season and impress your friends and family. Get creative with your toppings! Try nuts like almonds or pecans for crunch. Dried fruit like cranberries or raisins adds sweetness. Coconut flakes give a tropical vibe. If you want a spicy kick, sprinkle some chili powder. These mix-ins will take your bark to the next level! To keep your chocolate pretzel bark fresh, store it in an airtight container. Place parchment paper between layers if you stack it. This method prevents sticking. Keep the container in a cool, dry place. Avoid direct sunlight, which can melt the chocolate. If it's warm in your home, the fridge is a good option. Chocolate pretzel bark lasts about one to two weeks. It stays tasty for up to two weeks at room temperature. If you put it in the fridge, it can last a bit longer. Just make sure to check for any signs of spoilage before eating. You can freeze chocolate bark for up to three months. Wrap it tightly in plastic wrap before placing it in a freezer bag. When you're ready to enjoy it, let it thaw in the fridge overnight. This way, it stays fresh and tasty. Yes, you can use white chocolate. White chocolate adds a sweet touch. It pairs well with pretzels. However, it lacks the rich flavor of dark chocolate. You may want to add a pinch of salt to balance sweetness. To melt chocolate without burning, use the microwave. Put chocolate in a microwave-safe bowl. Heat it in 30-second bursts. Stir between each burst. This method helps to prevent burning. You can also use a double boiler. Just make sure the water does not touch the bowl. To make this recipe gluten-free, choose gluten-free pretzels. Many brands offer gluten-free options. Always check the label to be sure. This simple swap makes the bark safe for everyone. Enjoy the same great taste without gluten! Making chocolate pretzel bark is fun and easy. You learned about the best ingredients and types of chocolate. The steps for preparing the bark were clear, and I shared tips for great texture. You can get creative with toppings or try different flavor mixes too. Store your bark well to keep it fresh. It can last for weeks if stored properly. Enjoy making and sharing this tasty treat. I hope you have fun experimenting with your own versions!
    Chocolate Pretzel Bark Delightful No-Bake Treat
  • To make this easy one-pot tomato basil soup, gather these key ingredients: - 2 tablespoons olive oil - 1 medium onion, chopped - 2 cloves garlic, minced - 2 cans (14 oz each) diced tomatoes, with juice - 1 cup vegetable broth - 1 teaspoon dried oregano - 1 teaspoon sugar - Salt and pepper to taste - 1/2 cup heavy cream (or coconut cream for a vegan option) - Fresh basil leaves, for garnish - Croutons or toasted bread, for serving You can change the flavor of your soup with these optional ingredients: - Red pepper flakes for heat - Fresh herbs like thyme or parsley - A splash of balsamic vinegar for depth - Parmesan cheese for a richer taste When choosing your ingredients, consider these trusted brands: - For olive oil, use extra virgin from brands like California Olive Ranch. - Hunt's offers good canned tomatoes that are flavorful. - Swanson is a reliable option for vegetable broth. - For heavy cream, Land O'Lakes is a solid choice, while So Delicious provides great coconut cream. These ingredients will help you create a delicious, flavorful soup that warms the soul. 1. Gather your ingredients. You need: - 2 tablespoons olive oil - 1 medium onion, chopped - 2 cloves garlic, minced - 2 cans (14 oz each) diced tomatoes, with juice - 1 cup vegetable broth - 1 teaspoon dried oregano - 1 teaspoon sugar - Salt and pepper to taste - 1/2 cup heavy cream (or coconut cream for a vegan option) - Fresh basil leaves, for garnish - Croutons or toasted bread, for serving 2. Chop the onion and mince the garlic. This helps the flavors bloom. 1. Heat olive oil in a large pot over medium heat. Wait for it to shimmer. 2. Add the chopped onion. Sauté for about 5 minutes until it turns soft and clear. 3. Stir in the minced garlic. Cook for another 1-2 minutes until you smell that great aroma. 4. Pour in the diced tomatoes with their juice, vegetable broth, dried oregano, sugar, salt, and pepper. Mix it well. 5. Bring the mixture to a boil. Once boiling, reduce the heat to low. 6. Let it simmer uncovered for about 15-20 minutes. This lets the flavors blend nicely. 7. Remove the pot from heat. Blend the soup until smooth using an immersion blender. If you don't have one, carefully pour it into a blender in batches. 8. Return the pot to the heat. Stir in the heavy cream and warm it gently. Taste and adjust the seasoning. 9. Serve hot. Garnish with fresh basil leaves and enjoy with croutons or toasted bread. - Make sure your pot is deep enough. This helps prevent splatters. - Blend slowly at first. This helps to avoid a messy kitchen. - Keep the blender submerged. This ensures a smooth blend without lumps. - If you don’t have an immersion blender, use a regular blender. Blend in small batches for safety. To get the best flavor in your soup, use fresh ingredients. Fresh basil adds a bright taste. Choose ripe, juicy tomatoes for rich flavor. Adding sugar balances the acidity of the tomatoes. Don't rush the simmering step; let the soup cook for at least 15 minutes. This helps all the flavors blend well. Stir in the cream slowly for a creamy texture. Taste the soup and adjust salt and pepper as needed. One common mistake is not sautéing the onion long enough. If the onion is not soft, the soup lacks depth. Another mistake is skipping the blending step. Blending makes the soup smooth and creamy. Be careful not to add too much salt at once. You can always add more, but you can't take it out. Lastly, avoid overcooking the basil. Add it right before serving to keep its fresh aroma. Garnishing can make your soup look and taste special. Try adding croutons for crunch. A drizzle of olive oil on top adds richness. You can also use a sprinkle of grated cheese for extra flavor. For a fresh twist, add a dollop of pesto or a squeeze of lemon juice. Fresh herbs like parsley or chives can brighten up the dish. Get creative with your garnishes to make the soup uniquely yours! {{image_2}} To make this soup vegan, use coconut cream instead of heavy cream. Coconut cream adds a rich, creamy texture without dairy. You can also add extra veggies, like carrots or bell peppers, to boost flavor. These ingredients are healthy, colorful, and filling. This soup is gluten-free by nature since it doesn't use any gluten-based products. Just be sure your vegetable broth is labeled gluten-free. You can serve it with gluten-free bread or croutons. This way, everyone can enjoy a warm bowl without worry. For a heartier soup, you can add proteins. If you like chicken, cook it separately and add it to the soup before serving. Shredded rotisserie chicken works well. If you prefer beans, try adding a can of drained and rinsed white beans. They add protein and texture without changing the soup's flavor. After you enjoy your soup, let it cool down. Pour the soup into airtight containers. Make sure to leave some space at the top. This space helps when the soup expands. Store it in the fridge for up to 4 days. Always label it with the date. This way, you won't forget! If you want to keep your soup longer, freezing is a great choice. Use freezer-safe bags or containers. Make sure to leave space in the bags, too. You can freeze the soup for up to 3 months. When ready to eat, thaw it in the fridge overnight. This keeps it tasty and fresh. Reheating is easy! You can use a pot on the stove or a microwave. If using a pot, heat it on low. Stir often to avoid burning. If using a microwave, use short bursts of heat. Stir in between to help it warm evenly. If the soup seems thick, add a splash of water or broth. Yes, you can make this soup ahead of time. It tastes even better the next day. Just store it in an airtight container in the fridge. When you're ready to eat, heat it on the stove. Stir gently until warm. This soup keeps well for about three days. If you want a lighter option, you can use coconut cream. It adds a nice flavor too. You could also use milk or a non-dairy milk. Almond milk or oat milk works well. Just know that these will change the soup's texture slightly. To add some heat, try red pepper flakes. Start with a pinch and taste. You can also add a dash of hot sauce. For a fresh kick, mix in some diced jalapeños. These changes will make your soup warm and flavorful. We explored soup-making from start to finish. You learned about key ingredients, cooking steps, and helpful tips. I shared ways to adapt recipes for vegan, gluten-free, or protein-packed versions. Storing leftovers and reheating tips can help you enjoy your soup longer. By following this guide, you can make a soup that suits your taste. Now, grab your immersion blender and get cooking! Enjoy every warm and comforting bowl.
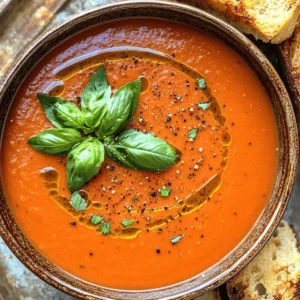
    One-Pot Tomato Basil Soup Easy and Flavorful Recipe
  • - 1 cup cold brew coffee - ½ cup heavy cream - 2 tablespoons pumpkin puree - 1 tablespoon maple syrup - ½ teaspoon vanilla extract - ½ teaspoon pumpkin pie spice - Ice cubes - Optional toppings (whipped cream, pumpkin pie spice) To make a Pumpkin Cream Cold Brew, you need simple ingredients. Cold brew coffee forms the base. I prefer to use smooth and rich cold brew. You can make it at home or buy it ready-made. Next, heavy cream makes the drink creamy and rich. I recommend using fresh cream for the best flavor. Pumpkin puree adds that classic fall taste. Look for pure pumpkin, not pie filling. Maple syrup gives just the right sweetness. It pairs well with the pumpkin flavors. Vanilla extract adds depth to the drink. Use pure vanilla for the best taste. Pumpkin pie spice brings warmth and a hint of spice. It completes this drink's flavor. Don’t forget the ice cubes! They keep your drink cold and refreshing. For a special touch, you can add whipped cream on top and sprinkle more pumpkin pie spice for garnish. These ingredients come together to create a delightful drink. Enjoy each sip as you savor the flavors of fall. 1. In a mixing bowl, combine: - ½ cup heavy cream - 2 tablespoons pumpkin puree - 1 tablespoon maple syrup - ½ teaspoon vanilla extract - ½ teaspoon pumpkin pie spice This mix creates a rich, creamy base. 2. Use a whisk or an electric mixer to whip the mixture. Aim for a slightly thick texture. It should still pour easily. 3. Be careful not to overwhip. If you do, it will turn into butter. Stop as soon as you see soft peaks forming. 1. Fill a tall glass with ice cubes. This keeps your drink cold and refreshing. 2. Pour 1 cup of cold brew coffee over the ice. Watch how the coffee swirls with the ice. 3. Gently spoon the pumpkin cream mixture on top of the cold brew. Let it float or swirl for a pretty look. 1. Dust a pinch of pumpkin pie spice on top of the cream. This adds a nice aroma and flavor. 2. If you want, add a dollop of whipped cream. This makes the drink even more indulgent. 3. Serve your drink right away. Enjoy this fall-inspired treat! You can make this drink your own with easy changes. First, adjust the sweetness by adding more or less maple syrup. If you like it sweeter, add an extra half tablespoon. If you prefer less sweetness, cut back to one teaspoon. Next, explore different spices for flavor. Try nutmeg or cinnamon for a warm twist. You can also mix in some ginger for a spicy kick. For a lighter option, swap heavy cream for almond milk or coconut cream. These alternatives still taste great but cut down on calories and fat. Avoid overwhipping the cream. If you whip too long, it can turn into butter. Aim for a slightly thick, pourable texture. Be careful with pumpkin puree. Using too much can make the drink too thick. Stick to the recipe's measurement for the best balance. Lastly, pay attention to layering. Pour the cold brew first, then gently spoon the pumpkin cream on top. This makes the drink look pretty and taste great. {{image_2}} You can switch up your cold brew coffee for a fun twist. Try using different types of cold brew. You can use dark roast for a richer flavor. Light roast gives a mild taste. If you prefer a caffeine-free option, explore decaf cold brew. It still gives you the smooth flavor without the buzz. Want to kick your drink up a notch? Add flavored syrups! Caramel and chocolate syrups mix well with pumpkin. They bring out the sweet taste. You can also add spices like nutmeg or cinnamon. These spices add warmth and depth to your drink. Don’t just stop at pumpkin! You can modify this drink for other seasons. In winter, try a peppermint version. Just swap pumpkin puree with peppermint extract. For fall, use apple or sweet potato puree. Each option gives a unique taste that fits the season. You can store leftover pumpkin cream in an airtight container. It lasts about three days in the fridge. Make sure to keep it sealed tightly. You can use this cream in other recipes, too. Try it on pancakes or in oatmeal for a tasty twist. Leftover cold brew coffee should go in the fridge. Use a sealed container to keep it fresh. It stays good for up to one week. To maintain the flavor, avoid letting it sit out at room temperature. Heavy cream lasts about a week after opening. Always check the date on the package. Pumpkin puree can last in the fridge for a week too. To use pumpkin puree efficiently, consider making extra pumpkin cream and store it for later. You can also freeze leftover puree for up to three months. To make this drink vegan, swap out some ingredients. Use coconut cream instead of heavy cream. You can also use maple syrup, as it is vegan-friendly. For the coffee, any non-dairy milk works well. Almond or oat milk are popular choices. They will keep the creamy texture while adding their own flavor. Yes, you can use store-bought cold brew. Look for brands that have a strong coffee flavor and no added sugars. A few good options include Stumptown, Califia Farms, and Starbucks. Make sure to check the label for ingredients. To make it hot, brew regular coffee instead of cold brew. Then, follow the same steps to prepare the pumpkin cream. For iced versions, make sure to chill your coffee first. Ice cubes help keep the drink cold without watering it down. If you want, serve it in a tall glass with a fun straw to enjoy! You can create a delicious cold brew pumpkin cream drink with easy steps. We discussed the simple ingredients and how to whip the perfect pumpkin cream mixture. I shared tips to customize your drink and avoid common mistakes. Variations and storage info help you enjoy this treat anytime. Try it hot or iced for a seasonal twist. Enjoy experimenting with flavors and share your favorite version! Your cold brew will impress and satisfy everyone.
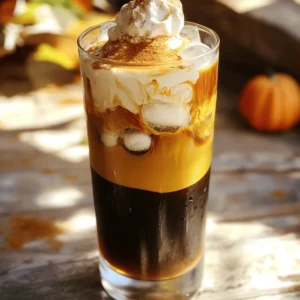
    Pumpkin Cream Cold Brew Copycat Delightful Drink
  • - 2 cups Greek yogurt (plain or vanilla) - 1 cup granola (your choice) - 2 cups mixed berries (strawberries, blueberries, raspberries) - 2 tablespoons honey or maple syrup - 1 teaspoon vanilla extract (optional) - Fresh mint leaves for garnish When making Greek yogurt parfait jars, the right ingredients matter. You can choose between plain or vanilla Greek yogurt. I love vanilla for that extra touch of sweetness. Next, select a granola you enjoy. Crunchy granola adds texture to your parfait. You can pick from various flavors, like honey or nut. For the berries, I recommend a mix of strawberries, blueberries, and raspberries. Each berry brings its unique taste and color. Wash and slice strawberries before using. Sweeteners like honey or maple syrup add a delightful drizzle. Just two tablespoons will do. For an extra layer of flavor, consider adding a teaspoon of vanilla extract to your yogurt. Finally, don't forget the fresh mint leaves for garnish. They add a burst of color and freshness. Each ingredient works together to create a simple yet tasty treat. Start by washing the mixed berries. Use cold water to rinse them well. Pat them dry with a clean towel. If you have strawberries, hull them first. Slice the strawberries into thin rounds. This makes them easier to layer. Next, mix the Greek yogurt with vanilla extract. This step is optional, but it adds flavor. Stir the vanilla into the yogurt until it blends well. If you use plain yogurt, this makes it taste sweeter. Grab some clean jars for the parfaits. Start with a layer of Greek yogurt at the bottom. Use about 1/3 cup of yogurt for each jar. Now, sprinkle about 2 tablespoons of granola on top of the yogurt. This adds a nice crunch. Next, add a layer of mixed berries, around 1/4 cup. You can use any mix of berries you like. Repeat these layers. Add another layer of yogurt, then more granola, and more berries. Fill the jars almost to the top. Aim for at least two to three layers in each jar for the best look. After layering, drizzle honey or maple syrup over the last layer of berries. This adds a sweet touch. Now, garnish the parfait with a sprig of fresh mint. It adds color and freshness. Place the jars in the refrigerator for about 30 minutes. This chilling time helps the flavors mix well. When ready to serve, take them out and enjoy! To make your parfait look great, pay attention to layers. Start with yogurt at the bottom. Use about 1/3 cup for each layer. Next, sprinkle on 2 tablespoons of granola. Add 1/4 cup of mixed berries on top. Repeat this until you reach the top of the jar. Aim for two to three layers for depth and color. For jar sizes, use small jars like 8-ounce ones. They are perfect for individual servings. They also make your parfait look pretty and neat. If you want a dairy-free option, use coconut yogurt or almond yogurt. These are great choices that still taste good. For vegan options, choose maple syrup instead of honey. If you need gluten-free granola, check labels carefully. Some granolas contain wheat. Look for brands that are certified gluten-free. You can also make your own granola at home for freshness and control. You can add more fun to your parfait with extra toppings. Try nuts, seeds, or a sprinkle of cinnamon. If you like chocolate, add cocoa nibs or dark chocolate chips. Seasonal fruits can change your parfait game. In summer, use peaches or nectarines. In fall, try apples or pears. Each season brings new flavors to enjoy! {{image_2}} You can switch up your Greek yogurt parfait jars to create fun flavor profiles. A tropical parfait is refreshing. Add coconut and pineapple for a sunny twist. Combine 1/2 cup of diced pineapple with shredded coconut. Layer this mix with yogurt and berries for a bright treat. If you love chocolate, try a chocolate yogurt parfait. Use chocolate-flavored Greek yogurt instead of plain or vanilla. You can also add cocoa powder to the yogurt. This adds rich flavor without extra sugar. Top it with chocolate granola for a delightful crunch. For a lighter option, focus on health-conscious variations. Choose low-sugar granola or skip it altogether. You can also replace honey with a sugar-free sweetener. This keeps the parfait tasty without the extra sugar. To increase protein, add nut butter or seeds. A tablespoon of almond or peanut butter works well. You can also sprinkle chia seeds on each layer. These additions boost protein and fiber, making your parfait filling and nutritious. Dessert versions of parfaits are fun and indulgent. Add layers of chocolate pudding or crumbled cookies. You can use graham crackers or Oreos for a sweet crunch. Try a brownie parfait by mixing bite-sized brownie pieces in your layers. Top it with whipped cream for a rich finish. These desserts can satisfy your sweet tooth while still being easy to prepare. Enjoy experimenting with flavors! To keep your Greek yogurt parfaits fresh, use airtight containers. These containers help prevent air and moisture from spoiling your tasty treat. When you layer the parfait, leave some space at the top. This way, the yogurt stays creamy, and the granola stays crunchy. Store the parfaits in the fridge for up to three days. Always check for any changes in smell or texture before eating. Can you freeze Greek yogurt parfaits? Yes, you can! However, freezing can change the texture of the yogurt and granola. For best results, freeze only the yogurt and berries. Avoid freezing granola, as it may get soggy. When you want to enjoy your parfait, thaw it in the fridge overnight. This helps maintain the right texture. After thawing, add fresh granola on top for crunch. Enjoy your parfaits as if they were just made! Greek yogurt parfaits can last for about 2-3 days in the fridge. Make sure to cover them well. This keeps them fresh and tasty. The yogurt may get watery over time, but the flavors will still be good. Yes, you can make Greek yogurt parfaits a day ahead. Just layer the yogurt, granola, and fruits in jars. Store them in the fridge until you are ready to serve. This makes breakfast or snacks super easy. You can use many fruits in parfaits. Here are some tasty options: - Bananas - Peaches - Apples - Mangoes - Kiwis - Pineapple Feel free to mix and match your favorites! In this post, we've explored how to make delicious Greek yogurt parfaits. You learned about choosing the right ingredients, like yogurt, granola, and berries. I’ve shared simple steps for prepping and layering your parfaits, along with tips for variations and storage. These parfaits offer endless options for flavor and health. Remember, you can customize it to fit any taste. Enjoy your delicious and nutritious creations!
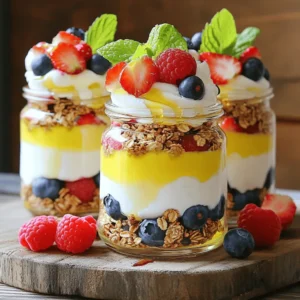
    Greek Yogurt Parfait Jars Simple and Tasty Treats
  • - 1 lb (450g) boneless, skinless chicken breasts, sliced into strips - 1 red bell pepper, sliced - 1 green bell pepper, sliced - 1 yellow onion, sliced - 2 tablespoons olive oil - 2 teaspoons chili powder - 1 teaspoon cumin - 1 teaspoon garlic powder - 1 teaspoon paprika - 1/2 teaspoon salt - 1/2 teaspoon black pepper - Juice of 1 lime - Flour tortillas (for serving) In this recipe, chicken breasts form the main protein. Choose fresh, boneless, and skinless cuts for best results. Slice them into strips for quick cooking and easy handling. Bell peppers add sweetness and crunch. Use red, green, and yellow for a colorful dish. Onion adds extra flavor; slice it thin to cook evenly. Olive oil helps the spices stick and adds richness. For spices, we use chili powder for heat, cumin for warmth, and garlic powder for depth. Paprika adds color and a mild flavor. Salt and black pepper enhance all the tastes. Squeeze fresh lime juice for a bright finish. Finally, warm flour tortillas serve as the base for your fajitas. - Fresh cilantro - Lime wedges Garnishes elevate your dish. Fresh cilantro brings a pop of color and fresh taste. Chop it finely and sprinkle it on top before serving. Lime wedges add a zesty kick. Squeeze some over your fajitas right before eating. This combination makes your meal look and taste even more delicious! First, set your oven to 400°F (200°C). This heat will cook our chicken and veggies just right. While the oven warms up, prepare your ingredients. Slice 1 pound of chicken breasts into strips. Next, slice 1 red bell pepper, 1 green bell pepper, and 1 yellow onion. All the pieces should be similar in size for even cooking. In a large bowl, mix the sliced chicken and vegetables. Drizzle 2 tablespoons of olive oil over the mixture. Sprinkle in 2 teaspoons of chili powder, 1 teaspoon of cumin, 1 teaspoon of garlic powder, 1 teaspoon of paprika, 1/2 teaspoon of salt, and 1/2 teaspoon of black pepper. Squeeze the juice of 1 lime over everything. Toss all the ingredients together until they are well-coated. This step is key to getting great flavor in every bite. Now, spread the chicken and vegetable mixture evenly on a large sheet pan. This helps everything cook evenly. Bake in your preheated oven for 20-25 minutes. Stir the mixture halfway through to ensure all sides cook well. Look for the chicken to be fully cooked and the veggies to be tender and slightly charred. Once done, take it out and let it cool for a couple of minutes before serving. To get the best results, use boneless, skinless chicken breasts. They cook evenly and stay juicy. Cut the chicken into thin strips. This helps them cook fast and right. For the veggies, avoid sogginess. First, slice your bell peppers and onion thick enough. Thin slices may turn mushy. Second, don’t overcrowd the sheet pan. Give veggies room to roast. This brings out their natural sweetness. Serve your fajitas family-style on a big platter. Lay out warm flour tortillas, and let everyone build their own. It’s fun and interactive! Enhance the flavor with lime wedges and fresh cilantro on the side. You can also add sour cream, salsa, or guacamole for extra taste. These small touches make a big difference. {{image_2}} You can easily change this recipe to suit your taste. First, think about protein. Instead of chicken, use beef or shrimp. Just slice them thinly like the chicken. This will help them cook evenly. Each protein adds a unique flavor to your fajitas. Next, let’s talk about vegetables. You can swap bell peppers and onions for zucchini or mushrooms. Slice the zucchini into half-moons or the mushrooms into strips. This gives you a new twist on the classic dish. Try mixing different veggies for fun colors and textures. If you need to make this recipe gluten-free, just skip the flour tortillas. Instead, serve the fajitas in corn tortillas or over a bed of rice. Both options taste great and keep the dish gluten-free. For a vegan version, replace the chicken with sliced portobello mushrooms or tofu. You can marinate the tofu to add flavor. Use the same spices and cook it just like the chicken. This way, everyone can enjoy delicious fajitas! To keep your leftovers fresh, store them in airtight containers. This helps lock in flavor and moisture. You can use glass or plastic containers. Make sure they seal well. You can also use freezer bags for easy storage. If you plan to eat them later, divide them into smaller portions. This way, you only take out what you need. When reheating your fajitas, do it slowly to keep the chicken moist. You can use a microwave-safe dish. Cover it with a damp paper towel. This helps keep the steam in. You can also reheat on the stovetop. Just add a little olive oil to a pan. Heat it over medium heat and stir often. This keeps the veggies crisp and tasty. Always check that the chicken is heated to 165°F (74°C) for safety. Enjoy your flavorful meal again! How do I know when the chicken is fully cooked? The chicken is fully cooked when it reaches an internal temperature of 165°F (75°C). You can check this with a meat thermometer. If you don’t have one, cut into the thickest part. The meat should be white, not pink. Can I prepare the ingredients ahead of time? Yes, you can! You can slice the chicken and vegetables a day in advance. Store them in the fridge in an airtight container. Just add the oil and spices right before cooking. This saves time and makes dinner easier. What if my fajitas are too spicy? If your fajitas are too spicy, you can add more lime juice. This helps balance the heat. You can also mix in sour cream or yogurt to cool them down. Serve with a side of rice to help absorb the spice. How can I make this recipe in a smaller batch? To make a smaller batch, just reduce the amounts of chicken and veggies. Use half a pound of chicken and one bell pepper. Adjust the spices accordingly. Cooking time may be shorter, so check for doneness early. You learned how to make tasty sheet pan chicken fajitas. We covered the main ingredients, from chicken to spices, along with tips for perfect cooking. You can customize the recipe with different proteins or veggies and store leftovers safely. Remember, cooking should feel fun and easy. With this guide, you can impress family and friends while enjoying delicious meals. Don't hesitate to experiment and make the recipe your own!
    Sheet Pan Chicken Fajitas Flavorful and Easy Meal
  • - 1 pound large shrimp, peeled and deveined - 1 cup shredded coconut (sweetened or unsweetened) - 1/2 cup panko breadcrumbs - 1/2 cup all-purpose flour - 1 teaspoon garlic powder - 1 teaspoon paprika - 1/2 teaspoon salt - 1/2 teaspoon black pepper - 1 tablespoon lime juice - Olive oil spray To make Air Fryer Coconut Shrimp Crunch, gather these key ingredients. First, you need shrimp. Choose large shrimp, peeled and deveined. This helps with easy cooking. Next, grab shredded coconut. You can use sweetened or unsweetened coconut. It gives a great flavor. For crunch, panko breadcrumbs are a must. They add a crispy bite. All-purpose flour helps the coating stick. For taste, we need some spices. Garlic powder and paprika enhance the flavor. Salt and black pepper balance everything nicely. Lime juice adds a fresh zing to the shrimp. Finally, olive oil spray helps with crispiness in the air fryer. Now that you have your ingredients ready, you can enjoy making this tasty treat! 1. Mix flour, garlic powder, paprika, salt, and pepper. Take a shallow bowl and add 1/2 cup flour, 1 teaspoon garlic powder, 1 teaspoon paprika, 1/2 teaspoon salt, and 1/2 teaspoon black pepper. Stir well to blend all the spices. 2. Whisk eggs and incorporate lime juice. In another bowl, crack 2 large eggs. Whisk them well and add 1 tablespoon of lime juice. Mix until the eggs are smooth. 3. Combine coconut with panko breadcrumbs. In a third bowl, mix 1 cup shredded coconut (you can use sweetened or unsweetened) with 1/2 cup panko breadcrumbs. This mix gives your shrimp a great crunch! 1. Coat shrimp in flour mixture. Take your 1 pound of peeled and deveined large shrimp. Dip each shrimp into the flour mix. Make sure it gets fully covered. Shake off any extra flour. 2. Dip in egg mixture. Next, dip the coated shrimp into the egg mix. Allow any excess egg to drip back into the bowl. 3. Encase in coconut and panko mix. Finally, roll the shrimp in the coconut and panko mixture. Press gently to make sure the coating sticks well. Repeat for all the shrimp. 1. Preheat air fryer to 375°F (190°C). Set your air fryer to 375°F. Let it heat up for about 5 minutes. 2. Arrange shrimp in a single layer. Lightly spray the air fryer basket with olive oil. Place the coated shrimp in a single layer. Do not overcrowd the basket to ensure even cooking. 3. Cook for 8-10 minutes, flipping halfway. Air fry the shrimp for 8 to 10 minutes. Flip them halfway to help them cook evenly. Look for a golden and crispy finish. To get that perfect crunch, use panko breadcrumbs. They are light and airy, which gives a great texture. Regular breadcrumbs can make your shrimp soft. When you coat the shrimp, press the mixture firmly onto each piece. This helps the coating stick well during cooking. Preheating the air fryer is key. It helps cook the shrimp evenly. Set the air fryer to 375°F (190°C) and let it heat for about five minutes. Also, avoid overcrowding the basket. If the shrimp are too close, they won’t cook right. Cook in batches if needed, so each shrimp gets good heat and crispiness. Dipping sauces can boost flavor. Try sweet chili sauce for a sweet touch. You can also make mango salsa for a fruity dip. For extra flavor in the coating, add spices like cayenne or cumin. A little lime zest can also brighten up the taste. These simple tips will elevate your coconut shrimp to a new level. {{image_2}} You can make your coconut shrimp even better with fun dipping sauces. Here are two great choices: - Sweet chili sauce: This sauce is sweet with a touch of heat. It pairs well with the crispy shrimp. Just pour some into a bowl and enjoy! - Mango salsa: This mix of fresh mango, onion, and lime brings a fruity twist. It adds brightness and flavor to each bite. You can cook coconut shrimp in different ways. Each method gives a unique taste and texture: - Oven-baking vs. air frying: Baking the shrimp will give a nice crunch but may not be as crispy as air frying. If you choose to bake, set your oven to 400°F (200°C). Bake for about 15-20 minutes, flipping halfway. - Pan-frying for a different texture: If you want a golden brown crust, try pan-frying. Heat oil in a skillet. Cook the shrimp for about 2-3 minutes on each side until golden. Add extra flavor to your coconut shrimp by making simple changes: - Adding lime zest to the coating: Grate some lime zest into the coating mix. This will add a bright citrus flavor. It makes the shrimp taste fresh and lively. - Using coconut milk for dredging shrimp: Instead of eggs, dip shrimp in coconut milk. This gives a richer coconut flavor. It also helps the coating stick better. To store leftover coconut shrimp, first let them cool to room temperature. Place them in an airtight container. You can keep them in the refrigerator for up to three days. If you want to store shrimp for longer, freezing is a great option. To freeze, wrap each shrimp in plastic wrap and place them in a freezer bag. Be sure to remove as much air as possible before sealing. This helps prevent freezer burn. The best way to reheat coconut shrimp is in the air fryer. Set it to 350°F (175°C). Heat the shrimp for about 5 minutes. This method keeps them crispy. If you don’t have an air fryer, you can use a regular oven. Place shrimp on a baking sheet and cover them with foil. This helps retain moisture. Remove the foil halfway through to crisp them up. In the fridge, coconut shrimp stay fresh for about three days. To maximize their shelf life, make sure they are stored in a tight container. Avoid leaving them out at room temperature for too long. If you notice any changes in smell or texture, it's best to throw them out. Yes, you can use frozen shrimp. Just thaw them first. Place them in cold water for about 15-20 minutes. After thawing, pat them dry with paper towels. This helps the coating stick better. If you don’t own an air fryer, you can bake the shrimp instead. Preheat your oven to 400°F (200°C). Place the shrimp on a baking sheet lined with parchment paper. Bake for about 12-15 minutes, flipping halfway. You won’t get the same crisp, but they will still taste great. To spice it up, add cayenne pepper to the flour mixture. Start with a pinch and adjust to your taste. You can also serve with a spicy dipping sauce, like sriracha or a spicy mayo. Absolutely! You can prepare the shrimp ahead of time. Coat them and store them in the fridge for 1 day. Just air fry them when you are ready to eat. These shrimp pair well with many sides. Try serving them with a fresh salad or rice. They also taste great with a side of sweet chili sauce or mango salsa for dipping. Enjoy the mix of flavors! This blog post covered how to make crispy air fryer coconut shrimp. You learned about the main ingredients, cooking steps, and various tips. The recipe allows for flavor changes and alternative cooking methods. You can enjoy this dish with different dipping sauces or side options. For quick snacks or special meals, this coconut shrimp is a winner. Try it out and savor the crunch!
    Air Fryer Coconut Shrimp Crunch Crispy and Tasty Treat
  • - 1 ½ cups all-purpose flour - 1 teaspoon baking powder - ½ teaspoon baking soda - ½ teaspoon salt - 1/3 cup poppy seeds - 1 cup granulated sugar - 1 large egg - ½ cup unsalted butter, melted and cooled - 1 teaspoon vanilla extract - 1 tablespoon lemon zest (about 1 lemon) - ½ cup fresh lemon juice (about 2-3 lemons) - ½ cup plain yogurt (or sour cream) To make the best Lemon Poppy Seed Loaf, gather your key ingredients. Each one plays a role in the flavor and texture of your loaf. First, use 1 ½ cups of all-purpose flour. This forms the base of your loaf. The flour gives structure and helps it rise. Next, add 1 teaspoon of baking powder and ½ teaspoon of baking soda. These leavening agents help your loaf rise while baking. Then, include ½ teaspoon of salt. This small amount enhances all the flavors. Now for the poppy seeds! You'll need 1/3 cup. They add a nice crunch and a pop of flavor. For sweetness, measure out 1 cup of granulated sugar. This balances the tartness of the lemon. You’ll also want 1 large egg. It helps bind the ingredients and adds moisture. Use ½ cup of unsalted butter, melted and cooled. This gives richness and a tender crumb. Next, add 1 teaspoon of vanilla extract for a warm, sweet aroma. For that fresh lemon flavor, include 1 tablespoon of lemon zest and ½ cup of fresh lemon juice. These give your loaf a bright and zesty taste. Finally, you need ½ cup of plain yogurt or sour cream. This keeps the loaf moist and adds tang. With these ingredients, you’re set to create a moist and tasty Lemon Poppy Seed Loaf that rivals any bakery treat! 1. Preheat your oven to 350°F (175°C). This is key for even baking. 2. Grease a 9x5-inch loaf pan. You can also add parchment paper for easy removal. 3. In a medium bowl, mix together: - 1 ½ cups all-purpose flour - 1 teaspoon baking powder - ½ teaspoon baking soda - ½ teaspoon salt - 1/3 cup poppy seeds Set this bowl aside for now. 4. In a large bowl, beat together: - 1 cup granulated sugar - 1 large egg Do this until the mixture is pale and fluffy, about 2-3 minutes. 5. Gradually add in the melted butter, lemon zest, lemon juice, and vanilla extract. Mix until well combined. 1. Start by adding half of the dry mixture to the wet mixture. Stir gently until just combined. 2. Pour in: - ½ cup plain yogurt (or sour cream) Mix again. 3. Add the rest of the dry ingredients, stirring until just combined. Be careful not to overmix. 1. Pour the batter into your prepared loaf pan. Smooth the top using a spatula. 2. Bake for 50-60 minutes. Check doneness by inserting a toothpick in the center. It should come out clean. 3. If the top browns too fast, loosely cover it with aluminum foil halfway through baking. 4. Once done, let the loaf cool in the pan for about 10 minutes. Then, move it to a wire rack to cool completely. - Ideal oven temperature: Set your oven to 350°F (175°C). This heat cooks the loaf evenly. - Importance of ingredient temperatures: Use room temperature butter and egg. This helps the batter mix well and rise nicely. - Dusting with powdered sugar: After cooling, slice the loaf. Lightly dust the top with powdered sugar for a sweet touch. - Lemon glaze option: Mix lemon juice with powdered sugar for a simple glaze. Drizzle it over the loaf for added flavor and shine. - Overmixing batter: Stir gently and stop mixing once combined. This keeps the loaf tender. - Checking doneness: Insert a toothpick in the center. If it comes out clean, your loaf is ready. Avoid opening the oven too early, as this can cause it to sink. {{image_2}} You can play with flavors in your lemon poppy seed loaf. Adding blueberries or raspberries gives a sweet twist. The tartness from these fruits balances the lemon well. You can fold in about one cup of fresh berries before baking. This makes your loaf colorful and fun. You might also want to try other citrus flavors. Blood orange or lime can add a unique taste. Just replace some lemon juice or zest with your chosen citrus. This change keeps the loaf fresh and exciting. If you seek healthier options, there are easy swaps. For sugar, you can use honey or maple syrup. These natural sweeteners add flavor and moisture. For butter, try applesauce or coconut oil instead. They will keep your loaf moist while cutting some fat. For those needing gluten-free options, swap all-purpose flour for gluten-free flour. Many brands work well in this recipe. Just make sure to check that your baking powder is gluten-free too. This way, everyone can enjoy a slice. Your lemon poppy seed loaf pairs well with drinks. It tastes great with tea or coffee. The bright lemon flavor complements hot drinks nicely. Slice the loaf and serve it warm or at room temperature. This loaf also shines as a brunch item. Serve it with a fruit salad or yogurt. It adds a lovely touch to any brunch spread. Whether for a family gathering or a quiet morning, it’s a delightful treat. To keep your lemon poppy seed loaf fresh, store it properly. The best way is to wrap it tightly in plastic wrap. This helps keep moisture in and prevents it from drying out. You can also place it in an airtight container. This method protects it from air and keeps it soft. If you want to save your loaf for later, freezing is a great option. First, let the loaf cool completely. Then, wrap it tightly in plastic wrap and place it in a freezer bag. This way, it can last up to three months in the freezer. When you're ready to enjoy it, simply take it out and let it thaw in the fridge overnight. You can also set it out at room temperature for a faster thaw. Enjoy your tasty treat whenever you like! You can use sour cream instead of yogurt. It gives a similar texture and taste. Another option is to use buttermilk. If you want a non-dairy choice, try coconut yogurt or almond yogurt. These options will keep your loaf moist and tasty. Check for a golden-brown color on top. Insert a toothpick into the center. If it comes out clean, your loaf is done. You can also gently press the top; it should spring back. If it's still wet, let it bake a bit longer. Yes, you can make a vegan lemon poppy seed loaf! Replace the egg with a flax egg. To do this, mix 1 tablespoon of ground flaxseed with 3 tablespoons of water. Let it sit for a few minutes until it thickens. Use coconut oil instead of butter and almond yogurt for a dairy-free option. You’ve learned how to make a delicious lemon poppy seed loaf. We covered essential ingredients, clear steps, and handy tips. I shared variations for flavor and healthier choices, plus storage methods. Baking is fun, but following these tips ensures good results. Enjoy serving this loaf with friends or at brunch. Remember, a few small changes can make a big difference. Embrace your baking journey!
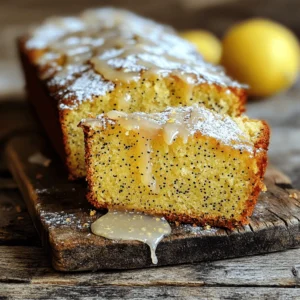
    Lemon Poppy Seed Loaf Bakery Style Fresh and Tasty Treat
  • - 2 pounds beef chuck, cut into 1-inch pieces - 8 ounces mushrooms, sliced (cremini or button) - 1 medium onion, finely chopped - 3 cloves garlic, minced - 4 cups beef broth - 2 tablespoons Worcestershire sauce - 1 tablespoon Dijon mustard - 1 teaspoon thyme, dried - 1 cup sour cream - 2 tablespoons all-purpose flour - Fresh parsley, chopped When I make slow cooker beef mushroom stroganoff, I focus on fresh and quality ingredients. The beef chuck is my first choice. It gets really tender and juicy after slow cooking. I cut it into 1-inch pieces for even cooking. I love mushrooms in this dish. I often use cremini or button mushrooms because they add a nice flavor. Sliced thin, they blend well with the sauce. Onions and garlic bring great depth to the dish. I chop the onion finely and mince the garlic. This way, they mix well with the beef and mushrooms. Next, the liquids and seasonings are key. I pour in 4 cups of rich beef broth. It adds flavor and moisture. Worcestershire sauce and Dijon mustard give that umami punch. I also add dried thyme for a hint of earthiness. For a creamier texture, I often use sour cream. Mixing it with flour helps thicken the sauce. Lastly, I like to sprinkle fresh parsley on top for a pop of color and freshness. With these ingredients, I know my stroganoff will be hearty and delicious. Each bite is a blend of flavors that warms the soul. First, gather your ingredients. You need beef, mushrooms, onion, and garlic. Cut the beef into 1-inch pieces. This helps it cook evenly. Next, slice the mushrooms and chop the onion finely. Mince the garlic. Now, add the beef chunks, sliced mushrooms, chopped onion, and minced garlic into your slow cooker. This mix is the heart of your stroganoff. Next, combine the liquids and seasonings. Pour in 4 cups of beef broth. Add in 2 tablespoons of Worcestershire sauce and 1 tablespoon of Dijon mustard. Sprinkle in 1 teaspoon of dried thyme and 1 teaspoon of paprika. Season with salt and pepper to taste. Stir well to mix everything together. Now, it’s time to cook. You can cook on low or high. Cooking on low takes 6-8 hours, while cooking on high takes 4-5 hours. I recommend low for the best flavor and tenderness. The longer cook time helps the beef become soft and juicy. Check the beef for tenderness around the end of the cooking time. It should easily fall apart with a fork. About 30 minutes before you serve, prepare the sour cream mixture. In a bowl, whisk 1 cup of sour cream with 2 tablespoons of flour, if you want a thicker sauce. This step is optional but adds creaminess. Stir this mixture into the stroganoff in the slow cooker. Let it cook for another 30 minutes on low. This helps thicken the sauce. Taste and adjust the seasoning if needed. While the stroganoff finishes, cook 12 ounces of egg noodles according to package instructions. Drain them once cooked and set aside. Serve the beef stroganoff over the noodles. Garnish with fresh chopped parsley for a pop of color and flavor. Enjoy your hearty meal! To boost the flavor of your stroganoff, use spices and herbs wisely. I love adding thyme and paprika for warmth. These spices enhance the beef's rich taste. You can also try adding a bay leaf while cooking. When it comes to seasoning, taste as you go. Start with salt and pepper, then adjust. Add more if needed, but do this slowly. A sprinkle of fresh parsley at the end adds brightness. You can thicken your sauce with flour or skip it entirely. If you choose flour, mix it with sour cream first. This keeps lumps from forming in your sauce. If you want a flour-free option, try cornstarch. Mix cornstarch with cold water to make a slurry. Stir this into the slow cooker for a smooth sauce. This beef stroganoff pairs well with egg noodles. Cook the noodles just before serving. Drain them and add to the plate. For a nice touch, garnish with fresh parsley. You can also serve it with crusty bread. This way, you can soak up the tasty sauce. Enjoy this meal with family or friends for a cozy dinner! {{image_2}} You can switch beef for other proteins in this dish. Chicken or turkey works well. For a plant-based option, try using mushrooms or tofu. Both can add a nice texture and flavor. You can use different types of mushrooms to change the taste. Try shiitake or portobello for a richer flavor. Adding herbs like rosemary or basil can also give a new twist. Experiment with spices like cumin or nutmeg for extra warmth. Serve this stroganoff over rice or mashed potatoes for a hearty meal. If you need a gluten-free option, use rice noodles or zucchini noodles instead of egg noodles. These swaps keep the dish delicious while meeting dietary needs. Store your leftover beef mushroom stroganoff in an airtight container. This keeps it fresh and tasty. You can keep it in the fridge for up to three days. When you're ready to eat, reheat it on the stove or in the microwave. Stir often to heat it evenly. If you find it too thick, add a splash of beef broth or water to loosen it up. For long-term storage, you can freeze the stroganoff. Make sure it cools completely before you pack it. Use freezer-safe containers or bags. This way, it won't get freezer burn. You can store it in the freezer for up to three months. When you're ready to eat, thaw it overnight in the fridge. Then, reheat it on the stove or microwave, adding more broth if needed. In the fridge, the stroganoff will last about three days. If you freeze it, aim to use it within three months for the best taste. After that, the flavor may fade, but it will still be safe to eat if properly stored. Always check for signs of spoilage before consuming. The best beef for stroganoff is beef chuck. This cut is tender and flavorful when slow-cooked. Other good options include sirloin or round cuts. These cuts are leaner but still work well. Always cut your beef into 1-inch pieces. This size helps it cook evenly in the slow cooker. Yes, you can use fresh mushrooms. Fresh mushrooms, like cremini or button, offer a stronger flavor. They also give a nice texture to your stroganoff. Canned mushrooms are softer and may lack some taste. If you choose fresh, slice them thinly for the best results. This helps them cook well and blend with the other flavors. To cook stroganoff in a regular pot, start by browning the beef. Use medium heat for about 5-7 minutes. Next, add the onions, garlic, and mushrooms. Stir them until they soften. After that, add the broth and seasonings. Let it simmer for about 1.5 to 2 hours. Stir occasionally until the beef is tender. Add the sour cream mixture towards the end to thicken the sauce. This method gives you a delicious meal without a slow cooker! You now have a complete guide to making beef stroganoff in a slow cooker. We covered the key ingredients, step-by-step methods, and useful tips for flavor and texture. You learned about variations, storage, and common questions. This dish is easy and flexible, allowing you to swap ingredients to fit your taste. I encourage you to try making it and enjoy the warm, rich flavors. With a few simple steps, you can impress your family and friends!
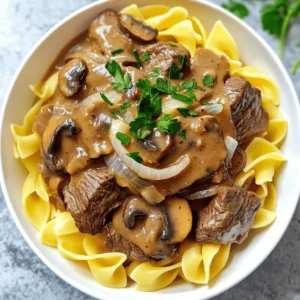
    Slow Cooker Beef Mushroom Stroganoff Hearty Meal
  • To make Minute Garlic Butter Chicken Bites, gather these items: - 1 lb (450g) boneless skinless chicken breasts, cut into bite-sized pieces - 4 tablespoons unsalted butter - 5 cloves garlic, minced - 1 teaspoon dried oregano - 1 teaspoon paprika - Salt and pepper to taste - 1 tablespoon fresh parsley, chopped (for garnish) - Zest and juice of 1 lemon When measuring, use a kitchen scale for the chicken. This ensures you have the right amount. For butter, use tablespoons. Use a knife to mince the garlic finely. For spices, a teaspoon works well. Accurate measuring helps your dish turn out perfect. If you need to swap ingredients, here are some ideas: - Chicken: Use turkey or firm tofu instead. - Butter: Olive oil works if you want a dairy-free option. - Garlic: Garlic powder can replace fresh garlic. Use less, about 1/8 teaspoon. - Herbs: Swap oregano for thyme or basil if you prefer. - Lemon: Lime juice and zest can give a different but tasty twist. Feel free to mix and match based on what you have. This recipe stays tasty no matter what! Start by cutting the chicken into bite-sized pieces. Use one pound of boneless, skinless chicken breasts. Next, season the pieces well. Sprinkle salt, pepper, paprika, and oregano over the chicken. Mix it well to ensure every piece gets flavor. Grab a large skillet and put it on medium heat. Add four tablespoons of unsalted butter to the skillet. Let the butter melt until it bubbles. Once melted, add five minced garlic cloves. Sauté the garlic for about one minute. Watch it closely so it doesn’t burn. Now, it’s time to add the chicken to the skillet. Place the seasoned chicken in a single layer. Cook the chicken for about three to four minutes on one side. You want it to turn golden brown. After that, flip the pieces over. Cook for another three to four minutes. Make sure the chicken reaches a safe temperature of 165°F (75°C). Once it’s done, squeeze the juice of one lemon into the skillet. Add the lemon zest, too. Stir everything together and let it cook for an extra minute. This helps mix all the yummy flavors. Finally, remove the skillet from heat and top with fresh chopped parsley for a bright finish. To boost the taste of garlic butter chicken bites, use fresh herbs. Fresh parsley adds color and flavor. You can also sprinkle some red pepper flakes for heat. If you like citrus, add zest from oranges or limes. This gives a fresh twist to your dish. To keep chicken tender, watch the cooking time. Cook for 3-4 minutes on each side. Check the internal temperature. It should be 165°F or 75°C. If you cook it too long, it can dry out. If you have a meat thermometer, use it for best results. Serve these bites in a warm skillet. Add lemon wedges on the side for extra flavor. They pair well with rice or a fresh salad. You can also serve them in tacos or as a sandwich. For a fun twist, try them with a dipping sauce. {{image_2}} You can make this dish even better by adding vegetables. Veggies add color and nutrition. Try bell peppers, zucchini, or broccoli. Cut them into small pieces. Add them to the skillet after the garlic. Sauté them for a few minutes. Then, add the chicken. The veggies will cook perfectly and soak up the garlic butter flavor. If you want to change the taste, use different seasonings. Instead of oregano, try thyme or basil. For more heat, add red pepper flakes. You can also use Italian seasoning for a twist. Experiment with what you have in your spice rack. Each blend will give your chicken a new flavor. You don’t have to stick with chicken. You can use shrimp, pork, or tofu. If using shrimp, cook them for about 2-3 minutes on each side. For pork, cut it into bite-sized pieces and cook until it reaches 145°F (63°C). Tofu works well too; just press it to remove water and cook until golden. Each protein will give a unique taste to the dish. Store leftover garlic butter chicken bites in an airtight container. Make sure to cool them first. They will stay fresh for up to three days in the fridge. When ready to eat, check for any off smells or changes in color. You can freeze these chicken bites too! Place them in a freezer-safe bag or container. Remove as much air as possible to prevent freezer burn. They will last for about two months in the freezer. For the best taste, eat them sooner rather than later. To reheat, use a skillet over medium heat. Add a bit of butter or oil to keep them moist. Cook for 5-7 minutes, stirring often, until heated through. You can also use a microwave. Heat in short intervals, checking often to avoid overcooking. Yes, you can use frozen chicken. Just remember to thaw it first. I suggest letting it sit in the fridge overnight. This way, the chicken cooks evenly. If you need to cook it faster, place it in cold water. Change the water every 30 minutes until thawed. Once thawed, cut it into bite-sized pieces and season as usual. Garlic butter chicken bites pair well with many sides. I love serving them with rice or pasta. You can also add a fresh salad for crunch. Roasted veggies like broccoli or bell peppers add color and nutrition. Feel free to get creative and mix your favorite sides! The best way to check chicken is by using a meat thermometer. The chicken should reach 165°F or 75°C. If you don’t have a thermometer, cut a piece in half. The meat should be white and the juices should run clear. If you see pink, keep cooking until it’s done. This blog post covered all you need for garlic butter chicken bites. We looked at ingredients, how to cook them, and tasty tips. You learned ingredient substitutions, cooking steps, and options for adding vegetables. Remember to store properly so your bites stay fresh. Use these ideas to make your meal fun and tasty. Now, you are ready to impress your family and friends with your cooking skills. Enjoy every bite!
    Minute Garlic Butter Chicken Bites Quick and Easy Meal
  • - 1 pound (450g) potato gnocchi - 2 cups cherry tomatoes, halved - 1 bell pepper (any color), sliced - 1 zucchini, sliced into half-moons - 1 red onion, cut into wedges - 3 tablespoons olive oil - Salt and pepper, to taste - 1/2 cup pesto (store-bought or homemade) - 1/4 cup grated Parmesan cheese (optional) - Fresh basil leaves for garnish These ingredients make a bright and tasty dish. The gnocchi adds a soft texture. Cherry tomatoes and bell peppers bring sweetness. Zucchini adds a nice crunch, while red onion gives a subtle kick. Olive oil helps all the flavors blend well. Pesto ties everything together with its herby notes. You can choose to add Parmesan for richness and a burst of flavor. Finally, fresh basil gives a lovely finish. - Preheat the oven to 425°F (220°C). - Line a large baking sheet with parchment paper. This helps with easy cleanup. - In a bowl, combine cherry tomatoes, bell pepper, zucchini, and red onion. - Drizzle with 2 tablespoons of olive oil. - Season with salt and pepper to taste. - Toss the veggies well to coat them evenly. - Spread the seasoned veggies out on the baking sheet. - Roast them in the oven for 15 minutes. This step brings out their natural sweetness. - While the veggies roast, bring a large pot of salted water to a boil. - Add the gnocchi to the boiling water. - Cook according to the package instructions until they float. This usually takes about 2-4 minutes. - Drain the gnocchi and set them aside. They should be soft and pillowy. - After 15 minutes, remove the baking sheet from the oven. - Add the cooked gnocchi to the roasted vegetables. - Drizzle the remaining tablespoon of olive oil and the pesto over the mix. - Toss gently to combine, being careful not to break the gnocchi. - Return the baking sheet to the oven and roast for another 10-15 minutes. - This final roast makes everything crispy and delicious. To get the best flavor, choose fresh vegetables. I like using cherry tomatoes, bell peppers, zucchini, and red onions. These add color and taste. You can mix in other veggies too, like asparagus or carrots. For even cooking, cut your veggies into similar sizes. This helps them roast at the same rate. When you spread them out, leave space so the heat can move around. Add the gnocchi later. This keeps it from getting mushy. Roast the veggies first, then mix in the gnocchi. You can use store-bought pesto for ease. But homemade pesto is often fresher and tastier. You can quickly make it with basil, garlic, nuts, and olive oil. To change the flavor, try adding lemon juice or Parmesan. You can also use nuts like walnuts or almonds. These will give your pesto a new twist. Presentation matters! Serve your dish hot on a large platter. Add fresh basil on top for color. A light drizzle of olive oil makes it shiny and appealing. Pair this meal with a green salad or crusty bread. These sides add texture and balance the meal. You can also serve it with a light wine for a special touch. {{image_2}} For a vegetarian delight, keep the cheese. You can swap out Parmesan for a vegan cheese. Nutritional yeast also adds a cheesy flavor without dairy. If you want to add more veggies, think about asparagus or carrots. Both add great taste and color. You can roast them just like the other veggies. Pesto is tasty, but you can try other sauces too. A simple tomato sauce gives a fresh twist. If you want something tangy, use a balsamic vinaigrette. Just drizzle it over the gnocchi and veggies before roasting. You can also try a yogurt dressing for a creamy touch. Each sauce changes the whole dish. Gnocchi comes in many forms. You can use cauliflower gnocchi for a lighter meal. It’s a great option for those who want fewer carbs. If you need gluten-free options, look for gluten-free pasta. Many brands offer great alternatives that taste just as good. This way, you can enjoy the dish without worries. To store leftovers, place them in an airtight container. Let the dish cool first. It will keep well in the fridge for about 3 to 4 days. Make sure to check for any signs of spoilage before eating. You can freeze this dish, but follow these steps. First, let it cool down completely. Then, transfer it to a freezer-safe container. Make sure to leave some space for expansion. It will last for about 2 to 3 months in the freezer. When ready to eat, thaw it overnight in the fridge. Reheat in the oven at 350°F (175°C) until warmed through. This helps keep its flavor and texture nice. Don't let leftovers go to waste! You can turn them into a tasty frittata. Just beat some eggs and mix in the gnocchi and veggies. Another idea is to blend them into a soup. Add broth and heat it up for a cozy meal. You can also use the leftovers in a wrap with some fresh greens for a quick lunch. The gnocchi is done when it floats to the top of the boiling water. This usually takes about 2 to 4 minutes. Watch closely as they cook. If they float, they are ready! You want them soft but not mushy. Overcooking makes them fall apart. Yes, you can use frozen gnocchi! Cook them straight from the freezer without thawing. Just add a couple of extra minutes to the cooking time. Frozen gnocchi may turn out softer than fresh ones. Adjust your cooking time for the best texture. I love using cherry tomatoes, bell peppers, zucchini, and red onions. These veggies add great flavor and color. You can also try carrots, asparagus, or broccoli. Just cut them into similar sizes for even cooking. The more colorful, the better the dish! You can prepare some parts ahead of time. Chop the veggies and store them in the fridge. Cook the gnocchi and let it cool before storing too. When ready to eat, combine everything and roast. This makes meal planning easy and fast! This blog post shared a tasty and easy recipe for roasted gnocchi and vegetables. You learned about key ingredients, cooking steps, and helpful tips to enhance your dish. Remember, you can mix and match flavors with variations like vegan options or different sauces. Proper storage and reusing leftovers can keep your meals fresh and exciting. With these ideas, you can create a delicious meal every time. Enjoy cooking and have fun experimenting with your ingredients!
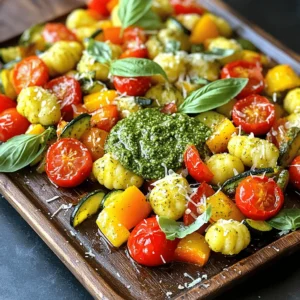
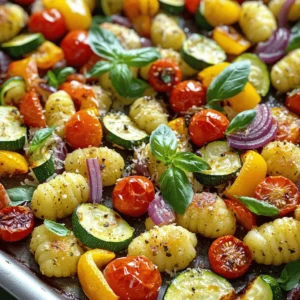
    Sheet-Pan Roasted Veggie and Pesto Gnocchi Delight
  • To make the luscious apple cider sangria, you will need: - 4 cups apple cider - 1 cup sparkling water - 1 orange, thinly sliced - 1 lemon, thinly sliced - 1 lime, thinly sliced - 1 apple, cored and diced - 1 cup fresh cranberries (or frozen) - 2 tablespoons honey or maple syrup (optional, for sweetness) - 1 cinnamon stick - Fresh mint leaves for garnish You can customize your sangria with these fun add-ins: - Other fruits like pears or peaches - A splash of brandy or rum - Ginger ale for extra fizz - Pomegranate seeds for a pop of color This sangria pairs well with: - Cheese and charcuterie boards - Roasted nuts or spiced popcorn - Grilled chicken or pork dishes - Pumpkin pie for a festive dessert These ingredients and pairings will help you create a drink that is perfect for any gathering. Enjoy! To make this sangria, gather your ingredients first. You will need apple cider, sparkling water, and fresh fruits. The prep time takes just 10 minutes. You can chill the drink in the fridge for 30 minutes. This helps all the flavors mix well. 1. Start by pouring 4 cups of apple cider into a large pitcher. 2. Next, add 1 cup of sparkling water. This gives your sangria a nice fizz. 3. Slice the orange, lemon, and lime thinly. Toss them into the pitcher. 4. Core and dice the apple. Add it to the mix along with 1 cup of cranberries. 5. If you like it sweeter, drizzle in 2 tablespoons of honey or maple syrup. 6. Add a cinnamon stick for warmth. Stir everything gently to combine. 7. Let the sangria chill in the fridge for at least 30 minutes. When ready to serve, fill glasses with ice. Pour the sangria over the ice and include some fruit. Garnish each glass with fresh mint leaves for a pop of color. Enjoy the bright flavors of autumn! To get the best flavor from your apple cider sangria, let it chill. After mixing, let it sit for at least 30 minutes. This time helps the fruits share their taste with the cider. You can even prepare it a few hours ahead of time. This way, flavors blend well. If you like a sweeter drink, add honey or maple syrup. Start with a small amount, then taste and adjust. Fresh fruits add a nice touch. Use a mix of sweet and tart fruits for balance. Serving your sangria in clear glasses shows off the colorful fruits. Add some ice to keep it cool. For a fancy look, garnish each glass with fresh mint leaves. You can also add extra slices of orange or lemon on the rim. This small touch makes a big impact. Use a large pitcher to serve, so everyone can see the pretty fruits inside. A bright tablecloth or napkins can enhance the overall look of your drink. One common mistake is using old or bland cider. Always choose fresh apple cider for the best taste. Avoid adding too much sweetness at first. You can always add more, but you can’t take it away. Don’t forget to include the cinnamon stick for warmth. Lastly, serve it cold. If your sangria sits out too long, it can get warm and lose its charm. Keep it chilled until it’s time to enjoy! {{image_2}} You can switch up the fruit in this sangria. Try using fruits like pears or peaches. They add a nice flavor and texture. You might also enjoy berries, like strawberries or blueberries. Each fruit gives a different taste that is fun to explore. Mix and match your favorites for a unique twist! If you want a non-alcoholic version, skip the alcohol. Use only apple cider and sparkling water. This makes a refreshing drink for everyone. You can also add a splash of ginger ale for extra fizz. It keeps the fun without the buzz! Change the fruits with the seasons to keep things fresh. In fall, use apples and cranberries. In winter, try blood oranges and pomegranates. In spring, add fresh strawberries and mint. In summer, enjoy juicy watermelon and citrus. These changes make your sangria special all year long! To store your apple cider sangria, pour it into a clean pitcher or jar. Make sure to cover it tightly with a lid or plastic wrap. This keeps the sangria fresh and tasty. If you have leftover fruit, you can keep it in the sangria. The fruit will soak up the flavors. Your sangria will stay good for about three days in the fridge. After three days, the fruit may start to break down. The flavors will also change over time. If you want the best taste, drink it within two days. You can reuse leftover sangria in creative ways! Use it in a smoothie for a fruity twist. You can also use it to soak fruit for desserts or use it in a glaze. This way, nothing goes to waste, and you get to enjoy those vibrant flavors again! Yes, you can make sangria ahead of time. I suggest making it a few hours before your event. This gives the flavors time to blend well. Just keep it in the fridge. If you make it the night before, it will taste even better. Just remember to add the fresh fruit right before serving. This keeps everything looking fresh and bright. You can easily adjust the sweetness of your sangria. Start with the apple cider, as it is sweet already. If you want it sweeter, add honey or maple syrup. I like to use two tablespoons as a starting point. Taste it and add more if needed. You can also use sweeter fruits like ripe apples or extra cranberries for more sweetness. For serving sangria, choose large glasses or wine glasses. These let you show off the colorful fruit inside. You can also use mason jars for a fun twist. Make sure the glass is big enough for ice and fruit. This provides a lovely presentation and a refreshing drink for your guests. In this post, we explored how to make a delicious sangria. We covered the key ingredients, optional add-ins, and perfect pairings. I shared step-by-step instructions to help you prepare and serve it right. Tips and tricks included how to enhance flavor and avoid common mistakes. We also looked at fun variations and storage tips for your sangria. Making sangria should be fun. Now you can impress friends with your skills! Enjoy trying different mixes and flavors. Happy sipping!
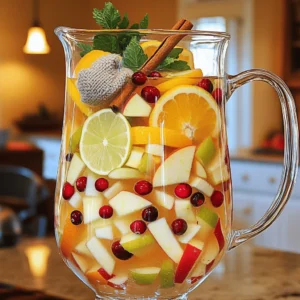
    Luscious Apple Cider Sangria with Fresh Fruit Recipe
  • - 2 ¼ cups all-purpose flour - 2 teaspoons ground ginger - 1 teaspoon ground cinnamon - ½ teaspoon ground cloves - ½ teaspoon salt - 1 teaspoon baking soda These dry ingredients create a warm, spiced base for your cookies. The flour gives structure, while the spices provide that cozy flavor. Ginger leads the way, with cinnamon and cloves adding depth. Salt balances the sweetness. Baking soda helps the cookies rise and crinkle. - ¾ cup unsalted butter, softened - 1 cup brown sugar, packed - 1 large egg - ¼ cup molasses The wet ingredients bring moisture and sweetness. Softened butter mixes easily with brown sugar, making the dough creamy. The egg acts as a binder, while molasses delivers rich flavor and color. This mix makes your cookies soft and chewy. - ½ cup granulated sugar This sugar is for rolling the cookie dough balls. It adds a sweet crunch to the outside. The sugar creates that lovely crinkle effect as the cookies bake. This step is key for both texture and appearance. 1. Preheat your oven to 350°F (175°C). Line two baking sheets with parchment paper. 2. In a bowl, whisk together the dry ingredients: flour, ground ginger, ground cinnamon, ground cloves, salt, and baking soda. Set this mix aside. 3. In a large bowl, cream the softened butter and brown sugar. Mix until it feels light and fluffy, about 3 to 4 minutes. 1. Beat in the egg and molasses. Mix until everything is well combined. 2. Gradually add the dry ingredients to the wet mix. Stir gently until just combined. Avoid overmixing to keep your cookies soft. 1. Chill the dough in the fridge for at least 30 minutes. This makes it easier to handle. 2. Once chilled, scoop out the dough into tablespoon-sized balls. Roll each ball in granulated sugar to coat nicely. 3. Place the dough balls on the prepared baking sheets. Space them about 2 inches apart for even baking. 4. Bake the cookies for 8 to 10 minutes. They should spread out and show cracks on top but stay soft. 5. Let the cookies cool on the baking sheets for 5 minutes. Then, transfer them to wire racks to cool completely. Chilling the dough is key for great cookies. It makes the dough easier to handle. When dough is cold, it holds its shape better. I suggest chilling it for at least 30 minutes. This step makes a big difference. Mixing the dough should be quick. Overmixing can make cookies tough. You want them soft and chewy. Mix until just combined, and avoid beating too long. This keeps the texture light. Adding extra spices can boost the flavor. For more warmth, try adding a bit of nutmeg or allspice. These spices give depth and make each bite special. Experiment with small amounts to find your sweet spot. Using dark brown sugar adds richness. It contains more molasses than light brown sugar. This makes your cookies taste more complex and delicious. If you want a deeper flavor, choose dark brown sugar. Serve your cookies on a pretty platter. A decorative touch can impress your guests. You can dust them with powdered sugar for a snowy look, too. This adds a fun detail. Pair these cookies with warm drinks like tea or coffee. The flavors complement each other well. This makes for a cozy treat. You can also serve them with ice cream for a delightful dessert. {{image_2}} You can switch out some ingredients to suit your needs. If you want a dairy-free version, try using coconut oil or vegan butter instead of unsalted butter. For sugar, use coconut sugar or maple syrup. These swaps keep the cookies tasty. If you need gluten-free cookies, swap all-purpose flour with almond flour or a gluten-free blend. These options work well and keep the cookies soft and chewy. Want to mix things up? Add chocolate chips or nuts to the dough. Chocolate adds a rich flavor, while nuts give a nice crunch. Both make the cookies even more delightful. You can also add citrus zest, like orange or lemon, for a fresh twist. This small change brightens up the taste and brings a unique flavor to each bite. For the holidays, swap the spices for seasonal favorites. You can add nutmeg or allspice for a festive flavor. These changes make the cookies perfect for holiday gatherings. When it comes to presentation, get creative! Decorate the cookies with icing or festive sprinkles. You can arrange them on a platter with seasonal fruits for a beautiful display. These small touches make your cookies stand out! To keep your Spiced Ginger Molasses Crinkle Cookies fresh, use airtight containers. This prevents air from making them dry. Place layers of cookies with parchment paper to avoid sticking. Store them at room temperature. They stay fresh for up to one week. After that, they still taste good but may lose some softness. You can freeze the cookie dough for later use. First, scoop out the dough into balls. Place them on a baking sheet and freeze until solid. Then, transfer the dough balls to a freezer bag. They can last up to three months in the freezer. When ready to bake, just take out the dough. Let it thaw in the fridge overnight, or bake straight from frozen. Just add a minute or two to the bake time. To restore the softness of your cookies, use the microwave. Heat them for about 10 seconds at a time. This warms them without making them hard. You can also use the oven. Preheat it to 300°F (150°C) and warm the cookies for about 5 minutes. Be careful not to overbake, as this can dry them out. Enjoy your cookies just as fresh as when you first made them! How do you make the cookies chewy vs. crispy? To make these cookies chewy, you should not overmix the dough. This keeps them soft. Chilling the dough also helps. If you want them crispy, bake a little longer. The edges should turn golden brown. Can I use another type of sugar? Yes, you can use white sugar instead of brown sugar. However, the flavor may change. Brown sugar adds moisture and a rich taste. If you use white sugar, the cookies may be less chewy. What should I avoid when making molasses cookies? Avoid overmixing the dough. This can make the cookies tough. Also, do not skip chilling the dough. Chilling helps cookies hold their shape and makes them easier to handle. Can I double the recipe? Yes, you can double the recipe. Just mix the ingredients in a large bowl. Make sure you have enough space on your baking sheets. You may need to bake in batches. What drinks pair well with Spiced Ginger Molasses Crinkle Cookies? These cookies go well with warm drinks. Try pairing them with tea or coffee. Hot cider also complements the spices nicely. Ideas for serving with ice cream or other desserts Serve these cookies warm with vanilla ice cream. The mix of warm and cold is amazing. You can also crumble them on top of desserts like pudding for a nice crunch. This blog post covered how to make delicious Spiced Ginger Molasses Crinkle Cookies. We looked at key ingredients, steps for making the dough, and important tips for getting that perfect crinkle. Remember, chilling the dough and using dark brown sugar can enhance flavor. Don’t forget the fun variations and storage tips to keep your cookies fresh. Baking should be enjoyable, so experiment and make it your own. Happy baking and enjoy your cookies!
    Spiced Ginger Molasses Crinkle Cookies Delight
  • - 4 medium russet potatoes, washed and cut into wedges - 3 tablespoons olive oil - 1 cup grated Parmesan cheese - 1 teaspoon garlic powder - 1 teaspoon onion powder - 1 teaspoon paprika - 1/2 teaspoon dried oregano - Salt and pepper to taste - Fresh parsley, chopped These ingredients make your air fryer crispy Parmesan potato wedges a must-try. First, choose medium russet potatoes. They have the right texture for frying. Wash them well to remove dirt, then cut them into wedges. The size matters; aim for uniform pieces to cook evenly. Next, olive oil is key. It helps the spices stick and gives a nice crisp. Use three tablespoons for four potatoes. Grated Parmesan cheese is a star ingredient. It adds a rich, cheesy flavor. Use about one cup, and don't shy away from more if you love cheese! For seasoning, combine garlic powder, onion powder, paprika, and oregano. Each spice brings its unique taste. Salt and pepper enhance everything, so adjust these to your liking. Fresh parsley is optional but adds a bright touch. Use it as a garnish for color and taste. These ingredients blend to create a delicious snack or side. Enjoy the crunch and flavor of these Parmesan potato wedges! - Preheat the air fryer to 400°F (200°C). - Wash 4 medium russet potatoes. Cut them into wedges. - In a large bowl, mix 3 tablespoons of olive oil with garlic powder, onion powder, paprika, oregano, salt, and pepper. - Toss the potato wedges in that marinade until they are fully coated. - Sprinkle 1 cup of grated Parmesan cheese over the wedges. Toss again to help cheese stick. - Place the wedges in the air fryer basket. Lay them in a single layer. Avoid overcrowding the basket. - Air fry for 15-20 minutes. Shake the basket halfway to help them cook evenly. - Once golden and crispy, take the wedges out. Let them cool slightly before serving. - Garnish with chopped parsley for a fresh touch. To get those perfect crispy wedges, focus on an even coating. When you coat the potatoes in the marinade, make sure each wedge is covered well. This helps the flavor stick and gives you that crunch. If you don’t coat them evenly, some potatoes may taste bland or be soggy. Avoid overcrowding in the air fryer basket. If you pack in too many wedges, they won’t cook evenly. The hot air needs space to circulate. I usually cook in batches if I have a lot of wedges. This way, each one turns out nice and crispy. Want to spice things up? You can add other spices to the marinade. Try adding chili powder for heat or Italian seasoning for a herb boost. You can also mix in some lemon zest for a fresh kick. Marinade variations can change the whole dish. You could soak the wedges in buttermilk for a tangy taste. Or use a splash of hot sauce for some extra flavor. The options are endless, so have fun experimenting! When it's time to serve, think about what goes well with your wedges. They pair nicely with dips like ranch or garlic aioli. You could also serve them with a side salad or grilled chicken for a complete meal. For a nice presentation, place the wedges on a large platter. Garnish with fresh parsley for color. You can add a small bowl of dip in the center. This will impress your guests and make your dish look even better! {{image_2}} You can swap out the Parmesan cheese for other types. Cheddar cheese adds a rich, sharp flavor to your wedges. Just shred it and sprinkle it on in the same way. For those who prefer vegan options, use vegan cheese shreds. They melt well and still give that cheesy taste. Want to spice things up? Add a pinch of cayenne pepper to the seasoning mix. This gives your potato wedges a nice kick. If you enjoy herbs, try mixing in rosemary or thyme. These herbs bring a fresh taste to the dish. Sweet potatoes are a tasty alternative to russet potatoes. They offer a different flavor and a bit more sweetness. When using sweet potatoes, slice them a bit thinner than regular potatoes. This helps them cook evenly. Adjust the cooking time to about 12-15 minutes, as sweet potatoes can cook faster. Enjoy the new twist on this classic recipe! To keep your crispy potato wedges fresh, store them in the fridge. Use an airtight container to prevent moisture. This helps them stay tasty and not soggy. They stay good for about three days. If you made a big batch, divide them into smaller portions for easy access. To reheat and keep the crispiness, use the air fryer. Preheat it to 400°F (200°C). Place the wedges in the basket for about 5-7 minutes. This method brings back the crunch. If you use a microwave, your wedges may get soft. Adjust your time based on how many you reheat. Yes, you can freeze potato wedges! Before freezing, let them cool completely. Then, place them in a single layer on a baking sheet. Once frozen, transfer them to a freezer bag. When you want to eat them, thaw overnight in the fridge. Cook them in the air fryer for the best results. You can air fry potato wedges for 15 to 20 minutes at 400°F. This time range helps them get golden and crispy. Make sure to check them halfway through. Shake the basket to ensure even cooking. If you like them extra crispy, add a few more minutes. Yes, you can! If you don’t have an air fryer, use the oven. Preheat your oven to 425°F. Spread the coated potato wedges on a baking sheet. Bake for 25 to 30 minutes. Flip the wedges halfway through for even cooking. They will still be delicious and crispy. These wedges pair well with many dips. Try ketchup, ranch, or garlic aioli for a tasty treat. You can also serve them as a side dish with grilled meats or burgers. They add a crunchy element to any meal. Enjoy them warm and fresh! This blog post covered how to make crispy Parmesan potato wedges in an air fryer. We discussed the key ingredients, from medium russet potatoes to tasty seasonings. You learned step-by-step instructions for preparation, marinating, and cooking. Tips for achieving the best crispy texture were shared, along with serving suggestions for flavor and presentation. You also discovered variations and storage information. Enjoy your cooking adventure! You can create delicious potato wedges to impress everyone.
    Air Fryer Crispy Parmesan Potato Wedges Delight
  • - 4 boneless, skinless chicken breasts - 2 tablespoons olive oil - 1 teaspoon Italian seasoning - Salt and pepper to taste The chicken is the star of this dish. I use boneless, skinless chicken breasts for a tender bite. Olive oil helps brown the chicken while adding flavor. I season it with Italian seasoning, salt, and pepper, which gives it a nice kick. - 1 cup heavy cream - ½ cup grated Parmesan cheese - 1 tablespoon lemon juice For the creamy sauce, I add heavy cream. It makes the sauce rich and smooth. Grated Parmesan cheese brings a salty depth to the flavor. A splash of lemon juice adds brightness, cutting through the creaminess perfectly. - 2 cups fresh spinach - 1 cup cherry tomatoes, halved - Fresh basil leaves, for garnish Fresh spinach adds color and nutrients. The cherry tomatoes burst with sweetness, enhancing the dish. I finish with fresh basil leaves for an aromatic touch. This mix of ingredients creates a delightful balance of flavors. Seasoning the Chicken Start by seasoning the chicken breasts. Use one teaspoon of Italian seasoning, salt, and pepper. Rub the spices on both sides. This step adds great flavor to the chicken. Cooking the Chicken Heat two tablespoons of olive oil in a large skillet over medium heat. Place the seasoned chicken in the skillet. Cook for about 6 to 7 minutes on each side. You want the chicken to be golden brown and fully cooked. Once done, remove the chicken and set it aside. Sautéing Garlic and Tomatoes In the same skillet, add three minced garlic cloves. Cook for about one minute until fragrant. Then, add one cup of halved cherry tomatoes. Cook for another 2 to 3 minutes. You want the tomatoes to soften and release their juices. Combining Ingredients for the Sauce Lower the heat and stir in one cup of heavy cream, half a cup of grated Parmesan cheese, and one tablespoon of lemon juice. Mix well. The cheese should melt and create a creamy sauce. Adding Spinach and Chicken Add two cups of fresh spinach and the cooked chicken back to the skillet. Stir gently to coat the chicken in the sauce. Let it simmer for about 5 minutes. This allows the spinach to wilt and the flavors to meld. Adjusting Seasoning Taste the dish and adjust the seasoning with salt and pepper as needed. This step is crucial for enhancing the overall flavor. Once it’s perfect, remove from heat and serve. Ensuring Juicy Chicken To keep the chicken juicy, don’t skip the seasoning. Use salt and pepper generously. This helps the flavors stick. Cook the chicken over medium heat for even cooking. Don't rush it. I cook each side for about six to seven minutes. Make sure the internal temperature reaches 165°F for safety. Perfecting the Sauce Consistency For a creamy sauce, use heavy cream. It gives a rich flavor and smooth texture. If the sauce is too thick, add a splash of chicken broth or water. This helps to loosen it while keeping it creamy. Stir the sauce well to combine all the flavors. Alternatives for Heavy Cream If you want a lighter option, use half-and-half. You can also mix milk with cornstarch. This gives a creamy feel but with fewer calories. For a dairy-free choice, coconut cream works well too. It adds a nice flavor and richness. Choosing Different Veggies You can switch the spinach for kale or Swiss chard. These greens also taste great and add nutrients. For color, try bell peppers or zucchini. They add crunch and flavor to the dish. Best Accompaniments This dish pairs well with pasta or rice. They soak up the creamy sauce nicely. You can serve it with a side salad for freshness. Garlic bread is also a great choice to complete the meal. Presentation Tips For a beautiful look, plate the chicken with sauce on top. Sprinkle fresh basil leaves for color. Adding cherry tomatoes around the plate makes it pop. A sprinkle of grated Parmesan on top adds a nice touch. {{image_2}} Adding Spices You can boost flavor by adding spices. Try a pinch of red pepper flakes for heat. A sprinkle of smoked paprika adds depth. You can also use fresh herbs like thyme or oregano. Each spice changes the dish's taste, so experiment to find your favorite. Incorporating Different Cheeses Parmesan cheese is classic, but you can mix it up. Try using feta cheese for a tangy twist. Mozzarella melts well for a creamy texture. Goat cheese adds a rich flavor. Each cheese brings its own character to the sauce. Using Skinless Chicken Thighs If you prefer dark meat, skinless chicken thighs are a great choice. They stay juicy and add more flavor. Thighs also cook well in the creamy sauce. This option can make the dish more tender and rich. Low-Carb Options For a low-carb meal, swap heavy cream with cauliflower puree. This keeps the creaminess but cuts carbs. You can also serve it over zucchini noodles or cauliflower rice. These swaps make the dish lighter yet satisfying. Dairy-Free Alternatives To make this dish dairy-free, use coconut cream instead of heavy cream. Nutritional yeast can replace cheese for a cheesy flavor. These swaps keep the dish creamy and rich without dairy. Gluten-Free Modifications This recipe is naturally gluten-free, but be sure to check all labels. Some chicken broth may contain gluten. Using gluten-free broth ensures safety. Enjoy the creamy sauce without worrying about gluten! After cooking, allow the dish to cool. Place leftovers in an airtight container. This keeps the meal fresh and prevents odors. When stored properly, One-Pan Creamy Tuscan Chicken with Spinach lasts about 3 to 4 days in the fridge. Be sure to check for any signs of spoilage before eating. If you want to store it longer, freeze the leftovers. First, cool the dish completely. Then, transfer it to a freezer-safe container. Leave some space at the top, as the sauce may expand. Properly frozen, this dish can last for up to 3 months. To reheat, thaw overnight in the fridge. Then, heat it gently in a pan over low heat. Stir in a splash of cream to restore its creamy texture. Enjoy the same great taste! What can I substitute for heavy cream? You can use coconut milk or a mix of milk and butter. Both will add creaminess. If you want a lighter option, try Greek yogurt. Just mix it in slowly to avoid lumps. Can I make this dish ahead of time? Yes, you can prepare the chicken and sauce in advance. Store them in the fridge for up to two days. Just reheat gently before serving. How can I tell if the chicken is cooked? The chicken should reach an internal temperature of 165°F. You can cut into it to check if the juices run clear. If there is any pink, cook it a bit longer. What’s the best way to reheat this dish? Reheat on the stove over low heat. Add a splash of cream or broth to keep it creamy. Stir gently until warm. Are there alternative herbs I can use? Yes! You can use fresh thyme or rosemary instead of Italian seasoning. Each herb brings a unique flavor. Experiment to find your favorite. Can I add more vegetables? Absolutely! Bell peppers, zucchini, or mushrooms work great in this dish. Just sauté them along with the garlic for best results. This blog post explored a delicious chicken dish, from main ingredients to clever tips. We discussed how to prepare juicy chicken, make a creamy sauce, and finish with fresh ingredients. You learned about ingredient substitutions and variations for different diets. Our storage tips keep leftovers fresh. In the end, this dish is flavorful, adaptable, and easy to store. Enjoy trying new flavors and impressing your friends and family. Cooking can be fun and rewarding using these simple steps!
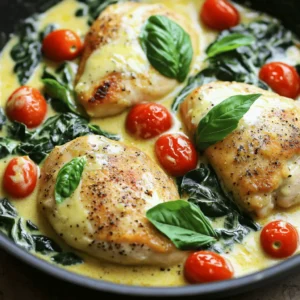
    One-Pan Creamy Tuscan Chicken with Spinach Delight
  • To make the Warm Salted Caramel Apple Galette, you need simple and fresh ingredients. Here is the list: - 1 pie crust (store-bought or homemade) - 3 large apples (e.g., Granny Smith, Honeycrisp) - 1/3 cup brown sugar - 1 tablespoon lemon juice - 1 teaspoon ground cinnamon - 1/4 teaspoon nutmeg - 1 tablespoon all-purpose flour - 1/3 cup salted caramel sauce - 1 egg, beaten (for egg wash) - Sea salt flakes (for topping) - 1 tablespoon unsalted butter Each ingredient adds a unique flavor. The apples bring sweetness and tartness. Brown sugar adds depth. Lemon juice brightens the dish. The spices like cinnamon and nutmeg give warmth. Flour helps the filling thicken. Salted caramel sauce brings a rich, sweet touch. The egg wash gives the crust a nice shine. Sea salt flakes add a delightful contrast. Lastly, butter adds richness to the filling. Gathering these items sets you up for success. Enjoy the process and the flavors! Start by peeling and coring your apples. I like to use Granny Smith or Honeycrisp. These apples add great flavor. Slice them thinly and place them in a large bowl. Add 1/3 cup of brown sugar, 1 tablespoon of lemon juice, 1 teaspoon of ground cinnamon, and 1/4 teaspoon of nutmeg. Sprinkle in 1 tablespoon of all-purpose flour to help thicken the filling. Toss everything together until the apples are well coated. Let this mix sit for about 10 minutes. This allows the flavors to blend beautifully. If you choose homemade pie crust, roll it out on a floured surface. Aim for a 12-inch circle. If you use store-bought crust, simply unroll it on a parchment-lined baking sheet. The crust should be about 1/8 inch thick. This thickness helps create a nice, flaky texture. Now it’s time to put everything together. Place the apple filling in the center of your rolled-out crust. Make sure to leave about a 2-inch border all around. Drizzle 1/3 cup of salted caramel sauce over the apples. This adds that sweet, salty flavor we love. Carefully fold the edges of the crust over the apples. Pleat the crust as needed to create a rustic look. Preheat your oven to 400°F (200°C). Brush the crust edges with a beaten egg to get a golden color. Sprinkle sea salt flakes over the caramel sauce. Dot the apples with 1 tablespoon of small butter pieces for richness. Bake your galette for 25 to 30 minutes. Look for a golden brown crust and tender apples. After baking, let the galette cool for about 10 minutes. This helps the filling set a bit. Slice it up and serve warm. Drizzle with extra salted caramel sauce if you like. Enjoy the sweet and salty goodness! Choosing the right apples makes a big difference. I like to use a mix of tart and sweet apples. Granny Smith apples add zing, while Honeycrisp apples give a nice sweetness. Aim for three large apples, and make sure they are firm. This helps them hold up during baking. A flaky crust makes this galette shine. If you use store-bought crust, let it sit at room temperature first. For homemade, keep your butter cold. This keeps the crust light and flaky. Roll it out evenly to about 12 inches wide. A rustic look is part of the charm, so don’t stress about perfection! You can use homemade or store-bought salted caramel sauce. If you want to make your own, cook sugar until it melts, then add cream and salt. It’s easy and tastes amazing! If you’re short on time, store-bought works well too. Just warm it slightly before pouring over the apples. This galette is best served warm. I love to drizzle extra salted caramel sauce on top. A scoop of vanilla ice cream adds a creamy touch. You can also sprinkle some sea salt flakes for a nice finish. This dessert is perfect for cozy nights or special gatherings. {{image_2}} You can change the taste of the galette with spices and fruits. Try adding ginger or allspice to the apple filling for a warm kick. You can also mix in some dried cranberries or raisins for extra sweetness. For a twist, use pears or berries instead of apples. Each fruit brings its own unique flavor and texture. If you want a gluten-free galette, use a gluten-free pie crust. You can find many options at stores or make one at home. For a vegan version, swap the egg wash with a plant-based milk like almond or oat. Replace the butter with coconut oil for a rich taste without dairy. These adjustments let everyone enjoy this treat. To make your galette look stunning, serve it on a rustic wooden board. You can dust it lightly with powdered sugar for a sweet touch. Add fresh mint leaves for color and aroma. Drizzle more salted caramel sauce over the top right before serving. These small details transform your galette into a showstopper. To keep your galette fresh, let it cool completely. Then, cover it with plastic wrap or foil. Store it in the fridge for up to three days. This helps maintain the flavor and texture of the apples and crust. When you're ready to enjoy your galette again, preheat your oven to 350°F (175°C). Place the galette on a baking sheet. Heat for about 10–15 minutes or until warm. This keeps the crust crispy while warming the apples and caramel. If you want to save some for later, you can freeze the galette. Wrap it tightly in plastic wrap, then in foil. It can stay in the freezer for up to two months. To eat, thaw it in the fridge overnight, then reheat in the oven as mentioned above. If you don’t have caramel sauce, you can use honey or maple syrup. Both add a sweet touch. You could also make a quick caramel at home with sugar and butter. Just melt sugar until golden, then stir in butter and cream. It’s simple and quick! You’ll know the galette is done when the crust is golden brown. The apples should be soft but not mushy. You can check the apples by poking them with a fork. If they give easily, it’s ready to come out! Yes, you can make the galette ahead of time. Prepare the filling and crust separately. Store them in the fridge for up to a day. When you are ready, assemble and bake. It’s a great way to save time! To reheat, place the galette in a preheated oven at 350°F. Bake for about 10-15 minutes. This warms it through and keeps the crust crispy. You can also use a microwave, but it might make the crust soft. This blog shows you how to make a delicious apple galette. You learned about the right ingredients, detailed steps, and helpful tips. The variations and storage info give you many options to try. Making this dessert is fun and simple. Enjoy experimenting with flavors and sharing your galette. You can impress your friends and family with this tasty treat. Happy baking!
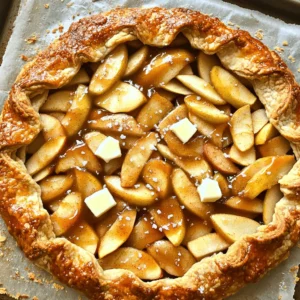
    Warm Salted Caramel Apple Galette Irresistible Bake
  • To make a delicious high-protein pumpkin pie smoothie, you'll need some simple ingredients. Here’s the list: - 1 cup unsweetened almond milk - 1/2 cup canned pumpkin puree - 1 ripe banana - 1 scoop vanilla protein powder - 1 teaspoon pumpkin pie spice - 1 tablespoon almond butter - 1 tablespoon maple syrup (optional) - Ice cubes (as needed for desired consistency) These ingredients work together to create a creamy and tasty smoothie. The almond milk gives it a light base. Canned pumpkin puree brings in that rich, fall flavor while adding nutrients. The ripe banana adds natural sweetness and creaminess. Vanilla protein powder boosts the protein level, making this smoothie a great post-workout treat. Pumpkin pie spice adds a warm, inviting aroma. Almond butter contributes healthy fats and a nutty flavor. If you like it sweeter, maple syrup is a nice touch, but it’s optional. Finally, ice cubes help adjust the smoothie’s thickness and chill it to perfection. Now that you have all the ingredients, you're ready to blend! 1. In a blender, combine 1 cup of unsweetened almond milk and 1/2 cup of canned pumpkin puree. Blend until smooth. 2. Next, add 1 ripe banana, 1 scoop of vanilla protein powder, 1 teaspoon of pumpkin pie spice, and 1 tablespoon of almond butter. If you like, add 1 tablespoon of maple syrup for sweetness. 3. Blend everything on high until it is creamy and well mixed. - If your smoothie is too thick, add a splash more almond milk or some ice cubes. This will help you reach the consistency you want. - Taste the smoothie. If it needs more sweetness, add a bit more maple syrup. Blend again to mix. - Once blended, pour the smoothie into a large glass or bowl. - For a nice touch, sprinkle some pumpkin pie spice on top. You can also add almond slices for extra flair. Serving it in a mason jar looks great too! To achieve the right consistency for your smoothie, start with the right ratio of liquid to solids. Use 1 cup of unsweetened almond milk and 1/2 cup of canned pumpkin puree. This balance gives a nice creamy base. If your smoothie is too thick, add more almond milk or a few ice cubes. Ice not only cools the drink but can also help thin it out. For the best creaminess, blend at a high speed. First, mix the almond milk and pumpkin puree until smooth. Then, add all other ingredients. Blend until everything is well combined. This method ensures a silky texture without lumps. Looking for alternate protein sources? Try using Greek yogurt instead of protein powder. It adds creaminess and a protein boost. You can also use plant-based protein powder for a vegan option. For dairy-free options, consider coconut yogurt instead of almond butter. This switch adds a unique flavor. You can also use cashew milk if almond milk is not available. Using fresh spices can elevate your smoothie. Freshly grated nutmeg or cinnamon packs more flavor than pre-mixed spices. You can also add a pinch of ginger for a zesty kick. Adjusting sweetness is key. If you prefer a sweeter smoothie, start with 1 tablespoon of maple syrup. Taste your blend and add more if needed. Everyone's sweet tooth is different, so adjust to your liking! {{image_2}} You can change the taste of your pumpkin pie smoothie easily. One fun way is to add cocoa powder. This gives your smoothie a rich chocolate flavor. Simply mix in one tablespoon of cocoa powder with the other ingredients. It adds a nice depth to the taste without overpowering it. Another option is to switch up the nut butter. If you prefer, use peanut butter or cashew butter instead of almond butter. Each nut butter brings its own unique flavor. You can try different combinations to find what you like best. If you want extra protein, Greek yogurt works great. Just add a half-cup to your smoothie. It will make your drink creamier and boost the protein level. This option is perfect for those who need more protein in their diet. For those looking to cut carbs, you can use unsweetened protein powder. This keeps the smoothie low in carbs while still being filling. It’s a great choice for anyone watching their carb intake. This smoothie fits right into the fall season. You can add seasonal flavors like ginger or nutmeg. Just a pinch can give it a nice autumn twist. You can also sprinkle some chopped pecans on top for crunch. For holiday-themed smoothies, think about adding peppermint extract. Just a drop can make it festive. You could also blend in some cinnamon for a warm, cozy flavor. These small changes can make your smoothie feel special for the holidays. To keep your high-protein pumpkin pie smoothie fresh, store it in a sealed jar. The fridge is the best place for it. Make sure you drink it within 24 hours for the best taste. If you want to save some for later, you can freeze it. Use an ice cube tray, pour in the smoothie, and freeze it in cubes. This way, you can grab a cube or two when you want a quick snack. Smoothies are best fresh, but sometimes you may need to refresh one. If your smoothie is in the fridge, just shake it well before drinking. You can also blend it again for a smoother texture. If your smoothie is frozen, let it thaw in the fridge overnight. After it’s thawed, blend it again to bring back the creamy texture. Avoid microwaving, as it can change the taste and texture. Your smoothie should stay fresh for about 24 hours in the fridge. After that, it may lose flavor and texture. Look for signs that it has gone bad. If it smells sour or has an odd color, it's best to toss it. Always trust your senses; if it doesn't look or smell right, don't drink it. What are the health benefits of a high-protein smoothie? High-protein smoothies are great for many reasons. They help build muscle and keep you full longer. The protein helps repair tissues and keeps your energy steady. With the pumpkin and banana, you also get fiber and vitamins. This mix supports your immune system and helps digestion. Can I make this smoothie vegan? Yes, this smoothie can easily be vegan! Simply use plant-based protein powder. Make sure your almond milk is unsweetened and dairy-free. The almond butter is already vegan, so you’re good to go. Skip the maple syrup if you want to cut back on sugar. How can I make this recipe more filling? To make it more filling, consider adding a few things. You can include a tablespoon of chia seeds or flaxseeds. These add healthy fats and fiber. Another option is to use Greek yogurt for extra protein. You can also add oats for a heartier texture. Caloric content and macronutrient breakdown This smoothie packs around 300 calories. It has about 20 grams of protein, 40 grams of carbs, and 10 grams of fat. This makes it a balanced drink for any meal or snack. The pumpkin adds vitamins A and C, while the banana gives potassium. Comparison with traditional pumpkin pie Compared to traditional pumpkin pie, this smoothie is much lighter. A slice of pumpkin pie can have over 300 calories and a lot of sugar. This smoothie gives you the same great flavors without all the extra calories. It’s a smart choice for a healthy treat. Best times to enjoy this smoothie You can enjoy this smoothie any time of day! It's perfect for breakfast or a post-workout snack. I love having it as a quick lunch too. It keeps me full and satisfied. Pairing ideas for meals or snacks This smoothie pairs well with many foods. Try it with whole-grain toast or a healthy muffin. You can also enjoy it with some nuts or yogurt for added protein. It makes a great snack before dinner or after a workout. This blog post outlines a simple way to create a delicious pumpkin smoothie. You learned about the key ingredients, preparation, and tips to enhance flavor. By adjusting the recipe, you can make it unique. The variations allow for different tastes and preferences. Overall, this smoothie not only tastes great but is also nutritious. Try it for breakfast or a snack. Enjoy experimenting with flavors and making it your own!
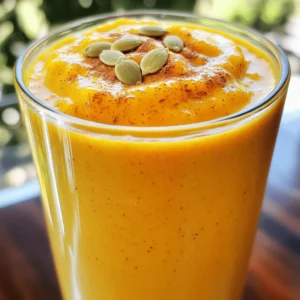
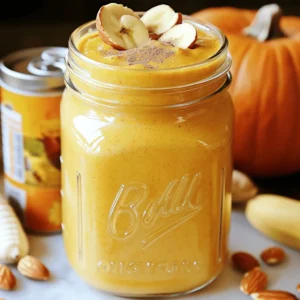
    High-Protein Pumpkin Pie Smoothie Tasty and Healthy
  • - 1 lb boneless, skinless chicken thighs, cut into bite-sized pieces - 1/2 cup all-purpose flour - 2 large eggs, beaten - 1 cup panko breadcrumbs - 1/4 cup cornstarch - Salt and pepper to taste - 2 tablespoons vegetable oil (for frying) For this recipe, chicken thighs work best. They stay juicy and tender, making every bite delicious. - Zest of 1 large orange - 1/2 cup fresh orange juice - 1/4 cup soy sauce - 1/4 cup honey - 2 teaspoons grated fresh ginger - 1 garlic clove, minced - 1 tablespoon rice vinegar - 1 teaspoon cornstarch mixed with 1 tablespoon water (for thickening) The orange zest brings bright flavor. Fresh juice adds sweetness and tang. Honey balances the saltiness from the soy sauce. - Sesame seeds for garnish - Sliced green onions for garnish - A few orange slices for a fresh touch These add color and flavor to your dish. They make your meal look great on the plate. Serve this chicken over steamed jasmine rice for a complete meal. Start by cutting one pound of boneless, skinless chicken thighs into bite-sized pieces. Season these pieces with salt and pepper. This step adds flavor upfront. Next, set up a breading station with three bowls. Fill one bowl with half a cup of all-purpose flour. In the second bowl, beat two large eggs. The last bowl holds one cup of panko breadcrumbs mixed with a quarter cup of cornstarch. This mix gives the chicken a great crunch. Now, it’s time to bread the chicken. Take a piece of seasoned chicken and dredge it in the flour. Make sure to shake off any excess flour. Next, dip the floured chicken into the beaten eggs. Finally, coat the chicken in the panko-cornstarch mix. Press down gently to ensure it sticks well. Place the breaded chicken on a plate. Repeat this with all pieces. Heat two tablespoons of vegetable oil in a large skillet over medium heat. To check if the oil is hot enough, drop a small piece of bread into the oil. If it sizzles, it’s ready. Add the breaded chicken pieces in batches. Avoid overcrowding the pan to ensure even cooking. Fry each piece for about four to five minutes on each side. Look for a golden brown color. Once cooked, drain the chicken on paper towels to remove excess oil. While the chicken fries, make the orange sauce. In a small saucepan, combine the zest of one large orange, half a cup of fresh orange juice, a quarter cup of soy sauce, and a quarter cup of honey. Add two teaspoons of grated fresh ginger and one minced garlic clove. Pour in one tablespoon of rice vinegar. Stir well and bring the mixture to a gentle simmer over medium heat. Once the sauce bubbles gently, it’s time to thicken it. Mix one teaspoon of cornstarch with one tablespoon of water in a small bowl. Stir this mixture into the sauce. Cook for another one to two minutes while stirring. This helps the sauce reach the right thickness without being too gloopy. Add the fried chicken pieces to the saucepan with the orange sauce. Toss everything together gently so that each piece is coated well. Transfer the orange chicken to a serving platter or individual bowls. For a beautiful finish, serve it over steamed jasmine rice. Garnish with sesame seeds and sliced green onions. Add a few orange slices on the side for a fresh flair. Enjoy your homemade, better-than-takeout orange chicken! To get the best flavor from your orange chicken, focus on these key steps: - Marinate the Chicken: You can marinate the chicken pieces in soy sauce for 30 minutes. This adds depth to the dish. - Use High Heat: When frying, make sure your oil is hot. This keeps the chicken crispy and prevents it from becoming oily. - Fry in Batches: Don’t crowd the pan. Frying in batches helps each piece cook evenly and get crispy. You can easily swap ingredients for healthier choices without losing taste: - Chicken Thighs to Chicken Breasts: If you prefer leaner meat, use boneless chicken breasts instead. - Panko Breadcrumbs to Whole Wheat Breadcrumbs: This adds fiber and nutrients. - Honey to Maple Syrup: If you want a different flavor, maple syrup works well and is a great natural sweetener. The way you serve your orange chicken can make it even more appealing. Here are some ideas: - Serve with Jasmine Rice: Place the chicken over a bed of steamed jasmine rice. This adds texture and flavor. - Garnish Creatively: Top with sesame seeds and sliced green onions for a pop of color. - Add Orange Slices: A few orange slices on the side give a fresh look and enhance the orange flavor. {{image_2}} You can swap chicken with other proteins. Try shrimp, tofu, or pork. Each option adds a unique twist. Shrimp cooks fast and has a nice texture. Tofu soaks up flavor and is great for vegans. Pork gives a nice savory taste. Just adjust cooking times to ensure everything is cooked well. For a vegetarian or vegan version, use plant-based proteins. Chickpeas or seitan work well. Both have great texture and flavor. If you choose tofu, press it to remove excess water first. Then, season and bread it like chicken. You can also try cauliflower florets. They crisp up nicely and soak up the sauce. While orange sauce is classic, you can explore other flavors. Try adding chili flakes for heat. You can mix in pineapple juice for a sweet twist. Experiment with sesame oil for a nutty taste. Soy sauce can be swapped for tamari to make it gluten-free. Each change brings a new taste and fun to your meal! To keep your Better-Than-Takeout Orange Chicken fresh, store it in an airtight container. Let it cool first, then transfer the chicken and sauce together. If you separate them, the chicken can become soggy. Store it in the fridge for up to three days. When it's time to enjoy your leftovers, reheating is key. Use a skillet over medium heat for the best results. Add a splash of water or broth to keep it moist. Stir occasionally until it's heated through. You can also use the microwave, but cover it to prevent drying out. If you want to save some for later, freezing works well. Place the chicken and sauce in a freezer-safe bag. Remove as much air as possible. This helps prevent freezer burn. You can freeze it for up to three months. When you’re ready to eat, thaw it overnight in the fridge before reheating. This keeps the flavors intact and tasty! This Orange Chicken is better than takeout for many reasons. First, you control the ingredients. You can use fresh chicken thighs and avoid any unwanted additives. Second, the flavor is bright and bold. The mix of orange juice, honey, and ginger gives it a sweet and tangy punch. Finally, making it at home allows you to customize the dish to your taste. You can adjust the sweetness or add more spice. Yes, you can make this recipe gluten-free. Use gluten-free flour and gluten-free panko breadcrumbs. These swaps keep the crunch while making the dish safe for those with gluten sensitivities. Make sure to also use a gluten-free soy sauce, like tamari, in the sauce. To keep your chicken crunchy, follow these tips: - Use panko breadcrumbs. They add extra crunch. - Mix cornstarch with the panko. It helps create a crispier coating. - Fry in small batches. This prevents the oil from cooling down. - Drain the fried chicken on paper towels. This keeps it from getting soggy. Serve this Orange Chicken with: - Steamed jasmine rice for a classic pairing. - Stir-fried vegetables for a colorful plate. - A simple salad for freshness. - Toasted sesame seeds and green onions for garnish. In this post, we covered how to make Better-Than-Takeout Orange Chicken. We explored the main ingredients, the step-by-step cooking process, and tips for flavor and presentation. I shared options for variations, like vegetarian choices and storage info to keep your leftovers fresh. With these insights, you can create a tasty dish at home that beats takeout. I hope you feel inspired to try this recipe and enjoy a delightful meal. Cooking at home can be fun and rewarding!
    Better-Than-Takeout Orange Chicken Simple and Tasty
  • - 2 boneless, skinless chicken breasts - 1 can (15 oz) black beans, rinsed and drained - 1 can (15 oz) diced tomatoes (with green chilies) - 1 medium onion, diced - 2 cloves garlic, minced - 1 cup corn (fresh, frozen, or canned) - 4 cups chicken broth These main ingredients build the heart of the soup. The chicken adds protein and richness. Black beans offer fiber and texture. Diced tomatoes bring acidity and flavor. Onion and garlic add depth. Corn gives a sweet crunch. Chicken broth ties everything together, making a warm base. - 1 teaspoon ground cumin - 1 teaspoon chili powder - 1/2 teaspoon smoked paprika - Salt and pepper to taste Spices bring life to the soup. Ground cumin adds warmth and earthiness. Chili powder offers a mild heat. Smoked paprika gives a hint of smokiness. Salt and pepper enhance all the flavors. Balancing these spices is key for a tasty dish. - Fresh cilantro, chopped (for garnish) - Lime wedges (for serving) - Tortilla chips or strips (for serving) Garnishes make this soup shine. Fresh cilantro adds brightness and freshness. Lime wedges offer a zesty kick when squeezed in. Tortilla chips or strips provide a crunchy contrast. Together, these toppings turn the soup into a delicious meal. To start, I heat olive oil in a skillet over medium heat. I add diced onion and sauté until it turns clear, about five minutes. Next, I stir in minced garlic and let it cook for one more minute. This step makes the kitchen smell amazing! Once the onion and garlic are ready, I move them to the slow cooker. I then add the chicken breasts, black beans, diced tomatoes, corn, and chicken broth. I sprinkle in the ground cumin, chili powder, smoked paprika, salt, and pepper. After all the ingredients are in, I give it a good stir to mix everything well. Now it's time to set the slow cooker. I cover it and choose the low setting for 6–8 hours or the high setting for 3–4 hours. This slow cooking lets all the flavors blend perfectly. When the cooking time is up, I take out the chicken breasts. I use two forks to shred the chicken into bite-sized pieces. Then, I return the chicken back into the soup and stir it all together. Before serving, I taste the soup and adjust the seasoning with more salt and pepper if needed. To serve, I ladle the hot soup into bowls. I like to garnish it with chopped cilantro, a squeeze of lime, and some tortilla chips or strips on top. This makes it look and taste even better! - Adjusting seasonings: Taste your soup before serving. If it needs more flavor, add salt, pepper, or spices. A pinch of chili powder can boost the heat. Always start small and taste as you go. - Adding extras for more depth: You can mix in extra ingredients. Consider adding diced bell peppers or fresh corn for sweetness. A splash of lime juice brightens the flavors. Fresh herbs like cilantro add a nice touch. - Ensuring proper chicken tenderness: Use boneless, skinless chicken breasts for the best results. Cook the soup on low for 6-8 hours. This slow cooking method makes the chicken tender and tasty. - Troubleshooting common cooking issues: If your soup seems too thin, mix in a cornstarch slurry. Combine 1 tablespoon of cornstarch with 2 tablespoons of water and stir it in. If the soup is too thick, add a bit of chicken broth to thin it out. - Garnishing beautifully: For a lovely look, sprinkle chopped cilantro on top just before serving. Add lime wedges on the side for a pop of color and flavor. - Serving suggestions for a complete meal: Serve with tortilla chips or strips for crunch. A side of avocado or a fresh salad pairs well too. This makes your meal colorful and exciting! {{image_2}} You can make this soup vegetarian by swapping the chicken for beans or tofu. Black beans work great, and they add protein. If you use tofu, choose firm tofu for the best texture. You might want to sauté the tofu first to give it more flavor. Adjust the broth for a flavorful base. Use vegetable broth instead of chicken broth. You can also add more spices to boost the taste. Consider adding more chili powder or cumin for extra warmth. If you like heat, add jalapeños or hot sauce to your soup. Fresh jalapeños can give it a nice kick. You can slice them and toss them in with the other ingredients. You can also use spicier seasonings. Try adding cayenne pepper or a spicy taco seasoning. Just be careful not to add too much at once; you can always add more later. For those needing gluten-free options, this soup is easy to adapt. All the main ingredients are naturally gluten-free. Just ensure your broth and any added seasonings are also gluten-free. If you want a low-sodium version, look for low-sodium broth. You can also cut back on added salt. This way, you can still enjoy great flavor without the extra sodium. To store leftovers, let the soup cool down first. Pour it into an airtight container. This method keeps the soup fresh. It lasts up to four days in the fridge. When reheating, use the stove or microwave. Heat until it is hot all the way through. Stir it well to mix flavors again. You can freeze this soup for later. Pour it into freezer-safe bags or containers. Make sure to leave space at the top for expansion. This soup stays good for about three months in the freezer. When you want to eat it, move it to the fridge overnight to thaw. You can also place it in warm water for quicker thawing. Prepping ingredients ahead of time is smart. Chop the onion and garlic, then store them in a container. You can also rinse and drain the beans in advance. This makes cooking easier during the week. Store all prepped items in the fridge. This way, you can make delicious meals quickly when you are busy. To amp up the heat, try adding jalapeños. You can chop them finely or leave them in larger pieces for a stronger flavor. Another option is to use hot sauce to taste. If you want more spice, increase the chili powder. You can also add a pinch of cayenne pepper for an extra kick. Yes, you can use frozen chicken. Just place the frozen chicken breasts directly in the slow cooker. The cooking time will be a bit longer. Set your slow cooker to high for 4-5 hours or low for 8-10 hours. Make sure the chicken reaches 165°F for safe eating. There are many great sides for this soup. You can serve it with tortilla chips for crunch. A simple green salad also works well. You might enjoy some avocado slices or quesadillas on the side. For a heartier meal, pair the soup with rice or cornbread. To store leftovers, let the soup cool first. Place it in an airtight container. It can stay in the fridge for up to 3 days. If you want to keep it longer, freeze the soup. Use freezer bags or containers, and it’ll last about 3 months. Always label your containers with the date. You can create a delicious slow cooker chicken tortilla soup with simple ingredients. Start by preparing the chicken, beans, and spices. Follow the steps for easy cooking and garnishing. Add your own flair with tips for flavor and presentation. You can also modify it to fit your diet or spice preferences. Remember, it’s all about making a warm and tasty meal. Enjoy cooking and sharing your soup with others!
    Savory Slow Cooker Chicken Tortilla Soup Recipe
  • For my Key Lime Pie Parfaits, I focus on a few key ingredients. Each one plays a role in creating that creamy delight. Here’s what you need: - 1 cup key lime juice (freshly squeezed, if possible) - 1 (8 oz) package cream cheese, softened - 1 (14 oz) can sweetened condensed milk - 1 teaspoon vanilla extract - 1 cup whipped topping (like Cool Whip) - 1 cup graham cracker crumbs - 2 tablespoons melted butter - Zest of 2 limes (for garnish) - Lime slices (for garnish) The key lime juice gives that tart flavor we love. The cream cheese and sweetened condensed milk bring creaminess. The whipped topping adds lightness, while the graham cracker crumbs give a crunchy base. You can swap some ingredients if needed. Here are my go-to options: - Key lime juice: Bottled key lime juice works but may lack freshness. - Cream cheese: Use mascarpone for a different cream flavor. - Sweetened condensed milk: Try coconut milk for a dairy-free version. - Whipped topping: You could use homemade whipped cream instead. - Graham cracker crumbs: Use crushed cookies or nuts for variety. These swaps help keep the taste close to the classic while allowing flexibility based on what you have on hand. To make these parfaits, you’ll need a few simple tools: - Mixing bowls - Electric mixer - Measuring cups and spoons - Serving glasses or bowls - Spatula for folding These tools make the process smooth and easy. You can make these parfaits in just a few steps with the right setup. To start, take one cup of graham cracker crumbs and two tablespoons of melted butter. In a medium bowl, mix the crumbs and butter until the crumbs are well coated. Grab your serving glasses or bowls for the parfaits. Spoon a layer of the graham cracker mixture into the bottom of each glass. Press it down gently to form a solid crust layer. This crust is the base of your parfait and adds that classic key lime pie crunch. Now for the creamy, zesty filling! In a large mixing bowl, beat one package of softened cream cheese until it is smooth. This step is key for a creamy texture. Next, add one can of sweetened condensed milk slowly while mixing. Then, pour in one cup of freshly squeezed key lime juice and one teaspoon of vanilla extract. Mix everything together well until it’s all blended into a creamy filling. Finally, gently fold in one cup of whipped topping. This will give the filling a light and fluffy texture that tastes heavenly. It’s time to put everything together! Start with a spoonful of the graham cracker crust in each glass. Then add a layer of the key lime filling on top. Smooth it out with a spatula for a nice finish. Repeat this process: add more graham cracker crust, followed by more key lime filling. Keep layering until the glasses are full, making sure the last layer is the creamy filling. Once you’ve finished layering, place the parfaits in the refrigerator for at least two hours. This chilling time helps the flavors meld and sets the filling. Before serving, add a sprinkle of lime zest and a slice of lime on top for a lovely touch. To get a smooth and creamy filling, start with soft cream cheese. If it’s too cold, your mixture will be lumpy. Use an electric mixer to beat the cream cheese well before adding other ingredients. Gradually mix in the sweetened condensed milk and key lime juice. This helps to combine everything better. Lastly, gently fold in the whipped topping. This keeps your filling light and fluffy, which is key for parfaits. Chilling is very important for these parfaits. After you layer the filling and crust, place them in the fridge. Let them chill for at least two hours. This helps the flavors blend and the filling to set. If you can wait longer, try to chill overnight. The longer they sit, the better they taste. Just remember to cover them with plastic wrap to keep them fresh. For a great presentation, use clear glasses. This shows off the pretty layers of crust and filling. You can add a sprinkle of lime zest on top for color. A slice of lime on the edge adds a nice touch too. You may even serve with colorful straws for fun. These parfaits are perfect for parties or as a sweet treat after dinner. Enjoy! {{image_2}} Mini parfaits are a fun twist. Use small cups or shot glasses. They look cute and are easy to grab. Layer the graham cracker crumbs and key lime filling just like the larger version. Each guest can enjoy their own little treat. This idea is perfect for parties, picnics, or any gathering. You can even set up a parfait bar with toppings. You can add fruits for a new taste. Try strawberries, blueberries, or mango. These fruits add color and sweetness. Just chop them up and layer them with the key lime filling. The fresh fruit pairs well with the tart lime. It creates a bright and fruity variation. Mix and match your favorite fruits for a fun twist. For a gluten-free option, swap the graham crackers. Use gluten-free cookies instead. You can also use crushed nuts for a nutty flavor. Make sure to check the labels on your ingredients. Ensure all are gluten-free. This version still tastes great and works for those with gluten allergies. Enjoying key lime parfaits is now possible for everyone! To store leftover parfaits, cover them tightly with plastic wrap or a lid. Place them in the fridge. This keeps them fresh for a few days. Try to eat them within three days for the best taste. For the best flavor, store your key lime juice in an airtight container. Keep it in the fridge, where it can last up to one week. If you have extra graham cracker crumbs, seal them in a bag and store them in a cool, dry place. This keeps them crunchy and ready to use. Since this recipe does not require baking, reheating is not needed. Just enjoy the parfaits cold from the fridge. If you want a warm treat, consider making a key lime pie instead. Yes, you can use bottled key lime juice. However, fresh juice gives the best flavor. Fresh limes have a bright taste that enhances the parfait. If you use bottled juice, check for quality. Some brands may have added sugars or preservatives. This can change the overall sweetness and tanginess of your dessert. Key Lime Pie Parfaits last about 3 to 4 days in the fridge. Store them in airtight containers to keep them fresh. Over time, the graham cracker crust may soften. For the best texture, enjoy them within the first couple of days. If you notice any off smells or changes in texture, it's best to discard them. Absolutely! You can make these parfaits a day ahead. Just layer and chill them in the fridge. This helps the flavors blend and the filling set perfectly. Keep the garnishes, like lime zest and slices, until just before serving. This keeps them fresh and vibrant for a lovely presentation. In this blog post, we explored the key ingredients for Key Lime Pie Parfaits, along with substitutes and equipment needed. We provided step-by-step instructions for preparing the crust, filling, and assembling the parfaits. Helpful tips ensured a creamy texture and proper chilling. We also discussed fun variations like mini parfaits and gluten-free options. Finally, I shared storage tips to keep your parfaits fresh. Enjoy creating these treats, and don't hesitate to experiment with flavors to make them your own!
    Key Lime Pie Parfaits No Bake Creamy Delight
  • - 1 pound store-bought gnocchi - 1 medium zucchini, sliced - 1 bell pepper (any color), chopped - 1 cup cherry tomatoes, halved - 1 red onion, diced - 3 cloves garlic, minced - 3 tablespoons olive oil To make this dish work, you need some key ingredients. Start with store-bought gnocchi for a quick meal. This saves time and still gives you great flavor. You can find gnocchi in most grocery stores. Next, gather assorted vegetables. I love using zucchini, bell peppers, cherry tomatoes, and red onions. Each adds color and flavor. These veggies roast well and become tender while the gnocchi crisp up. Don't forget the garlic! It adds a lovely aroma and taste. Finally, you’ll need olive oil to help everything roast perfectly. This makes the dish rich and tasty. - 1 teaspoon dried oregano - 1 teaspoon smoked paprika - Salt and pepper to taste - Optional: Grated Parmesan cheese Spices make this dish shine! Dried oregano gives a warm, earthy flavor. It pairs nicely with the veggies. Smoked paprika adds a hint of sweetness and a nice smokiness. You should also season with salt and pepper. This helps bring out the taste of all your ingredients. If you love cheese, sprinkle some grated Parmesan on top when serving. It melts beautifully and gives a creamy finish. Using these ingredients, you’ll create a tasty, colorful meal that everyone will enjoy! To start, preheat your oven to 425°F (220°C). This high heat gives a nice roast to the veggies and gnocchi. Next, line a large sheet pan with parchment paper. This helps with cleanup and keeps everything from sticking. Now, grab a large bowl and slice the zucchini. Chop the bell pepper and dice the red onion. Halve the cherry tomatoes and add them all to the bowl. Mince three cloves of garlic and toss them in too. Drizzle three tablespoons of olive oil over the veggies. Sprinkle in one teaspoon of dried oregano, one teaspoon of smoked paprika, and salt and pepper to taste. Mix everything well until the vegetables are fully coated. This step is key for flavor. Once mixed, spread the veggie mix evenly on one side of the prepared sheet pan. On the other side, add one pound of store-bought gnocchi. Lightly toss the gnocchi with a touch of olive oil and a pinch of salt and pepper. This helps them get crispy while roasting. Place the sheet pan in your preheated oven. Set a timer for 20-25 minutes. Halfway through cooking, give everything a good stir. This ensures even cooking and browning. When done, the gnocchi should be golden and crispy, while the veggies will be tender and flavorful. To ensure crispy gnocchi, follow these steps: - Use enough oil: Drizzle enough olive oil on the gnocchi before roasting. This helps them crisp up nicely. - Don’t crowd the pan: Spread the gnocchi and veggies out well. Crowding can lead to steaming instead of roasting. - Stir halfway through: Give the mixture a good stir at the halfway point. This helps everything cook evenly. For proper veggie cutting, consider these tips: - Uniform sizes: Cut your veggies into similar sizes. This ensures they roast at the same rate. - Thin slices for zucchini: Slice zucchini thinly for quick cooking. Thick slices can stay firm while others become soft. - Chop bell pepper and onion: Aim for 1-inch pieces for the bell pepper and onion. This size works well for even roasting. Garnishing your dish can elevate its look and taste: - Fresh basil: Add torn basil leaves right before serving. They bring a fresh taste and bright color. - Grated Parmesan: If you like cheese, sprinkle grated Parmesan on top. It adds a nice salty touch. Pairing your roasted gnocchi can enhance your meal: - Serve with a side salad: A light salad complements the rich flavors of the gnocchi. - Try a dipping sauce: Serve with a marinara sauce or a simple olive oil dip. These add extra flavor and fun! {{image_2}} You can switch up your veggies for this dish. Try using broccoli, carrots, or even asparagus. Each vegetable adds its own flavor and texture. Seasonal vegetables work great too. In summer, use zucchini and bell peppers. In fall, think about adding squash or Brussels sprouts. This flexibility keeps each meal exciting and fresh. If you want to make your own gnocchi, it's fun and easy. Just mix mashed potatoes with flour and egg, then shape it. For those who need gluten-free options, try using gluten-free pasta instead. There are also vegan gnocchi brands available. They let everyone enjoy this dish, no matter their diet. To keep your sheet-pan roasted veggie gnocchi fresh, store it in an airtight container. Place it in the fridge within two hours of cooking. This helps keep the taste and texture. You can safely store it for up to three days. When it's time to eat, reheat in the oven for best results. Preheat your oven to 350°F (175°C). Spread the gnocchi and veggies on a baking sheet. Heat for about 10-15 minutes until warm. If you have extra gnocchi and veggies, freezing is a great option. First, let them cool completely. Spread them out on a baking sheet in a single layer. Freeze for 1-2 hours until firm. Then, transfer them to a freezer bag or container. Be sure to remove as much air as possible. This helps prevent freezer burn. For best quality, use within three months. To reheat, take them out of the freezer and thaw overnight in the fridge. Then, follow the reheating instructions above. It takes about 30 minutes to make this dish. You need 10 minutes to prep and 20 minutes to cook. First, you chop the veggies and mix them. Then, roast everything together in the oven. This quick process gives you a tasty meal in no time. Yes, you can use frozen gnocchi. Just keep in mind that frozen gnocchi may be softer. You might need to cook them for a few extra minutes. It’s best to check for a golden color to see if they are ready. This way, you can still enjoy that crispy texture. You can serve roasted gnocchi with a fresh salad or crusty bread. A simple green salad pairs well with it. You might like to add a light vinaigrette for extra flavor. Roasted veggies also make a great side, adding more color and taste to your meal. This article covered key ingredients, easy steps, and helpful tips for making delicious sheet-pan roasted veggie gnocchi. Remember, the right mix of veggies and spices brings out the best flavors. Don’t be afraid to try new ingredients or pairings. You can customize this dish based on your favorites. Enjoy making this easy meal with your own twist! Cooking should be fun, and this dish surely is.
    Sheet-Pan Roasted Veggie Gnocchi Flavorful Delight
  • - 1 head of cauliflower, cut into bite-sized florets - 1 cup almond flour - 1 teaspoon garlic powder - 1 teaspoon onion powder - 1/2 teaspoon smoked paprika - 1/2 teaspoon salt - 1/4 teaspoon black pepper - 1 cup water (add more if needed) - 1/2 cup buffalo sauce (adjust for heat preference) - 2 tablespoons olive oil or cooking spray You can swap almond flour for regular flour if you like. For a gluten-free option, use chickpea flour. If you want more spice, add cayenne pepper to the batter. You can also use different sauces like barbecue or teriyaki for a new twist. Instead of buffalo sauce, try a spicy garlic sauce for a different flavor profile. Each serving has about 150 calories. You get 5 grams of protein, 8 grams of carbs, and 12 grams of fat. This dish is low in calories and high in flavor. It’s a great snack or appetizer that feels indulgent but is still healthy. First, grab a head of cauliflower. Cut it into small, bite-sized florets. Make sure they are all roughly the same size. This helps them cook evenly. Next, in a large bowl, mix the dry ingredients. Combine 1 cup of almond flour, 1 teaspoon of garlic powder, 1 teaspoon of onion powder, 1/2 teaspoon of smoked paprika, 1/2 teaspoon of salt, and 1/4 teaspoon of black pepper. Stir well until blended. Now, slowly add 1 cup of water to your dry mix. Keep stirring until you get a thick batter. If it's too thick, add a little more water. You want it to coat the cauliflower well. Before you start cooking, preheat your air fryer to 400°F (200°C). Let it heat for about 5 minutes. This step is key for crispy bites. Once heated, take your coated cauliflower florets. Dip each piece into the batter. Make sure they are fully covered. Let any extra batter drip off. Next, lightly spray the air fryer basket with olive oil. This helps prevent sticking. Place the cauliflower in the basket in a single layer. Don't overcrowd them; give them space to crisp up. Now, air fry the cauliflower for 12-15 minutes. Halfway through, shake the basket to ensure even cooking. Look for a golden brown and crispy finish. After cooking, carefully remove the cauliflower from the air fryer. Place the bites in a mixing bowl. Pour 1/2 cup of buffalo sauce over the florets. Toss gently to coat them evenly. If you prefer more heat, add extra sauce to taste. For an additional flavor boost, return the coated bites to the air fryer for another 2-3 minutes. This will help set the sauce and intensify the taste. Now you are ready to enjoy delicious buffalo cauliflower bites! To get the best texture, focus on your batter. Use almond flour for crunch. Mix it with garlic powder, onion powder, smoked paprika, salt, and black pepper. This gives flavor and helps the batter stick. When you add water, make sure it's thick enough to coat the cauliflower. If the batter is too thin, it won't stick well. Dip each floret carefully and let the excess drip off. This step is key for crispiness. A few common mistakes can ruin your bites. First, do not overcrowd the air fryer basket. This leads to uneven cooking. Leave space between each bite for hot air to circulate. Second, don’t skip the preheating step. If the fryer isn’t hot enough, the bites won’t get crispy. Lastly, be careful with the sauce. Adding too much sauce before the second fry can make them soggy. For a great presentation, serve your buffalo cauliflower bites on a platter. Line it with fresh celery and carrot sticks. This adds color and crunch. Drizzle extra buffalo sauce on top for flavor and eye appeal. Offer a side of creamy ranch or blue cheese dressing for dipping. This combo makes for a fun and tasty experience for everyone! {{image_2}} If you want your Buffalo cauliflower bites to pack more heat, add cayenne pepper or hot sauce to the batter. Use about 1/4 teaspoon of cayenne for a good kick. You can also increase the buffalo sauce amount. This will turn up the flavor and spice level. If you like it really spicy, try a hot pepper sauce instead of regular buffalo sauce. To keep these bites vegan, stick with almond flour, which is already gluten-free. You can use chickpea flour as a substitute if you want a different flavor. For the sauce, ensure that your buffalo sauce is vegan. Many brands offer this option. You can also make your own with hot sauce and plant-based butter. Want to change the flavor? Try different sauces! BBQ sauce gives a sweet twist. A garlic parmesan sauce adds a rich taste. For a tangy touch, use a lemon herb sauce. Each sauce changes the bites into something new and fun. Mix it up to find your favorite! To keep your leftover buffalo cauliflower bites fresh, let them cool down completely. Place them in an airtight container. Store the container in the fridge. They will stay good for up to 3 days. If you want to keep them longer, consider freezing. When it’s time to enjoy your leftovers, reheating is key. Preheat your air fryer to 350°F (175°C). Place the cauliflower bites in the basket in a single layer. Heat for about 5-7 minutes. This will help them regain their crispy texture. You can also use an oven for reheating. Just follow the same steps. If you want to freeze buffalo cauliflower bites, it’s easy! After cooking, let them cool down completely. Arrange them in a single layer on a baking sheet. Freeze for about an hour. Once frozen, transfer them to a freezer bag or container. They can last for up to 3 months in the freezer. When you’re ready to eat, cook from frozen. Just add a few extra minutes to the cooking time in the air fryer. Yes, you can use frozen cauliflower. Just thaw it first. Pat it dry to remove excess moisture. This helps the batter stick better and ensures crispiness. The best sauce is classic buffalo sauce. You can adjust the heat level to your taste. If you want extra flavor, try mixing in some garlic or ranch seasoning. To make them extra crispy, ensure the batter is thick. When air frying, do not overcrowd the basket. This allows hot air to circulate and creates a crunchier finish. Spraying a bit more oil can also help. Yes, they can be healthy! Cauliflower is low in calories and high in fiber. Almond flour adds protein and healthy fats. Just watch the buffalo sauce for added sugars and calories. Buffalo cauliflower bites are fun and easy to make. We covered ingredients, cooking steps, and tips for the best flavor. Remember, use fresh cauliflower for the best texture, and don't be afraid to try spicy sauces. Store any leftovers properly to keep them tasty. With these insights, you can impress your friends and family with this healthy snack. Enjoy crafting your perfect buffalo bites, and don’t hesitate to explore variations that suit your taste!
    Buffalo Cauliflower Bites Air Fryer Quick and Tasty
  • - 1 large flatbread or pizza dough - 2 large onions, thinly sliced - 4 ounces goat cheese, crumbled - 1 tablespoon olive oil - 2 teaspoons balsamic vinegar - 1 teaspoon fresh thyme leaves (or ½ teaspoon dried thyme) - Salt and pepper to taste - ¼ cup grated Parmesan cheese (optional) - Fresh arugula for garnish (optional) The flatbread or pizza dough forms the base of this dish. Use store-bought or homemade dough, depending on your time and taste. Sweet onions work best for caramelizing, creating a rich, deep flavor. Goat cheese adds creaminess and a tangy bite. Parmesan is optional but adds a nice salty touch. Fresh thyme enhances the dish with its earthy notes, while salt and pepper balance the flavors. For added flavor, consider mixing in some garlic while cooking the onions. You can also try adding a sprinkle of red pepper flakes for heat. If you want more veggies, roasted bell peppers or spinach make great toppings. For a fresh touch, add a handful of fresh arugula on top before serving. These options let you customize the flatbread to your taste. Heat olive oil in a large skillet over medium heat. Add the thinly sliced onions, salt, and pepper. Cook slowly, stirring every few minutes. Keep cooking for about 20-25 minutes. The onions should turn soft and golden brown. For more flavor, add balsamic vinegar in the last five minutes. This will give your onions a sweet and tangy touch. While your onions are cooking, preheat your oven to 425°F (220°C). If you use pizza dough, roll it out on a floured surface. You can make it as thick or thin as you like. Place the flatbread on a baking sheet or a pizza stone. Make sure it is ready for toppings. Once your onions are caramelized, spread them evenly over the flatbread. Crumble the goat cheese on top of the onions. If you want, sprinkle some grated Parmesan cheese too. Add fresh thyme leaves for a nice herbal note. Now, place the flatbread in the oven. Bake for about 12-15 minutes. It should be golden brown around the edges and the cheese should melt. After baking, let it cool a bit. If you like, top with fresh arugula for a peppery kick before slicing. Enjoy your warm flatbread! To get sweet, golden onions, take your time. Heat olive oil in your skillet over medium heat. Add the onions, salt, and pepper. Stir them often for 20-25 minutes. If you want extra flavor, add balsamic vinegar in the last five minutes. This gives the onions a nice glaze. You can use store-bought flatbread or make your own dough. Look for a flatbread that is thin and crisp. If you choose to make dough, roll it out to your favorite thickness. A thicker dough gives a chewy bite, while a thinner one is crispier. Both options taste great. Serve your flatbread warm. You can add fresh arugula on top for a peppery kick. If you like, sprinkle more goat cheese or Parmesan for extra creaminess. Pair it with a light salad or a glass of white wine. This dish is perfect for sharing at a party or enjoying as a snack. {{image_2}} You can make this flatbread a full veggie delight. Use a larger variety of vegetables. Add spinach, roasted peppers, or mushrooms. These add color and taste. They complement the sweet onions and tangy goat cheese. You can also try a mix of fresh herbs like basil or oregano. These options keep it vegetarian and delicious. If you need a gluten-free option, use gluten-free flatbread or pizza dough. Many brands offer great choices at stores. You can also make a crust using cauliflower or almond flour. This option gives a nice twist to the dish. Just ensure that your cheese is also gluten-free. There are many ways to boost the flavor of this flatbread. Try adding a sprinkle of red pepper flakes for heat. A drizzle of honey can add sweetness. You can swap goat cheese for feta or ricotta for a different taste. Consider mixing in some garlic or shallots with the onions for depth. These small changes make each bite exciting and new. To store leftover flatbread, wait for it to cool. Place it in an airtight container. You can also wrap it tightly in plastic wrap. This helps keep the flavors fresh. Store it in the fridge for up to three days. If you want to keep it longer, consider freezing. To reheat, preheat your oven to 350°F (175°C). Place the flatbread on a baking sheet. Bake for about 10 minutes until warm. This method helps keep the crust crisp. You can also use a microwave, but this may make the flatbread soft. Heat it in 30-second bursts until warm. For freezing, wrap the flatbread in plastic wrap. Then, place it in a freezer bag. Make sure to remove as much air as possible. It can last for up to three months in the freezer. When ready to eat, thaw it in the fridge overnight before reheating. Yes, you can use other types of cheese. Feta cheese adds a nice tang. Mozzarella gives a creamy melt. Cheddar brings a sharp flavor. Each cheese changes the dish. You can mix different cheeses too. This lets you create new tastes. Just remember to balance the flavors. You can make parts ahead of time. Caramelize the onions one day before. Store them in the fridge. You can also prepare the flatbread. Roll it out and keep it covered. When you are ready to bake, assemble it quickly. Just add cheese and bake. It saves time on busy days. This flatbread pairs well with a fresh salad. Try arugula with lemon vinaigrette. You can also serve it with soup. Tomato soup or butternut squash soup works great. A light red wine brings out the flavors too. Enjoy it as an appetizer or a main dish. This blog post covered how to make caramelized onion and goat cheese flatbread. We explored each ingredient, shared step-by-step instructions, and provided helpful tips. You can also find variations for different diets and storage advice. In closing, enjoy experimenting with flavors and personal touches. This flatbread will impress friends and family. Keep it simple and have fun in the kitchen! You’ll love every bite.
    Caramelized Onion Goat Cheese Flatbread Delightful Dish
  • - 1 cup rolled oats - 1 cup Greek yogurt (high protein) - 1 cup almond milk (or any milk of choice) - 1/2 cup mixed berries (blueberries, strawberries, raspberries) - 1 tablespoon chia seeds - 1 tablespoon honey or maple syrup (optional) - 1 teaspoon vanilla extract - Pinch of salt For this Berry Overnight Oats recipe, you need simple ingredients. Rolled oats form the base. They provide fiber and help keep you full. Greek yogurt adds protein, making this breakfast great for muscle repair. You can choose almond milk or any milk you like for creaminess. Mixed berries bring a burst of flavor and color. You can use blueberries, strawberries, or raspberries. Chia seeds add more protein and fiber, while honey or maple syrup gives a touch of sweetness, though it’s optional. A pinch of salt enhances all the flavors. Gather these ingredients, and you are ready to create a tasty and healthy breakfast. You will love how easy it is to make this dish. Plus, it’s packed with nutrients, perfect for your busy mornings. 1. Start by taking a medium bowl. Combine the rolled oats, Greek yogurt, almond milk, chia seeds, honey (if you want some sweetness), vanilla extract, and a pinch of salt. Mix them well until everything is smooth. 2. Now, gently fold in the mixed berries. Take care not to crush them. You want to keep their shape and flavor intact. 3. Once mixed, divide the oat mixture evenly into two mason jars or airtight containers. This keeps them fresh and easy to grab in the morning. - I recommend letting the oats soak overnight. This gives them enough time to absorb the liquid. - Soaking is important because it softens the oats and blends all the flavors. If you’re short on time, soak them for at least 4 hours. To get your oats just right, you may need to adjust the liquid. If you want thick oats, use less milk. For creamier oats, add more milk. After refrigeration, stir well. This mixes everything and checks the texture. If it's too thick, add a splash of almond milk. You can add sweeteners like honey or maple syrup. If you want to skip sugar, try mashed banana or applesauce. For extra flavor, add a dash of cinnamon or nutmeg. These spices go well with berries and oats. Serve your oats in the mason jars you used. This makes it easy and looks great. Top with extra berries for color. Add a sprig of mint to make it pop. This simple touch gives your dish a fresh look. {{image_2}} You can have fun mixing berries. Blueberries, strawberries, and raspberries work well together. Try different combinations based on what you find fresh at the store. In summer, use strawberries and blackberries for a sweet treat. In fall, add cranberries for a tart bite. Each mix adds unique flavors to your overnight oats. To make your oats more filling, add protein powder. A scoop of your favorite flavor can transform the dish. You can also add nuts like almonds or walnuts. They add crunch and healthy fats. Seeds like pumpkin or sunflower seeds are great too. This way, your breakfast is packed with flavor and nutrition. If you want a dairy-free option, use coconut yogurt instead of Greek yogurt. It gives a creamy texture and adds a hint of coconut flavor. For the milk, try oat milk or soy milk. Both work well and keep the recipe tasty. These swaps make it easy to enjoy this dish no matter your diet. To keep your berry overnight oats fresh, use airtight containers. Mason jars work great. They seal tightly and help maintain flavor. You can also use glass or plastic containers with lids. Store your oats in the fridge for up to five days. This way, you can enjoy a healthy breakfast all week long. You can freeze your overnight oats if you want to make them last longer. To freeze, place the oats in a freezer-safe container. Leave some space at the top, as they will expand. When you're ready to eat, thaw them in the fridge overnight. You can also microwave them for a quick meal. Freezing may change the texture a bit. It can make the oats a little mushy, but the flavor will still be good. Just stir well after thawing. If you want a thicker texture, use less milk before freezing. Enjoy your berry overnight oats any time you want! Yes, you can use frozen berries. They are often picked at the peak of ripeness, so they are still very tasty. The main difference is that frozen berries can make the oats a bit more watery. This happens because they release extra juice as they thaw. To avoid this, I suggest thawing them first and draining any excess liquid. You can also add them just before serving to keep the texture nice. Overnight oats can last up to five days in the fridge. Just make sure to store them in sealed containers. If you notice any strange smells or changes in color, it's best to throw them out. For the best taste and texture, enjoy them within three days. Yes, you can easily make these oats vegan. Swap Greek yogurt for a plant-based yogurt. Almond milk is already a great choice, but you can use any nut or oat milk. For the sweetener, you can use maple syrup instead of honey. This way, you keep the taste delicious and friendly for a vegan diet. You can add many tasty toppings to your oats. Here are some ideas: - Sliced bananas for added sweetness - Nuts like almonds or walnuts for crunch - Seeds such as pumpkin or sunflower for extra nutrition - Coconut flakes for a tropical twist - A sprinkle of cinnamon for warmth and depth Feel free to mix and match these toppings to suit your taste! In this article, we covered the essentials for making delicious overnight oats. You learned the key ingredients, step-by-step instructions, and helpful tips for perfecting this dish. We also explored variations, storage methods, and answered common questions. Now, you can enjoy a quick, healthy breakfast that fits your taste. Experiment with flavors and find your favorite mix. Overnight oats can be both fun and nutritious. Try it out and elevate your breakfast game!
    Berry Overnight Oats High Protein Healthy Breakfast Meal
  • - 1 cup all-purpose flour - 1/2 cup unsweetened cocoa powder - 1 cup granulated sugar - 1/2 teaspoon baking soda - 1 teaspoon baking powder - 1/4 teaspoon salt - 1/2 cup unsalted butter, melted - 2 large eggs - 1 teaspoon vanilla extract - 1/2 cup milk - 1 cup semi-sweet chocolate chips - 1/4 cup mini chocolate chips (for topping) - 1 cup = 240 ml - 1/2 cup = 120 ml - 1 teaspoon = 5 ml - 1/4 teaspoon = 1.25 ml - Use whole wheat flour for more fiber. - Swap unsweetened cocoa powder with dark cocoa for a richer taste. - Brown sugar can replace granulated sugar for a more moist muffin. - Applesauce can stand in for butter for a lighter option. - Use almond milk or oat milk instead of regular milk for a dairy-free version. - If you lack eggs, use flaxseed meal mixed with water as a binder. First, gather all your ingredients. You need flour, cocoa powder, sugar, baking soda, baking powder, salt, melted butter, eggs, vanilla extract, milk, and chocolate chips. Preheat your oven to 350°F (175°C). Line your muffin tin with paper liners or grease it lightly. This helps prevent sticking. In a large bowl, sift together the flour, cocoa powder, sugar, baking soda, baking powder, and salt. This step mixes everything well and adds air. In another bowl, whisk the melted butter, eggs, vanilla extract, and milk until smooth. Pour the wet mix into the dry mix gradually. Stir gently until just combined. It is okay if it has some lumps. Fold in the semi-sweet chocolate chips. Scoop the batter into your muffin tin using a 1/4 cup measuring cup. Fill each cup about 2/3 full. This gives the muffins room to rise. Sprinkle mini chocolate chips on top for extra flavor. Bake in your preheated oven for 18-20 minutes. Check with a toothpick; it should come out clean. Let the muffins cool for about 5 minutes in the tin. Then, move them to a wire rack to cool completely. Enjoy your delicious double chocolate chip muffins! To get the best texture for your double chocolate chip muffins, you must mix well. Start by sifting the dry ingredients together. This helps to aerate the flour and cocoa. While mixing the wet ingredients, whisk them until smooth. Combine wet and dry ingredients gently. Overmixing can lead to tough muffins. It is okay if there are small lumps in the batter. The key is to fold in the chocolate chips evenly without stirring too much. Store your muffins in an airtight container. This keeps them fresh for up to four days. If you want to keep them longer, freeze them. Wrap each muffin in plastic wrap, then place them in a freezer bag. To reheat, simply warm them in the microwave for about 15 seconds. This will bring back their soft texture. You can also enjoy them at room temperature for a nice treat. One common mistake is using cold ingredients. Make sure your eggs and milk are at room temperature. This helps the batter mix better. Another mistake is not measuring ingredients correctly. Use a kitchen scale for the best results. Lastly, avoid opening the oven door while baking. This can cause your muffins to sink. Stick to these tips, and you’ll have perfect muffins every time! {{image_2}} You can mix in nuts or dried fruits for a fun twist. Walnuts or pecans add a crunchy bite. Dried cherries or cranberries can bring a sweet zing. Just fold in about half a cup of your choice into the batter. This makes your muffins even more exciting! Want to make these muffins a bit healthier? You can swap some ingredients. Use whole wheat flour instead of all-purpose flour. This adds fiber and nutrients. Another tip is to reduce the sugar. Try using one-third cup of honey or maple syrup. You can also add mashed bananas for natural sweetness. This keeps the taste rich while being kinder to your body. Seasonal flavors can make your muffins special. For fall, add a teaspoon of cinnamon and some chopped apples. In winter, try adding peppermint extract or crushed candy canes. For summer, mix in fresh berries for a fruity burst. Each season brings a chance to change the flavor! After you bake your double chocolate chip muffins, you may have some left. If so, let them cool first. Once cooled, place them in an airtight container. This keeps them fresh and moist. You can store them at room temperature for up to three days. If you want to keep them longer, freezing is a great option. If you have extra muffins, freezing is easy and smart. Wrap each muffin tightly in plastic wrap. This prevents freezer burn and keeps them tasty. After wrapping, place them in a freezer-safe bag. You can freeze them for up to three months. When you want one, just thaw it in the fridge overnight or microwave it for a few seconds. When it comes to storing muffins, choose the right container. An airtight container works best to keep moisture in. You can also use a resealable bag. Just remove as much air as you can. If you use glass or plastic, ensure they seal well. This helps keep the muffins soft and fresh for your next treat. You can replace eggs with applesauce or mashed bananas. Use 1/4 cup per egg. This keeps muffins moist and adds natural sweetness. Check the muffins with a toothpick. Insert it into the center. If it comes out clean, your muffins are ready. They should look set and spring back when touched. Yes, you can make mini muffins! Just use a mini muffin tin. Bake for about 10-12 minutes instead of 18-20 minutes. Keep an eye on them to avoid overbaking. Pair these muffins with a glass of cold milk or a hot cup of coffee. Fresh berries also add a nice touch. You can even try them with a scoop of vanilla ice cream for a special treat! In this post, we explored ingredient lists, conversion tips, and helpful substitutes for your muffin recipe. I shared detailed steps to prepare, mix, and bake each muffin to perfection. You learned how to achieve the best texture and avoid common mistakes. We also discussed fun variations and storage tips to keep muffins fresh. With this guide, you are ready to bake delicious muffins tailored to your taste. Enjoy your baking journey and share your results!
    Double Chocolate Chip Bakery Muffins Delightful Treat
  • - 4 bone-in chicken thighs, skin on - 2 cups mushrooms, sliced (cremini or button) - 1 medium onion, diced - 3 cloves garlic, minced The chicken thighs are the star. Their skin adds flavor and keeps the meat juicy. I love using cremini mushrooms for their rich taste. You can also use button mushrooms if you prefer a milder flavor. Diced onions add sweetness, while minced garlic gives a nice kick. - 1 cup heavy cream - 1 cup chicken broth - 2 tablespoons olive oil - 1 teaspoon dried thyme - 1 teaspoon paprika - Salt and pepper to taste The heavy cream makes the sauce rich and smooth. Chicken broth adds depth and ties the flavors together. Olive oil helps to brown the chicken and sauté the veggies. Thyme and paprika add warmth and complexity. Don’t forget to season with salt and pepper! - Fresh parsley, chopped Fresh parsley brings color and brightness to the dish. It also adds a fresh flavor note. Just sprinkle it on top before serving for a beautiful finish. Preparing the Chicken First, pat the chicken thighs dry with paper towels. This step helps the skin crisp up. Season both sides of the chicken with salt, pepper, and paprika. The spices add a nice flavor. Searing the Chicken Next, heat olive oil in a large skillet over medium-high heat. Once hot, add the chicken thighs skin-side down. Sear them for about 6-7 minutes until the skin is golden brown. Flip the chicken and cook for another 5 minutes. Then, remove the chicken from the skillet and set it aside. Sautéing Onions and Mushrooms In the same skillet, add the diced onion and sliced mushrooms. Sauté them for 5-7 minutes. You want the onions to become translucent and the mushrooms to release their moisture. Adding Garlic and Thyme Now, add the minced garlic and dried thyme to the skillet. Stir and cook for an additional 1-2 minutes until you can smell the garlic's aroma. This step builds a rich flavor base for your sauce. Deglazing the Skillet Pour in the chicken broth and bring it to a gentle simmer. As it simmers, scrape the bottom of the skillet with a wooden spoon. This action helps lift any tasty bits stuck to the pan. Combining Chicken and Sauce Next, stir in the heavy cream and mix well. Return the chicken thighs to the skillet, placing them skin-side up. Make sure they are mostly covered with the creamy mushroom sauce. Simmering the Dish Reduce the heat to low, cover, and let it simmer for about 25-30 minutes. This slow cooking helps the chicken become tender and fully cooked. Adjusting Seasoning Once done, remove the skillet from heat. Taste the sauce and adjust the seasoning if needed. You can add more salt, pepper, or even some fresh herbs for extra flavor. Garnish with chopped parsley before serving. Enjoy! Ensuring Even Cooking To cook chicken thighs evenly, start with room temperature meat. Take them out of the fridge 30 minutes before cooking. This helps the inside cook through without burning the outside. Use a heavy skillet for better heat distribution. How to Check Chicken Doneness The best way to check if chicken is done is with a meat thermometer. Aim for 165°F (75°C) in the thickest part. If you don’t have a thermometer, cut into the thigh. The juices should run clear, not pink. Alternative Mushroom Options If you can’t find cremini or button mushrooms, try shiitake or portobello. Both add rich flavors. You can even mix different types for a unique taste. Cream Substitutes for Lighter Version You can replace heavy cream with half-and-half or Greek yogurt for a lighter dish. If you want a dairy-free option, use coconut milk or a nut-based cream. How to Store Leftovers Let the dish cool down before storing. Place it in an airtight container. It stays fresh in the fridge for up to three days. For longer storage, freeze it in portions. Reheating Instructions To reheat, place the chicken in a skillet over low heat. Add a splash of broth or water to prevent drying. Cover it to warm evenly. You can also use the microwave, but stir halfway through to heat it evenly. {{image_2}} You can make this dish even better by adding greens. Spinach or kale works great. Just toss them in with the mushrooms. They add color and nutrients. You can also try other veggies. Peas, carrots, or bell peppers can fit well in the sauce. Each adds a new taste and texture. If you want a change, use boneless chicken thighs. They cook faster and stay juicy. Chicken breast is another good option, but it can dry out. If you go with breast, watch the cooking time. It cooks quicker than thighs. Want a lighter sauce? Swap heavy cream for half-and-half or Greek yogurt. This cuts calories but still gives creaminess. You can also add cheese for a richer flavor. Parmesan or cream cheese blends well into the sauce. This gives it a tasty twist. Calories per Serving This dish has about 400 calories per serving. The creamy sauce adds richness, while the chicken provides protein. Macronutrient Composition - Protein: 30g - Fat: 28g - Carbohydrates: 8g This meal gives a good balance of protein and healthy fats. It can keep you full and satisfied. Benefits of Mushrooms Mushrooms are low in calories but rich in nutrients. They offer antioxidants, which help fight off illness. They also provide vitamins like B and D, boosting your overall health. Advantages of Chicken Thighs Chicken thighs are juicy and full of flavor. They contain more fat than chicken breast, which helps keep the meat tender. Plus, they provide a good source of protein, iron, and zinc. Gluten-Free and Keto Options This recipe is naturally gluten-free. It fits well into a keto diet due to its low carbohydrate content. You can enjoy it without worries about gluten. Allergy Awareness Be cautious if you have allergies. This recipe contains chicken and dairy. If you have mushroom allergies, skip the mushrooms or use another vegetable. Always check labels for hidden allergens. How long do I cook chicken thighs? Cook chicken thighs for about 25-30 minutes. Use a meat thermometer to check the internal temperature. It should read 165°F. This ensures the chicken is safe to eat. Can I use chicken breast instead of thighs? Yes, you can use chicken breast. However, thighs are juicier and more flavorful. If you choose breast, cook it for about 20-25 minutes. Keep an eye on it to avoid dryness. How to make this dairy-free? To make this dish dairy-free, swap heavy cream with coconut milk. Use a non-dairy milk alternative as well. This keeps the sauce creamy without dairy. Can I freeze the creamy mushroom sauce? You can freeze the sauce. Let it cool completely before placing it in a freezer-safe container. It lasts up to three months. Reheat gently on the stove when ready to use. What is the best way to sear chicken? The best way to sear chicken is to use a hot skillet. Start with a little olive oil. Place the chicken skin-side down and do not move it for the first few minutes. This helps achieve a nice golden color. How do I know when the chicken is fully cooked? Check for doneness using a meat thermometer. The chicken should reach 165°F. You can also cut into the thickest part. The juices should run clear with no pink. This blog post covers the key ingredients for a delicious chicken dish. We discussed main ingredients like chicken thighs, mushrooms, and garlic. I shared tips for creating a creamy sauce and garnishing with parsley. You now have step-by-step instructions for preparing and cooking the dish. I offered cooking tips and ingredient substitutes for flexibility. Lastly, we explored variations to suit your taste. Enjoy making this dish, and know it can be adjusted to fit your needs. Happy cooking!
    Creamy Mushroom Chicken Thighs Simple and Savory Meal
  • Here are the ingredients you need for Crispy Parmesan Crusted Chicken Cutlets. Gather these before you start cooking. - 4 boneless, skinless chicken breasts - 1 cup breadcrumbs (preferably panko for extra crispiness) - 1/2 cup grated Parmesan cheese - 1 teaspoon garlic powder - 1 teaspoon Italian seasoning - 1/2 teaspoon salt - 1/2 teaspoon black pepper - 2 large eggs - 1/4 cup flour - 3 tablespoons olive oil - Fresh parsley for garnish (optional) Each ingredient plays a key role in making this dish tasty. The chicken breasts are the main part. They give your meal protein and flavor. Using panko breadcrumbs gives extra crunch. The Parmesan cheese adds a rich, salty note. Garlic powder and Italian seasoning boost the flavor, making every bite delicious. The eggs help the coating stick to the chicken. Flour helps create a nice base for the egg and breadcrumbs. Olive oil not only adds taste but also helps in crisping the cutlets. Finally, fresh parsley gives a nice pop of color and freshness when you serve the dish. Make sure to choose high-quality ingredients for the best taste. If you have any allergies or specific preferences, feel free to adapt the ingredients to fit your needs. - Preheat your oven to 400°F (200°C). Line a baking sheet with parchment paper. - Set up a three-bowl breading station: one with flour, one with beaten eggs, and one with a mix of breadcrumbs, Parmesan, garlic powder, Italian seasoning, salt, and pepper. - Take a chicken breast, coat it in flour, shake off the excess, then dip it in the eggs. Press it into the breadcrumb mix until fully coated. Repeat this for all chicken breasts. - Heat olive oil in a large skillet over medium heat. Once hot, add the chicken cutlets. Cook for 3-4 minutes on each side until golden and crispy. Avoid overcrowding the pan. - Transfer the browned cutlets to the prepared baking sheet. Bake in the preheated oven for 10-15 minutes or until the chicken reaches an internal temperature of 165°F (75°C). - After baking, remove the cutlets from the oven. Let them rest for a few minutes. Garnish with fresh parsley if you like. Enjoy your crispy, cheesy chicken! To get that perfect crunch, start with panko breadcrumbs. They are light and airy, giving the cutlets a great texture. If you can't find panko, regular breadcrumbs work too, but they might not be as crispy. For frying, heat your olive oil until it's hot but not smoking. If the oil is too cool, the chicken will soak up the oil. This makes it greasy instead of crispy. Fry the chicken in batches. Overcrowding the pan leads to steaming, not frying. Want to add more flavor? Try mixing in some paprika, cayenne pepper, or dried herbs like thyme or oregano. These spices can elevate the taste. You can even add a bit of lemon zest for a fresh twist. Just remember to mix them into your breadcrumb mixture for even coverage. Cook the chicken until it reaches an internal temperature of 165°F (75°C). Use a meat thermometer for accuracy. This ensures the chicken is safe to eat. To avoid drying it out, keep an eye on cooking times. Fry for about 3-4 minutes on each side, then bake for 10-15 minutes. Resting the chicken for a few minutes after cooking helps it stay juicy too. {{image_2}} You can switch up the cheese in this recipe. Mozzarella gives a gooey texture. It melts well and adds a nice pull. Cheddar is another great choice. It brings a sharp flavor that pairs well with chicken. Try blending cheeses for new tastes. Mixing Parmesan with either cheese can add depth. Experiment and find your favorite combo. For a gluten-free version, use gluten-free breadcrumbs. They work just as well in this recipe. Look for brands made from rice or corn. They still give that nice crunch. Ensure your flour is also gluten-free. This way, everyone can enjoy the dish. It’s easy to make this change without losing flavor. Adding vegetables boosts flavor and nutrition. You can mix in spinach or roasted peppers. Spinach adds a mild taste and extra vitamins. Roasted peppers bring sweetness and color. Chop them finely and add to the breadcrumb mix. This not only enhances taste but also makes the dish pop. Feel free to get creative with other veggies too! After you enjoy your crispy chicken cutlets, store any leftovers safely. First, let the cutlets cool down to room temperature. Then, wrap them tightly in plastic wrap or store them in an airtight container. This keeps them fresh. Place them in the fridge. They will last for about 3 to 4 days. Avoid stacking them to keep them from getting soggy. To enjoy your leftovers, you want to bring back the crispiness. The best way to reheat them is in the oven. Preheat your oven to 350°F (175°C). Place the cutlets on a baking sheet. Heat them for about 10 to 15 minutes until they are hot and crispy again. You can also use an air fryer. Set it to 350°F (175°C) and cook for about 5 to 7 minutes. This method keeps them nice and crunchy. If you want to save cutlets for later, freezing is a great option. First, let the cutlets cool completely. Then, place them in a single layer on a baking sheet. Freeze them for a few hours. After they are frozen, transfer them to a freezer bag. Remove as much air as possible before sealing. When you want to eat them, thaw the cutlets in the fridge overnight. Reheat them in the oven to restore their crispiness. This method keeps them tasty for up to 2 months. Yes, you can use chicken thighs. They have more fat, making them juicier. Thighs also add great flavor. Just make sure to adjust the cooking time. Thighs may take a bit longer to cook through than breasts. Use a meat thermometer to check the internal temperature. It should reach 165°F (75°C) for safe eating. You can tell the chicken is done by checking the temperature. Insert a meat thermometer into the thickest part of the cutlet. It should read 165°F (75°C). If you don’t have a thermometer, look for golden brown color. The juices should run clear when you cut into it. Avoid cutting too soon to keep it juicy. Yes, you can prepare the cutlets ahead of time. Bread the chicken and store it in the fridge. This keeps it fresh for a few hours. You can also cook them and store the leftovers. Just let them cool, then place them in an airtight container. They stay good in the fridge for about three days. These cutlets pair well with many sides. Here are some tasty options: - Steamed broccoli - Mashed potatoes - Garlic bread - Salad with a light dressing - Pasta with marinara sauce Mix and match these sides to create a delicious meal. Enjoy your cooking! In this blog post, we covered how to make Crispy Parmesan Crusted Chicken Cutlets. You learned about the key ingredients, step-by-step cooking methods, and helpful tips for perfecting the dish. We also explored fun variations, storage options, and answered common questions. Now you can enjoy crispy cutlets that impress your family and friends. With a few tweaks, this dish can easily fit your needs. Enjoy cooking and experimenting with your own flavors!
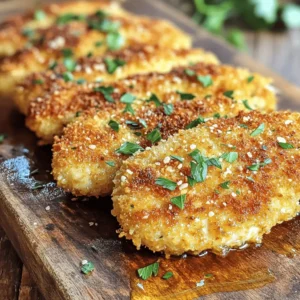
    Crispy Parmesan Crusted Chicken Cutlets Delight
  • - 2 packs of instant ramen noodles - 4 cups water - 4 cloves garlic, minced - 2 tablespoons chili oil - 1 tablespoon soy sauce - 1 teaspoon sesame oil - 1 small bunch of green onions, sliced - 1 tablespoon sesame seeds (optional) - Fresh cilantro for garnish (optional) - Crushed red pepper flakes to taste You need simple ingredients for this tasty dish. Instant ramen noodles are quick and easy to find. Fresh garlic packs a punch of flavor. Chili oil adds heat and richness. Soy sauce gives depth, while sesame oil adds a hint of nuttiness. Green onions brighten the dish with color and taste. For a fun touch, sesame seeds and cilantro work great as garnishes. Crushed red pepper flakes let you adjust the spice to your liking. This mix allows you to create a warm and satisfying meal. 1. In a medium pot, bring 4 cups of water to a boil over high heat. 2. Once the water is boiling, add the instant ramen noodles. Cook for about 3-4 minutes until tender. 3. After cooking, drain the noodles in a colander and return them to the pot. 1. While the noodles cook, heat 2 tablespoons of chili oil in a small skillet over medium heat. 2. Add 4 cloves of minced garlic to the skillet. Sauté for 1-2 minutes until it smells great and turns golden. Be careful not to burn it. 3. Stir in 1 tablespoon of soy sauce and 1 teaspoon of sesame oil into the garlic mixture. Remove from heat. 1. Pour the garlic chili oil mixture over the cooked noodles in the pot. Toss to coat the noodles well. 2. Add sliced green onions and crushed red pepper flakes. Mix everything together. 3. Serve the noodles in bowls. You can garnish with sesame seeds and fresh cilantro if you like. - Cooking Time for Ideal Texture For the best texture, cook the ramen noodles for just 3-4 minutes. This keeps them tender and chewy. If you cook them too long, they can become mushy. Always check the package instructions since some brands vary. - Tips for Avoiding Overcooked Garlic Sauté garlic for only 1-2 minutes. You want it to turn golden and fragrant, not brown. If it burns, it will taste bitter. If you’re unsure, keep a close eye on it as it cooks. - Suggestions for Extra Ingredients Add veggies like spinach or bell peppers for more color and nutrition. You can also include proteins like cooked chicken or tofu. These additions make the dish heartier and more satisfying. - Using Quality Chili Oil Choose a good-quality chili oil for the best flavor. A well-made chili oil has depth and richness. It elevates the dish from simple to gourmet. If you like heat, add more chili oil or some crushed red pepper flakes. {{image_2}} You can easily make this dish vegetarian or vegan. Just swap out a few ingredients. - Substituting Ingredients: Use vegetable broth instead of water for cooking. This adds more flavor. Instead of soy sauce, opt for tamari if you need a gluten-free option. - Recommended Plant-Based Additions: Add tofu for protein. You can sauté it in the chili oil until golden. Include vegetables like bell peppers, mushrooms, or broccoli. They add color and nutrition. Want more heat? You can easily change the spice level to fit your taste. - Modifying Chili Oil Amount: Start with less chili oil. You can add more to your liking later. This way, you control the heat level. - Other Heat Sources to Consider: Use fresh or dried chili peppers. You can also try jalapeños for a fresh kick. Crushed red pepper flakes are a great option, too. Just sprinkle them on top before serving. To keep your cooked noodles fresh, store them in an airtight container. This keeps moisture out and prevents clumping. Place the noodles in the fridge if you plan to eat them later. They stay good for about three days. When reheating, you can use a microwave or a pot. If using a microwave, add a splash of water to keep them moist. Heat in short bursts, stirring often. If using a pot, add a little water and warm them on low heat. Stir gently to avoid sticking. Preparing your ingredients in advance saves time. Chop the garlic and slice the green onions ahead of time. Store them in separate containers. This way, they stay fresh and ready to use. For meal prep, keep your ramen noodles separate from the sauce. Cook the noodles when you’re ready to eat. Mixing them with the sauce right before serving keeps everything tasty and fresh. You can use any instant ramen noodles. I like to pick brands that have simple flavors. Look for noodles that cook quickly, around 3-4 minutes. This saves time and keeps the meal fast. Some brands might have added flavors, so read the package. You can choose plain noodles if you want to control the taste. Yes, you can! There are many gluten-free ramen options. Look for rice noodles or brown rice ramen. These options hold up well in the dish. You can find them in most grocery stores. Always check for a gluten-free label to be safe. You can add fresh veggies to boost nutrition. Try spinach, carrots, or bell peppers. Sauté them with garlic for more flavor. You can also use less chili oil to cut down on fats. Another option is to swap regular noodles for whole grain or veggie noodles. This adds fiber and nutrients. This blog covered how to make flavorful garlic chili ramen. You learned about the key ingredients, simple steps, and helpful tips. I shared ways to customize your dish and make it healthier. Enjoy experimenting with different spices and garnishes. With this knowledge, you can create a delicious bowl every time. Whether it's a quick meal or a fun project, your ramen journey starts now. Dive in and savor your tasty creation!
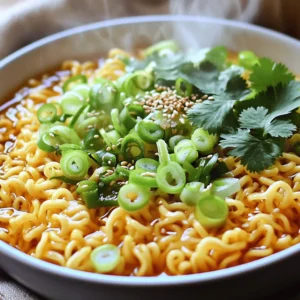
    Minute Garlic Chili Ramen Noodles Quick and Easy Meal
  • - 1 cup rolled oats - 1/2 cup almond butter (or peanut butter) - 1/2 cup pumpkin puree - 1/4 cup honey or maple syrup - 1/4 cup ground flaxseed - 2 teaspoons pumpkin spice seasoning - 1/2 teaspoon vanilla extract - 1/4 cup mini chocolate chips (optional) - Pinch of sea salt Each ingredient in these energy balls brings something special. - Rolled oats provide fiber and energy. They keep you full longer. - Almond butter adds healthy fats and protein. It helps build muscle. - Pumpkin puree is low in calories. It has vitamins A and C. - Honey or maple syrup gives natural sweetness. They are better than refined sugar. - Ground flaxseed is rich in omega-3 fatty acids. It supports heart health. - Pumpkin spice seasoning blends warm flavors. It adds a cozy touch. - Vanilla extract enhances sweetness. It makes the balls taste great. - Mini chocolate chips offer a fun treat. They can be skipped if you want less sugar. - Sea salt balances flavors. It makes everything taste better. You can swap some ingredients if needed. Here are some options. - Instead of almond butter, use peanut butter or sunflower seed butter. - If you want a vegan option, replace honey with agave syrup. - For a gluten-free version, ensure the rolled oats are certified gluten-free. - You can replace pumpkin puree with applesauce for a different taste. - To add crunch, try using chopped nuts in place of chocolate chips. These changes keep the energy balls tasty and healthy. Enjoy making your own version! To start, gather all your ingredients. You need rolled oats, almond butter, pumpkin puree, honey, ground flaxseed, pumpkin spice, vanilla extract, and mini chocolate chips if you want. In a large bowl, mix the rolled oats, almond butter, pumpkin puree, and honey or maple syrup. Stir until everything blends well. This step is key for a tasty base. Next, add the ground flaxseed, pumpkin spice, vanilla extract, and a pinch of sea salt. Mix again until all ingredients combine smoothly. The flaxseed adds fiber, and the pumpkin spice brings warmth to the flavor. If you love chocolate, now is the time to fold in the mini chocolate chips. They make the energy balls extra special. Use a sturdy spoon or spatula for mixing. This helps you combine the thick almond butter and pumpkin puree easily. If the mixture feels too dry, add a little more honey or pumpkin puree. If it's too wet, sprinkle in more oats or flaxseed. Taste your mixture! Adjust the sweetness or spice to your liking. Make sure to mix until no dry ingredients remain. This ensures each bite has great flavor. If you have kids helping, let them mix! It’s a fun way to get everyone involved. Once the mixture is ready, it’s time to roll the balls. Scoop about 1 tablespoon of the mixture using your hands. Roll it gently into a ball shape. Make sure the balls are firm, but not too tight. If they crumble, you may need to mix in a bit more almond butter or honey. Place each ball on a baking sheet lined with parchment paper. This prevents sticking. After shaping all the energy balls, chill them in the fridge for at least 30 minutes. Chilling helps them firm up and makes them easier to eat. Enjoy these tasty bites as a snack or breakfast on the go! To get the right texture for your energy balls, use rolled oats. They give a nice chewiness. The almond butter or peanut butter adds creaminess. Make sure your pumpkin puree is thick and not watery. If it feels too dry, add a bit more honey or maple syrup. If it seems too wet, add more oats or flaxseed. One common mistake is not chilling the balls long enough. They need at least 30 minutes in the fridge. This helps them firm up. Another mistake is not mixing well. Ensure all ingredients blend fully. If you skip the sea salt, you might miss out on flavor. Lastly, don’t skip the pumpkin spice. It gives that warm, cozy taste we love. For a fun presentation, place the energy balls in a bright bowl. You can sprinkle extra pumpkin spice on top for flair. These energy balls are great for snacks or a quick breakfast. Pair them with some fresh fruit or yogurt for a balanced meal. Enjoy them right away or store them in the fridge for later! {{image_2}} You can play with flavors in your energy balls. Try adding chocolate peanut butter for a rich twist. Just swap almond butter for chocolate peanut butter in the recipe. You could also mix in cinnamon raisin for a warm flavor. Just add some raisins and a bit more cinnamon. The options are fun and tasty! You can make these energy balls fit your diet too. For a vegan option, use maple syrup instead of honey. Almond butter is already plant-based, so you're all set there. If you want gluten-free, make sure to use certified gluten-free oats. This way, everyone can enjoy these yummy snacks! Boost the nutrition of your energy balls by adding superfoods. Consider mixing in protein powder for extra protein. A scoop of your favorite powder will work well. You can also add chia seeds for more fiber and omega-3s. Just a tablespoon will do the trick. These additions make your snack even healthier! To store your no-bake pumpkin spice energy balls, place them in an airtight container. This keeps them fresh and tasty. You can stack them in a single layer or add parchment paper between layers. This helps avoid sticking. If you want to freeze the energy balls, first chill them in the fridge. Once they firm up, place them in a freezer-safe container. They can last up to three months in the freezer. To thaw, just move them to the fridge overnight. You can also leave them at room temperature for a few hours. These energy balls stay fresh in the fridge for up to one week. For the best taste and texture, enjoy them within the first few days. Check for any changes in smell or texture before eating, just to be safe. Yes, you can. You can swap almond butter for peanut butter. Other options include cashew or sunflower seed butter. Each nut butter gives a unique taste. I find almond butter adds a nice creaminess. Peanut butter gives a classic flavor. These energy balls last about one week in the fridge. Store them in an airtight container. If you want them to last longer, freeze them. They can stay fresh for up to three months when frozen. Just let them thaw before you eat. Yes, these energy balls are gluten-free. Use certified gluten-free oats to be safe. All other ingredients are naturally gluten-free. This makes them a great snack for everyone. Enjoy without worry! You’ve learned how to make tasty no-bake pumpkin spice energy balls from scratch. We covered key ingredients and their benefits, plus tips for mixing and rolling. Remember to avoid common mistakes to get the best texture. You can play with flavors and substitute ingredients to fit your diet. Proper storage keeps them fresh longer. These snacks are easy, healthy, and full of energy. Now, it’s time to get in the kitchen and enjoy your new creation!
    No-Bake Pumpkin Spice Energy Balls Easy and Healthy

Posts pagination

← Newer 1 … 5 6 7 8 9 … 33 Older →

Footer

↑ back to top

More information

  • Dinner
  • Drinks
  • Appetizers
  • Dessert
  • About
  • Contact Us

    Our Policies

    • Privacy Policy
    • Cookie Policy
    • Copyright Policy
    • Disclaimer
    • GDPR Policy
    • Terms Of Us

    Copyright © 2024 My Saved Recipe