• Recipes
    • Dinner
    • Dessert
    • Appetizers
    • Drinks
  • About
  • Contact Us
  • Privacy Policy
menu icon
go to homepage
  • Recipes
    • Dinner
    • Dessert
    • Appetizers
    • Drinks
  • About
  • Contact Us
  • Privacy Policy

search icon
Homepage link
  • Recipes
    • Dinner
    • Dessert
    • Appetizers
    • Drinks
  • About
  • Contact Us
  • Privacy Policy

×
Savannah

Savannah

Savannah is the creative force behind My Saved Recipe, a space where food becomes both art and adventure. A passionate home chef, she delights in exploring flavors from around the world while honoring timeless classics.

Savannah’s philosophy centers on the power of food to bring people together, spark creativity, and create lasting memories. Through thoughtfully crafted recipes and practical tips, she inspires cooks of all levels to embrace fresh ingredients, experiment with confidence, and find joy in the kitchen.

  • To make this warm soup, you need a few key items. Gather these ingredients: - 1 lb boneless, skinless chicken breasts, diced - 2 tablespoons olive oil - 1 medium onion, chopped - 2 cloves garlic, minced - 3 medium carrots, diced - 2 stalks celery, diced - 1 cup frozen peas - 4 cups chicken broth - 1 cup heavy cream - 1 teaspoon dried thyme - 1 teaspoon dried rosemary - Salt and pepper to taste - 1 cup frozen or refrigerated pie crust, cut into small squares - Fresh parsley, chopped (for garnish) These ingredients create a rich and creamy soup that feels like a warm hug. You will need some basic cooking tools to make this soup. Here’s what I recommend: - A large pot for cooking - A cutting board for chopping - A sharp knife for easy dicing - Measuring cups and spoons for accuracy - A stirring spoon to mix the ingredients These tools help you cook efficiently and keep your kitchen tidy. Garnishes can make your soup look extra special. I like to use: - Fresh parsley, chopped - Additional pie crust squares for dipping These small touches add flavor and a nice finish to your cozy chicken pot pie soup. Start by heating the olive oil in a large pot over medium heat. I like to add the chopped onion and minced garlic right after. Sauté them for about 3 to 4 minutes. The goal is to make the onions soft and clear. Next, add the diced chicken to the pot. Cook it until the chicken is brown on all sides. This takes about 5 to 7 minutes. Don’t forget to sprinkle in salt, pepper, thyme, and rosemary. These spices bring out the best flavors. Once the chicken is ready, it’s time to add the diced carrots and celery. Stir these in and let them cook for another 5 minutes. You want them to start getting soft but not mushy. After that, toss in the frozen peas. They will add a nice pop of color and sweetness to the soup. Now, pour in the chicken broth. Bring the mix to a gentle boil. Once it boils, reduce the heat and let it simmer for 15 to 20 minutes. This helps all the flavors blend well together. After simmering, stir in the heavy cream for richness. If you have pie crust squares, add them now. Let them cook in the soup for about 10 minutes, until they are tender. Finally, taste the soup and adjust the seasoning if needed. Let it sit for a few minutes to thicken. Serve it hot in bowls, topped with fresh parsley for a touch of color. To make your Cozy Chicken Pot Pie Soup shine, use fresh herbs. Fresh thyme and rosemary add great taste. You can also add a splash of lemon juice. This brightens the flavors and adds a zing. For a bolder taste, try a bit of white wine. Cook it down before adding the broth. This adds depth and richness to the soup. The cooking time in this recipe is about 50 minutes. If you want a quicker meal, use diced rotisserie chicken. This cuts down the cooking time to about 30 minutes. You can also cook the soup on low heat. This allows the flavors to meld together nicely. Just remember to check often, so it doesn’t boil too much. Serve the soup in rustic bowls for a cozy touch. Top each bowl with freshly chopped parsley. For fun, add extra pie crust squares on the side. This lets everyone dip and enjoy. Pair the soup with a simple green salad. A light vinaigrette dressing goes well with the creamy soup. {{image_2}} To make this soup in a slow cooker, start by prepping your ingredients. Dice the chicken, onion, garlic, carrots, and celery. In a slow cooker, add all the chopped veggies, chicken, and seasonings. Pour in the chicken broth and stir well. Set the slow cooker on low for 6-8 hours or high for 3-4 hours. About 30 minutes before serving, stir in the heavy cream and peas. If using pie crust squares, add them now and let them cook until tender. Using an Instant Pot makes this soup quick and easy. Start by sautéing the onions and garlic in the pot. Add the diced chicken and cook until browned. Then, add the carrots, celery, and seasonings. Pour in the chicken broth and secure the lid. Set the pot to cook on high pressure for 10 minutes. After cooking, release the pressure and stir in the cream and peas. Add the pie crust squares and let them cook in the soup for about 5 minutes. For a vegetarian twist, replace the chicken with hearty veggies. Use diced potatoes, mushrooms, and green beans. You can also add chickpeas for protein. Sauté the veggies, then add vegetable broth instead of chicken broth. Follow the same steps for adding cream and pie crust squares. This version retains all the cozy flavors while being meat-free. To keep your Cozy Chicken Pot Pie Soup fresh, let it cool first. Transfer the soup to an airtight container. You can store it in the fridge for up to three days. Make sure to label the container with the date. This way, you know when to use it. If you want to keep your soup longer, freezing is a great idea. Pour the cooled soup into a freezer-safe container. Leave some space at the top since the soup will expand. You can freeze it for up to three months. It’s best to use a vacuum sealer if you have one. This keeps out air and prevents freezer burn. When you are ready to eat, thaw the soup in the fridge overnight. You can reheat it on the stove over medium heat. Stir it often to avoid sticking. If the soup is too thick, add a bit of chicken broth or water. You can also microwave it in a bowl. Cover the bowl with a paper towel to keep it from splattering. Heat it in short intervals, stirring in between. Enjoy your warm, comforting soup! Yes, you can use rotisserie chicken. It saves time and adds flavor. Just shred or chop it into small pieces. Add it to the pot when the recipe calls for diced chicken. This makes the soup quick and easy. You can use half-and-half or whole milk. For a dairy-free option, try coconut milk or almond milk. These will change the flavor a bit but will still keep the soup creamy. Just remember to adjust the seasoning to balance the taste. This soup lasts about 3 to 4 days in the fridge. Store it in an airtight container. Make sure it cools down before sealing. If you want to keep it longer, consider freezing it. This recipe is not gluten-free due to the pie crust. To make it gluten-free, use a gluten-free pie crust or skip the crust altogether. The soup is tasty on its own, even without the crust pieces. In this article, we explored how to make Cozy Chicken Pot Pie Soup from scratch. We covered the key ingredients, step-by-step cooking instructions, and helpful tips to enhance flavor. You also learned about different cooking methods and how to store leftovers. This dish is simple yet satisfying. It warms you up and brings comfort. Remember to experiment with flavors and enjoy every bowl. Happy cooking!
    Cozy Chicken Pot Pie Soup Comfort in a Bowl
  • - 1 lb potato gnocchi (store-bought or homemade) - 1 medium butternut squash, peeled and cubed - 2 cups Brussels sprouts, halved - 1 red onion, sliced - 1 red bell pepper, sliced - 3 tablespoons olive oil - 2 teaspoons dried thyme - 1 teaspoon smoked paprika - Salt and pepper to taste This dish shines with its simple yet vibrant ingredients. The potato gnocchi serves as a comforting base. You can use store-bought gnocchi for ease or make your own for a fresh touch. The butternut squash adds sweetness and creaminess. Brussels sprouts bring a slight bitterness, which balances the dish. The red onion and red bell pepper offer a pop of color and crunch. The seasonings elevate the flavors. Olive oil coats the veggies, helping them roast perfectly. Dried thyme gives a warm, herbal note. Smoked paprika adds a hint of smokiness, making every bite exciting. Salt and pepper round out the taste, ensuring nothing gets lost. - Fresh parsley, chopped (for garnish) - Parmesan cheese (if desired) Garnishes can enhance the dish's appeal. Fresh parsley adds brightness and a splash of color. If you love cheese, sprinkle some parmesan on top. It melts beautifully and adds a rich flavor. These garnishes make your meal look and taste even better! First, let’s get the oven ready. Set the temperature to 425°F (220°C). This heat will help roast the veggies and crisp the gnocchi. Now, let’s chop the vegetables. Take 1 medium butternut squash and peel it. Cut it into cubes. Next, grab 2 cups of Brussels sprouts. Cut them in half. Slice 1 red onion and 1 red bell pepper. Place all these in a large bowl. Drizzle 3 tablespoons of olive oil over the veggies. Then, sprinkle 2 teaspoons of dried thyme, 1 teaspoon of smoked paprika, and some salt and pepper. Toss everything well until the veggies are coated nicely. Spread the seasoned vegetables evenly on a large baking sheet lined with parchment paper. Roast them in the preheated oven for 20 minutes. Halfway through, take the baking sheet out and stir the veggies. This helps them cook evenly and brings out their best flavors. While the veggies roast, let’s prepare the gnocchi. If you’re using store-bought gnocchi, boil them in water. Cook until they float, which means they are ready. Drain and set them aside for later. After 20 minutes of roasting, take the baking sheet out. Add the cooked gnocchi to the roasted vegetables. Gently toss everything together. Return the baking sheet to the oven and roast for another 10-15 minutes. The gnocchi should be golden and slightly crispy on the edges when done. Enjoy the delightful mix of flavors! To get the best flavor, coat your veggies evenly with olive oil and seasonings. This step helps to ensure that every bite is packed with taste. When you toss the vegetables, aim for a light and even layer. This keeps them from sticking and helps them roast perfectly. Remember, a good roast needs space. Avoid overcrowding the baking sheet. This way, each vegetable can brown nicely. For crispy gnocchi, you want to roast them just right. After boiling, make sure to drain them well. Excess water can lead to sogginess. When you add the gnocchi to the baking sheet, spread them out. This helps them crisp up on the edges. Keep an eye on them while roasting. You want a golden color, which means they are just right. Presentation is key to a great meal. Serve your gnocchi and veggies on a large platter. Drizzle a bit of extra olive oil over the top for shine. A sprinkle of parmesan cheese adds flavor and a nice touch. If you want a pop of color, add fresh parsley as a garnish. This dish looks as good as it tastes! {{image_2}} You can use many seasonal vegetables in this recipe. Try adding: - Carrots, sliced - Sweet potatoes, cubed - Cauliflower, chopped - Kale, torn into pieces Each vegetable brings its unique taste and texture. Mixing them keeps the dish fresh and exciting. Choose what you love or what’s in season. Spice up your dish with different seasonings and herbs. Here are some ideas: - Rosemary for a woodsy flavor - Oregano for a Mediterranean twist - Garlic powder for extra depth - Red pepper flakes for heat Feel free to experiment! The right spices can elevate your meal and surprise your taste buds. Want to make this dish heartier? Add a protein! Consider: - Cooked chicken, diced - Italian sausage, sliced - Chickpeas for a plant-based option - Tofu, cubed and roasted Adding protein makes the meal more filling. Choose what fits your diet or mood. It’s a great way to customize your sheet-pan gnocchi! To store your leftovers, first let the dish cool completely. Use an airtight container to keep moisture in. Place the gnocchi and vegetables in the fridge within two hours. They will stay fresh for up to three days. When you're ready to eat, you can enjoy them cold or reheated. To reheat, I recommend using the oven or a skillet. For the oven, preheat to 350°F (175°C). Spread the gnocchi and veggies on a baking sheet. Heat for about 15 minutes or until warm. If using a skillet, add a bit of olive oil to avoid sticking. Heat over medium until everything is warm and crispy. You can freeze both uncooked and cooked meals. For uncooked gnocchi, place them in a single layer on a baking sheet. Freeze them for an hour before transferring to a freezer bag. Cooked meals can also be frozen. Just let them cool completely, then store in an airtight container. They will keep for about three months. Thaw in the fridge overnight before reheating. Yes, you can use homemade gnocchi. Making your own gives a fresh taste. To make gnocchi, you need potatoes, flour, and eggs. Cook the potatoes until soft, mash them, and mix with flour and eggs. Roll the dough into small pieces and shape them. Cook the gnocchi until they float in boiling water. This process takes time but is worth it. This dish takes about 50 minutes to make. You need 15 minutes to prep the ingredients. Roasting the vegetables takes 20 minutes. After that, you boil the gnocchi and mix everything. Finally, an extra 10 to 15 minutes in the oven gives a nice finish. Yes, you can swap vegetables easily. Try sweet potatoes, carrots, or zucchini. You can also mix in kale or spinach for extra greens. Just be mindful of cooking times. Some veggies may need more or less time to roast. This dish is great for meal prep. You can roast the veggies and cook the gnocchi ahead of time. Store them separately in containers. When ready to eat, mix and reheat. This saves time and makes meals easy. This blog post outlined a flavorful recipe using potato gnocchi and seasonal veggies. We covered step-by-step cooking tips, variations for personal taste, and ways to store leftovers. You learned how to achieve crispy gnocchi and select the best veggies. Cooking can be fun, and this dish is both simple and delicious. Try the ideas shared and enjoy the rich flavors. You’ll impress your friends and family with this tasty meal. Happy cooking!
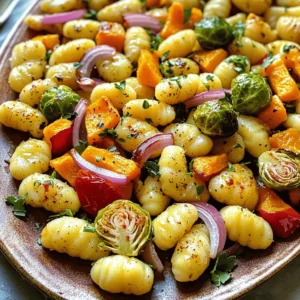
    Sheet-Pan Gnocchi with Roasted Fall Vegetables Delight
  • - 1 lb large shrimp, peeled and deveined - 1 cup shredded coconut - 1 cup panko breadcrumbs - 1/2 cup all-purpose flour - 2 large eggs, beaten - 1/2 cup sweet chili sauce - 1 tablespoon lime juice - 1 teaspoon sriracha (optional) - 1 teaspoon garlic powder - 1 teaspoon paprika - Salt and pepper to taste Gather these ingredients to create a delicious dish. Large shrimp work best for this recipe. Make sure to peel and devein them to avoid any gritty texture. Use fresh shredded coconut for a great taste. Panko breadcrumbs give a crunchy coating. The all-purpose flour helps the coating stick. Beating the eggs adds a nice layer of flavor. For the sweet chili sauce, you can use store-bought or make your own. Lime juice adds a nice tartness. If you like heat, add sriracha. For seasoning, garlic powder and paprika enhance the shrimp's flavor. A touch of salt and pepper brings it all together. These ingredients make the dish fun and easy to prepare! Each step builds on the last, leading to a tasty meal everyone will love. To start, you need to pat the shrimp dry with paper towels. This helps the coating stick well. If the shrimp are wet, the breading will not hold. Next, set up your breading stations. You will need three bowls. In the first bowl, mix the all-purpose flour with garlic powder, paprika, salt, and pepper. In the second bowl, whisk the eggs until smooth. In the third bowl, combine the shredded coconut and panko breadcrumbs. Now, let’s bread the shrimp. Begin by dipping each shrimp into the flour mixture. Shake off the extra flour. Then, dip the shrimp into the beaten eggs. Let the excess egg drip off. After that, coat the shrimp in the coconut-panko mix. Press down slightly to make sure it sticks. This process gives the shrimp a crunchy texture when cooked. Before cooking, preheat the air fryer to 400°F (200°C). Let it preheat for about 5 minutes. While it heats, lightly spray the air fryer basket with cooking oil. Place the shrimp in a single layer, making sure not to overcrowd them. Spray the tops of the shrimp lightly with cooking oil too. Air fry the shrimp for 8 to 10 minutes. Remember to flip them halfway through for even cooking. They should be golden brown and crispy when done. Preheating your air fryer is key. This step helps cook the shrimp evenly. Set it to 400°F (200°C) for about 5 minutes. Next, use cooking spray for extra crispiness. Lightly coat the air fryer basket and the shrimp. This small tip makes a big difference in texture. To keep the batter from falling off, dry your shrimp well. Pat them with paper towels. This way, the coating sticks better. Adjust seasonings to fit your taste. Want more spice? Add extra paprika or some cayenne. Love garlic? Increase the garlic powder for a bolder flavor. Coconut shrimp pairs well with several sides. Try a fresh salad or some rice. Both work great to balance the rich shrimp. For plating, stack the shrimp high on a plate. Add a small bowl of sweet chili sauce nearby for dipping. Garnish with lime wedges for color and a fresh touch. {{image_2}} You can easily change the flavor of your coconut shrimp. Try adding different seasonings to the flour mix. For a zesty kick, mix in some cayenne pepper or chili powder. You can also use dried herbs like oregano or thyme. Fresh herbs work great too! Chopped cilantro or parsley can give a fresh twist. Just remember, a little goes a long way. If you want to make your own sweet chili sauce, it’s simple! Combine 1/2 cup of sweet chili sauce, 1 tablespoon of lime juice, and 1 teaspoon of sriracha to add heat. You can also try other dipping sauces. Honey mustard or garlic aioli are great choices. They add new flavors to your dish. Experiment with what you love! You don’t have to use shrimp if you want a vegan option. Try using tofu or jackfruit instead. Both can soak up flavors well. For a gluten-free option for the breading, use almond flour instead of regular flour. You can also find gluten-free breadcrumbs at the store. These swaps make it easy for anyone to enjoy this dish! To store your leftover coconut shrimp, place them in an airtight container. This keeps them fresh and prevents them from drying out. Make sure the shrimp cool down before sealing the container. You can keep them in the fridge for up to three days. If you want, you can also line the bottom of the container with paper towels to soak up extra moisture. When reheating coconut shrimp, the air fryer is your best friend. Preheat it to 350°F (175°C) for about 5 minutes. Place the shrimp in a single layer and cook for 5 minutes. This method keeps the shrimp crispy. Avoid reheating in the microwave, as it makes the shrimp soggy. If you must use a microwave, place a paper towel over the shrimp to absorb steam. To freeze coconut shrimp, let them cool completely first. Arrange them in a single layer on a baking sheet. Freeze them for about two hours until firm. Then, transfer the shrimp to a freezer-safe bag or container. This helps prevent them from sticking together. You can freeze them for up to three months. When you’re ready to eat, thaw shrimp in the fridge overnight. For a quick thaw, place them in a sealed bag and submerge in cold water for about 30 minutes. This method keeps them juicy and ready for cooking. For this recipe, I suggest using large shrimp. Large shrimp are easy to handle and cook evenly. Look for shrimp that are fresh and smell like the ocean. If you can, buy shrimp that are wild-caught. They have better taste and texture. Avoid shrimp that are mushy or have a strong smell. Yes, you can bake these shrimp in the oven. Preheat your oven to 425°F (220°C). Place the breaded shrimp on a baking sheet lined with parchment paper. Spray them lightly with oil. Bake for about 12-15 minutes, flipping them halfway. They should be golden brown and crispy. To make shrimp less greasy, pat them dry before breading. This helps the coating stick better. Use a light spray of oil instead of pouring oil. This way, you reduce oil use and still get a nice crisp. Make sure the air fryer basket is not overcrowded. This allows hot air to circulate and keeps them crispy. Coconut shrimp pairs well with many sides. You can serve it with a fresh salad, rice, or coleslaw. For drinks, try a light beer or a fruity cocktail. These options balance the sweetness of the shrimp. You can also add a slice of lime for extra zest. You now have everything you need to make delicious air fryer coconut shrimp. From selecting the right shrimp to creating that perfect crispy coating, every step makes a difference. The sweet chili sauce adds a tasty kick, and with variations, you can make this dish your own. Remember, prep and technique are key for the best results. Enjoy sharing this dish with friends and family for a great meal. Cooking can be fun, and this recipe proves it!
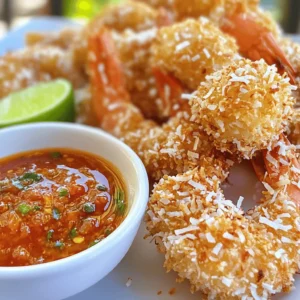
    Air Fryer Coconut Shrimp with Sweet Chili Sauce Delight
  • To create the perfect bakery-style chocolate chip banana bread, gather the following ingredients: - 3 ripe bananas, mashed - 1/2 cup unsalted butter, melted - 3/4 cup brown sugar, packed - 1/2 cup granulated sugar - 2 large eggs - 1 teaspoon vanilla extract - 1 teaspoon baking soda - 1/2 teaspoon salt - 1 1/2 cups all-purpose flour - 1 cup semi-sweet chocolate chips - 1/2 cup chopped walnuts (optional) Using ripe bananas is key. They add natural sweetness and moisture. Always choose bananas with brown spots. The butter should be unsalted for better control over flavors. The sugars give depth and richness to your bread. Eggs help bind everything together. Vanilla extract adds warmth and a lovely aroma. Baking soda is your leavening agent, while salt balances the sweetness. All-purpose flour gives structure to your loaf. Chocolate chips are the star of this recipe. They melt and create gooey pockets of joy. If you want a crunch, add chopped walnuts for a nice texture. You can adjust the amounts based on your taste. More chocolate? Go for it! Want to skip walnuts? No problem! Each ingredient plays a role, so choose wisely. First, you need to preheat your oven to 350°F (175°C). This step is key for even baking. Next, grab a 9x5-inch loaf pan. Grease it with butter or non-stick spray. This will help the banana bread slide out easily once it’s baked. Start by mashing three ripe bananas in a large bowl. Add in 1/2 cup of melted unsalted butter. Mix them well until smooth. Now, it’s time to add 3/4 cup of brown sugar and 1/2 cup of granulated sugar. Stir until everything is combined. Then, beat in two large eggs, one at a time. Add in 1 teaspoon of vanilla extract and mix again. Next, sprinkle 1 teaspoon of baking soda and 1/2 teaspoon of salt over the mixture. Stir well to combine. Now, gently fold in 1 1/2 cups of all-purpose flour. Be careful not to over-mix; the batter should be slightly lumpy. Finally, fold in 1 cup of semi-sweet chocolate chips. If you like, add 1/2 cup of chopped walnuts for extra crunch. Now, pour the batter into your prepared loaf pan. Smooth the top with a spatula for an even bake. Place the pan in the preheated oven. Bake for 60-65 minutes. To check if it’s done, insert a toothpick into the center. If it comes out clean, your banana bread is ready. Let the bread cool in the pan for about 10 minutes. Then, transfer it to a wire rack to cool completely. Enjoy the sweet smell wafting through your kitchen! To make great banana bread, start with ripe bananas. Ripe bananas have a sweeter taste. They are also softer, which helps create a moist bread. Look for bananas with brown spots. These spots mean they are extra sweet. Mixing is key. When you combine the ingredients, do it gently. Overmixing can make your bread tough. Aim for a slightly lumpy batter. This texture keeps the bread light and airy. Want more chocolate in your bread? Add extra chocolate chips! This makes each bite rich and sweet. You can also sprinkle some on top before baking. It adds a nice look and a chocolatey finish. For serving, slice the bread and place it on a wooden board. A dollop of whipped cream on the side makes it special. Pair it with coffee for a perfect treat any time of day. If your bread does not rise, check your baking soda. It must be fresh to work well. Also, make sure to follow the steps closely. For baking time, keep an eye on the bread. If it browns too fast, cover it with foil. Use a toothpick to test doneness. If it comes out wet, bake a bit longer. If it is dry, you may have overbaked it. Adjust your time next time for perfect results. {{image_2}} You can make your banana bread even more tasty! Try different types of chocolate. Milk chocolate gives a sweeter taste. Dark chocolate adds a rich flavor. You can also mix in fruits like blueberries or strawberries. They add a fun twist. Want some warmth? Sprinkle in some cinnamon for a cozy feel. Each mix-in creates a new treat. If you need a gluten-free option, you can swap out the flour. Use almond flour or coconut flour instead. These flours work well in banana bread. They keep the bread moist and tasty. Remember to check if you need more liquid. Gluten-free flours absorb moisture differently. This small change can make a big difference! For a vegan version, you can replace the eggs and butter. Use flax eggs instead of regular eggs. Just mix one tablespoon of flaxseed meal with three tablespoons of water. Let it sit for five minutes. For butter, use coconut oil or a plant-based spread. These swaps keep the bread yummy and moist. Enjoy your vegan banana bread guilt-free! To keep your banana bread fresh, wrap it well. Use plastic wrap or aluminum foil. You can also place it in an airtight container. This helps keep moisture in and air out. Store it at room temperature for up to three days. If you want it to last longer, refrigerate it. Make sure to wrap it tightly. This keeps it from drying out in the fridge. For even longer storage, freeze your banana bread. Slice it before freezing. This makes it easy to grab a piece later. Use freezer-safe bags or wrap each slice in plastic wrap. Label the bags with the date. Your banana bread can last for about three months in the freezer. To enjoy your banana bread warm, you can reheat it easily. If it’s at room temperature, pop a slice in the microwave. Heat it for about 10-15 seconds. Keep an eye on it to avoid overheating. If it’s frozen, let it thaw in the fridge overnight. Then, use the microwave as mentioned, or toast it. A toaster oven works well too. Heat it at 350°F for about 5-10 minutes. This gives it a nice, fresh taste. Enjoy your delicious banana bread warm! Yes, you can use frozen bananas. Just thaw them first and drain any excess liquid. Frozen bananas mash well and add great flavor. They work perfectly in this banana bread recipe. Homemade banana bread lasts about 3 to 5 days at room temperature. Store it in an airtight container to keep it fresh. If you want it to last longer, you can freeze it. Banana bread can be dense if you overmix the batter. Mix just until combined for a light texture. Also, make sure your baking soda is fresh. Old baking soda may not rise well. Yes, coconut oil can replace butter. Use the same amount of melted coconut oil. It adds a subtle flavor and keeps the bread moist. To ripen bananas quickly, place them in a brown paper bag. The bag traps the ethylene gas, speeding up ripening. You can add an apple to the bag for even faster results. You learned how to make banana bread from scratch. We covered the key ingredients and steps, from mixing to baking. I shared tips for texture, flavor, and storage. Consider trying variations like gluten-free or vegan options. With these ideas, you can create tasty banana bread. Don’t be afraid to experiment and enjoy the process. Happy baking!
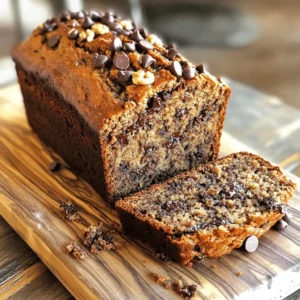
    Bakery-Style Chocolate Chip Banana Bread Delight
  • To make honey garlic butter roasted carrots, you need these simple items: - 1 pound baby carrots, washed and trimmed - 3 tablespoons unsalted butter, melted - 2 tablespoons honey - 4 cloves garlic, minced - 1 teaspoon fresh thyme leaves (or ½ teaspoon dried thyme) - Salt and pepper to taste - Optional: fresh parsley, chopped (for garnish) These ingredients work together to create a sweet and savory dish. The baby carrots give a nice crunch, while the honey adds sweetness. Garlic brings a warm flavor, and thyme adds a touch of freshness. Butter helps everything blend well, making each bite delicious. First, set your oven to 400°F (200°C). This heat helps cook the carrots just right. While the oven warms, take a baking sheet. Line it with parchment paper. This step makes cleaning easier later. In a mixing bowl, add these ingredients: - 3 tablespoons unsalted butter, melted - 2 tablespoons honey - 4 cloves garlic, minced - 1 teaspoon fresh thyme leaves (or ½ teaspoon dried thyme) Stir them together well. The mix should be smooth and fragrant. This blend gives the carrots a sweet and savory flavor. Now, grab your 1 pound of baby carrots, washed and trimmed. Add them to the bowl with your honey garlic butter. Toss the carrots gently. Ensure every carrot is coated with the tasty mix. This step is key for flavor. Spread the coated carrots on the lined baking sheet. Make sure they sit in a single layer. Then, sprinkle salt and pepper over them to taste. Place the sheet in the oven. Roast for 20-25 minutes. Stir the carrots halfway through for even cooking. They should be tender and slightly caramelized when done. Once cooked, take them out and let them cool a bit. If you like, add fresh chopped parsley on top before serving. When picking baby carrots, look for bright orange color. They should feel firm and crisp. Avoid any that are soft or have dark spots. Fresh carrots taste better and look more appealing. Buy organic if you can. They often have more flavor and fewer chemicals. To get that beautiful caramelization, spread the carrots in a single layer. This helps them cook evenly. Stir them halfway through roasting. This allows each side to brown nicely. The honey in the recipe adds a sweet touch and helps with caramelization. If you want even more color, roast them a bit longer, but watch closely. Feel free to tweak the recipe. If you want more sweetness, add more honey. For a stronger garlic flavor, use more minced garlic. You can also add a pinch of chili flakes for some heat. Taste the mixture before tossing the carrots in. Adjust the salt and pepper to your liking. Don't hesitate to get creative; cooking should be fun! {{image_2}} You can add more veggies to this dish. Try using parsnips, sweet potatoes, or bell peppers. Cut them into similar sizes as the carrots. This helps them cook evenly. Toss them in the honey garlic butter mix just like the carrots. You’ll get a colorful and tasty side dish. Mixing different veggies adds fun flavors and textures. Herbs can change the whole taste of your carrots. Instead of thyme, try rosemary or oregano. These herbs bring a new twist to the dish. You can also use fresh dill or basil for a fresh taste. Just chop them finely and mix them in with the garlic and honey. Each herb adds its own unique flavor. This way, you can create your perfect version of honey garlic carrots. If you love maple syrup, swap honey for maple syrup. It will give your carrots a rich, sweet taste. Use the same amount as the honey in the recipe. Maple syrup pairs well with garlic and butter too. This twist adds a new flavor layer. It’s a great option for those who want something different. You can also mix honey and maple for a blend of sweetness. Store your honey garlic butter roasted carrots in an airtight container. Let them cool first. Keep them in the fridge for up to 3 days. If you use leftovers, make sure they are fully cooled. This helps keep them fresh and tasty. To reheat, place the carrots in a pan over low heat. Add a bit of butter or oil if needed. Stir gently to warm them up. You can also reheat them in the microwave. Heat for 30 seconds, then check and stir. Repeat until they are warm. You can freeze these carrots if you want to save them. First, let them cool completely. Spread them out on a baking sheet in a single layer. Freeze for about 1 hour, then transfer them to a freezer bag. They can last for up to 3 months. When you're ready to eat, thaw them in the fridge overnight. Reheat as usual. Yes, you can use regular carrots. Just cut them into even pieces. Aim for 1 to 2 inches long. This helps them cook evenly. Baby carrots are sweet and tender, but regular ones work too. If you need a substitute for honey, try maple syrup or agave nectar. Both options add sweetness. You can also use brown sugar mixed with water. This can mimic the honey's texture and flavor. Check the carrots after 20 minutes. They should be tender and slightly caramelized. You can poke them with a fork to test. If they are soft and sweet, they are ready to eat! Yes, you can prepare the carrots ahead of time. Clean and cut them, then store them in the fridge. Mix the honey garlic butter and toss them just before roasting. This keeps the flavors fresh and bright. This recipe shows you how to make sweet and tasty roasted baby carrots. You learned about the key ingredients, like honey and butter, and how to mix them. I shared tips on picking the best carrots and roasting them just right. You can even try adding other veggies or herbs for fun. These carrots make a great side dish for any meal. Enjoy making this easy and delicious recipe!
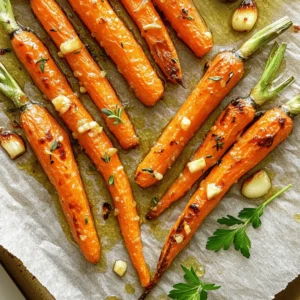
    Honey Garlic Butter Roasted Carrots Simple Recipe
  • - 2 chicken sausages, sliced into rounds - 1 bell pepper (any color), diced - 1 zucchini, sliced into half-moons - 1 red onion, cut into wedges - 1 cup cherry tomatoes, halved - 2 tablespoons olive oil - 1 teaspoon garlic powder - 1 teaspoon paprika - ½ teaspoon dried oregano - Salt and pepper to taste - Fresh parsley for garnish For this dish, I love using chicken sausage. It adds great flavor and protein. Choose your favorite type, whether it's spicy or mild. Fresh vegetables bring color and crunch. I like bell peppers, zucchini, red onion, and cherry tomatoes for this recipe. They mix well with the sausage. Olive oil and seasonings tie it all together. Garlic powder, paprika, and oregano create a tasty blend. Don’t forget salt and pepper to enhance the flavors. Garnish with fresh parsley for a pop of color and freshness. This dish is not only delicious but also very easy to make! {{ingredient_image_1}} First, you need to preheat your air fryer. Set it to 400°F (200°C). Let it warm up for about 5 minutes. This step helps make the chicken sausage and veggies crispy. Next, gather your ingredients. You will need: - 2 chicken sausages, sliced into rounds - 1 bell pepper (any color), diced - 1 zucchini, sliced into half-moons - 1 red onion, cut into wedges - 1 cup cherry tomatoes, halved - 2 tablespoons olive oil - 1 teaspoon garlic powder - 1 teaspoon paprika - ½ teaspoon dried oregano - Salt and pepper to taste - Fresh parsley for garnish In a large bowl, add the sliced chicken sausage, diced bell pepper, sliced zucchini, onion wedges, and halved cherry tomatoes. Now, drizzle the olive oil over the mixture. Sprinkle the garlic powder, paprika, oregano, salt, and pepper on top. Toss everything well to coat evenly. Once your ingredients are ready, it's time to cook. Transfer the mixture to the air fryer basket. Make sure it is spread out in an even layer. This helps all the food cook evenly. Air fry the mixture at 400°F (200°C) for 12 to 15 minutes. Shake the basket halfway through cooking. This step ensures that everything cooks well. After 12 to 15 minutes, check if the sausages are browned and the veggies are tender. If you want them crispier, add 2 more minutes. When it's done, remove the basket. Transfer the food to a serving platter. Finally, garnish with freshly chopped parsley before serving. Enjoy your delightful meal! When picking chicken sausage, look for brands with no fillers. Check the label for simple ingredients. Choose sausages with natural spices for better flavor. Freshness matters! Buy from local markets when you can. To get that perfect crisp, don’t overcrowd the air fryer basket. Spread the sausage and veggies in a single layer. This allows hot air to flow around each piece. Shake the basket halfway through cooking for even browning. If you want them crispier, add 2 more minutes to cooking time. Feel free to change the seasonings to fit your taste. Try adding more garlic powder for extra flavor. If you like heat, sprinkle in some red pepper flakes. For a fresh twist, use fresh herbs instead of dried ones. Always taste as you go, so you get it just right! Pro Tips Use Fresh Ingredients: Fresh vegetables and high-quality chicken sausages will enhance the flavor and texture of your dish. Don’t Overcrowd the Basket: Spreading the mixture in an even layer allows for better air circulation, resulting in crispier vegetables and sausages. Experiment with Seasonings: Feel free to add your favorite herbs and spices to customize the flavor profile to your liking. Garnish for Freshness: Adding fresh parsley or other herbs right before serving brightens the dish and adds a pop of color. {{image_2}} You can change the veggies to suit your taste. Try using broccoli, carrots, or asparagus. Each veggie adds unique flavor and texture. Just keep the cooking time in mind. Harder veggies may need more time. Softer ones, like spinach, cook faster. Aim for a colorful mix for a fun look! Chicken sausage comes in many flavors. You might try apple, spicy, or Italian. Each type can change the dish's taste. If you pick spicy sausage, add a little less paprika. If you choose apple sausage, it pairs well with sweet potatoes. Experiment until you find your favorite combination! Want a low-carb meal? Skip the cherry tomatoes and use more green veggies. Zucchini noodles can replace the regular ones for a fun twist. You can also use cauliflower instead of potatoes. This keeps the dish tasty while cutting carbs. Enjoy your meal without worrying about carbs! To store leftovers, place them in an airtight container. Make sure to cool the dish first. Leftover chicken sausage and veggies stay fresh in the fridge for up to three days. Reheat in the air fryer for best results. Set it to 350°F (175°C) for about 5–7 minutes. This keeps the sausage crispy and the veggies tender. You can also use a microwave, but the air fryer works better for texture. You can freeze leftovers if you want to save them for later. Place the cooled food in a freezer-safe bag or container. Remove as much air as you can before sealing. The dish can last in the freezer for up to three months. When ready to eat, thaw it in the fridge overnight and reheat. Yes, you can. If you don't have an air fryer, use a regular oven. Preheat your oven to 400°F (200°C). Spread the chicken sausage and veggies on a baking sheet. Roast them for about 20–25 minutes. Toss them halfway through to ensure even cooking. You won't get the same crispiness, but it will still taste great. To check if the chicken sausage is done, look for a nice brown color. The sausage should be hot inside. You can use a meat thermometer. Make sure it reads at least 165°F (74°C). This shows that the sausage is safe to eat. If it’s not brown or hot, cook it a bit longer. You have many tasty options! Here are a few ideas: - Quinoa or brown rice - A fresh green salad - Garlic bread or rolls - Mashed potatoes - Couscous or pasta salad These sides complement the flavors and make your meal even better. This blog post outlined how to make a tasty chicken sausage and veggie dish. We covered key ingredients, like chicken sausage and fresh vegetables. You learned easy steps to cook them in an air fryer. I shared tips for crispiness and picking the best sausage. We explored fun variations to keep meals exciting and how to store leftovers. In closing, this recipe is not just simple; it’s versatile and delicious. Enjoy cooking and experimenting with your meals!
    Air Fryer Chicken Sausage Veggies Delightful Meal
  • To make No-Bake Cranberry White Chocolate Oat Cookies, you will need: - 1 cup rolled oats - 1/2 cup creamy peanut butter - 1/4 cup honey or maple syrup - 1/2 cup dried cranberries, chopped - 1/2 cup white chocolate chips - 1/4 cup chopped nuts (such as almonds or pecans) - 1 teaspoon vanilla extract - A pinch of salt Each ingredient plays a key role. The oats give structure, while peanut butter adds creaminess. Honey or maple syrup provides sweetness and binds the mix. Dried cranberries add a tart bite, and white chocolate brings richness. If you want to switch things up, you can try these alternatives: - Use almond butter instead of peanut butter for a nutty flavor. - Maple syrup can replace honey for a vegan version. - Swap dried cranberries for raisins or chopped dates. - Try dark chocolate chips if you prefer a less sweet option. These swaps can bring new flavors and textures to your cookies, keeping them fun and fresh. Quality matters when baking. Here’s how to pick the best: - Choose rolled oats that are whole and not quick-cooking. - Look for natural peanut butter without added sugars or oils. - Pick dried cranberries with no added sugar for a healthier option. - Use real vanilla extract instead of imitation for better taste. These choices will enhance your cookies, making them taste truly gourmet. First, gather all your ingredients. You will need rolled oats, peanut butter, honey, dried cranberries, white chocolate chips, nuts, vanilla extract, and salt. This recipe is quick and easy, taking just 15 minutes to prep. In a large mixing bowl, combine these dry ingredients: - 1 cup rolled oats - 1/2 cup chopped dried cranberries - 1/2 cup white chocolate chips - 1/4 cup chopped nuts In a separate small bowl, mix the wet ingredients. Combine: - 1/2 cup creamy peanut butter - 1/4 cup honey or maple syrup - 1 teaspoon vanilla extract - A pinch of salt Stir the wet ingredients until they are smooth. Pour this mixture over the dry ingredients. Mix well until everything is evenly coated and combined. Line a baking sheet with parchment paper. Use a tablespoon to scoop out the mixture. Form each scoop into a cookie shape and place it on the baking sheet. Once all the cookies are shaped, refrigerate them for at least 30 minutes. This chilling helps the cookies set. After chilling, enjoy your delicious no-bake cookies! Store any leftovers in an airtight container in the fridge. When making no-bake cookies, avoid using old oats. Old oats can affect texture and taste. Do not skip chilling time; it helps cookies set properly. If your mixture feels too dry, add a little more honey or peanut butter. This will help bind everything together. Lastly, don’t pack the cookie mixture too tightly when shaping. This can lead to hard cookies, which we want to avoid. For the best texture, use rolled oats instead of instant oats. Rolled oats give a heartier chew. Ensure you mix the wet and dry ingredients thoroughly. This helps distribute flavors evenly. Chilling the cookies for at least 30 minutes is key. It helps them firm up nicely. If you want a softer cookie, chill them for a shorter time. For a crunchier bite, leave them in longer. You can boost the flavor of your cookies with simple add-ins. Try mixing in some chocolate chips or different dried fruits. Chopped nuts like almonds or pecans add a nice crunch. For a touch of spice, add a sprinkle of cinnamon or nutmeg. If you love coconut, shredded coconut works great, too. Feel free to experiment and find your favorite combo! {{image_2}} You can swap nuts and dried fruits in this recipe. If you have allergies, try seeds like sunflower or pumpkin. They add a nice crunch without nuts. For dried fruits, raisins or chopped apricots work well. You may also use chocolate chips instead of dried fruit for a sweeter taste. Honey and maple syrup are common sweeteners here. You can also use agave syrup or brown rice syrup. Each one brings a unique flavor. If you want a sugar-free option, try stevia or monk fruit sweetener. Just adjust the amount to taste, as these are sweeter than honey. Adding flavor makes these cookies special. Try mixing in spices like cinnamon or nutmeg for warmth. You can also add a splash of almond or orange extract for a twist. For a fun crunch, add crushed pretzels or puffed rice. Each addition brings a new layer of taste, making every bite exciting! To keep your No-Bake Cranberry White Chocolate Oat Cookies fresh, use an airtight container. This helps prevent moisture loss and keeps cookies soft. Place parchment paper between layers if you stack them. This method avoids sticking. When stored in the fridge, these cookies last about one week. They taste best when fresh, but they still stay tasty for a few days. If you notice any change in smell or texture, it is time to toss them. If you want to keep cookies for a longer time, freezing is a great option. Place cookies in a single layer on a baking sheet. Freeze them until solid, then transfer to a freezer bag. They can last up to three months in the freezer. When you want to eat them, just thaw them in the fridge or at room temperature. Enjoy the same yummy taste as fresh! Yes, you can make these cookies vegan. Just swap the honey with maple syrup. Use a vegan white chocolate option for the chips. This keeps your cookies tasty and plant-based. To make these cookies gluten-free, choose certified gluten-free rolled oats. Most oats can have gluten cross-contamination, so look for those labeled gluten-free. This small change makes your cookies safe for gluten-sensitive folks. If you need a peanut butter swap, try almond butter or sunflower seed butter. These options offer similar creaminess and flavor. They work well in the recipe. To soften hard cookies, place them in a sealed container with a slice of bread. The bread adds moisture to the cookies. After a few hours, your cookies will be soft and chewy again. You learned about key ingredients for cookies and how to mix them. We discussed tips to avoid mistakes and ways to enhance flavor. I shared options for variations, like sweeteners and add-ins. Proper storage methods help keep cookies fresh. Remember, you can adapt these recipes to fit your needs. Enjoy baking cookies that suit your taste and diet!
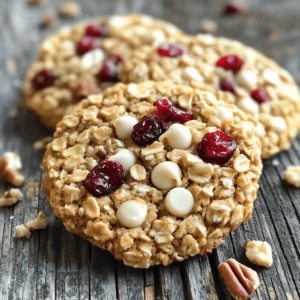
    No-Bake Cranberry White Chocolate Oat Cookies Delight
  • - 2 boneless, skinless chicken breasts, cut into bite-sized pieces - 2 tablespoons olive oil - Salt and pepper to taste - 3 cloves garlic, minced - 1 teaspoon dried oregano - 1/2 teaspoon red pepper flakes (optional) - 4 cups chicken broth - 1 cup marinara sauce - 12 oz spaghetti or fettuccine - 1 cup grated Parmesan cheese - 1 cup shredded mozzarella cheese - Fresh basil leaves for garnish If you want to switch things up, use these substitutes: - Chicken: Try turkey or tofu for a lighter option. - Olive oil: Canola oil or avocado oil works too. - Marinara sauce: Use any pasta sauce or homemade sauce. - Pasta: Zucchini noodles or whole grain pasta are good choices. Use fresh chicken for the best taste. Look for good-quality chicken breasts. Fresh garlic packs more flavor than jarred. For cheese, choose block Parmesan and shred it yourself. This gives a richer flavor. Always use low-sodium broth for better control of salt levels. Fresh basil adds a nice touch, so grab some if you can! Start by gathering all your ingredients. You need: - 2 boneless, skinless chicken breasts, cut into bite-sized pieces - 2 tablespoons olive oil - Salt and pepper to taste - 3 cloves garlic, minced - 1 teaspoon dried oregano - 1/2 teaspoon red pepper flakes (optional) - 4 cups chicken broth - 1 cup marinara sauce - 12 oz spaghetti or fettuccine - 1 cup grated Parmesan cheese - 1 cup shredded mozzarella cheese - Fresh basil leaves for garnish Next, cut the chicken into small pieces. This helps it cook evenly. Mince the garlic and set it aside. Heat the olive oil in a large pot over medium heat. Add the chicken pieces and season them with salt and pepper. Cook for about 5-7 minutes. You want the chicken to be browned and cooked through. Once done, remove the chicken from the pot and set it aside. In the same pot, add the minced garlic, dried oregano, and red pepper flakes if you like heat. Sauté for about 1 minute. This step adds a lot of flavor. Now, pour in the chicken broth and marinara sauce. Stir well and bring it to a boil. When it starts boiling, add your choice of spaghetti or fettuccine. Stir it occasionally and cook according to the package instructions, which usually takes about 8-10 minutes. After the pasta is al dente, reduce the heat to low. Fold the cooked chicken back into the pot. Add the grated Parmesan cheese slowly, mixing until it melts and combines well. Finally, sprinkle the shredded mozzarella cheese on top. Cover the pot and let it heat for another 2-3 minutes. This helps the cheese melt and get bubbly. To get the best texture, make sure to watch the pasta closely while it cooks. Stirring helps prevent sticking. If the pasta looks dry, add a little more chicken broth. When adding the cheeses, do it off the heat. This helps keep the cheese creamy rather than clumpy. Also, let the dish sit for a few minutes before serving. This gives it time to settle and enhances the flavor. Garnish with fresh basil leaves right before serving. This adds a nice touch and fresh flavor. Making Chicken Parmesan One-Pot Pasta is easy, but there are some common mistakes. One mistake is overcooking the chicken. Cook it just until it turns brown. If you leave it too long, it can dry out. Another mistake is not seasoning enough. Salt and pepper enhance the flavors. Remember to taste as you go. Lastly, avoid adding too much broth at once. This can make the dish too soupy. To make your dish pop, try adding fresh herbs. Fresh basil is a great choice. It gives a bright flavor. You can also use fresh parsley for a nice touch. Adding a splash of lemon juice just before serving can brighten the dish, too. If you like heat, add more red pepper flakes. Just a little extra can make a big difference. Keeping pasta from sticking can be tricky. The best tip is to stir often while it cooks. This keeps the noodles separate. Another great trick is using enough broth. If the pasta has enough liquid, it won't stick. Finally, after draining, rinse the pasta with cold water. This helps to cool it down and prevent sticking. {{image_2}} To make a vegetarian version, you can swap the chicken for plant-based protein. Try using chopped mushrooms or diced eggplant. These options add a nice texture and flavor. You can also use chickpeas for extra protein. Sauté the veggies just like you would with chicken. This will keep the dish hearty and filling. If you need a gluten-free meal, use gluten-free pasta. There are many types available, like rice or quinoa pasta. You can also use spiralized zucchini or spaghetti squash for a low-carb option. Just remember to adjust the cooking time as these alternatives cook faster than regular pasta. Adding vegetables makes your dish even better! You can toss in spinach, bell peppers, or zucchini. Just chop them into small pieces. Sauté them with the garlic to bring out their flavor. You can add them with the marinara sauce. This gives you a colorful and tasty meal. Plus, it boosts the nutrition! To store your Chicken Parmesan One-Pot Pasta, first let it cool. Place the pasta in an airtight container. This keeps it fresh and tasty. You can store it in the fridge for up to three days. Make sure to label the container with the date. That way, you’ll know when it’s best to eat. When you’re ready to enjoy leftovers, reheat gently. Use a pot on low heat. Add a splash of chicken broth or water to prevent drying out. Stir often until it’s warm. You can also use a microwave. Place the pasta in a microwave-safe dish, cover it loosely, and heat in short bursts. Stir in between to heat evenly. If you want to save some for later, freezing is a great option. First, let the pasta cool completely. Then, portion it into freezer-safe bags or containers. Press out as much air as possible before sealing. This helps avoid freezer burn. You can freeze it for up to three months. When you’re ready to eat, thaw it in the fridge overnight. Reheat as mentioned above for the best taste. Yes, you can. While I love spaghetti or fettuccine, other types work too. Penne, rigatoni, or even whole wheat pasta are great choices. Just remember to adjust the cooking time as needed. Always check the package for the right time. This way, your pasta will cook perfectly. To add heat, use more red pepper flakes. You can also add sliced jalapeños or a dash of hot sauce. Mix these in when you add the garlic. Start small to find your heat level. Taste as you go to make sure it’s just right for you. This dish pairs well with a simple green salad. A side of garlic bread is also a favorite. You can even serve it with steamed veggies. These sides add freshness and balance to the meal. Enjoy your dinner with these tasty options! This blog post covered ingredients, preparation steps, and tips for making your dish great. I shared how to choose quality ingredients, avoid common mistakes, and enhance flavor. You now know about variations like vegetarian and gluten-free options. Remember, the right storage is key to keeping leftovers fresh. With these tips, you can make a delicious Chicken Parmesan One-Pot Pasta easily. Enjoy your cooking journey and have fun getting creative in the kitchen!
    Chicken Parmesan One-Pot Pasta Easy Dinner Solution
  • - 2 cups all-purpose flour - 1 teaspoon baking powder - 1/2 teaspoon baking soda - 1 teaspoon ground cinnamon - 1/2 teaspoon ground ginger - 1/4 teaspoon ground nutmeg - 1/4 teaspoon ground cloves - 1/2 teaspoon salt - 1/2 cup unsalted butter, softened - 3/4 cup granulated sugar - 1 large egg - 1 teaspoon vanilla extract - 1/2 cup canned pumpkin puree - 3/4 cup chopped pecans or walnuts - 1 cup dark chocolate chips for dipping The key to great chocolate dipped pumpkin spice biscotti is the ingredients. Start with the dry ingredients. Flour is the base. Baking powder and baking soda help the biscotti rise. Spices like cinnamon, ginger, nutmeg, and cloves give it that warm, fall flavor. Don’t forget the salt; it balances the sweet. For the wet ingredients, soften your butter first. This makes it easy to cream with sugar. The sugar adds sweetness and helps create that light texture. Use one large egg for binding. Vanilla extract adds depth, while pumpkin puree gives moisture and flavor. If you want texture, consider adding chopped nuts. Pecans or walnuts work great. Finally, for that chocolatey finish, have dark chocolate chips ready for dipping. This combination creates a cozy, delicious treat perfect for any time. 1. Preheat the oven to 350°F (175°C). 2. In a medium bowl, whisk together: - 2 cups all-purpose flour - 1 teaspoon baking powder - 1/2 teaspoon baking soda - 1 teaspoon ground cinnamon - 1/2 teaspoon ground ginger - 1/4 teaspoon ground nutmeg - 1/4 teaspoon ground cloves - 1/2 teaspoon salt Set this aside. 3. In a large bowl, cream together: - 1/2 cup unsalted butter, softened - 3/4 cup granulated sugar Mix until light and fluffy. 1. Beat in: - 1 large egg - 1 teaspoon vanilla extract - 1/2 cup canned pumpkin puree Mix until everything is combined. 2. Gradually mix in the dry ingredients. If you like, fold in: - 3/4 cup chopped pecans or walnuts This adds a nice crunch! 1. Divide the dough into two. Form each half into a log, about 12 inches long and 2 inches wide. 2. Place the logs on a parchment-lined baking sheet. 3. Bake for 25-30 minutes, or until they are lightly browned and firm. 4. Let the logs cool for 10-15 minutes. 5. Once cool, slice them diagonally into 1/2 inch thick pieces. 6. Place the slices cut side down back onto the baking sheet. 7. Bake again for 15-20 minutes, flipping halfway. This step makes them crisp! 8. Let them cool completely on a wire rack. 9. In a microwave-safe bowl, melt: - 1 cup dark chocolate chips Do this in intervals of 30 seconds, stirring in between. 10. Dip the ends of each biscotti in the melted chocolate. Let any excess chocolate drip off. 11. Place them on parchment paper to set. To get the best texture in your biscotti, avoid overmixing. Mix the dough just until it comes together. Too much mixing makes them tough. You want a soft, slightly sticky dough. If it feels dry, add a touch more pumpkin puree. This keeps the biscotti moist and tasty. Melting chocolate can be simple. Use a microwave-safe bowl. Heat chocolate chips in 30-second bursts. Stir in between until smooth. This prevents burning. For dipping, hold the biscotti by one end. Dip it into the melted chocolate. Let the excess chocolate drip off. Place it on parchment paper to set. Serve your biscotti in a tall glass for a fun look. You can also arrange them on a nice platter. Dust with powdered sugar for a fancy touch. To store, keep them in an airtight container. This keeps them fresh and crunchy. Enjoy your treats with coffee or tea! {{image_2}} You can change the taste of your biscotti by adding different spices. Cardamom gives a warm flavor. Allspice adds a nice kick. You can also skip the nuts if you want a smoother bite. If you like crunch, pecans or walnuts work great. Just chop them up and mix them in. If you want a twist, try white chocolate instead of dark chocolate. White chocolate offers a sweet contrast to the pumpkin spices. You can even use flavored chocolate. Peppermint chocolate gives a fresh taste. Almond chocolate adds a nutty layer of flavor. Just melt and dip your biscotti like you would with dark chocolate. Pair your chocolate dipped pumpkin spice biscotti with warm drinks. A cup of coffee or tea works perfectly. Hot cocoa also makes a cozy match. You can create a themed platter with other treats. Mini muffins or cookies can add variety. Just arrange them on a nice plate for a fun dessert spread. To keep your chocolate dipped pumpkin spice biscotti fresh, store them in a cool, dry place. Use an airtight container to prevent moisture. A glass jar or a plastic container works well. Place a piece of parchment paper between layers to avoid sticking. This will keep the biscotti crisp for longer. Freezing biscotti is a great way to enjoy them later. First, let them cool completely. Then, wrap each piece in plastic wrap. Place the wrapped biscotti in a freezer bag. Remove as much air as possible before sealing. To thaw, simply take them out and let them sit at room temperature for about 30 minutes. For best quality, enjoy them within three months. At room temperature, your biscotti will stay fresh for about two weeks. Keep an eye out for signs of spoilage. If they become soft or lose their crunch, it’s time to toss them. If you see mold or an off smell, do not eat them. Proper storage helps extend their life and keeps them tasty. To make your biscotti less hard, you can bake it for a shorter time. Try reducing the second bake to 10-15 minutes. You can also add more pumpkin puree for moisture. This change may help keep the biscotti softer. Yes, you can use pumpkin pie spice. Just replace the individual spices with 2 teaspoons of pumpkin pie spice. It will add a great flavor to your biscotti. This option is a time-saver and works well. The best way to dip biscotti in chocolate is to melt the chocolate until smooth. Use a microwave or a double boiler. Dip one end of the biscotti into the chocolate, letting excess chocolate drip off. Place it on parchment paper to set. Homemade biscotti stays fresh for about two weeks when stored in an airtight container. Keep it in a cool, dry place. For longer storage, you can freeze it for up to three months. Just let it thaw at room temperature. Yes, you can use a dairy-free alternative like coconut oil or vegan butter. This swap works well and keeps the flavor intact. Just ensure the alternative is softened for easy mixing. You learned how to make delicious biscotti using simple, tasty ingredients. We started with the dry and wet ingredients, mixed them with care, and baked them to perfection. You can even change flavors and pair your biscotti with drinks or other sweets. Remember, storing your biscotti correctly keeps them fresh longer. Enjoy every bite, and get creative with your own twists on this treat!
    Chocolate Dipped Pumpkin Spice Biscotti Irresistible Treat
  • - 1 cup wild rice, rinsed and drained - 4 cups vegetable broth - 1 can (15 oz) pure pumpkin puree Wild rice is the star of this dish. It adds a lovely texture and nutty taste. Vegetable broth keeps it light and adds depth. Pure pumpkin puree brings creaminess and a sweet flavor. - 1 medium onion, chopped - 2 cloves garlic, minced - 2 medium carrots, diced - 1 cup celery, diced Onion, garlic, carrots, and celery make up the base of this soup. They create a strong flavor foundation. Sautéing these veggies brings out their sweetness. The aroma will fill your kitchen and make you hungry! - 1 teaspoon dried thyme - 1 teaspoon ground sage - 1/2 teaspoon nutmeg - 1 cup coconut milk - 2 tablespoons olive oil Thyme and sage add earthy notes. Nutmeg gives a warm spice that complements the pumpkin. Coconut milk adds a rich creaminess that makes the soup smooth. Olive oil helps sauté the veggies, making everything taste great! These ingredients come together to create a soup that is rich in flavor and perfect for cozy days. To start, we need a solid base for our soup. First, heat 2 tablespoons of olive oil in a large pot over medium heat. Once hot, add the chopped onion, diced carrots, and diced celery. Sauté them for about 5-7 minutes. You want the veggies to soften and the onions to turn translucent. Next, we’ll add flavor. Stir in 2 minced garlic cloves, 1 teaspoon of dried thyme, 1 teaspoon of ground sage, and 1/2 teaspoon of nutmeg. Cook this mixture for another minute until the garlic smells great. This step builds a rich flavor for our soup. Now, it’s time to add the wild rice. Take 1 cup of rinsed and drained wild rice and mix it into the pot with the veggies. Stir well to coat the rice in the vegetable mix. Next, pour in 4 cups of vegetable broth and bring the mixture to a boil. Once it bubbles, reduce the heat to low. Cover the pot and let it simmer for 40-45 minutes. You want the rice to be tender and the grains to start splitting. After the rice is done, add in 1 can of pure pumpkin puree and 1 cup of coconut milk. Stir well to combine everything. Let the soup simmer for another 10 minutes. This allows all the flavors to meld together beautifully. Before serving, season the soup with salt and pepper to taste. Adjust the seasoning as needed. Once ready, remove the soup from the heat. Let it cool for a few minutes, then serve hot. If you like, garnish with fresh parsley for a pop of color. Enjoy the rich, creamy goodness! To get the best texture, watch your cooking times. Simmer the wild rice for 40-45 minutes. This ensures the rice is tender and the grains split slightly. For a creamier soup, blend a portion of it. Use an immersion blender or regular blender. This gives a smooth feel while keeping some rice for texture. Add more herbs for depth. Try fresh thyme or rosemary for a fragrant twist. A pinch of cayenne pepper adds warmth. For garnishes, use fresh parsley or a sprinkle of pumpkin seeds. These not only look good but also add crunch. A heavy-bottomed pot works best for even heat. It prevents sticking and burning. Use a sharp knife for chopping veggies. A good cutting board helps with safety. An immersion blender makes blending easy. It saves time and reduces mess. {{image_2}} You can easily make this soup vegan. Just swap coconut milk for regular milk. Use vegetable broth instead of chicken broth for a plant-based option. For gluten-free variations, make sure your broth is gluten-free. Wild rice is naturally gluten-free, so that works well. Adding protein can make this soup heartier. You might like to add cooked chicken for extra flavor. If you want to keep it vegetarian, try adding beans. Chickpeas or black beans can work great. You can also mix in different vegetables. Spinach or kale adds color and nutrients. Bell peppers bring sweetness and crunch. Pair this soup with crusty bread for a warm meal. A fresh salad can add a nice, crisp touch. For a fun twist, serve the soup in hollowed-out pumpkin bowls. It makes for a great presentation and adds flavor! To store leftovers, let the soup cool completely. Then, pour it into an airtight container. Make sure to leave some space at the top, as the soup may expand when frozen. Label the container with the date so you remember when you made it. You can keep the soup in the fridge for up to five days. When reheating, pour the soup into a pot and warm it over medium heat. Stir it often to prevent sticking. You can add a splash of vegetable broth or coconut milk if it seems too thick. For a quick option, use the microwave. Heat it in short bursts, stirring in between, to ensure even warmth. For freezing, use a freezer-safe container. I like to divide the soup into smaller portions. This makes it easier to thaw only what you need. Leave space at the top of the container to allow for expansion. You can also use freezer bags, squeezing out as much air as possible before sealing. When you're ready to enjoy the soup, take it out of the freezer. Place it in the fridge overnight to thaw. If you're in a hurry, you can run the bag under cold water to speed up the process. Once thawed, heat it on the stove or in the microwave, just as you would with refrigerated soup. Always check the flavor and adjust seasoning if needed before serving. Yes, you can use fresh pumpkin. To prepare fresh pumpkin, first, cut it in half. Remove the seeds and strings. Roast it in the oven at 400°F for about 30-40 minutes until soft. Let it cool, then scoop out the flesh. Blend it until smooth to use in your soup. Fresh pumpkin adds a nice texture and flavor. If you need a substitute for wild rice, try brown rice or quinoa. Both grains offer a good chew and nutty flavor. Brown rice will take longer to cook, so adjust your simmering time. Quinoa cooks faster and adds protein. Choose the grain that fits your taste and time. This soup lasts 4 to 5 days in the fridge. Store it in an airtight container to keep it fresh. When reheating, warm it gently on the stove. Stir well to mix the flavors. If you notice any off smells or colors, it’s best to toss it out. This blog shared how to make a tasty pumpkin and wild rice soup. We explored key ingredients like wild rice, pure pumpkin, and tasty spices. The step-by-step guide helped you sauté veggies and cook everything perfectly. I offered tips to enhance flavors and adjust for dietary needs. Remember, storage methods keep your soup fresh for longer. Trying new variations can make each bowl unique. Enjoy creating your healthy, flavorful dish. Cooking can be fun, and this soup warms both body and soul.
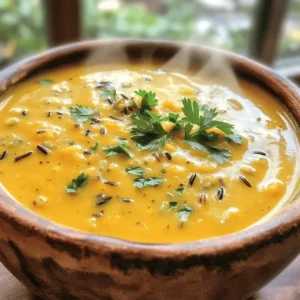
    Creamy Pumpkin Wild Rice Soup Rich in Flavor
  • - 1 pound large shrimp, peeled and deveined - 4 tablespoons butter - 5 cloves garlic, minced - 1 cup bell peppers (red, yellow, and green), sliced - 1 cup snap peas, trimmed - 2 tablespoons soy sauce - 1 tablespoon honey - 1 teaspoon crushed red pepper flakes (optional) - Salt and pepper to taste - Fresh parsley, chopped (for garnish) Gathering fresh ingredients is key to a great dish. Start with large shrimp, as they are tender and cook quickly. Make sure they are peeled and deveined for ease. Next, grab some butter. You’ll need four tablespoons to give your shrimp a rich flavor. Garlic is next on the list. Use five cloves, minced finely. This will add a strong aroma and taste. For color and crunch, get one cup of bell peppers. Use a mix of red, yellow, and green for a vibrant look. Snap peas are also important. A cup of trimmed snap peas adds sweetness and texture. For flavor, you’ll need two tablespoons of soy sauce and one tablespoon of honey. The soy sauce brings saltiness, while honey adds a touch of sweetness. If you like heat, add one teaspoon of crushed red pepper flakes. This is optional but gives a nice kick. Don’t forget salt and pepper for seasoning. Finally, fresh parsley will add a pop of color and freshness when you serve the dish. Now you have everything you need to make a fast and tasty garlic butter shrimp stir-fry! How to peel and devein shrimp Start with fresh shrimp. Hold the shrimp in one hand. With the other hand, grab the shell at the top. Peel the shell off by pulling it downwards. Next, locate the dark vein along the back. Use a small knife to make a shallow cut. Pull the vein out with your fingers. Rinse the shrimp under cold water to clean them. Chopping bell peppers and snap peas For the bell peppers, wash them well. Cut off the top and bottom. Slice the pepper in half and remove the seeds. Lay each half flat and slice them into thin strips. For snap peas, simply trim the ends with a knife. No need to cut them smaller; they stay whole for a nice crunch. Melting butter and sautéing garlic Grab a large skillet or wok and heat it on medium. Add the butter and let it melt. Once the butter is melted, add the minced garlic. Sauté the garlic for about 30 seconds. Watch it closely so it doesn’t burn. The garlic should smell amazing and become slightly golden. Cooking shrimp and adding vegetables Next, add the peeled shrimp to the skillet. Season them with salt and pepper. Cook the shrimp for 2-3 minutes, stirring often. They will turn pink and opaque when done. Once cooked, toss in the sliced bell peppers and snap peas. Stir-fry everything for another 2-3 minutes. The veggies should stay bright and crisp. Drizzling sauce and finishing touches Now, drizzle the soy sauce and honey over the shrimp and veggies. If you like heat, add crushed red pepper flakes. Toss all the ingredients together to coat them in the sauce. Cook for one more minute so everything is warm and the sauce sticks to the shrimp and veggies. Best serving suggestions For a tasty meal, serve the stir-fry over steamed rice or fluffy quinoa. This adds great texture and makes it filling. You can also pair it with noodles for a fun twist. Garnishing tips Before serving, sprinkle chopped fresh parsley on top. This adds a pop of color and fresh flavor. For extra crunch, add a sprinkle of sesame seeds. Enjoy your beautiful and vibrant dish! You can boost the heat in your dish by adding red pepper flakes. If you like spice, add more flakes for a kick. For variety, try different sauces. You might enjoy teriyaki or sweet chili sauce. These can change the flavor while keeping it simple. When sautéing shrimp, cook them until they turn pink and opaque. This means they are done. Keep stirring them for even cooking. For the veggies, cook them just enough to stay crunchy. This gives a nice texture to your dish. Prep your ingredients ahead of time. Chop veggies and season shrimp before cooking. This cuts down on cooking time. Another tip is to use frozen shrimp and vegetables. They are quick to use and still taste great. Just thaw them before cooking for the best results. {{image_2}} You can swap out shrimp for other proteins. Chicken works well and cooks fast. Tofu is a great option for a plant-based meal. For veggies, bell peppers are tasty, but you can use broccoli or carrots. They add different flavors and textures. Just remember to slice them thin so they cook quickly. Want to spice it up? Add Sriracha for a kick. It brings heat and flavor to the dish. You can also try coconut milk. It adds creaminess and a hint of sweetness. Just pour it in after you add the sauce. Instead of rice, try serving this stir-fry over noodles. It makes for a fun twist. You can also use it in wraps or as a salad topping. This gives you more options for meals. Enjoy experimenting with these ideas! To store leftovers, place the shrimp stir-fry in an airtight container. This keeps it fresh and prevents odors. Let the dish cool down first before sealing. You can store it in the fridge for up to three days. After that, the flavors may fade, and the shrimp may lose its texture. The best way to reheat the stir-fry is in a skillet over medium heat. This helps keep the shrimp tender and the veggies crisp. Add a splash of water or soy sauce to add moisture. Stir often to avoid burning. You can also use the microwave. Heat it in short bursts, stirring in between. This method is quick but may soften the veggies more. Yes, you can freeze garlic butter shrimp stir-fry! To freeze, let it cool completely. Then, place it in a freezer-safe bag or container. Squeeze out as much air as possible to prevent freezer burn. It will last in the freezer for about three months. To thaw, move the container to the fridge overnight. For a quicker option, place the bag in cool water for about an hour. Reheat in a skillet or microwave after thawing. This helps keep the flavors intact. Yes, you can use frozen shrimp. Just remember to thaw them first. Place the shrimp in cold water for about 15-20 minutes. This helps them thaw quickly and evenly. Once thawed, peel and devein if needed. You can then follow the recipe as usual. Frozen shrimp can save time and still taste great. If you want to replace butter, try olive oil. It gives a nice flavor and works well. You can also use vegan butter if you want a plant-based option. Both choices will keep your dish rich and tasty. Just use the same amount as stated in the recipe. To check if shrimp is done, look for a pink color. It should also be opaque, meaning you can’t see through it. The shrimp will curl into a C shape when cooked. This usually takes about 2-3 minutes per side. Avoid overcooking, as this can make shrimp tough and chewy. This blog post shares a simple shrimp stir-fry recipe. You learned about fresh ingredients, easy cooking steps, and creative variations. You can adjust flavors and save time with tips provided. Remember, you can substitute proteins and veggies for personal taste. Store leftovers properly and enjoy our reheating ideas. Follow these steps for a delightful dish every time. Cooking can be fun and easy, even for beginners. Now, gather your ingredients and start cooking. Enjoy every bite of your creation!
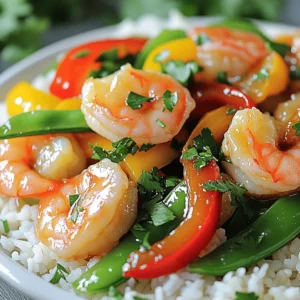
    Minute Garlic Butter Shrimp Stir-Fry Quick and Simple
  • - 2 cans (8 oz each) refrigerated cinnamon rolls - 4 large eggs - 1 cup milk - 1/2 cup heavy cream - 1 teaspoon vanilla extract - 1 teaspoon ground cinnamon - 1/4 teaspoon nutmeg - 1/4 cup maple syrup - 1/2 cup chopped pecans or walnuts - Extra icing from cinnamon rolls for drizzling When I make this Slow Cooker Cinnamon Roll Casserole, I start with the main ingredients. I grab two cans of refrigerated cinnamon rolls. I cut them into quarters for easy mixing. Then, I add four large eggs to a bowl. I pour in one cup of milk and half a cup of heavy cream. This mix makes the base rich and smooth. Next, I add flavor enhancers. I include one teaspoon of vanilla extract for sweetness. A teaspoon of ground cinnamon brings warmth to the dish. I also sprinkle in a quarter teaspoon of nutmeg. Finally, I pour in a quarter cup of maple syrup for a sweet finish. For extra crunch and flavor, I sometimes add optional ingredients. I chop half a cup of pecans or walnuts and sprinkle them in. I also save the extra icing from the cinnamon rolls for drizzling on top. This makes each bite even more delicious. Start by whisking the eggs in a large bowl. Add in the milk, heavy cream, vanilla extract, ground cinnamon, nutmeg, and maple syrup. Mix until everything blends well. This step builds a rich flavor base for your casserole. Next, lightly grease the slow cooker. You can use cooking spray or butter. This helps prevent the cinnamon rolls from sticking. Take the refrigerated cinnamon rolls and cut them into quarters. Place these pieces in an even layer at the bottom of the slow cooker. If you like nuts, sprinkle chopped pecans or walnuts over the cinnamon roll pieces. This adds a nice crunch and flavor. Now, pour the egg mixture over the cinnamon rolls. Make sure all pieces are coated well. Gently stir to combine everything. Be careful not to squish the cinnamon rolls too much. Cover the slow cooker with its lid. Set it to low for cooking. The cooking time is about 2.5 to 3 hours. Check for doneness by looking for a set center and golden brown edges. Once it’s done, turn off the slow cooker. Let the casserole cool for about 10 minutes before serving. Drizzle the extra icing from the cinnamon rolls over the top for a sweet finish. Enjoy your tasty delight! To make sure your casserole cooks evenly, cut the cinnamon rolls into quarters. This helps them soak up the egg mixture well. When placing them in the slow cooker, spread them out in a single layer. This allows heat to reach all parts. Different slow cookers may cook at different speeds. If your slow cooker runs hot, check the casserole after 2 hours. If it's not set, cook a bit longer. For slower models, you may need the full 3 hours. For a beautiful touch, garnish your casserole with fresh berries or a sprinkle of powdered sugar. The berries add color and a fresh taste. You can also drizzle extra maple syrup on top for sweetness. Pair your casserole with a warm cup of coffee or tea. The warmth of the drink complements the flavors in the dish. This makes for a cozy breakfast or brunch idea. If your casserole is not set in the center, it may need more cooking time. Try covering it and cooking for an extra 30 minutes. You can also check the heat setting to ensure it’s on low. For overcooked edges, you can add a little more cream or milk to the middle. This helps to moisten the center. Next time, keep an eye on the cooking time to avoid this. {{image_2}} You can change up the flavors in your casserole easily. For a fun fall twist, try pumpkin spice. Just add 1 teaspoon of pumpkin pie spice to your egg mixture. This will give your dish a warm, cozy flavor that’s perfect for autumn. Another tasty option is to add chocolate chips. Mix in 1/2 cup of chocolate chips with the cinnamon roll pieces. This sweet twist will make your casserole even more delightful. If you need to make it dairy-free, use almond milk or oat milk instead of regular milk. You can also swap heavy cream for coconut cream. This keeps the flavors rich while fitting your diet. For those who need gluten-free options, look for gluten-free cinnamon rolls. Many brands offer great choices that work well in this recipe. If you don’t have maple syrup, honey is a great alternative. It adds a nice sweetness without changing the recipe too much. You can also skip the nuts if you prefer. The casserole will still taste amazing. If you choose to add nuts, pecans or walnuts are both great options. Just make sure to chop them up for even distribution. To keep your Slow Cooker Cinnamon Roll Casserole fresh, let it cool first. Place it in an airtight container. This helps to retain moisture and flavor. Store it in the fridge for up to 3 days. If it lasts that long, you can enjoy it warm or cold! To freeze the casserole, cut it into portions. Wrap each piece tightly in plastic wrap. Then, place them in a freezer-safe bag. This keeps them fresh for up to 3 months. When you’re ready to eat, thaw it overnight in the fridge. Reheat in the microwave for 1-2 minutes or until warm. Get creative with your leftovers! You can turn them into breakfast sandwiches. Just add some scrambled eggs and cheese. They also make a great dessert. Top with whipped cream or ice cream for a sweet treat. Enjoy your casserole in new and fun ways! Yes, you can! If you don't have a slow cooker, use your oven. Preheat it to 350°F (175°C). Follow the same steps as the slow cooker recipe. Instead of layering in a slow cooker, use a greased baking dish. Pour the egg mixture over the cinnamon rolls and bake for about 30 to 40 minutes. Check for doneness by inserting a toothpick in the center. If it comes out clean, it's ready! The slow cooker takes about 2.5 to 3 hours on low heat. This gives the casserole a nice, warm texture. Prep time is only 15 minutes. So, the total time from start to finish is about 3 hours and 15 minutes. Remember to let it cool for about 10 minutes before serving. This helps the flavors settle and makes it easier to serve. Absolutely! You can use any brand of cinnamon rolls you like. Pillsbury cinnamon rolls are popular, but feel free to try others. You can even mix flavors, like adding cream cheese or caramel rolls. Each will give a unique taste to your casserole. If you want something special, look for seasonal flavors too! This blog post showed you how to make a delicious cinnamon roll casserole in your slow cooker. We covered all the key ingredients, from cinnamon rolls to eggs and milk. You learned easy steps for preparation, assembly, and cooking. We shared helpful tips and tricks to avoid common issues and even offered variations for dietary needs. I hope you feel ready to try this fun recipe. Get creative with flavors and enjoy every bite!
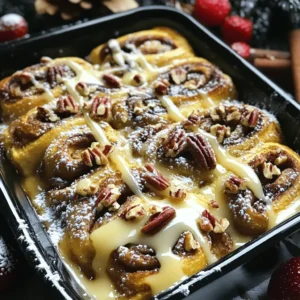
    Slow Cooker Cinnamon Roll Casserole Tasty Delight
  • To make this tasty Cranberry Orange Bakery Loaf, gather these simple ingredients: - 2 cups all-purpose flour - 1 cup fresh cranberries, chopped - 1 cup granulated sugar - 1/2 cup unsalted butter, softened - 3 large eggs - 1/2 cup orange juice, freshly squeezed - Zest of 1 orange - 1 teaspoon baking powder - 1/2 teaspoon baking soda - 1/4 teaspoon salt - 1 teaspoon vanilla extract - 1/2 cup walnuts or pecans, chopped (optional) - 1/4 cup powdered sugar (for glaze) - 2 tablespoons orange juice (for glaze) You can swap some ingredients if needed. Use whole wheat flour instead of all-purpose flour for a nuttier taste. If you don’t have fresh cranberries, dried cranberries work too. Just chop them a bit to mix well. You can replace butter with coconut oil for a dairy-free option. For the eggs, try using flaxseed meal mixed with water. This will keep it vegan and still tasty! Using fresh ingredients makes a big difference in your loaf. Fresh cranberries bring a vibrant flavor and texture. They add a nice tartness that balances the sweet orange. Fresh orange juice and zest enhance the citrus notes. This will make your loaf burst with flavor. Always choose the best ingredients you can find. This ensures your Cranberry Orange Bakery Loaf is delicious and enjoyable for everyone. 1. Start by preheating your oven to 350°F (175°C). Grease a 9x5-inch loaf pan. 2. In a large bowl, cream together 1/2 cup of softened butter and 1 cup of granulated sugar. Mix until it feels light and fluffy, about 3-5 minutes. 3. Add 3 large eggs to the mix, one at a time. Make sure to mix well after each egg. 4. Next, stir in 1/2 cup of freshly squeezed orange juice, the zest of 1 orange, and 1 teaspoon of vanilla extract. Mix until everything is combined. 5. In another bowl, whisk together 2 cups of all-purpose flour, 1 teaspoon of baking powder, 1/2 teaspoon of baking soda, and 1/4 teaspoon of salt. 6. Gradually add the dry mixture to the wet ingredients. Mix gently until just combined. Be careful not to overmix. 7. Fold in 1 cup of chopped fresh cranberries and, if you wish, 1/2 cup of chopped walnuts or pecans. Make sure they are evenly mixed. 8. Pour the batter into the prepared loaf pan. Use a spatula to smooth the top. 9. Bake for 55-65 minutes. Check if it’s done by inserting a toothpick into the center. It should come out clean. 10. Once baked, let the loaf cool in the pan for about 10 minutes. After that, carefully transfer it to a wire rack to cool completely. 11. For the glaze, whisk together 1/4 cup of powdered sugar and 2 tablespoons of orange juice until smooth. Drizzle this over the cooled loaf before serving. Enjoy your Cranberry Orange Bakery Loaf with a cup of tea or coffee! When making cranberry orange loaf, some mistakes can spoil your efforts. Here are key points to keep in mind: - Overmixing the batter: This leads to a tough loaf. Mix just until combined. - Using old ingredients: Fresh cranberries and eggs make a big difference. Check dates! - Skipping the zest: Orange zest adds vital flavor. Don't skip this step! - Not measuring ingredients: Use proper measuring cups for accuracy. Baking is a science. To take your loaf from good to great, follow these expert tips: - Use room temperature ingredients: This helps the batter blend smoothly. Let eggs and butter sit out before use. - Add a touch of spice: A dash of cinnamon or nutmeg can enhance the flavor. Just a little goes a long way. - Cool completely before glazing: This prevents the glaze from melting. Patience pays off! - Experiment with nuts: Try walnuts or pecans for added crunch. Both pair well with cranberries. Using the right tools helps achieve the best outcome. Here are my must-haves: - 9x5-inch loaf pan: A good-quality pan ensures even baking. Avoid dark pans as they can burn the loaf. - Mixing bowls: Use large bowls for easy mixing. A set of different sizes is handy. - Whisk and spatula: These tools help combine ingredients well. A rubber spatula is great for folding in cranberries. - Cooling rack: This allows air to circulate. It helps the loaf cool evenly and keeps it from becoming soggy. These tips will help you create a cranberry orange loaf that impresses every time! {{image_2}} To make a gluten-free version, swap all-purpose flour for a gluten-free blend. I suggest using a mix that includes xanthan gum for better texture. Follow the same steps in the recipe. The flavor will still shine through, making this loaf perfect for everyone. You can enhance your cranberry orange loaf with different add-ins. Try mixing in chocolate chips for a sweet twist. Dried fruits like apricots or cherries also work well. Just ensure you chop them into small pieces. These additions can make your loaf even more exciting and flavorful. Seasonal flavors can change your cranberry orange loaf's vibe. For fall, add cinnamon or nutmeg for warmth. In winter, consider using peppermint extract to give it a fresh taste. In spring, add fresh herbs like rosemary or thyme for a unique touch. Each season brings a chance to explore new flavors in this classic recipe. To keep your cranberry orange bakery loaf fresh, wrap it tightly in plastic wrap. You can also place it in an airtight container. Store it at room temperature for up to three days. If you want to keep it longer, the fridge is a good option, but it may dry out. To prevent this, seal it well. Freezing is a great way to save your loaf for later. First, let the loaf cool completely. Then, wrap it in plastic wrap and aluminum foil. This double layer will prevent freezer burn. You can freeze it for up to three months. When you're ready to enjoy it, thaw it in the fridge overnight. If your loaf feels a bit dry after storage, you can refresh it. Preheat your oven to 350°F (175°C). Take the loaf out of the wrapping and place it on a baking sheet. Heat it for about 10-15 minutes. This warms it up and brings back some moisture. Let it cool slightly before slicing. Enjoy it fresh again! To make your cranberry orange loaf moist, add extra orange juice. You can also use buttermilk instead of regular milk. Adding a bit more butter helps too. Consider using a mix of fresh and dried cranberries. They add flavor and moisture. Yes, you can use frozen cranberries in this recipe. Just toss them in flour before adding them to the batter. This prevents them from sinking to the bottom. Frozen cranberries work well and are convenient. They still bring that fresh taste to your loaf. The cranberry orange bakery loaf stays fresh for about 3-4 days at room temperature. Store it in an airtight container to keep it moist. If you want it to last longer, refrigerate it for up to a week. You can also freeze it for up to three months. Just wrap it well in plastic wrap and foil. In this post, we explored every step for making cranberry orange loaf. We covered key ingredients, how to prepare and bake, and tips for success. You learned about ingredient swaps and variations to fit your taste. Proper storage methods ensure your loaf stays fresh. I hope these insights help you create a delicious treat. Enjoy baking and sharing this delightful loaf!
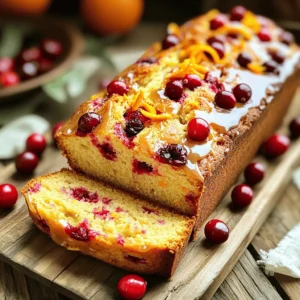
    Cranberry Orange Bakery Loaf Simple and Tasty Recipe
  • - 4 chicken thighs (boneless, skinless) - 2 large sweet potatoes, cut into wedges - 1 red bell pepper, sliced - 1 yellow onion, sliced The main ingredients for this dish are simple yet flavorful. Chicken thighs are juicy and tender, perfect for BBQ. Sweet potatoes add a natural sweetness. The red bell pepper and yellow onion bring in a nice crunch and color. - 2 tablespoons olive oil - 1 teaspoon garlic powder - 1 teaspoon paprika - Salt and pepper to taste The spices enhance the dish’s taste. Olive oil helps everything cook well. Garlic powder gives a nice kick. Paprika adds a touch of warmth. Don’t forget to season with salt and pepper to bring out all the flavors. - Favorite brands - Homemade versions You can use your favorite BBQ sauce. There are many brands to choose from. If you want to make your own, combine ketchup, vinegar, and brown sugar for a quick mix. Homemade BBQ adds a special touch and lets you control the flavors. First, you need to preheat your oven to 425°F (220°C). This high heat helps the chicken and sweet potatoes cook well. While the oven heats, prepare the sweet potatoes. Take two large sweet potatoes and cut them into wedges. Aim for similar sizes so they cook evenly. Next, grab a large bowl. Add the sweet potato wedges along with sliced red bell pepper and yellow onion. Drizzle two tablespoons of olive oil over the veggies. Season with one teaspoon of garlic powder, one teaspoon of paprika, and salt and pepper to taste. Toss everything well to coat the vegetables evenly. In the same bowl, take your four boneless, skinless chicken thighs. Pour one cup of your favorite BBQ sauce over them. Make sure each piece is fully covered with the sauce for the best flavor. Now, it’s time to arrange everything. Spread the sweet potato and veggie mix in a single layer on a large sheet pan. Nestle the BBQ-coated chicken thighs in the center among the veggies. This setup allows the flavors to blend while cooking. Roast the dish in your preheated oven for 25-30 minutes. You want the chicken to reach an internal temperature of 165°F and the sweet potatoes to be tender. If you like a nice char, turn on the broiler for 2-3 minutes at the end. This step caramelizes the veggies and enhances the chicken's flavor. Once done, let it rest for a few minutes before serving. Finish with a sprinkle of fresh parsley for a pop of color. To check if the chicken is done, use a meat thermometer. The safe internal temperature is 165°F. Insert the thermometer into the thickest part of the thigh. If it reads 165°F, your chicken is ready. For sweet potato tenderness, you can poke a wedge with a fork. If it slides in easily, they are done. You want them soft but not mushy. To add more flavor, consider using spices like cumin or chili powder. These spices can give your dish a nice kick. You can also mix in some fresh herbs like thyme or rosemary for a fresh touch. For BBQ sauce, you can experiment with different brands. Look for one with a balance of sweet and tangy. If you want to make your own, mix ketchup, honey, and a bit of vinegar. Using the broiler helps to create a nice char on the chicken. After baking, turn on the broiler for 2-3 minutes. Keep a close eye to avoid burning. The broiler cooks fast, so stay nearby. This step adds a great texture and flavor to your dish. {{image_2}} You can use chicken breast instead of thighs. Chicken breast cooks faster and is leaner. Just remember to reduce the cooking time. You can also switch to other meats like pork or turkey. Pork chops work well for a juicy option. Turkey thighs are great if you want a hearty flavor. Each meat brings its own taste, so feel free to experiment. You can include other vegetables to mix things up. Try adding broccoli, zucchini, or carrots. Each veggie gives a different flavor. You can also adjust the taste by using sweeter or spicier vegetables. For example, add jalapeños for heat or butternut squash for sweetness. Changing the veggies can make this dish new every time. Exploring regional BBQ sauces can change the whole dish. You might try a tangy vinegar sauce from the Carolinas or a sweet Kansas City style. Each sauce has a unique taste. Homemade sauce options let you control the flavor. Mix ketchup, brown sugar, and apple cider vinegar for a quick sauce. You can even add your favorite spices to create your own special blend. To keep your BBQ chicken sweet potato wedges fresh, store them properly. First, let the dish cool to room temperature. Then, place the leftovers in an airtight container. This helps to keep moisture in and flavors intact. You may want to separate the chicken from the sweet potatoes if you prefer. Use glass or plastic containers that seal tightly. This keeps the food fresh for up to 3 days in the fridge. When you are ready to enjoy your leftovers, reheating is key. You can use an oven or microwave. If you use the oven, preheat it to 350°F (175°C). Place the chicken and sweet potatoes on a baking sheet. Cover them with foil to keep moisture in. Bake for about 15-20 minutes until heated through. If you choose the microwave, heat in short bursts. Check every minute to avoid drying out the food. Adding a splash of water before covering can help add moisture. Freezing is a great way to save this dish for later. You can freeze the entire meal or just the chicken and sweet potatoes. For best results, wrap the food tightly in plastic wrap or use freezer-safe containers. This prevents freezer burn. When you want to eat it, move it to the fridge to thaw overnight. For quicker thawing, use the microwave on defrost mode. After thawing, reheat as mentioned above. Enjoy your meal just like fresh! It takes about 25 to 30 minutes to cook BBQ chicken on a sheet pan. The key is to check the chicken. It should reach an internal temperature of 165°F. This ensures the chicken is safe to eat. The sweet potatoes will also be tender at this time. If you want a crispy finish, you can broil for an extra 2 to 3 minutes. Yes, you can make this dish without BBQ sauce. Try using teriyaki sauce for a sweet taste. You could also use a spicy mustard sauce for a kick. If you prefer a dry rub, mix spices like cumin and chili powder. This will give great flavor without sauce. The options are endless based on what you like. You can serve many tasty sides with BBQ chicken sweet potato wedges. Here are some ideas: - Coleslaw: A crunchy, creamy side adds freshness. - Corn on the cob: Sweet corn pairs well with BBQ flavors. - Green salad: A light salad adds balance to the meal. - Baked beans: Rich and savory, they complement BBQ dishes. For serving ideas, you can present the dish on a large platter. Garnish with fresh parsley for color. This makes the meal look even more inviting. This blog post covered how to make delicious BBQ chicken with sweet potatoes. We explored ingredients like chicken thighs and sweet potatoes, along with spices to enhance flavor. I provided step-by-step instructions for preparing and baking the dish, along with tips to perfect your cooking. Feel free to try variations, such as using different meats or vegetables. Remember, proper storage keeps your leftovers fresh for next time. Enjoy creating this tasty meal, and don’t be afraid to experiment with flavors! Your next dinner will impress everyone.
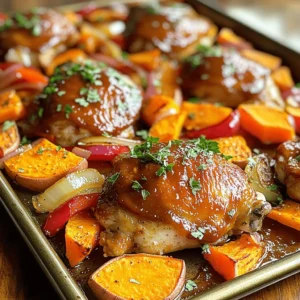
    BBQ Chicken Sweet Potato Wedge Sheet Pan Delight
  • To make Lemon Garlic Orzo with Spinach, gather these key items: - 1 cup orzo pasta - 2 tablespoons olive oil - 4 cloves garlic, minced - 3 cups vegetable broth - 2 cups fresh spinach, roughly chopped - Zest of 1 lemon - Juice of 1 lemon - 1 teaspoon dried oregano - Salt and pepper to taste These ingredients work together to create a bright, tangy dish with a rich flavor. If you want to enhance your dish, consider these optional items: - ¼ cup grated Parmesan cheese - Fresh parsley, chopped, for garnish The Parmesan adds creaminess, while parsley gives a fresh touch. You can also use lemon wedges on the side for extra zest. You can easily swap some ingredients if needed: - Use any small pasta instead of orzo. - Swap vegetable broth for chicken broth for a meatier flavor. - Fresh herbs can replace dried oregano. Use about three times as much. These substitutions can help you customize the dish to your taste or what you have on hand. Before you cook, gather all your ingredients. Here’s what you need: - 1 cup orzo pasta - 2 tablespoons olive oil - 4 cloves garlic, minced - 3 cups vegetable broth - 2 cups fresh spinach, roughly chopped - Zest of 1 lemon - Juice of 1 lemon - 1 teaspoon dried oregano - Salt and pepper to taste - ¼ cup grated Parmesan cheese (optional) - Fresh parsley, chopped, for garnish Next, measure everything out. This makes cooking easier. Chop the spinach and mince the garlic ahead of time. This way, you save time when cooking. Begin by heating the olive oil in a large pot over medium heat. Add the minced garlic. Sauté it for about 1-2 minutes. You want it to smell great, not burn. Now, add the orzo to the pot. Toast the orzo by stirring it for 2-3 minutes. Look for a light golden brown color. This adds a nice flavor. Pour in the vegetable broth, lemon zest, lemon juice, and dried oregano. Stir everything well. Bring the mixture to a boil. Then, reduce the heat to low. Cover the pot and let it simmer for 10-12 minutes. The orzo should be tender and most of the liquid should be absorbed. Once the orzo is cooked, stir in the fresh spinach. Let it wilt for 1-2 minutes. Season with salt and pepper to taste. If you like, sprinkle in the Parmesan cheese. Stir until it melts and blends in. To get the best texture, keep an eye on the cooking time. Orzo can go from perfect to mushy quickly. Stir occasionally, too. This helps the orzo cook evenly. If you want your orzo creamy, add more broth or water as it cooks. Taste it as you go. You can adjust the seasoning to your liking. Finishing with fresh parsley adds a nice touch. Serve it warm and enjoy! Fresh herbs can make your dish pop. Use parsley, basil, or thyme as great options. Chop them finely and stir them in right before serving. This adds a burst of flavor and fresh color to your orzo. You can even mix herbs into the cooking broth for a deeper taste. Don’t be afraid to experiment with different herbs to find your favorite mix. Adding cheese can take your orzo to the next level. Grated Parmesan gives a rich taste. Stir it in after cooking for a creamy texture. If you like a stronger flavor, try feta or goat cheese instead. These cheeses add tanginess that works well with lemon. You can also add a splash of cream for extra richness if you want. Cooking orzo is simple, but timing is key. Toast the orzo first for a nutty flavor. Keep stirring to prevent burning. When you add broth, let it boil, then lower the heat. Cover the pot and let it simmer for about 10-12 minutes. Check the orzo for doneness. It should be tender but not mushy. If you find it too dry, add a little more broth. {{image_2}} You can boost the nutrition of lemon garlic orzo by adding protein. Chicken, shrimp, or chickpeas work well. For chicken, cook strips in the pot after sautéing garlic. For shrimp, add them with the orzo until they turn pink. If you choose chickpeas, drain and rinse a can, then stir them in with the spinach. This adds flavor and makes your meal more filling. You can get creative with the vegetables in this dish. Try bell peppers, peas, or zucchini. Dice the bell peppers and add them with the garlic for a sweet crunch. Frozen peas can be stirred in with the spinach for vibrant color. For zucchini, slice it thin and toss it in while the orzo cooks. This way, you can enjoy a rainbow of veggies in your bowl. Adding spices can give your orzo a unique taste. Try red pepper flakes for heat or smoked paprika for a smoky flavor. Fresh herbs like basil or thyme can also add depth. Mix in a teaspoon of red pepper flakes when adding the broth for a kick. If you prefer fresh herbs, chop them and stir them in just before serving. These twists will keep your orzo exciting and new every time you make it! To keep your Lemon Garlic Orzo fresh, store it in an airtight container. Let it cool down first to avoid steam buildup. This helps keep it from getting soggy. Place the container in the fridge. It will stay good for up to three days. When you're ready to enjoy leftovers, gently reheat the orzo. You can use a microwave or a pot on the stove. If using the microwave, heat in short bursts. Stir it often to make sure it warms evenly. If using the stove, add a splash of vegetable broth or water. This helps revive the orzo and keeps it from drying out. Freezing is a great option for longer storage. To freeze, first, let the orzo cool completely. Then, portion it into freezer-safe bags. Squeeze out any air before sealing. This will help prevent freezer burn. You can freeze it for up to three months. To use, thaw it overnight in the fridge, then reheat as described above. Yes, you can use other small pasta shapes. Try ditalini, small shells, or even quinoa. Each will give a slightly different taste and texture. Be careful with cooking times. Check the package for the right times. To make this dish vegan, skip the Parmesan cheese. Use nutritional yeast instead for a cheesy flavor. You can also add more veggies. Try mushrooms, bell peppers, or zucchini for extra nutrients and taste. This orzo pairs well with grilled chicken or fish. A crisp salad or steamed veggies also work great. For a light meal, serve it alone with lemon wedges. You can add fresh herbs for a bright touch. Lemon Garlic Orzo is a simple, tasty dish. We explored key ingredients and step-by-step cooking tips. You learned how to enhance flavor with herbs and cheese. We also discussed variations and proper storage methods. In the end, this dish offers flexibility and great taste. You can make it your own with protein, veggies, or spices. Enjoy your cooking and let your creativity shine!
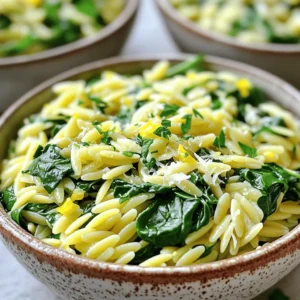
    Lemon Garlic Orzo with Spinach One Pot Delight
  • To make the Pumpkin Cream Cold Foam Iced Coffee, gather these ingredients: - 1 cup brewed coffee (chilled) - 1/2 cup milk of your choice (oat, almond, or whole) - 1/4 cup heavy cream - 2 tablespoons pumpkin puree - 1 tablespoon maple syrup (or sweetener of choice) - 1/2 teaspoon vanilla extract - 1/2 teaspoon pumpkin pie spice - Ice cubes - Whipped cream (optional, for garnish) - Extra pumpkin pie spice (for garnish) You can use different types of milk in this recipe. Each option brings a unique taste: - Oat milk: Creamy and rich, it pairs well with pumpkin. - Almond milk: Light and nutty, it adds a subtle flavor. - Whole milk: This gives a classic taste and a nice creaminess. Choose the milk that you enjoy most. You can even mix different milks for a fun twist! Sweeteners can change your drink's taste. Here are some options to play with: - Maple syrup: This adds a warm, rich sweetness. - Honey: A natural choice for a floral note. - Agave nectar: This is lighter, ideal for a mild sweetness. - Stevia or monk fruit: Good for a no-calorie option. Feel free to adjust the sweetness to your liking. Mix and match to find your perfect flavor! To start, brew a strong cup of coffee. I like to use a dark roast for rich flavor. Once brewed, let the coffee chill in the refrigerator. This makes your drink refreshing and cool. It takes about 10 minutes for the coffee to chill properly. In a medium bowl, mix together the heavy cream, pumpkin puree, maple syrup, vanilla extract, and pumpkin pie spice. Use a hand mixer or whisk to whip the mixture. You'll want to whip until it forms soft peaks. This will create a thick, creamy foam. The pumpkin and spices add warmth and depth to your foam. Grab a glass and fill it with ice cubes. Pour the chilled coffee over the ice. Next, carefully spoon the pumpkin cream foam on top of the coffee. This foam should float nicely above the coffee. If you want, you can add a dollop of whipped cream on top. Finish with a sprinkle of extra pumpkin pie spice for a nice touch. Enjoy your drink! To make great pumpkin cream foam, use cold heavy cream. Start with a medium bowl. Add the heavy cream, pumpkin puree, maple syrup, vanilla extract, and pumpkin pie spice. Whip this mixture with a hand mixer. Aim for soft peaks. Over-whipping can make it too thick. The foam should be creamy and light. This texture is key to your drink. For the best flavor, brew a strong cup of coffee. Use dark roast or espresso if you like. Chilling the coffee is a must. It helps keep the foam fluffy. If your coffee is too weak, the foam might overpower it. A stronger coffee gives a nice balance with the sweet pumpkin flavor. Presentation makes your drink fun. Start by filling a glass with ice cubes. Pour the chilled coffee over the ice. Carefully spoon the pumpkin cream foam on top. For extra flair, add whipped cream. A sprinkle of pumpkin pie spice on top adds color and flavor. Serve with a straw or spoon. This way, you can mix in the foam as you sip your drink. {{image_2}} You can change the milk and cream in this drink. Each type gives a new taste. Try oat milk for a nutty flavor. Almond milk adds a light sweetness. Whole milk makes the foam rich and creamy. You can also mix milk types for fun flavors. Want a bolder taste? Add more pumpkin pie spice or a pinch of nutmeg. You can also mix in a splash of flavored syrup, like caramel or vanilla. For a chocolate twist, use chocolate milk instead of regular milk. Each change brings a new layer of flavor to your drink. As the seasons change, so can your drink. For Halloween, try adding a drop of orange food coloring to the foam. For Christmas, mix in peppermint extract for a minty touch. In spring, use fresh vanilla beans for a light, floral flavor. Each of these ideas makes your Pumpkin Cream Cold Foam Iced Coffee feel special for any holiday. To keep your ingredients fresh, follow these steps: - Store pumpkin puree in an airtight container. - Refrigerate it for up to a week. - If you have heavy cream left, seal it tightly and store it in the fridge. You can store your iced coffee. Here’s how: - Pour it into a sealed container. - Keep it in the fridge for up to two days. - Use a glass jar or a pitcher for best results. Storing the foam is a bit trickier. Here’s what to do: - Store foam in an airtight container. - Keep it in the fridge and use within 24 hours. - When ready to use, whip it again for a creamy texture. These simple steps help you enjoy your pumpkin cream cold foam iced coffee even longer! To order a Pumpkin Cream Cold Foam Iced Coffee, start by asking for iced coffee. Request it chilled and strong. Then, ask for pumpkin cream cold foam on top. Some places allow you to pick your milk. You can choose oat, almond, or whole milk. Add sweetener or syrup based on your taste. Enjoy a drink that tastes like fall in a cup! Yes, you can make this recipe vegan. Use plant-based milk like almond or oat milk. Instead of heavy cream, use coconut cream or a vegan whipped topping. Maple syrup is already vegan, so that works well as a sweetener. Pumpkin puree is vegan too. With these swaps, you get a creamy, delicious vegan drink. For this drink, a medium or dark roast coffee works best. It gives a strong flavor to balance the sweetness of the cream. Cold brew coffee is also a great choice. It tastes smooth and less bitter. The key is to brew a strong cup, so it shines through the pumpkin cream foam. This blog post covered how to make a Pumpkin Cream Cold Foam Iced Coffee. We discussed key ingredients, including milk and sweeteners. I shared a step-by-step guide for brewing, creating foam, and assembling the drink. You also learned tips for perfecting foam and options for variations. Don’t forget about storing your ingredients and prepared coffee. In the end, this iced coffee treat is fun to make and enjoy. With simple adjustments, you can tailor it to your taste. Experiment and find your perfect pumpkin drink.
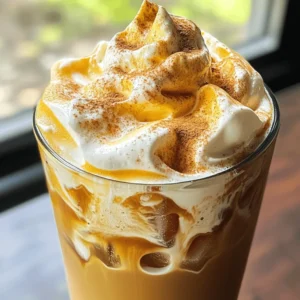
    Pumpkin Cream Cold Foam Iced Coffee Flavor Boost
  • - 2 packs of instant ramen noodles (discard seasoning packets) - 2 tablespoons gochujang (Korean red chili paste) - 1 red bell pepper, thinly sliced - 1 cup broccoli florets - 1 medium carrot, julienned - 3 cloves garlic, minced The heart of this dish lies in the instant ramen noodles. They cook quickly and soak up flavors well. Gochujang adds the heat and a rich taste. Fresh vegetables brighten the dish and add crunch. I love using red bell pepper for its sweetness and color. Broccoli florets bring a nice texture, while julienned carrots add a pop of orange. - Sesame seeds - Green onions These garnishes make your dish look pretty and add flavor. Sesame seeds give a nutty taste. Chopped green onions add a fresh bite. You can use them freely for added texture. - 1 tablespoon soy sauce - 1 tablespoon sesame oil - 1 tablespoon vegetable oil The sauces and oils bring everything together. Soy sauce adds a salty depth. Sesame oil gives a warm, nutty flavor. Vegetable oil helps cook the garlic and veggies without burning. This mix of flavors creates a balanced meal that you'll want to make again. To start, cook the instant ramen noodles. Boil water in a pot. Add the noodles and cook them as per the package instructions. This usually takes about 3 to 5 minutes. Once soft, drain the noodles in a colander. Set them aside so they can cool a little. Next, let’s make the gochujang sauce. In a small bowl, mix 2 tablespoons of gochujang with 1 tablespoon of soy sauce and 1 tablespoon of sesame oil. Stir until you have a smooth sauce. The mixture should be thick and a bit spicy, perfect for our dish. Now, we can move on to cooking the stir fry. Heat 1 tablespoon of vegetable oil in a large skillet or wok over medium-high heat. Once hot, add 3 cloves of minced garlic. Sauté the garlic for about 30 seconds until it smells great. Then, add the sliced red bell pepper, 1 cup of broccoli florets, and 1 medium carrot that you julienned. Stir fry these veggies for about 3 to 4 minutes. You want them to be tender but still crisp. After that, add the cooked ramen noodles to the skillet. Pour in the gochujang sauce you made earlier. Toss everything together so the noodles absorb the sauce. Cook for an additional 2 to 3 minutes. Finally, season with salt and pepper to taste. Remove from heat and stir in chopped green onions. Transfer the stir fry to serving plates and sprinkle sesame seeds on top for garnish. Enjoy your spicy, flavorful meal! For a great stir fry, I love using fresh, colorful vegetables. They add crunch and flavor. Here are some of my favorites: - Red bell pepper - Broccoli florets - Carrots These veggies cook fast and keep their shape well. You can also try seasonal vegetables like: - Snap peas in spring - Zucchini in summer - Sweet potatoes in fall To make your stir fry even better, consider adding protein. You can use: - Chicken - Shrimp - Tofu These options boost taste and nutrition. Adjust the spice level to your liking. If you want more heat, add extra gochujang. For less spice, use less gochujang or add a bit of honey. Plating is key for a nice meal. Serve the stir fry on a colorful plate. Sprinkle sesame seeds on top for style. Pair your dish with a refreshing drink, like iced tea or a light beer. Rice also makes a great side. Enjoy your meal! {{image_2}} You can easily make this dish vegetarian or vegan. Instead of using meat, try tofu or tempeh. Both options soak up flavors well. Cut the tofu into small cubes. Sauté it until golden brown before adding the other veggies. Tempeh has a nutty taste that adds depth. Use it just like tofu for a protein boost. If you need a gluten-free meal, worry not! You can swap the instant ramen noodles. Look for rice noodles or gluten-free ramen. These options cook quickly and taste great. Just follow the package instructions to get them right. Your stir fry will still be delicious and satisfying. For those on low-carb diets, you have choices too. Instead of noodles, use zucchini noodles or cauliflower rice. Both options are light and healthy. They absorb the gochujang flavor well. You can spiralize zucchini for a fun twist. Cook it quickly so it stays crisp. Enjoy a tasty meal that fits your diet! To keep your leftovers fresh, place them in an airtight container. Make sure the stir fry cools completely before sealing. Store it in the fridge for up to three days. This helps maintain flavor and texture. When you're ready to eat, just reheat it. You can freeze cooked stir fry for later. Portion it into freezer-safe bags or containers. Remove excess air to prevent freezer burn. It can last for about a month in the freezer. When you're hungry, just thaw it in the fridge overnight. Reheating properly keeps the noodles and veggies nice. The best way is to use a skillet. Heat on medium, adding a splash of water or broth. This helps steam the noodles and warms the veggies evenly. Stir gently until everything is heated through. You want it to taste fresh, just like when you first cooked it! If you can't find gochujang, you can use sriracha or red chili paste. These options add heat and flavor. You can mix them with a bit of miso for a deeper taste. Another choice is to blend chili powder with soy sauce. This will give some spice but not the same depth. Yes, fresh ramen is great! You need to cook it separately. Boil fresh ramen in water for 2-3 minutes. Drain it before you add it to the stir fry. Keep an eye on the cooking time. Fresh noodles cook faster. To reduce spice, use less gochujang. Start with one tablespoon and taste it. You can also add more vegetables like carrots or broccoli. These will help balance the heat. Adding a bit of sugar can also tone down the spice. This article showed you how to create a tasty gochujang ramen stir fry. We covered the key ingredients, from noodles to fresh veggies. I shared clear steps for cooking and mixing flavors, plus helpful tips for your dish. You can make vegetarian versions or adjust for dietary needs. Don't forget how to store leftovers for later. Now you can enjoy a fun, flavorful meal anytime. Embrace your creativity in the kitchen. Your ramen adventure starts today!
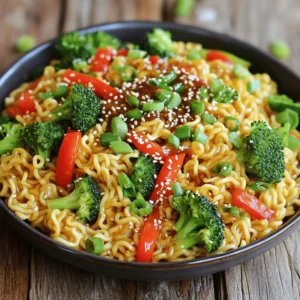
    Spicy Gochujang Ramen Stir Fry Tasty and Easy Meal
  • - 1 cup pitted dates, packed - 1 cup rolled oats - ½ cup almond or peanut butter - ½ cup chopped pecans - ¼ cup maple syrup - 1 teaspoon vanilla extract - ½ teaspoon sea salt (plus extra for topping) - ½ cup salted caramel sauce The main ingredients in these salted caramel pecan no bake bars create a rich and chewy treat. The pitted dates serve as the base. They provide natural sweetness and stickiness. Rolled oats add fiber and heartiness, making the bars filling. Almond or peanut butter binds everything together. It also gives a nice nutty flavor. Chopped pecans add crunch and a buttery taste. Maple syrup brings extra sweetness without being too heavy. Vanilla extract enhances all the flavors, making them pop. The sea salt balances the sweetness perfectly. Finally, the salted caramel sauce is the star of the show. It drizzles on top, creating a sweet and salty finish. - Extra salted caramel sauce - Whole pecans for decoration For extra flair, consider using optional garnishes. You can drizzle more salted caramel sauce on top. It makes the bars even more tempting. Whole pecans placed on top add a nice touch. They look great and give a bit more crunch. These simple extras take your bars from good to great! - Soak 1 cup of pitted dates in warm water for 10 minutes. - Drain the dates and set them aside for later use. - In a food processor, combine the soaked dates, 1 cup of rolled oats, ½ cup of almond or peanut butter, ¼ cup of maple syrup, 1 teaspoon of vanilla extract, and ½ teaspoon of sea salt. - Pulse the mixture until a sticky dough forms. If it feels too crumbly, add a little more almond or peanut butter. - Fold in ½ cup of chopped pecans into the dough until evenly mixed. - Line an 8x8-inch baking dish with parchment paper, leaving some overhang. Press the mixture firmly into the dish using your hands or a spatula. - Drizzle ½ cup of salted caramel sauce over the pressed mixture. Spread it gently to cover. Sprinkle with extra sea salt for a tasty touch. - Place the baking dish in the refrigerator for at least 2 hours. This helps the bars to set properly. - Once the bars are firm, lift them out using the parchment paper. - Cut them into squares or rectangles for serving. Enjoy your delicious treat! If you want to swap almond or peanut butter, try sunflower seed butter. It works well and is nut-free. You can also use cashew butter for a creamy taste. For sweeteners, if you don't have maple syrup, honey or agave syrup are great options. They add sweetness and moisture. Just keep in mind that honey is not vegan. To get that perfect sticky dough, be sure to soak those dates well. This makes them easier to blend and helps with binding. If your dough feels dry, add more nut butter. If your mixture is crumbly, don't worry! Just add a little water or more syrup. This will help it stick together better. For a lovely presentation, arrange the bars on a nice platter. Drizzle extra salted caramel sauce over the top for a sweet touch. Adding whole pecans as a garnish makes it look fancy and fun. Pair these bars with a cold glass of almond milk or a warm cup of tea. They also pair well with coffee for a tasty treat anytime. {{image_2}} You can easily change the flavors in these bars. Adding chocolate chips gives a rich taste. Dark chocolate pairs well with the sweet caramel. Shredded coconut adds a fun texture and flavor. You can also try different nuts or seeds. Walnuts or almonds work great. Each nut brings a unique crunch. If you want vegan options, swap the honey for agave syrup. Use peanut butter or almond butter that is nut-free. For gluten-free bars, choose certified gluten-free oats. You can also make low-carb bars. Use almond flour and a sugar substitute like erythritol. These changes keep the bars tasty and healthy. In fall, add pumpkin spice for a cozy flavor. A hint of cinnamon or nutmeg makes it perfect. In winter, try adding dried cranberries for a tart taste. You can also mix in chopped apples for a fresh twist. Each season offers new ways to enjoy these salted caramel pecan no bake bars. To keep your Salted Caramel Pecan No Bake Bars fresh, store them in an airtight container. This will prevent them from drying out and losing flavor. You can place parchment paper between layers to avoid sticking. These bars last up to one week in the fridge. If you want to keep them longer, freezing is a great option. First, cut the bars into squares. Then, wrap each piece tightly in plastic wrap. Place them in a freezer-safe bag, removing as much air as possible. They can stay frozen for up to three months. When you're ready to enjoy a bar, take it out of the freezer. Let it thaw in the fridge for a few hours before serving. This method keeps the texture and taste just right. Enjoy your treat! Yes, you can swap pecans for other nuts. Almonds, walnuts, or hazelnuts work well. Each nut brings its own flavor. For example, almonds add a sweet crunch, while walnuts give a rich taste. Just chop them up and mix them in like pecans. The bars need at least 2 hours in the fridge to chill. This time helps them set and hold their shape. If you can wait longer, they taste even better after a full night in the fridge. You can make these bars a few days ahead. Just store them in an airtight container in the fridge. They stay fresh for about a week. To keep them longer, you can freeze them. Wrap each bar in plastic wrap before freezing. Yes, making salted caramel sauce at home is easy! Just heat 1 cup of sugar in a pot over medium heat. Stir until it melts and turns golden. Then, carefully add 6 tablespoons of butter and ½ cup of cream. Stir until smooth. Finally, add a pinch of salt to taste. Let it cool before using. In this blog post, I detailed how to make delicious pecan caramel bars. We covered the main ingredients, mixing steps, and tips for the best consistency. I shared ideas for variations and how to store your bars. These treats are simple to make and fun to customize. Enjoy experimenting with flavors and enjoy your tasty snacks!
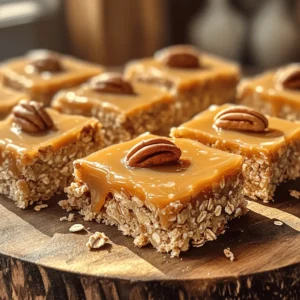
    Salted Caramel Pecan No Bake Bars Delightful Treat
  • To make these tasty fritters, you need: - 2 medium apples, peeled and diced (preferably Granny Smith or Honeycrisp) - 1 cup all-purpose flour - 1/2 cup granulated sugar - 1 teaspoon baking powder - 1/2 teaspoon ground cinnamon - 1/4 teaspoon nutmeg - 1/4 teaspoon salt - 1/2 cup buttermilk (or milk of choice) - 1 large egg - 1 teaspoon vanilla extract - 1 tablespoon lemon juice - Cooking spray or oil for the air fryer The glaze adds a sweet finish. For the vanilla glaze, gather: - 1 cup powdered sugar - 2 tablespoons milk - 1/2 teaspoon vanilla extract Choosing the right apples is key. Here are some tips: - Pick Firm Apples: Look for apples that feel solid and heavy. - Color Matters: Choose apples with bright, vibrant skin. - Taste the Variety: Granny Smith is tart, while Honeycrisp is sweet. - Freshness Counts: Check for any bruises or soft spots. Fresh apples give the best flavor. Using the right apples will make your fritters shine. Enjoy the process! First, peel and dice the apples. I like using Granny Smith or Honeycrisp for their tartness. In a bowl, toss the diced apples with lemon juice. This step keeps them from turning brown and adds a nice zing. Set the apples aside while you prepare the batter. In a large mixing bowl, combine the dry ingredients. Mix together one cup of flour, half a cup of granulated sugar, one teaspoon of baking powder, half a teaspoon of cinnamon, a quarter teaspoon of nutmeg, and a quarter teaspoon of salt. Stir it well to break up any lumps. In another bowl, whisk together half a cup of buttermilk, one egg, and one teaspoon of vanilla extract until smooth. Pour this mixture into the bowl of dry ingredients and mix until just combined. Gently fold in the diced apples, ensuring they spread evenly throughout the batter. Preheat your air fryer to 350°F (175°C) for about five minutes. Use a tablespoon or cookie scoop to drop spoonfuls of batter into the air fryer basket. Make sure to leave space between each fritter for even cooking. Lightly spray the tops with cooking spray. Air fry the fritters for 10 to 12 minutes, flipping halfway through. They should turn golden brown and look delicious. While they cool, prepare the vanilla glaze by whisking together one cup of powdered sugar, two tablespoons of milk, and half a teaspoon of vanilla extract until smooth. Drizzle this glaze over the fritters for a sweet finish. Enjoy your warm fritters with a drink! To make sure your fritters cook just right, follow these steps: - Preheat the Air Fryer: Always preheat your air fryer for about 5 minutes at 350°F. This helps the fritters cook evenly. - Space Them Out: When placing fritters in the basket, make sure to leave space. This allows hot air to flow around each fritter. - Flip Halfway: Remember to flip the fritters halfway through cooking. This ensures both sides turn golden brown. - Check for Doneness: Use a toothpick to check if they are done. If it comes out clean, they're ready! A great glaze can take your fritters to the next level. Here’s how to get it right: - Mix Well: Combine powdered sugar, milk, and vanilla extract in a bowl. Stir until it’s smooth and creamy. - Adjust Consistency: If your glaze is too thick, add a little milk. If it's too thin, add more powdered sugar. - Drizzle or Dip: You can either drizzle the glaze over the fritters or dip the tops directly. Both ways add flavor! Serve your fritters in fun ways to impress your friends and family: - On a Decorative Plate: Place fritters on a nice plate for a classy look. - Dust with Powdered Sugar: A light dusting of powdered sugar makes them look more appealing. - Add Cinnamon Sprinkles: A sprinkle of cinnamon not only looks great but adds flavor too. - Pair with Drinks: Enjoy them warm with a cup of coffee or tea for a delightful snack. {{image_2}} You can use many apple types for these fritters. Granny Smith apples add a nice tartness. Honeycrisp apples bring sweetness and crunch. Other good choices are Fuji and Gala apples. Each apple type gives a unique flavor and texture. Try a mix of apples for a fun twist! You can add more flavor to your fritters. Consider using ground ginger for warmth. A pinch of allspice can give a cozy taste. You might like to add chopped nuts, too. Walnuts or pecans add a nice crunch. Dried cranberries or raisins can add sweetness. Experiment and make these fritters your own! While vanilla glaze is classic, you can mix it up. Try adding cocoa powder for a chocolate glaze. A dash of almond extract can give a nutty twist. For a fruity glaze, use orange juice instead of milk. You can even mix in spices like cinnamon for a warm flavor. Let your imagination guide you! To keep your apple fritters fresh, let them cool first. Place them in an airtight container. This keeps them soft and tasty. You can store them in the fridge for up to three days. Just remember to line the container with paper towels. This absorbs any moisture. When you want to enjoy your fritters again, use the air fryer for the best results. Preheat it to 350°F (175°C). Place the fritters in the basket for about 3-4 minutes. This brings back their crispy texture. You can also use a microwave, but it might make them soft. Heat them in 15-second intervals until warm. If you want to save fritters for later, freezing is a great option. First, let them cool completely. Then, wrap each fritter in plastic wrap. Place them in a freezer bag or container. They can stay fresh for up to two months. For the glaze, store it in an airtight container in the fridge for a week. You can also freeze it in ice cube trays. Just thaw it when you are ready to use it. Yes, you can use regular milk if you don't have buttermilk. To make it similar, add one tablespoon of vinegar or lemon juice to a cup of milk. Let it sit for five minutes. This will mimic the tangy taste of buttermilk. These fritters can stay fresh for about three days when stored in an airtight container at room temperature. If you want them to last longer, store them in the fridge for up to one week. For best taste, enjoy them warm. You can use applesauce as an egg substitute. Use one-quarter cup of applesauce for each egg. This keeps the fritters moist while adding a touch of apple flavor. Another option is to use a flaxseed meal mix. Combine one tablespoon of flaxseed meal with two and a half tablespoons of water. Let it sit for five minutes until it thickens. You learned the key ingredients for air fryer apple fritters and their glaze. I shared tips for choosing apples and instructions for preparation. Cooking in an air fryer makes fritters light and crisp. You also discovered tricks for perfecting your fritters and creative glaze options. Don’t forget about storage tips; they help you enjoy leftovers. With these insights, you are ready to make delicious apple fritters that impress everyone. Enjoy the process, and happy cooking!
    Air Fryer Apple Fritters with Vanilla Glaze Delight
  • - 2 cans black beans, drained and rinsed - 1 can diced tomatoes (with juices) - 1 cup corn kernels (fresh or frozen) - 1 medium onion, diced - 3 cloves garlic, minced - 1 red bell pepper, diced I love using black beans for this chili. They add a rich texture and protein. Diced tomatoes bring moisture and a hint of sweetness. Corn gives a nice crunch and fresh taste. Onion, garlic, and red bell pepper provide a great base flavor. - 2-3 chipotle peppers in adobo sauce, minced - 1 tablespoon ground cumin - 1 tablespoon chili powder - 1 teaspoon smoked paprika - Salt and pepper to taste Chipotle peppers give this chili its smoky kick. Ground cumin and chili powder add depth and warmth. Smoked paprika enhances the flavor, while salt and pepper balance it all. - 1 cup cornmeal - 1 cup buttermilk (or substitute with milk + 1 tablespoon lemon juice) - 1 large egg - 1 teaspoon baking powder - 1 teaspoon sugar - 1/2 teaspoon salt For the cornbread crumble, cornmeal is key. It gives the perfect texture. Buttermilk keeps it moist and adds flavor. The egg helps bind everything together. Baking powder makes it rise, and sugar adds a hint of sweetness. - Heat olive oil in a large pot over medium heat. - Add the diced onion and red bell pepper. - Sauté for about 5 minutes until softened. - Stir in minced garlic, cumin, chili powder, smoked paprika, and chipotle peppers. - Cook for 1-2 minutes until the spices smell great. - Add black beans, diced tomatoes with their juice, corn, and vegetable broth to the pot. - Season with salt and pepper to taste. - Bring the mix to a boil, then reduce the heat. - Let the chili simmer uncovered for about 30 minutes. - Stir occasionally and adjust the seasoning as needed. - While the chili simmers, preheat your oven to 400°F (200°C). - In a bowl, whisk together cornmeal, baking powder, sugar, and salt. - In another bowl, mix buttermilk and egg. - Pour the wet mix into the dry mix and stir until just combined. - Pour the batter into a greased baking dish and bake for 20-25 minutes or until golden brown. - Let it cool slightly before crumbling the cornbread for the topping. To get the best flavor from your chili, start with the spice levels. If you like heat, add more chipotle peppers. For a milder taste, use less. Taste as you go. This helps you adjust the flavor to your liking. Garnishes can elevate your chili. I like to add fresh cilantro, diced avocado, or some sour cream. Lime wedges also add a bright touch. Each adds a new layer of flavor. For the best cornbread, focus on the consistency. Combine wet and dry ingredients gently. Do not overmix. This keeps the cornbread light and fluffy. If you want more texture, add corn kernels to the batter. Baking is key. Preheat your oven well. Use a greased dish for even cooking. Keep an eye on it. Bake until golden brown, about 20-25 minutes. A toothpick should come out clean. Pair your chili with side dishes for a complete meal. A simple green salad works well. Corn on the cob is another great choice. It adds sweetness and crunch. For drinks, I recommend cold beverages. A light lager or iced tea complements the chili. If you prefer non-alcoholic, try lemonade. It balances the heat and adds zest. {{image_2}} You can easily change the chili. Adding more veggies makes it better. Try bell peppers or zucchini for a colorful mix. You can also add meat. Ground turkey or beef works well if you want more protein. Just brown the meat before adding the other ingredients. If you need gluten-free options, look for gluten-free cornmeal. It is easy to find in stores. For a dairy-free version of the cornbread, swap buttermilk with almond milk and a splash of lemon juice. This keeps the cornbread moist and tasty. Do you want your chili hot or mild? To adjust the heat, add less chipotle. You can also leave out the seeds from the peppers. If you want a milder taste, use regular bell peppers instead of chipotle. This will keep the flavor but lower the heat. To keep your chili fresh, use airtight containers. Glass or plastic containers work well. Make sure to let the chili cool before sealing. This helps prevent moisture buildup. Store the chili in the fridge. It lasts for about 3 to 4 days. If you have extra chili, freezing is a good choice. First, let the chili cool completely. Then, scoop it into freezer-safe bags. Remove as much air as you can before sealing. Label the bags with the date. You can freeze it for up to 3 months. When you want to eat it, thaw overnight in the fridge. Reheat on the stove or in the microwave until hot. To keep cornbread fresh, wrap it in plastic wrap or foil. You can also store it in an airtight container. Cornbread is best eaten within 2 days. If you want to keep it longer, freeze it. For reheating, place it in a warm oven for 10 minutes. This helps restore its texture and taste. Yes, you can make this chili in a slow cooker! Here’s how: 1. Prep the Veggies: Start by chopping your onion, red bell pepper, and garlic. 2. Mix Ingredients: In the slow cooker, combine the black beans, diced tomatoes, corn, and vegetable broth. 3. Add Spices: Stir in the chipotle peppers, cumin, chili powder, smoked paprika, salt, and pepper. 4. Cook: Set the slow cooker on low for 6-8 hours or high for 3-4 hours. Stir occasionally if you can. 5. Finish Up: Before serving, taste and adjust the seasoning as needed. This method keeps the flavors rich and deep. Plus, it frees you up to do other things! This chili pairs well with several sides and toppings. Here are some tasty options: - Rice: Serve it over white or brown rice for a filling meal. - Tortilla Chips: Crunchy chips add a great texture. - Avocado: Fresh slices make a creamy topping. - Sour Cream: A dollop cools the spice. - Cheese: Shredded cheese adds richness. - Fresh Cilantro: Chopped cilantro gives a fresh flavor. Feel free to mix and match these sides to suit your taste! Chipotle Black Bean Chili lasts 3 to 5 days in the fridge. Here are some tips for storage: - Cool Down: Let the chili cool before putting it in the fridge. - Use Airtight Containers: Store it in airtight containers to keep it fresh. - Reheat Safely: When ready to eat, reheat on the stove or in the microwave until hot. If you want to keep it longer, consider freezing it! In this post, I covered key ingredients for making Chipotle Black Bean Chili and cornbread crumble. We explored step-by-step instructions and shared tips to enhance flavor and texture. Remember, you can easily adapt this chili with different veggies or meats. With proper storage, leftovers will taste great later. Cooking is fun and personal. Feel free to adjust spices and make it your own! Enjoy creating this delicious dish!
    Chipotle Black Bean Chili with Cornbread Crumble Delight
  • To make Parmesan spinach mushroom pasta skillet, gather these fresh ingredients: - 8 oz pasta (penne or fusilli works well) - 2 tablespoons olive oil - 1 cup sliced mushrooms (cremini or button) - 2 cups fresh spinach, roughly chopped - 3 cloves garlic, minced - 1 cup heavy cream - 1 cup grated Parmesan cheese - Salt and pepper to taste - 1 teaspoon Italian seasoning - Fresh parsley for garnish (optional) You can swap or adjust ingredients based on what you have. Here are some ideas: - Use whole wheat or gluten-free pasta for a healthier option. - Try different mushrooms like shiitake for a unique flavor. - Substitute half-and-half for heavy cream to lighten the dish. - Use nutritional yeast instead of Parmesan for a dairy-free version. Using fresh ingredients makes a big difference in taste. Fresh spinach adds a vibrant color and a mild flavor. Fresh mushrooms bring an earthy note and a meaty texture. The quality of Parmesan cheese elevates the creaminess and richness of the sauce. Always choose ingredients that look and smell good. Fresh items will enhance your dish and make it more enjoyable. {{ingredient_image_1}} To start, gather all your ingredients. You will need: - 8 oz pasta (penne or fusilli work well) - 2 tablespoons olive oil - 1 cup sliced mushrooms (cremini or button) - 2 cups fresh spinach, roughly chopped - 3 cloves garlic, minced - 1 cup heavy cream - 1 cup grated Parmesan cheese - Salt and pepper to taste - 1 teaspoon Italian seasoning - Fresh parsley for garnish (optional) Next, measure everything out. This makes cooking easier and faster. Heat the olive oil in a large skillet over medium heat. Add the sliced mushrooms. Sauté them for about 5-7 minutes. They should become tender and browned. Once the mushrooms are ready, add the minced garlic. Cook it for one more minute. Stir it often to keep it from burning. Now, stir in the chopped spinach. Cook until it wilts, which takes about 2-3 minutes. While this cooks, boil a large pot of salted water. Add the pasta and cook according to the package instructions. After cooking, drain the pasta and set it aside. Pour the heavy cream into the skillet with the mushrooms and spinach. Stir well to mix everything. Let the sauce come to a gentle simmer. Next, add the grated Parmesan cheese. Stir until it melts and becomes creamy. Season with salt, pepper, and the Italian seasoning to your taste. Now it's time to add the cooked pasta to the skillet. Toss it well to coat the pasta with the creamy sauce. Make sure the vegetables are evenly mixed in. Let everything simmer for another 2-3 minutes. This helps the flavors blend together. Before serving, taste the dish. Adjust the seasoning if needed. Serve the pasta skillet directly from the pan for a casual meal. You can also plate individual servings. Add fresh parsley and more Parmesan cheese for garnish if you like. Enjoy your delicious Parmesan Spinach Mushroom Pasta Skillet! To make a creamy sauce, use heavy cream. This gives your dish a rich texture. Heat the cream gently. Stir in the grated Parmesan cheese slowly. This helps it melt well. Taste and adjust seasoning after adding the cheese. If it’s too thick, add a splash of pasta water. This extra liquid makes the sauce silky. Choose any pasta shape you like. I enjoy penne or fusilli for this dish. Boil water in a large pot. Add salt to the water; this enhances flavor. Cook the pasta until it’s al dente, which means firm but not hard. Drain your pasta but save some water. This water can help you if your sauce is too thick. If you need a gluten-free option, use gluten-free pasta. For a lighter dish, swap heavy cream for half-and-half. You can also use dairy-free cheese and cream for a vegan version. If you're allergic to mushrooms, try zucchini or bell peppers instead. These swaps keep the dish tasty while meeting your needs. Pro Tips Use Fresh Ingredients: For the best flavor, opt for fresh spinach and high-quality Parmesan cheese. Fresh ingredients enhance the creaminess and overall taste of the dish. Perfect Pasta Cooking: Cook your pasta al dente, as it will continue to cook slightly when mixed with the sauce. This ensures the pasta retains its texture. Adjust Creaminess: If you prefer a lighter dish, you can substitute half of the heavy cream with vegetable or chicken broth to reduce calories while still maintaining flavor. Customize Vegetables: Feel free to add other vegetables like bell peppers or zucchini to the skillet. This not only boosts nutrition but also adds a variety of textures and flavors. {{image_2}} You can boost your Parmesan Spinach Mushroom Pasta by adding protein. Chicken and shrimp work great. For chicken, use bite-sized pieces. Cook them in the skillet before adding mushrooms. Shrimp cooks fast and adds a nice seafood flavor. Just toss them in when the spinach wilts. Both options make your dish heartier and more filling. If you want more veggies, try bell peppers or zucchini. Chop them small and sauté with mushrooms. Bell peppers add sweetness and color. Zucchini brings moisture and texture. You can mix and match your favorite vegetables. This keeps the dish fresh and exciting while adding nutrition. Cheese is key to this dish. While Parmesan shines, feel free to experiment. Try goat cheese for tanginess or mozzarella for a stretchy texture. Feta can add a salty kick, too. Each cheese brings its own flavor, making the dish unique. Don’t be afraid to mix different cheeses for a creamy, rich taste. Store any leftovers in an airtight container. Let the pasta cool down first. This keeps it fresh and tasty. Place it in the fridge. It will last for about 3-4 days. Make sure to label the container with the date. This way, you can keep track of how long it’s been stored. To reheat, use a skillet for best results. Add a splash of water or cream. This helps revive the creamy texture. Heat it over medium heat. Stir often to prevent burning. You can also use the microwave. Just cover it loosely to avoid drying out. Heat in short bursts, stirring in between. You can freeze the pasta, but it may change texture. Use a freezer-safe container. Leave some space for expansion. It’s best to freeze it without the cream sauce. This helps keep the sauce smooth when reheating. When ready to eat, thaw it in the fridge overnight. Reheat on the stove with some added cream for creaminess. To make this recipe gluten-free, choose gluten-free pasta. Many brands offer options like brown rice or chickpea pasta. Just cook it the same way as regular pasta. Follow the package directions for the best results. The rest of the ingredients are naturally gluten-free. This way, you can enjoy the creamy, tasty flavors without worry. Yes, you can prepare this pasta ahead of time. Cook the pasta and store it in the fridge. Keep the sauce separate to maintain creaminess. When ready to serve, reheat the sauce and add the pasta. This keeps every bite fresh and delicious. Just remember, the sauce might thicken as it cools. You can add a splash of cream to loosen it when reheating. For this dish, I recommend using penne or fusilli. Both types hold sauce well and add texture. Penne has a nice tube shape that traps the creamy sauce. Fusilli’s spiral shape also keeps the sauce clinging to every bite. You can use other short pastas too, but these two work best for a creamy skillet dish. This blog post provided a complete guide to making a tasty pasta dish. We covered fresh ingredients, cooking steps, and helpful tips. You learned about variations with proteins and veggies, along with storage tips. Remember, fresh ingredients make a big difference in taste. Feel free to experiment with substitutions to suit your needs. Whether you're cooking for yourself or sharing with friends, these steps will help you make a great meal. Enjoy every bite and happy cooking!
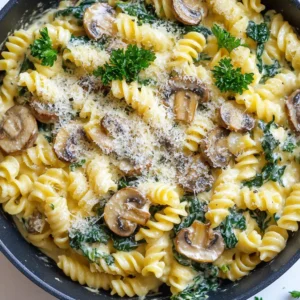
    Parmesan Spinach Mushroom Pasta Skillet Delight
  • - 2 cups coconut water - 1 cup freshly squeezed orange juice - 1 cup freshly squeezed lemon juice - 2 tablespoons honey or agave syrup - 1/2 teaspoon sea salt - 2 cups water - Optional: 1/2 teaspoon grated ginger - Fresh mint leaves for garnish To make a refreshing homemade natural sports drink, gather these simple ingredients. Coconut water serves as a great base. It hydrates and provides essential electrolytes. Freshly squeezed orange juice adds natural sweetness and vitamin C. Lemon juice gives a zesty kick and bright flavor. You can sweeten your drink with honey or agave syrup. Adjust the sweetness to your taste. Sea salt is key; it helps replace lost electrolytes after exercise. Water dilutes the flavors and keeps the drink light. For an extra punch, consider adding grated ginger. It helps with digestion and adds a spicy note. Fresh mint leaves not only look pretty but also add a cool flavor. This drink is all about balance and freshness, making it a perfect post-workout refreshment. {{ingredient_image_1}} - Mixing the base ingredients Start by grabbing a large bowl or pitcher. Pour in 2 cups of coconut water. Then, add 1 cup of freshly squeezed orange juice and 1 cup of freshly squeezed lemon juice. This mix gives you a tasty and refreshing base. - Adding sweeteners and salt Next, add 2 tablespoons of honey or agave syrup. Stir it well until it dissolves completely. This step adds a nice sweetness to balance the tanginess. Now, sprinkle in 1/2 teaspoon of sea salt. This salt helps replace lost electrolytes, which is key for hydration. - Adjusting consistency and flavor Slowly add 2 cups of water to the mixture. Stir continuously as you pour. This helps you reach the perfect taste and thickness. If you like a spicy twist, add 1/2 teaspoon of grated ginger. Mix it in well. Taste your drink and adjust sweetness or salt if needed. - Chilling and serving suggestions Chill your drink in the fridge for about 30 minutes. You can also serve it right away over ice. Pour the drink into glasses and add fresh mint leaves on top for a lovely finish. This adds a burst of freshness and looks great! - How to choose ripe fruits for juicing: Look for oranges and lemons that feel heavy for their size. The skin should have a slight shine. Avoid fruits with blemishes or soft spots. Fresh fruits give the best juice. - Adjusting sweetness and salt levels: Start with the recipe's measurements. Taste the drink after mixing. If it's too sweet, add a bit more lemon juice. If it’s not salty enough, sprinkle in a tiny pinch of sea salt. A little goes a long way. - Best practices for mixing and storage: Use a clean pitcher for mixing. Stir well until all the ingredients blend. Store your drink in the fridge. It tastes best fresh but lasts for three days. - Incorporating ginger and mint: Grate fresh ginger for a spicy kick. Mint leaves add a fresh aroma. Mix them in right before serving for the best flavor. - Other flavor combinations to consider: Try adding pineapple juice for a tropical twist. You can also mix in berries like strawberries or blueberries. Each adds a unique taste and color. Pro Tips Fresh Juice Matters: Always use freshly squeezed juices for the best flavor and maximum nutritional benefits. Bottled juices often contain preservatives and sugar, which can alter the taste and healthiness of your drink. Adjust Sweetness to Taste: Depending on your preference and the sweetness of the oranges, you might want to adjust the amount of honey or agave syrup. Start with less and add more as needed to achieve your desired sweetness. Chill for Refreshing Taste: Allow the drink to chill in the refrigerator for at least 30 minutes. This enhances the flavors and makes it extra refreshing, especially on a hot day. Experiment with Flavors: Feel free to add other ingredients like berries or cucumber for extra flavor and nutrition. You can also substitute different citrus fruits to create your own unique blend! {{image_2}} Coconut water is a key part of this drink. It is full of natural electrolytes. These help keep you hydrated. This drink can quickly replace fluids lost while you exercise. The potassium in coconut water helps your muscles work well. Citrus juices, like orange and lemon, add great taste and health. They are rich in vitamin C. This vitamin boosts your immune system. Freshly squeezed juices also add flavor and a bit of sweetness. They help balance the flavors in your drink. Honey or agave syrup adds a touch of sweetness. Both are natural sugars. They give you quick energy. Sea salt plays an important role, too. It helps replace lost sodium. This is vital after sweating. Together, these ingredients help maintain your electrolyte balance. Homemade sports drinks hold many advantages. First, they have better nutrition. You control what goes into your drink. You avoid the extra sugars and chemicals often found in store-bought drinks. Making your own drink is also cheaper. You can create several servings for less cost than one bottle from the store. Many commercial drinks contain preservatives. These keep drinks fresh longer but can be unhealthy. By making your own, you enjoy fresh ingredients without any unwanted extras. This way, you can feel good about what you drink. You can easily change the flavor of your homemade natural sports drink. Here are a few fun options: - Tropical fruit options: Use pineapple or mango juice instead of orange juice. These fruits add a sweet and sunny taste. - Herbal infusions: Try adding fresh basil or rosemary. These herbs give a fresh twist and can be very refreshing. - Berry blends: Blend in strawberries or blueberries for a fruity flavor. They add natural sweetness and vibrant color. You can adjust the recipe to fit different diets. Here are some smart swaps: - Vegan alternatives: Replace honey with maple syrup or agave syrup. These options keep your drink vegan while still adding sweetness. - Low-sugar options: Reduce honey or syrup for a lower sugar drink. You can also add more citrus juice for flavor without extra sugar. Can I use frozen fruit instead of fresh? Yes, you can use frozen fruit. It blends well and keeps the drink cold. Just make sure to thaw the fruit a bit before blending. This way, you still get great flavor and nutrients. How long does this drink last in the fridge? This drink lasts about three days in the fridge. Make sure to store it in a sealed container. Always check for freshness before drinking. Is this drink suitable for all ages? Yes, this drink is great for everyone. Kids and adults can enjoy the taste and benefits. Just adjust the sweetness for younger kids if needed. Can I adjust the electrolytes for different activities? Absolutely! You can change the salt and honey levels based on your needs. If you exercise hard, add more sea salt. For light activities, keep it balanced. Feel free to experiment! Making your own sports drink is easy and fun. You learned about key ingredients, like coconut water and fresh juices. We covered steps for mixing and enhancing the flavor with tips for success. You also discovered the benefits of natural ingredients compared to store-bought drinks. Keep experimenting with variations to find your favorite flavor. Homemade drinks offer great taste and health benefits without added junk. Now, you can stay hydrated and feel good while being active. Enjoy your refreshing creations!
    Homemade Natural Sports Drink Refreshing Hydration Boost
  • To make this tasty Loaded Baked Potato Soup, you need: - 4 large russet potatoes, peeled and diced - 1 medium onion, chopped - 3 cloves garlic, minced - 4 cups chicken or vegetable broth - 1 cup heavy cream - 1 cup sharp cheddar cheese, shredded - 1/2 cup sour cream - 2 tablespoons olive oil - 1 teaspoon smoked paprika - Salt and pepper to taste These main ingredients create a rich and creamy soup that warms the soul. The russet potatoes provide a hearty base. The onion and garlic add great flavor. The broth makes it cozy and comforting. Cream and cheese turn it into a creamy delight. You might want to add some optional ingredients for a twist: - 4 slices of cooked turkey bacon, crumbled - Extra cheese for more richness - Different spices like garlic powder or onion powder Adding turkey bacon gives a nice crunch. You can also get creative with spices. This allows you to tailor the soup to your taste. Garnishes can make your soup look and taste even better. Here are some great ideas: - Sliced green onions - Extra shredded cheddar cheese - A dollop of sour cream These garnishes add color and flavor. They also give a nice touch to each bowl. Don't skip this step; it makes your soup feel special! {{ingredient_image_1}} To make Loaded Baked Potato Soup, you need to gather all your ingredients. The main steps include cooking the onions and garlic, boiling the potatoes, and blending everything into a creamy soup. This recipe takes about 40 minutes from start to finish. 1. Start by heating 2 tablespoons of olive oil in a large pot over medium heat. 2. Add the chopped onion. Sauté it for about 5 minutes until it looks clear. 3. Mix in 3 cloves of minced garlic and cook for another minute. You want it to smell good! 4. Next, add the 4 diced russet potatoes, 4 cups of broth, and 1 teaspoon of smoked paprika. 5. Bring this mix to a boil. Then lower the heat and let it simmer for 15-20 minutes. The potatoes should be tender. 6. Use an immersion blender to puree the soup until it is smooth. For a chunkier soup, blend only half and mix it back in. 7. Stir in 1 cup of heavy cream, 1 cup of shredded cheddar cheese, and 1/2 cup of sour cream. Heat it on low until the cheese melts. 8. If you want, add 4 slices of crumbled turkey bacon just before serving. 9. Serve hot and top each bowl with sliced green onions and extra cheese if you like. To get the best texture, blend the soup well but not too much. If you like it creamy, blend until smooth. If you want some potato pieces, blend just half. Adding heavy cream makes it rich and velvety. Always heat the soup gently after adding cheese so it melts evenly. Taste and adjust salt and pepper for flavor. To boost the flavor of your soup, use fresh herbs like thyme or chives. They add brightness and depth. A splash of lemon juice can also enhance the soup’s taste. Don't skip the smoked paprika; it gives a lovely smoky note. If you like a spicy kick, add a pinch of cayenne pepper for warmth. One common mistake is overcooking the potatoes. You want them tender but not mushy. When blending, don’t over-puree. Keeping some chunks adds texture. Also, be careful with salt. Taste the soup before adding more. If the broth is salty, you may not need extra salt. Lastly, avoid adding cream too early. Wait until the potatoes are blended to keep the soup creamy. An immersion blender is ideal for this soup. It’s easy and keeps the pot clean. If you don’t have one, a regular blender works too. Just blend in batches and be cautious with hot soup. A large pot is crucial for cooking all the ingredients evenly. A wooden spoon is great for stirring and scraping the bottom of the pot. Pro Tips Choose the Right Potatoes: Use russet potatoes for their starchy texture, which will create a creamy and smooth soup. Blend to Your Preference: Adjust the soup's consistency by blending all or just half of the soup, depending on whether you prefer it creamy or chunky. Enhance Flavor with Seasoning: Don't shy away from seasoning! Adjust the salt and pepper to your taste and consider adding herbs like thyme for extra depth. Garnish for Presentation: Top your soup with extra cheddar cheese and green onions to add color and a burst of fresh flavor. {{image_2}} You can easily make this soup vegetarian. Instead of chicken broth, use vegetable broth. Omit the turkey bacon to keep it meat-free. This soup remains creamy and tasty with just the right spices. To make it dairy-free, swap out heavy cream for coconut milk. Use a dairy-free cheese instead of sharp cheddar. You can use cashew cream for a rich and creamy texture. These swaps keep the soup delicious without dairy. Toppings can change your soup experience. Try crispy onions for crunch. Add diced tomatoes for freshness. You can also use avocado slices for creaminess. Don’t forget a sprinkle of fresh herbs like parsley or cilantro. Each topping adds unique flavors to your soup. To store leftover soup, let it cool down first. Then, pour it into an airtight container. Make sure to seal it tight. Place it in the fridge for up to three days. Label your container so you remember when you made it. If you want to enjoy it later, freezing is a great option. To freeze your loaded baked potato soup, use freezer-safe containers. Leave some space at the top, as the soup will expand when frozen. It can last for up to three months in the freezer. Just remember to label your containers with the date. This helps you keep track of how long it has been stored. When you are ready to eat, take the soup out of the fridge or freezer. For fridge leftovers, heat it on the stove over low heat. Stir it often to avoid burning. If it is frozen, let it thaw in the fridge overnight first. You can also microwave it in a safe bowl. Heat in short bursts, stirring in between, to make sure it warms evenly. Enjoy your delicious soup anytime! To make this soup vegan, swap out a few key ingredients. First, use vegetable broth instead of chicken broth. Replace heavy cream with coconut cream or cashew cream for that rich texture. Use a vegan cheese that melts well and omit the sour cream or choose a plant-based alternative. You can also skip the bacon or use a vegan bacon option. This way, you keep the creamy goodness while making it plant-based. Yes, you can use different potatoes for your soup! While russet potatoes give a nice creamy texture, you can try Yukon Gold or red potatoes. These types have a slightly different flavor and texture. Just remember that waxy potatoes will hold their shape better, while starchy ones will break down and make the soup creamier. Feel free to mix and match to find your favorite blend! Toppings can elevate your soup and add fun flavors. Here are some great options: - Shredded cheddar cheese - Crumbled turkey bacon or vegan bacon - Sliced green onions - Sour cream or a vegan alternative - Chopped chives - Crispy fried onions - A sprinkle of smoked paprika Try different toppings to find your perfect combo! This blog post covered how to make Loaded Baked Potato Soup. We discussed the main and optional ingredients, plus suggested garnishes. You learned step-by-step cooking instructions and tips for getting the right texture. We explored helpful tips, common mistakes, and equipment advice. You also found variations for vegetarians and those needing dairy-free options. Lastly, we shared how to store, freeze, and reheat leftovers. Now, you can create a delicious soup that fits your taste! Enjoy making it your own.
    Loaded Baked Potato Soup Comforting Flavorful Recipe
  • To make the double chocolate chunk skillet cookie, gather these items: - 1 cup unsalted butter, softened - 1 cup brown sugar, packed - 1/2 cup granulated sugar - 2 large eggs - 2 teaspoons vanilla extract - 1 3/4 cups all-purpose flour - 1/2 cup unsweetened cocoa powder - 1 teaspoon baking soda - 1/4 teaspoon salt - 1 cup semi-sweet chocolate chunks - 1/2 cup white chocolate chunks - Sea salt for sprinkling You can add walnuts for a nice crunch. They enhance flavor and texture. If you want a twist, try adding a bit of espresso powder. It boosts chocolate flavor without being too strong. Choose chocolate that has at least 60% cocoa content. This gives a rich, deep flavor. Look for brands that use real cocoa butter. Avoid chocolate with added fillers or waxes. Check the ingredients list to ensure quality. A good chocolate chunk melts well and enhances your cookie's taste. Start by preheating your oven to 350°F (175°C). This helps your cookie bake evenly. Next, grab a large mixing bowl. Cream together 1 cup of softened butter, 1 cup of brown sugar, and 1/2 cup of granulated sugar. Mix until it feels light and fluffy. Add 2 large eggs, one at a time, mixing well after each. This makes the batter smooth. Then, stir in 2 teaspoons of vanilla extract for that warm flavor. In another bowl, sift together 1 3/4 cups of all-purpose flour, 1/2 cup of unsweetened cocoa powder, 1 teaspoon of baking soda, and 1/4 teaspoon of salt. Gradually add the dry mix to the wet ingredients. Stir gently until just combined. Finally, fold in 1 cup of semi-sweet chocolate chunks and 1/2 cup of white chocolate chunks. If you like nuts, add 1/2 cup of chopped walnuts. Grease a 10-inch cast-iron skillet with butter or cooking spray. Pour the cookie dough into the skillet. Spread it evenly and smooth the top with a spatula. For an extra kick, sprinkle a pinch of sea salt over the top. Place the skillet in your preheated oven. Bake for about 25 to 30 minutes. The edges should feel set, while the center remains slightly gooey. This gives you that perfect, soft texture. Once baked, remove the skillet from the oven. Let it cool for about 10 minutes. This cooling time helps the cookie firm up a bit. Serve warm, right from the skillet. For a truly decadent treat, top it with a scoop of vanilla ice cream. A drizzle of chocolate sauce will make it even better. Enjoy your delicious creation! To get a gooey center in your skillet cookie, watch the baking time closely. Bake it for 25 to 30 minutes. The edges should look set, but the center needs to be soft. This will give you that perfect melt-in-your-mouth texture. After baking, let it cool for just 10 minutes. This allows the cookie to firm up a bit while keeping the middle warm and gooey. Using the right tools makes baking easier and more fun. Here are some essentials: - A 10-inch cast-iron skillet for even cooking - Mixing bowls for combining ingredients - A spatula for spreading the dough - Measuring cups and spoons for accuracy - An oven thermometer to ensure correct baking temperature These tools help you create the best double chocolate chunk skillet cookie every time. A few mistakes can ruin your cookie. Here are some to watch out for: - Overmixing the dough: Mix until just combined to keep it tender. - Not measuring ingredients: Use accurate measurements for success. - Skipping the sea salt: A sprinkle on top adds great flavor. - Baking too long: Remove the cookie when edges are set and the center is soft. Avoiding these pitfalls ensures a delicious, gooey dessert every time. {{image_2}} You can change the chocolate in this cookie. Swap semi-sweet chocolate chunks for dark chocolate for a richer taste. Dark chocolate adds depth and pairs well with the cocoa. If you prefer milk chocolate, use it for a sweeter cookie. Milk chocolate gives a nice creamy flavor. Each type brings a unique twist to the dish. To make this cookie nut-free, simply leave out the walnuts. You can replace them with seeds like sunflower or pumpkin seeds for crunch. Alternatively, add more chocolate chunks for extra richness. This keeps the texture enjoyable while being safe for those with nut allergies. Adding flavors can make your skillet cookie even more fun. For a minty taste, mix in mint extract or chopped mint chocolate. This gives a fresh twist. If you want a coffee kick, add instant espresso powder. Just one teaspoon can boost flavor without making it too strong. Both options can turn your dessert into a new experience! To keep your double chocolate chunk skillet cookie fresh, let it cool first. Cover it tightly with plastic wrap or aluminum foil. You can also store it in an airtight container. This will help keep the cookie moist. Try to finish it within three days for the best taste. When you want to enjoy leftovers, preheat your oven to 350°F (175°C). Place the cookie in the oven for about 10 minutes. This will warm it up and make it soft again. You can also use a microwave. Heat it in short bursts of 15 seconds. Check often so it doesn't get too hot. Yes, you can freeze this skillet cookie! First, let it cool completely. Wrap it well in plastic wrap, then place it in a freezer-safe bag. It can last for up to three months in the freezer. When you’re ready to eat, just thaw it in the fridge overnight. Then reheat it as mentioned above for a warm treat. Yes, you can prepare the dough in advance. Mix the ingredients and store the dough in the fridge. Wrap it tightly in plastic wrap to keep it fresh. You can bake it later when you are ready. This makes it easier for parties or family gatherings. No worries! You can use any oven-safe skillet. A regular metal or glass baking dish works too. Just make sure to grease it well before adding the dough. This helps prevent sticking and ensures easy serving. Look for golden edges and a slightly gooey center. The top should look set but not too firm. A toothpick inserted in the center should come out with a few moist crumbs. If it’s too wet, bake for a few more minutes. Yes, you can switch up the sweeteners! Try coconut sugar or honey for a twist. Just keep in mind that this might change the texture a bit. Adjust the amount based on the type of sweetener you choose. This guide walked you through making a delicious skillet cookie. We covered all the key ingredients, how to prepare and bake it perfectly, and tips to customize your cookie. You learned about storage and variations to keep things interesting. Remember, the best cookies come from high-quality ingredients and cautious baking. Keep experimenting with flavors and techniques. Enjoy your sweet creations!
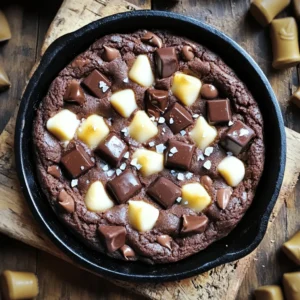
    Double Chocolate Chunk Skillet Cookie Decadent Dessert
  • To make carrot cake overnight oats, you will need: - 1 cup rolled oats - 1 ½ cups almond milk (or any milk of choice) - 1 medium carrot, grated - 1 tablespoon chia seeds - 1 tablespoon maple syrup (or honey) - 1 teaspoon vanilla extract - ½ teaspoon ground cinnamon - ¼ teaspoon ground nutmeg - ¼ cup raisins - ¼ cup chopped walnuts (optional) - A pinch of salt - Greek yogurt or coconut yogurt for topping (optional) - Fresh mint leaves for garnish (optional) You can swap almond milk for any milk you like. Soy milk, oat milk, or cow's milk work well. For sweeteners, try honey, agave syrup, or stevia. Each option gives a unique taste. Choose what fits your diet best. Toppings can make your oats special. Greek yogurt adds creaminess and protein. Coconut yogurt is a great dairy-free choice. Fresh mint leaves add color and a fresh taste. You can also add more nuts, seeds, or fresh fruit. Try sliced bananas or berries for a fun twist! To start, grab a large bowl. Add 1 cup of rolled oats. Pour in 1 ½ cups of almond milk. You can use any milk you like. Next, grate 1 medium carrot and add it to the bowl. Then, include 1 tablespoon of chia seeds. For a touch of sweetness, mix in 1 tablespoon of maple syrup or honey. Add 1 teaspoon of vanilla extract for flavor. Sprinkle in ½ teaspoon of ground cinnamon and ¼ teaspoon of ground nutmeg. Don’t forget a pinch of salt to enhance taste. Now, it’s time to mix. Stir the ingredients together until they blend well. You want the oats to soak up the milk. Make sure the grated carrot is evenly spread throughout. Next, fold in ¼ cup of raisins and ¼ cup of chopped walnuts, if you choose to use them. Mix gently to avoid breaking the oats. This helps keep a nice texture. Once mixed, divide the oats into two jars or containers. Seal them tightly with lids. Place the jars in the fridge. Let them chill overnight, or for at least 4 hours. This allows the oats to soak up all the delicious flavors. When you’re ready to eat, stir the oats well. If they seem too thick, add a splash more almond milk. Enjoy your creamy, tasty Carrot Cake Overnight Oats! To get the best texture in your carrot cake overnight oats, use rolled oats. Rolled oats soak up the liquid well. This makes them soft but not mushy. If you want them creamier, add more almond milk. Letting the oats sit overnight helps them absorb all the flavors. Stir after refrigerating to check the thickness. If it’s too thick, just add a splash of milk. You can change the flavor of your oats easily. Try adding different spices like ginger or allspice for a warm kick. Swap walnuts for pecans or almonds for a new taste. If you love coconut, add shredded coconut to enhance the flavor. You can also use different sweeteners like agave or brown sugar. This gives you lots of options to make it your own. For a beautiful presentation, layer the oats in clear jars. This shows off the colorful layers. Top with Greek yogurt or coconut yogurt for creaminess. Fresh mint leaves add a nice pop of green. You can also sprinkle a few extra raisins or nuts on top for crunch. Serve these oats cold for a refreshing breakfast or snack. {{image_2}} You can change the nuts and seeds in your oats. Instead of walnuts, try pecans or almonds. They add a nice crunch. For seeds, you can use sunflower or pumpkin seeds. They offer great flavor and extra nutrition. Just remember to chop larger nuts to avoid big bites. Spices can make a big difference in your oats. If you want more flavor, add more cinnamon or a dash of ginger. You can also try nutmeg or cardamom. For a sweet touch, use coconut extract. Each spice changes the taste, so experiment to find your favorite. You can easily adapt this recipe to fit your diet. For a vegan option, just use maple syrup instead of honey. Use almond milk or any plant milk to keep it dairy-free. If you need gluten-free oats, make sure to buy certified gluten-free rolled oats. This way, everyone can enjoy the dish! To store your Carrot Cake Overnight Oats, use airtight containers. Glass jars work best. Make sure the lids seal tightly. This keeps the oats fresh and prevents odors. Place the jars in the fridge. They can stay there for a few days. Carrot Cake Overnight Oats last about 3 to 5 days in the fridge. Check for signs of spoilage before eating. If the oats smell sour or have a strange color, toss them. If you see mold, don’t eat them. Always trust your senses! Meal prepping makes mornings easier. Make a double batch of oats. Store them in separate jars for quick access. You can mix in different toppings each day. This adds variety and keeps breakfast interesting. Enjoy your tasty and easy morning treat! Yes, you can make these oats ahead of time. In fact, they taste better after sitting. You can prepare them the night before or even a few days in advance. Just store them in the fridge. The oats will soak up the milk and flavors, making a delicious treat. If you don’t have rolled oats, you can use quick oats. They work well, too. Steel-cut oats are not a good choice. They need more time to soak and won't soften enough overnight. If you want gluten-free oats, choose certified gluten-free rolled oats. To keep your oats from being too watery, use less liquid. Start with a 1:1 ratio of oats to milk. If you like them thicker, you can add less milk. Chia seeds will also help absorb moisture. They expand and thicken the mix as they sit. Yes, adding protein powder is a great idea! You can mix in one scoop when combining the oats and milk. This will boost the protein and make your breakfast more filling. Choose a flavor that matches your taste. Vanilla or unflavored powders work best. You’ve learned about making delicious Carrot Cake Overnight Oats. We covered the key ingredients and their alternatives. You now know the best mixing techniques and storage tips. I shared ways to customize flavors and presented variations for different diets. Remember, meal prep helps save time and keep oats fresh. Enjoy making this tasty breakfast that fits your needs and tastes. With these instructions, I trust you will create oats that everyone loves. Happy cooking!
    Carrot Cake Overnight Oats Simple and Healthy Recipe
  • - 2 pounds chicken wings - 1 tablespoon olive oil - 1 teaspoon garlic powder - 1 teaspoon onion powder - 1 teaspoon smoked paprika - ½ teaspoon salt - ½ teaspoon black pepper - ½ cup grated Parmesan cheese - 2 tablespoons fresh parsley, chopped - 2 tablespoons unsalted butter, melted - 3 cloves garlic, minced To make my Air Fryer Garlic Parmesan Wings, I start with basic but key items. The chicken wings are the star. I use two pounds, which is perfect for sharing. Olive oil adds moisture and helps the wings crisp up. Garlic powder brings a punch of flavor that I can't resist. Next, I add seasonings. Onion powder and smoked paprika give depth. Salt and black pepper enhance everything, rounding out the taste. The grated Parmesan cheese is a must. It melts slightly, coating the wings in rich, cheesy goodness. I finish with fresh parsley. It adds a nice pop of color and freshness. For the sauce, I combine melted butter and minced garlic. This mix coats the cooked wings and makes them shine. The blend of flavors is what makes these wings truly special. Each bite is crispy, cheesy, and bursting with flavor. First, take 2 pounds of chicken wings. Put them in a large bowl. Add 1 tablespoon of olive oil. Then, sprinkle in 1 teaspoon of garlic powder, 1 teaspoon of onion powder, 1 teaspoon of smoked paprika, ½ teaspoon of salt, and ½ teaspoon of black pepper. Mix everything well. Make sure each wing gets coated nicely. Next, preheat your air fryer to 400°F (200°C). This step is key for crispy wings. Let it heat for about 5 minutes. Now it's time to cook! Place the wings in a single layer in the air fryer basket. Avoid stacking them. This helps air circulate for even cooking. Cook the wings for 25 to 30 minutes. Remember to shake the basket halfway through. This ensures all sides cook evenly. You want them golden brown and crispy. While the wings cook, you can make the sauce. In a small bowl, mix 2 tablespoons of melted butter, 3 cloves of minced garlic, and ½ cup of grated Parmesan cheese. Stir well until combined. Once the wings are done, take them out and place them in a larger bowl. Pour the garlic Parmesan sauce over the wings. Toss gently until each wing is coated. For a nice touch, sprinkle 2 tablespoons of chopped fresh parsley on top before serving. To get your wings really crispy, avoid overcrowding the air fryer. When wings touch, they steam instead of crisping up. This makes them soggy. Cook in a single layer to let air flow around each wing. While cooking, shake the basket halfway through. This helps wings cook evenly. It ensures all sides get that golden brown look. Remember, a little shake goes a long way! If you want more flavor, add extra seasonings. Try some cayenne pepper for heat or smoked paprika for depth. You can even mix in some Italian herbs like oregano or thyme. They add a tasty twist! Experiment with different cheeses too. While Parmesan is great, try using blue cheese or cheddar. Each cheese brings a new flavor that can change your wings for the better! For a great look, serve wings on a large platter. Garnish with extra parsley and a sprinkle of Parmesan. This makes them pop and look appetizing. Pair your wings with dipping sauces for a fun touch. Ranch and blue cheese are classic choices. You can also serve them with celery sticks for crunch. This adds a fresh balance to your meal! {{image_2}} You can spice up your wings in many ways. For a kick, add hot sauce to your seasoning mix. This adds heat and flavor. You can try different herbs, too. Oregano, thyme, or even Italian seasoning work well. These changes let you create your own flavor. Don't be afraid to mix and match! Cooking frozen wings is easy. You don’t need to thaw them first. Just add a few extra minutes to your cooking time. Cook them at 400°F (200°C) for about 30-35 minutes. Shake the basket halfway through. This helps them cook evenly. Frozen wings can be just as crispy and tasty as fresh ones. If you love these wings, try other air fryer recipes. You can make crispy air fryer chicken tenders or even shrimp. These options give you variety and fun. Pair your wings with sides like sweet potato fries or a fresh salad. These sides balance the meal and make it even better. To keep your wings fresh, store them in the fridge. Place them in an airtight container. You can also use a zip-top bag, squeezing out the air. Make sure they cool down first. This helps keep the crispiness. Use the wings within three days for the best taste. To reheat your wings and keep them crispy, the oven works best. Preheat your oven to 375°F (190°C). Spread the wings on a baking sheet. Bake them for about 10-15 minutes. This way, they regain their crunch. You can also use the air fryer again. Set it to 350°F (175°C) for 5-7 minutes. Avoid the microwave, as it can make them soggy. If you want to save wings for later, you can freeze them. First, let them cool completely. Then, place them in a freezer-safe bag or container. Remove as much air as possible to prevent freezer burn. They can last up to three months in the freezer. When you're ready to eat them, thaw them in the fridge overnight. Reheat as mentioned earlier for the best results. It takes about 25 to 30 minutes to cook chicken wings in an air fryer. Smaller wings may cook faster, while larger ones can take a bit longer. Always check for crispiness and a golden brown color. Shake the basket halfway through to help them cook evenly. Yes, you can use other types of wings or chicken parts. Drumsticks work well for this recipe. Boneless chicken thighs are another good option if you want juicy meat. Just adjust the cooking time based on the size and type of the chicken. For garlic Parmesan wings, ranch dressing and blue cheese are popular choices. Both add a cool, creamy contrast to the savory wings. You can also try a spicy sauce for a kick. Pairing with celery sticks makes for a great crunchy side! To make garlic Parmesan chicken wings, I covered key ingredients and steps. You learned how to prepare, cook, and enhance the flavor. I shared tips for crispiness and ideas for variation. Proper storage and reheating methods ensure your leftovers stay tasty. Remember, these wings are easy to make and can be adjusted to your taste. Enjoy experimenting and sharing with friends. This recipe is fast, fun, and will impress everyone!
    Air Fryer Garlic Parmesan Wings Crispy and Flavorful
  • - 2 pounds flank steak, sliced thinly against the grain - 1/2 cup soy sauce - 1/4 cup brown sugar - 3 tablespoons sesame oil - 3 cloves garlic, minced - 2-inch piece of ginger, grated - 1 tablespoon gochugaru (Korean red pepper flakes) - 1 small onion, thinly sliced - 1 carrot, julienned - 1 red bell pepper, thinly sliced - 4 green onions, chopped (for garnish) - Cooked rice (for serving) - Sesame seeds (for garnish) When making Slow Cooker Korean Beef Bulgogi, using fresh, high-quality ingredients is key. The flank steak is the star of this dish. It is tender and flavorful when cooked low and slow. Cutting it thinly against the grain helps it stay juicy and easy to eat. Soy sauce adds a deep, umami flavor. It balances well with the sweetness of brown sugar. Sesame oil brings a rich, nutty taste. Together, these ingredients create a perfect marinade for the beef. Don't forget the garlic and ginger! They add a nice kick and a warm aroma. Gochugaru, or Korean red pepper flakes, gives the dish a mild heat. Adjust the amount if you prefer more spice. The veggies are important for texture and color. Use a small onion, a crunchy carrot, and a sweet red bell pepper. These will cook down nicely and add flavor to the beef. For serving, cooked rice is a must. It soaks up all the wonderful sauce. Finally, garnish with green onions and sesame seeds for a bright finish. This dish is not only tasty but also visually appealing. To start, gather your ingredients. In a large bowl, combine the following: - 1/2 cup soy sauce - 1/4 cup brown sugar - 3 tablespoons sesame oil - 3 cloves garlic, minced - 2-inch piece of ginger, grated - 1 tablespoon gochugaru Next, stir everything together. Mix until the sugar dissolves completely. This marinade will bring a great flavor to the beef. Now, take the flank steak. Add it to the marinade in the bowl. Make sure each piece is well-coated. Cover the bowl and place it in the fridge. Let it marinate for at least 30 minutes, or better yet, overnight for the best taste. Take the marinated beef out of the fridge. Transfer it to your slow cooker. Next, layer on the following: - 1 small onion, thinly sliced - 1 carrot, julienned - 1 red bell pepper, thinly sliced Cover the slow cooker with its lid. Set it to cook. You can choose low for 6-8 hours or high for 3-4 hours. Cook until the beef is tender. Once it’s done cooking, taste the beef. Adjust the seasoning to your liking. You may want to add more soy sauce or sugar to enhance the flavor. Serve the Korean beef bulgogi over cooked rice. Garnish with chopped green onions and a sprinkle of sesame seeds. Enjoy the delicious and colorful dish! To get the best flavor, marinate the beef for at least 30 minutes. This short time helps the beef soak up the tasty marinade. For even better taste, marinate overnight. The longer you let it sit, the richer the flavor becomes. Just keep it in the fridge to stay fresh. You know the beef is perfectly cooked when it feels tender and easy to pull apart. Cooking times matter here. On low, cook for 6-8 hours. On high, aim for 3-4 hours. After cooking, check if the beef breaks apart with a fork. This means it's ready to enjoy. Serve your Korean beef bulgogi over hot cooked rice. This adds a lovely base to absorb all the juices. For sides, try steamed broccoli or pickled vegetables. They add great color and crunch. You can also serve it with kimchi for a spicy kick. Finish with chopped green onions and sesame seeds for a nice touch. {{image_2}} You can enjoy bulgogi without meat. Use tofu or mushrooms instead. For tofu, choose firm varieties. Press it to remove extra moisture. Cut the tofu into thin slices. Marinate it just like the beef. For mushrooms, shiitake or portobello work best. Slice them thinly. Toss them in the same marinade. Let them soak up the flavors before cooking. Both options will be just as tasty. Want more heat? Add extra gochugaru to the marinade. You can also mix in some sliced fresh chili peppers. If you prefer less spice, reduce the gochugaru. You can also skip the fresh chili peppers. Taste as you go to find your perfect balance. If you need substitutes for soy sauce, try tamari or coconut aminos. Both give a similar flavor. For sweeteners, maple syrup or honey can work well. Adjust the amounts to fit your taste. These swaps keep your bulgogi delicious and enjoyable. Store your leftover Korean beef bulgogi in an airtight container. This keeps it fresh and tasty. Let the dish cool first before sealing. Place it in the fridge within two hours of cooking. It will stay good for about three to four days. You can freeze cooked bulgogi for later use. Place it in a freezer-safe container. Make sure to leave some space at the top for expansion. It can stay frozen for up to three months. To reheat, thaw it in the fridge overnight. Warm it in a pan over low heat. Stir often until it is hot all the way through. Fresh bulgogi will last in the fridge for about four days. If frozen, it can keep for about three months. Always check for any off smells or changes in color before eating. This ensures your meal is safe and delicious. The best cut of beef for bulgogi is flank steak. This cut is thin, tender, and flavorful. You can also use sirloin or ribeye, but flank steak gives the best results. Thin slices help the meat absorb the marinade well. This adds to the dish's rich taste. Make sure to slice against the grain for a tender bite. Yes, you can use other methods to cook bulgogi. If you don’t have a slow cooker, try a skillet. Heat a pan over medium heat and add the marinated beef. Stir-fry it for about 5 to 7 minutes until it’s cooked through. You can also grill the beef for a smoky flavor. Just make sure the grill is hot and prepped for cooking. Bulgoi pairs well with many side dishes. Here are some popular options: - Steamed rice - Kimchi - Pickled vegetables - Stir-fried vegetables - Lettuce wraps These sides add flavor and balance to the meal. They also help make your plate look colorful and inviting. This blog post covered how to make delicious bulgogi using flank steak and simple ingredients. You learned to prepare a flavorful marinade, marinate the beef, and cook it in a slow cooker. I shared tips for perfecting texture and offered storage advice. Try variations with vegetarian options or adjust spice levels to fit your taste. Enjoy preparing this meal with family and friends. Bulogi is not just a dish; it's an experience that brings everyone together. Happy cooking!
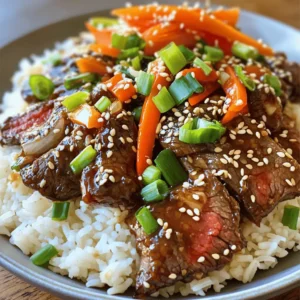
    Slow Cooker Korean Beef Bulgogi Flavorful Delight
  • - 1 block (14 oz) firm tofu, pressed and cubed - 1 tablespoon cornstarch - 3 tablespoons vegetable oil (divided) - 1 bell pepper (red or green), diced - 1 cup broccoli florets - 2 green onions, sliced (for garnish) - 1/4 cup soy sauce - 2 tablespoons hoisin sauce - 1 tablespoon rice vinegar - 1 tablespoon sesame oil - 2 tablespoons brown sugar - 2 cloves garlic, minced - 1 inch ginger, minced - 1 teaspoon red pepper flakes (adjust for spice preference) Gathering the right ingredients is key. The tofu gives this dish its base. Use firm tofu for the best texture. Cornstarch helps it get crispy. You need vegetable oil for frying. Next, pick some vibrant veggies. I love adding bell pepper for color and crunch. Broccoli adds a nice bite and is full of nutrients. The green onions are perfect for a fresh finish. Now let's talk sauce! The soy sauce gives umami. Hoisin adds sweetness. Rice vinegar adds tanginess. Sesame oil gives a nutty flavor. Brown sugar balances the sauce. Garlic and ginger bring depth. Adjust the red pepper flakes to suit your taste. With all these ingredients, you will create a dish that is better than takeout. - First, you need to press the tofu. This helps remove excess moisture. Wrap the tofu block in a clean towel. Place a weight on top and let it sit for at least 20 minutes. - After pressing, cut the tofu into bite-sized cubes. This size cooks well and soaks up flavor. - Next, coat the tofu with cornstarch. Sprinkle it over the cubes and toss gently. This gives the tofu a crispy texture. - In a large skillet or wok, heat 2 tablespoons of vegetable oil over medium-high heat. - Add the coated tofu cubes. Fry until golden and crispy on all sides. This takes about 6 to 8 minutes. Once done, remove the tofu from the skillet and set it aside. - In the same skillet, add the last tablespoon of vegetable oil. - Sauté the diced bell pepper and broccoli florets. Cook for about 3 to 4 minutes until they are tender-crisp. This keeps the veggies bright and fresh. - While the vegetables cook, mix the sauce. In a bowl, combine the soy sauce, hoisin sauce, rice vinegar, and sesame oil. - Add brown sugar, minced garlic, minced ginger, and red pepper flakes. Stir well to combine. This sauce brings all the flavors together. - Add the crispy tofu back into the skillet with the sautéed vegetables. - Pour the prepared sauce over the tofu and veggies. Stir everything well. Cook for an additional 2 to 3 minutes until heated through. This step ensures each piece is coated in delicious sauce. To make crispy tofu, start by pressing it well. Wrap the tofu in a clean kitchen towel. Place a weight on top. Let it sit for at least 20 minutes. This removes excess moisture. After pressing, cut the tofu into bite-sized cubes. Sprinkle cornstarch over the cubes. Toss gently to coat each piece. The cornstarch helps create that crunch we love. When frying, use a hot skillet. Heat 2 tablespoons of vegetable oil over medium-high heat. Cook the tofu for about 6-8 minutes. Flip the pieces to get them golden and crispy on all sides. This step is key for a great texture. To balance flavors, use red pepper flakes wisely. If you like it spicy, add more flakes. If you prefer mild, use less. Start with a teaspoon and adjust to your taste. For sweetness and tanginess, the sauce is crucial. Use brown sugar to add sweetness. The rice vinegar gives it that nice tang. Taste the sauce before adding it to the tofu and veggies. Adjust if needed for your perfect balance. I love serving this dish over steamed jasmine rice or quinoa. It not only tastes great but looks beautiful. Drizzle with extra sesame oil for flavor. For garnishes, sprinkle sesame seeds on top. Add sliced green onions for freshness. To make it pop, arrange everything nicely on the plate. A colorful presentation makes the dish even more appetizing. {{image_2}} You can easily customize your General Tso's Tofu with other veggies. Carrots add a sweet crunch. Snap peas bring a nice snap and vibrant color. Feel free to use: - Carrots, sliced thin - Snap peas, trimmed - Zucchini, chopped - Bell peppers, diced in different colors Adding these vegetables boosts flavor and nutrition. Plus, it makes the dish look colorful and inviting. If you want to switch up the protein, try tempeh or seitan. Tempeh has a nutty flavor and a hearty texture. Seitan is chewy and absorbs flavors well. Both options work great in this dish. You can use: - Tempeh, cubed and sautéed - Seitan, sliced and fried These choices add variety and keep your meals interesting. For a gluten-free version, swap soy sauce with tamari. Tamari is a great alternative that tastes similar. You can also use coconut aminos for a sweeter taste. For thickening, use: - Cornstarch, as in the original recipe - Arrowroot powder, as a gluten-free option These adaptations ensure you enjoy the same flavors without gluten. To keep your General Tso’s Tofu fresh, store it in an airtight container. This helps prevent moisture loss and keeps flavors intact. Place the leftovers in the fridge right after they cool down. Aim to eat the leftovers within 3 days for the best taste and safety. When you want to enjoy your leftovers, use the stovetop for the best texture. Heat a non-stick skillet over medium heat. Add a splash of oil if needed. Then, add your tofu and veggies and stir until heated through. This method keeps everything crispy. You can also use the microwave, but be careful not to overheat it. Microwave in short bursts for about 30 seconds. Stir in between to avoid sogginess. You can freeze General Tso’s Tofu, but it may change the texture. To freeze, let the dish cool completely. Then, transfer it to a freezer-safe container. Make sure to leave some space for expansion. It can be frozen for up to 2 months. When you're ready to eat, thaw it in the fridge overnight. Reheat using the stovetop method for the best results. This way, you’ll get a tasty meal ready in no time! Yes, you can make General Tso's Tofu ahead of time. To prepare it, cook the tofu and veggies as directed. Store them in an airtight container in the fridge for up to three days. When ready to serve, just heat it in a pan or microwave. The flavors will deepen, making it even tastier. If you need a substitute for hoisin sauce, you can use soy sauce mixed with a bit of brown sugar. This mix will give you a similar sweet and salty flavor. You can also try mixing soy sauce with peanut butter for a nutty twist. To make tofu less soggy, press it well before cooking. Wrap the tofu in a towel and place a weight on it for at least 20 minutes. This removes excess moisture. After pressing, coat the cubes with cornstarch. Fry them in hot oil until they turn golden and crispy. This will create a nice texture. Yes, this recipe is great for meal prep. Cook the tofu and veggies, then store them separately in airtight containers. You can reheat them together, or keep them apart to maintain texture. This way, you have a quick and healthy meal ready to go! This post covered a simple recipe for General Tso's Tofu. We discussed main ingredients like tofu, vegetables, and savory sauces. You learned about cooking steps, tips for crispy tofu, and how to store leftovers. In summary, this dish is easy to customize and enjoy. With a few tweaks, it fits your taste and needs. Try out the recipe and have fun with variations. You’ll create a tasty meal that is satisfying and healthy.
    Better-Than-Takeout General Tso’s Tofu Delight
  • To make crispy everything bagel roasted chickpeas, you need: - 1 can (15 oz) chickpeas, drained and rinsed - 2 tablespoons olive oil - 2 tablespoons everything bagel seasoning - 1 teaspoon garlic powder - ½ teaspoon onion powder - Salt and pepper to taste These ingredients create the perfect blend of flavors. The chickpeas give a nice crunch, while the seasoning adds a savory kick. You can switch things up with these alternate ingredients: - Use avocado oil instead of olive oil for a lighter taste. - Try different seasonings like taco seasoning or curry powder. - Add nutritional yeast for a cheesy flavor without dairy. These options let you play with flavors and create your own favorite version. You can find everything bagel seasoning at most grocery stores. Look in the spice aisle. Many brands offer it, but you can also make your own. Just mix equal parts sesame seeds, poppy seeds, garlic flakes, onion flakes, and salt. This homemade blend gives you fresh flavors for your chickpeas. Start by preheating your oven to 400°F (200°C). This high heat helps the chickpeas get crispy. Next, grab a baking sheet and line it with parchment paper. This step keeps the chickpeas from sticking and makes cleanup easier. Open a can of chickpeas and drain them. Rinse them well under cold water to remove the canning liquid. After rinsing, pat the chickpeas dry with a clean kitchen towel or paper towels. Drying them is key for a crispy result. If they are wet, they will steam instead of roast. In a large bowl, add the dry chickpeas. Pour in 2 tablespoons of olive oil and mix well. Make sure every chickpea gets coated. Then, sprinkle in 2 tablespoons of everything bagel seasoning, 1 teaspoon of garlic powder, and ½ teaspoon of onion powder. Add salt and pepper to taste. Toss everything together until the spices cover the chickpeas evenly. Spread the seasoned chickpeas on the prepared baking sheet in a single layer. This helps them roast evenly. Place the baking sheet in the oven and roast for 25-30 minutes. Shake the pan halfway through cooking to ensure they crisp up nicely. Keep an eye on them, as you want them golden brown and crunchy. Once done, take them out and let them cool slightly. They will continue to crisp as they cool. Enjoy them as a snack or as a topping for salads and bowls. Choose canned chickpeas that are firm and not mushy. Look for brands with no added sugars or preservatives. You can also use dried chickpeas, but they need soaking and cooking. If you pick dried chickpeas, soak them overnight for the best results. Fresh chickpeas give a better taste, so always check the expiration date. To make crispy chickpeas, dry them well. After rinsing, use a clean towel to pat them dry. The drier they are, the better they will crisp up in the oven. Make sure to spread them evenly on the baking sheet. Avoid overcrowding, as this can trap steam and make them soggy. Lastly, shake the pan halfway through cooking to help them brown evenly. One common mistake is not drying the chickpeas. If they're wet, they won't crisp up. Another error is not using enough oil. The oil helps them become golden and crunchy. Avoid opening the oven door too often, as this lets heat escape. Finally, don't skip the cooling step; they become crunchier as they cool. {{image_2}} For a kick, add some heat! Mix in a teaspoon of cayenne or chili powder. Toss the chickpeas with these spices along with the original seasonings. This gives a spicy twist that really wakes up your taste buds. Fresh herbs bring a bright flavor. After roasting, toss your chickpeas with chopped parsley, cilantro, or dill. This adds a fresh taste that balances the crunch of the chickpeas. Try mixing in herbs right after they come out of the oven for extra freshness. Want to try something different? Add a tablespoon of maple syrup or honey to the olive oil. This gives a sweet layer to the savory seasoning. It’s a great way to enjoy a mix of flavors. Toss the chickpeas well to coat before roasting. To keep your crispy chickpeas fresh, store them in an airtight container. This helps prevent moisture from making them soft. I recommend using glass jars or plastic containers with tight lids. Place them in a cool, dry spot away from sunlight. For best results, do not store them in the fridge; cold air can make them lose their crunch. When stored correctly, roasted chickpeas can last up to a week. If you keep them at room temperature, they will stay crunchy for about five to seven days. If you notice any signs of softening, it’s best to eat them quickly. If you want to keep them longer, consider freezing them. However, freezing may affect their crispiness once thawed. If your chickpeas lose their crunch, you can revive them in the oven. Preheat your oven to 350°F (175°C). Spread the chickpeas on a baking sheet and heat for about 10 minutes. This will help restore their crispy texture. Avoid the microwave, as it tends to make them soggy. Enjoy your chickpeas as a snack or a topping for meals! Yes, you can use dried chickpeas. Soak them overnight and cook them first. This way, you get a fresh taste. Just remember, they will take longer to prepare. Canned chickpeas are quicker and easier. Crispy chickpeas are very versatile. You can enjoy them as a snack all on their own. They also make a great topping for salads or soups. Try them in grain bowls for added crunch. They add flavor and texture to many dishes. To make this recipe vegan, it is already safe since it contains no animal products. For gluten-free diets, ensure your everything bagel seasoning has no gluten. You can also adjust spices to suit your taste or dietary needs. If you want less salt, just reduce it in the mix. Yes, you can find pre-made crispy chickpeas in many stores. Look in the snack or health food aisle. They come in various flavors, including everything bagel. Check the ingredients for allergens or additives. Making your own lets you control the flavor and health benefits. You learned how to make crispy everything bagel roasted chickpeas. We discussed the needed ingredients and where to find them. You now have step-by-step instructions for baking and perfecting the chickpeas. I shared tips to avoid common mistakes and ways to make tasty variations. Storing and reheating methods will help keep your snack fresh. Try different flavors and enjoy. This healthy snack is fun and easy to make!
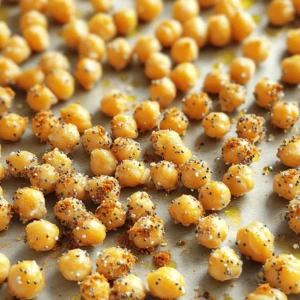
    Crispy Everything Bagel Roasted Chickpeas Recipe
  • - 2 cups cottage cheese (low-fat or full-fat) - 3 tablespoons unsweetened cocoa powder - 2 tablespoons honey or maple syrup (to taste) - 1 teaspoon vanilla extract - 1/4 cup Greek yogurt - A pinch of salt Cottage cheese is the star of this dish. It gives the mousse a creamy texture and packs a protein punch. You can choose low-fat or full-fat options, depending on your taste or diet. Unsweetened cocoa powder adds rich chocolate flavor without extra sugar. Honey or maple syrup serves as a natural sweetener, letting you control the sweetness level. Vanilla extract adds warmth and depth. Greek yogurt makes the mousse even creamier and adds protein. - 1/4 cup dark chocolate chips (optional for garnish) - Fresh berries for topping (optional) For toppings, dark chocolate chips add a crunchy bite and extra chocolate flavor. Fresh berries bring a burst of freshness. You can use strawberries, raspberries, or blueberries for a colorful touch. - Low-fat vs. full-fat cottage cheese: Low-fat cottage cheese gives a lighter mousse, while full-fat offers a richer taste. - Healthy sweeteners options: Honey and maple syrup are great choices, but feel free to explore other natural sweeteners like agave or stevia. Each adds its own unique flavor to the mousse. 1. Combine ingredients in a blender. Start with 2 cups of cottage cheese. Add 3 tablespoons of unsweetened cocoa powder. Pour in 2 tablespoons of honey or maple syrup. Then, add 1 teaspoon of vanilla extract and 1/4 cup of Greek yogurt. Don’t forget a pinch of salt! 2. Blend until smooth. Turn on your blender and mix on high speed. Make sure to scrape down the sides. This helps blend all the ingredients well. You want a smooth, creamy texture. - Pour into serving dishes. Use small cups or bowls for a fun presentation. This mousse looks great in clear dishes. - Garnish with toppings. Add dark chocolate chips on top. You can also use fresh berries for color and flavor. They make the mousse more appealing and tasty. - Refrigerate for optimal texture. Place the mousse in the fridge for at least 30 minutes. This chilling time helps the mousse firm up nicely. It will be cool and ready to enjoy when served! To get that dreamy mousse texture, I recommend using a blender. A blender creates a smoother mix than a food processor. If you opt for a food processor, it may leave some lumps. While blending, make sure to scrape down the sides. This step helps mix all the ingredients evenly. Don't skip this! It ensures every spoonful is creamy and delicious. Taste testing is key here. Once you blend your mousse, take a small spoonful. If it needs more sweetness, add honey or maple syrup. Blend again for a few seconds. Taste it once more. Repeat this until you find the right balance. Everyone's sweet tooth is different, so adjust to your liking! Serving matters, too! Pour your mousse into small cups or pretty bowls. Clear glasses show off the rich color. For a fun touch, sprinkle dark chocolate chips on top. A few fresh berries add color and freshness. They make your dessert look fancy and inviting. Enjoy sharing this treat with friends or family! {{image_2}} You can make this mousse even more tasty. Try adding a splash of almond extract. It gives a nice nutty taste. You could also mix in a little espresso. The coffee flavor works really well with chocolate. If you want, you can change the sweeteners, too. Use agave syrup or a sugar substitute to fit your needs. Looking for vegan options? You can use plant-based yogurt instead of cottage cheese. It gives a creamy texture. You could also swap cottage cheese for silken tofu. It blends smoothly and still packs protein. This is a great way to make it plant-based. Serving ideas can take your mousse to the next level. Layer the mousse with fresh fruits like strawberries or bananas. It adds color and flavor. Another fun option is to create a parfait. Just add granola between layers of mousse. This gives a nice crunch that contrasts with the smooth mousse. To keep your mousse fresh, use an airtight container. A glass jar or a plastic container works well. Store it in the fridge for up to three days. This way, you can enjoy your treat later without losing its yummy taste. You can freeze the mousse if you want to save it longer. Use a freezer-safe container and leave some space at the top. The mousse can last for about two months in the freezer. To enjoy it later, thaw it in the fridge overnight. This keeps the texture nice. If you have leftover mousse, get creative! Use it as a dip for fruit slices or spread it on toast. You can also mix it into smoothies for extra protein. Another fun idea is to layer it in parfaits with granola and berries. These options make your mousse even more exciting! This mousse packs a protein punch! The main source is cottage cheese. In 2 cups of cottage cheese, you get about 28 grams of protein. Greek yogurt adds another 5 grams. So, if you divide this mousse into four servings, each serving has about 8 grams of protein. This makes it a great snack or dessert choice for anyone wanting to boost their protein intake. Yes, you can! To make this mousse dairy-free, swap the cottage cheese for silken tofu. Tofu has a smooth texture and blends well. For Greek yogurt, try using a dairy-free yogurt made from coconut or almond milk. These swaps keep the mousse creamy while making it suitable for those avoiding dairy. You can store the mousse in the fridge for up to 3 days. Use an airtight container to keep it fresh. After a few days, the texture may change slightly, but it will still taste good. If you want to keep it longer, consider freezing it for up to a month. Just remember to thaw it in the fridge before serving. This blog post shared a simple, healthy recipe for high-protein chocolate cottage cheese mousse. We looked at the main ingredients, optional toppings, and how to prepare the mousse for best results. You learned tips for the perfect texture and creative variations to try. Finally, we discussed how to store leftovers. Now, you can enjoy a tasty treat that is both nutritious and fun to make. Dive in, get creative, and savor this delicious dessert that fits your diet!
    High-Protein Chocolate Cottage Cheese Mousse Delight
  • To make a delicious Spicy Penne Arrabbiata, you will need: - 300g penne pasta - 4 cloves garlic, minced - 1 teaspoon red pepper flakes (adjust to taste) - 1 can (400g) crushed tomatoes - 1 tablespoon tomato paste - 3 tablespoons extra-virgin olive oil - Salt, to taste - Fresh basil leaves, for garnish - Grated Parmesan cheese, for serving (optional) You can easily swap some ingredients. If you don’t have penne, try rigatoni or farfalle. For garlic, shallots can work too. If you want less heat, use less red pepper flakes or leave them out. You can also use fresh tomatoes if you prefer. Just chop them up and use about 800g. Olive oil is key, but you can use vegetable oil if needed. Fresh ingredients bring bright flavors. Fresh garlic adds a strong taste. However, canned tomatoes are convenient and tasty. If you use canned tomatoes, look for those with no added sugar or salt. They have a rich flavor that matches fresh ones. Always check the labels to get the best quality. If you can, use fresh basil for garnish. It enhances the dish's aroma and taste. {{ingredient_image_1}} Start by boiling a large pot of salted water. Use enough water to give the penne room to cook well. Once the water boils, add 300g of penne pasta. Cook it for about 10-12 minutes. You want it to be al dente, which means it should still have a little bite. After cooking, save 1 cup of the pasta water. Drain the rest of the water and set the pasta aside. This water will help later on. Next, grab a large skillet. Heat 3 tablespoons of extra-virgin olive oil over medium heat. Once hot, add 4 cloves of minced garlic and 1 teaspoon of red pepper flakes. Stir these for about 30 seconds. This step is key; you want the garlic to smell good, but not burn. Then, pour in 1 can of crushed tomatoes and 1 tablespoon of tomato paste. Mix them well. Bring this to a gentle simmer. Add salt to taste. Let it cook for 10-15 minutes. This time helps the flavors blend and the sauce to thicken nicely. Now it's time to bring it all together. Add the drained penne to the skillet with the sauce. Toss everything so the pasta gets coated well. If the sauce looks too thick, add some of that reserved pasta water. Do this a little at a time until you reach your desired sauce consistency. It’s important that the pasta is covered evenly with sauce. Once mixed, let it sit for a minute. Then, plate your spicy penne Arrabbiata. For a nice touch, garnish with fresh basil leaves. Optionally, you can top it with grated Parmesan cheese for extra flavor. To make your Spicy Penne Arrabbiata just right, start with one teaspoon of red pepper flakes. If you like it mild, use less. For more heat, add more flakes. Taste the sauce before you mix in the pasta. You can always adjust it later. Remember, you can also add crushed red peppers or hot sauce for extra kick. Fresh herbs can bring your dish to life. I love adding fresh basil to my spicy penne. Chop it up and sprinkle it on top before serving. You can also use parsley for a fresh taste. If you want to be bold, try adding some oregano. These herbs will add a lovely aroma and flavor to the sauce. To avoid mushy pasta, cook it until it is al dente. Follow the package instructions closely. Remember to save a cup of pasta water before draining. This water helps the sauce stick to the pasta. If you think the pasta looks too dry, add a bit of the reserved water. Toss everything well to ensure even coating. Pro Tips Adjust the Heat: If you prefer a milder sauce, reduce the red pepper flakes or omit them entirely. You can always add more spice later if desired. Quality Ingredients Matter: Use high-quality extra-virgin olive oil and canned tomatoes for the best flavor. San Marzano tomatoes are a great choice for authenticity. Perfect Pasta Cooking: To achieve perfectly cooked pasta, always salt your boiling water generously. This enhances the flavor of the pasta itself. Make it Creamy: For a creamier texture, stir in a splash of heavy cream or a dollop of mascarpone cheese just before serving. {{image_2}} You can add protein to your spicy penne Arrabbiata for a hearty meal. Chicken is a great choice. Simply cook diced chicken in the skillet before adding garlic and red pepper flakes. Shrimp is another tasty option. Sauté the shrimp until they are pink and cooked through. For a plant-based option, use tofu. Cube the tofu and sauté it until golden. Then, add it to the sauce with the pasta. Each protein adds a unique flavor and texture. If you want a vegetarian twist, there are many ways to adapt this dish. You can add vegetables like bell peppers, zucchini, or mushrooms. Sauté them in the olive oil with the garlic. They will soak up the spicy sauce well. Another idea is to use lentils or chickpeas. These will add protein and fiber, making the dish filling. Just mix them into the sauce after it simmers. This way, you keep the dish rich and satisfying. If you need a gluten-free option, don’t worry! Many pasta brands make gluten-free penne. Look for those made from rice, corn, or quinoa. They cook well and taste great in this dish. Follow the package instructions for cooking time. You can also use spiralized vegetables like zucchini or sweet potatoes. They make a fun, light alternative. Just sauté them until tender before adding the sauce. This way, you enjoy a healthy, gluten-free version of spicy penne Arrabbiata. You can store leftover Spicy Penne Arrabbiata in the fridge. Place it in an airtight container. It stays fresh for up to three days. Make sure to let it cool down before sealing. This helps keep the flavors intact. If you want to save some for later, freezing is a great option. First, let the pasta cool completely. Then, put it in freezer-safe bags or containers. Remove as much air as you can. It can last up to three months in the freezer. When you're ready to eat, just thaw it in the fridge overnight. Reheating Spicy Penne Arrabbiata is easy. You can use the stove or the microwave. If you use the stove, add a splash of water or olive oil in a pan. Heat it over low until warm, stirring gently. If using the microwave, cover the dish with a lid or wrap. Heat in short bursts, stirring in between. This helps it heat evenly. Enjoy your tasty pasta! Penne Arrabbiata comes from Italy. The name means "angry penne" in Italian. It gets its name from the spicy red pepper flakes. This dish hails from the Lazio region, especially Rome. Chefs created it to showcase simple ingredients. The focus is on pasta, garlic, and tomatoes. It’s a classic example of Italian cooking done right. Many people enjoy it for its bold flavors and quick prep time. Yes, you can make this dish vegan. Simply skip the Parmesan cheese when serving. Use nutritional yeast for a cheesy flavor instead. Check the tomato paste to ensure it has no animal products. The main ingredients are already plant-based, so it's easy to adapt. This way, you keep the dish flavorful and satisfying without dairy. To make the sauce less spicy, reduce the red pepper flakes. Start with half a teaspoon instead of a full teaspoon. You can also add more crushed tomatoes to balance the heat. Another trick is to include a bit of sugar. Sugar can help tone down the spice. Taste as you go to find the right balance for you. This blog post covered everything you need for Penne Arrabbiata. You learned about the key ingredients and how to swap them out. I explained how to cook the pasta and make a spicy sauce. You also got tips to adjust spice levels and enhance flavor with herbs. In the end, enjoy experimenting with variations and storing your dish. Cooking should be fun, so get creative! Share your results and keep trying new ideas.
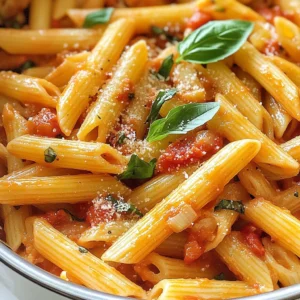
    Spicy Penne Arrabbiata Flavorful and Simple Recipe
  • For this meatloaf, you will need the following: - 1 lb ground beef - 1 lb ground turkey - 1 cup breadcrumbs - 1/2 cup onion, finely chopped - 1/2 cup bell pepper, finely chopped - 2 cloves garlic, minced - 1 large egg - 1 tablespoon Worcestershire sauce - 1 tablespoon soy sauce - 1 teaspoon dried oregano - 1 teaspoon dried thyme - Salt and pepper to taste To make the tangy glaze, gather these items: - 1/2 cup ketchup - 2 tablespoons brown sugar - 1 tablespoon apple cider vinegar - 1 teaspoon mustard Using fresh ingredients makes a big difference in flavor. Here are some tips: - Choose lean ground beef and turkey for a better texture. - Fresh herbs like oregano and thyme add more taste than dried ones. - Use fresh garlic instead of garlic powder for a punch. - Select ripe bell peppers for sweetness. - Dice onions just before mixing to keep them crisp. These tips will help you create a meatloaf that is not only tasty but also healthy. Enjoy the cooking process! {{ingredient_image_1}} Start by preheating your oven to 350°F (175°C). This sets the stage for cooking the meatloaf evenly. While the oven heats, grab a loaf pan and lightly grease it. This step helps the meatloaf come out smoothly after baking. Next, take a large mixing bowl. Add 1 pound of ground beef and 1 pound of ground turkey. These meats give great flavor and texture. Then, toss in 1 cup of breadcrumbs. This helps bind the meatloaf. Now, add 1/2 cup of finely chopped onion and 1/2 cup of finely chopped bell pepper. These veggies add moisture and taste. Don't forget the 2 cloves of minced garlic for that nice kick! Crack in 1 large egg, and pour in 1 tablespoon each of Worcestershire sauce and soy sauce. These sauces deepen the flavor. Next, sprinkle in 1 teaspoon of dried oregano and 1 teaspoon of dried thyme. Add salt and pepper to taste. Mix everything together until well combined. Transfer the mixture into your greased loaf pan. Press it down so it takes the shape of the pan. In a separate bowl, mix up the tangy glaze. Combine 1/2 cup of ketchup, 2 tablespoons of brown sugar, 1 tablespoon of apple cider vinegar, and 1 teaspoon of mustard. Whisk these together until smooth. Now, pour half of the glaze over the meatloaf. Spread it evenly for great flavor. Set the remaining glaze aside for later. With everything ready, you can now bake the meatloaf. For a great meatloaf, mix your meats well. I use both ground beef and ground turkey for flavor and texture. The breadcrumbs help bind the meat. They soak up juices and keep the loaf moist. Don't skip the egg; it adds richness and holds everything together. When mixing, avoid overworking the meat. This keeps it tender. The glaze makes this meatloaf special. To create it, mix ketchup, brown sugar, apple cider vinegar, and mustard. This mix gives a tangy and sweet taste. Pour half the glaze on before baking. This helps it caramelize nicely. Brush on the rest in the last 10 minutes. This keeps the glaze fresh and flavorful. Cook your meatloaf at 350°F (175°C). This gentle heat cooks it evenly. Use a meat thermometer to check doneness. You want the inside to reach 160°F (70°C). Let it rest for 10 minutes after baking. This helps the juices settle, making it easier to slice. Enjoy your delicious, tangy meatloaf! Pro Tips Use a Meat Thermometer: Ensure your meatloaf is cooked perfectly by using a meat thermometer. The internal temperature should reach 160°F (70°C) for safe consumption. Add Vegetables for Moisture: Incorporating finely chopped carrots or zucchini can add moisture and flavor to your meatloaf, making it even more delicious. Rest Before Slicing: Allowing the meatloaf to rest for 10 minutes before slicing helps the juices redistribute, resulting in a juicier and more flavorful dish. Experiment with Spices: Don't hesitate to experiment with different herbs and spices in the meat mixture, such as smoked paprika or Italian seasoning, to customize the flavor profile to your liking. {{image_2}} You can swap some ingredients to make a healthier meatloaf. Use ground turkey instead of beef. This cuts fat but keeps flavor. You can also use whole wheat breadcrumbs. They add fiber and nutrients. For a low-carb option, try almond flour instead of breadcrumbs. You can change the protein to fit your diet. Ground chicken is a great choice. It has a light flavor and pairs well with the glaze. If you prefer plant-based meals, use lentils or black beans. They add protein and fiber. Just mash them well before mixing. To make your meatloaf even tastier, add spices or herbs. Try adding smoked paprika for a warm flavor. Fresh herbs like parsley or basil can brighten the dish. A bit of chili powder adds a nice kick. Experiment and find what you love! To store leftover meatloaf, let it cool first. Wrap it tightly in plastic wrap or foil. Place it in an airtight container. This keeps it fresh. You can also slice it for easy serving later. Store it in the fridge for up to four days. To freeze meatloaf, wrap it well in plastic wrap. You can then place it in a freezer bag. Squeeze out the air to prevent freezer burn. It lasts up to three months in the freezer. To reheat, thaw it overnight in the fridge. Then, bake it at 350°F (175°C) until warm. This usually takes about 20 to 30 minutes. You can also microwave slices for quick meals. Cooked meatloaf stays good in the fridge for about four days. If you freeze it, it can last up to three months. After that, the flavor and texture might change. Always check for any off smells or colors before eating it. Proper storage helps keep your meatloaf tasty and safe to eat. To reheat meatloaf, use the oven. Preheat it to 250°F (120°C). Place the meatloaf in a dish. Cover it with foil to keep it moist. Heat for about 20 to 30 minutes. Check that it is warm all the way through. You can also use the microwave. Slice the meatloaf and place it on a plate. Heat for 1 to 2 minutes. Make sure it’s hot before serving. Yes, you can make this meatloaf ahead of time. Prepare the meat mixture and shape it in the loaf pan. Cover it with plastic wrap and store it in the fridge. You can do this a day or two before cooking. When ready, just bake it straight from the fridge. This helps save time on busy days. Yes, you can bake meatloaf in a slow cooker. Shape the meat mixture into a loaf. Place it in the slow cooker. Cook on low for 6 to 8 hours or on high for 3 to 4 hours. Check the internal temperature to make sure it reaches 160°F (70°C). Using a slow cooker makes it easy and keeps the meat moist. In this post, we explored ingredients for tangy glazed meatloaf, how to prepare it, and tips for perfecting texture and flavor. We also discussed variations to suit different diets. Remember, using fresh ingredients makes a big difference in taste. Store your leftovers properly to enjoy later. Whether it's a family dinner or a quick meal, this meatloaf can be your go-to recipe. With these steps and tips, you can make a meatloaf that truly shines.
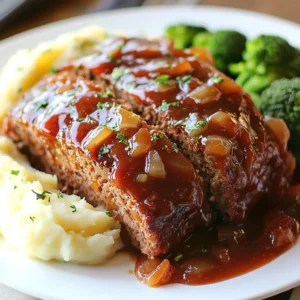
    Tangy Glazed Meatloaf Savory and Satisfying Recipe
  • To make the perfect pumpkin spice hot chocolate, gather these simple ingredients: - 1 cup milk (dairy or non-dairy) - 1 cup pumpkin puree - 2 tablespoons unsweetened cocoa powder - 2 tablespoons brown sugar (adjust to taste) - 1/2 teaspoon pumpkin pie spice (plus extra for garnish) - 1/4 teaspoon vanilla extract - 1/4 cup whipped cream (optional for topping) - Pinch of salt Each ingredient plays an important role. The milk gives a creamy base, while pumpkin puree adds that rich, autumn flavor. Unsweetened cocoa powder brings the chocolatey taste we crave. Brown sugar adds sweetness, which you can adjust to your liking. Pumpkin pie spice gives that warm, cozy aroma. Vanilla extract enhances the overall flavor, making it more inviting. A pinch of salt balances the sweetness, and whipped cream makes it extra special. Now that you have your ingredients ready, you can start making this warm and comforting drink! - Combine milk and pumpkin puree Start by pouring 1 cup of milk into a medium saucepan. You can use dairy or non-dairy milk based on your choice. Next, add 1 cup of pumpkin puree. Whisk them together until the mixture is smooth. Heat over medium heat until warm but not boiling. - Add cocoa powder and other ingredients Now, sprinkle in 2 tablespoons of unsweetened cocoa powder. Add 2 tablespoons of brown sugar to sweeten your drink. Then, measure 1/2 teaspoon of pumpkin pie spice and a pinch of salt. This will enhance the flavor. Whisk everything together until it is fully combined. Make sure there are no lumps. - Whisk until fully combined Keep whisking until you see a nice, creamy texture. This step helps blend all the flavors well. You want it to be smooth and rich. - Simmer and stir Stir in 1/4 teaspoon of vanilla extract. Let the mixture come to a gentle simmer. This should take about 3 to 5 minutes. Stir occasionally to prevent burning. - Serve with toppings Once your hot chocolate is steaming and ready, remove it from the heat. Pour it into mugs. For a special touch, top each mug with 1/4 cup of whipped cream, if you like. Finish with a sprinkle of pumpkin pie spice for added flavor and charm. Enjoy every sip of your creamy comfort drink! - How to avoid lumps in hot chocolate: To keep your hot chocolate smooth, whisk the milk and pumpkin puree well. Add the cocoa powder slowly while whisking. This helps break up any lumps. If lumps still form, use a fine mesh strainer before serving. - Adjusting sweetness: Taste your hot chocolate before serving. If you want it sweeter, add more brown sugar. Start with a teaspoon at a time and mix well. This way, you control the sweetness. - Ensuring the perfect temperature: Heat your mixture over medium heat. Stir often to avoid burning. You want it hot, but not boiling. A gentle simmer is best for a creamy texture. - Creative serving suggestions: Pour your hot chocolate into clear mugs. This shows off the rich color. You can also serve it in small jars for a rustic look. - Visual garnish ideas: Top with whipped cream for creaminess. Sprinkle extra pumpkin pie spice on top for a pop of color. You can even add chocolate shavings or a cinnamon stick for a fun touch. {{image_2}} You can easily adapt this pumpkin spice hot chocolate to fit your diet. - Vegan pumpkin spice hot chocolate: Swap the milk for any non-dairy milk. Almond, oat, or coconut milk work great. Use maple syrup instead of brown sugar for sweetness. This keeps it creamy and delicious while staying plant-based. - Keto-friendly options: Choose almond milk or coconut milk with no sugar added. Replace the brown sugar with a keto-friendly sweetener like erythritol or stevia. This way, you can enjoy the flavors without extra carbs. You can also change the taste of your hot chocolate with simple additions. - Adding extra spices: Try adding a bit of cinnamon or nutmeg for warmth. A pinch of cayenne pepper can also give it a spicy kick. These spices enhance the flavor and make it even cozier. - Incorporating flavored extracts: You can use almond or peppermint extract to switch things up. Just a few drops will change the drink's character and make it feel special. Experiment and find your favorite mix! To store your pumpkin spice hot chocolate, let it cool first. Then, pour it into an airtight container. Place it in the fridge. It stays fresh for about three days. After that, the flavor may fade. Remember to check for any changes in smell or texture before drinking. When you want to enjoy your hot chocolate again, use a saucepan. Pour in the cold hot chocolate and heat it over low heat. Stir often to keep it smooth. Avoid high heat. This helps the drink keep its creamy texture. You can also use a microwave. Heat it in short bursts, stirring in between. This method is quick but may need a bit more care to keep it from getting too hot. Can I use a different sweetener? Yes, you can use different sweeteners. Try honey, maple syrup, or agave. Adjust the amount based on your taste. Each sweetener adds its own flavor. What can I substitute for pumpkin puree? You can use butternut squash puree or sweet potato puree. Both give a similar taste and texture. You can also use canned pumpkin if you like. How can I make this recipe in larger batches? To make more servings, simply double or triple the ingredients. Just keep the same cooking steps. Use a larger pot to mix everything well. Are there any health benefits to pumpkin spice? Yes, pumpkin spice has some health benefits. It contains spices like cinnamon and ginger. These have antioxidants that can help your body. They may also aid digestion. How does this drink compare to regular hot chocolate? This drink is creamier and richer than regular hot chocolate. Pumpkin adds fiber and vitamins. It can be a healthier option if you use less sugar. This blog post covered how to make a tasty pumpkin spice hot chocolate. We discussed the key ingredients, like milk and pumpkin puree. I included easy step-by-step instructions for preparing it. Plus, I shared helpful tips for perfecting the recipe and creative serving ideas. We explored dietary and flavor variations to fit your needs. Finally, I offered storage and reheating advice for leftover drinks. Enjoy this warm, comforting treat anytime. Embrace the fall flavors and share it with friends!
    Pumpkin Spice Hot Chocolate Creamy Comfort Drink
  • - 1 cup cottage cheese, smoothened - 1/2 cup unsweetened cocoa powder - 1/3 cup honey or maple syrup These main ingredients give this mousse its rich and creamy texture. Cottage cheese is the star here. It adds protein and a smooth base. Unsweetened cocoa powder gives the chocolate flavor without added sugar. Honey or maple syrup sweetens it just right. - 1 teaspoon vanilla extract - 1/2 teaspoon instant coffee - 1/4 cup dark chocolate chips, melted - A pinch of sea salt These optional ingredients enhance the mousse. Vanilla adds warmth. Instant coffee deepens the chocolate flavor. Dark chocolate chips bring richness. A pinch of sea salt balances the sweetness. - Fresh berries - Whipped cream Garnishes make your mousse look pretty and taste better. Fresh berries add color and a fruity kick. Whipped cream offers a light, fluffy contrast. Both options make your dessert feel special. To start, I place the cottage cheese in a blender. I blend it until it is smooth and creamy. This step is key to getting rid of lumps. A smooth texture makes the mousse rich and enjoyable. If the mixture has lumps, the mousse will not be as good. Next, I add the unsweetened cocoa powder to the blender. I also pour in honey or maple syrup for sweetness. Then, I add one teaspoon of vanilla extract. This gives the mousse a nice flavor. I melt dark chocolate chips and add them too. If I want more depth, I add a bit of instant coffee. Finally, I sprinkle in a pinch of sea salt. I blend everything again until the mixture is fully smooth. After blending, I transfer the mousse into small serving bowls. This recipe makes four servings, which is perfect for sharing. I then place the bowls in the fridge. The mousse needs to chill for at least 1 to 2 hours. This chilling time helps the mousse set properly. When it’s time to serve, I add a dollop of whipped cream and some fresh berries on top. This makes the dessert look and taste even better! To get a smooth mousse, blending is key. You want to blend the cottage cheese until it is creamy. This step makes sure there are no lumps. After adding the cocoa powder and sweetener, blend again. This ensures all flavors mix well. Taste the mousse and adjust sweetness as needed. You can add more honey or maple syrup if you like it sweeter. For a great presentation, serve the mousse in small cups. You can top each cup with whipped cream and fresh berries. This adds color and makes it look fancy. Pair the mousse with coffee or tea for a nice touch. The rich chocolate flavor goes well with a warm drink. Cottage cheese has many nutritional benefits. It is high in protein and low in calories. This makes it a great choice for a healthy dessert. The mousse is rich in flavor but still light. You can enjoy it without guilt. Plus, it gives you energy without too many calories. {{image_2}} You can make this mousse even better by adding flavor. One easy way is to use different extracts. Almond extract adds a nice touch. Just add a few drops for a warm, nutty flavor. You can also use flavored cottage cheese. Some brands offer options like strawberry or vanilla. These can change the taste in fun ways. If you want a different kind of sweetness, try agave nectar. It's a natural sweetener that works well. You can also use stevia substitutes. These are great for cutting sugar. Remember, they can be sweeter than honey or syrup, so use less. Want to switch things up with chocolate? You can use white chocolate instead of dark. This gives a sweet, creamy taste. You can also try flavored chocolates. Think mint or orange for a fun twist. Just melt them and mix them in like you do with dark chocolate. After enjoying your cottage cheese chocolate mousse, you might have some left. To keep it fresh, store it in a clean, airtight container. This prevents any odors from other foods in your fridge. The mousse can last up to 3 days in the fridge. Just make sure it stays covered to maintain its creamy texture. Yes, you can freeze mousse! Freezing is a great way to save leftovers for later. To do this, place the mousse in a freezer-safe container. Leave some space at the top for expansion. The mousse can stay in the freezer for up to 2 months. Remember, the texture might change slightly after thawing. To thaw your mousse, move it from the freezer to the fridge. This method keeps it creamy and smooth. Let it sit in the fridge for about 4 to 6 hours. Avoid microwaving it, as this can ruin the texture. If you need to speed things up, you can thaw it at room temperature for about an hour. Just remember to enjoy it quickly after thawing! Yes, you can make this mousse dairy-free. Use silken tofu or a dairy-free cream cheese as a substitute for cottage cheese. Both options provide a creamy texture without dairy. You can also try using nut-based yogurts, like almond or cashew yogurt, for a tasty twist. The mousse needs to chill for at least 1 to 2 hours. This chilling time allows the flavors to meld and the mousse to firm up. If you want a firmer texture, you can chill it longer. Just keep an eye on it to avoid freezing. You can use sugar instead of honey or maple syrup. However, sugar may alter the texture and sweetness level. Start with less sugar, as it can be sweeter than liquid sweeteners. Always taste and adjust as needed. Yes, you can make this recipe in advance. Prepare the mousse one day ahead and store it in the fridge. Just remember to keep it covered to avoid any odors from the fridge. This way, you can enjoy a delicious dessert without last-minute stress. This blog post shared a simple recipe for chocolate mousse using cottage cheese. You learned about the main and optional ingredients, while also exploring tips for the perfect texture. Variations and storage options were covered to help you customize your mousse. Remember, you can make this dessert your own. Whether you want it dairy-free or flavored differently, the choices are yours. Enjoy making this easy, tasty treat, and share it with others!
    Cottage Cheese Chocolate Mousse Rich and Creamy Delight
  • - 1 lb (450g) large shrimp, peeled and deveined - 2 tablespoons unsalted butter - 2 cups cooked jasmine rice - 4 cloves garlic, minced - 1 tablespoon soy sauce - 1 tablespoon lemon juice - 1 cup broccoli florets (or any vegetable of your choice) - 2 green onions, sliced - Fresh cilantro for garnish (optional) - Salt and pepper to taste In this dish, the large shrimp are the star. They give a sweet and juicy bite. I love using unsalted butter for cooking. It adds a rich flavor without too much salt. The jasmine rice makes this bowl feel warm and cozy. For the seasonings and extras, minced garlic adds a strong, savory taste. Soy sauce and lemon juice bring balance with saltiness and freshness. Fresh herbs, like cilantro and green onions, not only brighten the dish but also add a nice crunch. You can choose broccoli or any veggie you like. It adds color and nutrients to the meal. This combination makes the Minute Garlic Butter Shrimp Rice Bowls quick and tasty. Start by seasoning the shrimp. Use salt and pepper to taste. This simple step brings out their flavor. Set the seasoned shrimp aside while you prepare the other ingredients. Next, let's cook the broccoli. In a large skillet, melt 1 tablespoon of butter over medium heat. Add the broccoli florets and sauté them for about 2-3 minutes. You want them bright green and tender-crisp. Remove the cooked broccoli from the skillet and set it aside for now. Now, it’s shrimp time! In the same skillet, add the remaining tablespoon of butter and the minced garlic. Cook these for about 30 seconds until you smell that lovely garlic aroma. Then, add the shrimp to the skillet. Sauté them for 2-3 minutes. They should turn pink and opaque. This means they are done cooking. Return the cooked broccoli to the skillet with the shrimp. Add the soy sauce and lemon juice. Stir everything together well. Let it cook for one more minute to heat through. Now, scoop the cooked jasmine rice into bowls. Top it with your garlic butter shrimp and vegetables. For a nice touch, garnish with sliced green onions and fresh cilantro if you like. Enjoy your meal! To ensure shrimp are perfectly cooked, keep these tips in mind: - Watch the Color: Cook shrimp until they are pink and opaque. This usually takes 2-3 minutes in a hot pan. - Don’t Crowd the Pan: Cook shrimp in batches if needed. This helps them sear and not steam. - Season Well: A sprinkle of salt and pepper before cooking will enhance the shrimp's natural flavor. To avoid overcooking vegetables, follow these steps: - Cook Quickly: Sauté broccoli just until it turns bright green and tender-crisp. This should take about 2-3 minutes. - Use High Heat: A hot skillet helps cook veggies fast. This keeps them colorful and crunchy. - Remove Promptly: Take the vegetables out of the pan as soon as they are done. This prevents them from cooking more. For presentation tips to make your dish appealing, try these ideas: - Warm Bowls: Serve the rice in warm bowls. This keeps the meal hot longer. - Extra Butter Drizzle: Drizzle a bit of melted butter over the top for added richness. - Garnish Smartly: Use sliced green onions and fresh cilantro for a pop of color. Pairing ideas for a complete meal include: - Simple Salad: A light green salad with a lemon vinaigrette complements the shrimp. - Sliced Fruit: Serve fresh fruit like mango or pineapple for sweetness. - Crispy Bread: A slice of crusty bread can soak up the garlic butter sauce. {{image_2}} You can switch out broccoli for many other veggies. Try bell peppers, snap peas, or zucchini. Each of these brings a new taste and color to your bowl. If you want to save time, use frozen vegetables. They are quick and still healthy. Just add them straight to the skillet. They cook fast and keep their nutrients. To make your dish more exciting, add spices or sauces. A dash of chili flakes can give it a kick. You might also try adding a splash of teriyaki sauce for extra flavor. Fresh herbs can brighten your meal. Try mixing in basil, parsley, or cilantro. Each herb adds its unique twist. Don't be afraid to mix and match! To store your Minute Garlic Butter Shrimp Rice Bowls, first cool them. Place the bowls in airtight containers. This helps keep the shrimp and rice fresh. You can store them in the fridge for up to three days. Make sure to label the containers with the date. This way, you know how long they have been stored. When you are ready to enjoy the leftovers, reheat them gently. The best method is using a microwave. Place the rice and shrimp in a microwave-safe dish. Add a splash of water to keep it moist. Cover the dish with a microwave-safe lid or wrap. Heat for about two minutes, stirring halfway through. This helps warm it evenly. To avoid soggy rice, do not overheat. If you prefer, you can also reheat the dish in a skillet. Heat over low heat and stir frequently. This way, you keep the flavors bright while warming everything through. This dish takes about 20 minutes to make. You’ll spend 10 minutes prepping the ingredients and another 10 minutes cooking. It’s fast and perfect for busy nights. Yes, you can use frozen shrimp! Just make sure to thaw them first. Place the shrimp in cold water for about 15-20 minutes. This keeps them juicy when you cook them. Fresh shrimp will taste a bit better, but frozen shrimp works well too. If you don’t have jasmine rice, you can use other types. Long-grain white rice or brown rice are great options. For a low-carb choice, try cauliflower rice. Each type gives a different flavor and texture, so pick what you like best. Yes! This recipe is great for meal prep. You can cook a big batch and store it in the fridge. Just keep the shrimp and rice separate until you’re ready to eat. This keeps everything fresh and tasty. You can enjoy it all week! This recipe for Minute Garlic Butter Shrimp Rice Bowls is simple and tasty. You learned about the key ingredients like shrimp, butter, and jasmine rice. We covered easy steps for cooking shrimp and vegetables. Plus, I shared tips to make it perfect every time. You can switch up the veggies or add spices for more flavor. Remember, it’s great for meal prep too! Enjoy creating your dish and have fun experimenting in the kitchen. Dig in and delight in every bite!
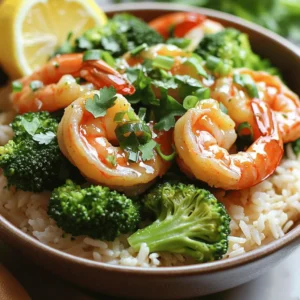
    Minute Garlic Butter Shrimp Rice Bowls Quick and Tasty
  • - 1 cup unsalted butter, melted - 1 cup brown sugar, packed - 1/2 cup granulated sugar - 3 large eggs - 2 teaspoons vanilla extract - 2 cups all-purpose flour - 1 teaspoon baking powder - 1/2 teaspoon baking soda - 1/2 teaspoon salt - 1 cup pretzel pieces, roughly crushed - 1 cup caramel sauce, store-bought or homemade - 1/2 cup chocolate chips (optional) - Sea salt flakes for topping For the best taste, I recommend using brands known for quality. - Butter: Land O’Lakes or Challenge for rich flavor. - Sugars: Domino or C&H for consistent sweetness. - Vanilla Extract: Nielsen-Massey for pure vanilla goodness. - Flour: King Arthur Flour for reliable baking. - Caramel Sauce: Smucker’s or homemade for that perfect drizzle. You can make this recipe fit your needs. Here are some swaps: - Butter: Use coconut oil for a dairy-free option. - Sugars: Replace granulated sugar with coconut sugar for a healthier choice. - Eggs: Use flax eggs (1 tablespoon flaxseed meal + 2.5 tablespoons water per egg) for a vegan version. - Flour: Swap all-purpose flour with gluten-free flour for a gluten-free treat. - Pretzels: Use gluten-free pretzels to maintain the gluten-free status. These changes keep the taste while fitting different diets. Enjoy making these bars your own! Start by heating your oven to 350°F (175°C). This step is key for even baking. Next, take a 9x13 inch baking pan. Grease it lightly and line it with parchment paper. Leave some paper hanging over the edges. This will help you lift the blondies out later. In a large bowl, combine 1 cup of melted unsalted butter, 1 cup of packed brown sugar, and 1/2 cup of granulated sugar. Whisk them together until smooth. This mix should look glossy. Now, add 3 large eggs, one at a time. Make sure to whisk well after each egg. Finally, stir in 2 teaspoons of vanilla extract until it blends fully. In another bowl, whisk together 2 cups of all-purpose flour, 1 teaspoon of baking powder, 1/2 teaspoon of baking soda, and 1/2 teaspoon of salt. Gradually mix these dry ingredients into the wet mixture. Stir until just combined; do not overmix. Now, gently fold in 1 cup of crushed pretzel pieces. If you want, add 1/2 cup of chocolate chips for extra taste. Pour half of the batter into the prepared baking pan. Spread it evenly across the bottom. Next, drizzle half of the caramel sauce over this layer. Carefully spoon the rest of the batter on top and spread it out gently. Then, drizzle the rest of the caramel sauce over the batter. Use a knife to swirl it for a nice marbled look. Place the pan in the preheated oven. Bake for 25-30 minutes. To check if they are done, insert a toothpick into the center. It should come out with a few moist crumbs. Once baked, let the blondies cool in the pan for about 10 minutes. After that, lift them out using the parchment paper and let them cool completely on a wire rack before cutting into bars. To get soft and chewy blondies, use melted butter. This helps keep them moist. Mix the sugars well with the butter. You want a smooth and creamy mix. When you add the flour, don’t overmix. Stir just until you see no flour. This keeps the blondies light and tender. Start with sugar and heat it slowly. Stir it often to avoid burning. Once it melts, add butter and cream. Mix it until smooth. If you want a richer flavor, add a pinch of sea salt. You can make the sauce ahead of time and store it in the fridge. Just warm it up before you use it. Keep an eye on your baking time. Check for doneness at 25 minutes. If a toothpick comes out with a few moist crumbs, they are ready. If they bake too long, they will dry out. Remember to let them cool in the pan for a bit. This helps them stay soft as they cool. {{image_2}} You can make your blondie bars even better by adding nuts. Chopped pecans or walnuts give a nice crunch. You can also use different types of chocolate. Dark chocolate adds a rich flavor, while white chocolate gives a sweet touch. Mix and match until you find your favorite combo. If you need a gluten-free treat, use almond flour or a gluten-free blend. Just swap the all-purpose flour in the recipe. The bars will still be soft and tasty. Keep an eye on the baking time, as gluten-free flour may change the texture a bit. Want to change the flavor? Try adding almond or coconut extract to the batter. You can also top the bars with crushed pretzels, nuts, or drizzles of extra caramel. These small changes can make a big difference. Don’t be afraid to get creative and make it your own! To keep your blondies fresh, store them in an airtight container. Line the container with parchment paper. This helps avoid sticking. Place the blondies in a single layer. If you need more than one layer, add more parchment paper in between. This keeps them from squishing together. Store them at room temperature for easy access. Freezing blondies is simple. First, let them cool completely. Then, cut them into squares. Wrap each square tightly in plastic wrap. Place the wrapped blondies in a freezer-safe bag. Make sure to remove extra air before sealing. You can freeze them for up to three months. When you want to enjoy one, just take it out and let it thaw at room temperature. When stored properly, blondies last about one week at room temperature. You can also keep them in the fridge for longer freshness. If you serve them cold, they taste great. For a warm treat, pop them in the microwave for a few seconds. Just be careful not to overheat them. The warm caramel will melt in your mouth! Yes, you can use salted pretzels if you like. Just remember to lower the salt in the recipe. Salted pretzels add a nice crunch and a salty kick. This makes the sweet caramel even better. You might enjoy the extra flavor they bring. The blondies are done when a toothpick comes out with a few moist crumbs. This means they are baked just right. If the toothpick is clean, the blondies might be overcooked. They will also look slightly golden on the edges. Let them cool slightly before cutting. These blondie bars go great with ice cream or whipped cream. A scoop of vanilla ice cream on top adds a creamy touch. Other desserts like brownies or cookies also work well. You can even serve them with fresh fruit for a nice balance. Yes, you can make these bars ahead of time. They taste great the next day too! Just store them in an airtight container. You can also freeze them for longer storage. They will still taste yummy when thawed. In this blog post, we explored how to make Salted Caramel Pretzel Blondie Bars step by step. We covered essential ingredients, including top brands and substitutes for dietary needs. I shared tips for texture and homemade caramel. You learned about fun variations and storage tips for these tasty treats. Remember, the key to success is careful prep and knowing your oven. Try these blondies for a delightful treat, and enjoy experimenting with your own flavors. Happy baking!
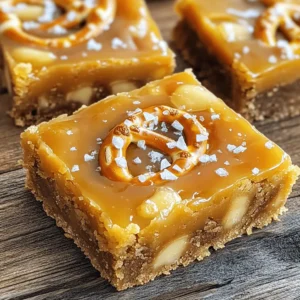
    Salted Caramel Pretzel Blondie Bars Irresistible Treat
  • To make Everything Bagel Chicken Tenders, you need these main items: - 1 pound chicken tenders - 1 cup buttermilk - 1 cup all-purpose flour - 1/2 cup breadcrumbs - 1/4 cup sesame seeds - 1/4 cup poppy seeds - 2 tablespoons garlic powder - 2 tablespoons onion powder - 2 teaspoons dried dill - 2 teaspoons salt - 1 teaspoon black pepper - 1 teaspoon smoked paprika - Olive oil spray These ingredients bring rich taste and texture to the dish. The chicken tends to soak up the buttermilk well. This step makes the meat juicy and flavorful. The everything bagel mixture adds a crispy crust that is hard to resist. For more flavor, consider adding these optional items: - Fresh herbs like parsley or chives - Grated Parmesan cheese - A squeeze of lemon juice Fresh herbs can brighten the dish. Parmesan adds a savory kick. Lemon juice gives a nice zing to balance the richness. These sauces pair well with your chicken tenders: - Ranch dressing - Honey mustard - BBQ sauce - Spicy mayo Each sauce adds a unique twist. Ranch is creamy and cool, while honey mustard is sweet and tangy. BBQ sauce brings a smoky flavor, and spicy mayo adds heat. Choose your favorite or mix them up for fun! Start by marinating the chicken. Take a medium bowl and mix together the buttermilk, garlic powder, onion powder, salt, black pepper, and smoked paprika. This blend adds great flavor. Next, add the chicken tenders and coat them well. Make sure every piece is covered. Cover the bowl and place it in the fridge. Let it sit for at least 30 minutes. For more flavor, you can marinate for up to 2 hours. Now, it’s time to prepare the coating. In a large shallow dish, mix the flour, breadcrumbs, sesame seeds, poppy seeds, dried dill, and a pinch of salt. This mixture is key for that everything bagel taste. Stir well to combine all the ingredients. Make sure there are no clumps. Your coating should be ready to use when the chicken is marinated. Preheat your oven to 400°F (200°C). While it heats, line a baking sheet with parchment paper. Lightly spray the parchment with olive oil. This keeps the tenders from sticking. Remove each chicken tender from the buttermilk mixture. Let the excess buttermilk drip off. Dredge each tender in the everything bagel coating. Press lightly so it sticks well. Place the coated tenders onto the prepared baking sheet. Once done, lightly spray the tops of the tenders with olive oil. Bake in the preheated oven for 20 to 25 minutes. They should turn golden brown and reach an internal temperature of 165°F (75°C). Enjoy your crispy, flavorful chicken tenders! To get the best texture, marinate the chicken well. Use buttermilk to tenderize the meat. Let the chicken sit in the marinade for at least 30 minutes. If you have time, go for 2 hours. The longer it sits, the better the taste. When coating the chicken, press firmly to help the mixture stick. This makes the tenders crispy and full of flavor. You can make these tenders your own. Try adding more spices to the coating. Cumin or chili powder can add a nice kick. For a sweeter touch, mix in some brown sugar. Use different seeds too. Swap poppy seeds for flax seeds if you prefer. You can even add cheese for a richer taste. Parmesan or cheddar can work great. Get creative and find your favorite mix! Using the right tools can help. A shallow dish is perfect for the coating. A baking sheet lined with parchment paper ensures easy cleanup. An oven thermometer helps to check the heat. Lastly, a meat thermometer is key. It tells you when the chicken is safe to eat. Aim for an internal temperature of 165°F (75°C). Enjoy cooking with these handy tools! {{image_2}} You can change the flavor by swapping out the spices. Try using Italian seasoning for a new twist. Cajun seasoning adds heat and a kick. For a fresh taste, mix in lemon zest. You can also use a blend of your favorite herbs. Experimenting lets you find what you love best. You can fry these chicken tenders if you want a crispy outside. Heat oil in a pan to 350°F. Fry each tender for about 4-5 minutes on each side. You can also use an air fryer. Set it to 400°F and cook for 10-12 minutes. Both methods give you tasty options. You can make this dish fit your diet. For a dairy-free option, use almond milk instead of buttermilk. If you want to make it gluten-free, swap the flour with almond flour or a gluten-free blend. You can also use crushed cornflakes instead of breadcrumbs for crunch. These swaps keep the flavors while meeting your needs. To store leftover chicken tenders, first let them cool. Place them in an airtight container. This keeps them fresh. You can store them in the fridge for up to three days. Make sure they are not too warm before sealing. This helps prevent moisture buildup. To reheat your chicken tenders, preheat your oven to 350°F (175°C). Spread the tenders on a baking sheet. Heat them for about 10-15 minutes. This keeps them crispy. You can also use an air fryer for quick reheating. Set it to 350°F and cook for about 5-7 minutes. If you want to freeze the chicken tenders, wrap them tightly in plastic wrap first. Then place them in a freezer-safe bag. They can last for up to three months in the freezer. When you are ready to eat, remove them from the freezer. Thaw them in the fridge overnight. Once thawed, reheat as mentioned above. Enjoy your tasty tenders! Yes, you can use regular chicken breasts. Just cut them into strips. This way, they will cook evenly. Make sure to adjust the cooking time, as thicker pieces may take longer. If you don't have buttermilk, you can use milk mixed with vinegar or lemon juice. Just combine 1 cup of milk with 1 tablespoon of vinegar or lemon juice. Let it sit for about five minutes. This will create a nice sour cream-like texture. You can store the chicken tenders in the fridge for up to three days. Make sure to keep them in an airtight container. This keeps them fresh and tasty for later meals. Yes, you can make this recipe gluten-free. Use gluten-free flour and gluten-free breadcrumbs. These swaps will keep the dish delicious and safe for those who need to avoid gluten. These chicken tenders pair well with many sides. Some good options include: - Fresh salad - Roasted vegetables - Sweet potato fries - Coleslaw - Mashed potatoes These sides will balance the flavors and enhance your meal. Enjoy! You learned how to make tasty Everything Bagel Chicken Tenders, including marinating and coating. I shared tips for the best texture and flavor. You also explored variations and how to store leftovers. I hope you try these tips and make this dish your own. Simple cooking can lead to amazing meals. Enjoy your time in the kitchen, and happy cooking!
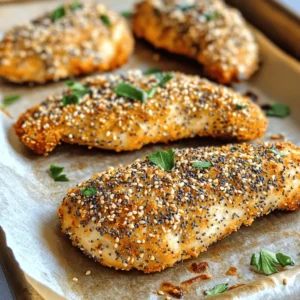
    Everything Bagel Chicken Tenders Flavorful and Easy
  • - 8 oz penne pasta - 1 lb smoked sausage, sliced (Andouille or kielbasa) - 1 tablespoon olive oil - 1 bell pepper (red or green), diced - 1 small onion, chopped - 3 cloves garlic, minced - 1 cup heavy cream - 1 cup chicken broth - 2 tablespoons Cajun seasoning - 1 cup cherry tomatoes, halved - 1 cup baby spinach - Salt and pepper to taste - Grated Parmesan cheese for serving - Fresh parsley, chopped for garnish When you shop for the ingredients, look for bright colors and firm textures. Choose pasta that feels smooth. For sausage, pick ones with a nice smell and no signs of spoilage. Fresh bell peppers should be shiny and firm. Check that the garlic is dry and plump. For tomatoes, select plump ones that feel heavy for their size. Look for spinach that is crisp and vibrant green. For sausage, I often choose Andouille from brands like Aidells or Johnsonville. They have great flavor and quality. For Cajun seasoning, Tony Chachere’s is a fan favorite. It adds a nice kick. If you want a milder taste, McCormick’s is also a good option. Always check the labels for freshness and quality. 1. Cook the penne: Boil water in a pot. Add the penne pasta. Cook until it is al dente, about 8-10 minutes. Drain the pasta and set it aside. 2. Brown the sausage: Heat olive oil in a large skillet over medium heat. Add the sliced smoked sausage. Cook for about 5-7 minutes, or until it gets a nice brown color. 3. Add veggies: Toss in the diced bell pepper, chopped onion, and minced garlic. Sauté for 3-4 minutes. You want the veggies to soften but not lose their crunch. 4. Create the sauce: Pour in the heavy cream and chicken broth. Stir well to combine. Add the Cajun seasoning. Bring the mixture to a simmer for about 5 minutes. 5. Mix in tomatoes and spinach: Add the halved cherry tomatoes and baby spinach to the sauce. Stir until the spinach wilts, about 2 minutes. 6. Combine pasta and sauce: Add the cooked penne to the skillet. Toss everything together until the pasta is well coated with the creamy sauce. 7. Season and serve: Taste the dish. Add salt and pepper as needed. Serve hot, garnished with grated Parmesan cheese and chopped parsley. - Pasta timing: Start cooking the pasta first. This way, it will be ready when your sauce is done. - Sauce simmer: Let the sauce simmer for at least 5 minutes. This helps deepen the flavors. - Final mix: Combine the pasta with the sauce right before serving. This keeps everything fresh and creamy. - Overcooking pasta: Make sure to cook the pasta al dente. Overcooked pasta can become mushy. - Burning garlic: Garlic can burn quickly. Add it to the pan last, just before the other vegetables. - Not adjusting seasoning: Always taste your dish before serving. You may need to add more salt or pepper. To boost the Cajun flavors in your dish, use fresh herbs. Add chopped green onions or parsley. For more heat, consider using crushed red pepper flakes. You can also try different Cajun seasoning brands. Each one has its own unique blend of spices. Cook the penne pasta until it is al dente. This keeps the pasta firm and chewy. Make sure to drain it well to avoid excess water. When mixing pasta with sauce, be quick. This helps the pasta absorb the sauce without becoming mushy. Pair this dish with a light white wine, like Sauvignon Blanc. Its acidity balances the creaminess of the pasta. For side dishes, serve a simple green salad. A loaf of crusty bread works well too. It’s perfect for soaking up any leftover sauce. {{image_2}} If you want to switch up the meat, try using chicken or turkey sausage. Both options work well and add great flavor. You could also use shrimp for a seafood twist. Just cook the shrimp until they turn pink before adding them to the sauce. You can even try chorizo for a spicy kick. Each choice brings a unique taste to the dish. To make this dish vegetarian, swap the sausage for mushrooms or tempeh. Both options provide a hearty texture. For a vegan version, use coconut cream instead of heavy cream. Vegetable broth can replace chicken broth. Add more veggies like zucchini or bell peppers for added flavor and nutrition. This keeps the meal rich and satisfying while being plant-based. If you have dietary needs, there are easy swaps you can make. For gluten-free pasta, use brown rice or quinoa pasta. You can also use lactose-free cream for a dairy-free option. If you're watching your sodium, low-sodium chicken broth is a great choice. Always adjust seasonings to match your taste and health goals. This way, you can enjoy this dish no matter your needs! Store your leftover creamy Cajun sausage pasta in an airtight container. This keeps it fresh. Let the pasta cool to room temperature before sealing. Use leftovers within three to four days for the best taste. When reheating, use low heat on the stove or microwave. Add a splash of chicken broth or cream to keep it creamy. Stir often to avoid burning. Heat until just warm, not hot. This helps keep the sauce smooth. You can freeze creamy Cajun sausage pasta for up to three months. Use a freezer-safe container and leave space for expansion. To thaw, move it to the fridge overnight. Reheat on low heat, adding a bit of liquid to restore creaminess. To make this dish gluten-free, swap the penne pasta for gluten-free pasta. Many brands offer great options. You can find gluten-free penne made from brown rice or lentils. Just cook it according to the package instructions. This way, you keep the creamy sauce and flavors without gluten. I recommend using a good-quality Cajun seasoning blend. Look for one that includes paprika, cayenne, garlic powder, and oregano. Brands like Tony Chachere's or Old Bay offer great flavors. You can also make your own blend at home for a personal touch. Just mix the spices in equal parts for a balanced taste. Yes, you can use other pasta shapes! Fusilli, rotini, or even fettuccine work well. Just keep an eye on the cooking time, as it may vary. The key is to cook the pasta until it’s al dente. This helps it hold up in the creamy sauce. Creamy Cajun sausage pasta stays fresh in the fridge for about 3 to 4 days. Store it in an airtight container. When you’re ready to eat, just reheat it on the stove or in the microwave. Add a splash of cream or broth to keep it creamy. Creamy Cajun Sausage Pasta is easy to make with fresh ingredients. From choosing the right sausage to cooking for perfect flavor, I covered it all. Remember to avoid common mistakes to keep your dish creamy. You can also play with the recipe for different diets or tastes. Store your leftovers well for future meals. Enjoy your cooking adventure, and don’t hesitate to try new variations!
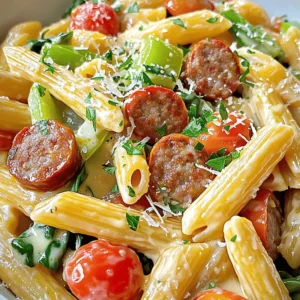
    Creamy Cajun Sausage Pasta Simple and Flavorful Meal
  • - 1 cup apple cider - 2 cups all-purpose flour - 1/2 cup granulated sugar - 1/4 cup brown sugar, packed Apple cider gives these muffins a warm, sweet flavor. It makes every bite taste like fall. All-purpose flour helps create a nice texture. The mix of granulated and brown sugars adds depth to the sweetness. - 1/2 cup unsweetened applesauce - 1/4 cup vegetable oil - 1 teaspoon vanilla extract Using unsweetened applesauce keeps the muffins moist without adding too much sugar. Vegetable oil helps them stay soft and fluffy. Vanilla extract adds a lovely aroma and extra flavor. - 1/4 cup granulated sugar (for topping) - 1 teaspoon ground cinnamon (for topping) The topping is a simple mix of sugar and cinnamon. This adds a sweet crunch to the warm muffins. It makes them feel like a cozy treat right out of the oven. Adding this topping boosts the flavor and makes them extra special. 1. Preheating the oven and preparing the muffin tin: Start by preheating your oven to 350°F (175°C). While the oven heats up, line a muffin tin with paper liners or spray it with non-stick cooking spray. This step keeps your muffins from sticking and makes cleanup easy. 2. Reducing the apple cider: Next, pour 1 cup of apple cider into a small saucepan. Bring it to a boil over medium-high heat. Once it boils, reduce the heat to low and let it simmer. You want to cook it until it reduces by half, which takes about 10 to 15 minutes. After that, set it aside to cool slightly. 3. Combining dry ingredients: In a medium bowl, whisk together 2 cups of all-purpose flour, 1 teaspoon of baking powder, 1 teaspoon of baking soda, 1 teaspoon of ground cinnamon, 1/2 teaspoon of ground nutmeg, and 1/4 teaspoon of salt. Make sure these dry ingredients are well mixed for even flavor. 4. Mixing wet ingredients: In a large bowl, combine 1/2 cup of granulated sugar, 1/4 cup of brown sugar (packed), 1/2 cup of unsweetened applesauce, 2 large eggs, 1/4 cup of vegetable oil, and 1 teaspoon of vanilla extract. Mix these ingredients well until the mixture is smooth. 5. Incorporating wet and dry mixtures: Slowly add the cooled, reduced apple cider to your wet mixture. Stir it until fully combined. Then, gradually add the dry mixture into the wet mixture. Stir gently until just combined, being careful not to overmix. Overmixing can make your muffins tough. 6. Baking time and testing for doneness: Divide the batter evenly among the muffin cups, filling each about two-thirds full. Bake the muffins for 18 to 20 minutes. To test for doneness, insert a toothpick into the center of a muffin. If it comes out clean, your muffins are ready. These steps will guide you to perfect, cozy Apple Cider Donut Muffins that are sure to delight everyone! To get the best texture in your muffins, avoid overmixing. When you mix the wet and dry ingredients, stop as soon as you see no dry flour. Overmixing makes the muffins tough. Also, ensure your ingredients are at room temperature. Cold eggs or applesauce can affect how well the batter combines. This simple step helps create a light and fluffy muffin. Add spices to boost flavor. A little extra cinnamon or nutmeg makes a big difference. You can also sprinkle some chopped nuts or chocolate chips for a fun twist. Using fresh apple cider is key. It gives muffins a rich, apple flavor. If you can, find cider from a local farm. It adds freshness that store-bought cider may lack. These muffins are best served warm. Place them on a rustic wooden platter for a cozy look. Garnish with thin apple slices and a sprinkle of cinnamon. Pair your muffins with warm apple cider or a hot cup of coffee. The flavors blend perfectly, creating a comforting treat. {{image_2}} You can make these muffins gluten-free. Use a gluten-free flour blend instead of all-purpose flour. Make sure it has xanthan gum for binding. You can also add a binder like ground flaxseed or chia seeds mixed with water. This helps hold the muffins together. Add some fun flavors to your muffins! You can mix in chopped nuts like walnuts or pecans for crunch. Chocolate chips are also a great choice for a sweeter touch. If you want to spice things up, try adding ginger or cardamom. These spices give the muffins a warm, cozy taste. Want to lessen the sugar? You can reduce the granulated sugar by a third. This keeps the muffins sweet without being too sugary. For a sugar swap, use honey or maple syrup instead. These options add a unique flavor and can be healthier. Enjoy experimenting with these variations to suit your taste! To keep your Apple Cider Donut Muffins fresh, store them in an airtight container. Place parchment paper between layers to avoid sticking. These muffins taste best when eaten within three days. Keep them at room temperature if you plan to eat them quickly. If you want to enjoy them later, freezing is a great option. To freeze your muffins, let them cool completely after baking. Wrap each muffin in plastic wrap. Then, place them in a freezer bag. Label the bag with the date. When you're ready to eat, take out a muffin and let it thaw at room temperature. You can also heat it in the microwave for about 15-20 seconds. When stored properly, your Apple Cider Donut Muffins will stay fresh for about three days at room temperature. In the freezer, they can last up to three months. Always check for any signs of freezer burn before eating. Enjoying them fresh will give you the best taste! Enjoy these muffins warm. They taste great fresh out of the oven. Serve them on a rustic wooden platter for a cozy vibe. Pair them with a warm drink like apple cider or coffee. A little butter or cream cheese can elevate the taste too. You might even sprinkle some extra cinnamon sugar on top for a sweet kick. Yes, you can make these muffins ahead of time. Bake them and let them cool completely. Store them in an airtight container at room temperature for up to three days. If you want to keep them longer, freeze them. Just wrap each muffin in plastic wrap and place them in a freezer bag. When ready to eat, let them thaw at room temperature or warm them in the oven. If you don’t have apple cider, you can use apple juice as a substitute. It will change the flavor slightly but still taste great. You can also use a mix of water and a bit of lemon juice for a similar tartness. For an adult twist, try hard cider. Each option brings its own flavor, so feel free to experiment! Making apple cider donut muffins is simple and fun. You mix wet and dry ingredients, then bake them to perfection. You can add spices or nuts for flavor. Follow tips to get the best texture. Store them well for lasting freshness. In the end, enjoy these muffins with friends or as a snack. They are great warm with a drink. I hope this guide helps you bake delicious muffins that impress everyone!
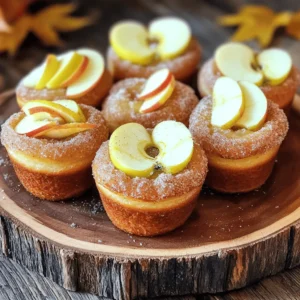
    Apple Cider Donut Muffins Cozy and Flavorful Treat
  • - 4 ripe peaches, pitted and sliced - 1 cup rolled oats - 1/2 cup all-purpose flour - 1/2 cup brown sugar - 1/4 cup granulated sugar - 1 teaspoon cinnamon - 1/2 teaspoon nutmeg - 1/4 teaspoon salt - 1/2 cup unsalted butter (1 stick) - 1/2 cup chopped pecans or walnuts (optional) - Vanilla ice cream or whipped cream, for serving Accurate measurements are key to great taste. Use a dry measuring cup for the oats and flour. For sugars, scoop them into the cup and level off. This ensures you won't have too much sweetness or dryness. You can enhance the flavor of your crisp by adding a few extras: - A splash of lemon juice to the peaches for brightness. - A pinch of ginger for a spicy kick. - A handful of raisins or dried cranberries for chewy texture. These simple additions can elevate your dish and give it a unique twist. First, gather all your ingredients. You need fresh peaches, oats, flour, and sugar. Don't forget the butter and spices. Preheat your oven to 350°F (175°C). This step is key for cooking your crisp evenly. 1. Brown the Butter: In a medium saucepan, melt the unsalted butter over medium heat. Stir it constantly. It will bubble and start to turn golden brown. This takes about 5-7 minutes. The nutty smell tells you it’s ready. Watch closely to avoid burning. 2. Prepare the Peaches: In a large bowl, add the sliced peaches. Sprinkle granulated sugar, cinnamon, and nutmeg over them. Gently toss the peaches to coat. This helps enhance their natural sweetness. Place the peaches in the bottom of a cast-iron skillet or oven-safe dish. 3. Make the Topping: In another bowl, mix rolled oats, flour, brown sugar, and salt. If you want, add chopped pecans or walnuts for crunch. Drizzle the brown butter over this mix. Stir until you have a crumbly topping. 4. Assemble the Crisp: Evenly spread the oat topping over the peaches. Make sure to cover them completely. This layer will turn golden and crisp in the oven. 5. Bake: Place the skillet in the oven. Bake for 25-30 minutes. Look for a golden brown topping and bubbly peaches. 6. Cool and Serve: Once done, remove the skillet from the oven. Let it cool for a few minutes. This will help the juices settle. - Watch the Heat: Keep your heat at medium. Too high, and the butter burns quickly. - Stir Constantly: This ensures even cooking and prevents sticking. - Look for Color: When the butter is golden brown, it’s ready. The smell is a great clue too! With these steps, you’ll create a delicious Brown Butter Peach Crisp Skillet. Enjoy the warm, sweet flavors! To pick great peaches, look for ripe ones. They should feel soft but not too mushy. Check for a sweet aroma. A bright color also indicates ripeness. You can choose yellow or white peaches. Both taste good in this crisp. Avoid peaches with bruises or dark spots. These might not taste fresh. You can change the flavor of your crisp. Try adding a splash of lemon juice to the peaches. This adds brightness. For a spicy kick, add a pinch of ginger. If you like nuts, mix in almonds or hazelnuts. You can even add dried fruits like cranberries. Each change can make your dish unique. Using the right tools helps a lot. You need a cast-iron skillet or an oven-safe dish. This helps cook the crisp evenly. A medium saucepan is key for browning the butter. Get a mixing bowl for combining ingredients. A spatula or wooden spoon is great for stirring. Don’t forget an oven mitt for safety! {{image_2}} Serve the Brown Butter Peach Crisp Warm. The heat makes the peaches juicy and sweet. Use a large spoon to scoop out servings directly from the skillet. This method keeps the crisp warm and inviting. Place each serving in a bowl, allowing guests to enjoy the delightful aroma. Top each serving with a scoop of vanilla ice cream or a dollop of whipped cream. The cold creaminess pairs well with warm, buttery peaches. You can also sprinkle a bit of cinnamon on top for extra flavor. If you want a nutty crunch, add some chopped nuts on top too. If you have any leftovers, let them cool. Store them in an airtight container in the fridge. They will last for about three days. To reheat, place the crisp in the oven at 350°F for about 10-15 minutes. You can also microwave individual servings for a quick treat. Enjoy your delicious dessert again! You can switch up the fruit in this crisp. Try using nectarines, plums, or cherries. Each fruit adds its own flavor and sweetness. Mix and match to find your favorite combo. For a tropical twist, use mango or pineapple. These fruits create a bright, sunny taste. If you need a gluten-free version, swap the all-purpose flour for almond flour or coconut flour. Oats are often gluten-free, but check the label. Use certified gluten-free oats to be safe. This keeps the crisp just as tasty and enjoyable. Pecans and walnuts work well, but you can use other nuts too. Try almonds or hazelnuts for a different crunch. Chop them up and mix them into the topping. This adds flavor and texture to your crisp. You can even skip the nuts if you prefer a nut-free option. You can make this dish ahead of time by preparing the filling and topping separately. Slice the peaches and mix them with sugar and spices. Store this in the fridge. For the topping, mix oats, flour, and brown sugar. Keep this in a separate container. When you are ready to bake, combine the two and pour the brown butter over the top. Bake as directed. This method keeps the topping crispy and fresh. Yes, frozen peaches work well. Just make sure to thaw and drain them before use. Frozen peaches can release more water. This extra moisture may make the crisp soggy. To fix this, cook the peaches in a pan for a few minutes to reduce liquid. Once they are drier, mix them with sugar and spices as usual. This way, you still get that sweet peach flavor. If you don’t have brown sugar, you can use white sugar. Just add a tablespoon of molasses to it for flavor. Another option is to use coconut sugar. This has a similar taste and color. If you prefer a sugar-free option, try using maple syrup or honey. Just keep in mind that these will change the texture a bit. Adjust the liquid in the recipe accordingly to keep it balanced. Brown Butter Peach Crisp Skillet brings together simple ingredients and easy steps. We’ve covered measurements, optional flavors, and ways to pick ripe peaches. Cooking tips help you master perfect brown butter. Serving ideas and storage options make this dish even better. Variations let you explore new flavors with different fruits or nuts. This dish is fun to make and enjoy. Try it out, and let your creativity shine!
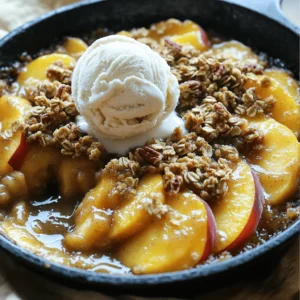
    Brown Butter Peach Crisp Skillet Delightful Recipe
  • - 1 ½ cups graham cracker crumbs - ½ cup unsalted butter, melted - 2 tablespoons granulated sugar - 2 (8 oz) packages cream cheese, softened - 1 cup powdered sugar - ½ cup fresh lemon juice - Zest of 2 lemons - 1 teaspoon vanilla extract - 1 cup whipped cream You can swap out the crust if you want. For a gluten-free option, try almond flour or gluten-free cookies. You can also use crushed chocolate cookies for a different flavor. For the filling, you can make it dairy-free. Use a dairy-free cream cheese made from nuts or coconut. For the sweetener, you can use honey or maple syrup instead of sugar. Just adjust the amounts to taste. These substitutions keep the recipe easy and tasty. Enjoy your no bake lemon cheesecake bars any way you like! 1. In a medium bowl, combine the graham cracker crumbs, melted butter, and granulated sugar. 2. Mix until it looks like wet sand. 3. Press this mixture firmly into the bottom of your baking dish. 4. Make sure it is even across the bottom. 5. Refrigerate the crust while you prepare the filling. 1. In a large bowl, beat the softened cream cheese until smooth and creamy. 2. Use a hand mixer or stand mixer for easier mixing. 3. Gradually add the powdered sugar, fresh lemon juice, lemon zest, and vanilla extract. 4. Beat until everything is well mixed and smooth. 5. Gently fold in the whipped cream until no streaks are left. 1. Pour the cheesecake filling over the chilled crust. 2. Spread it out evenly with a spatula. 3. Cover the dish with plastic wrap. 4. Refrigerate for at least 4 hours until the cheesecake sets. To make great cheesecake bars, start with cream cheese. It must be soft. If it's cold, your filling will be lumpy. Leave it out for an hour to soften. You can also microwave it for 10-15 seconds. Just don’t let it melt. Next, focus on the crust. The right texture is key. Mix graham cracker crumbs, melted butter, and sugar until it looks like wet sand. Press it firmly into your dish. Use a flat-bottomed cup for even pressure. This helps the crust hold together when cut. Cutting the bars takes a bit of care. Use a sharp knife for clean lines. Dip the knife in hot water, then dry it off. This helps cut through the filling easily. For serving, garnish with extra lemon zest. It adds a nice pop of color and flavor. Pair these bars with tea or lemonade. They also go well with fresh fruit on the side. {{image_2}} You can change the flavor of your cheesecake bars easily. Adding other fruit zest or purees can bring new tastes. For example, try using orange or lime zest for a twist. You can also mix in fruit purees, like raspberry or strawberry, to add color and flavor. Different extracts can also enhance the taste. Instead of vanilla, try almond or coconut extract. Just a small amount changes the entire profile. Experimenting with these flavors makes your no bake lemon cheesecake bars unique. The crust is key for a great cheesecake. You can switch it up by using chocolate cookies instead of graham crackers. This gives a rich, sweet flavor that pairs well with the tangy filling. Just crush the cookies and mix with butter as you would with the graham crackers. If you want a healthier option, try a nut-based crust. Use ground almonds or walnuts mixed with coconut oil. This adds a nice crunch and flavor. Both these crust options can make your dessert feel fresh and new. To keep your lemon cheesecake bars fresh, store them in the fridge. Use an airtight container. This prevents moisture loss and keeps flavors strong. You can also wrap them tightly in plastic wrap. This way, they stay nice and cool. When ready to eat, just take out the amount you want. If you want to save some for later, you can freeze them. Cut the bars into pieces before freezing. Place parchment paper between layers to avoid sticking. Wrap each piece in plastic wrap. Then, put them in a freezer-safe bag. This helps keep them fresh for up to three months. These lemon cheesecake bars last about five days in the fridge. Always check for changes in texture or smell. Signs of spoilage include a sour smell or a change in color. If you spot any mold, throw them away immediately. Freshness is key for the best taste! Yes, you can use low-fat cream cheese. It will still work well in this recipe. The bars may be a bit less rich, but they will still taste great. I often use low-fat cream cheese when I want a lighter option. Just ensure it's softened for easy mixing. To make a larger batch, you can double the recipe. Use a bigger baking dish, like a 13x9-inch one. This will help the cheesecake bars set properly. Keep the same cooking time, but check for doneness. If you want even more, triple the recipe. Just make sure to mix well so it all blends nicely. You can use bottled lemon juice, but fresh juice is best. Fresh lemons give a brighter flavor. If you use bottled juice, choose one without added sugars or preservatives. The taste will be slightly different, but it should still work for the cheesecake bars. This blog post showed how to make cheesecake bars step by step. You learned about key ingredients and substitutions. We covered how to prepare the crust and filling, ensuring great taste and texture. Tips helped you perfect your bars, while variations sparked new ideas. Lastly, I shared storage info to keep leftovers fresh. In the end, these cheesecake bars are fun to make and enjoy. You can be creative and try different flavors. I hope you feel inspired to bake your own delicious version.
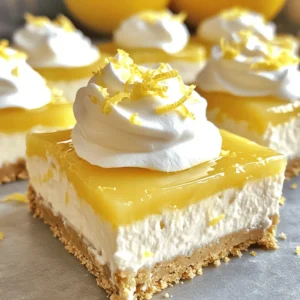
    No Bake Lemon Cheesecake Bars Quick and Easy Recipe
  • - 2 cod fillets (about 6 oz each) - 8 oz green beans, trimmed - 2 cloves garlic, minced - 1 teaspoon fresh ginger, grated - 2 tablespoons white miso paste - 2 tablespoons maple syrup - 1 tablespoon soy sauce (low-sodium) - 1 tablespoon rice vinegar - 1 tablespoon olive oil - Salt and pepper to taste - Sesame seeds - Sliced green onions Using fresh ingredients makes a big difference. The cod fillets should be firm and bright. The green beans need to be crisp and vibrant. Fresh garlic and ginger add a punch of flavor. You’ll get the best taste from good-quality miso paste and pure maple syrup. In your pantry, keep low-sodium soy sauce and rice vinegar handy. These add depth to the dish. Olive oil helps to toss the green beans and adds richness. Salt and pepper round out the flavor nicely. For garnishes, sesame seeds add a nice crunch. Sliced green onions give freshness and color. You can serve the meal right from the pan for a rustic touch. Enjoy the bright colors and rich flavors! First, set your oven to 400°F (200°C). This temperature helps cook the cod and green beans evenly. While the oven heats, get your tools ready. Grab a large sheet pan, a small bowl, and a whisk. In a small bowl, mix together these ingredients carefully: - 2 tablespoons white miso paste - 2 tablespoons maple syrup - 1 tablespoon low-sodium soy sauce - 1 tablespoon rice vinegar - 2 cloves garlic, minced - 1 teaspoon fresh ginger, grated Whisk them until smooth. This marinade gives the cod a sweet and savory flavor. Place the cod fillets in a shallow dish. Pour the miso marinade over the cod. Cover the dish and put it in the fridge. Let it marinate for at least 15 minutes, or up to 1 hour if you have more time. While the cod marinates, prepare the green beans. Trim the ends of the beans. On the sheet pan, toss the trimmed beans with 1 tablespoon olive oil. Add salt and pepper to taste. Spread the green beans evenly on one half of the pan. After marinating, take the cod out of the fridge. Remove it from the marinade, but save the extra marinade. Place the cod on the other half of the sheet pan. Now, it's time to bake! Place the sheet pan in the oven. Bake for 15-20 minutes. The cod should be opaque and flaky. The green beans will be tender-crisp. Halfway through cooking, brush the saved marinade over the cod for extra flavor. Once done, take the pan out of the oven. For a nice touch, sprinkle sesame seeds and sliced green onions on top. This makes the dish look fresh and inviting. To get the best texture for cod, start with fresh fillets. Fresh fish has a nice firmness. When marinating, allow the cod to soak for at least 15 minutes. This time lets the flavors seep in. If you have more time, let it marinate for up to an hour. This longer soak makes the fish even tastier. Once baked, the cod should flake easily. You’ll know it’s done when it turns opaque. Miso is a star in this dish. The white miso paste gives a rich, savory taste. Mixing it with maple syrup adds sweetness. The soy sauce and rice vinegar balance the flavors nicely. For more depth, add minced garlic and grated ginger. They bring warmth and spice to the marinade. Remember to brush the reserved marinade on the cod halfway through baking. This step boosts the flavor even more. Ovens can vary in heat. If your oven runs hot, check the cod at 15 minutes. If it’s cooler, you might need the full 20 minutes. Always look for the cod to be opaque and flaky. Use a fork to test the texture. The green beans should be tender-crisp. If they need more time, you can leave them in a bit longer. Just keep an eye on the cod to avoid overcooking it. {{image_2}} You can use many vegetables with this dish. Instead of green beans, try broccoli, asparagus, or bell peppers. Each veggie adds its own flavor and texture. Just make sure to cut them to a similar size for even cooking. Toss them in olive oil, salt, and pepper just like the green beans. This way, they will cook perfectly with the cod. Cod is a great choice, but you can switch it up. Salmon, tilapia, or even shrimp work well. Each protein brings a unique taste. If you choose salmon, keep the cooking time the same. For shrimp, reduce the time to about 10-12 minutes. This way, everything stays tender and full of flavor. Get creative with the marinade! You can try a teriyaki sauce instead of the miso mix. It gives a sweet and savory taste. For a spicy kick, add some sriracha to the mix. You can also use a lemon-garlic marinade for a fresh twist. Mixing and matching flavors can keep your meals exciting and new. To store your leftover sheet pan miso maple cod and green beans, first, cool them down. Place the food in a shallow container. This helps it cool faster. Cover the container with a tight lid or plastic wrap. Store it in the fridge for up to three days. Make sure to keep the cod and green beans together. This keeps the flavors intact. If you want to save the dish for later, you can freeze it. First, let the cod and green beans cool completely. Then, place them in an airtight container or a freezer bag. Remove excess air to prevent freezer burn. You can freeze the dish for up to three months. When you’re ready to eat, just thaw it in the fridge overnight. To reheat, use the oven or a microwave. For the oven, preheat it to 350°F (175°C). Place the cod and green beans on a baking sheet. Heat for about 10-15 minutes, or until warm. If using a microwave, place the food in a microwave-safe dish. Heat in short bursts, about 1-2 minutes at a time. This helps avoid overheating. Always check that the cod is hot all the way through before serving. Yes, you can prepare this dish ahead of time. You can marinate the cod and trim the green beans a few hours before cooking. Just keep the marinated cod in the fridge until you are ready to bake. This helps the flavors soak in more! If you want to swap out cod, use other firm fish. Salmon, halibut, or tilapia work well. These fish have similar textures and will still taste great with the miso maple sauce. To make this dish gluten-free, simply replace soy sauce with tamari. Tamari is a gluten-free soy sauce alternative. All other ingredients in this recipe are naturally gluten-free, so you’re good to go! This blog post covered the key ingredients and step-by-step process for making a tasty cod dish. I shared helpful tips to perfect the texture and flavor while exploring variations using different proteins and veggies. Proper storage methods keep your leftovers fresh. Always remember, you can easily make this dish gluten-free or prep it ahead. Enjoy cooking and experimenting with your meals!
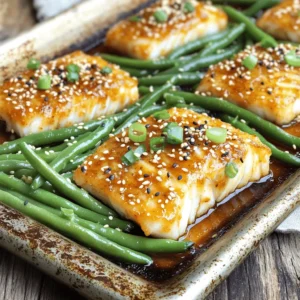
    Sheet Pan Miso Maple Cod & Green Beans Delight

Posts pagination

← Newer 1 … 6 7 8 9 10 … 33 Older →

Footer

↑ back to top

More information

  • Dinner
  • Drinks
  • Appetizers
  • Dessert
  • About
  • Contact Us

    Our Policies

    • Privacy Policy
    • Cookie Policy
    • Copyright Policy
    • Disclaimer
    • GDPR Policy
    • Terms Of Us

    Copyright © 2024 My Saved Recipe