• Recipes
    • Dinner
    • Dessert
    • Appetizers
    • Drinks
  • About
  • Contact Us
  • Privacy Policy
menu icon
go to homepage
  • Recipes
    • Dinner
    • Dessert
    • Appetizers
    • Drinks
  • About
  • Contact Us
  • Privacy Policy

search icon
Homepage link
  • Recipes
    • Dinner
    • Dessert
    • Appetizers
    • Drinks
  • About
  • Contact Us
  • Privacy Policy

×

Slow Cooker Buffalo Chicken Dip Easy and Delicious Dish

Published: Dec 15, 2024 · by Savannah · Leave a Comment

WANT TO SAVE THIS RECIPE?

Looking for the ultimate Buffalo chicken dip recipe? Try this easy slow cooker buffalo chicken dip that's perfect for game day or any gathering! This creamy buffalo dip features shredded chicken, cream cheese, and a kick of buffalo sauce, making it a must-try spicy dip recipe. Set your slow cooker and in just a couple of hours, enjoy an irresistible dip that your friends will love. Click to save and make it today! #BuffaloChickenDip #SlowCookerRecipes #SpicyDip #DipRecipes
To make this tasty Slow Cooker Buffalo Chicken Dip, you will need: - 2 cups cooked chicken, shredded - ½ cup cream cheese, softened - ½ cup sour cream - ½ cup ranch dressing - ½ cup buffalo sauce (adjust to taste) - 1 cup shredded cheddar cheese - ½ cup crumbled blue cheese (optional) - ¼ teaspoon garlic powder - ¼ teaspoon onion powder - Fresh chives or green onions, chopped (for garnish) You can swap some ingredients for a different flavor. If you want to cut fat, use low-fat cream cheese and sour cream. For a dairy-free option, try vegan cream cheese and sour cream. You can use Greek yogurt in place of sour cream for a tangy twist. If you dislike blue cheese, leave it out or replace it with more cheddar cheese. Garnishes can make your dish pop! Chopped chives or green onions add a fresh touch. You might also sprinkle some extra cheese on top before serving. A drizzle of buffalo sauce can give it an eye-catching look. Serve with crunchy veggies or tortilla chips for a fun twist! {{ingredient_image_1}} Start with 2 cups of cooked chicken. I like to use rotisserie chicken for ease. Just shred it into small pieces. This step is key for a smooth dip. If you have leftover chicken, that works too! Make sure it is tender and easy to shred. In a large bowl, mix the shredded chicken with cream cheese, sour cream, ranch dressing, and buffalo sauce. Use ½ cup of each of the cream cheese, sour cream, and ranch dressing. Adjust the buffalo sauce to your taste. Next, add 1 cup of shredded cheddar cheese and ½ cup of crumbled blue cheese if you like. Then, sprinkle in ¼ teaspoon of garlic powder and onion powder. Mix everything well until it is smooth and creamy. After mixing, transfer the dip into your slow cooker. Spread it evenly across the bottom. Cover the slow cooker and set it to low for 2 hours, or high for 1 hour. Stir occasionally, so it heats evenly. You want it hot and bubbly. When time is up, stir well and adjust the buffalo sauce if needed. Serve your warm dip with tortilla chips, celery sticks, or veggie sticks. This gives a nice crunch and balances the heat. For a fresh touch, garnish with chopped chives or green onions. They add color and flavor. Enjoy your tasty buffalo chicken dip with friends or family! To shred chicken well, use two forks. Hold one fork in each hand. Grab a piece of cooked chicken with one fork. Pull it apart with the other fork. You can also use your hands if the chicken is cool. Shredded chicken should be in small pieces. This helps it mix well in the dip. You can change the spice level of your dip. If you like it mild, use less buffalo sauce. Start with ¼ cup and taste it. Add more if you want more heat. You can also mix in some cream cheese for a milder flavor. For extra kick, add a bit of hot sauce or cayenne pepper. This dip is great for meal prep. You can make it a day ahead. Just mix all the ingredients and store it in the fridge. When you’re ready, put it in the slow cooker. Cook it on low for two hours or high for one hour. This saves you time on game day or at parties. Pro Tips Adjust the Heat: If you prefer a milder dip, reduce the amount of buffalo sauce or use a milder version. You can always add more heat later. Cheese Variations: Experiment with different cheese blends such as pepper jack or mozzarella for a unique twist on flavor and texture. Make Ahead: You can prepare the dip a day in advance. Just store it in the refrigerator and reheat it in the slow cooker before serving. Serving Suggestions: Serve with a variety of dippers like tortilla chips, celery sticks, or sliced bell peppers for a colorful presentation. {{image_2}} You can make a tasty vegetarian version of Buffalo dip. Swap the chicken for 2 cups of shredded jackfruit or chickpeas. Both options give a great texture. Mix in the same creamy ingredients. This way, you get that rich flavor without meat. Serve it with veggies or chips. Friends will love this twist! Cheese brings a lot to this dip. You can change the cheese to fit your taste. Try pepper jack for a spicy kick. Use mozzarella for a milder flavor. If you love blue cheese, add more or skip it entirely. Each choice will change the dip’s taste. Experiment and find your perfect mix! Want to boost the flavor? Add a dash of hot sauce for more heat. A squeeze of lemon juice gives a fresh zing. You can also mix in some diced jalapeños for extra spice. For a smoky touch, try smoked paprika. Each of these will make your Buffalo dip even better. Have fun creating your own flavor! After enjoying your buffalo chicken dip, let it cool down. Transfer it to an airtight container. Make sure to seal it well to keep it fresh. You can store it in the fridge for up to four days. If you want it to last longer, consider freezing it. When you’re ready to eat the dip again, there are easy ways to reheat it. You can use a microwave or the stovetop. If using the microwave, heat it in short bursts. Stir after each burst to ensure even heating. For the stovetop, warm it over low heat, stirring often. This keeps the dip creamy and tasty. If you freeze buffalo chicken dip, it can last up to three months. To freeze, place it in a freezer-safe container. Make sure to leave some room for expansion. When you want to use it, thaw it in the fridge overnight. Reheat it slowly to maintain the flavor and texture. You should not use raw chicken for this dip. The recipe calls for cooked chicken. Using raw chicken can lead to food safety issues. Cook the chicken first, then shred it. This will ensure the dip is safe to eat and full of flavor. Buffalo chicken dip pairs well with many snacks. Here are some tasty options: - Tortilla chips - Celery sticks - Carrot sticks - Crackers - Sliced baguette Each of these adds a nice crunch and complements the creamy dip. Buffalo chicken dip lasts about three to four days in the fridge. Store it in an airtight container. To enjoy it again, just reheat it gently on the stove or in the microwave. Make sure it heats all the way through before serving. In this article, we explored all aspects of making Buffalo Chicken Dip. We listed ingredients and swapped ideas, and provided tips for cooking and shredding chicken. You learned how to store leftovers and heat them up later. We even shared variations, like a vegetarian option. Buffalo Chicken Dip is fun to make and share. Try it out, and you’ll surely impress your friends. Enjoy your cooking adventure!

Looking for an easy and tasty dish for your next gathering? Slow Cooker Buffalo Chicken Dip is the perfect choice! I’ll guide you through every simple step, from gathering your ingredients to serving this crowd-pleaser. With a few tweaks, you can customize the spice and flavors. Get ready to impress your friends and family with this comforting dip that everyone will love! Let’s whip up some magic in your slow cooker!

Why I Love This Recipe

  1. Easy Preparation: This dip comes together in just 10 minutes, making it a perfect last-minute snack for parties or game days.
  2. Rich and Flavorful: The combination of cream cheese, cheddar, and buffalo sauce creates a creamy and spicy dip that everyone loves.
  3. Slow Cooker Convenience: Cooking it in a slow cooker allows for a hands-off approach, freeing you up to enjoy the festivities.
  4. Customizable: You can easily adjust the heat level by varying the amount of buffalo sauce or adding extra toppings like jalapeños.
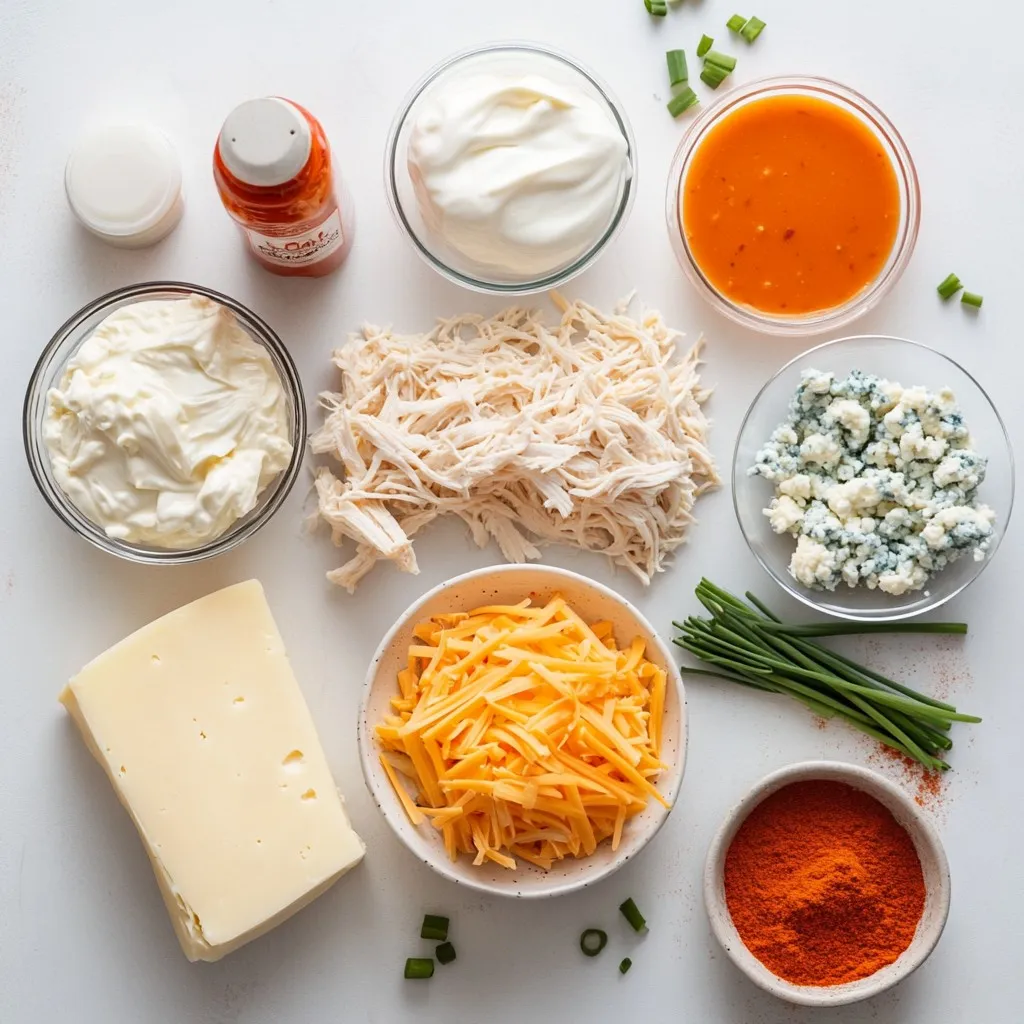
Ingredients

List of Ingredients

To make this tasty Slow Cooker Buffalo Chicken Dip, you will need:

  1. 2 cups cooked chicken, shredded
  2. ½ cup cream cheese, softened
  3. ½ cup sour cream
  4. ½ cup ranch dressing
  5. ½ cup buffalo sauce (adjust to taste)
  6. 1 cup shredded cheddar cheese
  7. ½ cup crumbled blue cheese (optional)
  8. ¼ teaspoon garlic powder
  9. ¼ teaspoon onion powder
  10. Fresh chives or green onions, chopped (for garnish)

Ingredient Substitutions

You can swap some ingredients for a different flavor. If you want to cut fat, use low-fat cream cheese and sour cream. For a dairy-free option, try vegan cream cheese and sour cream. You can use Greek yogurt in place of sour cream for a tangy twist. If you dislike blue cheese, leave it out or replace it with more cheddar cheese.

Optional Garnishes

Garnishes can make your dish pop! Chopped chives or green onions add a fresh touch. You might also sprinkle some extra cheese on top before serving. A drizzle of buffalo sauce can give it an eye-catching look. Serve with crunchy veggies or tortilla chips for a fun twist!

Step-by-Step Instructions

Preparing the Chicken

Start with 2 cups of cooked chicken. I like to use rotisserie chicken for ease. Just shred it into small pieces. This step is key for a smooth dip. If you have leftover chicken, that works too! Make sure it is tender and easy to shred.

Combining Ingredients

In a large bowl, mix the shredded chicken with cream cheese, sour cream, ranch dressing, and buffalo sauce. Use ½ cup of each of the cream cheese, sour cream, and ranch dressing. Adjust the buffalo sauce to your taste. Next, add 1 cup of shredded cheddar cheese and ½ cup of crumbled blue cheese if you like. Then, sprinkle in ¼ teaspoon of garlic powder and onion powder. Mix everything well until it is smooth and creamy.

Slow Cooking Process

After mixing, transfer the dip into your slow cooker. Spread it evenly across the bottom. Cover the slow cooker and set it to low for 2 hours, or high for 1 hour. Stir occasionally, so it heats evenly. You want it hot and bubbly. When time is up, stir well and adjust the buffalo sauce if needed.

Serving Suggestions

Serve your warm dip with tortilla chips, celery sticks, or veggie sticks. This gives a nice crunch and balances the heat. For a fresh touch, garnish with chopped chives or green onions. They add color and flavor. Enjoy your tasty buffalo chicken dip with friends or family!

Tips & Tricks

How to Perfectly Shred Chicken

To shred chicken well, use two forks. Hold one fork in each hand. Grab a piece of cooked chicken with one fork. Pull it apart with the other fork. You can also use your hands if the chicken is cool. Shredded chicken should be in small pieces. This helps it mix well in the dip.

Adjusting Spice Levels

You can change the spice level of your dip. If you like it mild, use less buffalo sauce. Start with ¼ cup and taste it. Add more if you want more heat. You can also mix in some cream cheese for a milder flavor. For extra kick, add a bit of hot sauce or cayenne pepper.

Making Ahead of Time

This dip is great for meal prep. You can make it a day ahead. Just mix all the ingredients and store it in the fridge. When you’re ready, put it in the slow cooker. Cook it on low for two hours or high for one hour. This saves you time on game day or at parties.

Pro Tips

  1. Adjust the Heat: If you prefer a milder dip, reduce the amount of buffalo sauce or use a milder version. You can always add more heat later.
  2. Cheese Variations: Experiment with different cheese blends such as pepper jack or mozzarella for a unique twist on flavor and texture.
  3. Make Ahead: You can prepare the dip a day in advance. Just store it in the refrigerator and reheat it in the slow cooker before serving.
  4. Serving Suggestions: Serve with a variety of dippers like tortilla chips, celery sticks, or sliced bell peppers for a colorful presentation.

Variations

Vegetarian Buffalo Dip

You can make a tasty vegetarian version of Buffalo dip. Swap the chicken for 2 cups of shredded jackfruit or chickpeas. Both options give a great texture. Mix in the same creamy ingredients. This way, you get that rich flavor without meat. Serve it with veggies or chips. Friends will love this twist!

Different Cheese Options

Cheese brings a lot to this dip. You can change the cheese to fit your taste. Try pepper jack for a spicy kick. Use mozzarella for a milder flavor. If you love blue cheese, add more or skip it entirely. Each choice will change the dip’s taste. Experiment and find your perfect mix!

Flavor Enhancements

Want to boost the flavor? Add a dash of hot sauce for more heat. A squeeze of lemon juice gives a fresh zing. You can also mix in some diced jalapeños for extra spice. For a smoky touch, try smoked paprika. Each of these will make your Buffalo dip even better. Have fun creating your own flavor!

Storage Info

How to Store Leftovers

After enjoying your buffalo chicken dip, let it cool down. Transfer it to an airtight container. Make sure to seal it well to keep it fresh. You can store it in the fridge for up to four days. If you want it to last longer, consider freezing it.

Reheating Instructions

When you’re ready to eat the dip again, there are easy ways to reheat it. You can use a microwave or the stovetop. If using the microwave, heat it in short bursts. Stir after each burst to ensure even heating. For the stovetop, warm it over low heat, stirring often. This keeps the dip creamy and tasty.

Freezing Tips

If you freeze buffalo chicken dip, it can last up to three months. To freeze, place it in a freezer-safe container. Make sure to leave some room for expansion. When you want to use it, thaw it in the fridge overnight. Reheat it slowly to maintain the flavor and texture.

FAQs

Can I use raw chicken for this recipe?

You should not use raw chicken for this dip. The recipe calls for cooked chicken. Using raw chicken can lead to food safety issues. Cook the chicken first, then shred it. This will ensure the dip is safe to eat and full of flavor.

What can I serve with Buffalo Chicken Dip?

Buffalo chicken dip pairs well with many snacks. Here are some tasty options:

  1. Tortilla chips
  2. Celery sticks
  3. Carrot sticks
  4. Crackers
  5. Sliced baguette

Each of these adds a nice crunch and complements the creamy dip.

How long does it last in the fridge?

Buffalo chicken dip lasts about three to four days in the fridge. Store it in an airtight container. To enjoy it again, just reheat it gently on the stove or in the microwave. Make sure it heats all the way through before serving.

In this article, we explored all aspects of making Buffalo Chicken Dip. We listed ingredients and swapped ideas, and provided tips for cooking and shredding chicken. You learned how to store leftovers and heat them up later. We even shared variations, like a vegetarian option.

Buffalo Chicken Dip is fun to make and share. Try it out, and you’ll surely impress your friends. Enjoy your cooking adventur

To make this tasty Slow Cooker Buffalo Chicken Dip, you will need: - 2 cups cooked chicken, shredded - ½ cup cream cheese, softened - ½ cup sour cream - ½ cup ranch dressing - ½ cup buffalo sauce (adjust to taste) - 1 cup shredded cheddar cheese - ½ cup crumbled blue cheese (optional) - ¼ teaspoon garlic powder - ¼ teaspoon onion powder - Fresh chives or green onions, chopped (for garnish) You can swap some ingredients for a different flavor. If you want to cut fat, use low-fat cream cheese and sour cream. For a dairy-free option, try vegan cream cheese and sour cream. You can use Greek yogurt in place of sour cream for a tangy twist. If you dislike blue cheese, leave it out or replace it with more cheddar cheese. Garnishes can make your dish pop! Chopped chives or green onions add a fresh touch. You might also sprinkle some extra cheese on top before serving. A drizzle of buffalo sauce can give it an eye-catching look. Serve with crunchy veggies or tortilla chips for a fun twist! {{ingredient_image_1}} Start with 2 cups of cooked chicken. I like to use rotisserie chicken for ease. Just shred it into small pieces. This step is key for a smooth dip. If you have leftover chicken, that works too! Make sure it is tender and easy to shred. In a large bowl, mix the shredded chicken with cream cheese, sour cream, ranch dressing, and buffalo sauce. Use ½ cup of each of the cream cheese, sour cream, and ranch dressing. Adjust the buffalo sauce to your taste. Next, add 1 cup of shredded cheddar cheese and ½ cup of crumbled blue cheese if you like. Then, sprinkle in ¼ teaspoon of garlic powder and onion powder. Mix everything well until it is smooth and creamy. After mixing, transfer the dip into your slow cooker. Spread it evenly across the bottom. Cover the slow cooker and set it to low for 2 hours, or high for 1 hour. Stir occasionally, so it heats evenly. You want it hot and bubbly. When time is up, stir well and adjust the buffalo sauce if needed. Serve your warm dip with tortilla chips, celery sticks, or veggie sticks. This gives a nice crunch and balances the heat. For a fresh touch, garnish with chopped chives or green onions. They add color and flavor. Enjoy your tasty buffalo chicken dip with friends or family! To shred chicken well, use two forks. Hold one fork in each hand. Grab a piece of cooked chicken with one fork. Pull it apart with the other fork. You can also use your hands if the chicken is cool. Shredded chicken should be in small pieces. This helps it mix well in the dip. You can change the spice level of your dip. If you like it mild, use less buffalo sauce. Start with ¼ cup and taste it. Add more if you want more heat. You can also mix in some cream cheese for a milder flavor. For extra kick, add a bit of hot sauce or cayenne pepper. This dip is great for meal prep. You can make it a day ahead. Just mix all the ingredients and store it in the fridge. When you’re ready, put it in the slow cooker. Cook it on low for two hours or high for one hour. This saves you time on game day or at parties. Pro Tips Adjust the Heat: If you prefer a milder dip, reduce the amount of buffalo sauce or use a milder version. You can always add more heat later. Cheese Variations: Experiment with different cheese blends such as pepper jack or mozzarella for a unique twist on flavor and texture. Make Ahead: You can prepare the dip a day in advance. Just store it in the refrigerator and reheat it in the slow cooker before serving. Serving Suggestions: Serve with a variety of dippers like tortilla chips, celery sticks, or sliced bell peppers for a colorful presentation. {{image_2}} You can make a tasty vegetarian version of Buffalo dip. Swap the chicken for 2 cups of shredded jackfruit or chickpeas. Both options give a great texture. Mix in the same creamy ingredients. This way, you get that rich flavor without meat. Serve it with veggies or chips. Friends will love this twist! Cheese brings a lot to this dip. You can change the cheese to fit your taste. Try pepper jack for a spicy kick. Use mozzarella for a milder flavor. If you love blue cheese, add more or skip it entirely. Each choice will change the dip’s taste. Experiment and find your perfect mix! Want to boost the flavor? Add a dash of hot sauce for more heat. A squeeze of lemon juice gives a fresh zing. You can also mix in some diced jalapeños for extra spice. For a smoky touch, try smoked paprika. Each of these will make your Buffalo dip even better. Have fun creating your own flavor! After enjoying your buffalo chicken dip, let it cool down. Transfer it to an airtight container. Make sure to seal it well to keep it fresh. You can store it in the fridge for up to four days. If you want it to last longer, consider freezing it. When you’re ready to eat the dip again, there are easy ways to reheat it. You can use a microwave or the stovetop. If using the microwave, heat it in short bursts. Stir after each burst to ensure even heating. For the stovetop, warm it over low heat, stirring often. This keeps the dip creamy and tasty. If you freeze buffalo chicken dip, it can last up to three months. To freeze, place it in a freezer-safe container. Make sure to leave some room for expansion. When you want to use it, thaw it in the fridge overnight. Reheat it slowly to maintain the flavor and texture. You should not use raw chicken for this dip. The recipe calls for cooked chicken. Using raw chicken can lead to food safety issues. Cook the chicken first, then shred it. This will ensure the dip is safe to eat and full of flavor. Buffalo chicken dip pairs well with many snacks. Here are some tasty options: - Tortilla chips - Celery sticks - Carrot sticks - Crackers - Sliced baguette Each of these adds a nice crunch and complements the creamy dip. Buffalo chicken dip lasts about three to four days in the fridge. Store it in an airtight container. To enjoy it again, just reheat it gently on the stove or in the microwave. Make sure it heats all the way through before serving. In this article, we explored all aspects of making Buffalo Chicken Dip. We listed ingredients and swapped ideas, and provided tips for cooking and shredding chicken. You learned how to store leftovers and heat them up later. We even shared variations, like a vegetarian option. Buffalo Chicken Dip is fun to make and share. Try it out, and you’ll surely impress your friends. Enjoy your cooking adventure!

Fiery Slow Cooker Buffalo Chicken Dip

A spicy and creamy dip perfect for parties and gatherings.
Print Recipe Pin Recipe
Prep Time 10 minutes mins
Cook Time 2 hours hrs
Total Time 2 hours hrs 10 minutes mins
Course Appetizer
Cuisine American
Servings 8

Ingredients
  

  • 2 cups cooked chicken, shredded
  • 1 2 cup cream cheese, softened
  • 1 2 cup sour cream
  • 1 2 cup ranch dressing
  • 1 2 cup buffalo sauce
  • 1 cup shredded cheddar cheese
  • 1 2 cup crumbled blue cheese
  • 1 4 teaspoon garlic powder
  • 1 4 teaspoon onion powder
  • Fresh chives or green onions, chopped (for garnish)

Instructions
 

  • In a large mixing bowl, combine the shredded chicken, softened cream cheese, sour cream, ranch dressing, and buffalo sauce.
  • Mix in the shredded cheddar cheese, crumbled blue cheese, garlic powder, and onion powder until everything is well incorporated.
  • Transfer the mixture to a slow cooker, spreading it evenly.
  • Cover and cook on low for 2 hours or on high for 1 hour, stirring occasionally until the dip is hot and bubbly.
  • Once done, give it a good stir to mix everything again and adjust the buffalo sauce if desired.
  • Serve warm, garnished with chopped chives or green onions for an added freshness.

Notes

Adjust the buffalo sauce to your preferred spice level.
Keyword appetizer, buffalo chicken dip, slow cooker, spicy dip

Related Recipes

  • - 12 oz fresh cranberries - 1 cup sugar - 1/2 cup orange juice - 1/4 cup apple cider vinegar - 1/2 teaspoon ground cinnamon - 1/4 teaspoon ground ginger - 1/4 teaspoon allspice - 1 small onion, finely chopped - 1/2 cup raisins - 1 tablespoon freshly grated orange zest - Salt to taste To make this easy cranberry chutney, gather all your ingredients first. Fresh cranberries are key for that bright, tart flavor. The sugar balances the tartness and adds sweetness. Orange juice and apple cider vinegar give it a nice tang. Spices like ground cinnamon, ground ginger, and allspice add warmth. A small onion brings depth and flavor. Raisins add a chewy sweetness, and the orange zest brightens the dish. Finally, salt helps bring all the flavors together. Using these fresh ingredients leads to a chutney that bursts with flavor. This chutney pairs well with many dishes, making it perfect for any table. Enjoy the process of mixing these lovely flavors! {{ingredient_image_1}} - Rinse the cranberries. This helps remove dirt and makes them clean. - Prepare the onion and zest. Chop the onion finely and grate the orange zest. - Dissolve sugar over medium heat. In a medium saucepan, mix sugar, orange juice, apple cider vinegar, ground cinnamon, ground ginger, and allspice. Stir well until the sugar melts. - Add onion and cranberries. Once the sugar dissolves, toss in the chopped onion and cook for 3-4 minutes until soft. Then, stir in the rinsed cranberries and raisins. - Simmer and thicken. Bring the mix to a boil, then lower the heat. Let it simmer for 15-20 minutes. Keep stirring until the cranberries burst and the chutney thickens. - Cool and refrigerate. Once done, take it off the heat. Let it cool to room temperature. It will thicken more as it cools. Transfer to a container and chill for at least 2 hours. Enjoy the melded flavors! You can serve this cranberry chutney in many tasty ways. It pairs well with roasted meats. The sweet and tangy flavor enhances turkey, chicken, or pork. Spread it on sandwiches for a fun twist. Its bright taste lifts any meal. You can easily adjust the sweetness. If you like it sweeter, add more sugar. This will balance the tartness of the cranberries. Adding extra spices can also give depth to the flavor. Try a pinch of cloves or nutmeg for a warm touch. These small changes make a big impact on taste! Pro Tips Freshness Matters: Always use fresh cranberries for the best flavor and texture; frozen cranberries can become mushy when cooked. Adjust the Sweetness: Taste your chutney as it cooks; you can easily adjust the sweetness by adding more sugar or balancing it with additional vinegar. Perfect Pairings: This chutney pairs beautifully with roasted meats like turkey or pork, giving a delightful contrast to savory dishes. Make Ahead: Chutney tastes even better the next day! Make it in advance and store it in the fridge to allow the flavors to develop. {{image_2}} You can change the flavor of your cranberry chutney by adding fruits. Diced apples or pears work well. They add sweetness and texture. You can also try different dried fruits. Raisins add a nice touch, but dried apricots or figs can enhance the taste, too. Each fruit brings its unique flavor, making your chutney special. Spices can transform your chutney! You might try adding cloves or nutmeg for warmth. These spices add depth and complexity. If you want to switch up the citrus, consider using lemon instead of orange. Lemon gives a bright, zesty twist to the chutney. Experimenting with spices and fruits allows you to create a chutney that suits your taste perfectly. To keep your chutney fresh, store it properly. First, let it cool to room temperature. Then, use an airtight container. A glass jar or a plastic container works well. Make sure the lid is tight to keep out air. In the refrigerator, your chutney stays fresh for about two weeks. If you want to keep it longer, freeze it. Pour the chutney into freezer-safe bags or containers. Leave some space at the top, as it will expand when frozen. It can last for up to six months in the freezer. When ready to use, thaw it overnight in the fridge. You will know the chutney is done when it thickens nicely. Look for these signs: - The cranberries should burst and soften. - The mixture should coat the back of a spoon. - It should not run off like liquid. Cook it for 15-20 minutes after boiling. Keep stirring to avoid burning. As it cools, it will thicken more. Yes, you can make cranberry chutney ahead of time. It tastes even better after sitting. Here are some tips: - Make it up to a week in advance. - Store in an airtight container in the fridge. - Let it chill for at least 2 hours before serving. This gives the flavors time to mix well. Yes, you can can this chutney. Follow these guidelines for safe canning: - Use sterilized jars and lids. - Process the jars in a water bath for about 10 minutes. - Make sure to leave 1/4 inch of headspace in each jar. Check seals before storing. Proper canning lets you enjoy this chutney for months! This blog post walks you through making a tasty cranberry chutney. You learned the key ingredients, step-by-step instructions, and helpful tips. Remember, you can tweak flavors and even add fruits. This chutney pairs well with meats and sandwiches. Store it right to keep it fresh for a longer time. Enjoy your cooking and have fun making this easy recipe!
    Easy Cranberry Chutney Simple and Flavorful Recipe
  • - 2 medium sweet potatoes - 2 tablespoons olive oil - 1 teaspoon paprika - 1 teaspoon garlic powder - ½ teaspoon sea salt - ¼ teaspoon black pepper - Optional: 1 teaspoon cayenne pepper Sweet potatoes are the star of this recipe. They bring a sweet and nutty flavor. I love using medium-sized sweet potatoes for this dish. The olive oil adds richness and helps with crisping. Paprika and garlic powder give a nice kick to each bite. Sea salt and black pepper add balance to the flavors. If you like heat, try the cayenne pepper. It adds a spicy twist. These ingredients work together to create a tasty snack that’s easy to make. You can find all these items in your local grocery store. When you gather these ingredients, you set the stage for a crunchy, flavorful delight. It's all about quality here. Fresh sweet potatoes make a big difference in taste. So, pick the best ones you can find! First, wash the sweet potatoes under cold water. Use a vegetable brush to scrub off dirt. Next, peel the sweet potatoes with a vegetable peeler. Pat them dry with a kitchen towel to remove moisture. Now, it’s time to cut the sweet potatoes. Use a mandoline slicer or a sharp knife. Cut them into thin slices, about 1/8 inch thick. The thinner the slices, the crispier the chips will be! In a large bowl, combine the sweet potato slices with olive oil. Add paprika, garlic powder, sea salt, and black pepper. If you like spice, add cayenne pepper. Toss everything together well. Make sure each slice gets a good coat of the seasoning mix. Preheat your air fryer to 375°F (190°C). This should take about 3-5 minutes. While it preheats, let the sweet potatoes sit for a few minutes. After preheating, arrange the slices in a single layer in the air fryer basket. Avoid overcrowding; cook in batches if needed. Air fry the chips for 10-12 minutes. Shake the basket halfway through for even crispness. If you want them crispier, add an extra 2-3 minutes. Once cooked, remove the chips and cool them on a wire rack. They will crisp up more as they cool. Repeat the cooking for any remaining slices. Enjoy your crunchy sweet potato chips! Slice thickness plays a big role in how crispy your sweet potato chips get. Aim for slices that are about 1/8 inch thick. Thinner slices cook faster and crisp up nicely. If your slices are too thick, they may turn out chewy. Shaking the basket during cooking is key. Halfway through the cooking time, take the basket out and shake it gently. This helps to ensure that all the chips cook evenly. If you skip this step, some chips might burn while others stay soft. You can boost the taste of your chips with spices. Try adding a sprinkle of cayenne pepper if you like heat. Other spices to consider are cinnamon for sweetness or cumin for a savory touch. For serving, I love to pair my sweet potato chips with dips. A creamy guacamole or yogurt dip adds a nice contrast. You can also serve them with salsa for a fresh taste. A mandoline slicer is a fantastic tool for cutting sweet potatoes. It helps you achieve uniform slices quickly. This way, all the chips will cook at the same rate. Not all air fryers are the same. Some models work better for making chips. Look for air fryers with good reviews on crisping. Brands like Philips and Ninja are popular choices for making perfect chips. {{image_2}} You can have fun with sweet potato chips by changing the flavors. Sweet options include cinnamon and sugar. This gives a warm, cozy taste. For a savory twist, try adding rosemary or thyme. These herbs add a fresh touch. You can also mix spices like cumin or chili powder for extra kick. Each choice can change your snack game! If you want to mix it up, try other veggies as chips. Carrots, zucchini, and beets work well. Slice them thinly like sweet potatoes. Each veggie will have a different cook time. Carrots take about 10-15 minutes, while zucchini cooks faster, around 8-10 minutes. Keep an eye on them to avoid burning! Making chips that fit your diet is easy. Sweet potato chips are naturally gluten-free. Just check your seasonings to be sure. For a vegan option, use olive oil and skip any dairy dips. You can serve them with hummus or guacamole. This makes for a tasty, healthy snack that everyone can enjoy! Store your leftover sweet potato chips in an airtight container. Glass jars or plastic containers work well. Make sure they are completely cool before sealing. This helps keep them crunchy. Avoid using paper bags, as they trap moisture. If you want, you can layer the chips with parchment paper. This way, they stay separated and won’t break easily. For longer storage, keep the container in the refrigerator. This helps keep them fresh for a few days. To reheat your sweet potato chips, use the air fryer. Set it to 350°F (175°C) for about 5 minutes. This method helps regain their crunch. You can also use an oven. Simply place the chips on a baking sheet and heat them for 5-7 minutes. Avoid microwaving the chips. This makes them soft and chewy, not crispy. Always check them often while reheating. You want them to be warm but not burnt. These chips last for about 3-5 days in the fridge. Keep an eye on them for freshness. If you see any signs of mold or a weird smell, it’s time to toss them. Fresh chips should taste sweet and crunchy. If they taste stale or soft, they have gone bad. Yes, you can make sweet potato chips without oil. You can use an air fryer alone to get crispiness. Just slice the sweet potatoes thinly and season them. You can also try baking them in the oven at a high temperature. Keep an eye on them as they cook. The key is to ensure they are thin enough for crispness. Your sweet potato chips might not be crispy for a few reasons. Here are some common issues: - Slice Thickness: If your slices are too thick, they won’t crisp up. Aim for about 1/8 inch thick. - Overcrowding: If you pack too many slices in the air fryer, they will steam instead of crisp. Cook in batches for the best results. - Moisture: Make sure to pat the slices dry before cooking. Excess moisture leads to soggy chips. To fix these issues, slice evenly, avoid overcrowding, and dry your sweet potatoes well. To check if your sweet potato chips are done, look for a golden-brown color. They should be firm and crunchy. Here are some tips: - Time: Cook them for 10-12 minutes at 375°F (190°C). Shake the basket halfway through. - Touch: Use tongs to test a chip. If it feels firm and snaps easily, they are ready. - Cooling: Let them cool on a wire rack after cooking. They will get crunchier as they cool. Following these steps will help you achieve that perfect crunch! In this guide, we explored how to make tasty sweet potato chips. We covered selecting ingredients, preparing and seasoning the sweet potatoes, and using an air fryer for that perfect crunch. I shared tips to enhance flavor and ensure your chips stay crispy. Remember, you can try different spices or even swap in other veggies. Storing and reheating the chips correctly keeps them fresh, too. Enjoy your homemade snacks and experiment with flavors for fun results! Your kitchen can be a place of endless chip creativity!
    Air Fryer Sweet Potato Chips Crunchy and Flavorful Snack
  • - 1 lb chicken tenders - 1 cup buttermilk - 1 cup all-purpose flour - 1 cup panko breadcrumbs - 1 teaspoon garlic powder - 1 teaspoon onion powder - 1 teaspoon paprika - ½ teaspoon cayenne pepper (adjust for spice preference) - Salt and pepper to taste - 2 tablespoons olive oil When measuring ingredients, use dry measuring cups for flour and breadcrumbs. For liquids like buttermilk, use a liquid measuring cup. This helps get accurate amounts. For spices, use measuring spoons for precision. Always level off the measuring cup or spoon to avoid extra ingredients. Choose fresh chicken tenders that look pink and firm. Check the sell-by date for freshness. When buying spices, opt for whole spices when possible. They stay fresh longer. Store spices in a cool, dry place away from sunlight. Use fresh buttermilk for the best flavor and texture. Start by marinating the chicken tenders. Place the chicken in a bowl and cover it with buttermilk. This helps keep the chicken juicy and tender. Let it sit for at least 30 minutes, or up to 2 hours in the fridge. The longer you marinate, the better the flavor. Next, prepare the coating. In a shallow dish, mix together the flour, panko breadcrumbs, garlic powder, onion powder, paprika, cayenne pepper, salt, and pepper. This blend gives your tenders a tasty crunch. Make sure the mix is well combined for even flavor. Now it’s time to air fry. Preheat your air fryer to 400°F (200°C) for about 5 minutes. While it heats, take each chicken tender out of the buttermilk, letting the extra drip off. Dredge each piece in the flour mix, pressing it on well. This helps form a crispy layer. Once coated, lightly spray or drizzle olive oil over the chicken. Place the tenders in a single layer in the air fryer basket. You might need to cook in batches. Air fry for 10-12 minutes. Flip them halfway through for even cooking. Check that the chicken reaches 165°F (75°C) inside. If not, cook for a few more minutes. Enjoy your crispy chicken tenders! To get the best crunch, ensure you coat the chicken well. Use both flour and panko breadcrumbs. The panko gives a nice light texture. Don't skip the olive oil! A light spray or drizzle helps the coating crisp up. - Make sure your air fryer is preheated to 400°F (200°C) before cooking. - Space out the chicken tenders in the basket. This helps them cook evenly. Avoid these common errors to ensure perfect chicken tenders: - Marinating too briefly: Marinate for at least 30 minutes for the best flavor. - Overcrowding the air fryer: This leads to soggy chicken. Cook in batches if needed. - Skipping the oil: Without oil, the coating won’t crisp properly. Seasonings play a big role in flavor. Use garlic powder, onion powder, and paprika for a tasty kick. If you like heat, add cayenne pepper. You can also try different spices based on your taste. - Consider adding herbs like thyme or rosemary for a fresh touch. - Experiment with unique seasonings like lemon zest or smoked paprika for added flavor. These tips will help you master crispy chicken tenders and impress everyone at your dinner table! {{image_2}} To make spicy air fryer chicken tenders, add more cayenne pepper. You can use one to two teaspoons, based on your taste. You can also mix in some hot sauce to the buttermilk. This gives the chicken a nice kick. Serve these spicy tenders with ranch dressing. The cool ranch will balance the heat. You can easily make gluten-free chicken tenders. Swap the all-purpose flour for almond flour. Use gluten-free panko breadcrumbs instead of regular ones. Make sure to check the labels to avoid hidden gluten. The taste will still be great, and the texture remains crispy. This option is perfect for those with gluten sensitivities. Don't be afraid to get creative with coatings. Try crushed cornflakes or potato chips for a different crunch. You can also use crushed nuts like almonds or pecans. Mix in some herbs or spices to add flavor. For a lower-carb option, use coconut flour or crushed pork rinds. Each option gives a unique twist to your chicken tenders. After enjoying your crispy chicken tenders, store any leftovers in an airtight container. This keeps them fresh and tasty. Place the container in the fridge. They will last for up to three days. When you want to eat them again, take them out of the fridge. To reheat your chicken tenders, use the air fryer for the best results. Preheat the air fryer to 350°F (175°C). Place the tenders in a single layer. Heat them for about 5-7 minutes. This helps them regain their crispiness. You can also use an oven. Set it to 375°F (190°C) and bake for 10-12 minutes. If you have more chicken tenders than you can eat, freezing is a great option. Let the cooked tenders cool completely. Then, place them in a freezer-safe bag or container. Squeeze out as much air as possible. They can stay frozen for up to three months. When you are ready to eat, thaw them in the fridge overnight. Then, reheat them in the air fryer for the best taste. You can marinate chicken tenders for at least 30 minutes. For best results, I suggest marinating for up to 2 hours. This helps the chicken soak in the buttermilk, making it juicy and tender. Marinating too long may make the texture mushy. Yes, you can cook frozen chicken tenders in an air fryer. Just add a few extra minutes to the cooking time. Preheat the air fryer and cook at 400°F for about 12-15 minutes. Check the internal temperature; it should reach 165°F. This method gives you crispy tenders without thawing them first. There are many great dipping sauces for chicken tenders. Some popular choices include honey mustard, ranch, and barbecue sauce. You can also try spicy buffalo sauce or a creamy garlic dip. Each sauce adds its own flavor and fun to the meal. Experiment with different dips to find your favorite! You now know how to make tasty air fryer chicken tenders. You learned about the best ingredients, including measurement tips and freshness advice. I shared steps for marinating, coating, and cooking. The tips covered crispiness and how to avoid mistakes. There are fun variations like spicy and gluten-free options. I also explained how to store and reheat leftovers. With this knowledge, you can create great meals at home. Enjoy your cooking!
    Air Fryer Crispy Chicken Tenders Quick and Flavorful Dish
  • - Puff Pastry: Use one sheet of thawed puff pastry. It gives a flaky base. - Onions: Three large onions work best. You can use yellow or sweet onions. They caramelize well. - Olive Oil: You need two tablespoons for cooking the onions. It adds flavor and helps with browning. - Balsamic Vinegar: One teaspoon gives a nice tang. It enhances the sweetness of the onions. - Sugar: One teaspoon helps caramelize the onions better. It balances the flavors. - Thyme: Use one teaspoon of thyme leaves. Fresh is great, but dried works too. - Gruyère Cheese: One cup, shredded. It melts beautifully and adds a rich taste. - Ricotta Cheese: Half a cup. It adds creaminess to the tart. - Salt and Pepper: Add to taste for flavor. - Egg: One beaten egg for an egg wash. It makes the crust golden and shiny. Each ingredient plays a role in making this tart flavorful and satisfying. When you gather them, make sure they are fresh. Fresh ingredients make a big difference in taste. Enjoy the process of putting this dish together! - Thawing puff pastry: Start by taking your puff pastry out of the freezer. Let it sit at room temperature for about 30 minutes. This makes it easier to roll out. - Slicing onions efficiently: Use a sharp knife for slicing. Cut off the ends, then peel the skin. Slice the onions thinly for even cooking. - Preheating oven and preparing tools: Preheat your oven to 400°F (200°C). Gather your tart pan, a large skillet, and a mixing bowl. - Caramelization process: Heat the olive oil in the skillet over medium heat. Add the sliced onions and stir them gently. Add sugar, balsamic vinegar, thyme, salt, and pepper. - Importance of stirring: Stir the onions every few minutes. This helps them cook evenly and prevents burning. - Signs of perfect caramelized onions: You’ll know they are done when they are soft, golden brown, and sweet. This takes about 20-25 minutes. - Rolling out the pastry: Lightly flour your surface. Roll out the puff pastry until it fits your tart pan. Carefully transfer it into the pan. - Spreading the cheese mixture: In a bowl, mix the Gruyère and ricotta cheese together. Spread this mixture evenly over the pastry base. - Layering the onions properly: Once the onions are caramelized, layer them on top of the cheese mixture. Spread them evenly for balanced flavor. - Egg wash application: Brush the edges of the pastry with the beaten egg. This gives the tart a nice golden color. - Baking time and temperature: Place the tart in the oven and bake for 25-30 minutes. The pastry should puff up and turn golden. - Checking for doneness: Look for a golden crust and bubbly cheese. This shows that your tart is ready to enjoy. Caramelizing onions takes time and patience. Here are some tips to get it right: - Common mistakes to avoid: Don’t rush the process. Cooking on too high heat can burn the onions. Stir them often to get even cooking. - Using sugar and vinegar: Adding sugar helps the onions caramelize faster. A splash of balsamic vinegar adds depth. Use just a teaspoon for a sweet touch. - Alternative onion types: While yellow onions are best, you can try sweet onions. They add a nice flavor. Red onions also work, but they taste milder. Choosing the right cheese makes a big difference in flavor. - Benefits of using Gruyere: Gruyere melts well and has a nutty taste. It adds richness to your tart. The cheese pairs nicely with the sweetness of the onions. - Substitutes for ricotta: If you can't find ricotta, use cream cheese or goat cheese. These options still give a creamy texture. Pair your tart with the right sides to elevate the meal. - Best sides to accompany the tart: A simple green salad balances the richness. You can also serve it with roasted veggies for added color and flavor. - Suggestions for garnishing: Fresh thyme or a drizzle of balsamic reduction adds a nice touch. You can also sprinkle some grated cheese on top before serving. {{image_2}} You can make this tart fit your taste. For a vegetarian option, skip the meat. Try adding mushrooms or spinach for extra flavor. If you want protein, consider adding cooked chicken or crispy bacon. They both add a nice touch. You can also mix up the cheese. Try using sharp cheddar or creamy goat cheese instead of Gruyère. Each cheese brings its own twist to the tart. To boost the taste, play with herbs and spices. Basil, oregano, or rosemary can add depth. Fresh herbs work best, but dried ones are fine too. You can also add veggies like mushrooms or spinach. They not only taste great but also add color. Just sauté them briefly before adding to the tart. Think about how you serve your tart. A nice serving dish can impress guests. You might use a wooden board or a colorful plate. For a fancy touch, sprinkle fresh thyme on top. A drizzle of balsamic reduction adds sweetness and looks beautiful. Consider serving it warm or at room temperature. It tastes great either way and looks inviting. To keep your tart fresh for a few days, refrigerate it. After it cools, wrap it tightly in plastic wrap or foil. This helps prevent it from drying out. You can also use an airtight container. This keeps moisture in and flavors strong. If you want to save the tart for later, freezing is a great option. Wrap it well in plastic wrap. Then, place it in a freezer-safe bag. This helps to keep the taste and texture. You can freeze it for up to three months. To reheat the tart, first thaw it in the fridge overnight. Preheat your oven to 350°F (175°C). Place the tart on a baking sheet. Heat for about 15-20 minutes. This will warm it through and crisp the pastry. Enjoy the rich flavors again! If you need a puff pastry substitute, try these options: - Gluten-free options: Use a gluten-free pie crust mix. This works well for a similar texture. - Homemade pastry alternatives: You can make a simple dough with flour, butter, and cold water. Roll it thin for a crusty base. To control the sweetness of your onions, consider these methods: - Methods to control sweetness: Cook onions longer for a deep flavor, or add less sugar. - Other flavor profiles: Try adding salt or vinegar to balance sweetness with tang. This can give more depth to the tart. Yes, you can prep this tart ahead of time: - Prep-ahead instructions: Cook the onions and assemble the tart. Cover it and store in the fridge for up to one day. - Best reheating practices: Bake it at 350°F (175°C) for about 15 minutes to warm through. Look for these signs to check if your tart is ready: - Visual cues for readiness: The pastry should be golden brown and puffed. - Checking cheese melt and pastry color: Melted cheese should bubble, and the edges should be crisp and brown. You now have all the tools to make a delicious onion and cheese tart. This recipe covers the key ingredients, from puff pastry to the right cheese. The step-by-step instructions guide you through each process, ensuring success. Remember to caramelize the onions well and layer everything perfectly. With tips on variations and storage, you can customize this dish to your taste. Lastly, don’t hesitate to explore new flavors and try different ingredients. Make this recipe your own, and enjoy sharing it with friends and family!
    Caramelized Onion Gruyere Tart Savory and Simple Delight

WANT TO SAVE THIS RECIPE?

Leave a Reply Cancel reply

Your email address will not be published. Required fields are marked *

Recipe Rating


Hi I’m Savanna

Cooking is my love language, and I’m thrilled to share these dishes with you. May each bite bring comfort and joy let’s enjoy this flavorful journey together!

More about me

Recent Desserts

  • - 1 ½ cups graham cracker crumbs - ½ cup unsalted butter, melted - 2 cups cream cheese, softened - 1 cup granulated sugar - 1 teaspoon vanilla extract - 3 large eggs - 1 cup sour cream - 1 ½ cups fresh cranberries - ½ cup sugar for cranberry topping - 2 tablespoons water - Zest of 1 orange The ingredients for this easy cranberry cheesecake are simple but effective. Each one plays a role in creating a rich, creamy dessert. The graham cracker crumbs and melted butter form the crust. This crust adds a crunchy layer that balances the smooth filling. Next, cream cheese is the star of the show. It gives the cheesecake its creamy texture and tangy flavor. Granulated sugar sweetens the mix, while vanilla extract adds depth. Eggs help bind everything together, giving it structure as it bakes. Sour cream is key for a smooth texture. It also adds a bit of tang to cut the sweetness. Fresh cranberries bring a burst of flavor and color. The sugar and water create a sweet topping that complements the tartness of the berries. Finally, the orange zest adds a hint of brightness, making each bite more exciting. - 9-inch springform pan - Electric mixer - Medium and large mixing bowls - Small saucepan - Cooling rack To make this cheesecake, you need the right tools. A 9-inch springform pan is perfect because it allows easy removal. An electric mixer helps you whip the ingredients together quickly. You will need medium and large mixing bowls for different steps. A small saucepan is essential for making the cranberry topping. Lastly, a cooling rack helps the cheesecake cool evenly. Having these tools ready makes the process smooth and fun. {{ingredient_image_1}} - Preheat your oven to 325°F (160°C). - In a medium bowl, mix 1 ½ cups of graham cracker crumbs with ½ cup of melted butter. - Press this mixture into the bottom of your springform pan evenly. - In a large bowl, beat 2 cups of softened cream cheese with 1 cup of granulated sugar. - Add 3 large eggs one at a time, mixing well after each. - Blend in 1 cup of sour cream and the zest of 1 orange until smooth. - Pour the cheesecake batter over the cooled crust in the springform pan. - Bake for 50-60 minutes until the edges are set. The center should still jiggle slightly. - Once done, turn off the oven and crack the door. Let the cheesecake cool in the oven for 1 hour. - In a small saucepan, combine 1 ½ cups of fresh cranberries, ½ cup of sugar, and 2 tablespoons of water. - Cook over medium heat until the cranberries burst and the sauce thickens, about 8-10 minutes. - Remove from heat and let the topping cool before adding it to the cheesecake. - Once the cheesecake is cool, spread the cranberry topping on top evenly. - Refrigerate the cheesecake for at least 4 hours or overnight to let it set completely. - Avoid overmixing once the eggs are added. This keeps your cheesecake light and fluffy. - Ensure all ingredients are at room temperature. Cold ingredients can cause lumps. - Use a water bath for a creamier texture (optional). Wrap the pan in foil to prevent water from leaking in. Place it in a larger pan with water before baking. - Top with whipped cream and whole cranberries. This adds a festive touch and richness. - Garnish with fresh mint leaves. They add color and a refreshing flavor contrast. Pro Tips Chill the Cream Cheese: For a smoother batter, ensure the cream cheese is at room temperature. This helps prevent lumps and creates a velvety texture. Don't Overmix: Mix the batter until just combined, especially after adding the eggs. Overmixing can lead to cracks in the cheesecake. Use a Water Bath: For an even creamier cheesecake, consider baking in a water bath. This helps regulate the temperature and prevents the cheesecake from drying out. Cool Gradually: Let the cheesecake cool slowly in the oven after baking. This prevents sudden temperature changes that can cause cracks. {{image_2}} You can get creative with your cheesecake flavors. Adding different fruits can change the taste. Try adding raspberries or blueberries for a fresh twist. They will add sweetness and color. You can also use a chocolate or caramel drizzle. This will give your cheesecake an extra layer of richness. A drizzle can make each slice look more tempting. You don’t have to stick to the same ingredients. You can swap sour cream for Greek yogurt. This will add protein and a tangy flavor. If you want a gluten-free option, try using gluten-free graham crackers. They work just as well in the crust. These swaps keep your cheesecake tasty while fitting different diets. To keep your cranberry cheesecake fresh, store it in the fridge. Place it in an airtight container. This helps to keep the cheesecake moist and tasty. Aim to eat it within 4-5 days for the best flavor. You can freeze the cheesecake if you need to save it for later. Wrap it tightly in plastic wrap and then in foil. This helps prevent freezer burn. When you are ready to enjoy it, thaw it in the fridge overnight. To serve, slice it while still cold for neat portions. Let it sit at room temperature for about 30 minutes before serving for the best taste. Yes, you can make the cheesecake in advance. I like to prepare it a day before serving. It lets the flavors blend well. Once you finish baking and cooling, cover it with plastic wrap. Place it in the fridge overnight. This way, it sets perfectly and is ready when you are. The longer it chills, the better it tastes! You can tell when the cheesecake is done by looking at the edges. They should be set, while the center remains slightly jiggly. This jiggly part will firm up as it cools. Keep an eye on the time, too. Bake it for 50 to 60 minutes at 325°F (160°C). If it looks good, turn off the oven and let it cool with the door cracked. Absolutely! You can make the cranberry topping ahead of time. Cook the cranberries, sugar, and water as directed. Once it thickens, let it cool. Store it in the fridge for up to two days. When ready, just spread it over the cheesecake. It saves time and makes serving easier! This cheesecake recipe combines rich cream cheese and tart cranberries for a delightful treat. You prepare the crust, mix the batter, and bake it to perfection. Don’t forget to top it with the sweet cranberry sauce for a burst of flavor. With the tips offered, you can tweak recipes or make it ahead. Enjoy this cheesecake soon. It’s a wonderful addition to any gathering or a special moment.
    Easy Cranberry Cheesecake Simple and Delicious Dessert
  • - 2 cups fresh cranberries - 1 cup granulated sugar (plus additional for coating) - 1 cup water - 1 teaspoon vanilla extract - Pinch of salt - Optional: Zest of 1 orange for added flavor To make sugared cranberries, gather your ingredients first. Start with fresh cranberries. They should be bright and firm. This ensures they taste great. Next, get granulated sugar. You will need it for the syrup and coating. Water is also essential for creating your syrup. Adding vanilla extract makes the flavor richer. A pinch of salt helps balance the sweetness. If you want a fruity twist, use orange zest. It gives a nice citrus note. These ingredients come together to create a delightful treat. They shine as a snack or a decoration for your holiday dishes. {{ingredient_image_1}} 1. Rinse and dry cranberries. Start by rinsing the fresh cranberries under cold water. Look for any stems or blemished ones and remove them. Set the clean cranberries aside on a kitchen towel to dry. 2. Prepare the syrup mixture. In a medium saucepan, mix 1 cup of water, 1 cup of granulated sugar, and 1 teaspoon of vanilla extract. Add a pinch of salt. For a twist, add the zest of 1 orange to brighten the flavor. 3. Simmer cranberries in syrup. Bring the mixture to a gentle boil over medium heat. Stir it occasionally until the sugar fully dissolves. Then, add the cranberries to the boiling syrup. Reduce the heat to low and let them simmer for 5-7 minutes. You'll know they are ready when they start to pop and look glazed. 1. Transfer cranberries to a wire rack. Use a slotted spoon to move the cranberries from the syrup to a wire rack set over a baking sheet. This catches any drips. Let them cool for 15-20 minutes until the syrup becomes tacky. 2. Coat in granulated sugar. While the cranberries are still sticky, roll them in granulated sugar. Make sure each cranberry is well-coated. Shake off any extra sugar to avoid clumps. 3. Allow to dry completely. Place the sugared cranberries back on the wire rack. Let them dry for about 30 minutes. Once dried, you can enjoy them as a snack or use them to add sparkle to your holiday dishes! To get the best cranberries, look for firm, shiny berries. They should be bright red and free from blemishes. If you find any soft or shriveled ones, toss them out. You want the freshest cranberries for the best taste. Store cranberries in the fridge. They can last up to two weeks if kept dry and cool. Temperature is key when simmering the cranberries. Keep the heat low after boiling. This helps the cranberries pop and release their juices. You will know they are ready when they start to burst and have a glossy finish. For an even sugar coating, roll the cranberries while they are still sticky. This helps the sugar stick well. Shake off any extra sugar to avoid clumps. You can also try coating them with powdered sugar for a different look. For a crunch, consider using crushed nuts or coconut flakes. Pro Tips Freshness is Key: Use only fresh, firm cranberries for the best flavor and texture. Avoid any that are soft or have blemishes. Customize the Sweetness: Adjust the amount of sugar based on your taste preference. You can also experiment with different sugars, like coconut sugar, for a unique flavor. Perfect Coating: Make sure the cranberries are still a bit sticky when rolling in sugar to achieve an even and beautiful coating. Storage Tips: Store sugared cranberries in an airtight container at room temperature for up to a week, or refrigerate for longer freshness. {{image_2}} You can make sugared cranberries even more fun by adding flavors. One great option is citrus. Zest from an orange or lemon brightens the taste. Just mix it into the syrup as you cook. This small step adds a fresh twist. You can also try spices. Cinnamon or nutmeg works well. Add a pinch to the syrup mixture for warmth. You may discover a new favorite flavor that surprises your guests. If you want to skip regular sugar, there are alternatives. Honey or maple syrup can add a nice touch. They give a different flavor and sweetness. Use them in the same way as sugar in the recipe. Natural sweeteners like stevia or agave are also options. They are lower in calories and can be healthy. Adjust the amount you use, as they can be sweeter than sugar. Sugared cranberries shine on their own, but pairing them with other ingredients is fun! Try mixing them with nuts. Pecans or almonds add crunch and richness. This combo can be a great snack or topping. You can also add chocolate. Dark or white chocolate drizzles create a sweet treat. The mix of tart cranberries and rich chocolate is hard to resist. Lastly, consider adding herbs. Fresh mint or rosemary adds a savory note. This twist can be exciting for your taste buds. Try it out for a unique holiday snack! To keep your sugared cranberries fresh, use airtight containers. Glass jars or plastic containers work well. Make sure they are clean and dry before use. Store them in a cool, dry place, away from sunlight. Sugared cranberries last about 1 week in the pantry. If you keep them in the fridge, they may last up to 2 weeks. Always check for any signs of spoilage before eating. Freezing sugared cranberries is easy. Start by placing them in a single layer on a baking sheet. Make sure they do not touch each other. Freeze them for about 1 hour until firm. Once frozen, transfer the cranberries into a freezer bag. Remove as much air as possible before sealing. Write the date on the bag so you remember when you froze them. When you want to use them, take out the desired amount. Let them thaw in the fridge overnight or at room temperature for a few hours. Use them in your favorite recipes or enjoy them as a snack! Sugared cranberries can last up to two weeks when stored properly. Keep them in an airtight container at room temperature. If you want them to last longer, consider refrigerating them. Just remember, they may lose some crunchiness after a few days. Yes, you can use frozen cranberries. However, they may not pop or glaze as fresh ones do. If using frozen cranberries, thaw them first. Drain any excess water before adding them to the syrup. Sugared cranberries contain some health benefits. They are rich in vitamins and antioxidants. However, they do have added sugar, which increases calorie content. Enjoy them in moderation to balance health and taste. Sugared cranberries are great with many dishes! Serve them on a cheese platter, with desserts, or in salads. They add a sweet, tart flavor and a lovely pop of color. To make a sugared cranberry garnish, coat fresh cranberries in sugar. First, prepare them as in the recipe. Once they are dry, simply place them on top of desserts or around dishes for a festive touch. In this post, we explored how to make sugared cranberries. We discussed key ingredients, preparation steps, and tips for success. You learned how to coat and store these sweet treats. Remember to choose fresh cranberries for the best flavor. Don’t hesitate to try variations like using citrus zest or alternative sweeteners. With this knowledge, you can create a delicious and eye-catching snack. Enjoy sharing your tasty creation with family and friends!
    Sugared Cranberries Delightful Holiday Recipe Guide
  • - Ripe bananas: They are key for flavor and moisture. Ripe bananas give natural sweetness and a soft texture. - Options for ripeness: Look for bananas with brown spots. They are best for baking. Yellow bananas can work, but they won't be as sweet. - Melting coconut oil: It adds healthy fats. It works better than butter because it is plant-based. Coconut oil keeps the bread moist without extra dairy. - Honey vs. maple syrup: Honey is sweeter and adds a nice flavor. Maple syrup has a unique taste, but both are healthy. Honey has more nutrients, while maple syrup is lower in calories. - Whole wheat flour: This flour is more nutritious than white flour. It has more fiber, which helps digestion. Whole wheat flour adds a nutty taste to the bread. - Role of rolled oats: Oats add fiber and help with texture. They make the bread heartier and more filling. Oats also help lower cholesterol. First, preheat your oven to 350°F (175°C). This step is key. Preheating helps the bread bake evenly. If you skip this, your bread may cook unevenly. Next, prepare your loaf pan. You can lightly grease a 9x5 inch pan with coconut oil. Alternatively, you can line it with parchment paper. Lining the pan makes it easier to remove the bread later. Now, let’s mix the wet ingredients. Start by mashing the ripe bananas in a bowl. Add the melted coconut oil and stir well. This blending is important for a smooth texture. Then, add honey or maple syrup, eggs, and vanilla extract. Mix until everything is smooth. In another bowl, whisk the baking soda, salt, cinnamon, and whole wheat flour. This step ensures even distribution of the dry ingredients. Gradually add the dry mix to the wet mix. Stir gently until just combined. Be careful not to over-mix the batter. This keeps your banana bread light and fluffy. Pour the batter into your prepared loaf pan. Smooth the top with a spatula for an even bake. Bake in your preheated oven for 50-60 minutes. To check if it’s done, insert a toothpick into the center. If it comes out clean, your bread is ready. Once baked, let the bread cool in the pan for about 10 minutes. This helps it firm up. After that, transfer it to a wire rack to cool completely. Cooling helps maintain the perfect texture and flavor. Using overripe bananas is key for great banana bread. They bring natural sweetness and moisture. Look for bananas that are brown or have dark spots. The mushier, the better! To mash them, use a fork or a potato masher. This makes a smooth mix that blends well. Mixing is crucial for good banana bread. You can fold or stir the batter. Folding is gentle and keeps the air in. This helps your bread rise. Stirring works too but can make the bread dense. Aim for a thick batter. It should not be too runny. To make your banana bread special, add spices or extracts. Cinnamon adds warmth. Vanilla boosts sweetness. You can also add nuts or chocolate chips. Walnuts give a crunchy texture, while chocolate adds richness. Balance the flavors to match your taste. Mix in what you love! {{image_2}} Each slice of healthy banana bread has about 150 calories. It gives you energy without too many empty calories. This recipe uses whole wheat flour, which has more nutrients than regular flour. Whole wheat flour has more fiber, iron, and B vitamins. Fiber helps with digestion and keeps you feeling full. Bananas are a key ingredient. They are rich in potassium, which helps your heart and muscles. They also provide vitamin C, which boosts your immune system. Coconut oil is another star. It supports heart health and helps your metabolism. This oil gives the bread a nice texture, too. You can add dark chocolate chips for a tasty twist. They are packed with antioxidants that fight free radicals in your body. Walnuts and pecans are two great options for nuts. Walnuts have more omega-3 fatty acids, which are good for your brain. Pecan nuts are sweeter and add a nice crunch. Choose the one you like best! You can make banana bread gluten-free easily. The best options for flour are almond flour, coconut flour, or a gluten-free all-purpose mix. Each flour gives a different taste and texture. Coconut flour absorbs more liquid, so add an extra egg or more mashed bananas. Almond flour makes the bread moist and dense, which many love. For a vegan version, you need to replace the eggs. Flaxseed meal mixed with water works great. Use one tablespoon of flaxseed meal with three tablespoons of water for each egg. For dairy, try almond milk or oat milk. These options keep the flavor and texture just right. You can spice up your banana bread with nutmeg, ginger, or cardamom. Each spice adds a unique taste. If you want more texture, mix in dried fruits like raisins or cranberries. Seeds like chia or pumpkin also work well. For a nutty touch, add almond or peanut butter. Each mix-in gives your banana bread a new twist. To keep your banana bread fresh at room temperature, wrap it tightly in plastic wrap. This helps prevent air from drying it out. You can also store it in an airtight container. Place it in a cool, dry spot in your kitchen. Avoid direct sunlight and heat sources. If you want to save banana bread for later, freezing is a great option. Let the bread cool completely before wrapping it. Use plastic wrap or aluminum foil to wrap it tightly. Then, place it in a freezer-safe bag. When you’re ready to enjoy it, take it out and thaw it in the fridge overnight or at room temperature for a few hours. Banana bread can last about 3 to 5 days at room temperature. If you freeze it, it can last up to 3 months. Always check for signs of spoilage before eating. If you see mold or notice an off smell, it's best to discard it. Enjoy your banana bread while it's fresh! This article covered everything you need for healthy banana bread. We discussed selecting ripe bananas, using better fats like coconut oil, and choosing whole wheat flour. I shared tips for mixing and baking, plus health benefits of the ingredients. We explored variations, storage tips, and how to keep your bread fresh. Remember, healthy baking can still be fun and tasty. Enjoy your delicious banana bread, knowing it’s good for you.
    Healthy Banana Bread Tasty and Nutritious Recipe
  • To make delicious Japanese soufflé pancakes, you need these simple ingredients: - 2 large eggs (separated) - 2 tablespoons granulated sugar (divided) - 1/2 teaspoon vanilla extract - 3 tablespoons milk - 1/4 cup all-purpose flour - 1/2 teaspoon baking powder - A pinch of salt - Butter (for greasing) - Powdered sugar (for dusting) - Fresh fruit (for serving, optional) - Maple syrup (for serving, optional) These ingredients work together to create light, fluffy pancakes. The eggs play a key role. Separating them allows you to whip the whites into a meringue, giving the pancakes their airy structure. The sugar adds sweetness and helps with the meringue's stability. Vanilla extract brings a lovely flavor, while milk makes the batter creamy. Flour and baking powder contribute to the pancake's rise. A pinch of salt balances the sweetness. Greasing the pan with butter ensures the pancakes cook evenly. Finally, powdered sugar and fresh fruit make for a beautiful and tasty presentation. Don’t forget the maple syrup; it adds a rich sweetness that pairs perfectly! - Start by separating the egg whites from the yolks. - In a bowl, whisk the egg whites until soft peaks form. - Gradually add 1 tablespoon of sugar while whisking. - Whisk until the meringue is stiff and shiny. Set this aside. - In another bowl, whisk the egg yolks with the other tablespoon of sugar. - Add vanilla extract and milk, mixing until smooth. - Sift in the flour, baking powder, and salt. Stir gently to combine. - Take a spatula and fold one-third of the meringue into the yolk mixture. - Be gentle to keep the batter light and airy. - Carefully fold in the rest of the meringue until no white streaks show. - Ensure the batter stays fluffy. - Heat a non-stick skillet over low heat and add a little butter to grease it. - Use a ring mold to pour 1/4 of the batter into the mold. - Cover the skillet with a lid and cook for about 4-5 minutes. - Check for a golden brown bottom before flipping. - Carefully remove the ring mold and flip the pancake. - Cover again and cook for another 4-5 minutes. - Repeat with the remaining batter, greasing the skillet as needed. Using room temperature eggs is key. They mix better with other ingredients. Cold eggs can make the batter dense. To fold in the egg whites, use a spatula. Be gentle and don’t stir too hard. You want to keep that air in the batter. This helps the pancakes rise high and stay fluffy. Keep your skillet on low heat. Too high of a temperature burns the pancakes. A non-stick skillet works best for easy flipping. Use a ring mold to shape the pancakes. This ensures they cook evenly and hold their shape. When dusting with powdered sugar, use a fine sieve. This gives a light, even coating. For a beautiful stack, layer the pancakes gently. Add fresh fruit between the layers for color. Drizzle maple syrup on top for a sweet finish. {{image_2}} You can change the taste of your Japanese soufflé pancakes easily. Here are two fun options: - Matcha soufflé pancakes: Add 1-2 teaspoons of matcha powder to the batter. This gives your pancakes a lovely green color and a rich, earthy flavor. - Chocolate soufflé pancakes: Mix in 2 tablespoons of cocoa powder. This will make your pancakes sweet and chocolatey, perfect for dessert lovers. If you have special dietary needs, you can still enjoy these pancakes. - Gluten-free options: Use gluten-free flour instead of all-purpose flour. The pancakes will still be soft and delicious. - Vegan alternatives: Replace eggs with aquafaba, the liquid from canned chickpeas. Use plant-based milk for a tasty vegan version. You can also make your pancakes fit the seasons. - Pumpkin spice for fall: Add 1 teaspoon of pumpkin spice to the batter. This adds a warm, cozy flavor, perfect for autumn. - Fresh berries for summer: Top your pancakes with fresh berries like strawberries or blueberries. They add color and a burst of flavor to your dish. Store your cooked pancakes in the fridge. Place them in an airtight container. This keeps them fresh for about two days. When you want to enjoy them again, reheat carefully. Heat them in a non-stick skillet over low heat. This keeps them fluffy. You can also use the microwave. Place a damp paper towel over the pancakes. Heat in short bursts until warm. For leftover ingredients, store them properly. Keep egg whites and yolks in separate containers. Seal them tight to avoid drying. For milk, use a sealed bottle or jar. Store flour in a cool, dry place. It stays fresh longer. Check your baking powder's expiration date. Replace it if it’s old to ensure your pancakes rise well. To freeze pancakes, let them cool completely. Stack them with parchment paper between each pancake. Place the stack in a freezer bag. Squeeze out as much air as possible before sealing. They can stay frozen for up to a month. When you’re ready to eat, thaw overnight in the fridge. Reheat in the skillet or microwave. Enjoy your fluffy pancakes anytime! Japanese soufflé pancakes stand out because they are light and fluffy. Unlike traditional pancakes, which are flat and dense, these pancakes rise high and have a soft texture. The secret lies in separating the eggs. You whip the egg whites into a meringue. This adds air and creates that unique fluffiness. Traditional pancakes use a batter that does not require this step, making them denser. Yes, you can prep some parts ahead. You can separate the eggs and store the yolks and whites in the fridge. You can also sift the dry ingredients and mix them in a bowl. This way, you save time when you are ready to cook. However, I recommend making the pancakes fresh for the best fluffiness. Toppings can really enhance your pancakes. Here are some great ideas: - Fresh fruit like berries or bananas - Maple syrup for sweetness - Whipped cream for a rich touch - A dusting of powdered sugar for a lovely look You can mix and match these for a fun treat! You now have the full guide to making fluffy Japanese soufflé pancakes. From the ingredients to the cooking tips, you can create a delicious treat. Remember to use fresh ingredients for the best flavor and texture. Don't forget to experiment with various toppings and flavors to make these pancakes your own. Each bite should be a delight. Enjoy this fun cooking adventure, and impress everyone with your tasty creation!
    Japanese Soufflé Pancakes Fluffy and Delicious Treat

Recent Drinks

  • To make whipped hot chocolate, you will need: - 2 cups whole milk - 1/2 cup heavy cream - 1/4 cup unsweetened cocoa powder - 1/2 cup semi-sweet chocolate chips - 1/4 cup granulated sugar - 1 teaspoon vanilla extract - A pinch of salt - Whipped cream (for topping) - Chocolate shavings or cocoa powder (for garnish) When I choose ingredients, I focus on quality. Here are my tips: - Milk: Use whole milk for a rich taste. Look for milk that is fresh. - Cream: Heavy cream creates a thick and fluffy topping. Check the fat content. - Cocoa Powder: Unsweetened cocoa gives depth. Opt for Dutch-processed for smoother flavor. - Chocolate Chips: Semi-sweet chips add sweetness and richness. Choose high-quality brands. - Sugar: Granulated sugar is best. You can use raw sugar for a unique flavor. - Vanilla Extract: Pure vanilla has great taste. Avoid artificial flavoring when possible. Not everyone can use the same ingredients. Here are some swaps: - Milk Alternatives: Almond milk or oat milk can replace whole milk for a dairy-free option. - Cream Alternatives: Coconut cream gives a rich texture without dairy. - Sugar Alternatives: Try maple syrup or honey instead of granulated sugar. - Cocoa Powder: Carob powder can replace cocoa for a caffeine-free option. - Chocolate Chips: Use dark chocolate or dairy-free chips for a vegan version. To make whipped hot chocolate, start with the milk. Pour 2 cups of whole milk into a small saucepan. Heat it over medium heat until it steams. Make sure the milk does not boil. This step helps keep the chocolate smooth. Next, remove the saucepan from the heat. Add in the following ingredients: - 1/4 cup unsweetened cocoa powder - 1/2 cup semi-sweet chocolate chips - 1/4 cup granulated sugar - 1 teaspoon vanilla extract - A pinch of salt Whisk all these ingredients well. Keep whisking until everything blends into a smooth mix. This part is key for rich flavor. Now, take a separate bowl. Pour in 1/2 cup of heavy cream. Use a hand mixer to whip it. Keep going until soft peaks form. Once the cream is ready, fold half of it into the hot chocolate mixture. This gives the drink a lighter feel. Pour your whipped hot chocolate into mugs. Leave some space at the top. Top each mug with a generous dollop of the remaining whipped cream. Finally, add some fun touches. Sprinkle chocolate shavings or a dusting of cocoa powder on top. This makes each cup look special and tasty. Whisking is all about speed and technique. Use a whisk or a hand mixer for best results. Make sure to whisk in the cocoa and chocolate chips well. This ensures no clumps remain. When folding in the whipped cream, be gentle. Use a spatula and move from the bottom to the top. This keeps the air in the cream and keeps it fluffy. Seeing is believing! Check out videos online that show how to make whipped hot chocolate. Visual guides help you understand each step better. You can find many demos on popular cooking websites or platforms like YouTube. Watching someone else makes it easier to follow along. Enjoy making this delightful treat! To make great whipped cream, start with cold heavy cream. Use a chilled bowl for best results. Whip the cream with a hand mixer on medium speed. Stop when you see soft peaks form. This means the cream holds its shape but is not too stiff. For extra flavor, add a bit of vanilla extract while whipping. One mistake is using warm cream. Warm cream won’t whip up well. Another mistake is over-whipping. If you whip too long, the cream turns into butter. Watch it closely. Lastly, don't skip the sugar. It helps balance the cream's taste and adds a nice sweetness to your whipped hot chocolate. You can make your whipped hot chocolate even more fun! Try adding flavored syrups, like peppermint or caramel. A sprinkle of cinnamon or nutmeg can give it a warm spice. You can also mix in a bit of instant coffee for a mocha twist. Get creative and find your favorite flavor combo! {{image_2}} You can add fun flavors to your whipped hot chocolate. Here are some ideas: - Peppermint: Add a few drops of peppermint extract. Top with crushed candy canes. - Caramel: Stir in caramel sauce before serving. Drizzle more on top for a treat. - Hazelnut: Use hazelnut spread in the mix for a nutty twist. - Spicy: Add a dash of cayenne pepper for a kick. These flavors make your drink unique and exciting. If you want a dairy-free whipped hot chocolate, try these swaps: - Milk: Use almond milk, coconut milk, or oat milk instead of whole milk. - Cream: Substitute heavy cream with coconut cream or a dairy-free version. - Chocolate: Choose dairy-free chocolate chips for a rich taste. These options help everyone enjoy this treat. Change your whipped hot chocolate with seasonal flavors. Here are some fun ideas: - Pumpkin Spice: Add pumpkin puree and pumpkin spice for fall. - Eggnog: Use eggnog instead of milk for a holiday vibe. - S'mores: Mix in marshmallow fluff and graham cracker crumbs for summer fun. These twists keep your whipped hot chocolate fresh and exciting all year long. To store leftover whipped hot chocolate, transfer it to an airtight container. Cover tightly to keep it fresh. Avoid mixing the whipped cream with the drink. This keeps the cream fluffy. Store it in the fridge for up to three days. When you want to enjoy your whipped hot chocolate, heat it gently in a saucepan. Use low heat to avoid burning. Stir frequently to mix well. If the whipped cream has deflated, you can whip up more. Add this fresh cream on top for a great finish. The ingredients in your whipped hot chocolate have different shelf lives. Whole milk lasts about five to seven days after opening. Heavy cream stays fresh for about a week. Cocoa powder can last for years if stored in a cool, dry place. Keep chocolate chips for about a year if sealed well. Whipped hot chocolate is a rich drink that combines hot cocoa and whipped cream. I love how the creamy texture makes it feel special. You start with a warm chocolate base. Then, you fold in whipped cream for extra fluff. This creates a delightful drink that feels like dessert in a cup. You can top it with more whipped cream and chocolate shavings. It’s a cozy treat perfect for chilly days. Yes, you can prepare the hot chocolate base ahead of time. Just follow the recipe steps to make your hot chocolate. Once it cools, store it in the fridge. When you're ready to enjoy, reheat it gently on the stove. Whip fresh cream to top it right before serving. This keeps the fluffiness and taste fresh. It’s a great way to save time on busy days. You can easily customize your whipped hot chocolate with a few fun twists. Here are some ideas: - Flavorings: Add peppermint extract for a minty taste. - Spices: A dash of cinnamon or nutmeg adds warmth. - Milk alternatives: Use almond or oat milk for a different flavor. - Chocolate: Try dark chocolate chips for a richer taste. - Toppings: Experiment with sprinkles, caramel drizzle, or flavored whipped cream. Mix and match these ideas to create your own version of whipped hot chocolate! We covered the essential ingredients, tips for choosing quality items, and swaps for diets. I shared step-by-step instructions, helpful whisking tips, and visuals to guide you. We explored tricks to make perfect whipped cream and avoid common mistakes. I also provided tasty flavor options and fun variations for every season. Lastly, I included storage tips to keep leftovers fresh. Enjoy your whipped hot chocolate adventure! Customize it to fit your taste and have fun experimenting.
    Whipped Hot Chocolate Delightful and Creamy Treat
  • - 1 cup brewed espresso or strong coffee - 1 cup milk (dairy or non-dairy) - 2 tablespoons pure maple syrup - 1/2 teaspoon ground cinnamon - 1/4 teaspoon vanilla extract - Whipped cream - Extra ground cinnamon for garnish - Extra maple syrup for drizzle You can use any milk you like. I enjoy whole milk for rich taste. Almond milk adds a nice nutty flavor. Oat milk makes it creamy and smooth. If you prefer non-dairy, soy milk is a great choice too. Each milk brings a unique twist to your latte. Try different types to find your favorite! Start by brewing one cup of strong coffee or espresso. Use your favorite method, like a French press or coffee maker. If you want it to be extra rich, espresso is the best choice. The coffee should be hot and ready for the next steps. This drink shines with a bold flavor that pairs well with maple and cinnamon. Next, pour one cup of milk into a small saucepan. Heat it on medium-low until it is warm, but do not let it boil. Boiling milk can ruin the texture. Once warm, use a whisk or a milk frother to froth the milk. Aim for a creamy texture with some bubbles. This frothy milk will add a lovely touch to your latte. In a separate bowl, mix the brewed coffee, two tablespoons of pure maple syrup, half a teaspoon of ground cinnamon, and a quarter teaspoon of vanilla extract. Stir this mixture well to combine all the flavors. Slowly pour the frothed milk into the coffee mixture. Use a spoon to hold back the foam at first. After pouring, spoon the foam on top of the latte. For a beautiful finish, drizzle some extra maple syrup over the foam and sprinkle a pinch of ground cinnamon. Enjoy this warm drink right away! To get the best froth, start with cold milk. You can use dairy or non-dairy milk. Whole milk gives the best foam, but almond or oat milk works too. Heat your milk gently until warm, but don’t let it boil. Use a whisk or a milk frother. Whisk quickly to add air and create a light foam. The foam should be creamy and have small bubbles. This froth adds a nice touch to your latte. Taste is personal, so adjust the sweetness and spice to your liking. Start with 2 tablespoons of maple syrup. If you want it sweeter, add more syrup a little at a time. For spice, 1/2 teaspoon of ground cinnamon is perfect. If you want more flavor, add a pinch more. You can even try nutmeg for a different taste. Always mix well after each addition to get the right balance. Presentation makes your drink special. Use clear glass mugs to show off the layers. After pouring the latte, add whipped cream on top for a treat. Drizzle extra maple syrup over the cream. This looks nice and adds flavor. Sprinkle a little ground cinnamon or cocoa on top for color. Serve your latte with a small spoon for stirring. Enjoy your cozy drink with a warm blanket and a good book! {{image_2}} You can easily make this latte dairy-free. Use plant-based milk like almond, oat, or coconut. Each milk adds a unique taste. Almond milk offers a nutty flavor, while oat milk is creamy. Coconut milk gives a tropical twist. Choose what you love most! Want to mix it up? Try adding new flavors! For a pumpkin spice latte, mix in 1 tablespoon of pumpkin puree and a pinch of nutmeg. For a mocha twist, add 1 tablespoon of cocoa powder to your espresso blend. It gives a rich, chocolatey taste. You can also try flavors like caramel or hazelnut for a fun twist. Feeling warm? Make a cold version! Brew your coffee, then chill it in the fridge. For the milk, use cold milk and froth it if you can. Combine the chilled coffee with milk and maple syrup. Serve it over ice for a refreshing treat. Drizzle with maple syrup and sprinkle cinnamon on top. It’s perfect for hot days! If you have any leftover milk, keep it in the fridge. Use an airtight container to keep it fresh. For opened maple syrup, store it in a cool, dark place. If you want it to last longer, keep it in the fridge. Ground cinnamon can stay in your pantry. Just make sure it is in a sealed jar. To reheat your Maple Cinnamon Latte, pour it into a small saucepan. Heat it gently over low heat. Stir often to keep it from burning. You can also use a microwave. Heat it for 30 seconds, then stir. Repeat until it's warm, but do not let it boil. To keep your coffee fresh, store it in a dark, cool place. Use an airtight container to keep air out. Buy whole beans instead of ground coffee. Grind them just before brewing for the best taste. Use your coffee within two weeks for the best flavor. I recommend using brewed espresso or strong coffee for the best flavor. Espresso gives a rich base. If you prefer drip coffee, just brew it stronger than usual. The key is to balance the coffee with the sweet maple syrup and warm milk. This balance gives the drink its cozy taste. Yes, you can prepare parts of the latte ahead. Brew the coffee and store it in the fridge. You can also froth the milk before serving. Just warm it up again when you’re ready. However, I suggest making it fresh for the best taste. The flavors are at their peak when served right away. Maple syrup offers natural sweetness without refined sugar. It has antioxidants that help your body. These compounds can fight inflammation and support your immune system. Plus, maple syrup contains minerals like manganese and zinc. This makes it a better choice than regular sugar. Enjoying it in your latte adds a tasty touch with health perks. We explored how to create a Maple Cinnamon Latte from start to finish. First, we covered essential ingredients, optional toppings, and the best milk choices. Next, we detailed each step: brewing coffee, frothing milk, and combining flavors. I shared tips for perfect froth, sweetness adjustments, and serving ideas. You can even try fun variations or store leftovers for later. In the end, making this latte is easy and rewarding. Enjoy the warm flavors and make it your own!
    Maple Cinnamon Latte Cozy and Warm Beverage Delight
  • To make pumpkin spice hot chocolate, gather these simple ingredients. They create a warm, cozy drink you’ll love. - 2 cups milk (or non-dairy alternative) - 2 tablespoons cocoa powder - 2 tablespoons pumpkin puree - 2 tablespoons sugar (adjust to taste) - 1/2 teaspoon pumpkin spice mix (or a mix of cinnamon, nutmeg, and ginger) - 1/4 teaspoon vanilla extract - Whipped cream for topping - Additional pumpkin spice and chocolate shavings for garnish Milk is key for a creamy texture. You can use dairy milk or try almond, oat, or soy milk for a non-dairy choice. The cocoa powder adds rich chocolate flavor. Sugar balances the taste, so adjust it to your liking. Pumpkin puree brings a smooth texture and pumpkin flavor. The pumpkin spice mix gives that warm, fall taste. If you don’t have pumpkin spice, mix cinnamon, nutmeg, and ginger for a similar effect. Finally, whipped cream makes the drink feel special. Top it with a sprinkle of more pumpkin spice and chocolate shavings for a lovely finish. Enjoy making your pumpkin spice hot chocolate! 1. Start by heating 2 cups of milk in a medium saucepan. Keep the heat on medium-low. You want it warm but not boiling. 2. Whisk in 2 tablespoons of cocoa powder, 2 tablespoons of pumpkin puree, and 2 tablespoons of sugar. Mix until it's smooth. 3. Stir the mixture gently as it heats. Wait until it steams and is hot enough to serve. 4. Add 1/2 teaspoon of pumpkin spice mix and 1/4 teaspoon of vanilla extract. Whisk again until it all blends well. 5. Once ready, remove the saucepan from the heat. Pour the hot chocolate into your favorite mugs. 6. Top each mug with whipped cream. For fun, sprinkle extra pumpkin spice and chocolate shavings on top. Tips for Achieving the Perfect Blend: - Whisk well to avoid any lumps. - Make sure the milk does not boil to keep it creamy. - Taste and adjust the sugar as you like. Serving the hot chocolate in mugs makes it warm and cozy. Enjoy your delicious drink on a chilly day! How to adjust sweetness to taste Start by adding sugar slowly. This way, you can check the taste as you go. I usually use two tablespoons, but you can add more or less. If you want it sweeter, try using a sugar alternative, like honey or maple syrup. Just remember, each sweetener has its own flavor. Recommendations for the best cocoa powder For rich flavor, use high-quality cocoa powder. I recommend brands like Dutch-processed cocoa. It gives a deeper taste and pairs well with pumpkin. Always sift your cocoa powder to avoid lumps. This makes your drink smooth and creamy. Tips for the creamiest texture To get the creamiest hot chocolate, use whole milk or a full-fat non-dairy option. Almond milk or oat milk also works well. Heat your milk slowly and whisk often. This adds air and helps create a nice foam. If you want an even richer drink, add a splash of cream or use half-and-half. {{image_2}} You can easily make this drink dairy-free. Use almond, soy, or oat milk instead of regular milk. Each choice gives a unique taste. For a creamier texture, try coconut milk. It adds a rich flavor that pairs well with pumpkin. When it comes to whipped cream, look for vegan brands made from coconut or almond. You can also make your own by blending coconut cream with a bit of sugar and vanilla. This gives you a light and fluffy topping without dairy. Want to spice it up? Add a dash of peppermint extract. It adds a fresh twist that brightens the drink. You can also mix in other spices like cardamom or allspice for a different flavor profile. For chocolate lovers, try using dark chocolate instead of cocoa powder. It brings a deeper taste that complements pumpkin well. If you’re feeling adventurous, white chocolate can add a sweet creaminess. Simply melt it into your hot chocolate as you mix. Each option lets you create a new cozy drink! To keep your leftover pumpkin spice hot chocolate fresh, follow these tips: - Cool it down: Let the hot chocolate reach room temperature before storing. - Use an airtight container: This prevents any odd smells from other foods in your fridge. - Refrigerate: Store it in the fridge for up to three days. When you are ready to enjoy your pumpkin spice hot chocolate again, reheating is simple: - Stovetop method: Pour your cold hot chocolate into a saucepan. Heat over low heat. Stir often to avoid sticking. - Microwave method: Use a microwave-safe mug. Heat in short bursts, about 30 seconds. Stir in between to ensure even heating. For the best taste, do not overheat your hot chocolate. It should be warm and comforting, not boiling. You can also add a little more pumpkin spice or sugar for extra flavor during reheating. Enjoy your cozy treat again! Can I use no sugar alternatives? Yes, you can use no sugar alternatives like stevia or monk fruit. These sweeteners add flavor without the calories. Adjust the amount to fit your taste. How can I make this drink spicy? To add spice, try more pumpkin spice mix or a dash of cayenne. A little heat can balance the sweet taste. You can also add a pinch of chili powder for a fun twist. Where can I find or buy pre-made Pumpkin Spice Hot Chocolate? You can find pre-made mixes at most grocery stores. Look for brands like Starbucks or Land O’Lakes. Online retailers also offer many options, making it easy to enjoy without making it yourself. What are the health benefits of the ingredients used? The main ingredients each offer benefits: - Pumpkin puree is high in vitamins A and C. - Cocoa powder is rich in antioxidants. - Milk provides calcium and protein, supporting bone health. This drink can be a tasty treat that also nourishes your body. To make the perfect Pumpkin Spice Hot Chocolate, start with quality ingredients. Choose your milk, cocoa, and spices wisely. Follow the steps to blend flavors well, ensuring a rich taste. Don’t shy away from personalizing your drink with toppings or variations. Store any leftovers properly, and reheating is easy. Explore FAQs for extra tips to enhance your drink. Enjoy making this cozy treat anytime you crave warmth and flavor. Happy sipping!
    Pumpkin Spice Hot Chocolate Delightful Cozy Treat
  • To make a tasty pumpkin spice protein smoothie, you need a few key ingredients: - 1 cup unsweetened almond milk - 1/2 cup canned pumpkin puree - 1 ripe banana - 1 scoop vanilla protein powder - 1 teaspoon pumpkin pie spice - 1/2 teaspoon vanilla extract - 1/4 cup Greek yogurt These main ingredients create a creamy texture and a rich flavor. The almond milk provides a smooth base. Canned pumpkin adds nutrition and a lovely orange color. The ripe banana sweetens the mix naturally. You can add a few optional items to make your smoothie special: - 1 tablespoon maple syrup (for extra sweetness) - Ice cubes (for a cold, refreshing drink) If you like sweeter smoothies, the maple syrup is a great choice. Ice cubes will chill the drink and give it a frosty feel. Let’s break down the health perks of these ingredients: - Almond milk: Low in calories and a good source of vitamin E. - Pumpkin puree: High in fiber and packed with vitamins A and C. - Banana: Great for potassium and natural sweetness. - Vanilla protein powder: Helps build and repair muscles. - Pumpkin pie spice: Adds flavor and may boost your metabolism. - Greek yogurt: Full of protein and good for gut health. Each ingredient plays a role in making this smoothie not just tasty but also nutritious. Enjoy the rich flavors and health benefits all in one glass! To make the pumpkin spice protein smoothie, start by gathering your ingredients. You need: - 1 cup unsweetened almond milk - 1/2 cup canned pumpkin puree - 1 ripe banana - 1 scoop vanilla protein powder - 1 teaspoon pumpkin pie spice - 1 tablespoon maple syrup (optional) - 1/2 teaspoon vanilla extract - 1/4 cup Greek yogurt - Ice cubes (optional) Now, take a blender and add the almond milk first. This helps the other ingredients blend smoothly. Next, add the canned pumpkin puree and ripe banana. Then, spoon in the Greek yogurt. This gives your smoothie a nice creamy texture. Next, sprinkle in the vanilla protein powder and pumpkin pie spice. If you like it sweeter, pour in the maple syrup and add the vanilla extract. Blend on high speed until everything is smooth and creamy. If you want it cold, toss in some ice cubes and blend again. To get the right consistency, consider the following tips: - Start with less almond milk. You can always add more if needed. - If your smoothie is too thick, add a splash more milk. - For a thicker smoothie, use more Greek yogurt or less milk. You can customize your smoothie based on what you like. If you want more spice, add a little extra pumpkin pie spice. If you prefer more sweetness, add more maple syrup. Just taste the smoothie as you blend. Adjust until it’s just right for you! To make a great smoothie, start with your liquid base. Use almond milk, as it adds creaminess. Next, layer in your pumpkin puree and banana. They create a rich, smooth texture. Add your Greek yogurt for protein and thickness. Blend on high speed. This helps mix all ingredients well. If you want it chilled, toss in ice cubes before blending. Blend until everything is smooth and creamy. You can boost your smoothie’s nutrition easily. Add a handful of spinach for extra vitamins. Chia seeds are another great choice. They add fiber and omega-3s. Try replacing some almond milk with Greek yogurt. This will up your protein content. If you need more sweetness, use honey instead of maple syrup. Just a small amount can make a big difference. Watch out for using too much liquid. This can make your smoothie too thin. Also, skip the overripe fruits. They can alter the taste. Don’t forget to measure your spices. Too much pumpkin pie spice can overpower the other flavors. Lastly, avoid blending too long. This can heat your smoothie and change its texture. Keep it simple, and enjoy your tasty treat! {{image_2}} You can easily make this smoothie vegan. Swap the Greek yogurt for a plant-based yogurt. Use a vegan protein powder too. Almond milk is already dairy-free, so you’re all set there. If you want, try coconut yogurt. It adds a nice creaminess and flavor. Want to spice it up? Add a pinch of nutmeg or cinnamon for more warmth. A scoop of almond butter can add a nutty taste. You can also toss in some spinach. It’s a great way to sneak in greens without changing the flavor much. If you don’t have protein powder, no worries! You can replace it with chia seeds or hemp seeds. These options boost protein and add healthy fats. Silken tofu is another great choice. It makes the smoothie creamy and packs a protein punch. If you have leftover smoothie, store it in an airtight container. Glass jars work well. Seal it tight to keep air out. This helps the smoothie stay fresh. You can keep it in the fridge for up to 24 hours. Shake it well before drinking. The ingredients may separate a bit. Freezing smoothie ingredients is smart and easy. Prepare your ingredients in advance. Use small containers or freezer bags. Measure out the almond milk, pumpkin puree, banana, and yogurt. You can freeze them in portions. When you want a smoothie, just blend the frozen mix with fresh almond milk. This makes for a quick and tasty treat. If you have a smoothie you don't want to drink, don't waste it. Use it in different ways. Pour it over oatmeal for a tasty breakfast. You can add it to pancakes for extra flavor. You can even freeze it into popsicles for a fun snack. There are many ways to enjoy your smoothie! Yes, you can use fresh pumpkin. Start by cooking the pumpkin until soft. Then, scoop it out and mash it. Use about half a cup of fresh pumpkin in your smoothie. It adds a nice, fresh flavor. However, canned pumpkin is easier and quicker. To make this smoothie dairy-free, you can skip the Greek yogurt. Use more almond milk instead. You can also add a dairy-free yogurt. Look for one made from almond or coconut. Both options keep it creamy and tasty. You can add many flavors to your smoothie! Try a pinch of nutmeg for warmth. Add a handful of spinach for extra nutrients. You can also mix in some peanut butter for protein. Each ingredient can change the taste and make it even better! You now know how to make a delicious pumpkin spice protein smoothie. We discussed key ingredients and their benefits. I shared step-by-step blending tips for the right mix. Remember to customize flavors and avoid common mistakes. You can also explore variations with vegan options and freezer methods for storage. This smoothie can boost your nutrition and taste great. Enjoy making it your own!
    Pumpkin Spice Protein Smoothie Tasty and Healthy Treat

Footer

↑ back to top

More information

  • Dinner
  • Drinks
  • Appetizers
  • Dessert
  • About
  • Contact Us

    Our Policies

    • Privacy Policy
    • Cookie Policy
    • Copyright Policy
    • Disclaimer
    • GDPR Policy
    • Terms Of Us

    Copyright © 2024 My Saved Recipe