Go Back
To make the easiest chocolate lava cake, you need just a few key items: - 1/2 cup (1 stick) unsalted butter - 1 cup high-quality dark chocolate (70% cocoa or higher), chopped - 1 cup powdered sugar - 2 large eggs - 2 egg yolks - 1 teaspoon pure vanilla extract - 1/2 cup all-purpose flour - A pinch of salt - Non-stick cooking spray or butter for greasing ramekins These ingredients work together to create that rich, gooey center we all love. Choosing the right chocolate is key. Look for chocolate that has at least 70% cocoa. Higher cocoa content means a deeper flavor. I recommend using chocolate bars over chips. Bars melt smoother, giving you a better texture. Always read the label. Avoid chocolate with added fillers or wax. If you're in a pinch, you can swap some items. For butter, you can use coconut oil or margarine. If you have no dark chocolate, semi-sweet chocolate works too, but it will be sweeter. For a gluten-free option, substitute all-purpose flour with almond flour. Remember, these changes may alter the taste and texture slightly. For the full recipe, check out the comprehensive guide. Start by preheating your oven to 425°F (220°C). This high heat helps create that gooey center. Next, grab four ramekins. Grease them with non-stick cooking spray or butter. Dust them with cocoa powder to keep the cake from sticking. In a medium microwave-safe bowl, combine the chopped dark chocolate and the butter. Microwave this mix in 30-second bursts. Stir after each interval until it melts smoothly. This step is key. The chocolate should be glossy and lump-free. Once your chocolate and butter are melted, add the powdered sugar. Stir it in well until mixed. Next, crack in the eggs and egg yolks. Pour in the vanilla extract, then whisk until everything is blended. Finally, fold in the flour and a pinch of salt. Be gentle here. We want a smooth batter without overmixing. Now, divide the batter into your prepared ramekins, filling them about three-quarters full. Place the ramekins on a baking sheet for easy handling. Bake for 12 to 14 minutes. The edges should be firm, but the center should jiggle slightly. After baking, let them cool for one minute. Carefully run a knife around the edges, then flip them onto plates. Serve warm. When you cut into them, the chocolate should flow out like lava. Enjoy this delight with a dusting of powdered sugar or some ice cream. To get that gooey center, timing is key. Bake the cakes for just 12-14 minutes. The edges should be firm, but the center must stay soft. Test one by gently shaking it. If it jiggles, it’s perfect! Remember, every oven is different. Keep an eye on the cakes as they bake. Here are some common pitfalls: - Overbaking: This leads to a dry cake with no lava. Trust your timer. - Not greasing ramekins: Always grease them to prevent sticking. - Skipping the chocolate quality check: Use high-quality chocolate. It makes a big difference in taste. - Mixing too much: Fold the batter gently. Overmixing can ruin the texture. Serve the lava cake warm for the best experience. A scoop of vanilla ice cream complements the rich chocolate. Fresh berries add a nice tartness. You can also drizzle chocolate sauce on top for extra sweetness. Garnish with mint leaves for a pop of color and freshness. These simple touches can elevate your dessert experience. For the full recipe, check the previous section! {{image_2}} You can make your chocolate lava cake even more special. Try adding a splash of espresso for a rich coffee taste. Just one teaspoon can make a big difference. Orange zest is another great choice. The citrus adds a fresh note to the sweet chocolate. You may also mix in some mint extract for a cool twist. These small changes can turn a simple dessert into something unique. How you serve your lava cake matters. A scoop of vanilla ice cream on the side makes it even better. The cold ice cream contrasts nicely with the warm cake. Whipped cream is another tasty option. You can add fresh berries for a fruity touch. For an extra special look, drizzle some chocolate sauce on top. If you need a gluten-free option, it’s easy to adjust the recipe. Simply switch all-purpose flour with almond flour or a gluten-free blend. The cake will still be rich and delicious. You can also use dairy-free chocolate and butter for a vegan version. Just be sure to check the labels. These modifications help everyone enjoy this sweet treat. After enjoying your lava cake, store any leftovers in an airtight container. This keeps them fresh and moist. Let the cakes cool first. Then, cover them tightly. Place the container in the fridge. They will last for up to three days. To reheat your lava cake, use the microwave. Heat each cake for about 15 to 20 seconds. Check if it is warm but not too hot. You want to keep that gooey center. If you prefer the oven, preheat it to 350°F (175°C). Place the cake on a baking sheet. Heat for about 5 to 7 minutes. This method helps keep the cake's texture nice and soft. You can freeze chocolate lava cakes for later. Wrap each cooled cake in plastic wrap. Then, place them in a freezer-safe bag. Label the bag with the date. They will stay good for about three months. When you want to eat one, thaw it in the fridge overnight. Reheat it as mentioned above. Enjoy your sweet treat anytime! You will know the lava cake is done when the edges look firm. The center should still be soft and jiggly. A good tip is to bake for 12-14 minutes. Check if the top is slightly set. If it looks wet, give it another minute. Remember, it will keep cooking after you take it out. Yes, you can make the batter in advance. Prepare it and then cover the bowl. Keep it in the fridge for up to 24 hours. When ready to bake, just stir the batter again. Pour it into greased ramekins and bake as usual. This saves time when you want a quick treat! You can serve chocolate lava cake with many tasty options. A scoop of vanilla ice cream is a classic choice. Fresh berries add a nice touch and balance the rich chocolate. Whipped cream also works well. For an extra kick, drizzle chocolate or caramel sauce on top. These pairings make each bite even more delightful! This blog post covered everything you need for the perfect chocolate lava cake. You learned about essential ingredients and how to pick high-quality chocolate. I shared step-by-step instructions to make your baking easy. You also got tips to avoid common mistakes and ways to enhance the flavor. Finally, remember that this treat can be stored and reheated well. Enjoy making and sharing this delicious dessert!

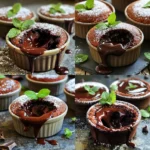
Easiest Chocolate Lava Cake

Indulge in the rich flavors of Decadent Chocolate Lava Cake with this easy recipe! Perfectly gooey in the center and bursting with chocolate goodness, this dessert is sure to impress. With just a handful of ingredients and simple steps, you can create a restaurant-quality treat at home. Click through to discover how to make this irresistible classic and wow your friends and family at your next gathering!

Ingredients
  

1/2 cup (1 stick) unsalted butter

1 cup high-quality dark chocolate (70% cocoa or higher), chopped

1 cup powdered sugar

2 large eggs

2 egg yolks

1 teaspoon pure vanilla extract

1/2 cup all-purpose flour

A pinch of salt

Non-stick cooking spray or butter for greasing ramekins

Instructions
 

Preheat your oven to 425°F (220°C). Grease four ramekins with non-stick cooking spray or butter and dust with cocoa powder to prevent sticking.

    In a medium microwave-safe bowl, combine the chopped dark chocolate and butter. Microwave in 30-second intervals, stirring after each, until fully melted and smooth.

      Stir in the powdered sugar into the melted chocolate mixture until well combined.

        Add eggs and egg yolks to the mixture, followed by the vanilla extract. Whisk until fully incorporated.

          Gently fold in the flour and a pinch of salt until just combined, being careful not to overmix.

            Divide the batter evenly among the prepared ramekins, filling each about 3/4 full.

              Place the ramekins on a baking sheet and bake for 12-14 minutes, or until the edges are firm but the center is still soft and jiggly.

                Remove from the oven and allow to cool for 1 minute. Carefully run a knife around the edges of each ramekin and invert onto serving plates.

                  Serve immediately while warm, allowing the chocolate to flow out when cut. Optionally, dust with additional powdered sugar and serve with a scoop of vanilla ice cream or fresh berries.

                    Prep Time: 15 minutes | Total Time: 25 minutes | Servings: 4

                      - Presentation Tips: Garnish with fresh mint leaves and a drizzle of chocolate sauce for an extra touch!