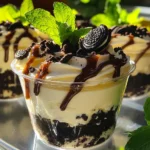
No-Bake Cookies & Cream Cheesecake Cups
Indulge in the delightful taste of No-Bake Cookies & Cream Cheesecake Cups! This easy recipe combines creamy cheesecake with crunchy Oreo goodness, perfect for a quick dessert. With just a few simple steps, you can create a stunning treat that will impress your guests. Enjoy the rich flavors with a chocolate drizzle and a fresh mint garnish. Click through to explore the full recipe and make these irresistible cheesecake cups today!