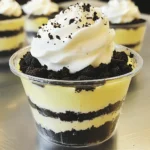
No-Bake Oreo Cheesecake Cups
Indulge in these delightful No-Bake Oreo Cheesecake Cups that are sure to satisfy your sweet cravings! With a rich cream cheese filling and a crunchy Oreo crust, this easy recipe is perfect for entertaining or a sweet treat at home. Enjoy the creamy layers topped with extra Oreos for a delicious finish. Ready to impress your friends and family? Click through for the full recipe and make your dessert dreams come true!