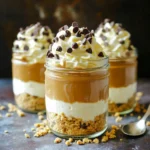
No-Bake Peanut Butter Cheesecake Jars
Indulge in a deliciously easy treat with these No-Bake Peanut Butter Cheesecake Jars! Perfect for any occasion, this creamy dessert combines smooth peanut butter and rich cream cheese topped with crunchy graham crackers and mini chocolate chips. In just 20 minutes of prep, you'll create a delightful dessert that sets up in the fridge. Click through for the full recipe and impress your friends and family with this tasty treat!